1
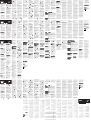
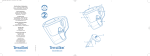
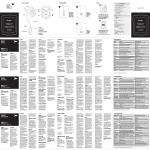
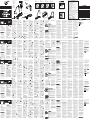
FIG.1: Overview - Headset
1. Charging Port
2. Push4 Button
Turn On / Off
Indicator light
3. Vol+
4. Vol5. Speaker
6. Microphone
7. Clip
8. Ear Hook
9. Headset Cord
10. Ear Bud
FIG.2: Changing the ear buds
6
7
FIG.4:
Wearing the Headset
with hook
FIG.5:
Wearing the Headset
without hook
FIG.6:
Clipping the Headset
to your clothes
FIG.7:
Attaching the Headset
to your mobile
5
8
Push the
button 3 sec
- Activate Bluetooth on your mobile
- Make sure the headset is charged
- Turn the headset on
- Headset is already in pairing mode
FIG.8: Mounting the ear hook
10
4
3
2
FIG.3: Charging
9
1
- Search for new device in your mobile
- Select your headset from the list
- Enter the PIN number : 0000
Note:
Please read the “Safe Usage Guidelines” and “Limited Warranty” before using the headset.
INTRODUCTION
Thank you for choosing a
SH240 Bluetooth® headset
from SouthWing. This user
guide provides all the information you will need to use and
care for your product. All relevant information regarding
your SouthWing product can
be found in the support section of our website:
www.southwing.com
Bluetooth is a registered trademark
owned by Bluetooth SIG, Inc.
U.S.A. and licensed to
SouthWing.
Charging Socket [1]. The Indicator Light [2] will turn red to
indicate the headset battery is
charging.
3. Once the Indicator Light [2]
turns off, the headset is fully
charged and can be remo- ved
from the power supply.
Please Note:
• The headset will not function
while charging.
• If the Indicator Light [2] remains
off while charging, the battery is already fully charged and does not
require further charging. • To maximize battery life, do not charge
the headset for extended periods of
time.
• Full battery capacity will be
achieved after two or three full
charge/discharge cycles.
• When your battery is empty, it
takes up to three hours to completely charge your headset.
1. CHARGING THE HEADSET
You will need to charge the
battery of your headset. To do
so, follow these steps:
1. Plug the power supply into
a power outlet.
2. Plug the connector of the
power supply into the USB
Nota:
Antes de utilizar el auricular, léase las
“Indicaciones de seguridad para el
usuario” y la “Garantía limitada”.
INTRODUCCIÓN
Gracias por escoger el SH240
Bluetooth® de SouthWing.
Esta guía del usuario proporciona toda la información necesaria para utilizar y cuidar el
producto. Toda la información
relevante relacionada con el
producto SouthWing puede
encontrarse en la sección de
ayuda de nuestra página web:
www.southwing.com
Bluetooth es una marca registrada
propiedad de Bluetooth SIG, Inc.
U.S.A. y se autoriza su uso a SouthWing.
1. CARGA DEL AURICULAR
Es necesario cargar la batería
del auricular. Para ello, siga los
pasos siguientes:
1. Conecte el adaptador a la
línea de suministro eléctrico.
2. Enchufe el conectador del
adaptador a la clavija de carga
[1]. El indicador luminoso [2] se
2. PAIRING THE HEADSET
Auto-pairing
For added convenience, your
headset has an auto-pairing
function so that when you turn
the headset on for the first
iluminará de color rojo indicando que la batería del auricular está en proceso de carga.
3. Cuando el indicador luminoso [2] se apague, el auricular
se habrá cargado totalmente y
se podrá desenchufar del
adaptador.
Nota importante:
• El auricular no funcionará mientras
dure la carga.
• Si cuando se procede a cargar el
auricular, el indicador luminoso [2]
permanece apagado, la batería ya
está totalmente cargada y no es necesario seguir con la carga.
• Para alargar al máximo la vida de
la batería, no cargue el auricular durante largos períodos de tiempo.
• La capacidad total de la batería se
alcanzará al cabo de dos o tres ciclos
de carga / descarga.
• Si la batería está descargada,
serán necesarias hasta tres horas
para cargar completamente el auricular.
2. ENLACE DEL AURICULAR
Modo de enlace automático
Para un uso más fácil, el auricular posee una función de
time, it is already in pairing
mode. The Indicator Light [2]
will flash red and blue alternatively and a series of high tones
can be heard. Follow these
steps to pair the headset with
your mobile phone:
1. Put the mobile phone into
pairing mode (reference your
phone user manual). Ensure
that the mobile phone is no
more than 3 feet (1meter)
away from the headset.
2. Select the headset name
“SouthWing SH240” from the
list
3. Enter the PIN number: 0000
Now the headset and your mobile phone are paired and
ready for hands free communication through the Blue-tooth
connection.
To save battery you can disconnect the headset and your
phone by pressing the Multifunction button [2] three times.
To re-connect them press the
Multi-function button [2] once.
Normal pairing
You will need to follow the
steps below if you want to pair
your headset with another mobile phone.
1. Ensure the headset is off.
2. Put the headset in pairing
mode by pressing and holding
the Multi-function button [2]
for about 5 seconds until the
Indicator Light [2] flashes red
and blue alternatively and a series of high tones are heard.
auto-enlace, de modo que
cuando usted encienda el auricular por primera vez, ya lo encontrará en modo enlace (oirá
también una serie de pitidos
agudos y el indicador luminoso
se iluminará en rojo y azul de
forma alterna). Tras esto, siga
las instrucciones siguientes:
1. Coloque el teléfono móvil
en el modo enlace (véase las
instrucciones que acompañan
al teléfono). Asegúrese de que
el teléfono no está a más de 1
metro de distancia del auricular.
2. Seleccione el modelo
“SouthWing SH240” de la lista
3. Introduzca el número pin:
0000.
Ahora el auricular y el móvil
están enlazados y preparados
para una comunicación manos
libres vía Bluetooth.
Para ahorrar batería puede desconectar el auricular del teléfono, para ello presione el
botón multifunción [2] tres
veces consecutivas. Para conectarlos de nuevo presiones
de nuevo el botón multifunción.
Modo de enlace normal
Necesitará repetir este proceso cada vez que quiera enlazar su auricular con otro
teléfono móvil.
1. Asegúrese de que el auricular está apagado.
2. Pulse y mantenga presionado el botón On/Off [2] durante 5 segundos hasta que el
indicador luminoso [2] parpa-
2. ASSOCIER L'OREILLETTE
Auto association
Remarque:
Veuillez lire les "Instructions de sécurité" ainsi que la "Limitation de garantie" avant d'utiliser l'oreillette.
INTRODUCTION
Merci d'avoir choisi l'oreillette
SH240 Bluetooth® de SouthWing. Ce manuel d'utilisation
vous fournira toutes les informations dont vous aurez besoin pour utiliser correctement
ce produit et le maintenir en
bon état de marche. Toutes les
informations utiles concernant
ce produit SouthWing sont disponibles dans la section d'assistance technique de notre
site Internet:
www.southwing.com
Bluetooth est une marque déposée
propriété de Bluetooth SIG, Inc.
U.S.A., dont SouthWing exploite la licence.
1. CHARGER L'OREILLETTE
Vous devrez charger la batterie
de l'oreillette. Pour ce faire, respectez les instructions suivantes:
1. Branchez le chargeur sur
une prise de courant.
2. Insérez le connecteur du
chargeur dans le port de recharge USB [1]. L'indicateur lumineux [2] deviendra rouge
pour indiquer que la batterie de
l'oreillette est en train de se recharger.
3. Lorsque l'indicateur lumineux [2] s'éteint, l'oreillette est
complètement chargée et peut
être retirée du chargeur.
Remarques:
• L'oreillette ne peut pas fonctionner
pendant son rechargement.
• Si l'indicateur lumineux [2] reste
éteint pendant le rechargement, cela
signifie que la batterie est déjà complètement chargée et qu'il n'est pas
nécessaire de la recharger.
• Afin de prolonger au maximum la
durée de vie de la batterie, ne laissez
pas l'oreillette se charger pendant de
longues périodes.
• La batterie atteindra sa capacité
maximale après deux ou trois cycles
complets de rechargement/déchargement.
• Lorsque la batterie est déchargée,
trois heures peuvent être nécessaires
pour recharger complètement l'oreillette.
Pour plus de facilité, l'oreillette
possède une fonction d'auto
association grâce à laquelle elle
est automatiquement en mode
association lorsqu'on l'allume
pour la première fois. L'indicateur lumineux [2] clignotera alternativement en rouge et en
bleu et vous entendrez une
série de bips aigus. Suivez les
instructions suivantes pour associer l'oreillette à votre téléphone portable:
1. Sélectionnez le mode association sur le téléphone portable (consultez le manuel
d'utilisation de votre téléphone). Assurez-vous que votre
téléphone portable ne se
trouve pas à plus d'un mètre de
distance de l'oreillette.
2. Sélectionnez l'oreillette
"SouthWing SH240" dans la
liste.
3. Entrez le numéro PIN: 0000
L'oreillette et votre téléphone
portable sont maintenant associés et prêts pour une utilisation en mode mains libres via la
connexion Bluetooth.
Pour économiser la batterie,
vous pouvez déconnecter l'oreillette du téléphone en appuyant trois fois sur le bouton
multifonctions [2]. Pour les reconnecter, appuyez une fois
sur le bouton multifonctions
[2].
Association normale
2. PAAREN DES HEADSETS
Automatisches Paaren
Hinweis:
Bitte lesen Sie vor Benutzung des Headsets die Anleitung zur sicheren Verwendung und die
Garantiebestimmungen.
EINLEITUNG
Vielen Dank, dass Sie sich für
ein SH240 Bluetooth® Headset
von Southwing entschieden
haben. In diesem Benutzerhandbuch finden Sie alle Informationen, die Sie für eine sichere
Verwendung und Pflege Ihres
Headsets brauchen. Alle wichtige Informationen zu Ihrem
neuen SouthWing-Produkt finden Sie im Support-Bereich unserer Website:
www.southwing.com
Bluetooth ist ein eingetragenes Markenzeichen im Besitz von Bluetooth
SIG, Inc. U.S.A., für das SouthWing
eine Lizenz hält.
1. AUFLADEN DES HEADSETS
Der Akku Ihres neuen Headsets
muss aufgeladen werden. Dies
geschieht folgendermaßen:
1. Den Netzstecker des Ladekabels an eine Steckdose ans-
Nota:
Leggere attentamente le sezioni “Istruzioni per un utilizzo corretto” e
“Garanzia limitata” prima di utilizzare
l’auricolare.
INTRODUZIONE
Grazie per aver scelto un auricolare SH240 Bluetooth® di
SouthWing. Questa Guida per
l’utente fornisce tutte le informazioni necessarie a utilizzare
questo prodotto. Tutte le informazioni relative al prodotto
SouthWing sono disponibili
nella sezione di supporto del
sito Web all’indirizzo:
www.southwing.com
Bluetooth è un marchio registrato di
Bluetooth SIG, Inc. U.S.A. ed è concesso in licenza a SouthWing.
1. CARICA DELL'AURICOLARE
Sarà necessario caricare la batteria dell’auricolare. Per effettuare questa operazione,
completare la seguente procedura:
1. Collegare l’alimentatore a
una presa elettrica.
chließen.
2. Den Stecker des Ladekabels
an die Lade-Buchse am Headset
[1] anschließen. Die Anzeige [2]
leuchtet rot auf, um anzuzeigen,
dass der Akku des Headsets geladen wird.
3. Wenn die zweifarbige LEDAnzeige [2] ausgeht, ist das Headset vollkommen aufgeladen
und kann vom Stromnetz getrennt werden.
Wichtige Hinweise:
• Das Headset kann während des Aufladens nicht benutzt werden.
• Wenn die zweifarbige LED-Anzeige
[2] beim Laden auf OFF bleibt, ist der
Akku bereits aufgeladen und braucht
nicht länger geladen zu werden.
• Um eine maximale Lebensdauer des
Akkus zu gewährleisten, das Headset
nicht über längere Zeiträume am
Stromnetz angeschlossen lassen.
• Die volle Akkukapazität wird nach
zwei bis drei kompletten Lade-/Entladezyklen erreicht.
• Wenn der Akku leer ist, dauert es
etwa drei Stunden, bis das Headset
wieder vollständig aufgeladen ist.
2. Collegare il connettore della
presa elettrica nel socket di ricarica USB [1]. La spia luminosa [2] diventerà rossa a
indicare che la batteria dell’auricolare è in fase di ricarica.
3. Quando la spia luminosa [2] si
spegne, l’auricolare è completamente carico e può essere rimosso dall’alimentatore.
Nota:
• L’auricolare non funziona durante la
ricarica.
• Se la spia luminosa [2] rimane
spenta durante la ricarica, allora la
batteria è già carica e non richiede
un’ulteriore ricarica.
• Per aumentare la durata della batteria, non ricaricare l’auricolare per
periodi di tempo troppo lunghi.
• La capacità completa della batteria
sarà raggiunta dopo due o tre cicli di
caricamento/scaricamento.
• Quando la batteria è completamente scarica, sarà necessario un
massimo di tre ore per ricaricare
completamente l’auricolare.
2. ASSOCIAZIONE DELL'AURICOLARE
Associazione automatica
L’auricolare è dotato di una
Ihr Headset verfügt über eine
Funktion zum automatischen
Paaren und steht nach dem
erste Einschalten bereits im Paarungsmodus. Die Anzeige [2]
leuchtet abwechseln rot und
blau auf und es ertönen eine
Reihe hoher Töne. Paaren des
Headsets mit Ihrem Mobiltelefon:
1. Das Mobiltelefon in den Paarungsmodus stellen (siehe Bedienungsanleitung des Handys).
Sicherstellen, dass das Mobiltelefon maximal 1 m vom Headset
entfernt ist.
2. Das Headset „SouthWing
SH240” aus der Liste auswählen.
3. Den PIN eingeben: 0000
Ihr Headset ist jetzt mit Ihren
Mobiltelefon gepaart und ist bereit zum Freihandsprech-Betrieb
per Bluetooth.
Zum Akkusparen können Headset und Mobiltelefon getrennt
werden, indem die Multifunktionstaste [2] drei Mal gedrückt
wird. Um das Headset wieder
anzuschließen, die Multifunktionstaste [2] ein Mal drücken.
Normales Paaren
Auf diese Weise können Sie Ihr
Headset mit einem anderen Mobiltelefon paaren.
1. Vergewissern Sie sich, dass
das Headset ausgestellt ist.
2. Stellen Sie Ihr Headset in den
funzione di associazione automatica in modo che quando
viene acceso per la prima volta
si trova già in modalità di associazione. La spia luminosa [2]
lampeggerà di rosso e di blu
alternativamente e sarà possibile udire una serie di toni. Seguire questa procedura per
accoppiare l’auricolare al telefono cellulare:
1. Inserire il telefono in modalità di associazione (fare riferimento al manuale per l’utente
del telefono). Verificare che il
telefono cellulare non sia lontano più di un metro dall’auricolare.
2. Selezionare il nome dell’auricolare “SouthWing SH240”
dall’elenco
3. Immettere il PIN: 0000
A questo punto l’auricolare e il
telefono cellulare sono associati e pronti per una comunicazione a mani libere mediante
la connessione Bluetooth.
Per risparmiare la batteria, è
possibile scollegare l'auricolare
e il telefono premendo tre
volte il tasto multi-funzione [2].
Per riassociarli, premere una
volta il tasto multi-funzione [2].
3. Complete the normal pairing process by following
steps 1, 2 and 3 in the autopairing section.
3. WEARING AND CARRYING THE
HEADSET
Selecting an ear bud
The headset comes with different sized comfortable ear
buds, try and select the one
that best fits your ear.
To replace an ear bud:
1. With your hand, pull gently
outwards from one side of the
ear bud; make sure that you
do not lose the ear bud once
removed.
2. Select a new ear bud and
adjust it carefully so it fits perfectly over the speaker nozzle
Wearing the Headset with the Ear
hook
The Ear hook can be used for
firm hold and maximum comfort. To mount the Ear hook,
carefully place the round head
of the Ear hook between the
headset body and the clip, and
make sure that it is firmly adjusted. To wear it follow these
steps:
1. Rotate the
Ear hook [8] slightly forwards.
2. Gently place the Speaker [5]
into your ear canal.
3. Rotate the Ear hook [8]
backwards and adjust it behind
your ear.
4. To use the headset in the
other ear, simply mount the
dee azul y rojo de forma alternativa (oirá también una serie
de pitidos agudos).
Complete el proceso normal
de enlace siguiendo los puntos
1, 2 y 3 de la sección de autoenlace que aparece más arriba.
3. USO Y COLOCACIÓN DEL
AURICULAR
Selección de una almohadilla
El auricular viene con varias almohadillas de forma y tamaño
diferentes para un ajuste óptimo, seleccione aquella que le
sea más cómoda.
Para re-emplazar una almohadilla:
1. Con la mano, tire con cuidado de la almohadilla hacia
fuera; asegúrese de que no la
pierde una vez retirada
2. Seleccione la nueva almohadilla y ajústela con cuidado
en el altavoz del auricular
Uso del auricular con el soporte
para la oreja
Puede emplearse el soporte de
la oreja para conseguir la máxima comodidad. Para montarlo coloque con cuidado el
extremo redondo del soporte
entre el cuerpo del auricular y
la pinza en la parte inferior,
asegúrese de que queda bien
ajustado. Para colocarlo en la
oreja, siga los pasos siguientes:
1. Gire ligeramente el soporte
[8] hacia delante.
Suivez les instructions suivantes pour associer votre oreillette à un autre téléphone
portable.
1. Vérifiez que l'oreillette est
éteinte.
2. Mettez l'oreillette en mode
association en appuyant sur le
bouton multifonctions et en le
maintenant enfoncé [2] pendant environ 5 secondes jusqu'à ce que l'indicateur
lumineux [2] clignote alternativement en rouge et en bleu et
que vous entendiez une série
de bips aigus.
3. Terminez la procédure d'association normale en suivant
les étapes 1, 2 et 3 de la partie
"auto association".
3. PORTER ET TRANSPORTER L'OREILLETTE
Ear hook [8] on the other side
of the headset.
and the Indicator Light flashes
before turning off.
Wearing the Headset without the
Ear hook
Accepting / rejecting* a call
To wear the headset without
using the Ear hook:
1. Remove the Ear hook by
pulling it out gently and store it
in a safe place
2. Gently place the Speaker [5]
into your ear canal.
3. Find the most comfortable
position by rotating the headset forward and backward.
Carrying the Headset
When not in use, you can carry
your headset in one of the following convenient ways.
1. Clip it to your clothes using
the designed clip in the bottom part of the headset.
2. Attach it to your mobile
phone using the provided
cord; connect one end to the
headset charging port and use
the cord to hold it to your mobile.
4. GENERAL USAGE
Turning the Headset On and Off
To turn the headset on, press
and hold the Multi-function
button [2] for about 3 seconds
until a rising series of tones is
heard and the Indicator Light
[2] flashes blue 6 times.
To turn the headset off, press
and hold the Multi-function
button [2] for about 3 seconds
until a series of tones is heard
2. Con suavidad, coloque el
auricular [5] en el canal auditivo
3. Gire el soporte [8] hacia
atrás y ajústelo detrás de la
oreja.
4. Para cambiar de una oreja a
la otra, simplemente monte el
soporte por el otro lado del auricular.
Uso del auricular sin el soporte
para la oreja
Puede utilizar el auricular sin
necesidad de emplear el soporte para la oreja, para ello:
1. Retire el soporte tirando
con cuidado de él hacia fuera y
guárdelo en un lugar seguro.
2. Con suavidad, coloque el
auricular [5] ligeramente en el
canal auditivo.
3. Finalmente, busque la posición más cómoda girando el
auricular hacia delante y hacia
atrás
du haut-parleur.
Porter l'oreillette avec le crochet
Le crochet peut être utilisé
pour une fixation sûre et un
confort maximum. Pour installer le crochet, placez délicatement l'extrémité arrondie du
crochet entre le corps de l'oreillette et la pince, et vérifiez qu'il
est bien fixé. Pour le porter, suivez les instructions suivantes:
1. Tournez légèrement le crochet [8] vers l'avant.
2. Placez doucement le hautparleur [5] dans votre canal auditif.
3. Tournez le crochet [8] vers
l'arrière et ajustez-le derrière
votre oreille.
4. Pour passer d'une oreille à
l'autre, fixez simplement le crochet [8] de l'autre côté de l'oreillette.
L'oreillette est vendue avec des
écouteurs-boutons confortables de différentes tailles. Essayez-les et choisissez celui qui
convient le mieux à votre oreille.
Pour remplacer un écouteurbouton:
1. Tirez doucement une extrémité de l'écouteur-bouton vers
l'extérieur; assurez-vous de ne
pas perdre l'écouteur-bouton
après l'avoir retiré.
2. Choisissez un autre écouteur-bouton et ajustez-le soigneusement pour qu'il soit
parfaitement fixé sur l'extrémité
Pour porter l'oreillette sans utiliser le crochet:
1. Enlevez le crochet en le retirant délicatement et conservezle en lieu sûr
2. Placez doucement le hautparleur [5] dans votre canal auditif.
3. Trouvez la position la plus
confortable en tournant l'oreillette vers l'avant ou vers l'arrière.
Paarungsmodus, indem Sie die
Multifunktionstaste [2] für etwa
5 Sekunden gedrückt halten, bis
die zweifarbige LED-Anzeige [2]
abwechselnd rot und blau aufleuchtet und eine Reihe hoher
Töne zu hören sind.
3. Das Pairing entsprechend
den Schritten 1, 2 und 3 des Automatischen Paarens fortsetzen.
ins Ohr einsetzen.
3. Den Ohrbügel [8] nach hinten
drehen und hinter dem Ohr festmachen.
4. Das Headset kann mit dem
Ohrbügel [8] auf beiden Seiten
getragen werden.
Das Headset wird mit bequemen Ohrpolstern in verschiedenen Ausführungen geliefert.
Suchen Sie sich das Polster aus,
das für Sie am bequemsten
sitzt.
Auswechseln von Ohrpolstern:
1. Mit der Hand das Ohrpolster
an einer Seite anfassen und vorsichtig abzihene. Aufpassen,
dass das abgezogene Ohrpolster nicht verloren geht.
2. Ein neues Ohrpolster auswählen und es auf die Lautsprecher ziehen.
Headset mit Ohrbügel tragen
Der Ohrbügel bietet festen Sitz
und optimalen Tragekomfort.
Zur Installation des Ohrbügels
den runden Kopf des Bügels
vorsichtig zwischen Headset
und Clip setzen und festmachen. Ans-Ohr-Setzen:
1. Den Ohrbügel [8] etwas nach
vorne drehen.
2. Den Lautsprecherknopf [5]
premuto il tasto multifunzione
[2] per circa 5 secondi fino a
che la spia luminosa [2] lampeggerà di rosso e di blu alternativamente e verrà emessa
una serie di segnali acustici.
3. Completare il normale processo di associazione effettuando i passi 1, 2 e 3 nella
sezione di associazione automatica.
3. COME INDOSSARE E PORTARE
L’AURICOLARE
Selezione di una cuffietta auricolare
L’auricolare viene fornito con
una serie di comode cuffiette a
dimensioni differenti, provare e
selezionare quelle che meglio
si adattano al proprio orecchio.
Per sostituire una cuffietta:
1. Spingere gentilmente verso
l’esterno della cuffietta; verificare che la cuffietta non venga
persa una volta rimossa.
2. Selezionare una nuova cuffietta e regolarla attentamente
in modo che corrisponda perfettamente al gancio del microfono.
Associazione normale
Come indossare l’auricolare con
l’archetto
Seguire questa procedura se si
desidera associare l’auricolare
con un altro telefono cellulare.
1. Verificare che l’auricolare
sia spento.
2. Inserire l’auricolare in modalità di associazione tenendo
L’archetto può essere utilizzato
per tenere fermo l’auricolare e
per ottenere il massimo comfort. Per montare l’archetto,
posizionare attentamente la
parte rotonda dell’archetto tra il
corpo dell’auricolare e la clip,
Changing the volume
Redial the last called number
To increase the volume during
a call, press Vol+ button [3]. To
decrease the volume, press
the Vol- button [4]. The headset
will remember previous volume settings each time it is
turned on.
Press briefly the Multi-function
button [2] twice; the last called
number will be automatically
dialed.
Ending a call
Press the Multi-function button
[2] briefly during a call and the
call will be ended.
Transporter l'oreillette
Lorsqu'elle n'est pas en fonctionnement, vous pouvez transporter l'oreillette de différentes
façons:
It is possible to save a favorite
number in the headset and
speed dial it with the Push4TM
4. EMPLEO GENERAL
Respuesta automática de
llamadas
brevemente durante una llamada y ésta finalizará.
Apagado y encendido
Puede configurar su auricular
para que responda automáticamente todas las llamadas al
cabo de 3 segundos. Para hacerlo, en estado encendido,
pulse el botón Vol- durante 3
segundos hasta que escuche
la confirmación. Para desactivar la respuesta automática repita la misma acción.
Para encender el auricular,
pulse el botón On/Off [2] durante 3 segundos hasta que
escuche un sonido acendente.
El indicador luminoso [2] parpadeará en azul 6 veces.
Para apagar el auricular, pulse
el botón On/Off [2] durante 3
segundos hasta que escuche
un sonido descendente. El indicador luminoso parpadeará y
el auricular se apagará.
Aceptar / rechazar* una llamada
Cuando suena el teléfono
(puede oírse el tono de la llamada en el auricular), pulse
brevemente el botón multifunción [2] si desea aceptar la llamada. Pulse y mantenga
pulsado el botón multifunción
[2] durante 1 segundo para rechazarla.
* Las características indicadas con
asterisco solamente funcionarán con
teléfonos Bluetooth compatibles con
la configuración manos libres. Actualmente, la mayoría de teléfonos
Bluetooth poseen esta función.
During a call, you may wish to
transfer the call to your mobile,
to do so press the Multi-function button [2] twice. To transfer the call back to the headset
repeat the same command.
Iniciar una llamada desde el teléfono móvil
Marque el número con el teléfono móvil. Si el auricular está
conectado y el teléfono se ha
enlazado correctamente, la llamada se transferirá al auricular.
Iniciar una llamada con marcación
por voz
Puede iniciar la función de
marcación por voz desde el auricular (el teléfono debe ser
compatible con esta función y
se deben introducir las cuñas
de voz). Para activarlo, pulse
brevemente el botón multifunción [2]. Ahora podrá decir el
nombre de la persona con la
que desea hablar, con lo cual
se iniciará la llamada.
Cambio de volumen
Para aumentar el volumen, durante la llamada, pulse el botón
Vol+ [3]. Para disminuir el volumen, pulse el botón Vol- [4]. El
auricular mantendrá el ajuste
del volumen incluso cuando
esté desconectado.
Rellamada automática
Para volver a marcar el último
número llamado pulse de
forma consecutiva el botón
multi-función [2].
Finalizar una llamada
1. Accrochez-la à vos vêtements en utilisant la pince prévue à cet effet sur la partie
inférieure de l'oreillette.
2. Attachez-la à votre téléphone portable en utilisant le
cordon fourni; fixez une extrémité au port de chargement de
l'oreillette et utilisez le cordon
pour l'attacher à votre téléphone.
4. UTILISATION GÉNÉRALE
Allumer et éteindre l'oreillette
Pour allumer l'oreillette, appuyez sur le bouton multifonctions et maintenez-le enfoncé
[2] pendant environ 3 secondes
jusqu'à ce que vous entendiez
une série de bips et que l'indicateur lumineux [2] clignote 6
fois en bleu.
Pour éteindre l'oreillette, appuyez sur le bouton multifonctions et maintenez-le enfoncé
[2] pendant environ 3 secondes
jusqu'à ce que vous entendiez
une série de bips et que l'indicateur lumineux [2] clignote
avant de s'éteindre.
Accepter/refuser* un appel
Lorsque le téléphone sonne (la
sonnerie peut être entendue
dans l'oreillette), appuyez brièvement une fois sur le bouton
multifonctions [2] pour prendre
l'appel. Sinon, appuyez sur le
bouton multifonctions et maintenez-le enfoncé [2] pendant 1
seconde pour refuser l'appel.
die Anzeige [2] sechs Mal blau
aufleuchtet.
Zum Ausschalten des Headsets
die Multifunktionstaste [2] für 3
Sekunden gedrückt halten, bis
das Gerät zu piepen beginnt und
die Anzeige [2] aufleuchtet und
dann erlischt.
Einen eingehenden Anruf
annehmen/ablehnen*
Transport des Headsets
Lautstärke regeln
Wenn das Headset nicht in Gebrauch ist, kann es auf folgende
Arte getragen werden.
1. Das Headset mit dem speziell entworfenen Clip an der Unterseite an der Kleidung
festmachen.
2. Das Headset mit der mitgelieferten Kordel am Mobiltelefon
befestigen. Ein Ende am Ladeport des Headsets festmachen
und die Kordel dann am Handy
befestigen.
Während eines Anrufs kann mit
der Taste Vol + die Lautstärke
erhöht werden. Mit der Taste
Vol- [4] wird die Lautstärke reduziert. Das Headset merkt sich
die zuletzt eingestellte Lautstärke.
Zum Einschalten des Headsets
die Multifunktionstaste [2] für 3
Sekunden gedrückt halten, bis
das Gerät zu piepen beginnt und
verificando che sia regolato
saldamente. Per indossarlo, effettuare le seguenti operazioni:
1. Ruotare l’archetto [8] leggermente in avanti.
2. Inserire gentilmente l’altoparlante [5] nell’orecchio.
3. Ruotare l’archetto [8] all’indietro e regolarlo dietro l’orecchio.
4. Per utilizzare l’auricolare nell’altro orecchio, montare semplicemente l’archetto [8]
sull’altro lato dell’auricolare.
Come indossare l’auricolare senza
l’archetto
Per indossare l’auricolare
senza utilizzare l’archetto:
1. Rimuovere l’archetto e conservarlo in un posto sicuro.
2. Inserire gentilmente l’altoparlante [5] nell’orecchio.
3. Individuare la posizione più
comoda ruotando l'auricolare
avanti e indietro.
Come portare l’auricolare
Quando non viene utilizzato,
portare l’auricolare in uno dei
modi riportati di seguito.
1. Agganciarlo ai vestiti utilizzando l’apposita clip nella
parte inferiore dell’auricolare.
2. Collegarlo al telefono cellulare mediante il cavo fornito;
connettere un'estremità alla
presa di ricarica dell’auricolare
e utilizzare il cavo per tenerlo
collegato al telefono.
4. UTILIZZO GENERALE
Wenn das Telefon klingelt (Klingelton ertönt im Headset), die
Multifunktionstaste [2] einmal
kurz drücken, um den Anruf anzunehmen. Um den Anruf abzulehnen, die Multifunktionstaste
[2] für 1 Sekunden gedrückt halten.
Automatische Anrufannahme
Damit Ihr Headset eingehende
Anrufe automatisch nach 3 Sekunden annimmt, im bei eingeschaltetem Gerät die Taste Vol- 3
Sekunden lang drücken, bis ein
Piepton erklingt.
Um die Automatische Anrufannahme zu deaktivieren, diesen
Schritt wiederholen.
Einen Anruf von Ihrem Mobiltelefon
starten
Die Nummer wie gewohnt wäh-
Accensione e spegnimento dell’auricolare
Per accendere l’auricolare, premere e tenere premuto il tasto
multifunzione [2] per circa 3
secondi fino a che viene
emessa una serie di segnali
acustici e la spia luminosa [2]
lampeggia di blu 6 volte.
Per spegnere l’auricolare, premere il tasto multifunzione [2]
per circa 3 secondi fino a che
viene emessa una serie di segnali acustici e la spia luminosa
lampeggia prima di essere
spenta.
Accettazione / rifiuto* di una chiamata
Quando il telefono squilla (lo
squillo può essere udito nell’auricolare), premere brevemente il tasto multifunzione [2]
una volta per accettare la chiamata. In alternativa, premere e
tenere premuto il tasto multifunzione [2] per 1 secondo per
rifiutare la chiamata.
Aumento/diminuzione del volume
Per aumentare il volume durante una chiamata, premere il
tasto Vol+ [3]. Per diminuire il
volume, premere il tasto Vol[4]. L’auricolare sarà impostato
sulle impostazioni di volume
precedenti ogni volta che viene
riacceso.
Risposta automatica
È possibile configurare l’auricolare in modo da rispondere automaticamente a tutte le
Régler le volume
Pour augmenter le volume pendant un appel, appuyez sur le
bouton Vol+ [3]. Pour baisser le
volume, appuyez sur le bouton
Vol- [4]. L'oreillette conserve
tous les réglages de volume
lorsqu'elle est éteinte.
Transferir una llamada desde el auricular al móvil
En una llamada, puede transferir el sonido desde el auricular
al móvil y continuar la llamada
en éste último, para ello pulse
el botón multi-función [2] 2
veces seguidas. Para devolver
la llamada al auricular repita la
misma acción.
Push4TM número favorito
Es posible guardar un número
favorito en el auricular y llamarlo de forma rápida con el
acceso Push4TM. Este número
puede ser guardado usando el
número de la última llamada
recibida (no compatible con llamadas anónimas o no identificadas). Para hacerlo, una vez
terminada la llamada recibida,
mantenga pulsados a la vez los
botones multi-función [2] y
Vol+ durante 1 segundo hasta
que oiga el tono de confirmación.
Para llamar al número favorito
guardado, pulse el botón multifunción [2] durante 1 segundo.
Cambio del tono de llamada del auricular
Para cambiar el tono de llamada pre-configurado en el
auricular entre en el menú de
tonos de llamada pulsando el
botón Vol+ o Vol- durante 5
segundos. A continuación use
de nuevo las teclas de volu-
prendre en charge la fonction de numérotation vocale et vous devez avoir
préalablement enregistré sur votre téléphone les commandes vocales associées aux numéros (pour de plus
amples informations, consultez le manuel d'utilisation de votre téléphone)
Rappel du dernier numéro
Prise d'appel automatique
Vous pouvez configurer l'oreillette pour une prise d'appel automatique au bout de 3
secondes. Pour activer ce
mode lorsqu'elle est allumée,
appuyez sur Vol- pendant 3 secondes jusqu'à ce que vous entendiez un bip.
Pour désactiver la prise d'appel
automatique, il vous suffit de
procéder de la même manière.
Effectuer un appel depuis votre téléphone portable
Composez le numéro de la manière habituelle sur votre téléphone. Si l'oreillette est
allumée et que le téléphone est
correctement connecté, l'appel
sera transféré vers l'oreillette.
Appuyez deux fois brièvement
sur le bouton multifonctions [2]
; le dernier numéro appelé sera
automatiquement composé.
Mettre fin à un appel
Appuyez brièvement sur le
bouton multifonctions [2] pendant l'appel pour mettre fin à
celui-ci.
Transférer un appel de l'oreillette
vers le téléphone portable
Pendant un appel, si vous souhaitez le transférer vers votre
téléphone portable, appuyez
deux fois sur le bouton multifonctions [2]. Pour transférer à
nouveau l'appel vers l'oreillette,
procédez de la même façon.
Numéro préféré Push4TM
Effectuer un appel avec la numérotation vocale
Pour activer la numérotation
vocale, appuyez brièvement sur
le bouton multifonctions [2] et
patientez jusqu'à entendre le
signal de réponse sur votre téléphone. Vous pouvez alors
dire le nom de la personne que
vous souhaitez appeler.
Remarque: votre téléphone doit
len. Wenn das Headset angeschaltet ist und das Telefon erfolgreich gepaart wurde, wird der
Anruf automatisch an das Headset geleitet.
Vous pouvez enregistrer votre
numéro préféré sur l'oreillette
et le composer automatiquement avec le bouton multifonctions Push4TM [2]. Ce numéro
peut être automatiquement enregistré à partir du numéro du
dernier appel reçu (non compatible avec les numéros cachés
ou non identifiés). Pour ce faire,
lorsque l'appel reçu est terminé, appuyez sur les boutons
tifunktionstaste [2] zwei Mal gedrückt wird. Um das Gespräch
zum Headset zurückzuschalten,
den Befehl wiederholen.
Push4TM Favoritennummer
Einen Anruf mit sprachgesteuertem
Wählen starten
Um einen Anruf mit sprachgesteuertem Wählen zu starten, die
Multifunktionstaste [2] kurz
drücken und auf das Freizeichen
warten. Anschließend den
Namen der Person ansagen, die
angerufen werden soll.
Hinweis: Ihr Telefon muss sprachgesteuertes Wählen unterstützen und Sie
müssen vorher auf Ihrem Mobiltelefon
Sprachbefehle mit den Rufnummern für
die einzelnen Namen gespeichert
haben. (Eine genaue Anleitung dazu finden Sie in der Bedienungsanleitung
Ihres Handys.)
Wahlwiederholung der zuletzt gewählten Nummer
Die Multifunktionstaste [2] kurz
zwei Mal drücken, um die zuletzt
gewählte Nummer noch einmal
zu wählen.
Ein Gespräch beenden
Während des Gesprächs die
Multifunktionstaste [2] kurz
drücken, um das Gespräch zu
beenden.
Auf dem Headset kann eine Favoritennummer gespeichert
werden, die mit der Push4TMMultifunktionstaste [2] gewählt
wird. Die Nummer kann automatisch aus dem letzten eingegangenen Anruf gespeichert
werden (nicht möglich für nicht
angezeigte oder nicht identifizierte Anrufer). Dazu nach Ende
des eingehenden Gesprächs die
Multifunktionstaste [2] zusammen mit der Taste Vol.+ für 1
Sekunde drücken, bis eine Reihe
von Pieptönen zu hören sind.
Um die gespeicherte Favoritennummer anzurufen, doe
Push4TM- Multifunktionstaste [2]
für 1 Sekunde gedrückt halten.
Um den Standardklingelton des
Headsets das Klingelton-Menü
öffnen, indem die Taste Vol.+
oder die Taste Vol.- 5 Sekunden
lang gedrückt wird. Mit den Tasten Vol.+ und Vol.- auswählen
den gewünschten Klingelton
auswählen und mit der Multifunktionstaste [2] bestätigen
und zurück in den StandbyModus gehen.
Akkudauer
Während eines Anrufs kann
vom Headset zum Handy umgestellt werden, indem die Mul-
Um die Akkudauer zu verlängern, verfügt das Headset über
eine automatische Abschalt-
chiamate dopo 3 secondi; per
far ciò, in stato ON, premere il
tasto Vol- per 3 secondi fino a
che viene udito un segnale
acustico.
Per disabilitare la risposta automatica ripetere la stessa operazione.
Premere brevemente il tasto
multifunzione [2] durante una
chiamata e la chiamata verrà
terminata.
Comporre il numero come al
solito sul cellulare. Se l’auricolare e il telefono sono stati correttamente associati, il
cellulare trasferirà la chiamata
all’auricolare.
Composizione di una chiamata con
il menu vocale
Per una chiamata vocale premere brevemente il tasto multifunzione [2] e attendere un
tono di ritorno dal telefono.
Quindi, dire il nome della persona che si desidera chiamare.
Nota: il telefono deve supportare la
funzione di chiamata vocale ed è necessario prima registrare sul telefono
i frammenti vocali associati ai numeri
di telefono (fare riferimento al manuale del telefono cellulare per maggiori dettagli)
Composizione dell’ultimo numero
chiamato
Premere brevemente il tasto
multifunzione [2] due volte; l’ultimo numero chiamato verrà
composto automaticamente.
Fine di una chiamata
5. TROUBLESHOOTING
Problems
Suggestions
The Headset will not
turn on
- The Headset battery may be empty.
- Try recharging the Headset.
Pairing is unsuccessful
- Try moving the phone and Headset closer together during pairing.
- Make sure that the mobile phone is in the correct Bluetooth mode.
- Some electrical devices such as microwave ovens create
a noisy electrical environment making it difficult for the
Headset to communicate with the phone. Try moving
away from such devices and try again.
Pairing has succeeded
but calls are not heard
- Make sure that your phone is switched on and ready to
connect to the Headset.
The Headset stops responding to button presses
- Ensure that your Headset battery is charged.
- Try resetting your headset by charging it for a few
seconds and then switching it on again.
Trasferimento di una chiamata
dall’auricolare al telefono cellulare
Durante una chiamata, è possibile trasferire la chiamata al telefono; per far ciò, premere
due volte il tasto multifunzione
[2]. Per trasferire la chiamata
all’auricolare ripetere lo stesso
comando.
Push4TM: Numero preferito
È possibile salvare un numero
preferito nell’auricolare e comporlo rapidamente con il tasto
multifunzione Push4TM [2].
Questo numero può essere
salvato automaticamente dall’ultimo numero in entrata
(funzione non compatibile per
numeri di chiamate non identificati o nascosti). Per far ciò,
una volta che la chiamata ricevuta è stata terminata, premere e tenere premuto il tasto
multifunzione [2] e il tasto Vol+
per 1 secondo, fino a che
viene emessa una serie di segnali acustici.
Per richiamare il numero preferito memorizzato, premere e
tenere premuto il tasto multifunzione Push4TM [2] per 1 secondo.
Modifica della suoneria
Per modificare la suoneria predefinita nell’auricolare, entrare
nel menu dell’auricolare pre-
above 40 degrees Celsius or
below 0 degrees Celsius
- Do not leave your Headset
connected to the charger for
extended periods of time, as
excessive charging will reduce
battery life.
Safe Usage Guidelines
6. ADDITIONAL INFORMATION
purchased it.
Contacts
Battery Care
Please contact SouthWing
with the following details
should you have any questions
or suggested improvements.
Your Headset battery will have
a long life provided you follow
these guide lines:
- Do not use any accessory to
charge your Headset other
than the ones provided by
SouthWing for this product.
- Do not charge your Headset
outdoors.
- Do not charge your Headset if
the ambient temperature is
Email: customer.service@
southwing.com
Please note: For all warranty related issues, please return the product to the shop from which you
men para navegar por los diferentes tonos disponibles y use
el botón multi-función para
confirmar su selección y volver
al modo normal.
Vida de la batería
Para alargar la duración de la
batería, el auricular incorpora la
función “apagado automático”.
Esta función desconecta el auricular después de 12 horas de
inactividad. Si se ha activado
esta función, el auricular podrá
conectarse de nuevo siguiendo
el procedimiento normal.
Puede consultar el estado de
la batería en cualquier momento, para ello pulse el botón
multi-función [2] cuatro veces
consecutivas, escucará un número de pitidos equivalente a
las horas de conversación restantes (4 pitidos indicará más
de 4 horas de conversación,
hasta el máximo disponible).
Cuando la carga de la batería
esté baja, el auricular produce
una secuencia de tonos de advertencia audibles cada 30 segundos, por favor re-cargue la
batería lo antes posible.
5. LOCALIZACIÓN Y RESOLUCIÓN DE PROBLEMA
Problema
Sugerencias
El auricular no se conecta
- La batería del auricular puede estar agotada.
- Intente recargar el auricular.
No se ha conseguido realizar el enlace
- Durante el proceso de enlace intente juntar al máximo
el teléfono y el auricular.
- Asegúrese de que el teléfono móvil se encuentra en el
modo Bluetooth correcto.
- Algunos dispositivos eléctricos, como los hornos microondas, crean unas condiciones ambientales de
ruido eléctrico que dificultan la comunicación del auricular con el teléfono. Inténtelo de nuevo, alejándose de tales
dispositivos.
- Only use the product according to the directions within
this User Guide. Usage of this
product contrary to these directions could cause injury. In
addition, any usage of this product contrary to this User
Guide will void any warranty.
- Do not use the product in an
environment where it may
come in contact with liquid be
exposed to high humidity or
extreme temperatures.
- Do not place the product in a
fire as it may explode causing
injury or death.
- Do not use the product in
areas where usage of radio
transmitters is prohibited (e.g.
aircraft and hospitals) or close
to sensitive devices that may
be affected by a radio transmitter (e.g. pacemakers).
- Do not attempt to service this
product yourself. If the product
requires servicing, this must
be performed by an approved
service person. - If the product
becomes dirty, it should be cleaned with a soft cloth. Do not
use any cleaning agents as
these may damage the plastics, electronics or battery.
- Usage of this product while
El auricular se desactiva
y no responde a las acciones de comando
No se ha conseguido realizar el enlace
- Asegúrese de que el teléfono está conectado y listo
para enlazar con el auricular. Compruebe cómo realizar
esta operación en el manual de instrucciones del teléfono.
El enlace se ha realizado,
pero las llamadas no se
oyen en el auricular
- Asegúrese de que la batería del auricular esté cargada.
Intente reinicializar el auricular cargándolo durante
unos segundos y volviéndolo a encender.
multifonctions [2] et Vol+ et
maintenez-les enfoncés pendant 1 seconde, jusqu'à entendre une série de bips.
Pour appeler le numéro préféré
enregistré, appuyez sur le bouton multifonctions Push4TM [2]
et maintenez-le enfoncé pendant 1 seconde.
Changer de sonnerie
Pour changer la sonnerie par
défaut dans l'oreillette, entrez
dans le menu sonnerie en appuyant sur le bouton Vol+ ou
Vol- pendant 5 secondes. Ensuite, utilisez les boutons Vol+
et Vol- pour choisir une nouvelle sonnerie et appuyez une fois
sur le bouton multifonctions [2]
pour la sélectionner et retourner en mode veille.
Durée de la batterie
Pour économiser la batterie, l'oreillette possède une fonction
de mise en veille. Cette fonc-
tion éteint l'oreillette au bout de
12 heures d'inactivité. Lorsque
l'oreillette est sur le mode de
mise en veille, elle peut être rallumée normalement.
Pour vérifier le niveau de la batterie, appuyez 4 fois sur le bouton multifonctions [2] et une
série de bips vous indiquera le
temps de conversation restant
en heures (4 bips pour 4 heures de conversation ou plus).
Lorsque le niveau de la batterie
est faible, l'oreillette émettra
une série d'avertissements sonores toutes les 30 secondes;
vous devrez alors immédiatement la recharger car il ne vous
restera que quelques minutes
de temps de conversation.
* Les caractéristiques suivies d'une astérisque ne fonctionnent qu'avec des téléphones
Bluetooth compatibles avec la fonction mains
libres. Actuellement, la plupart des téléphones Bluetooth incluent cette fonction.
6. INFORMACIÓN ADICIONAL
Contactos
Por favor póngase en contacto
con SouthWing ante cualquier
pregunta o sugerencia de mejora, indicándonos el número
de serie de su producto.
Email:
customer.service@
southwing.com
Nota:
Para cualquier tipo de consulta relacionada con la garantía, por favor diríjase con el producto al
establecimiento donde lo adquirió.
La batería de su auricular tendrá una vida prolongada si
usted sigue las siguientes indicaciones:
- No use ningún accesorio para
cargar su Auricular que no sea
uno de los provistos por
SouthWing para este producto.
- No cargue su Auricular al aire
libre.
- No cargue su Auricular si la
temperatura ambiente supera
los 40ºC o si no alcanza los
0ºC.
- No deje su Auricular conectado al adaptador de corriente
durante largos periodos de
Problème
Suggestions
L'oreillette ne s'allume
pas
- La batterie de l'oreillette est peut-être déchargée.
- Essayez de recharger l'oreillette .
L'association ne s'est
pas faite
- Essayez de rapprocher le téléphone de l'oreillette pendant l'association.
- Vérifiez que votre téléphone portable est sur le bon mode
Bluetooth.
- Certains appareils électriques tels que les fours à microondes perturbent l'environnement électrique et peuvent
gêner la communication entre l'oreillette et le téléphone.
Essayez de vous éloigner de ces appareils et recommencez.
funktion. Mit dieser Funktion
schaltet sich das Headset nach
12 Stunden Inaktivität automatisch aus. Wenn sich das Headset automatisch abgeschaltet
hat, muss es auf normalem Weg
wieder eingeschaltet werden.
Um den Akkustand zu überprüfen, die Multifunktionstaste [2] 4
Mal drücken. Das Headset fängt
an zu Piepen, und die Anzahl der
Töne gibt die ungefähr verbleibende Sprechzeit an (4 Pieptöne
entsprechen 4 oder mehr Stunden Sprechzeit).
Bei schwachem Akku beginnt
das Headset im 30-SekundenAbstand mit Warntönen zu piepen. Das Gerät muss dann
sofort aufgeladen werden, da
der Reststand des Akku nur
noch für wenige Minuten
Sprechzeit ausreicht.
* Die mit einem Stern gekennzeichneten
technischen Merkmale funktionieren nur
bei Bluetooth®-Telefonen, die das Freisprechprofil unterstützen. Heutzutage unterstützen die meisten
Bluetooth®-Handys dieses Profil.
5. FEHLERBEHEBUNG
Vorschläge zur Behebung
Das Headset lässt sich
nicht einschalten
- Der Akku des Headsets ist eventuell leer bzw.
schwach.
- Laden Sie das Headset auf und versuchen Sie es erneut.
6. INFORMATIONS COMPLÉMENTAIRES
Contacts
Veuillez contacter SouthWing à
l'adresse suivante si vous avez
des questions ou des suggestions.
Email:
customer.service@
southwing.com
Remarque: Pour tout ce qui concerne la garantie, veuillez rapporter le
produit au magasin où vous l'avez
acheté.
La batterie de votre oreillette
durera longtemps si vous suivez les indications suivantes:
- Utilisez uniquement les accessoires fournis par SouthWing pour recharger votre
oreillette.
- Ne rechargez pas votre oreillette à l'air libre.
- Ne rechargez pas votre oreillette si la température ambiante est supérieure à 40
degrés Celsius ou inférieure à 0
degrés Celsius.
- Ne laissez pas votre oreillette
6. ZUSÄTZLICHE INFORMATIONEN
Kontakte
Bitte wenden Sie sich an SouthWing, wenn Sie Fragen oder
Vorschlläge haben sollten.
Email:
customer.service@
southwing.com
Bitte beachten Sie: Sollte es notwendig werden, die Garantie in Anspruch zu nehmen, bringen Sie das
Produkt bitte in das Geschäft zurück, in
dem Sie es gekauft haben.
Der Akku Ihres Headsets hält
länger, wenn Sie folgende Regeln befolgen:
- Zum Laden Ihres Headsets
ausschließlich das von SouthWing für dieses Produkt gelieferte Zubehör verwenden.
- Das Headset nicht im Freien
aufladen.
- Das Headset nicht bei Umgebungstemperaturen über 40 ºC
oder unter 0 ºC aufladen.
- Das Headset nicht über einen
längeren Zeitraum am Ladegerät
angeschlossen lassen, da ein zu
langes Laden die Lebensdauer
des Akkus verkürzt.
Das Paaren war erfolgreich, aber auf dem Headset ist nichts zu hören
- Vergewissern Sie sich, dass Ihr Telefon angeschlossen ist und zur Verbindung mit dem Headset bereit ist.
Hinweise zur sicheren Anwendung
Das Headset reagiert
nicht mehr auf Tastendruck
- Vergewissern Sie sich, dass der Akku des Headsets
aufgeladen ist.. Starten Sie das Headset neu, indem
Sie es aus- und wieder einschalten bzw. indem Sie es
von der Stromversorgung trennen.
- Das Headset stets entsprechend den Anweisungen des
Benutzerhandbuchs verwenden.
Ein unsachgemäße Verwendung
dieses Geräts kann zu Verletzungen führen. Eine Verwendung
Durata della batteria
Per conservare la durata della
batteria, l’auricolare è dotato di
una funzione di spegnimento
automatico. Questa funzione
spegne l’auricolare dopo 12
ore di inattività. Una volta che
l’auricolare è entrato in modalità di spegnimento automatico, potrà essere poi acceso
normalmente.
Per controllare il livello della
batteria, premere il tasto multi-
L’auricolare non risponde
alla selezione dei tasti
5. RISOLUZIONE DEI PROBLEMI
Problema
Suggerimenti
L’auricolare non si accende
- La batteria dell’auricolare potrebbe essere scarica.
- Provare a ricaricare l’auricolare.
L’associazione non
riesce
- Provare ad avvicinare il telefono e l’auricolare durante
l’associazione.
- Verificare che il cellulare abbia attivata la modalità Bluetooth
- Alcuni dispositivi elettrici, come ad esempio i forni a microonde, creano un campo elettrico rumoroso, rendendo
difficile la comunicazione dell’auricolare con il telefono
Allontanarsi da tali dispositivi e provare di nuovo.
L’associazione è riuscita
correttamente ma le
chiamate non vengono
ascoltate
- Verificare che il cellulare sia acceso e pronto per la connessione all’auricolare.
Conditions
1. To be granted, this guaran-
tiempo, ya que el exceso de
carga reduce la vida de su batería.
Indicaciones de Seguridad para el
Usuario
- Use el producto solamente
según las instrucciones contenidas en este Manual de Usuario. El uso de este producto
contraviniendo estas instrucciones pod-ría causar daños.
Además, cualquier uso de este
producto contraviniendo dichas instrucciones invalidará
toda garantía.
- No use el producto en un ambiente donde pueda entrar en
contacto con líquidos, estar expuesto a humedades elevadas
o temperaturas extremas.
- No exponga este producto al
fuego, su batería interna podría
explotar causando daños o la
muerte.
- No use este producto en
áreas donde el uso de transmisores de radio se encuentra
prohibido (Ej. Aviones y hospitales) o cerca de equipos sensibles a transmisores de radio
(Ej.Marcapasos).
- No intente reparar este producto usted mismo. Si el producto necesita reparación,
debe realizarla personal autorizado de reparación.
- Para limpiar el producto uti-
connectée au chargeur pendant de longues périodes car
un rechargement excessif réduira la durée de vie de la batterie.
Instructions de sécurité
- Utilisez ce produit uniquement en suivant les instructions fournies dans ce manuel
d'utilisation. Le non-respect de
ces instructions pourrait causer
des dommages matériels ou
corporels. De plus, toute utilisation non conforme à ce manuel d'utilisation annulera la
garantie.
- N'utilisez pas ce produit dans
un lieu où il pourrait entrer en
contact avec un liquide, être
exposé à un degré élevé d'humidité ou à des températures
extrêmes.
- Ne mettez pas ce produit en
contact avec le feu car il pourrait
exploser et provoquer des blessures ou entraîner la mort.
- N'utilisez pas ce produit dans
des zones où l'utilisation d'émetteurs radioélectriques est
interdite (dans les avions ou les
hôpitaux, par exemple) ou à
proximité d'appareils sensibles
pouvant être perturbés par un
entgegen den in diesem Benutzerhandbuch aufgeführen Anleitungen führt zum Erlöschen
jeglicher Garantieansprüche.
- Das Gerät nicht in Umgebungen verwenden, in denen es
dem Kontakt mit Flüssigkeiten,
hohen Feuchtigkeitsniveaus
oder extremen Temperaturen
ausgesetzt ist.
- Das Gerät nicht ins Feuer werfen, da es explodieren und Körperverletzungen bis hin zum Tod
verursachen könnte.
- Das Gerät nicht in Bereichen
verwenden, in denen die Nutzung von Funksendern verboten
ist (z. B. an Bord von Flugzeugen
und in Krankenhäusern) oder in
denen sich Geräte in der Nähe
befinden, die empfindlich auf
Funksender reagieren (z. B.
Herzschrittmacher).
- Das Gerät niemals selbst warten oder reparieren. Wartungsund Reparturarbeiten dürfen
ausschließlich von autorisiertem
Wartungspersonal durchgeführt
werden.
- Verschmutzte Geräte mit
einem weichen Tuch reinigen.
Keine Reinigungsmittel verwenden, die die Kunststoffteile, die
Elektronik oder den Akku beschädigen könnten.
- Die Verwendung des Geräts
am Steuer kann Ihre Reaktionsfähigkeit beeinträchtigen.
- Die Benutzung kabelloser Headsets beim Autofahren ist in einigen Ländern gesetzlich
verboten. Sie sollten sich daer
über die lokale Gesetzgebung
- Verificare che la batteria dell’auricolare sia carica.
- Provare a reimpostare l’auricolare ricaricandolo per pochi
secondi e quindi accendendolo di nuovo.
6. INFORMAZIONI AGGIUNTIVE
Contatti
Contattare SouthWing con i
seguenti dettagli nel caso in
cui è necessario effettuare domande o fornire suggerimenti.
Email:customer.service@
southwing.com
* Le caratteristiche contrassegnate
con un asterisco (*) sono valide solo
per telefoni Bluetooth che supportano il profilo Hands-free. La maggior
parte dei telefoni Bluetooth supporta
questo profilo.
SouthWing provides a guarantee that this product will be
free of defects in workmanship
and material for a period of 2
years. Should the product fail
under normal usage within this
period, please return the product to the store from which it
was purchased. At the discretion of SouthWing, the faulty
product will then be replaced
or repaired at no cost according to the conditions outlined
below.
- Vérifiez que la batterie de l'oreillette est chargée.
-Essayez de réinitialiser l'oreillette en la rechargeant
pendant quelques secondes puis en la rallumant.
- Halten Sie das Telefon und das Headset näher zusammen.
- Vergewissern Sie sich, dass das Mobiltelefon im korrekten Bluetooth-Modus steht.
- Bestimmte Elektrogeräte wie beispielsweise Mikrowellen erzeugen elektrisches Rauschen, das die Verbindung zwischen Headset und Telefon stören kann.
Entfernen Sie sich von solchen Geräten und versuchen Sie es erneut.
funzione [2] 4 volte fino a che
viene emessa una serie di segnali acustici che indicano il
tempo di conversazione espresso in ore (4 beep indicano
4 o più ore di conversazione).
Quando la batteria è scarica,
l’auricolare produce un sequenza di toni di avviso acustico ogni 30 secondi, pertanto
ricaricare la batteria immediatamente in quanto restano disponibili solo pochi minuti di
conversazione.
Warranty
L'oreillette ne répond plus
aux commandes
Fehler beim Paaren
mendo i tasti Vol+ o Vol- per 5
secondi. Quindi utilizzare Vol+
e Vol- per selezionare la nuova
suoneria e premere il tasto
multifunzione [2] una volta per
selezionarla e tornare in modalità stand-by.
set at high volumes may affect your
hearing capacity.
- Vérifiez que votre téléphone est allumé et prêt à être
connecté à l'oreillette.
Akku-Pflege
Störung/Problem
Caution:Prolonged use of the head-
L'association s'est faite
mais on n'entend pas les
appels
Entretien de la batterie
5. RÉSOLUTION DES PROBLÈMES
driving may reduce your ability
to react to road conditions.
- Be aware that using a wireless headset while driving is
illegal in certain countries. Therefore, you should check the
local laws before using the
product while driving.
- As this product contains parts
which may cause injury if consumed, keep it out of reach of
children.
- Use only the power supply or
accessories approved by
SouthWing. Usage of a different power supply or charger
or modification of either of
these devices may damage the
product or result in a risk of
electrocution.
- Asegúrese de que la batería del auricular esté cargada.
-Intente reinicializar el auricular cargándolo durante
unos segundos y volviéndolo a encender.
Cuidado de la Batería
Ändern des Klingeltons
Transfer eines Gesprächs vom Headset an das Mobiltelefon
Composizione di una chiamata dal
cellulare
charge it immediately as you
have only few minutes of talk
time left.
Battery Life
Dial the number as usual with
your phone. If your headset
is on and the phone has been
Tragen des Headsets ohne Ohrbügel:
1. Den Ohrbügel vorsichtig abziehen und an einem sicheren
Ort aufbewahren.
2. Den Lautsprecherknopf [5]
ins Ohr einsetzen.
3. Das Headset nach vorne und
hinten drehen, um die bequemste Position zu finden.
An- und Ausstellen des Headsets
To change the default ring tone
in the headset enter the ring
tone menu by pressing either
Vol+ or Vol- buttons for 5 seconds. Next, use the Vol+ and
Vol- to select the new ring tone
and press the Multi-function
button [2] once to select it and
go back to stand-by mode.
Push4TM Favorite number
Transferring a call from the Headset to the mobile
When the battery is low the
headset will produce an audible warning tone sequence
every 30 seconds, please
Changing the ring tone
Initiating a call from your mobile
phone
You can configure the headset
to automatically answer all incoming calls after 3 seconds,
to do so while in the ON state
press Vol- for 3 seconds until
you hear a beep.
To disable automatic answer
repeat the above action.
Headset ohne Ohrbügel tragen
4. BEDIENUNGSANLEITUNG
Multi-function button [2]. This
number can be automatically
saved from the last incoming
call number (not compatible
for hidden or unidentified call
numbers). To do so, once the
received call has ended, press
and hold both Multi-function
button [2] and Vol+ buttons for
1 second, until you hear a series of tones.
To call the stored favorite number, press and hold the
Push4TM Multi-function button
[2] for 1 second.
To conserve battery life, your
headset features an auto-sleep
function. This function switches the headset off after 12
hours of inaction. Once your
headset has entered autosleep, it can be switched on
again normally.
To check your battery level,
press the Multi-function button
[2] 4 times, and a series of
beeps will indicate the talk
time in hours (4 beeps indicates 4 or more hours of talk
time).
Pulse el botón multifunción [2]
Porter l'oreillette sans le crochet
Ohrpolster wählen
To voice dial press briefly the
Multi-function button [2] and
wait for the feedback tone
from the phone. Then speak
the name of the person you
wish to call.
Note: your phone must support
voice dialing and you must first record voice tags into your phone associated to phone numbers (please
check your phone manual for details)
Sujeción del auricular a la ropa
Cuando no está en uso, puede
llevar el auricular consigo de
diferentes formas, para hacerlo
siga las instrucciones siguientes:
1. Use la pinza en la parte inferior del auricular para sujetarlo
a su ropa.
2. Llévelo sujeto al móvil
usando el accesorio disponible; conecte un extremo al
puerto de carga del auricular y
ate el cordón en el lugar disponible en su teléfono móvil.
Initiating a Call with Voice Dialing
* The features marked with an asterisk will only work with Bluetooth
phones which support the Handsfree profile. Today, most Bluetooth
phones support this profile.
Automatic answer (call pick up)
Sélectionner un écouteur-bouton
3. TRAGEN UND BEFESTIGEN DES HEADSETS
When the phone rings (the ring
tone can be heard in the headset), briefly press the Multifunction button [2] once to
accept the call. Alternatively,
press and hold the Multi-function button [2] for 1 second to
reject the call.
correctly connected, your
phone will transfer the call to
your headset.
Nota: per tutti i problemi relativi alla
garanzia, restituire il prodotto al negozio dove è stato acquistato.
Istruzioni per la batteria
La batteria dell’auroricolare
avrà una durata maggiore se si
seguono queste istruzioni:
- Per ricaricare l’auricolare, non
utilizzare alcun accessorio se
non quelli forniti da SouthWing
per questo prodotto.
- Non caricare l’auricolare in
spazi esterni.
- Non ricaricare l’auricolare se
la temperatura dell’ambiente
supera i 40°C o scende al di
sotto dei 0°C
- Non lasciare l’auricolare connesso al caricabatterie per periodi di tempo prolungati, in
quanto una carica eccessiva riduce la durata della batteria.
Istruzioni per un utilizzo corretto
- Utilizzare il prodotto seguendo soltanto le informa-
zioni riportate in questa Guida
per l’utente. L’utilizzo del prodotto in contrapposizione a
quanto riportato in queste istruzioni può provocare dei
danni. Inoltre, qualsiasi utilizzo
contrario a quanto riportato in
questa Guida per l’utente non
sarà coperto da garanzia.
- Non utilizzare il prodotto in un
ambiente in cui è potrebbe essere a contatto con liquidi ed
essere esporto a una elevata
umidità o a temperature estreme.
- Non mettere a contatto il prodotto con fiamme in quanto
potrebbe esplodere, causando
morti o feriti.
- Non utilizzare il prodotto in
aree in cui è proibito l'utilizzo di
trasmettitori radio (ad esempio, aerei ed ospedali) oppure
in vicinanza di dispositivi che
potrebbero essere influenzati
da un trasmettitore radio (ad
esempio, un pacemaker).
- Non provare a riparare il prodotto da soli. Se il prodotto richiede assistenza, questa deve
essere fornita da un tecnico
appropriato.
- Se il prodotto si sporca, va
pulito con un panno morbido.
Non utilizzare alcun agente pulente o detersivo in quanto potrebbe danneggiare la plastica,
la parte elettronica o la batteria.
Latest information at: www.southwing.com
tee requires the presentation
of the original dated purchase
invoice with the serial number
and dealer details clearly indicated. SouthWing reserves the
right to refuse warranty service
if this documentation is not
presented.
2. Any product repaired or replaced will be covered by the
same warranty conditions until
the end of the original warranty
period or 90 days (whichever is
later).
3. The free repair or replacement warranty does not cover
failure of the product due to
normal wear and tear, misuse,
use contrary to the product
user guide, accident, modification or adjustment, forces of
nature, or damage resulting
from contact with liquids.
4. Only service personnel who
have been approved by SouthWing may repair this product.
Attempted repair by anyone
else will void this warranty.
5. At the discretion of SouthWing, a faulty unit will be either repaired or replaced. If
repair is not possible, SouthWing reserves the right to replace the faulty product with
another product of equivalent
value.
6. SouthWing does not offer
any further express warranty
either written or oral. To the extent allowed by local law, any
implied warranty or condition
of merchantability, satisfactory
quality, or fitness for a particu-
lar purpose is limited to the duration of the warranty described above.
7. To the extent allowed by
local law, SouthWing will not
be liable for any incidental or
consequential damages of any
nature whatsoever, including
but not limited to lost profits or
commercial loss.
Some countries or states do
not allow the exclusion or limitation of incidental or consequential damages, or limitation
of the duration of implied warranties. This may mean that
the limitations or exclusions
stated above do not apply to
you.
This guarantee does not affect the consumer’s statutory
right under applicable local
laws in force, or the consumer’s rights against the dealer
arising from their sales/purchase contract.
lice una gamuza suave. No utilice agentes limpiadores que
puedan dañar el plástico, la
electrónica o batería.
- El uso de este producto durante la conducción puede reducir su capacidad de reacción
en carretera.
- Tenga presente que el uso de
un auricular inalámbrico durante la conducción es ilegal
en ciertos países. Por consiguiente, debería verificar las
leyes locales antes de usar
este producto durante la conducción.
- Este producto contiene partes que podrían causar daños
si son ingeridas, por tanto
manténgalo fuera del alcance
de los niños.
- Use solamente el adaptador
de corriente o accesorios aprobados por SouthWing. El uso
de otros dispositivos o la modificación de éstos puede
dañar el producto o provocar
un riesgo de electrocución.
producto defectuoso le será
reemplazado o reparado sin
coste bajo las condiciones indicadas abajo.
Precaución: El uso prolongado del
auricular a altos volumenes puede
afectar la audición.
Garantía
SouthWing garantiza que este
producto se halla libre de defectos de fabricación y materiales por un periodo de 2
años. Si durante este periodo
el producto falla durante su
uso normal, sírvase devolverlo
a la tienda donde lo adquirió. A
la discreción de SouthWing, el
émetteur radioélectrique (pacemakers, par exemple).
- N'essayez pas de réparer ce
produit vous-même. Si le produit doit être entretenu ou réparé, ceci devra être effectué
par un technicien agréé.
- Si le produit est sale, il doit
être nettoyé avec un chiffon
doux. N'utilisez pas de produits
de nettoyage car ils pourraient
endommager le plastique, les
composants électroniques ou
la batterie.
- L'utilisation de ce produit au
volant d'un véhicule peut réduire votre capacité de réaction.
- Sachez que l'utilisation d'une
oreillette sans fil en conduisant
est illégale dans certains pays.
Par conséquent, informez-vous
des lois locales avant d'utiliser
ce produit en conduisant.
- Sachant que ce produit contient des éléments pouvant
provoquer des blessures en
cas d'ingestion, maintenez-le
hors de portée des enfants.
- Utilisez uniquement le chargeur ou les accessoires autorisés par SouthWing. L'utilisation
d'un autre chargeur ou la modification de cet appareil peut endommager le produit ou
entraîner un risque d'électrocution.
Attention: Une utilisation prolongée
de l'oreillette à des volumes élevés
peut entraîner une détérioration de
votre acuité auditive.
informieren, bevor Sie das Gerät
verwenden.
- Da dieses Gerät Teile enthält,
die Verletzungen verursachen
können, wenn sie verschluckt
werden, das Gerät stets außerhalb der Reichweite von Kindern
aufbewahren.
- Es dürfen ausschließlich von
SouthWing zugelassene Netzkabel und Zubehörteile verwendet
werden. Die Verwendung anderer Kabel oder Ladegeräte oder
die Manipulation dieser Teile
kann zur Schäden am Headset
oder Gefährdung durch Stromschläge führen.
Vorsicht: Eine Nutzung des Headsets
mit hoher Lautstäke über einen längeren Zeitraum kann die Hörfähigkeit beeinträchtigen.
Garantie
Southwing gewährleistet für
einen Zeitraum von 2 Jahren,
dass dieses Produkt frei von
Material- und Herstellungsfehlern ist. Sollten am Gerät während der bestimmungsgemäßen
Verwendung innerhalb der Garantieperiode Fehler oder Störungen auftreten, bringen Sie
das Produkt bitte in das Geschäft zurück, in dem Sie es gekauft haben. SouthWing wird
das fehlerhafte Gerät nach eigenem Ermessen entweder kostenfrei gegen ein neues
austauschen oder reparieren.
Dabei gelten die folgenden Garantiebestimmungen.
- L’utilizzo di questo prodotto
durante la guida può ridurre la
capacità di reazione alle condizioni stradali.
- L’utilizzo di un auricolare wireless durante la guida non è
consentito in alcuni paesi. Pertanto, consultare la regolamentazione locale in materia prima
di utilizzare il prodotto durante
la guida.
- Poiché questo prodotto contiene parti che possono causare danni se consumate,
tenerlo lontano dalla portata
dei bambini.
- Utilizzare soltanto l’alimentatore o gli accessori approvati
da SouthWing. L’uso di un alimentatore o di un caricabatterie differente o la modifica di
questi può danneggiare il prodotto e aumentare il rischio di
elettrocuzione.
Attenzione: l’uso prolungato dell’auricolare ad alto volume può interferire
con le capacità uditive.
Garanzia
SouthWing garantisce che
questo prodotto non ha alcun
difetto per un periodo di 2
anni. Se il prodotto dovesse riportare un malfunzionamento
in questo periodo, restituirlo al
negozio in cui è stato acquistato. A discrezione di SouthWing, il prodotto malfunzionante potrà essere sostituito o riparato senza alcun
costo aggiuntivo in base alle
condizioni riportate di seguito.
This product has no usage limitations in the EU.
This product follows the
WEEE (Waste Electrical
and Electronic Equipment
Requirements).
2002/96/EC
7. DECLARATION OF CONFORMITY
Hereby, SouthWing S.L. declares that this Bluetooth Headset
is in compliance with the essential requirements and other
relevant provisions of Directive
1999/5/EC.
For additional information please visit: http://www.southwing.com
Condiciones
1. Para ser válida, esta garantía requiere de la presentación
del recibo de compra original
emitido por el vendedor con la
fecha, el numero de serie y los
detalles del vendedor claramente indicados. SouthWing
se reserva el derecho a rehusar dar servicio de garantía si
estos documentos no son presentados.
2. Cualquier producto reparado o reemplazado seguirá
cubierto por las mismas condiciones de garantía hasta el
final del periodo original de garantía o 90 días (el que finalice
más tarde).
3. La garantía de reparación o
reposición gratuita no cubre fallos del producto debidos al
desgaste normal, a usos indebidos o contrarios al manual de
usuario del producto, accidente, modificación o ajuste,
fuerzas de la naturaleza, o
daños causados por el contacto con líquidos.
4. Esta garantía no será válida
en caso que el producto sea
reparado por personal de servicio que no sea aprobado por
SouthWing.
5. A la discreción de SouthWing, una unidad defectuosa
será reparada o re-emplazada.
Si la reparación no es posible,
Garantie
SouthWing garantit ce produit
contre tout défaut de fabrication ou de pièces pendant une
période de deux ans. En cas de
fonctionnement défectueux du
produit utilisé dans des conditions normales pendant cette
période, veuillez le rapporter au
magasin où vous l'avez acheté.
A la discrétion de SouthWing,
le produit défectueux sera ensuite remplacé ou réparé gratuitement conformément aux
conditions exposées ci-après.
Conditions
1. Pour être valable, la présente garantie requiert la présentation de la facture originale
avec la date d'achat, ainsi que
le numéro de série et les renseignements sur le distributeur
clairement indiqués. SouthWing se réserve le droit de refuser une réparation sous
garantie si ces documents ne
sont pas fournis.
2. Tout produit réparé ou remplacé sera couvert par les
mêmes conditions de garantie
pendant toute la durée initiale
de garantie ou un délai de 90
jours (la plus longue des deux
échéances prévalant).
3. La garantie de réparation ou
de remplacement gratuit(e) ne
couvre pas les défauts du produit causés par une usure normale, un mauvais usage, une
utilisation non conforme au
manuel d'utilisation du produit,
un accident, une modification
Garantiebestimmungen
1. Zur Inanspruchnahme der
Garantie muss die mit dem
Kaufdatum versehene Originalrechnung vorgelegt werden, aus
der die Seriennummer des Geräts und die Angaben des Verkäufers eindeutig hervorgehen
müssen. SouthWing behält sich
das Recht vor, Garantieleistungen abzulehnen, wenn die geforderte Dokumentation nicht
vorgelegt wird.
2. Reparierte oder ersetzte Geräte fallen unter dieselben Garantiebestimmungen mit
Laufzeit bis zum Ablauf der ursprünglichen Garantieperiode
bzw. von 90 Tagen (der jeweils
spätere Zeitpunkt).
3. Die Gewährleistung für Ersatz oder Garantie erstreckt sich
nicht auf Fehler des Geräts, die
aufgrund nutzungsbedingter Abnutzung, unsachgemäßer oder
nicht bestimmungsgemäßer
Verwendung, Manipulation des
Geräts, höherer Gewalt oder
Schäden durch Kontakt mit Flüssigkeiten eingetreten sind.
4. Das Headset darf ausschließlich von Fachpersonal mit Zulassung durch SouthWing repariert
werden. Die versuchte Reparatur durch andere Personen führt
zum Erlöschen dieser Garantie.
5. SouthWing wird das fehlerhafte Gerät nach eigenem Ermessen entweder kostenfrei
gegen ein neues austauschen
oder reparieren. Wenn eine Reparatur nicht möglich istm behält sich SouthWing das Recht
Condizioni
1. Per poter essere concessa,
questa garanzia richiede la presentazione della ricevuta d’acquisto originale datata con il
numero di serie del prodotto e
i dettagli del rivenditore riportati chiaramente. SouthWing si
riserva il diritto di rifiutare il servizio di garanzia se tale documentazione non viene
presentata.
2. Qualsiasi prodotto riparato
o sostituito sarà coperto dalle
stesse condizioni di garanzia
fino alla fine del periodo di garanzia originale o di 90 giorni.
3. La garanzia non copre un
malfunzionamento del prodotto dovuto a un consumo
eccessivo, a un uso non corretto, a un uso contrario a
quanto riportato nella guida
per l’utente, a modifiche o ottimizazioni, a disastri naturali o
da danni risultanti dal contatto
con liquidi.
4. Soltanto il personale di servizio approvato da SouthWing
può riparare questo prodotto.
Qualsiasi tentativo di riparazione alternativo farà cessare
questa garanzia.
5. A discrezione di SouthWing,
un’unità difettosa verrà riparata
o sostituita. Se la riparazione
non è possibile, SouthWing si
riserva il diritto di sostituire il
prodotto malfunzionante con
un altro prodotto di valore
equivalente.
6. SouthWing non offre alcun
altro tipo di garanzia, né scritta
SouthWing se reserva el derecho de reemplazar el producto
defectuoso por otro producto
de valor equivalente.
6. SouthWing no ofrece ninguna garantía, oral o escrita,
adicional a la presente garantía
limitada. En la medida permitida conforme al derecho nacional, comunitario y
convencional aplicable, cualquier garantía implícita, condición de comercialización,
calidad satisfactoria o adecuación a un determinado fin se limitará a la duración de la
garantía descrita con anterioridad.
7. En la medida legalmente
permitida, SouthWing no será
responsable de los daños incidentales o emergentes de
cualquier naturaleza, incluyendo sin carácter exhaustivo
el lucro cesante o las pérdidas
en la cartera comercial.
Algunos países o estados no
permiten total o parcialmente
la exclusión o limitación de la
responsabilidad por los daños
incidentales o emergentes, o
la limitación de la duración de
las garantías implícitas. Esto
puede significar que las limitaciones o exclusiones descritas
no le sean de aplicación.
La presente garantía no afecta
a los derechos de los consumidores y usuarios recogidos en
el ordenamiento jurídico vigente, ni sus derechos frente
al proveedor derivados del
acuerdo contractual en virtud
del cual se ha adquirido el producto.
ou une adaptation, les forces
de la nature ou des dommages
résultant d'un contact avec des
liquides.
4. Seul un technicien agréé par
SouthWing est autorisé à réparer ce produit. Une tentative de
réparation par toute autre personne entraînera l'annulation
de la garantie.
5. A la discrétion de SouthWing, une unité défectueuse
sera soit réparée soit remplacée. Si la réparation n'est pas
possible, SouthWing se réserve le droit de remplacer le
produit défectueux par un autre
produit de valeur équivalente.
6. SouthWing n'accorde aucune autre garantie expresse,
écrite ou orale. Dans la mesure
permise par la loi locale, toute
garantie implicite ou de qualité
marchande, de qualité satisfaisante ou d'aptitude à un usage
donné est limitée à la durée de
la garantie susmentionnée.
7. Dans la mesure permise par
la loi locale, SouthWing ne sera
pas responsable des dommages indirects ou accessoires de
quelque nature que ce soit, y
compris mais sans que cela
soit limitatif, des manques à
gagner ou des pertes commerciales. Certains pays ou états
n'autorisent pas l'exclusion ou
la limitation des dommages indirects ou accessoires, ou la limitation de la durée des
garanties implicites. Cela peut
signifier que les limitations ou
exclusions susmentionnées ne
vous concernent pas. La présente garantie n'affecte pas le
droit du consommateur prévu
en vertu des lois locales en vigueur ou les droits du consommateur à l'encontre du
distributeur et découlant du
contrat de vente/d'achat.
vor, das fehlerhafte Gerät durch
ein anderes Gerät in vergleichbarem Wert zu ersetzen.
6. SouthWing gibt keinerlei weitergehenden schriftlichen oder
mündlichen vertraglichen Gewährleistungen oder Zusicherungen ab. In dem Umfang, in
dem es gemäß der lokalen Gesetzgebung zulässig ist, werden
jegliche implizierten Gwährleistungsansprüche abgelehnt,
darin eingeschlossen, aber nicht
hierauf beschränkt, alle implizierten Gewährleistungen für Markttauglichkeit oder Tauglichkeit für
einen bestimmten Verwendungszweck.
7. In dem Umfang, in dem es
gemäß der lokalen Gesetzgebung zulässig ist, haftet SouthWing nicht für beiläufig
entstandene Schäden oder Folgeschäden jeglicher Art, darin
eingeschlossen, aber nicht hierauf beschränkt, entgangener
Gewinn oder Geschäftsverlust.
In manchen Ländern ist der
Ausschluss oder die Beschränkung von beiläufig entstandenen
Schäden oder Folgeschäden
bzw. die Beschränkung von implizierten Gewährleistungsansprüchen nicht zulässig. Sollte
dies in Ihrem Land der Fall sein,
haben die oben genannten Einschränkungen keine Gültigkeit für
Sie.
Diese Garantie beschränkt
weder die geltenden gesetzlichen Verbraucherrechte noch
die Ansprüche des Käufers gegenüber dem Verkäufer aus
dem Verkausvertrag.
né verbale. In base alle leggi
locali, qualsiasi garanzia implicita, condizione di commerciabilità, qualità o idoneità per un
determinato scopo è limitata
alla durata della garanzia descritta sopra.
7. In base a quanto definito
dalle leggi locali, SouthWing
non è responsabile di danni accidentali o provocati di qualsiasi natura, comprese perdite
di profitti o danni commerciali.
Alcuni paesi non consentono
l’esclusione o la limitazione di
danni accidentali o provocati o
la limitazione della durata delle
garanzie riportate. Ciò può significare che le limitazioni o le
esclusioni definite finora potrebbero non essere valide per
particolari utenti.
Questa garanzia non interessa
i diritti dei clienti in base alle
leggi locali o rispetto alla controparte venditrice in base al
contratto di acquisto/vendita.
Questo prodotto non ha alcuna limitazione di utilizzo nella Comunità Europea.
7. DICHIARAZIONE DI CONFORMITÀ
SouthWing S.L. dichiara che
questo auricolare Bluetooth è
conforme ai requisiti essenziali
e ad altre specifiche rilevanti
della Direttiva 1999/5/EC.
Per ulteriori informazioni, visitare:
http://www.southwing.com
7. DECLARACIÓN DE CONFORMIDAD
Por medio de la presente
SouthWing S.L., declara que el
Bluetooth Headset cumple con
los requisitos esenciales y cualesquiera otras disposiciones
aplicables o exigibles de la Directiva 1999/5/CE
Para más información por favor
consulte:
http://www.southwing.com
Este dispositivo no tiene limitaciones de uso en la UE
Este producto cumple
con los requisitos de la
directiva WEEE
(residuos electrónicos)
2002/96/CE
7. DÉCLARATION DE CONFORMITÉ
Par la présente, SouthWing S.L.
déclare que cette oreillette
Bluetooth est conforme aux
exigences essentielles et aux
autres dispositions pertinentes
de la directive 1999/5/EC.
Pour plus d'informations, consultez notre site: www.southwing.com
Ce produit n'a pas de limitation d'usage dans l'UE.
Ce produit respecte la
directive DEEE (déchets
d'équipements électriques et électroniques).
2002/96/EC
7. KONFORMITÄTSERKLÄRUNG
SouthWing S. L. erklärt hiermit,
dass dieses Bluetooth-Headset
die wesentlichen Anforderungen
und anderer relevanter Bestimmungen der europäischen Richtlinie 1999/5/EG erfüllt.
Weitere Information finden Sie
unter:
http://www.southwing.com
Für dieses Gerät gelten innnerhalb
der EU keine Verwendungsbeschränkungen.
Dieses Produkt erfüllt die
WEEE (europäische Richtlinie über Elektro- und
Elektronik-Altgeräte).
2002/96/EG
Questo prodotto segue la
specifica WEEE (Waste
Electrical and Electronic
Equipment Requirements).
2002/96/EC
Opmerking:
Lees voor het gebruik van de headset
de “Richtlijnen voor veilig gebruik”
en “Beperkte Garantie”
INTRODUCTIE
Dank u voor het kiezen van een
SH240 Bluetooth® headset van
SouthWing. Deze handleiding
geeft alle informatie die u
nodig heeft voor gebruik en
behandeling van uw product.
Alle relevante informatie over
uw SouthWing-product kunt u
terugvinden in de ondersteuningsectie van onze website:
www.southwing.com
Bluetooth is een gedeponeerd handelsmerk van Bluetooth SIG, Inc.
U.S.A. en onder licentie gegeven aan
SouthWing.
[1]. Het indicatielampje [2] licht
rood op om aan te geven dat
de batterij van de headset aan
het opladen is.
3. Wanneer het indicatielampje [2] uit gaat, is de headset volledig opgeladen en kunt
u de voeding verwijderen.
Let op: De headset functioneert niet
tijdens het opladen. Als het indicatielampje [2] uit blijft tijdens het opladen, is de batterij al volledig
opgeladen en hoeft niet verder te
worden opgeladen.
• Sluit de headset niet langdurig aan
op de voeding om de levensduur van
de batterij te verhogen.
• De volledige batterijcapaciteit
wordt na twee of drie volledige
oplaad-/ontlaadcycli bereikt.
• Als uw batterij leeg is, duurt het
drie uur om uw headset volledig op
te laden.
1. OPLADEN VAN DE HEADSET
2. KOPPELEN VAN DE HEADSET
U dient de batterij van uw headset op te laden. Om dat te
doen, volgt u deze stappen:
1. Stop de voeding in een
stopcontact.
2. Steek de connector van de
voeding in de USB-oplaadpoort
Nota:
Por favor, leia as “Directrizes de Utilização Segura” e a “Garantia Limitada” antes de utilizar o auricular.
INTRODUÇÃO
Obrigado por escolher o auricular Bluetooth® SH240 da
SouthWing. Este manual do
utilizador fornece todas as informações de que necessita
para utilizar e manter o produto. Todas as informações relevantes relativas ao seu
produto SouthWing podem ser
encontradas na secção de suporte do nosso website:
www.southwing.com
Bluetooth é uma marca registada
propriedade da Bluetooth SIG, Inc.
U.S.A. e licenciada à SouthWing.
Automatisch koppelen
Voor extra gebruiksgemak
heeft de headset een automatisch koppelenfunctie zodat,
als u de headset voor de
eerste keer aanzet, deze al in
USB [1]. A luz indicadora [2]
fica vermelha para indicar que
a bateria do auricular está a carregar.
3. Assim que a luz indicador
[2] se desligar, o auricular está
totalmente carregado e pode
ser removido do carregador.
Tenha em atenção: O auricular não
funciona enquanto está a carregar.
Se a luz indicadora [2] permanecer
desligada durante o carregamento, a
bateria já está totalmente carregada
e não requer mais tempo de carregamento.
•Para maximizar a vida útil da bateria, não carregue o auricular durante
muito tempo.
•A capacidade total da bateria é
atingida após dois ou três ciclos
completos de carga/descarga.
•Quando a bateria está vazia, são
necessárias até três horas para carregar completamente o auricular.
koppelmodus is. Het indicatielampje [2] zal van rood naar
blauw gaan knipperen en een
serie hoge tonen is hoorbaar.
Volg deze stappen voor het
koppelen van de headset met
uw mobiele telefoon:
1. Zet de mobiele telefoon in
koppelmodus (zie uw telefoongebruikershandleiding). Zorg
ervoor dat de mobiele telefoon
niet meer dan 3 feet (1 meter)
verwijderd is van de headset.
2. Selecteer de headsetnaam
“SouthWing SH240” uit de lijst
3. Geef de PIN-code: 0000
De headset en uw mobiele telefoon zijn nu gekoppeld en
klaar voor handsfree-communicatie via de Bluetooth-verbinding.
Om uw batterij te sparen, kunt
u de headset en uw telefoon
loskoppelen door drie keer op
de multifunctionele toets [2] te
drukken. Druk één keer op de
multifunctionele toets [2] om
ze weer met elkaar te verbinden.
Normaal koppelen
U dient de volgende stappen
hieronder te volgen voor het
koppelen van uw headset aan
een andere mobiele telefoon.
1. Schakel de headset uit.
2. Zet de headset in koppelmodus door de multifunctionele toets [2] ongeveer 5
seconden ingedrukt te houden
totdat het indicatielampje [2]
van rood naar blauw knippert
(“auto-pairing”) para que,
quando liga o auricular pela primeira vez, o mesmo já está em
modo de associação. A luz indicadora [2] pisca a vermelho e
azul alternadamente e ouve-se
uma série de tons elevados.
Siga os seguintes passos para
associar o auricular ao telefone
móvel:
1. Coloque o telemóvel no
modo de associação (consulte
o manual de utilizador do seu
telefone). Assegure-se de que
o telefone móvel não está a
mais de 1 metro do auricular.
2. Seleccione o nome do auricular “SouthWing SH240” da
lista
3. Introduza o número PIN:
0000
Agora, o auricular e o telefone
móvel estão associados e
prontos para a comunicação
em mãos livres através da ligação Bluetooth.
Para poupar energia, é possível
desassociar o auricular e o telefone premindo a tecla de
multifunções [2] três vezes.
Para voltar a associá-los, prima
a tecla de multifunções [2]
uma vez.
1. CARREGAR O AURICULAR
Associação normal
Irá necessitar de carregar a bateria do seu auricular. Para tal,
siga os seguintes passos:
1. Ligue o carregador à tomada de electricidade.
2. Ligue a ficha do carregador
à tomada de carregamento
Примечание:
Перед использованием телефонной гарнитуры ознакомьтесь с разделами
"Рекомендации по безопасности" и "Ограниченная гарантия".
ВВЕДЕНИЕ
Благодарим вас за выбор телефонной гарнитуры SH240
Bluetooth® компании SouthWing. В данном руководстве
пользователя содержится
вся необходимая информация по эксплуатации и уходу
за устройством. Вся существенная информация о продукции компании SouthWing
находится в разделе технической поддержки нашего
веб-сайта:
www.southwing.com
® Bluetooth является зарегистрированным товарным
знаком корпорации Bluetooth SIG, Inc. U.S.A., лицензированным на имя
компании SouthWing.
1. ЗАРЯДКА ТЕЛЕФОН-
гарнитуры во время
вождения автомобиля
запрещено законом.
Поэтому перед
использованием изделия во
время вождения автомобиля
необходимо изучить местные
законы.
- Поскольку данный продукт
содержит детали, которые
могут вызвать телесные
повреждения при попадании
внутрь организма, храните
его вне досягаемости детей.
- Используйте только те
источники питания или
аксессуары, которые
одобрены компанией SouthWing. Использование других
источников питания или
зарядных устройств или
внесение изменений в
конструкцию одобренных
устройств могут повредить
данное изделие или
привести к опасности
поражения электрическим
током.
Внимание: Длительное
использование гарнитуры с
сильной громкостью может
привести к ухудшению
слуха.
Гарантия
Компания SouthWing
предоставляет двухлетнюю
гарантию на отсутствие в
данном изделии дефектов
вследствие некачественной
работы и материалов. Если в
течение этого периода в
Not:
Kulaklığı kullanmadan önce, lütfen
“Güvenli Kullanım Talimatları” ve
“Sınırlı Garanti” belgelerini okuyun.
GİRİŞ
SouthWing'in SH240
Bluetooth® kulaklığını seçtiğiniz
için teşekkür ederiz. Bu kullanım kılavuzu, ürününüzün kullanımı ve bakımı konusunda
gerek duyacağınız tüm bilgileri
size sunar. SouthWing ürününüzle ilgili bütün bilgiler web sitemizin destek bölümünde
bulunabilir:
www.southwing.com
®
Bluetooth, sahibi Bluetooth SIG,
Inc. U.S.A. olan tescilli bir ticari
markadır ve lisansı SouthWing’e
verilmiştir.
1. KULAKLIĞIN ŞARJ EDİLMESİ
Kulaklığınızın pilini şarj etmeniz
gereklidir. Bunun için aşağıdaki
adımları izleyin:
1. Güç kaynağını bir elektrik
prizine takın.
2. Güç kaynağı konnektörünü
USB Şarj Soketine [1] takın.
2. ASSOCIAR O AURICULAR
Associação automática (“auto-pairing”)
Para sua conveniência, o auricular possui uma função de associação automática
НОЙ ГАРНИТУРЫ
Аккумулятор телефонной
гарнитуры необходимо зарядить. Для этого выполните
следующие действия:
1. Подсоедините источник
питания к электрической розетке.
2. Присоедините разъем
источника питания к зарядному гнезду USB [1]. Индикатор [2] ] засветится
красным светом, что говорит
о начавшейся зарядке аккумулятора телефонной гарнитуры.
3. Как только световой индикатор [2] погаснет, полностью заряженную гарнитуру
можно отсоединять от источника питания.
Обратите внимание:
• Во время зарядки гарнитура не работает.
• Если во время зарядки индикатор [2] не светится, аккумулятор полностью
заряжен, и подзарядка не
требуется.
• Для увеличения срока
службы аккумулятора не за-
продукте обнаружена
неисправность при обычной
эксплуатации, просьба
возвратить продукт к
магазин, в котором он был
куплен. По усмотрению
компании SouthWing
неисправный продукт будет
бесплатно заменен или
отремонтирован в
соответствии с
приведенными ниже
условиями.
Условия
1. Для выполнения условий
гарантии следует
предоставить оригинальную
счет-фактуру с четким
указанием даты покупки,
серийного номера и
информации о торговом
агенте. Компания SouthWing
оставляет за собой право
отказать в гарантийном
обслуживании в случае не
предоставления этих
документов.
2. На любой замененный
или отремонтированный
продукт распространяются
те же самые условия
гарантии до окончания
гарантийного периода
первоначально
приобретенного изделия или
не истекут 90 дней (в
зависимости от того, какой
срок наступит позже).
3. Гарантия бесплатного
ремонта или замены не
распространяется на
неисправности изделия,
Gösterge Işığı [2] pilin şarj edildiğini gösterir biçimde kırmızıya dönecektir.
3. Gösterge Işığı [2] söndüğünde, kulaklık tamamen
şarj olmuştur ve güç kaynağından ayrılabilir.
Lütfen Dikkat Edin:
• Kulaklık şarj sırasında çalışmayacaktır.
• Gösterge Işığı [2] şarj sırasında
sönük kalırsa, pil zaten şarj edilmiştir ve daha fazla şarj etmeye gerek
yoktur.
• Pilin ömrünü uzatmak için, kulaklığı uzun sürelerle şarj etmeyin.
• İki veya üç şarj/deşarj döngüsünün ardından tam pil kapasitesine
ulaşılacaktır.
• Piliniz boşaldığında, kulaklığınızın
tamamen şarj olması üç saat kadar
sürer.
2. KULAKLIĞI EŞLEŞTİRME
Otomatik Eşleştirme
Daha rahat bir kullanım için kulaklığınız, ilk kez çalıştırıldığında
eşleştirme modunda olmasını
sağlayan bir otomatik eşleştirme özelliğine sahiptir. Gösterge Işığı [2] değişken biçimde
É necessário seguir os seguintes passos se desejar associar
o auricular a outro telefone
móvel.
1. Assegure-se de que o auricular está desligar.
2. Coloque o auricular em
ряжайте гарнитуру продолжительное время.
• Полная емкость аккумулятора достигается после двух
или трех циклов
зарядки/разрядки.
• Если аккумулятор разряжен, может понадобиться
около трех часов, чтобы
полностью зарядить телефонную гарнитуру.
en een serie hoge tonen hoorbaar is.
3. Volg de stappen 1,2 en 3 in
de sectie automatisch koppelen, om het normale koppelproces te beëindigen.
3. DRAGEN EN VERVOEREN VAN DE
HEADSET
Uitkiezen van een oordop
De headset wordt geleverd
met comfortabele oordoppen
van verschillende grootte, probeer en kies de oordop die het
beste in uw oor past.
Om een oordop te vervangen:
1. Trek de oordop er aan één
kant voorzichtig met uw hand
uit; Pas op dat u de oordop
niet verliest nadat die verwijderd is.
2. Kies een nieuwe oordop en
plaats die voorzichtig om de
huls van de luidspreker.
Het dragen van de headset met de
oorhaak
De oorhaak kan worden gebruikt voor stevige grip en maximaal comfort. Om de
oorhaak te dragen, plaatst u de
ronde kop van de oorhaak voorzichtig tussen de behuizing
van de headset en de klem en
maakt u het stevig vast. Volg
voor het dragen de volgende
stappen:
1. Draai de oorhaak [8] een
klein beetje naar voren.
2. Plaats de luidspreker [5] voorzichtig in uw gehoorkanaal.
modo de associação premindo
e mantendo premida a tecla de
multifunções [2] durante mais
de 5 segundos até que a luz indicadora [2] pisque a vermelho
e azul alternadamente e se se
ouvir uma série de tons elevados.
3. Complete o processo de
associação normal seguindo
os passos 1, 2 e 3 da secção
de associação automática
(“auto-pairing”).
3. COLOCAR E TRANSPORTAR O AURICULAR
Seleccionar o botão de ouvido
O auricular vem equipado com
botões de ouvido confortáveis
e de diferentes tamanhos. Experimente e escolha o que
melhor se adequar ao seu ouvido.
Para substituir o botão de ouvido:
1. Com a mão, carregue levemente de dentro para fora
dum lado do botão de ouvido;
certifique-se que não perde o
botão ao removê-lo.
2. Seleccione um novo botão
de ouvido e ajuste-o com cuidado para que se adeqúe perfeitamente à saída do
auscultador
Het dragen van de headset zonder
de oorhaak
Het dragen van de headset
zonder de oorhaak:
1. Verwijder de oorhaak door
het er voorzichtig uit te trekken
en het op een veilige plaats op
te bergen.
2. Plaats de luidspreker [5] voorzichtig in uw gehoorkanaal.
3. De meest comfortabele positie vindt u door het achter- en
voorwaarts draaien van de headset.
Het vervoeren van de headset
Wanneer u uw headset niet
gebruikt, kunt u die op één van
de volgende manieren vervoeren.
1. Klem het in uw kleren met
de bijpassende klem in het onderste gedeelte van de headset.
2. Maak het met het bijgeleverde koord vast aan uw mobiele telefoon; verbind één
uiteinde aan de voedingaansluiting van de headset en gebruik het koord om aan uw
mobiele telefoon vast te houden.
ximo conforto. Para montar o
gancho do ouvido, coloque
cuidadosamente a cabeça redonda do gancho do ouvido
entre o corpo do auricular e o
clique e certifique-se de que
está ajustado de forma firme.
Para colocá-lo, siga os seguintes passos:
1. Rode o gancho do ouvido
[8] ligeiramente para a frente.
2. Coloque suavemente o auscultador [5] no canal do ouvido.
3. Rode o gancho do ouvido
[8] para trás e ajuste-o atrás da
orelha.
4. Para utilizar o auricular na
outra orelha, basta montar o
gancho do ouvido [8] no outro
lado do auricular.
Utilizar o auricular sem o gancho
do ouvido
Para utilizar o auricular sem o
gancho do ouvido:
1. Remova o gancho do ouvido suavemente e guarde-o
num lugar seguro
2. Coloque suavemente o auscultador [5] no canal do ouvido.
3. Encontre uma posição confortável rodando o auricular
para a frente e para trás.
Transportar o auricular
É possível utilizar o gancho do
ouvido para que o auricular
fique bem preso, com o má-
ние гарнитуры “SouthWing
SH240”
автоматической регистрации.
Utilizar o auricular com o gancho
do ouvido
3. Введите код PIN: 0000
Автоматическая регистрация
Для удобства пользователя
телефонная гарнитура имеет
функцию автоматической регистрации, поэтому при первом включении телефонной
гарнитуры она переходит в
режим регистрации. Индикатор [2] будет мигать поочередно красным и синим
светом, также будут слышны
серии сигналов высокого
тона. Для регистрации телефонной гарнитуры на вашем
мобильном телефоне выполните следующие действия:
1. Переведите мобильный
телефон в режим регистрации (см. инструкцию к мобильному телефону).
Проследите, чтобы мобильный телефон находился не
далее 1 метра от телефонной
гарнитуры.
2. Выберите в списке назва-
Для регистрации телефонной гарнитуры на других мобильных телефонах
выполните следующие действия.
1. Выключите гарнитуру.
2. Переведите телефонную
гарнитуру в режим регистрации. Для этого нажмите и
удерживайте многофункциональную кнопку [2] в течение 5 секунд, пока
индикатор [2] не начнет мигать поочередно красным и
синим светом, а гарнитура
издаст серию звуковых сигналов высокого тона.
3. Для завершения обычного
процесса регистрации выполните пункты 1, 2 и 3 описанные выше для процесса
Обычная регистрация
3. КРЕПЛЕНИЕ И НОШЕНИЕ ТЕЛЕФОННОЙ ГАРНИТУРЫ
Выбор вкладыша
Мобильная гарнитура поставляется с удобными вкладышами различных размеров;
выберите тот из них, который лучше всего подходит
вам.
Для того, чтобы заменить
вкладыш:
1. Осторожно потяните
рукой за край вкладыша;
убедитесь в том, что снятый
вкладыш не потеряется.
2. Выберите новый вкладыш
и аккуратно установите его
так, чтобы он надежно занял
свое место в качестве насадки поверх громкоговорителя
Крепление телефонной
гарнитуры с помощью
дужки
Для надежной фиксации и
максимально комфортного
ношения гарнитуры используется дужка. Чтобы установить дужку, аккуратно
разместите ее закругленную
часть между корпусом гарнитуры и зажимом; проверьте
надежность крепления.
Чтобы закрепить гарнитуру,
выполните следующие действия:
возникшие вследствие
естественного износа,
использования не по
назначению, эксплуатации
изделия с нарушением
инструкций руководства
пользователя, несчастных
случаев, внесения изменений
в конструкцию или
регулировок, воздействия
сил природы или
повреждений в результате
контакта с жидкостями.
4. Ремонт данного продукта
может осуществлять только
обслуживающий персонал,
одобренный компанией
SouthWing. При попытке
ремонта изделия другими
лицами данная гарантия
аннулируется.
5. По усмотрению компании
SouthWing неисправный
продукт будет либо
отремонтирован, либо
заменен. Если ремонт
невозможен, компания South
Wing оставляет за собой
право замены неисправного
изделия другим
аналогичным.
6. Компания SouthWing не
предоставляет других,
письменных или устных
гарантий. В зависимости от
местного законодательства,
любая подразумеваемая
гарантия или условие, или
товарная пригодность,
удовлетворительное
качество или годность к
конкретному использованию
товара ограничены
длительностью описанной
выше гарантии.
7. В зависимости от местного
законодательства, компания
SouthWing не несет
ответственности за какие бы
то ни было случайные или
косвенные убытки любого
характера, включая, без
ограничения, упущенную
прибыль или коммерческий
ущерб. В некоторых странах
или государствах
запрещается исключение
или ограничение случайных
или косвенных убытков, или
ограничение длительности
подразумеваемых гарантий.
Это может означать, что
приведенные выше
ограничения или
исключения не применимы к
вам. Данная гарантия не
затрагивает законных прав
клиента, действующих на
основании местного
законодательства, а также
прав клиента по отношению
к торговому агенту,
проистекающих из их
договора купли-продажи
kırmızı ve mavi renklerde yanıp
sönecek ve bir dizi tiz sinyal
sesi duyulacaktır. Kulaklığınızı
cep telefonunuzla eşleştirmek
için şu adımları izleyin:
1. Cep telefonunuzu eşleştirme moduna getirin (telefon
kullanım kılavuzuna bakın). Telefonun kulaklıktan 1 metreden
daha uzakta bulunmadığından
emin olun.
2. Listeden “SouthWing
SH20” kulaklık adını seçin.
3. PIN Numarasını girin: 0000
münde yer alan 1, 2, ve 3.
adımları izleyerek normal eşleştirme işlemini tamamlayın.
4. Kulaklığı diğer kulağınızda
kullanmak için, Kulak kancasını
[8] yalnızca kulaklığın diğer tarafına monte edin.
3. KULAKLIĞI TAKMA VE TAŞIMA
Kulaklığı, Kulak kancası olmadan
kullanma
Bir kulak içi elemanı seçme
Kulaklığı, Kulak kancası olmadan kullanmak için:
1. Kulak kancasını nazikçe çekerek çıkartın ve güvenli bir
yerde saklayın
2. Hoparlörü [5] kulak kanalınıza nazik bir biçimde yerleştirin.
3. Kulaklığı ileri veya geri döndürerek en rahat konumu
bulun.
Artık kulaklığınız ve cep telefonunuz eşleştirilmiştir ve Bluetooth bağlantısı aracılığıyla
ahizesiz iletişime hazırdır.
Pil tasarrufu yapmak için Çok
Amaçlı düğmeye [2] üç kez basarak kulaklık ve telefonunuzun
bağlantısını kesebilirsiniz. Bağlantıyı yeniden kurmak için Çok
Amaçlı düğmeye [2] bir kez
basın.
Normal eşleştirme
Kulaklığınızı başka bir telefon
ile eşleştirmek istiyorsanız
aşağıdaki adımları izlemeniz
gerekecektir.
1. Kulaklığın kapalı olmasını
sağlayın.
2. Gösterge Işığı [2] değişken
biçimde kırmızı ve mavi renklerde yanıp sönene ve bir dizi
tiz sinyal sesi duyulana kadar
Çok Amaçlı düğmeyi [2] yaklaşık 5 saniye basılı tutarak kulaklığı eşleştirme moduna
getirin.
3. Otomatik eşleştirme bölü-
4. ALGEMEEN GEBRUIK
Aan-/uitzetten van de headset
Om de headset aan te zetten,
drukt u gedurende 3 seconden
op de multifunctionele toets[2]
totdat een groeiend aantal
tonen hoorbaar is en het indicatielampje [2] 6 keer blauw
knippert.
Om de headset uit te zetten,
drukt u gedurende 3 seconden
op de multifunctionele toets[2]
totdat een groeiend aantal tonen
hoorbaar is en het indicatielampje [2] knippert voordat de
headset uit gaat.
Aannemen/weigeren* van een gesprek
Druk, wanneer de telefoon rinkelt (de beltoon is hoorbaar in
de headset), éénmaal kort op
de multifunctionele toets[2]
om de oproep te accepteren.
U kunt ook de multifunctionele
toets [2] één seconde ingedrukt houden om het gesprek
te weigeren.
Wijzigen van het volume
dat deze alle inkomende oproepen na 3 seconden automatisch
beantwoordt. Om dat te doen in
de AAN-stand, drukt u Vol- gedurende 3 seconden in totdat u
een piep hoort.
Herhaal bovenstaande actie
voor het uitzetten van de automatische telefoonbeantwoording.
Een oproep starten vanaf uw mobiele telefoon
Kies op uw telefoon een nummer.
Als de headset is ingeschakeld
en de telefoon op de juiste
wijze is gekoppeld, wordt het
gesprek automatisch naar de
headset doorgegeven.
Een oproep starten met voice dialing
Om te kunnen voice dailen,
druk kort op de multifunctionele toets [2] en wacht voor de
terugkoppelingstoon van de telefoon. Spreek vervolgens de
naam uit van diegene die u
wenst te bellen.
Druk, om het volume gedurende een gesprek te verhogen, op de Vol+ toets [3]. Om
het volume te verlagen, druk
op de Vol- toets [4]. De headset onthoudt de laatste volume-instellingen, iedere keer
dat deze aangezet wordt.
Opmerking: Uw telefoon dient voice
dialing te ondersteunen en u dient
eerst spraaklabels in uw telefoon op
te nemen die gekoppeld zijn aan telefoonnummers ( raadpleeg de handleiding van uw telefoon voor details)
Automatisch telefoonbeantwoording (oproep opnemer)
Druk tweemaal kort op de multifunctionele toets [2]; het
laatstgekozen nummer zal au-
U kunt de headset zo instellen
Quando não está em utilização, pode transportar o seu
auricular numa das seguintes
formas convenientes.
1. Prenda-o à roupa utilizando
o clipe colocado na parte inferior do auricular.
2. Prenda-o ao telemóvel utili-
Теперь мобильная гарнитура зарегистрирована на телефоне и готова к
осуществлению вызовов без
помощи рук посредством
соединения Bluetooth®.
С целью экономии заряда аккумулятора можно разорвать
соединение гарнитуры с телефоном, трижды нажав
многофункциональную
кнопку [2] . Для установки
повторного соединения нажмите многофункциональную кнопку [2] один раз.
2. РЕГИСТРАЦИЯ ТЕЛЕФОННОЙ ГАРНИТУРЫ
3. Draai de oorhaak [8] naar
achter en maak het achter uw
oor vast.
4. Om de headset in het andere oor te gebruiken, bevestigt u de oorhaak simpelweg
aan de andere kant van de headset.
zando o cordão fornecido;
ligue uma extremidade à ficha
de carregamento do auricular e
utilize o cordão para o prender
ao telemóvel.
4. UTILIZAÇÃO GERAL
Ligar e desligar o auricular
Para ligar o auricular, prima e
mantenha premida a tecla de
multifunções [2] durante 3 segundos até que se oiça uma
série de tons crescentes e a
luz indicadora [2] pisque a azul
6 vezes.
Para desligar o auricular, prima
e mantenha premida a tecla de
multifunções [2] durante cerca
de 3 segundos até que se oiça
uma série de tons e a luz indicadora pisque antes de se
desligar.
Atender/rejeitar* uma chamada
Quando o telefone toca (o
toque de chamada pode ser
ouvido no auricular), prima rapidamente a tecla de multifunções [2] para aceitar a
chamada. Em alternativa,
prima e mantenha premida a
tecla de multifunções [2] durante 1 segundo para rejeitar a
chamada.
Alterar o volume
Para aumentar o volume durante uma chamada, prima a
tecla Vol+ [3]. Para diminuir o
volume, prima a tecla Vol- [4].
O auricular irá lembrar-se das
1. Поверните дужку [8]
слегка вперед.
2. Осторожно поместите
громкоговоритель [5] iв слуховой канал.
3. Поверните дужку [8] в обратном направлении и установите ее за ухом.
4. Чтобы надеть гарнитуру
на другое ухо, просто закрепите дужку [8] с противоположной стороны телефонной
гарнитуры.
Крепление телефонной
гарнитуры без помощи
дужки
Чтобы закрепить гарнитуру
без помощи дужки:
1. Снимите дужку, осторожно потянув за нее, и положите в безопасное место
2. Осторожно поместите
громкоговоритель [5] в слуховой канал.
3. Найдите наиболее удобное положение, вращая телефонную гарнитуру вперед и
назад.
Ношение телефонной
гарнитуры
Неиспользуемую гарнитуру
удобнее всего носить одним
из следующих способов.
1. Прикрепите ее к одежде
при помощи специального
зажима в нижней части гарнитуры.
2. Присоедините ее к мобильному телефону при помощи прилагаемого кабеля,
подключив один из его кон-
Opnieuw bellen laatstgekozen nummer
definições de volume anteriores de cada vez que é ligado.
Resposta automática (atendimento
de chamadas)
Pode configurar o auricular
para atender automaticamente
todas as chamadas recebidas
após 3 segundos; para tal, se
estiver no estado ligado, prima
Vol- durante 3 segundos até
ouvir um sinal curto.
Para desactivar as respostas
automáticas, repita a acção
acima.
Iniciar uma chamada a partir do telemóvel
Marque o número como normal no seu telefone. Se o auricular estiver activado e o
telefone estiver correctamente
ligado, o telefone transfere a
chamada para o auricular.
Iniciar uma chamada com marcação por voz
Para marcar por voz, prima de
forma breve a tecla de multifunções [2] e espere pelo sinal
de resposta do telefone.
Então, diga o nome da pessoa
que pretende contactar.
Nota: o telefone deve ter suporte
para marcação por voz e deve gravar
previamente expressões de voz no
telefone, associadas a números de
telefone (consulte o manual do telefone para obter mais detalhes).
Voltar a marcar o último número
marcado
цов к зарядному гнезду гарнитуры; кабель будет удерживать гарнитуру в
пределах досягаемости.
4. ОСНОВНЫЕ ФУНКЦИИ
Включение и выключение гарнитуры
Чтобы включить гарнитуру,
нажмите и удерживайте
многофункциональную
кнопку [2] около 3 секунд,
пока не послышится серия
нарастающих звуковых сигналов и индикатор [2] не
мигнет синим светом 6 раз.
Чтобы выключить гарнитуру, нажмите и удерживайте многофункциональную
кнопку [2] около 3 секунд,
пока не послышится серия
звуковых сигналов; световой
индикатор должен замигать
и отключиться.
Прием/отклонение* вызова
Чтобы принять вызов, однократно нажмите многофункциональную кнопку [2] при
поступлении телефонного
звонка (звонок слышен в
наушнике гарнитуры). При
необходимости отклонить
вызов, нажмите и удерживайте многофункциональную
кнопку [2] около 1 секунды.
* Функции, отмеченные
звездочкой, работают
только с телефонами с Blue-
tomatisch worden gebeld.
Beëindigen van een oproep
Druk kort op de multifunctionele
toets [2] gedurende een oproep,
waarna deze beëindigt.
Een gesprek van de headset naar
de telefoon overzetten
Gedurende een oproep, wilt u
de oproep mogelijk naar uw
mobiel overzetten. Druk hiervoor tweemaal op de multifunctionele toets [2]. Om de
oproep naar de headset terug
te zetten, voert u dezelfde opdracht uit.
Push4TM Favoriete nummer
Het is mogelijk om een favoriet
nummer in de headset op te
slaan en snel te bellen met de
Push4TM multifunctionele toets
[2]. Dit nummer kan automatisch worden bewaard vanuit
de laatste ingekomen oproep
(niet geschikt voor verborgen
of niet te identificeren telefoonnummers). Om dat te doen,
drukt u, nadat de ontvangen
oproep beëindigd is, gedurende 1 seconde op zowel de
multifunctionele toets [2] als de
Vol+ toets totdat u een serie
toongeluiden hoort.
Om het vastgelegde favoriete
nummer te bellen, drukt u gedurende 1 seconde op de
Push4TM multifunctionele toets
[2].
Wijzigen van de beltoon
Om de standaard beltoon te
Prima de forma breve a tecla
de multifunções [2] duas
vezes; será marcado automaticamente o último número marcado.
Terminar uma chamada
Prima a tecla de multifunções
[2] de forma breve durante
uma chamada e a chamada
será terminada.
Transferir uma chamada do auricular para o telemóvel
Durante uma chamada, se
desejar transferir a chamada
para o telemóvel, pode fazê-lo
premindo a tecla de multifunções [2] duas vezes. Para
transferir a chamada para o auricular, repita o mesmo comando.
wijzigen in de headset, gaat u
naar het beltoonmenu door gedurende 5 seconden op de
Vol+ -of de Vol- toets te drukken. Gebruik vervolgens de
Vol+ en Vol- om de nieuwe beltoon te kiezen en druk éénmaal
op de multifunctionele toets [2]
om deze te selecteren, om vervolgens naar de stand-by
modus te gaan.
Levensduur batterij
Om langer van de batterij gebruik te kunnen maken, is uw
headset voorzien van een automatische slaapstandfunctie.
Deze functie zet de headset uit
als die gedurende 12 uur niet
gebruikt is. Als uw headset
eenmaal in de slaapstand staat,
kan het op de gebruikelijke
wijze weer aangezet worden.
Om het niveau van de batterij
te controleren, drukt u 4 keer
op de multifunctionele toets
[2] waarna een serie piepjes de
spreektijd in uren weergeeft ( 4
piepjes staan voor 4 uur+
spreektijd).
Als de batterij bijna leeg is, zal
de headset iedere 30 seconden een aantal geluidswaarschuwingen geven. Laad de
batterij onmiddellijk op. Er resteren nog maar een paar minuten spreektijd.
* De functies die met een sterretje
zijn gemarkeerd, werken alleen op
Bluetooth®-telefoons die het handsfree-profiel ondersteunen. Dit profiel
wordt door de meeste Bluetooth®-telefoons ondersteund.
tooth®, поддерживающими
профиль Hands-free ("свободные руки"). Большинство современных
телефонов с Bluetooth® поддерживают этот профиль.
Регулировка громкости
Для увеличения громкости
во время разговора нажмите
кнопку Vol+ [3]. Для уменьшения громкости нажмите
кнопку Vol- [4]. При следующем включении телефонная
гарнитура вызовет из памяти предыдущие настройки
громкости
Автоматический ответ
на входящие вызовыт
Можно настроить гарнитуру
автоматически отвечать на
все входящие вызовы через
3 секунды после их поступления. Для этого при включенной гарнитуре нажмите и
удерживайте кнопку Vol- в
течение 3 секунд до звукового сигнала.
Для отключения функции
автоматического ответа повторите вышеописанную
процедуру.
Осуществление вызова с
мобильного телефона
Наберите на телефоне номер
вызываемого абонента. Если
гарнитура включена и правильно зарегистрирована на
телефоне, телефон переадресует вызов на гарнитуру.
6. AANVULLENDE INFORMATIE
Contactgegevens
Neem via onderstaande website contact op met SouthWing
als u een vraag wilt stellen of
een verbetering wilt doorgeven.
Email:
customer.service@
southwing.com
Let op: Voor alle garantiegerelateerde zaken verwijzen wij u naar de
winkel waarin u uw producten heeft
gekocht.
Batterijverzorging
5. PROBLEEMOPLOSSING
Probleem
Mogelijke oplossingen
De headset kan niet worden ingeschakeld
- De batterij van de headset is mogelijk leeg.
- Laad de headset opnieuw op.
Het koppelen lukt niet
- Houd de telefoon en de headset tijdens het koppelen
dichter bij elkaar.
- Zorg dat de mobiele telefoon in de juiste Bluetoothmodus staat.
- Sommige elektrisch apparaten (bijv. magnetrons) kunnen
storingen veroorzaken waardoor de headset niet goed met
de telefoon kan communiceren. Ga buiten het bereik van
dit soort apparaten staan en probeer het opnieuw.
Koppeling is gelukt,
maar de oproepen zijn
niet hoorbaar
- Controleer of uw telefoon is ingeschakeld en gereed is
om verbinding met de headset te maken.
De batterij van uw headset is
voorzien van een lange levensduur zolang u de volgende
richtlijnen volgt:
- Gebruik geen andere voedingsbron om uw headset op
te laden dan die bij uw product
door SouthWing is meegeleverd.
- Laad uw headset niet buiten op.
-Laad uw headset niet op bij
een omgevingstemperatuur
boven de 40 graden Celsius of
onder de 0 graden Celsius.
- Laat uw headset niet langdurig aangesloten op de oplader,
omdat daarmee de levensduur
zal worden verminderd.
Richtlijnen voor veilig gebruik
multifunções Push4TM [2] durante 1 segundo.
Duração da bateria
pode ser ligado de forma normal.
Para verificar o nível da bateria,
prima a tecla de multifunções
[2] 4 vezes e uma série de toques indicará o tempo de conversação em horas (4 toques
indicam 4 ou mais horas de
tempo de conversação).
Quando a bateria está com
pouca energia, o auricular produz uma sequência de sinais
de aviso audíveis todos os 30
segundos; carregue-o imediatamente, pois sobram apenas
alguns minutos de tempo de
conversação.
Para conservar a bateria durante mais tempo, o auricular
possui a função de “autosleep”. Esta função desliga o
auricular após 12 horas de inactividade. Após o auricular entrar em modo de “auto-sleep”,
* As funções marcadas com um asterisco funcionam apenas com telefones Bluetooth que suportem o
perfil mãos livres. Actualmente, a
maioria dos telefones Bluetooth suportam este perfil.
Alterar o toque
Para alterar o toque padrão no
auricular, aceda ao menu de
toques, premindo a tecla Vol+
ou a tecla Vol- durante 5 segundos. De seguida, utilize
Vol+ e Vol- para seleccionar
um novo toque e prima a tecla
de multifunções [2] uma vez
para seleccioná-lo e voltar ao
modo de espera.
Número favorito Push4TM
É possível guardar um número
favorito no auricular e utilizar
um atalho para marcá-lo, utilizando a tecla de multifunções
Push4TM [2]. É possível definir
automaticamente este número
a partir do número da última
chamada recebida (não é compatível com números não identificados ou ocultos). Para tal,
logo que a chamada recebida
termine, prima e mantenha
premido tanto a tecla de multifunções [2] como a tecla Vol+
durante 1 segundo, até ouvir
uma série de tons.
Para telefonar para o número
favorito guardado, prima e
mantenha premida a tecla de
- Controleer of de batterij van de headset is opgeladen.
- Probeer uw headset te resetten door het voor een paar
seconden op te laden en het daarna weer aan te zetten.
De headset reageert niet
meer wanneer u toetsen
indrukt
5. RESOLUÇÃO DE PROBLEMAS
Problema
Sugestões
O auricular não liga
- A bateria do auricular pode estar sem energia.
- Tente recarregar o auricular.
A associação falhou
- Tente aproximar o telefone e o auricular durante a associação.
- Certifique-se de que o telefone está no modo Bluetooth
correcto.
- Alguns dispositivos eléctricos, como os fornos microondas, criam um ambiente eléctrico com ruído, tornando
difícil a comunicação do auricular com o telefone. Tente
afastar-se de dispositivos deste tipo e tente de novo.
A associação foi bem-sucedida, mas não é possível ouvir as chamadas
- Certifique-se de que o telefone está ligado e pronto a
ligar-se ao auricular.
Осуществление вызова с
использованием голосового набора
Для голосового набора номера кратковременно нажмите
многофункциональную
кнопку [2] и дождитесь
ответного звукового сигнала
телефона. После этого произнесите имя вызываемого
абонента.
Примечание: ваш телефон
должен поддерживать возможность голосового набора;
также необходимо заранее
занести голосовые метки в
память телефона и связать
их с номерами абонентов
(подробности см. в инструкции к телефону)
Повторный набор последнего номера
Дав раза подряд кратковременно нажмите многофункциональную кнопку [2];
набор последнего номера
произойдет автоматически.
Окончание вызова.
Чтобы окончить вызов, кратковременно нажмите многофункциональную кнопку [2]
во время разговора.
Переадресация вызова с
гарнитуры на мобильный телефон
Если вы хотите переадресовать вызов с гарнитуры на
мобильный телефон, дважды
нажмите многофункциональную кнопку [2] во время разговора. Для обратной
переадресации вызова на
гарнитуру повторите те же
действия.
Выбранный номер
Push4TM
Имеется возможность сохранить выбранный номер в памяти гарнитуры с целью его
ускоренного набора при помощи многофункциональной
кнопки Push4TM [2]. Этот
номер может сохраняться автоматически как номер последнего входящего вызова
(неприменимо к номерам,
которые были скрыты или не
были определены). Для
этого по окончании принятого вызова одновременно
нажмите и удерживайте
многофункциональную
кнопку [2] и кнопку Vol+ в
течение 1 секунды, пока не
послышится серия звуковых
сигналов.
Чтобы позвонить на выбранный номер, нажмите и удерживайте
многофункциональную
кнопку Push4TM [2] в течение
1 секунды.
- Gebruik het product uitsluitend volgens de instructies in
deze gebruikershandleiding.
Gebruik van het product anders dan deze richtlijnen, kan
verwonding veroorzaken. In
aanvulling hierop valt ieder gebruik anders dan in deze gebruikershandleiding wordt
beschreven, buiten de garantie.
- Gebruik het product niet in
een omgeving waarin het in
aanraking kan komen met vloeistoffen, kan blootstaan aan
vochtigheid of extreme temperaturen.
- Plaats het product niet in vuur
waardoor het mogelijk explodeert, leidt tot verwondingen
of de dood.
- Gebruik het product niet in
gebieden waar het gebruik van
radiozenders verboden is (bijv.
vliegtuigen en ziekenhuizen) of
vlak bij gevoelige apparaten
die daardoor beïnvloed kunnen
worden (bijv. pacemakers).
- Probeer het product niet zelf
te repareren. Als het product
gerepareerd dient te worden,
dient dat uitsluitend door een
geautoriseerde onderhoudsmonteur te geschieden. Als
het product vuil wordt, dient
het te worden gereinigd met
zachte stof. Maak geen gebruik van schoonmaakmiddelen die de plastic onderdelen,
- Certifique-se de que a bateria do auricular está carregada.
- Tente reiniciar o auricular carregando-o durante uns segundos e ligando-o de novo.
O auricular deixa de responder aos toques nas
teclas
6. INFORMAÇÕES ADICIONAIS
Contactos
Por favor, contacte a SouthWing com os seguintes detalhes, se tiver alguma questão
ou sugestões de melhorias.
Email: customer.service@
southwing.com
Tenha em atenção: Para todos os
assuntos relacionados com a garantia, devolva o produto à loja onde o
comprou.
Manutenção da bateria
A bateria do auricular terá uma
vida útil prolongada, desde
que cumpra as seguintes directrizes:
- Não utilize qualquer acessório
para carregar o auricular que
não seja o fornecido pela
SouthWing para este produto.
- Não carregue o auricular no
exterior.
- Não carregue o auricular se a
temperatura ambiente estiver
acima dos 40 graus Celsius ou
abaixo dos 0 graus Celsius.
- Não deixe o auricular ligado
ao carregador durante perídos
de tempo prolongados, tendo
em conta que o carregamento
excessivo pode reduzir a vida
útil da bateria.
или Vol- в течение 5 секунд.
Затем при помощи кнопок
Vol+ и Vol- выберите новую
мелодию и один раз нажмите
многофункциональную
кнопку [2] для того, чтобы
занести ее в память и вернуться в режим ожидания.
Время работы от аккумулятора
Для увеличения времени работы аккумулятора, гарнитура имеет функцию
автоматического перехода в
спящий режим. Функция автоматически выключает гарнитуру после 12 часов
отсутствия активности.
После автоматического перехода в спящий режим,
включение гарнитуры осуществляется обычным спосо-
Directrizes de utilização segura Utilize o produto de acordo
com as indicações deste Manual do Utilizador. O não cumprimento das indicações
durante a utilização do produto
pode causar ferimentos. Além
disso, qualquer utilização do
produto contrária a este Manual do Utilizador irá anular
qualquer garantia.
- Não utilize o produto num
ambiente onde possa entrar
em contacto com líquido, com
elevada humidade ou temperaturas extremas.
- Não coloque o produto perto
de fogo, pois pode explodir,
causando ferimentos ou
morte.
- Não utilize o produto em
áreas em que a utilização de
transmissores de rádio é proibida (por exemplo, aviões e
hospitais) ou perto de dispositivos importantes que possam
ser afectados por um transmissor rádio (por exemplo, pacemakers). - Não tente arranjar
o produto sem auxílio técnico.
Se o produto necessitar de intervenção, tal deve ser efectuado por um técnico
aprovado.
- Se o produto ficar sujo, deve
ser limpo com um pano suave.
Não utilize quaisquer agentes
de limpeza, que podem danifi-
бом.
Для проверки уровня заряда
аккумулятора нажмите многофункциональную кнопку
[2] 4 раза подряд; количество звуковых сигналов в последующей серии будет
соответствовать количеству
часов работы в режиме разговора (4 звуковых сигнала
означают, что осталось 4 и
более часов работы в режиме разговора).
При низком заряде аккумулятора гарнитура будет выдавать звуковой сигнал
предупреждения каждые 30
секунд; немедленно произведите зарядку – оставшегося
заряда хватит всего на несколько минут работы в режиме разговора.
de elektronica of de batterij
kunnen beschadigen.
- Gebruik van dit product tijdens het rijden kan uw reactievermogen op het overige
verkeer beïnvloeden.
- Wees u ervan bewust dat het
gebruik van een draadloze headset in bepaalde landen verboden is. Om die reden dient
u de plaatselijke wet- en regelgeving te raadplegen voordat u
het product tijdens het rijden
gebruikt.
- Het product bevat kleine onderdelen die verwondingen
kunnen geven als ze worden
ingeslikt. Houd het product
daarom buiten bereik van kinderen.
- Gebruik uitsluitend de voedingsbron of accessoires die
zijn goedgekeurd door SouthWing. Het gebruik van een andere voedingsbron, oplader of
aanpassingen aan dit soort apparaten, kunnen het product
beschadigen of resulteren in
het risico van elektrocutie.
Voorzichtig: Langdurig gebruik van
de headset op hoog geluidsniveau
kan uw gehoor aantasten.
Garantie
SouthWing biedt een garantie
op productiefouten en materiaal gedurende 2 jaar. Als het
product toch niet goed functioneert tijdens normaal gebruik
en binnen de garantieperiode,
breng het product dan terug
naar de winkel waar het is ge-
car o plástico, os peças electrónicas ou a bateria.
- A utilização deste produto durante a condução pode reduzir
a capacidade de reagir às condições do trânsito.
- Tenha em atenção que a utilização dum auricular sem fios
durante a condução é ilegal
em certos países. Desta
forma, deve consultar a legislação local antes de utilizar o
produto durante a condução.
- Tendo em conta que o produto contém peças que
podem causar ferimentos se
forem consumidos, não o
deixe ao alcance de crianças. Utilize apenas o carregador e
acessórios aprovados pela
SouthWing. A utilização dum
carregador diferente ou a modificação deste tipo de dispositivos pode danificar o produto
ou resultar em risco de electrocussão.
Atenção: A utilização prolongada do
auricular num volume elevado pode
afectar a audição.
Garantia
A SouthWing garante que o
produto estará livre de defeitos
de mão-de-obra e materiais
durante um período de 2 anos.
Se o produto falhar em condições de utilização normal durante este período, por favor
devolva o produto à loja onde
foi comprado. De acordo com
a decisão da SouthWing, o
produto defeituoso será subs-
1. Om te worden geholpen,
vereist deze garantie dat u de
originele aankoopfactuur kunt
overleggen waarop het serienummer en de gegevens van
de verkoper duidelijk vermeld
staan. SouthWing behoudt
zich het recht voor om garantie
te weigeren als deze factuur
niet kan worden overlegd.
Ieder product dat gerepareerd
of vervangen is valt onder dezelfde garantiebepalingen tot
het einde van de originele garantieperiode of 90 dagen (de
langstdurende periode).
3. Gratis reparatie of vervanging voortkomend uit de garantie geldt niet bij slijtage,
misbruik, gebruik dat afwijkt
van de gebruikershandleiding,
ongelukken, wijzigingen of
aanpassingen, natuurgeweld
of schade als gevolg van contact met vloeistoffen.
4. Uitsluitend onderhoudsmonteurs die door SouthWing
zijn goedgekeurd, mogen het
product repareren. Iedere poging tot reparatie door anderen
maakt de garantie ongeldig.
Naar goedvinden van SouthWing zal een defect product
gerepareerd dan wel vervangen worden. Als reparatie niet
tituído ou reparado sem custos
para o utilizador nas condições
definidas abaixo.
Condições
1. Para ser atribuída, esta garantia requer a apresentação
da factura de compra original,
datada, com o número de
série e os detalhes do revendedor claramente indicados. A
SouthWing reserva-se o direito
de recusar o serviço de garantia se a documentação não for
apresentada.
2. Qualquer produto reparado
ou substituído estará coberto
pelas mesmas condições de
garantia até ao final do período
de garantia original ou durante
90 dias (sendo válido o maior
período de tempo).
3. A garantia de reparação ou
substituição gratuita não cobre
a falha do produto devido à utilização normal, à utilização não
adequada, à utilização contrária ao guia do utilizador do produto, a acidente, modificação
ou reajuste, a forças da natureza ou a danos resultantes do
contacto com líquidos.
4. Apenas o pessoal técnico
aprovado pela SouthWing
pode reparar o produto. A tentativa de reparação por qualquer outra pessoa anula a
garantia.
5. De acordo com a decisão
da SouthWing, uma unidade
defeituosa será substituída ou
reparada. Se a reparação não
for possível, a SouthWing re-
Неполадка
Предлагаемое решение
Гарнитура не включается
- Возможно, разряжен аккумулятор гарнитуры.
- Попробуйте зарядить гарнитуру.
Регистрация не удается
- Попробуйте приблизить гарнитуру к телефону и повторите регистрацию.
- Убедитесь, что на телефоне включен соответствующий режим Bluetooth
- Некоторые электроприборы, например, микроволновая печь, излучают много помех, способных воспрепятствовать обмену данными между гарнитурой и
телефоном. Попробуйте повторить регистрацию на
большем удалении от таких электроприборов.
После успешной регистрации гарнитура не
принимает вызовы
- Убедитесь, что телефон включен и готов для связи с
гарнитурой.
Гарнитура не отвечает
на нажатие кнопок
- Убедитесь, что аккумулятор гарнитуры заряжен.
- Попробуйте произвести инициализацию гарнитуры. Подключите ее к зарядному устройству и
заряжайте в течение нескольких секунд, после
чего снова включите гарнитуру.
Контактная
информация Если у вас есть
вопросы или пожелания,
обращайтесь в компанию
SouthWing по следующему
электронному адресу.
Изменение мелодии
звонка
Voorwaarden
5. УСТРАНЕНИЕ НЕПОЛАДОК
6. ОПОЛНИТЕЛЬНАЯ
ИНФОРМАЦИЯ
Для изменения мелодии,
установленной в гарнитуре
по умолчанию, войдите в
меню мелодий звонков,
нажав любую из кнопок Vol+
kocht. Naar goedvinden van
SouthWing zal het defecte product onder de hieronder genoemde voorwaarden zonder
kosten worden vervangen of
gerepareerd .
Адрес электронной
почты:
customer.service@
southwing.com
Обратите внимание:
Для решения всех
вопросов, связанных с
гарантией, просьба
возвратить продукт в
магазин, в котором он был
приобретен.
Обслуживание
аккумулятора
Аккумулятор гарнитуры
прослужит долго при
соблюдении следующих
рекомендаций:
mogelijk is, behoudt SouthWing zich het recht voor om
het product te vervangen voor
een ander product van vergelijkbare waarde. 6.SouthWing
biedt op geen enkele wijze
aanvullende geschreven of
mondelinge garantie. Zoals de
lokale wetgeving voorschrijft,
is iedere garantie, voorwaarde
of verkoopafspraak, toereikende kwaliteit van geschiktheid voor een bepaald doel,
gelimiteerd tot de duur van de
garantie beschreven hierboven.
7. Zoals de lokale wetgeving
voorschrijft, is SouthWing niet
aansprakelijk voor incidentele
of indirecte schades door
welke oorzaak dan ook, inclusief, maar niet beperkt tot, het
verlies van winst of omzet. Enkele landen of staten staan de
uitsluiting of beperking van incidentele of indirecte schades,
of de beperking van de garantieduur van meegeleverde garanties niet toe. Dat kan
betekenen dat de beperkingen
of uitsluitingen die hierboven
genoemd zijn, niet voor u van
toepassing zijn. Deze vrijstelling beïnvloedt de wettelijke
gebruikersrechten onder het
plaatselijke, van toepassing
zijnde recht, of de gebruikersrechten tegen verkopers die
voortkomen uit hun verkoop/aankoopcontract, niet.
7. CONFORMITEITSVERKLARING
serva-se o direito de substituir
o produto defeituoso por outro
produto de valor equivalente.
6. A SouthWing não oferece
qualquer outra garantia expressa quer escrita quer oral.
Nas condições definidas pelas
leis locais, qualquer garantia
implícita ou condição de
venda, qualidade satisfatória
ou adequação para um objectivo particular é limitada à duração da garantia acima descrita.
7. Nas condições definidas
pelas leis locais, a SouthWing
não será responsabilizada por
quaisquer danos acidentais ou
consequentes, de qualquer natureza, incluindo mas não limitado a lucros perdidos ou
perdas comerciais.Alguns países ou estados não permitem
a exclusão ou limitação de
danos acidentais ou consequentes, ou limitação da duração das garantias implícitas.
Tal poderá significar que as limitações ou exclusões acima
definidas não se aplicam no
caso de determinados utilizadores.Esta garantia não afecta
os direitos legais do consumidor sob as leis locais aplicáveis
em vigor, ou os direitos do
consumidor face ao revendedor resultantes do contrato de
compra e venda.
de acordo com os requisitos
essenciais e outras normas relevantes da Directiva
1999/5/CE.
Hiermee verklaart SouthWing
S.L. dat deze Bluetooth headset in overeenstemming is met
de essentiële vereisten en andere relevante uitgegeven richtlijnen 1999/5/EC.
Bezoek voor meer informatie:
http://www.southwing.com
Dit product heeft geen gebruiksbeperkingen in de EU.
Dit product volgt de
WEEE (Waste Electrical
and Electronic Equipment
Requirements).
2002/96/EC
Para obter informações adicionais, consulte:
http://www.southwing.com
Este produto não tem limitações de
utilização na U.E.
Este produto segue os
WEEE (Waste Electrical
and Electronic Equipment
Requirements, Requisitos
de Resíduos de Material
Electrónico e Eléctrico).
2002/96/CE
7. DECLARAÇÃO DE CONFORMIDADE
A SouthWing S.L. declara que
este auricular Bluetooth está
- Для подзарядки гарнитуры
не используйте аксессуары,
не предоставленные
компанией SouthWing для
данного продукта.
- Не заряжайте гарнитуру на
открытом воздухе
- Не заряжайте гарнитуру,
если температура
окружающего воздуха выше
40 или ниже 0 градусов по
Цельсию
- Не оставляйте гарнитуру
подключенной к зарядному
устройству на длительное
время, поскольку
чрезмерная зарядка
сокращает срок службы
аккумулятора.
Рекомендации по
безопасности
- lИспользуйте продукт
только в соответствии с
указаниями, приведенными
в данном "Руководстве
пользователя".
Невыполнение данных
указаний по эксплуатации
продукта может привести к
телесным повреждениям.
Кроме того, при любом
использовании данного
изделия с нарушением
указаний "Руководства
пользователя" аннулируется
гарантия.
- Не пользуйтесь изделием в
местах, где оно может войти
в соприкосновение с
жидкостью, подвергнуться
воздействию высокой
влажности или
экстремальным
температурам.
- Не помещайте изделие в
огонь, поскольку оно может
взорваться и причинить
телесные повреждения или
смерть.
- Не пользуйтесь изделием в
местах, где запрещено
использование
радиопередающих устройств
(например, в самолетах и
больницах), или вблизи
чувствительных приборов,
подверженных негатиному
влиянию радиопередатчиков
(например, электронных
стимуляторов сердца).
- Не пытайтесь
самостоятельно
ремонтировать данное
изделие. Если продукт
нуждается в обслуживании,
его должен проводить
квалифицированный
обслуживающий персонал.
- Если продукт загрязнился,
его следует вытереть мягкой
тканью. Не используйте
моющие средства, поскольку
они могут повредить
пластик, электронику или
аккумулятор.
- При использовании
данного изделия во время
вождения автомобиля
сокращается скорость
реакции на изменение
окружающей обстановки.
- Следует помнить, что в
некоторых странах
использование
беспроводной телефонной
Дополнительная информация находится на веб-сайте:
http://www.southwing.com
Данное изделие не имеет
ограничений по использованию в странах Евросоюза.
Данное изделие соответствует требованиям к утилизации
электрического и
электронного оборудования WEEE.
2002/96/EC
7. ДЕКЛАРАЦИЯ
СООТВЕТСТВИЯ
Настоящим SouthWing S.L.
заявляет, что данная
гарнитура соответствует
предъявляемым
требованиям и другим применимым положениям Директивы 1999/5/EC.
Kulaklık farklı boyutlara sahip
rahat kulak içi elemanlarıyla birlikte gelir; kulağınıza en uygun
olanını seçin.
Bir kulak içi elemanını değiştirmek için:
1. Kulak içi elemanının bir yanını elinizle nazikçe dışarı
doğru çekin; çıkarttıktan sonra
kulak içi elemanını kaybetmeyin.
2. Yeni bir kulak içi elemanı
seçin ve hoparlör ucuna mükemmel bir biçimde oturana
kadar dikkatle ayarlayın.
Kulaklığı, Kulak kancası ile kullanma
Kulak kancası sıkı bir tutuş ve
maksimum rahatlık için kullanılabilir. Kulak kancasını takmak
için, Kulak kancasının yuvarlak
kafasını kulaklık gövdesi ve
klips arasına dikkate yerleştirin
ve sağlam bir biçimde ayarlanmasını sağlayın. Takmak için
aşağıdaki adımları izleyin:
1. Kulak kancasını [8] biraz ileri
doğru döndürün.
2. Hoparlörü [5] kulak kanalınıza nazik bir biçimde yerleştirin.
3. Kulak kancasını [8] ] geriye
doğru döndürün ve kulağınızın
arkasına yerleştirin.
Kulaklığı taşıma
Kullanılmadığında, kulaklığınızı
aşağıdaki yöntemlerden birini
kullanarak taşıyabilirsiniz.
1. Kulaklığın alt kısmındaki
klipsi kullanarak giysinize takın.
2. Birlikte verilen kabloyu kullanarak cep telefonunuza takın;
bir ucunu kulaklık şarj bağlantı
noktasına takın ve kabloyu cep
telefonunuza tutturmak için kullanın.
terge Işığı [2] kapanmadan
önce yanıp sönene ve bir dizi
sinyal sesi duyulana kadar Çok
Amaçlı düğmeye [2] basın ve
yaklaşık 3 saniye basılı tutun.
Bir aramayı kabul etme/reddetme*
Telefon çaldığında (zil sesi kulaklıktan duyulur), gelen aramayı
kabul etmek için Çok Amaçlı
düğmeye [2] hafifçe basın.
Diğer bir şekilde, aramayı reddetmek için Çok Amaçlı düğmeye [2] basın ve 1 saniye
kadar süreyle basılı tutun.
* Yıldız ile işaretli özellikler yalnızca
Ahizesiz profili destekleyen Bluetooth telefonlarıyla çalışacaktır. Günümüzde çoğu Bluetooth telefon bu
profili desteklemektedir.
Kulaklığı Açma ve Kapama
Kulaklığı açmak için, Gösterge
Işığı [2] mavi renkte 6 kez yanıp
sönene ve bir dizi yükselen sinyal sesi duyulana kadar Çok
Amaçlı düğmeye [2] basın ve
yaklaşık 3 saniye basılı tutun.
Kulaklığı kapamak için, GösÉѪ£ùàÇ °Ã ͪéÑ€Ç ŠÝ ÉѪ£ùàÇ ¡ÑÕôàÇ ¼
.¬íѪ„èàÇ
Áªäê裪é Êªí¼°àÇ °Ã á°ûàÇ »³é ƒã£è ¼
°Ã ¬´ô‚àÇ °Ã ¬ÆѪØàÇ ÑÇÑÖ€Ç ÑÕô °Ã
Šä³í ¸àÀ° .¬íäãÖàÇ ÊªäªãÖàÇ Éûã ûíûôè
Ì‚Úà ¬ôÖ°ãàÇ ÊÇÁªäêè£¼Ç °Ã û°ûôàÇ ‰Ã
.¸íàÚ ÏéØäè ¼ ûÞ
Ï°´ôàªé Óª£ãàÇ ˆàÅ ‰ªãÖàÇ ÇÀå ˜ûÄí ¼
‰íäÇ°´àÇ ªçàýßè ŠèàÇ ¸àçè£ãàà ¬íä°äª´àÇ
áÕôí Ï°´ô ˜Ã °Ã ªçé á°ã³ãàÇ ¬íàôãàÇ
û´Ú È„°ãé áíß°àÇ ûÖ ¸àçè£ãàÇ ªçíàÚ
.ªãçäíé ¾ÑéãõàÇ œíéàÇ/ÁÇѨàÇ
¬´éªØãàÇ ‰‚ÚÅ -7
¬ßѨ ‰à³è ¡áíàûàÇ ÇÀå È„°ãé
ÓÃÑàÇ ¬Úªã£ ‰Ã SouthWing S.L.
ʪéàØèãàÇ œã ¬´ÝÇ°èã ÌÀå Bluetooth
ÑÇÑ´àªé ¬´à³èãàÇ ìÑù€Ç ذѨàÇ° ¬í£ª£€Ç
.1999/5/EC
œÞ°ã ÉÑªí¢ ˆ„Ñõí ¡Êªã°à³ãàÇ ‰ã ûòí¢ãà
:Èí°àÇ
http://www.southwing.com
îèäãàÇ ÇÀå ¾Çûùè£Ç ˆàÚ û°íÞ ˜Ã û„°è ¼
.ŠéÑ°€Ç ûªôè¼Ç á°û áùÇû
ʪéàØèãé îèäãàÇ ÇÀå Šýí
ʪýàù㠉㠥àùèàÇ
¬íƪéÑçßàÇ É¢ç„€Ç
.(WEEE) ¬íä°Ñèßà›Ç°
2002/96/EC
Numarayı her zamanki gibi telefonunuzdan çevirin. Kulaklığınız açık ve telefonunuz da
doğru biçimde takılıysa, telefonunuz aramayı kulaklığınıza aktaracaktır.
Sesli Arama yöntemiyle bir arama
yapma
Sesli arama için hafifçe Çok
Amaçlı düğmeye [2] basın ve
telefondan gelecek sinyali bekleyin. Ardından aramak istediğiniz kişinin adını söyleyin.
Not: telefonunuz sesli aramayı desteklemeli ve ilk olarak telefon numaralarıyla ilgili ses etiketlerini
telefonunuza kaydetmelisiniz (lütfen
ayrıntılar için telefonunuzun kullanma
kılavuzuna bakın)
Ses şiddetini değiştirme
layın.
Push4™ En çok aranan numara
Kulaklığa çok aranan bir numarayı kaydetmek ve Push4™ Çok
Amaçlı düğme [2] ile hızlı
arama yapmak mümkündür. Bu
numara en son gelen aramadan otomatik olarak kaydedilebilir (gizli veya tanımlanamayan
numaralarla uyumlu değildir).
Bunun için gelen aramanın
sonlandırılmasının ardından, bir
dizi sinyal sesi duyana dek Çok
amaçlı düğme [2] ve Vol+ düğmelerini 1 saniye boyunca basılı tutun.
En çok aranan kayıtlı numarayı
aramak için, Push4™ Çok Amaçlı düğmeye [2] basın ve 1 saniye kadar süreyle basılı tutun.
Pil seviyesini kontrol etmek
için, Çok Amaçlı düğmeye [2] 4
kez basın, bir seri bip sesi
kalan konuşma süresini bildirecektir (4 adet bip sesi 4 veya
daha fazla konuşma süresi kaldığını gösterir).
En son aranan numarayı tekrar
arama
Çok Amaçlı düğmeye [2] hafifçe iki kez basın; son aranan
numara otomatik olarak aranacaktır.
Bir aramayı bitirme
Kulaklığı gelen aramalara 3 saniye sonra yanıt verecek şekilde yapılandırabilirsiniz,
bunun için ON (Açık) durumdayken bir bip sesi duyana dek
3 saniye kadar Vol- düğmesine
basın.
Otomatik yanıtlamayı devre dışı
bırakmak için yukarıdaki eylemi
tekrarlayın.
.̪äûà ¬ôÖ°ãàÇ Ø°Ñ¨àà ªð´Ý° ªð䪄ã
ذѨàÇ
¾íû´è Ñã€Ç ÈàØèí ¡‰ªãÖàÇ ¬ãûù ƒäãà -1
…íÑªè ªçé û°„°ãàÇ ¬íàÕ€Ç ÁÇѨàÇ ÉÑ°èªÝ
Šà£à£èàÇ ¾ÞÑàÇ ªçé ƒÖ°ãàÇ° ÁÇѨàÇ
¬ßѨ ÿýèôè .áíß°àªé ¬ÕªùàÇ áíÕªýèàÇ°
¬ãûù »ÝÑ ŠÝ Ïôàªé SouthWing
.ÉÑ°èªýàÇ ÌÀå ¾íû´è ¾ûÚ ¬àªô ŠÝ ‰ªãÖàÇ
ÒàÇûéè£Ç °Ã Òô‚ÕÅ ¾èí îèä㠘à œÖùí -2
ˆèô ¸àÀ° ‰ªãÖàªé ¬ÕªùàÇ Ø°Ñ¨àÇ Óýäà
Éûã °Ã ¬íàÕ€Ç ‰ªãÖàÇ ‰ªíÑ£ Éûã ¬íªçä
.(á°Øà ‰°ßè ªãçíÃ) ªðã°í 90
áÇûéè£¼Ç °Ã Í‚Õ›Ç ‰ªãÖ áã¨í ¼ -3
¬„íèä îèäãàªé áØÚ Ë°ûô Šäª„ãàÇ
Á°£ °Ã üàèàÇ° ˆàéàà ¬í³íéØàÇ ü°ÑÿàÇ
¬ýàªùã ¬´íÑØé ÒãÇûùè£Ç °Ã îèäãàÇ ¾Çûùè£Ç
°Ã Òé ¥ªùàÇ ¾ûùè£ãàÇ áíàûé ûÑ° ªãà
ʪíàãÚ ÁÇÑ„Å Èé£é °Ã Ëûªôà ÒÖѳè
ì°Þ á³ýé °Ã îèäãàÇ ˆàÚ áíû³è °Ã ØéÖ
Òè£ã‚ã ‰Ú ¤¨äí ˜ÀàÇ üàèàÇ °Ã ¬³íéØàÇ
.áÆÇ°£àà
¬Ø£Ç°é ¼Å îèäãàÇ ÇÀå Í‚ÕÅ Š½éäí ¼ -4
¬ßѨ áéöÞ ‰ã ûãè³ã ¥Õùèã ŠäÝ
¥ù¨ ˜Ã ¬à°ªôã ˜ûÄè£ .SouthWing
ÇÀå áªØéÅ ˆàÅ îèäãàÇ Í‚Õ› ÑùÂ
.‰ªãÖàÇ
°Ã ¬éí³ãàÇ Éûô°àÇ áÇûéè£Ç Ñãà œ„Ñí -5
SouthWing ¬ßѨ Ñíû´è ˆàÅ ªçô‚ÕÅ
¬ßѨ ‰¦Ý ¡Í‚Õ›Ç ÑÀ³è ÇÀÅ.ªåûô°
áÇûéè£Ç ŠÝ Ïôàªé ÿýèôè SouthWing
Òà ªðí°ª£ã ‰°ßí Ñù îèäãé Èí³ãàÇ îèäãàÇ
.¬ãí´àÇ ŠÝ
¬íà SouthWing ¬ßѨ ¾û´è ¼ -6
Êäªß ÁÇ°£ ¡ìÑùà ¬ôíÑÕ ÊªäªãÖ
Òé ƒã£í ˜ÀàÇ ûôàÇ ˆàÅ.¬íçý¨ ¾Ã ¬é°èßã
ØѨ °Ã ‰ªãÖ ˜Ã ÑÕè´í ¡ŠàôãàÇ ‰°äª´àÇ
¬íÖÑã Éû°„ °Ã Ïí°£èàà ¬íàéªÞ °Ã ŠäãÖ
‰ªãÖàÇ Éûã ˆàÚ ‰í³ã »Ñ½à ¬ãÁ‚ã °Ã
.Ì‚Úà ÉÑ°ßÀãàÇ
¡ŠàôãàÇ ‰°äª´àÇ Òé ƒã£í ˜ÀàÇ ûôàÇ ˆàÅ -7
¬íà SouthWing ¬ßѨ áãôèè ¼
¬ÆÑªØ °Ã ¬´ô¼ ÑÇÑÖà ¬íà ‰Ú ¬íà°Æ£ã
áªêãàÇ áíé£ ˆàÚ ¸àÀ ŠÝ ªãé ¡Œ°ä ˜Ã ‰ã
Arama sırasında Çok Amaçlı
düğmeye [2] hafifçe basın,
arama sonlandırılacaktır.
Bir aramayı Kulaklıktan cep telefonuna aktarma
Arama sırasında aramayı cep
telefonunuza aktarmayı isteyebilirsiniz, bunun için Çok Amaçlı düğmeye [2] iki kez basın.
Aramayı yeniden kulaklığa aktarmak için aynı komutu tekrar(ʪíý¨è£ãàÇ° ÊÇÑƪØàÇ áªêãàÇ áíé£ ˆàÚ)
ûÞ ŠèàÇ ¬£ª£ôàÇ É¢ç„€Ç ‰ã ÈÑ´àªé °Ã
¬íßࣂàÇ Êª„°ãàÇ áª£Ñ› ¢ªç„ ˜¤é Ñê¤èè
áíé£ ˆàÚ Èà´àÇ ÊªÖéä ØéÖ É¢ç„Ã)
.(áªêãàÇ
ÇÀÅ .¸£ýäé îèäãàÇ ¬äªíÕ ÁÇÑ„Å á°ªôè ¼ ¸Ñè È„íÝ ¡¬äªíÕàÇ ˆàÅ ¬„ªôé îèäãàÇ ‰ªß
…£èÇ ÇÀÅ .ûãè³ã ¬äªíÕ Šäýà ¬ãçãàÇ ÌÀå
ÔªãÞ ¬³ØÞ ¾Çûù裪é Òýíÿäè Š½éäíÝ ¡îèäãàÇ
ûÞ Ëíô ¡üíÿäè ûǰ㠘à ¾ûùè£è ¼ .¬ãÚªä
¬íßí裂éàÇ Êªä°ßãàÇ ü‚èÅ ˆàÅ ¸àÀ ˜ûÄí
.¬íѪØéàÇ °Ã ʪíä°Ñèßà›Ç °Ã
Éûªí´àÇ Áªäêà îèäãàÇ ÇÀå ¾Çûùè£Ç ˜ûÄí ûÞ áÇ°ô€ ¬éª„è£¼Ç ˆàÚ ¸èÑûÞ áíà´è ˆàÅ
.ÏíÑØàÇ
ÓÃÑ ¬Úªã£ ¾Çûùè£Ç ‰Ã ¸äªé£ô ŠÝ œÖ ‰°äª´àà ªýðàªùã ÇðÑãà û³í Éûªí´àÇ Áªäêà ¬íßࣼ
¸íàÚ ‰í³èí ¡¾ê ‰ã° .á°ûàÇ »³é ŠÝ
¾Çûùè£Ç áéÞ ¬íàôãàÇ ‰íäÇ°´àÇ ˆàÅ Œ°„ÑàÇ
.Éûªí´àÇ Áªäêà îèäãàÇ
ûÞ ÁÇ¢„à ˆàÚ îèäãàÇ ÇÀå ÁÇ°èô¼ ÇðÑÿä Òä¦Ý ¡¬éªÕ› »Ñ³èàÇ ªçß‚çè£Ç ‰Ú ¾„äí
‰Ú Çðûí³é îèäãàÇ ÇÀçé ÿªýèô¼Ç ˆ„Ñíõ
.áªýØ€Ç á°ªäèã
°Ã ŠÆªéÑçßàÇ ÑªíèàÇ ÑûÕ㠼Š¾ûùè£è ¼ -hWing ¬ßѨ áéöÞ ‰ã Éûãè³ãàÇ Êª´ôàãàÇ
‰ôª¨ °Ã Ѫíè ÑûÕã ¾Çûùè£Ç ø‰Å .Sout
ÌÀå ‰ã ˜Ã ˆàÚ áíû³è ˜¤é ¾ªí´àÇ °Ã ÑùÂ
°Ã îèäãàÇ üàè ˆàÅ ˜ûÄí ûÞ ¡É¢ç„€Ç
.¬íƪéÑçß Êª´³Õ Ë°ûô Ñتùãà »Ñ³èàÇ
ÓÃÑàÇ ¬Úªã£ ¾Çûùè£Ç ÑêÄí ûÞ :Òíéäè
Ê°Õ Êªí°è£ã ûäÚ ¬àí°Ø ¬íä㢠ÉÑèýà
.œã£àÇ ÉÑûÞ ˆàÚ ¬³ýèÑã
‰ªãÖàÇ
ÇÀå °àù SouthWing ¬ßѨ ‰ãÖè
Éûãà ¬ãªùàÇ° ¬ÚªäÕàÇ È°íÚ ‰ã îèäãàÇ
ŠÝ îèäãàªé ÈíÚ Ñ°çÿ ¬àªô ŠÝ .‰íãªÚ
‰ªíÑ£ Éûã á‚ù ˜ûª³àÇ ¾Çûùè£¼Ç ü°Ñÿ
ˆàÅ îèäãàÇ Œª„ÑÅ ˆ„Ñíõ ¡‰ªãÖàÇ ÇÀå
Áðªäé° .Òäã îèäãàÇ ÁÇѨ ¾è ˜ÀàÇ Ñ„èãàÇ
û³é ¾èí ¡SouthWing ¬ßѨ Ñíû´è ˆàÚ
Òô‚ÕÅ °Ã Èí³ãàÇ îèäãàÇ áÇûéè£Ç ¸àÀ
Kulaklığın varsayılan zil sesini
değiştirmek için Vol+ veya Voldüğmelerine 5 saniye süreyle
basarak zil sesi menüsüne
girin. Daha sonra, Vol+ ve Volile yeni zil sesini seçin ve Çok
Amaçlı düğmeye [2] bir kez basarak seçtikten sonra bekleme
moduna geri dönün.
Sorun
Öneriler
Kulaklık açılmıyor
- Kulaklık pili bitmiş olabilir
- Kulaklığ.ı şarj etmeyi deneyin.
Eşleştirme işlemi başarısız
- Eşleştirme işlemi sırasında telefon ve Kulaklığı birbirine yaklaştırın.
- Çep telefonunun doğru Bluetooth modunda olduğundan emin olun.
- Mikrodalga fırınlar gibi bazı elektrikli cihazlar parazitli
bir elektrik ortamı yarattıklarından, Kulaklığın telefonla
iletişimini zorlaştırmaktadır. Bu tip cihazlardan uzaklaştırmaya çalışın ve yeniden deneyin..
Eşleştirme başarılı ancak
aramalar duyulmuyor
- Telefonunuzun açık ve Kulaklığa takılı olduğundan
emin olun.
Kulaklık, düğmeye basılmasına yanıt vermiyor
- Kulaklığınızın pilinin şarj edildiğinden emin
olun.
- Birkaç saniye süreyle şarj ederek kulaklığınızı
sıfırlamayı deneyin ve cihazı yeniden açın.
Pil Ömrü
Pil ömrünü korumak için kulaklığınızda bir otomatik uyuma
özelliği bulunmaktadır. Bu fonksiyon 12 saat kadar süren eylemsizliğin ardından kulaklığı
kapatır. Kulaklığınız otomatik
uyku moduna girdiğinde, yeniden normal bir biçimde açılabilir.
.îèäãàÇ ˆàÚ
:Šä°Ñèßà›Ç ûíÑéàÇ
[email protected]
:Šàí ªã ¬ÿô‚ã ˆ„Ñíõ
Ïà³èè ŠèàÇ ÊªÚ°Ö°ãàÇ ¬Ýªßà ¬é£äàªé
Ñ„èãàÇ ˆàÅ îèäãàÇ Œª„ÑÅ ˆ„Ñõí ¡‰ªãÖàªé
.îèäãàÇ Òäã ÊíÑè¨Ç ˜ÀàÇ
¬íѪØéàªé ¬íªä³àÇ
¬íѪØéà ŠÖÇÑèÝ¼Ç Ñã³àÇ ûèãí ü°£
ŒªéèÇ ¬àªô ŠÝ ¬àí°Ø ÉÑèýà ÓÃÑàÇ ¬Úªã£
:¬íàªèàÇ ÊÇûª¨Ñ›Ç
¬Úªã£ ‰ô¨à ʪ´ôà㠘à ¾ûùè£è ¼ ¬ßѨ ªåÑÝ°è ŠèàÇ ¸àè ü‚ùé ÓÃÑàÇ
.îèäãàÇ ÇÀçà SouthWing
‰ßªã€Ç ŠÝ ÓÃÑàÇ ¬Úªã£ ‰ô¨é ¾´è ¼ .¬ô°èýãàÇ
Ê¢°ª„è ÇÀÅ ÓÃÑàÇ ¬Úªã£ ‰ô¨è ¼ °Ã ¬í°Æã ¬„Ñû 40 ¬ØíôãàÇ ÉÑÇÑôàÇ ¬„Ñû
.¬í°Æã ¬„Ñû 0 ‰Ú ÊÖýùäÇ ÇÀÅ
‰ôª¨àªé ¬àÕèã ÓÃÑàÇ ¬Úªã£ ¸Ñèè ¼ ØÇÑÝ›Ç ˜ûÄí Ëíô ¡¬àí°Ø ¬íä㢠ÊÇÑèýà
ŠÖÇÑèÝ¼Ç Ñã³àÇ ÑÕÞ ˆàÅ ‰ô¨àÇ ŠÝ
.¬íѪØéàà
‰ãŸÇ ¾Çûùè£¼Ç ÊÇûª¨ÑÅ
ÊÇûª¨Ñ‡à ªð´Ý° ¼Å îèäãàÇ ÇÀå ¾ûùè£è ¼ ˜ûÄí ûÞ .ÇÀå ¾ûùè£ãàÇ áíàûé ÉûÑÇ°àÇ
ÌÀçà üàªùã °ôä ˆàÚ îèäãàÇ ¾Çûùè£Ç
¬ÝªÖ›ªé .¬éªÕ› »Ñ³èàÇ ˆàÅ ÊÇûª¨Ñ›Ç
ˆàÚ îèäãàÇ ÇÀå ¾Çûùè£Ç ˜ûÄí ¡¸àÀ ˆàÅ
ÇÀå ¾ûùè£ãàÇ áíàûé ûÑ° ªãà üàªùã °ôä
.‰ªãÖ ˜Ã áªØéÅ ˆàÅ
îèäãàÇ ‰°ßí ¬Æíé ŠÝ îèäãàÇ ¾ûùè£è ¼ °Ã áÆÇ°£àÇ œã Óã‚èàà ªðÖѳ㠪çíÝ
Éûíû¨àÇ ÉÑÇÑôàÇ Êª„Ñû °Ã ¬íળàÇ ¬é°ØÑàÇ
.(¬íª½àà ¬³ýèÑãàÇ °Ã ¬íª½àà ¬ÖýùäãàÇ)
û´Ý ¡ÑªäàÇ ŠÝ Òƪ´à¦é îèäãàÇ ‰ã ¥àùèè ¼ »Ñ³èàÇ ˆàÅ ˜ûÄí ªãã ¡îèäãàÇ Ñ„ýäí
.ɪݰàÇ Ë°ûô °Ã ¬éªÕ›
ªçé Ñÿôí Ïتäã ŠÝ îèäãàÇ ¾ûùè£è ¼ ¬íßࣂàÇ Êª„°ãàÇ áª£ÑŠɢç„à ¾Çûùè£Ç
Pil seviyesi düşük olduğunda,
kulaklık her 30 saniyede bir işitilebilir bir uyarı sesi verecektir,
yalnızca birkaç dakikalık konuşma süreniz kaldığından lütfen derhal şarj edin.
5. SORUN GİDERME
Zil sesini değiştirme
Bir arama sırasında ses şiddetini artırmak için Vol+ düğmesine [3] basın. Ses şiddetini
azaltmak için Vol- düğmesine
[4] basın. Kulaklık her açıldığında bir önceki ses şiddeti
ayarını hatırlayacaktır.
Otomatik yanıtlama (arama yanıtlama)
4. GENEL KULLANIM
Cep telefonunuzdan arama yapma
E-posta: customer.service@
6. EK BİLGİLER
southwing.com
İletişim
Herhangi bir sorunuz veya geliştirmeye yönelik bir öneriniz
varsa aşağıdaki detaylarla birlikte lütfen SouthWing ile temasa geçin.
Lütfen dikkat edin: Garantiyle ilgili konularda, lütfen ürünü satın aldığınız mağazaya iade edin.
Pil Bakımı
Kulaklığınızın pili aşağıdaki tali-
Ñã³àÇ ˆàÚ ÿªýôàÇ á„à ‰ã ¸àÀ° ¡ŠÆª´àèàÇ
¬ýíÿ°àÇ ÌÀå ¾°´è° .¬íѪØéàà ŠÖÇÑèݼÇ
12 Ñ°Ñã û³é ÓÃÑàÇ ¬Úªã£ áí½¨è üª´í¦é
áùûè ªãûäÚ° .ªçãÇûùè£Ç ¾ûÚ ‰ã ʪڪ£
¡ŠÆª´àèàÇ üÞ°èàÇ œÖ° ŠÝ ÓÃÑàÇ ¬Úªã£
.Š³íéØ °ôä ˆàÚ ªçàí½¨è ÉûªÚÅ ¸äßãí
ˆàÚ Ø½ÖÇ ¡¬íѪØéàÇ ‰ô¨ ì°è£ã ¥ôýà
ˆèô ¡ÊÇÑã 4 [2] üƪÿ°àÇ ûû³èã Ñ¢àÇ
‰Ã ˆàÅ Ñí¨è ÊÇÑݪÕàÇ ‰ã ¬à£à£ ÑûÕè
4) ʪڪ£àªé Ëûôèàà ͪèãàÇ ÊÞ°àÇ
‰ã Ñêßà °Ã ʪڪ£ 4 ˆàÅ Ñí¨è ÊÇÑݪÕ
.(ËûôèàÇ ÊÞ°
¡¬Öýùäã ¬íѪØéàÇ ¬ÞªØ ‰°ßè ªãûäÚ
áß ¬íè°Õ ÊÇÑíÀôè ¬à£à£ ¬íѪØéàÇ ÑûÕèõ
Ñ°ýàÇ ˆàÚ ¬íѪØéàÇ ‰ô¨ Áª„Ñé ¡¬íäªê 30
‰ã Ø´Ý ¬àíàÞ ÏƪÞûà Šýßí Š´éèãàÇ ‰ô¨àªÝ
.ËûôèàÇ
¬íݪÖŠʪã°à³ã -6
áªÕè¼Ç ʪç„
SouthWing ¬ßѨé áªÕè¼Ç ˆ„Ñíõ
¸íûà Êäªß ÇÀÅ ¬íàªèàÇ áíÕªýèàªé ¬äª³è£¼ªé
ʪäí£ôè ÁÇÑ„Å ‰¤¨é ʪôÑè´ã °Ã ¬àƣà ¬íÃ
ʪãàªßãàÇ Ñù ¬ãÆªÞ ‰ã ªðíßíèªã°è°Ã ¾ÞÑàÇ
°Ã ¬íýùãàÇ ¾ªÞÑ€Ç œã ¬´ÝÇ°èã ÑíÛ) ÉûÑÇ°àÇ
ÁªçèäÇ ûÑ„ãé ¡¸àÀé ¾ªí´àà .(ÉûûôãàÇ ÑíÛ
ˆàÚ ÑÇÑãè£¼Ç œã ؽÖÇ ¡ÉûÑÇ°àÇ ¬ãàªßãàÇ
Ñ¢àÇ° [2] üƪÿ°àÇ ûû³èã Ñ¢àÇ ‰ã áß
¡ÉûôÇ° ¬íäªê Éûãà (Ê°ÕàÇ œÝÑ) Vol+
.ʪã½äàÇ ‰ã ¬à£à£ œã£è ˆèô
ؽÖÇ ¡‰¢ùãàÇ áÖýãàÇ ¾ÞÑàªé áªÕè‚à
[2] üƪÿ°àÇ ûû³èã Push4TM Ñ¢ ˆàÚ
.¬íäªê 1 Éûãà
‰íäÑàÇ ¬ã½ä Ñíí½è
ŠÝ ¬íÖÇÑèÝ¼Ç ‰íäÑàÇ ¬ã½ä Ñíí½èà
ؽÖàªé ‰íäÑàÇ ¬ã½ä ¬ãÆªÞ áùûÇ ¡¬Úªã£àÇ
Vol- °Ã (Ê°ÕàÇ œÝÑ) Vol+ Ñ¢ ˆàÚ
¡¸àÀ û³é° .‰Ç°ê 5 Éûãà (Ê°ÕàÇ »ýù)
- ° (Ê°ÕàÇ œÝÑ) Vol+ ‰íÑ¢àÇ ¾ûùè£Ç
Ê°Õ ¬ã½ä Ѫíèù¼ (Ê°ÕàÇ »ýù) Vol
üƪÿ°àÇ ûû³èã Ñ¢àÇ ˆàÚ Ø½ÖÇ° Éûíû„
œÖ° ˆàÅ Œ°„Ñàà ÉûôÇ° ÉÑã [2]
.ûÇû³è£¼Ç
¬íѪØéàà ŠÖÇÑèÝ¼Ç Ñã³àÇ
üÞ°èàÇ ¬ýíÿ°é ÓÃÑàÇ ¬Úªã£ ûí°¢è ¾è
ªçô‚ÕÅ° ʂߨãàÇ üª¨ßè£Ç -5
matları izlemeniz durumunda
uzun ömürlü olacaktır:
- Kulaklığınızı şarj etmek için
SouthWing tarafından bu
ürünle birlikte verilenden farklı
bir aksesuar kullanmayın.
- Kulaklığınızı açık havada şarj
etmeyin
- Ortam sıcaklığı 40 derece Celsius üzerinde veya 0 derece
Celsius altındayken Kulaklığınızı
şarj etmeyin
- Aşırı şarj pil ömrünü kısaltacağından, kulaklığınızı uzun süreler boyunca şarj cihazına
bağlı bırakmayın.
Güvenli Kullanım Talimatları
- Ürünü yalnızca bu Kullanım Kılavuzunda yer alan talimatlara
göre kullanın. Ürünün bu talimatlara aykırı kullanımı yaralanmalara yol açabilir. Ek olarak,
bu ürünün herhangi bir biçimde Kullanıcı Kılavuzuna aykırı kullanımı tüm garantileri
geçersiz kılacaktır.
- Ürünü sıvıyla temas edebileceği, yüksek oranda neme
veya aşırı sıcaklıklara maruz kalabileceği ortamlarda kullanmayın.
- Patlayarak yaralanmalara veya
ölüme yol açabileceğinden
ürünü ateşe atmayın.
- Ürünü radyo vericilerinin kullanımının yasak olduğu yerlerde
(örneğin uçak veya hastanelerde) veya radyo vericisinden
etkilenebilecek hassas cihazların (örneğin kalp pili) yakınında
kullanmayın.
- Bu ürünü kendiniz onarmaya
¡ÊªãàªßãàÇ ˆàÚ ŠÆª´àèàÇ ûÑàÇ ûÇûÚÅ áíسèà
.Ì‚Úà ÉÑ°ßÀãàÇ ÊÇÁÇÑ„›Ç ÑÑß
á°ãôãàÇ üèªçàÇ ‰ã ¬ãàªßã Áûé
á°ãôãàÇ üèªçàÇ ¾Çûùè£ªé ¾ÞÑàÇ ÈàØÇ
¬Úªã£ áí½¨è ¾è ÇÀÅ.Éûªè³ãàÇ ¬´íÑØàªé
¡ƒíôÕàÇ áߨàªé üèªçàªé ªçäÇÑÞÅ° ÓÃÑàÇ
¬Úªã£ ˆàÅ ¬ãàªßãàÇ áí°ôèé üèªçàÇ ¾°´í£Ý
.ÓÃÑàÇ
áªÕè¼Ç ¬ýíÿ° ¾Çûùè£ªé ¬ãàªßã Áûé
Šè°ÕàÇ
ɢ터 ÉÑèýà ؽÖÇ ¡¬íè°Õ ¬ãàªßã ÁÇÑ„›
ˆèô ÑÿèäÇ° [2] üƪÿ°àÇ ûû³èã Ñ¢àÇ ˆàÚ
ÏØäÇ ¾ê .üèªçàÇ ‰ã ¬à骴ãàÇ ¬ã½äàÇ Œªã£
.Òèêûªôã ŠÝ ÈÛÑè ˜ÀàÇ ¥ù¨àÇ ¾£ªé
ªðãÚÇû ¸ýèªå ‰°ßí ‰Ã È„í :¬ÿô‚ã
¾°´è ‰Ã È„í° Šè°ÕàÇ áªÕè¼Ç ¬íÕªùà
üèªçàÇ ŠÝ ¬íè°ÕàÇ ûÇ°ß€Ç áí„£èé ¼°Ã
¬³„ÇÑã Áª„Ñé) üèÇ°çàÇ ¾ªÞÑ¤é ¬é°ôÕã
(áíÕªýèàÇ ‰ã ûí¢ãà üèªçàÇ áíàû
¾ÞÑ Ñùâé áªÕè¼Ç Éû°ª³ã
ʪôÇÑèÞÇ
¬àߨãàÇ
ûû³èã Ñ¢àÇ ˆàÚ É¢í„° ÉÑèýà ؽÖÇ
Ñùâé áªÕè¼Ç ¾èíà º‰íèÑã [2] üƪÿ°àÇ
.ªðíƪ´àè Òé áªÕè¼Ç ¾è ¾ÞÑ
.‰ô¨àÇ ‰ã ¬ÛÑªÝ ÓÃÑàÇ ¬Úªã£ ¬íѪØé ‰°ßè ªãéÑ .ÓÃÑàÇ ¬Úªã£ ‰ô¨ ÉûªÚÅ á°ªô -
.ÓÃÑàÇ ¬Úªã£ áí½¨è ¾èí ¼
¬ãàªßãàÇ ÁªçäÅ
.‰ÇÑÞ›Ç Áªäêà Ñéßà ÉÑ°Õé ¬Úªã£àÇ° üèªçàÇ ‰íé ÈíÑ´èàÇ á°ªô .ƒíôÕàÇ Bluetooth œÖ° ŠÝ á°ãôãàÇ üèªçàÇ û°„° ‰ã ûß¤è ªçé ¬Æíé ªçäÚ ¤¨äí üí°°ÑßíãàÇ ‰ÇÑÝà áêã ¬íƪéÑçßàÇ É¢ç„€Ç »³é ŠÝ ÇÑðãà üèªçàÇ° ÓÃÑàÇ ¬Úªã£ ‰íé áªÕè¼Ç á³„í ªãã ¡ŠÆªéÑçß Ôí°¨è
.¬à°ªôãàÇ ûÚð É¢ç„€Ç ÌÀå ‰Ú ûª³èé¼Ç ÈÑø„.¬é°³ÕàÇ ¬íªÛ
.ͪ„äé ‰ÇÑÞ›Ç ¬íàãÚ ¾èè ¾à
.ÓÃÑàÇ ¬Úªã£é áªÕè‚à ¢åª„ Òäð áí½¨èàÇ ûíÞ üèªçàÇ ‰Ã ‰ã ûߤè -
Šääßãí ¼ ‰ßఠͪ„äé ‰ÇÑÞ›Ç ¾è
ʪãàªßãàÇ Œªã£
.ÓÃÑàÇ ¬Úªã£ ¬íѪØé ‰ô¨ ‰ã ûߤè ûÚà ¾ê ‰Ç°ê Éû³à ªçäô¨ ÏíÑØ ‰Ú ÓÃÑàÇ ¬Úªã£ ØéÖ ÉûªÚÅ á°ªô .ªçàí½¨è
‰Ú ÓÃÑàÇ ¬Úªã£ ÊýÞ°è
ˆàÚ Ø½ÖàÇ Ê¼°ªôãà ¬éª„è£¼Ç
.ÑÇÑ¢€Ç
ÉÑèýà [2] üƪÿ°àÇ ûû³èã Ñ¢àÇ ˆàÚ Ø½ÖÇ
.ªåĪçäÅ ¾èí£° ¬ãàªßãàÇ ÁÇÑ„Å Áªäêà ɢ터
üèªçàÇ ˆàÅ ¬Úªã£àÇ ‰ã ¬ãàªßãàÇ áí°ôè
á°ãôãàÇ
¬ãàªßãàÇ áí°ôè ŠÝ ÈÛÑè ûÞ ¡¬ãàªßãàÇ ÁªäêÃ
ؽÖÇ ¡¸àÀé ¾ªí´àà ¡á°ãôãàÇ ¸ýèªå ˆàÅ
.‰íèÑã [2] üƪÿ°àÇ ûû³èã Ñ¢àÇ ˆàÚ
¡ÓÃÑàÇ ¬Úªã£ ˆàÅ ¬ãàªßãàÇ áí°ôè ÉûªÚ›
.Ñã€Ç Óýä ÑÑß
áÖýãàÇ Push4TM ¾ÞÑ
¬Úªã£ ŠÝ áÖýã ¾ÞÑ ÿýô ‰ßããàÇ ‰ã
ûû³èã Ñ¢àÇ ¾Çûùè£ªé ¬ÚÑ£é ÒéàØ° ÓÃÑàÇ
ÇÀå ÿýô ‰ßãí .[2] Push4TM üƪÿ°àÇ
çalışmayın. Ürün servis gerektiriyorsa, bu işlem yetkili bir servis elemanı tarafından
gerçekleştirilmelidir.
- Ürün kirlenmesi durumunda
yumuşak bir bezle temizlenmelidir. Plastik aksama, elektronik
devrelere veya pile zarar verebileceğindenherhangi bir temizlik ürünü kullanmayın.
- Bu ürünün araç sürerken kullanımı, yol koşullarına tepki
verme yeteneğinizi azaltabilir.
- Araç sürerken kablosuz kulaklık kullanımının bazı ülkelerde
yasa dışı olduğunu unutmayın.
Bu yüzden, araç sürerken
ürünü kullanmadan önce yerel
yasalar konusunda bilgi edinin.
- Ürün yutulması durumunda
yaralanmalara neden olabilecek
parçalar içerdiğinden, çocukların erişebileceği yerlerden
uzakta tutun.
- Yalnızca SouthWing tarafından onaylanmış güç kaynağı
veya aksesuarları kullanın. Farklı bir güç kaynağı veya şarj cihazının kullanılması ya da bu
cihazlar üzerinde yapılacak değişiklikler ürüne zarar verebilir
ve elektrik çarpması riskini artırır.
Dikkat:Kulaklığın yüksek sesle,
uzun sürelerle kullanılması işitme
yeteneğinizi etkileyebilir.
Garanti
SouthWing, bu ürünün 2 yıl süreyle işçilik ve malzeme hatalarından muaf olacağı konusunda
garanti vermektedir. Ürünün
¾ª³àÇ ¾Çûùè£¼Ç -4
ªçàí½¨è üª´íÅ° ÓÃÑàÇ ¬Úªã£ áí½¨è
œã ؽÖÇ ¡ÓÃÑàÇ ¬Úªã£ áí½¨èà
[2] üƪÿ°àÇ ûû³èã Ñ¢àÇ ˆàÚ ÑÇÑã裼Ç
‰ã ¬à£à£ ÑûÕè ˆèô ‰Ç°ê Ë‚ê Éûãà
[2] ѨÄãàÇ Á°Ö »ã°í° ¬íળàÇ Êªã½äàÇ
.ÊÇÑã 6 Éûãà ÏÑ¢€Ç ‰°ààªé
œã ؽÖÇ ¡ÓÃÑàÇ ¬Úªã£ áí½¨è üª´í›
[2] üƪÿ°àÇ ûû³èã Ñ¢àÇ ˆàÚ ÑÇÑã裼Ç
‰ã ¬à£à£ ÑûÕè ˆèô ‰Ç°ê Ë‚ê Éûãà
áéÞ Ñ¨ÄãàÇ Á°Ö »ã°í° ¬íળàÇ Êªã½äàÇ
.áí½¨èàÇ üª´íÅ
¬ãàªßãàÇ *»ÝÑ/á°éÞ
Œªã£ ‰ßãí) ªðäíäÑ üèªçàÇ ÑûÕí ªãûäÚ
ؽÖÇ ¡(ÓÃÑàÇ ¬Úªã£ ŠÝ ‰íäÑàÇ ¬ã½ä
[2] üƪÿ°àÇ ûû³èã Ñ¢àÇ ˆàÚ É¢í„° ÉÑèýà
ˆàÚ Ø½ÖÇ.¬ãàªßãàÇ á°é´à ÉûôÇ° ÉðÑã
ÉûôÇ° ¬íäªê Éûãà [2] üƪÿ°àÇ ûû³èã Ñ¢àÇ
.¬ãàªßãàÇ »ÝÑà
¬ã‚³é ÉûûôãàÇ ÊÇ¢íãàÇ áã³è ü°£ *
ŠèàÇ Bluetooth üèÇ°å œã Ø´Ý ¬ã„äàÇ
ÊÞ°àÇ ŠÝ°.‰íûíàÇ Ñô œÖ°àÇ ¾Úûè
Bluetooth üèÇ°å ÈàÛà ¾Úûè ¡ŠàªôàÇ
.œÖ°àÇ ÇÀå
Ê°ÕàÇ Ñíí½è
ˆàÚ Ø½ÖÇ ¡¬ãàªßãàÇ Áªäêà ʰÕàÇ œÝÑà
áíà´èà° .[3] (Ê°ÕàÇ œÝÑ) Vol+ Ñ¢àÇ
Vol- Ñ¢àÇ ˆàÚ Ø½ÖÇ ¡Ê°ÕàÇ ì°è£ã
œ„Ñè£è ü°£ .[4] (Ê°ÕàÇ »ýù)
áß ŠÝ Ï骣àÇ Ê°ÕàÇ ûÇûÚÅ ÓÃÑàÇ ¬Úªã£
.ªçàí½¨è ¾èí ÉÑã
ʪãàªßãàÇ ˆàÚ ŠÆª´àèàÇ ûÑàÇ
‰Ú ŠÆª´àèàÇ ûÑàà ÓÃÑàÇ ¬Úªã£ ¬Æíçè ¸äßãí
¸àÀé ¾ªí´àà° ¡‰Ç°ê 3 û³é ÉûÑÇ°àÇ ÊªãàªßãàÇ
Ñ¢àÇ ˆàÚ Ø½ÖÇ "ON" áí½¨èàÇ ¬àªô ŠÝ
Ê°Õ œã£è ˆèô ‰Ç°ê Ë‚ê Éûãà Vol.ÉÑݪÕ
normal kullanım koşulları altında bu süre içerisinde arızalanması durumunda, lütfen
ürünü satın aldığınız mağazaya
iade edin. SouthWing’in takdirine göre, arızalı ürün değiştirilecek veya aşağıda belirlenen
koşullara uygun olarak ücretsiz
olarak onarılacaktır.
Koşullar
1. Bu garantiye hak kazanmak
için, seri numarası ve bayi bilgileri açık şekilde yazılmış olan,
orijinal tarihli satış faturasının
ibrazına gerek duyulur. SouthWing bu belgenin ibraz edilememesi durumunda garanti
hizmetini reddetme hakkını
saklı tutar.
2. Onarılan veya değiştirilen
tüm ürünler orijinal garanti süresinin bitimine veya 90 gün
boyunca (hangisi daha uzun
süreliyse) aynı garanti koşullarına tabi olacaktır.
3. Ücretsiz onarım veya değiştirme garantisi, ürünün normal
bir şekilde yıpranmasından,
kötü kullanmadan, ürün kullanım kılavuzuna aykırı kullanımdan, kazalar, yapılan değişiklik
ve ayarlamalardan, doğa şartlarından veya sıvıyla temasından
kaynaklanan arızaları kapsamaz.
4. Bu ürünün onarımı yalnızca
SouthWing tarafından onaylanmış servis personeli tarafından
gerçekleştirilebilir. Başka kişilerce gerçekleştirilebilecek
onarım işlemleri bu garantiyi
geçersiz kılacaktır.
û³é ÒäÇû´Ý ¾ûÚ ‰ã Ï´ôè° ¡¾ªã‹à ¸íûíé
.ÒèàÇ¢Å
¥Ñôé ÒØéÖÇ° ûíû„ ‰Àà áãªô ÑèùÇ -2
.¬Úªã£àÇ ¬ôèÝ œã ªðãªãè È£ªäèí Ëíôé
¸é¨ã ¾Çûù裪é ÓÃÑàÇ ¬Úªã£ ÁÇûèÑÇ
‰Àõ€Ç
ʪéê ‰ªãÖà ‰À€Ç ¸é¨ã ¾Çûùè£Ç ‰ßãí
¡‰À€Ç ¸é¨ã ÈíßÑèà.¬íåªäèã ¬ôÇÑ° áãªß
¾£„ ‰íé ‰À€Ç ¸é¨ãà Ñíûè£ãàÇ ÓÃÑàÇ œÖ
ˆàÚ ªçØéÖ ‰ã Ï´ôè° ¡¸é¨ãàÇ° ¬Úªã£àÇ
ÊÇ°ØùàÇ œéèÇ ¡ªçÆÇûèѼ° .ƒíôÕ °ôä
:¬íàªèàÇ
.ð‚íàÞ ¾ªã€Ç ˆàÅ [8] ‰Àõ€Ç ¸é¨ã Ñûà -1
ɪäÞ áùÇû ÏÝÑé [5] Ê°ÕàÇ Ñéßã œÖ -2
.¸äÀÃõ
¾ê ¡üàùàÇ ˆàÅ [8] ‰Àõ€Ç ¸é¨ã Ñûà -3
.¸äÀÃõ üàù ÒØéÖÇ
‰À€Ç ŠÝ ÓÃÑàÇ ¬Úªã£ ¾Çûù裼 -4
‰À€Ç ¸é¨ã ÈíßÑèé ¬Øª£éé ¾Þ ¡ìÑù€Ç
.ÓÃÑàÇ ¬Úªã£ ‰ã ÑùŸÇ È䪄àÇ ˆàÚ [8]
¸é¨ã ‰°ûé ÓÃÑàÇ ¬Úªã£ ÁÇûèÑÇ
‰Àõ€Ç
¸é¨ã ¾Çûùè£Ç ‰°ûé ÓÃÑàÇ ¬Úªã£ ÁÇûèѼ
:‰À€Ç
Òéô£ ÏíÑØ ‰Ú ‰À€Ç ¸é¨ã Œ¢äé ¾Þ -1
‰ã ‰ªßã ŠÝ Òäí¢ùè° ÏÝÑé
ɪäÞ áùÇû ÏÝÑé [5] Ê°ÕàÇ Ñéßã œÖ -2
.¸äÀÃõ
Ñêß€Ç œÖ°ãàÇ ŠÝ ÓÃÑàÇ ¬Úªã£ œÖ -3
ˆàÅ ªåÑí°ûè ÏíÑØ ‰Ú ¸íàÅ ¬é£äàªé ¬ôÇÑ
.üàùàÇ ˆàÅ° ¾ªã€Ç
ÓÃÑàÇ ¬Úªã£ áãô
áãô ¸äßãí ¡ªçãÇûùè£Ç ¾ûÚ ¬àªô ŠÝ
.¬íàªèàÇ ÏÑØàÇ ìûô¦é ÓÃÑàÇ ¬Úªã£
¸é¨ãàÇ ¾Çûùè£ªé ¸£é‚ã ŠÝ ªçèíéêèé ¾Þ -1
¬Úªã£ ‰ã Šàý£àÇ Á¢„àÇ ŠÝ ¸àÀà ¾ãÕãàÇ
.ÓÃÑàÇ
¾Çûù裪é á°ãôãàÇ ¸ýèªçé ªçÞªôà¦é ¾Þ -2
Àýäã ŠÝÑØ ûôà áÕ°° ¡ÏÝÑãàÇ ØíѨàÇ
-ãàÇ ØíѨàÇ ¾ûùè£Ç° ÓÃÑàÇ ¬Úªã£ ‰ô¨
.á°ãôãàÇ üèªçàÇ ŠÝ ªçèíéêèà ÏÝÑ
5. Arızalı bir cihaz SouthWing’in takdiriyle onarılır veya değiştirilir. Onarım mümkün
değilse, SouthWing arızalı
ürünü aynı değere sahip başka
bir ürünle değiştirme hakkını
saklı tutar.
6. SouthWing yazılı ya da
sözlü ifade edilen başka herhangi bir garanti sunmaz. Yerel
yasaların izin verdiği oranda,
tüm zımni garanti ve koşullar
veya ticarete elverişli koşullar,
tatminkar kalite ya da özel bir
maksada yönelik uygunluk, yukarıda tanımlanan garanti süresiyle sınırlıdır.
7. Yerel yasaların izin verdiği
oranda, SouthWing, kar kaybı
veya ticari kayıplar dahil ancak
bunlarla sınırlı kalmayacak şekilde niteliği ne olursa olsun,
her türlü doğrudan ya da dolaylı zararlardan sorumlu tutulmayacaktır. Bazı ülke ve
eyaletlerde doğrudan ya da dolaylı zararların muafiyetine veya
sınırlandırılmasına ya da zımni
garanti süresinin sınırlandırılmasına izin verilmez. Bu, yukarıda belirtilen sınırlamaların sizi
bağlamayacağı anlamına gelmektedir. Bu garanti tüketicinin
yürürlükteki yerel yasalar altındaki kanuni haklarını veya bayie
karşı satış/satın alma anlaşmasından kaynaklanan tüketici haklarını etkilemez.
Bluetooth Kulaklığın 1999/5/AT
Yönetmeliğinin temel gereklilikleri ve diğer ilgili hükümlerine
uygun olduğunu beyan eder.
Ek bilgi için lütfen şu adresi ziyaret edin:
http://www.southwing.com
Bu ürünün AB’de kullanımı konusunda herhangi bir sınırlama yoktur.
Bu ürün WEEE (Atık Elektrikli ve Elektronik Ekipman Gereklilikleri)
gereksinimlerine uygundur. 2002/96/EC
7. UYUMLULUK BİLDİRİMİ
İşbu belgeyle, SouthWing S.L.
¸ýèªå œã ÓÃÑàÇ ¬Úªã£ ‰ÇÑÞ› ¬íàªèàÇ
:á°ãôãàÇ
œÖ° ŠÝ á°ãôãàÇ üèªçàÇ á³„Ç -1
¸ýèªå ¾ûùè£ã áíàû œ„ÇÑ) ‰ÇÑÞ›Ç
¬Úªã£ ‰íé ¬Ýª£ãàÇ ‰Ã ‰ã ûߤè .(á°ãôãàÇ
¾ûÞ 3 ‰Ú ûí¢è ¼ á°ãôãàÇ üèªçàÇ° ÓÃÑàÇ
.(ûôÇ° Ñèã)
SouthWing” üèªçàÇ ¾£Ç ûûô -2
¬ãƪ´àÇ ‰ã “SH240
0000 :PIN ¾ÞÑ áùûÃ -3
á°ãôãàÇ üèªçàÇ° ÓÃÑàÇ ¬Úªã£ ‰°ßè ÇÀçé
áªÕè‚à ‰Çû³ã° ‰ÇÑÞ›Ç œÖ° ŠÝ
.Ë°è°àé áªÕèÇ á‚ù ‰ã ˜°ûí‚àÇ
áÕÝ ¸äßãí ¬íѪØéàÇ ¬ÞªØ ˆàÚ ÿªýôàà
ؽÖàªé á°ãôãàÇ üèªçàÇ° ÓÃÑàÇ ¬Úªã£
Ë‚ê [2] üƪÿ°àÇ ûû³èã Ñ¢àÇ ˆàÚ
Ñ¢àÇ ˆàÚ Ø½ÖÇ ªãçàíÕ°è ÉûªÚ›.ÊÇÑã
.ÉûôÇ° ÉÑã [2] üƪÿ°àÇ ûû³èã
˜ûª³àÇ ‰ÇÑÞ›Ç
Êäß ÇÀÅ ¬íàªèàÇ ÊÇ°ØùàÇ ŒªéèÇ ˆàÅ ëªèôè£
á°ãôã üèªçé ÓÃÑàÇ ¬Úªã£ ‰ÇÑÞÅ ûíÑè
.ÑùÂ
.ÓÃÑàÇ ¬Úªã£ áí½¨è üª´íÅ ‰ã ûߤè -1
‰ÇÑÞ›Ç œÖ° ŠÝ ÓÃÑàÇ ¬Úªã£ ᳄à -2
ûû³èã Ñ¢àÇ ˆàÚ ÑÇÑãè£¼Ç œã ؽÖàªé
»ã°í ˆèô ‰Ç°ê 5 Éûãà [2] üƪÿ°àÇ
Ñãô€Ç ‰íä°ààªé [2] ѨÄãàÇ Á°Ö
‰ã ¬à£à£ Œªã£ ¾èí° áûªéèàªé ÏÑ¢€Ç°
.¬íળàÇ Êªã½äàÇ
Œªéèªé ¬íûª³àÇ ‰ÇÑÞ›Ç ¬íàãÚ áãßè£Ç -3
¥ªùàÇ ¾£´àÇ ‰ã 3° 2° 1 ‰íè°ØùàÇ
.ŠÆª´àèàÇ ‰ÇÑÞ›ªé
ªçàãô° ÓÃÑàÇ ¬Úªã£ ÁÇûèÑÇ -3
‰À€Ç áãªô ѪíèùÇ
‰Àà áãÇ°ôé ¬´ÝÑã ÓÃÑàÇ ¬Úªã£ ‰°ßè
áãªôàÇ ÑèùÇ° ÈÑ„ ¡¬ýàèùã ¾ª„ô¤é ¬ôíÑã
.¸é£ªäí ˜ÀàÇ
:‰Àà áãªô áÇûé裼
ûôÇ° È䪄 ‰ã ‰À€Ç áãªô Èô£Ç -1
ѨÄãàÇ ÍªéÕã ÁªýØäÇ ûÑ„ãé -3
áãèßÇ ûÞ ÓÃÑàÇ ¬Úªã£ ‰°ßè ¡[2]
ѪíèàÇ ÑûÕã ‰Ú ªçàÕÝ ‰ßãí° ªçäô¨
.ŠÆªéÑçßàÇ
:‰Ã ¬ÿô‚ã Áª„ÑàÇ
Áªäêà áã³àÇ ‰Ú üÞ°èè ÓÃÑàÇ ¬Úªã£ •
.ªçäô¨
Áªäêà ªÆðýØã [2] ѨÄãàÇ ÍªéÕã áÿ ÇÀÅ •
¬àãèßã ¬íѪØéàÇ ‰Ã Šä³í ÇÀçÝ ¡‰ô¨àÇ
.‰ô¨àÇ ‰ã òûí¢ãà ëªèôè ¼° á³ýàªé ‰ô¨àÇ
ˆàÅ ¬íѪØéàà ŠÖÇÑèÝ¼Ç Ñã³àÇ ¬àªØ› •
¬Úªã£ ‰ô¨è ¼Ã È„í ¡‰ßãã ûô ˆÕÞÃ
.¬àí°Ø ¬íä㢠ÊÇÑèýà ÓÃÑàÇ
¬ãªèàÇ ªçè³£ ˆàÅ ¬íѪØéàÇ áÕè ü°£ •
‰ã ¬àãªß ÊÇÑ°û Ë‚ê °Ã ‰íèÑ°û û³é
.‰ô¨àÇ –ÇÑÝÅ/‰ô¨àÇ
‰ô¨àÇ ‰ã ¬ÛÑªÝ ¬íѪØéàÇ Êäªß ÇÀÅ •
áÕè Éûã ‰ô¨àÇ Ïѽè£í ü°£Ý ¡ªðãªãè
ÓÃÑàÇ ¬Úªã£ ‰ô¨à ʪڪ£ Ë‚ê ˆàÅ
.ð‚ãªß ªäðô¨
ÓÃÑàÇ ¬Úªã£ ‰ÇÑÞÅ -2
ŠÆª´àèàÇ ‰ÇÑÞ›Ç
¾è ¡¾Çûùè£¼Ç ¬à°ç£ ‰ã Ñéßà ÑûÞ ÑíÝ°èà
‰ÇÑÞ›Ç ¬ýíÿ°é ÓÃÑàÇ ¬Úªã£ ûí°¢è
ŠÝ ÓÃÑàÇ ¬Úªã£ ‰°ßè Ëíôé ¡ŠÆª´àèàÇ
ÉÑãàà ªçàí½¨è ûäÚ á³ýàªé ‰ÇÑÞ›Ç œÖ°
‰°ààªé [2] ѨÄãàÇ Á°Ö »ã°í.ˆà°€Ç
Œªã£ ‰ßãí° áûªéèàªé ÏÑ¢€Ç° Ñãô€Ç
ÊÇ°ØùàÇ œéèÇ.¬³ýèÑãàÇ Êªã½äàÇ ‰ã ¬à£à£
:¬ÿô‚ã
¾Çûùè£¼Ç ÊÇûª¨ÑÅ" ¾£´àÇ ÉÁÇÑÞ ˆ„Ñíõ
áéÞ "û°ûôãàÇ ‰ªãÖàÇ" ¾£´àÇ° "‰ãŸÇ
.ÓÃÑàÇ ¬Úªã£ ¾Çûùè£Ç
¬ãû´ã
ÓÃÑàÇ ¬Úªã£ îèäã ÁÇѨ ¸Ñªíèù¼ ÇðÑߨ
¬ßѨ ‰ã SH240 Bluetooth®
ÇÀå ¾ûùè£ãàÇ áíàû ¾û´í .SouthWing
ÇÀå ¾Çûù裼 ¬ã¢‚àÇ Êªã°à³ãàÇ ¬Ýªß
¬Ýªß ˆàÚ Ñ°ê³àÇ ‰ßãí.Òé Áªäèڼǰ îèäãàÇ
îèäã á°ô ¬àÕàÇ ÊÇÀ ʪã°à³ãàÇ
¾ÚûàÇ ¾£Þ á‚ù ‰ã SouthWing
:ªäé ¥ªùàÇ Èí°àÇ œÞ°ã ˆàÚ û°„°ãàÇ
www.southwing.com
¬à„£ã ¬íѪ„è ¬ã‚Ú Bluetooth û³èõ
.Bluetooth SIG, Inc ¬ßÑ¨à ¬ß°àãã
¬ÕøùÑã° ¬íßíÑã€Ç ÉûôèãàÇ Êªí¼°àªé
.SouthWing ¬ßѨà
ÓÃÑàÇ ¬Úªã£ ‰ô¨ -1
¬Úªã£ ¬íѪØé ‰ô¨ ¸íàÚ ‰í³èí
ÊÇ°ØùàÇ œéèÇ ¡¸àÀé ¾ªí´àà° .ÓÃÑàÇ
:¬íàªèàÇ
ŠÆªéÑçßàÇ ÑªíèàÇ ÑûÕã áÕ° -1
.ŠÆªéÑçß Ñªíè Àù¤ãé
ŠÝ ѪíèàÇ ÑûÕã áÕ°ã áªùû¦é ¾Þ -2
á°ôèí£ .[1] USB ‰ô¨ Óé´ã
Ñãô€Ç ‰°ààÇ ˆàÅ [2] ѨÄãàÇ ÍªéÕã
¬íѪØé ‰ô¨ ¬íàãÚ ÁÇÑ„Å ˆàÅ ÉѪ¨‡à
.ÓÃÑàÇ ¬Úªã£