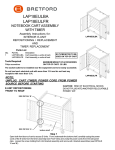
1
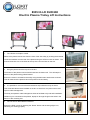
8935 HI-LO DUO 680
Electric Plasma Trolley Lift Instructions
1.
The Hilo duo is simple to install.
Remove the plasma mount bars from the front of the duo trolley by undoing the brackets.
Locate the brackets onto the rear of the plasma using the VESA mounts as shown. The
mounts locate into one of the holes at the top of the unit and also on the slot.
2.
Hang the plasma onto the top rail of the duo.
The bottom of the plasma mount should locate into the bottom rail. This will stop the
bottom of the plasma being pulled forward.
Ensure the mount is screwed to the trolley using the M6 button head screw as shown.
This will make sure the plasma cannot be pulled of the accidently.
3.
It is possible to mount an electrical extension strip inside the body as shown.
This will enable all the items installed on the duo to work from one power source and
improve cable management.
The body incorporates cable management holes to facilitate a tidy and safe installation.
Cables may be connected to the plasma, laptop etc through the grommet holes in the
bottom of the mounting box.
4.
The unit has an RCD fitted as standard.
Ensure the RCD is reset by pressing the “Reset” button and the orange light is on,
indicating it is working properly.
5.
The height adjustment switch is located on the side of the unit.
Press the up arrow to raise the unit and the down arrow to lower the unit.
6. If the Hi-Lo Duo is fitted with a laptop shelf, unclip the gravity catch to enable the
shelf to swing adjacent to the screen.
The laptop may be used either in front of the unit or behind.
The shelf has a grommet hole which the laptops cables can be passed through, to help
with the cable management.
If the Hi-Lo Duo is fitted with the power bar inside the unit, the laptop may be powered
from there.
7.
The speaker shelves are mounted above the plasma.
The speakers may be mounted on the shelf stuck down with the Velcro provided.