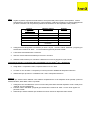
1
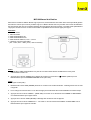
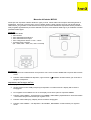
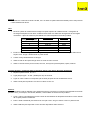
MIP199 User Manual Thank you for purchasing the Logic3 i-Station Studio for use with iPod, the latest in our long and established range of speakers. As with all Logic3 products, the i-Station Studio has been built to the highest manufacturing standards, to bring you the very latest and advanced technology available. This product has been designed specifically to work with iPod and has been certified by Logic3 to meet Apple performance standards. Packaging Contents i-Station Studio Remote Control Power Cable UK Power Cable Euro Line-In cable Adaptor Cradles Power 1. Connect the Power Cable to the AC connection on the back of the MIP199 and to your AC mains power socket. 2. Press the POWER button on the top of the unit or the ‘I/ the unit ON / OFF. POWER’ button on the remote control to switch Set Clock 1. Switch the unit OFF 2. Press and hold the TIME button on the unit , the hours display will begin to flash 3. Press the PRESET button to switch between 12 and 24 hours clock mode 4. Press the TUNING + or - buttons on the unit or the ‘FF/TUNER+’, ‘RW/TUNER-’ buttons on the remote control to adjust the hours. 5. Press the TIME button and the minutes display will begin to flash 6. Press the TUNING + or - buttons on the unit or the ‘FF/TUNER+’, ‘RW/TUNER-’ buttons on the remote control to adjust the minutes 7. Press the TIME button on the unit or the remote control to set the time or if the unit is left idle for 15 seconds the selected time will be set automatically. 8. Press the PRESET button to switch between 12 and 24 hours clock mode Listening to the Radio 1. With the unit switched ON, press the SOURCE button on the unit or remote control to select the FM or AM Radio mode. 2. To manually scan through the radio frequencies, repeatedly press the TUNING + or - buttons on the unit or the ‘RW/TUNER-’, ‘FF/TUNER+’ buttons on the remote control. 3. To automatically scan through the radio frequencies. Press and hold the TUNING + or - buttons on the unit or the ‘RW/TUNER-’, ‘FF/TUNER+’ buttons on the remote control. The scan will automatically stop when a strong signal is found. 4. The display will automatically show the set time if the unit is left idle for 5 seconds, to briefly view the current radio station press the PRESET button on the unit or remote control. Presetting Stations in the Radio Memory The MIP199 can store up to 10FM and 10AM radio stations. 1. Select the frequency you want to store into the memory. 2. Press the ‘MEMORY’ button on the unit or remote control, ‘P01’ will begin to flash on the front display. Press the TUNING + or - buttons on the unit or the ‘RW/TUNER-’, ‘FF/TUNER+’ buttons on the remote control to select between presets ‘P01’ ‘P10’. 3. Press the ‘MEMORY’ button to store the frequency. The display will stop flashing to indicate the frequency is now stored into the memory. 4. Press the SOURCE button to switch to the AM and FM bands and repeat the above procedure to store up to 10AM or 10 FM frequencies into the memory. Recalling Preset Stations 1. Press the ‘SOURCE’ button to select AM Radio or FM Radio. 2. Press and hold the PRESET button for 2 seconds 3. Press the TUNING + or - buttons on the unit or the ‘RW/TUNER-’, ‘FF/TUNER+’ buttons on the remote control to select between the preset frequencies Antenna The unit has a built in FM Antenna, use the aerial wire at the back of the unit for the clearest possible FM signal. iPod 1. Remove the dock blanking plate on the top of the unit. Fit the appropriate dock cradle required for your iPod. The MIP199 is provided with a selection of different universal dock cradles and 1 blanking plate for use with other portable audio devices. Adaptor Cradle Number 3 4 5 6 7 U1 Please use cradle supplied with iPod Please use cradle supplied with iPod iPod Model Capacity iPod mini 4G iPod & U2 iPod 4G iPod iPod Photo iPod Photo Universal blanking plate st iPod nano 1 Gen nd iPod nano 2 Gen th 5 Gen iPod with Video 4GB & 6GB 20GB 40GB 20GB & 30GB 40GB & 60GB 2GB, 4GB & 8GB 30GB, 60GB & 80GB 2. Dock your iPod onto the 30pin dock connection. Press the ‘SOURCE’ button to select the ‘iPod’ function. The iPod symbol will appear on the front display. 3. The iPod will automatically begin to recharge. 4. Use the iPod click wheel to navigate between the iPod menu screens. 5. Use the remote control to control the play/pause, repeat, shuffle functions of the iPod wirelessly. th S-Video / Composite Video connections (iPod 5 Gen / iPod Photo compatible only) 1. Repeat above steps from 1 to 4. 2. Turn ON the “ TV Out ” option on your iPod. 3. Connect a S-Video or Composite cable (not supplied) from the back of the MIP199 to your TV. 4. Use the iPod to playback and view photos or videos on your TV. Aux-In The MIP199 can also be used as a speaker system in conjunction with a number of other portable audio devices such as iPod shuffle, MiniDisc, MP3 Players or Portable CD Players. 1. Connect the included 3.5mm Audio-In cable into the headphone socket of your audio device and to the ‘LINE IN’ connection on the back of the unit. 2. Press the ‘SOURCE’ button to select the ‘AUX’ function. The ‘AUX’ symbol will appear on the front display. 3. You can now use the MIP199 to play sound from your external audio devices. Remote Control Mute Control 1. Press the ‘MUTE’ button on the remote control, the audio music will switch off and the MUTE indicator will appear on the front display. 2. To cancel the Mute function and restore the music press the MUTE button again or press the VOLUME + buttons on the unit or the remote control. The MUTE indicator will disappear. Bass and Treble 1. Press the Bass + or – buttons on the remote control to adjust the bass level of the unit, the bass level ranges from -6 to +6. The Bass level will default to 0 if the power is disconnected. 2. Press the Treble + or – buttons on the remote control to adjust the treble level of the unit, the treble level ranges from -6 to +6. The Treble level will default to 0 if the power is disconnected. Headphone The MIP199 has a line out connection at the back of the unit, to allow you to connect headphones resulting in no audio output from speakers at the front of the unit Note : Always adjust the volume level to the minimum level before connecting your headphones into the system, then adjust the volume level to your preference Dimmer Control The MIP199 has a 4 level dimmer for the front display when the unit is active. To control the brightness of the light press and hold the ‘DIMMER’ button on the remote control. iPod synchronization The MIP199 offers the facility to allow data synchronization to your iPod by using iPod 30pin to USB Cable (not supplied). 1. Connect a iPod 30 pin cable into the 30 pin dock connection port on the back of the MIP199. 2. Connect the USB connector to an available USB port on your PC. 3. The iPod will now be recognized as an external device to allow you to synchronize your iPod Safety information This lighting flash arrow symbol in a triangle alerts users to the presence of non-insulated high voltage within the product's enclosure that present an electrical shock hazard. The exclamation point symbol in a triangle alerts users to the presence of important operating and maintenance instructions in the literature accompanying this product. This device complies with part 15 of the FCC Rules. Operation is subject to the following two conditions: (1) This device may not cause harmful interference, and (2) this device must accept any interference received, including interference that may cause undesired operation. Should you have any connection or setup problems with the Logic3 MIP199 please contact our Technical Support Hotline on +44 01923 471 000– National call rates apply or E-mail [email protected] MIP199 Manuel d’utilisation Merci d’avoir acheté la i-Station Studio Logic3 pour iPod, la toute dernière innovation dans notre importante gamme d’enceintes. Comme pour tous les produits Logic3, la i-Station Studio a été conçue selon les normes de fabrication les plus strictes afin que vous puissiez disposer des technologies les plus récentes. Ce produit a été spécialement conçupour fonctionner avec un iPod et est certifié compatible avec les normes Apple par Logic3. Sommaire i-Station Studio Télécommande Câble d’alimentation UK Câble d’alimentation Euro Câble d’entrée stéréo 3,5 mm – 3,5 mm 5 stations d’accueil universelles (4G – 20Go, 4Go – 40Go, photo, mini & universel) Power 1. Connectez le Câble d’alimentation à la prise de connexion ACà l’arrière du MIP199 et à votre prise d’alimentation secteur AC 2. Appuyez sur le bouton POWER sur le dessus de l’unité ou sur le bouton ‘I/ POWER’ (VEILLE) sur la télécommande pour ALLUMER/ÉTEINDRE l’unité (ON / OFF). Clock 1. Éteignez l’unité (OFF) 2. Maintenez le bouton TIME (HEURE) enfoncé sur l’unité ou sur la télécommande : l’affichage de l’heure se met à clignoter 3. Pour changer le Forma d’Heure 12 ou bien 24 appuyez et maintenez les touches PRESET au même temps 4. Appuyez sur les boutons TUNING+ - (RÉGLAGE) sur l’unité ou sur les boutons FF/TUNER+ et RW/TUNERsur la télécommande pour régler l’heure. 5. Appuyez sur le bouton TIME (HEURE): l’affichage des minutes se met à clignoter. 6. Appuyez sur les boutons TUNING/CH + - sur l’unité ou sur les boutons FF/TUNER+ et RW/TUNER- sur la télécommande pour régler les minutes. 7. Appuyez sur le bouton TIME (HEURE) sur l’unité ou sur la télécommande pour régler l’heure ou laissez l’unité au repos pendant 15 secondes et l’heure sélectionnée sera réglée automatiquement. 8. Pour changer le Forma d’Heure 12 ou bien 24 appuyez et maintenez les touches PRESET au même temps Radio 1. Avec l’unité allumée (ON), appuyez sur le bouton SOURCE sur l’unité ou sur la télécommande pour sélectionner le mode radio FM ou AM. 2. Pour parcourir manuellement les fréquences radio, appuyez à plusieurs reprises sur les boutons TUNING+-(RÉGLAGE) situés sur l’unité ou sur les boutons RW/TUNER+ et FF/TUNER– situés sur la télécommande. 3. Pour parcourir automatiquement les fréquences radio, maintenez enfoncés les boutons TUNING+ (RÉGLAGE) sur l’unité ou les boutons RW/TUNER+ et FF/TUNER– sur la télécommande. La recherche de fréquence s’arrêtera automatiquement lorsqu’un signal fort est perçu. 4. L’écran affichera automatiquement l’heure réglée si vous laissez l’unité au repos pendant 5 secondes. Pour un bref aperçu de la station de radio que vous êtes en train d’écouter, appuyez sur le bouton PRESET (PRÉSÉLECTION) situé sur l’unité ou sur la télécommande. Mémorisation De La Station Radio L’MIP199 peut enregistrer jusqu’à 10 stations radio FM et 10 stations radio AM. 1. Sélectionnez le canal que vous souhaitez mémoriser 2. Appuyez sur le bouton MEMORY (MÉMOIRE) sur l’unité ou la télécommande. P01 se met à clignoter sur l’écran principal. Appuyez sur le bouton TUNING+- (RÉGLAGE) sur l’unité ou sur les boutons RW/TUNER- et FF/TUNER+ sur la télécommande pour présélectionner les stations allant de P01 à P10 3. Appuyez sur la touche « MEMORY » pour enregistrer le canal. L’affichage cesse de clignoter pour indiquer que le canal est maintenant enregistré en mémoire. 4. Appuyez sur le bouton SOURCE pour passer de la bande AM à la bande FM et suivez à nouveau la procédure ci-dessus pour enregistrer jusqu’à 10 fréquences AM ou FM dans la mémoire. Rappeler Les Stations Présélectionnées 1. Appuyez sur le bouton SOURCE pour sélectionner la radio AM ou la radio FM. 2. Maintenez enfoncé le bouton PRESET/DISPLAY pendant 2 secondes. 3. Appuyez sur les boutons TUNING+- (RÉGLAGE) sur l’unité ou sur les boutons RW/TUNER- et FF/TUNER+ sur la télécommande pour choisir parmi les fréquences présélectionnées. Antenna L’appareil est doté d’une antenne FM. Ajustez l’antenne à l’arrière de l’appareil pour obtenir le signal FM le plus clair possible. iPod 1. Retirez le cache de la station d’accueil au sommet du système. Placez le socle d’accueil adapté à votre iPod. L’MIP199 est fournie avec plusieurs socles d’accueil universels et 1 cache pour l’utilisation d’autres appareils audio portables. Numéro de socle d’adaptation 3 4 5 6 7 U1 Modèle d’iPod Capacité Mini iPod iPod 4G et iPod U2 iPod 4G iPod Photo iPod Photo Cache universel 4 Go et 6 Go 20 Go 40 Go 20 Go et 30 Go 40 Go et 60 Go 2. Branchez votre iPod sur la prise d’accueil à 30 broches. Appuyez sur la touche « SOURCE » pour sélectionner la fonction « iPod ». Le symbole iPod s’affiche à l’écran avant. 3. L’iPod se recharge alors automatiquement. 4. Utilisez la roulette de l’iPod pour naviguer dans les menus de l’iPod. 5. Utilisez la télécommande pour utiliser à distance les fonctions lecture/pause, répétition et lecture aléatoire. Connexions S-Vidéo/Vidéo composite (compatibles iPod 5G/iPod Photo uniquement) 1. Répétez les étapes 1 à 4 ci-dessus. 2. Activez l’option “Sortie télévision“ de votre iPod. 3. Connectez un câble S-Video ou composite (non fourni) à l’arrière du MIP199 et raccordez-le à votre téléviseur. 4. Utilisez l’iPod pour regarder vos photos et vos clips vidéo sur votre téléviseur et les écouter. Entrée auxiliaire ’MIP199 peut aussi être utilisée comme système de haut-parleurs associé à plusieurs autres appareils audio portables comme l’iPod Shuffle, le MiniDisc, les lecteurs MP3 ou les lecteurs de CD portables. 1. Branchez le câble d’entrée auxiliaire de 3,5 mm dans la prise écouteurs de votre appareil audio et dans la prise « AUDIO IN » à l’arrière de l’MIP199. 2. Appuyez sur la touche « SOURCE » pour sélectionner la fonction « AUX ». Le symbole « AUX » s’affiche à l’écran avant. 3. Utilisez l’MIP199 pour écouter le contenu de vos appareils audio externes. Remote Control Commande Mute (Silence) (Seulement Sur La Télécommande) 1. Appuyez sur le bouton MUTE (SILENCE) sur la télécommande, le son est coupé et MUTE s’affiche sur l’écran principal. 2. Pour annuler la fonction Mute et rétablir la musique, appuyez à nouveau sur le bouton MUTE ou appuyez sur les boutons VOLUME +- sur l’unité ou VOLUME+ et VOLUME- sur la télécommande. L’affichage MUTE disparaît. Réglage des basses et des aigus 1. Appuyez sur les boutons Bass + ou – de la télécommande pour régler le volume des basses de l’unité, le niveau allant de -6 à +6. Lorsque l’alimentation est coupée, le niveau des basses se règle automatiquement sur 0 par défaut. 2. Appuyez sur les boutons Treble + ou – de la télécommande pour régler le volume des aigus de l’unité, le niveau allant de -6 à +6. Lorsque l’alimentation est coupée, le niveau des basses se règle automatiquement sur 0 par défaut. Écouteurs Le MIP199 possède un port de sortie au dos de l’unité permettant de connecter des écouteurs et par conséquent, ne dispose pas de port pour enceintes à l’avant. Remarque : réglez toujours le niveau de vos écouteurs au minimum avant de les brancher sur l’appareil. Vous pouvez ensuite monter le volume au niveau souhaité. Contrôle de la luminosité MIP199 est dotée d’un écran LCD rétroéclairé. Pour contrôler la luminosité de l’affichage, Maintenez le bouton sur la touche « DIMMER » de la télécommande. iPod synchronisation Le MIP199 vous permet de synchroniser les données avec votre iPod grâce à un câble ‘30pin’ à USB (non fourni). 1. Branchez le cable ‘30pin’ au port de connexion dock à l’arrière de l’MIP199. 2. Branchez la prise USB dans un port USB disponible de votre PC. 3. L’iPod sera désormais reconnu comme périphérique externe, ce qui vous permettra de le synchroniser. Le symbole de la foudre dans un triangle avertit l'utilisateur de la présence de niveaux de tension dans l'appareil qui présentent un risque d'électrocution. Le symbole du point d'exclamation dans un triangle conseille à l'utilisateur de lire toute la documentation jointe au produit pour garantir une sécurité de fonctionnement Ce périphérique est conforme aux normes CE et règles FCC – Part. 15. Son fonctionnement répond aux deux conditions suivantes: (1)Ce périphérique ne cause pas d’interférences gênantes et (2) ce périphérique est tolérant aux interférences reçues, y compris celles pouvant causer un fonctionnement erratique. En cas de problème de connexion ou d’installation du Logic3 MIP199, contactez-nous en composant notre numéro d’assistance technique : +44 01923 471 000 - Coût d’un appel national - ou par e-mail : [email protected] MIP199 User Manual Vielen Dank, dass Sie sich für den Kauf der Logic3 i-Station Studio für iPod, die neuesten Lautsprecher in unserer umfangreichen und beliebten Produktreihe, entschieden haben. Wie bei allen Logic3-Produkten wurden auch bei der Produktion der i-Station Studio die höchsten Ansprüche an eine hochwertige Verarbeitung gestellt, um Ihnen die neueste und fortschrittlichste Technologie bieten zu können. Dieses Produkt wurde speziell für den iPod konzipiert, und Logic3 bescheinigt, dass es die Leistungsstandards von Apple erfüllt. Inhalt i-Station Studio Stromkabel für Großbritannien nach BSI Europäisches Stromkabel Fernbedienung Stereo-Line-In-Kabel mit zwei 3,5-mm-Steckern 5 Universal Dock-Adapter (4G – 20 GB, 4G – 40 GB, Photo, Mini & Universal) Einschalten 1. Stecken Sie Ihr Netzteil in den Stromeingang auf der Rückseite Ihrer MIP199 und in die Steckdose. 2. Drücken Sie die Taste POWER auf der Oberseite Ihres Gerätes oder die Taste ‘I/ Fernbedienung, um es EIN-/AUSZUSCHALTEN POWER’ auf Ihrer Zeit einstellen 1. Schalten Sie das Gerät AUS. 2. Drücken Sie die Taste TIME [ZEIT] am Gerät oder auf der Fernbedienung und halten Sie diese gedrückt. Die Stundenanzeige blinkt auf. 3. Um zwischen 12 oder 24 Stunden Anzeige der Uhr zu wechseln, drücken und halten Sie die PRESET Tasten 4. Drücken Sie die Tasten TUNING +- [ABSTIMMEN] am Gerät oder die Tasten FF/TUNER+, RW/TUNER[VOR/TUNER+, ZURÜCK/TUNER] auf der Fernbedienung, um die Stunden einzustellen 5. Drücken Sie die Taste TIME [ZEIT] Die Minutenanzeige blinkt auf. 6. Drücken Sie die Tasten TUNING+- [ABSTIMMEN] am Gerät oder die Tasten FF/TUNER+, RW/TUNER[VOR/TUNER+, ZURÜCK/TUNER] auf der Fernbedienung, um die Minuten einzustellen 7. Drücken Sie die Taste TIME [ZEIT] am Gerät oder auf der Fernbedienung. Wenn das Gerät 15 Sekunden lang inaktiv ist, wird die ausgewählte Zeit automatisch eingestellt. 8. Um zwischen 12 oder 24 Stunden Anzeige der Uhr zu wechseln, drücken und halten Sie die PRESET Tasten Radio 1. Im eingeschalteten Zustand können Sie den FM- oder AM-Radiomodus durch Drücken der Taste SOURCE [QUELLE] auswählen. 2. Drücken Sie die Tasten TUNING+- [ABSTIMMEN] am Gerät oder die Tasten FF/TUNER+, RW/TUNER[VOR/TUNER+, ZURÜCK/TUNER] auf der Fernbedienung, um einen manuellen Sendersuchlauf zu starten. 3. Zum automatischen Sendersuchlauf. Drücken Sie die Tasten TUNING +- [ABSTIMMEN] am Gerät oder die Tasten FF/TUNER+, RW/TUNER- [VOR/TUNER+, ZURÜCK/TUNER] auf der Fernbedienung. Bei gutem Empfang wird der Suchlauf automatisch angehalten. 4. Wenn das Gerät fünf Sekunden inaktiv ist, wird die eingestellte Zeit auf dem Display automatisch angezeigt. Drücken Sie die Taste PRESET [VOREINSTELLEN] am Gerät oder auf der Fernbedienung, um sich den aktuellen Radiosender anzeigen zu lassen. Radiosender speichern Die MIP199 kann bis zu 10 FM und 10 AM Radiosender speichern. 1. Wählen Sie den Radiosender aus, den Sie speichern möchten. 2. Drücken Sie die Taste MEMORY [SPEICHER] am Gerät oder auf der Fernbedienung. P01 blinkt auf dem Front-Display auf. Drücken Sie die Taste TUNING +- [ABSTIMMEN] am Gerät oder die Tasten FF/TUNER+, RW/TUNER- [VOR/TUNER+, ZURÜCK/TUNER] auf der Fernbedienung, um zwischen den Voreinstellungen P01 P10 auszuwählen. 3. Drücken Sie den „MEMORY”-Knopf, um den Sender zu speichern. Sobald die Anzeige aufhört zu blinken, ist der Radiosender gespeichert. 4. Drücken Sie die Taste SOURCE [QUELLE], um zwischen AM- und FM-Band auszuwählen und wiederholen Sie die oben genannten Schritte, um bis zu zehn AM- oder zehn FM-Frequenzen im Speicher abzulegen. Gespeicherte Sender abrufen 1. Drücken Sie die Taste SOURCE [QUELLE], um zwischen AM- oder FM-Radio auszuwählen. 2. Drücken Sie die Taste PRESET [VOREINSTELLEN] und halten Sie diese zwei Sekunden gedrückt. 3. Drücken Sie die Taste TUNING+- [ABSTIMMEN] am Gerät oder die Tasten FF/TUNER+, RW/TUNER[VOR/TUNER+, ZURÜCK/TUNER] auf der Fernbedienung, um zwischen den voreingestellten Frequenzen auszuwählen. Antenne Richten Sie die Antenne auf der Geräterückseite aus, damit Sie ein möglichst rauscharmes FM-Signal erhalten. iPod 1. Entfernen Sie den Docking-Verschlussstreifen an der Oberseite des Gerätes. Stecken Sie die für Ihren iPod passenden Dock Adapter auf. Eine Auswahl verschiedener Universal Dock Adapter und ein Verschlussstreifen für andere Musikabspielgeräte liegen der MIP199 bei. Adapter Nummer 3 4 5 6 7 U1 iPod Model iPod mini 4G iPod & U2 iPod 4G iPod iPod Photo iPod Photo Universal blanking plate Kapazität 4GB & 6GB 20GB 40GB 20GB & 30GB 40GB & 60GB 2. Setzen Sie den iPod in die 30pin-Dockingstation ein. Drücken Sie den „SOURCE”-Knopf und wählen Sie iPod. Das iPod-Symbol erscheint auf der Anzeige des Gerätes. 3. Der iPod lädt sich nun automatisch auf. 4. Benutzen Sie das iPod Click Wheel, um durch die Menüs des iPod zu navigieren. 5. Benutzen Sie die Fernbedienung um Abspielen/Pause, Wiederholen oder die zufällige Wiederholung einzustellen. S-Video-/Composite-Video-Anschluss (nur kompatibel mit iPod (5. Generation)/iPod Photo) 1. Wiederholen Sie die oben stehenden Schritte ab 1 bis 4. 2. Aktivieren Sie die Option “TV-Ausgang ” Ihres iPod. 3. Schließen Sie ein S-Video oder Composite-Video-Kabel (nicht mitgeliefert) von der Rückseite des MIP199 an Ihr Fernsehgerät an. 4. Schauen Sie mit Ihrem iPod Fotos oder Videos auf Ihrem Fernseher an. Audio Die MIP199 lässt sich ebenfalls als Lautsprechersystem mit vielen anderen mobilen Musikabspielgeräten wie dem iPod Shuffle, MiniDisc, MP3-Spielern und tragbaren CD-Spielern benutzen. 1. Stecken Sie das beiliegende 3,5 mm AUDIO-IN Kabel in den Kopfhöreranschluss Ihres Musikabspielgerätes ein und verbinden Sie es mit dem „AUX IN“-Anschluss an der Rückseite der MIP199. 2. Drücken Sie den „SOURCE”-Knopf um die „AUX”-Funktion einzustellen. Das „AUX“-Symbol erscheint auf der Leuchtanzeige. 3. Spielen Sie nun über die MIP199 Musik Ihrer externen Musikabspielgeräte ab. Fernbedienung Stummschaltung (nur bei Fernbedienung) 1. Drücken Sie die Taste MUTE [STUMM] auf der Fernbedienung. Die Musik schaltet sich aus und auf dem Front-Display wird MUTE [STUMM] angezeigt. 2. Drücken Sie die Taste MUTE [STUMM] erneut oder drücken Sie die Tasten VOLUME +- [LAUTSTÄRKE] am Gerät oder VOLUME+ , VOLUME- [LAUTSTÄRKE+, LAUTSTÄRKE-] auf der Fernbedienung, um die Stummschaltung zu unterbrechen und die Musik wieder abzuspielen. Die Anzeige MUTE [STUMM] erlischt. Bässe und Höhen 1. Drücken Sie auf der Fernbedienung die Bass-Tasten + oder –, um den Basspegel des Geräts anzupassen. Der Basspegel reicht von -6 bis +6. Der Basspegel wird standardmäßig auf 0 zurückgesetzt, wenn der Strom unterbrochen wird. 2. Drücken Sie auf der Fernbedienung die Höhen-Tasten + oder -, um den Höhenpegel des Geräts anzupassen. Der Höhenpegel reicht von -6 bis +6. Der Höhenpegel wird standardmäßig auf 0 zurückgesetzt, wenn der Strom unterbrochen wird. Kopfhörer An der Rückseite der MIP199 befindet sich eine Line-Out-Buchse. Wenn Sie einen Kopfhörer an diese Buchse anschließen, werden die Lautsprecher an der Vorderseite des Geräts deaktiviert. Hinweis: Stellen Sie die Lautstärke immer auf den Minimalpegel ein, bevor Sie den Kopfhörer an das System anschließen. Stellen Sie den Pegel erst danach wie gewünscht ein. Dimmer Die MIP199 verfügt über eine LCD Hintergrundbeleichtung, wenn das Gerät angeschaltet ist. Um die Helligkeit einzustellen, Drücken Sie die Taste den „DIMMER“ iPod synchronisieren Die MIP199 ermöglicht mit Hilfe eines iPod 30 Pin zu USB Kabels (nicht im Lieferumfang enthalten) eine Datensynchronisierung Ihres iPods. 1. Stecken Sie das iPod 30Pin Kabel in den 30Pin Port an der Rückseite Ihrer MIP199. 2. Stecken Sie das USB-Kabel in den USB-Port an Ihrem PC ein. 3. Der iPod wird nun als externes Gerät erkannt und ist zum Synchronisieren bereit. Dieser in einem Dreieck dargestellte Blitz warnt Anwender vor nicht isolierter Hochspannung, die innerhalb des Produktgehäuses auftritt und die Gefahr eines Stromschlags birgt. Das in einem Dreieck dargestellte Ausrufezeichen macht Anwender auf wichtige Betriebs- und Wartungsanweisungen in der Dokumentation des Produkts aufmerksam. Dieses Gerät entspricht dem Teilabschnitt 15 der FCC-Regeln. Die Inbetriebnahme hängt von den folgenden zwei Bedingungen ab: (1) Dieses Gerät darf keine schädlichen Störungen verursachen. (2) Dieses Gerät muss empfangene Störungen zulassen, auch wenn diese zu unerwünschtem Betrieb führen. Bei Problemen beim Anschließen oder Einrichten der Logic3 MIP199 setzen Sie sich bitte unter +44 01923 471 000 mit unserem technischen Support in Verbindung (Telefongebühren fallen an), oder schicken Sie uns eine E-Mail an [email protected] . Manuale dell’utente MIP199 Grazie per aver acquistato i-Station Studio di Logic3 per iPod, l’ultimo della nostra ampia e affermata gamma di amplificatori. Come tutti i prodotti Logic3, anche l’i-Station Studio è stato costruito secondo i più alti standard di fabbricazione, per garantire ai nostri clienti la tecnologia più avanzata attualmente disponibile. Questo prodotto è stato progettato appositamente per essere utilizzato con l’iPod, ed è certificato dalla Logic 3 per soddisfare i livelli di prestazione della Apple. Contenuti i-Station Studio Telecomando Cavo alimentazione britannico Cavo alimentazione europeo Cavo collegamento stereo 3.5 mm - 3.5mm 5 sostegni dock universali (4G – 20Gb, 4Gb – 40Gb, foto, mini e universal) Accensione 1. Collegare il Cavo alimentazione fra la presa AC che si trova sul retro dell’MIP199 e la presa della corrente di rete 2. Premere il tasto POWER sul dispositivo, oppure il tasto “I/ spegnere il dispositivo. POWER” del telecomando, per accendere o Impostazione dell’orologio / dell’ora 1. Spegnere il dispositivo. 2. Tenere premuto il tasto TIME [ora/riposo] sul dispositivo o sul telecomando: il display dell’ora inizia a lampeggiare 3. Per scegliere tra la modalità 12 o 24 ore sul display orario tenere premuto il pulsante PREST 4. Premere i tasti TUNING +- sul dispositivo o FF/TUNER+, RW/TUNER- [rispettivamente: sintonizza indietro - sintonizza avanti] sul telecomando per regolare le ore 5. Premere il tasto TIME [ora]: il display dei minuti inizia a lampeggiare 6. Premere i tasti TUNING +- sul dispositivo o FF/TUNER+, RW/TUNER- sul telecomando per regolare i minuti 7. Premere nuovamente il tasto TIME [ora] del dispositivo o del telecomando, per impostare l’ora. Se il dispositivo resta inattivo per 15 secondi, l’ora selezionata si imposta automaticamente. 8. Per scegliere tra la modalità 12 o 24 ore sul display orario tenere premuto il pulsante PREST Radio 1. Quando il dispositivo è acceso, premere il tasto SOURCE [sorgente] sul dispositivo stesso o sul telecomando per selezionare la modalità di radio FM o AM. 2. Per scorrere manualmente fra le frequenze radio, premere i tasti TUNING+- [sintonizzazione/canale] sul dispositivo o FF/TUNER+, RW/TUNER- [rispettivamente: sintonizza indietro - sintonizza avanti] del telecomando. 3. Per scorrere automaticamente fra le frequenze radio, tenere premuti i tasti TUNING+[sintonizzazione/canale] sul dispositivo o FF/TUNER+, RW/TUNER- [rispettivamente: sintonizza indietro sintonizza avanti] del telecomando. Lo scorrimento delle frequenze si arresta automaticamente non appena viene captato un segnale forte. 4. Il display mostra automaticamente l’ora selezionata se lasciato inattivo per 5 secondi. Per visualizzare brevemente la stazione radio, premere il tasto di PRESET sul dispositivo o sul telecomando. Salvataggio delle stazioni radio nella memoria L’MIP199 può memorizzare un massimo di 10 frequenze FM e 10 frequenze AM. 1. Selezionare il canale che si desidera memorizzare. 2. Premere il tasto MEMORY [memoria] sul dispositivo o sul telecomando: P01 inizia a lampeggiare sul display frontale. Premere il tasto TUNING +- [sintonizzazione/canale] dal dispositivo o i tasti RW/TUNER-, FF/TUNER+ [rispettivamente: sintonizza indietro - sintonizza avanti] dal telecomando per effettuare la propria selezione fra P01 e P10. 3. Premere il tasto “MEMORY” (memori) per salvare il canale. Il display smette di lampeggiare, indicando che il canale è stato memorizzato. 4. Premere il tasto SOURCE [sorgente] per passare fra la banda AM e la banda FM, e ripetere la procedura descritta sopra per salvare fino a 10 frequenze per banda nella memoria del dispositivo. Sintonizzazione su stazioni preimpostate 1. Premere il tasto SOURCE [sorgente] per selezionare la radio AM o la radio FM. 2. Tenere premuto il tasto PRESET per 2 secondi 3. Premere i tasti TUNING+- [sintonizzazionee] del dispositivo o i tasti RW/TUNER-, FF/TUNER+ [rispettivamente: sintonizza indietro - sintonizza avanti] del telecomando per selezionare una delle frequenze pre-impostate Antenna Il dispositivo è dotato di antenna FM. Regolare l’antenna, situata sul retro dell’apparecchio, per ottenere il segnale radio migliore. iPod 1. Togliere la piastra di protezione della stazione dock posta sulla parte superiore del dispositivo. Inserire l’alloggiamento dock più adatto all’iPod in vostro possesso. L’MIP199 è dotato di una serie di alloggiamenti per dock universale e di una piastra di protezione da utilizzare con altri dispositivi audio portatili. Numero alloggiamenti adattatore 3 4 5 6 7 U1 Modello di iPod Potenza iPod mini iPod 4G e iPod U2 iPod 4G iPod photo iPod photo Piastra di protezione universale 4GB & 6GB 20GB 40GB 20GB & 30GB 40GB & 60GB 2. Collegare l’iPod nell’apposita connessione per dock a 30 poli. Premere il tasto “SOURCE” (sorgente) per selezionare la funzione di “iPod”. L’icona dell’iPod appare sul pannello frontale 3. L’iPod inizia automaticamente a ricaricarsi. 4. Usare la ruota di selezione dell’iPod per scorrere i vari menu. 5. Utilizzare il telecomando per controllare a distanza le funzioni di play/pause, ripeti, shuffle. a Collegamenti S-Video / Composite Video (compatibili solo con iPod 5 gen. / iPod Photo) 1. Ripeti le istruzioni da 1 a 4. 2. Scegli Video > Impostazioni video, imposta Uscita TV su Sì in iPod. 3. Connetti un cavo S-Video o Composite (non fornito) dal retro dell’MIP199 all'impianto televisivo. 4. Utilizza iPod per riprodurre o visualizzare foto o video sull’impianto televisivo. Audio In L’MIP199 può essere inoltre utilizzato come sistema d’amplificazione di vari dispositivi audio portatili, quali iPod Shuffle, MiniDisc, lettori MP3 o lettori cd portatili. 1. Collegare il cavo di AUDIO-IN di 3,5 mm incluso nella presa delle cuffie del dispositivo audio e nella presa “AUX-IN” sul retro dell’MIP199. 2. Premere il tasto “SOURCE” (sorgente) per selezionare la funzione di “AUX”. L’icona “AUX” appare sul pannello frontale. 3. L’MIP199 può essere utilizzato per ascoltare la musica caricata su dispositivi audio esterni. Telecomando Comando Di Muto (Solo Sul Telecomando) 1. Premere il tasto MUTE [muto] sul telecomando: la musica si spegne e l’indicatore MUTE appare sul display frontale. 2. Per annullare la funzione di muto e ripristinare la musica, premere nuovamente il tasto MUTE [muto] o premere i tasti VOLUME +- del dispositivo o quelli VOLUME +, VOLUME - sul telecomando. L’indicatore MUTE [muto] scompare. Controlli Bass e Treble 1. Premi i pulsanti Bass (+) oppure (-) sul telecomando per modificare il livello di uscita del dispositivo da un minimo di -6 ad un massimo di +6. Il livello di default è 0 se il dispositivo è spento. 2. Premi i pulsanti Treble (+) oppure (-) sul telecomando per modificare il livello di uscita del dispositivo da un minimo di -6 ad un massimo di +6. Il livello di default è 0 se il dispositivo è spento. Cuffie L’MIP199 possiede un'uscita di collegamento sul retro del dispositivo per permettere di collegare le cuffie: quando le cuffie sono collegate, non esce alcun suono dagli altoparlanti del dispositivo stesso. Nota: regolare sempre il volume al minimo prima di collegare le cuffie al sistema, ed effettuare solo successivamente la regolazione in base alle proprie preferenze. Variatore di luminosita L’MIP199 è dotato di LCD a retroilluminazione, in funzione quando il dispositivo è attivo. Tenere premuto “DIMMER” (regola luminosità). iPod sincronizzazione L’MIP199 offre la possibilità di sincronizzare i dati con l’iPod mediante un cavo USB – 30pin dotazione). (non in 1. Collegare la 30pin nella porta “30pin” sul retro dell’MIP199. 2. Collegare la spina USB ad una porta omonima del PC. 3. L’iPod viene riconosciuto come dispositivo esterno e può essere sincronizzato. Questo fulmine inserito in un triangolo avverte della presenza di cavi ad alto voltaggio non isolati all'interno del prodotto che potrebbero causare shock elettrici. Questo punto esclamativo inserito in un triangolo avverte della presenza di importanti istruzioni operative e di manutenzione nella documentazione che accompagna questo prodotto. Questo dispositivo è conforme alla parte 15 delle regolamentazioni FCC. L'operatività è soggetta alle seguenti condizioni: (1) Questo dispositivo non deve causare interferenze pericolose, e (2) questo dispositivo deve accettare qualsiasi interferenza in entrata, incluse quelle che possono causare malfunzionamenti. Per eventuali problemi di connessione o installazione del Logic3 MIP199 contattare il nostro Supporto Clienti al numero +44 01923 471 000 – Si applicano le tariffe di chiamata nazionali. Oppure scrivere a: [email protected] Manual del usuario de la MIP199 Le agradecemos que haya adquirido la Logic3 i-Station Studio para utilizarla con su iPod, lo último en nuestra amplia gama establecida de altavoces. Como sucede con el resto de nuestros productos Logic3, la i-Station Studio se ha fabricado siguiendo las normas de fabricación más exigentes, para poder proporcionarle la tecnología más avanzada y más actual disponible. Este producto se ha diseñado específicamente para funcionar con el iPod y ha sido certificado por Logic3 para cumplir las normas de rendimiento de Apple. Contenido i-Station Studio Mando a distancia Cable de alimentación BSI Reino Unido Cable de alimentación Europa Cable de entrada estéreo 3,5 mm a 3,5 mm 5 bases de acoplamiento universal (4G – 20Gb, 4Gb – 40Gb, photo, mini y Universal) Encendido 1. Conecte el Cable de alimentación a la conexión AC de la parte posterior de la MIP199 y a la toma de red para suministro de CA. 2. Pulse el botón POWER de la parte superior de la unidad o el botón ‘I/ para encender/apagar la unidad. POWER’ del mando a distancia Ajustar Reloj / Hora 1. Apague la unidad. 2. Mantenga pulsado el botón TIME [HORA/] de la unidad o del mando a distancia, el indicador de las horas comenzará a parpadear 3. Para cambiar entre modo 12 y 24 horas en el reloj, pulse y mantenga pulsados los botones PRESET/DISPLAY 4. Pulse los botones TUNING +-[SINTONIZACIÓN] de la unidad o los botones ‘FF/TUNER+’ [AVANCE RÁPIDO/SINTONIZADOR+], ‘RW/TUNER-’ [RETROCESO/SINTONIZADOR-] del mando a distancia para ajustar la hora. 5. Pulse el botón TIME [HORA] y el indicador de los minutos comenzará a parpadear 6. Pulse los botones TUNING +- [SINTONIZACIÓN] de la unidad o los botones ‘FF/TUNER+’[AVANCE RÁPIDO/SINTONIZADOR+], ‘RW/TUNER-’ [RETROCESO/SINTONIZADOR-] del mando a distancia para ajustar los minutos 7. Pulse el botón TIME [HORA] de la unidad o del mando a distancia para ajustar la hora o si la unidad está inactiva durante 15 segundos la hora seleccionada se establecerá automáticamente. 8. Para cambiar entre modo 12 y 24 horas en el reloj, pulse y mantenga pulsados los botones PRESET Radio 1. Pulse el botón “SOURCE” en la unidad o el mando a distancia para seleccionar entre FM o AM. Con la unidad encendida, pulse el botón SOURCE [FUENTE] de la unidad o del mando a distancia para seleccionar el modo de Radio FM o AM 2. Para explorar manualmente las frecuencias de radio, pulse repetidamente los botones TUNING+[SINTONIZACIÓN] de la unidad o los botones ‘RW/TUNER+’ [RETROCESO/SINTONIZADOR-], ‘FF/TUNER–’ [AVANCE RÁPIDO/SINTONIZADOR+] del mando a distancia.. 3. Para explorar automáticamente las frecuencias de radio, mantenga pulsados los botones TUNING+[SINTONIZACIÓN] de la unidad o los botones ‘RW/TUNER+’ [RETROCESO/SINTONIZADOR-], ‘FF/TUNER–’ [AVANCE RÁPIDO/SINTONIZADOR+] del mando a distancia. La exploración se detendrá automáticamente cuando se encuentre una señal fuerte. 4. La pantalla mostrará automáticamente la hora establecida si la unidad está inactiva durante 5 segundos, para ver brevemente la emisora de radio actual pulse el botón. Guardar La Estación De Radio En La Memoria La MIP199 puede almacenar hasta 10 estaciones FM y 10 estaciones AM 1. Seleccione el canal que quiere guardar en la memoria. 2. Pulse el botón ‘MEMORY’ [MEMORIA] de la unidad o del mando a distancia, ‘P01’ comenzará a parpadear en la pantalla frontal. Pulse el botón TUNING+- [SINTONIZACIÓN] en la unidad o los botones ‘RW/TUNER-’ [RETROCESO/SINTONIZADOR-], ‘FF/TUNER+’ [AVANCE RÁPIDO/SINTONIZADOR+] del mando a distancia para seleccionar entre las presintonías ‘P01’ ‘P10’ 3. Pulse el botón “MEMORY” para guardar el canal. La pantalla dejará de parpadear para indicar que el canal se encuentra ahora almacenado en la memoria 4. Pulse el botón SOURCE [FUENTE] para cambiar entre las bandas AM y FM y repita el procedimiento anterior para almacenar hasta 10 frecuencias AM y 10 frecuencias FM en la memoria. Selección De Emisoras Presintonizadas 1. Pulse el botón ‘SOURCE’ [FUENTE] para seleccionar Radio AM o Radio FM. 2. Mantenga pulsado el botón PRESET [PRESINTONÍA] durante 2 segundos. 3. Pulse los botones TUNING+- [SINTONIZACIÓN] de la unidad o los botones ‘RW/TUNER-’ [RETROCESO/SINTONIZADOR-], ‘FF/TUNER+’ [AVANCE RÁPIDO/SINTONIZADOR+] del mando a distancia para seleccionar entre las frecuencias presintonizadas. Antenna Ajuste la antena en la parte trasera de la unidad para obtener la señal FM más clara posible. iPod 1. Extraiga la placa de protección de la base de conexión en la parte superior de la unidad. Ajuste la base dock adecuada para su iPod. La MIP199 dispone de una selección de bases dock universales diferentes y una placa de protección para utilizar con otros dispositivos de audio portátiles. Número de la base del adaptador 3 4 5 6 7 U1 Modelo iPod Capacidad iPod mini 4G iPod & U2 iPod 4G iPod iPod Photo iPod Photo Placa de protección Universal 4GB & 6GB 20GB 40GB 20GB & 30GB 40GB & 60GB 2. Conecte su iPod al conector de 30 pin. Pulse el botón “SOURCE” para seleccionar la función iPod. El símbolo de iPod aparecerá en la pantalla. 3. El iPod comenzará a cargarse automáticamente. 4. Utilice la rueda de clic para navegar por las pantallas del menú de iPod. 5. Utilice el mando a distancia para controlar las funciones de reproducción/pausa, repetir, orden aleatorio de forma inalámbrica. Conexiones S-Vídeo/vídeo compuesto (sólo compatibles con dispositivos iPod de quinta generación o iPod Photo) 1. Repita los pasos indicados en los puntos 1 a 4. 2. Active la opción “Salida TV” del iPod. 3. Conecte la parte posterior del MIP199 al televisor con un cable S-Vídeo o compuesto (no incluido). 4. Utilice el iPod para ver vídeos o fotografías en el televisor. Entrada Audio La MIP199 se puede utilizar también como sistema de altavoces junto con otro tipo de dispositivos de audio como iPod shuffle, MiniDisc, Reproductores MP3 o Reproductores de CD portátiles. 1. Conecte el cable de entrada auxiliar de 3,5 mm, que se adjunta, en la ranura para auriculares de su dispositivo de audio y en la ranura “AUDIO IN” en la parte posterior de la MIP199. 2. Pulse el botón “SOURCE” para seleccionar la función “AUX”. El símbolo “AUX” aparecerá en la pantalla. 3. Utilice la MIP199 para reproducir el sonido desde su dispositivo de audio externo. Remote Control Silenciamiento (Solo Mando A Distancia) 1. Pulse el botón ‘MUTE’ [SILENCIAMIENTO] del mando a distancia, la música se apagará y el indicador MUTE aparecerá en la pantalla frontal. 2. Para cancelar la función Mute y restablecer la música pulse el botón MUTE [SILENCIAMIENTO] de nuevo o pulse los botones VOLUME +- [VOLUMEN] de la unidad o ‘VOLUME+’ [MÁS VOLUMEN], ‘VOLUME‘[MENOS VOLUMEN] del mando a distancia. El indicador MUTE desaparecerá. Graves y agudos 1. El nivel de graves y agudos se regula con el mando a distancia. Para ajustar los graves, pulse los botones de control de graves + o – (los niveles oscilan de -6 a +6 y el valor vuelve a cero si la unidad está apagada). 2. Para ajustar el nivel de agudos, pulse los botones de control de agudos + o – (los niveles oscilan de -6 a +6 y el valor vuelve a cero si la unidad está apagada). Auriculares Los auriculares se conectan a la salida de línea situada en la parte posterior del MIP199. Al conectarlos, se silenciarán los altavoces de la parte frontal de la unidad. Nota: Antes de conectar los auriculares al sistema, se recomienda bajar el volumen al mínimo. Una vez conectados, podrá regularlos como desee. Control De Iluminación La MIP199 dispone de retroiluminación LCD cuando la unidad está en activo. Mantenga pulsado el botón “DIMMER”. iPod Sincronización La MIP199 ofrece la capacidad de permitir la sincronización de datos a su iPod utilizando un cable 30pin para USB (no suministrado). 1. Conecte la 30pin en el puerto 30pin de la parte posterior de la MIP199. 2. Conecte la conexión USB a un puerto USB disponible de su ordenador. 3. El iPod será reconocido ahora como un dispositivo externo que le permitirá sincronizar el iPod. Este símbolo del relámpago en un triángulo alerta a los usuarios de la presencia de alto voltaje no aislado en el interior del producto que presenta un riesgo de descarga eléctrica. El símbolo de exclamación en un triángulo alerta a los usuarios de la presencia de instrucciones importantes de funcionamiento y mantenimiento en la documentación que acompaña a este producto. Este dispositivo cumple con el apartado 15 de las normas de la FCC. Su funcionamiento está sujeto a las dos condiciones siguientes: (1) este dispositivo no debería causar interferencias nocivas y (2) este dispositivo debe aceptar cualquier interferencia que reciba, incluidas las interferencias que puedan causar un funcionamiento no deseado. Si tiene problemas de conexión o instalación con el Logic3 MIP199 contacte con nuestra línea de atención técnica a través del +44 01923 471 000 (tarifa de llamada internacional) o mediante correo electrónico: [email protected] MIP199 Manual de utilizador Obrigado por ter adquirido o i-Station Studio da Logic3 para utilização com o iPod, o mais recente da nossa variada gama de altifalantes. Como todos os produtos da Logic3, o i-Station Studio foi produzido de acordo com os padrões de fabrico mais elevados, disponibilizando a tecnologia mais recente e mais avançada. Este produto foi concebido especificamente para trabalhar com o iPod e foi certificado pela Logic3 para corresponder às normas de desempenho Apple. Conteúdo i-Station Studio Controlo Remoto Cabo de alimentação RU BSI Cabo de alimentação Euro Cabo de Line in estéreo de 3,5 mm a 3,5 mm 5 carregadores de dock universais (4G – 20Gb, 4Gb – 40Gb, fotos, mini e universal) Alimentação 1. Ligue o Cabo de alimentação à ligação ‘AC na traseira do MIP199 e à sua tomada de corrente eléctrica. 2. Prima o botão POWER no topo da unidade ou o botão do o botão ‘I/ ON / OFF [LIGAR/DESLIGAR] a unidade. POWER’ no controlo remoto para Configuração Do Relógio/Hora 1. Desligue a unidade 2. Prima e mantenha premido o botão TIME [HORA] na unidade ou no controlo remoto, a hora começa a piscar 3. Para alterar o modo como as horas são apresentadas no ecrã, 12 ou 24 Horas, pressione os botões PRESET 4. Prima os botões TUNING +- [SINTONIZAR]na unidade ou ‘FF/TUNER+’, ‘RW/TUNER-’ [AVANÇAR RÁPIDO/SINTONIZAR+ RETROCEDER/SINTONIZAR -] no controlo remoto para ajustar a hora. 5. Prima o botão TIME [HORA] e os minutos começam a piscar 6. Prima os botões TUNING +- [SINTONIZAR] na unidade ou ‘FF/TUNER+’, ‘RW/TUNER-’ [AVANÇAR RÁPIDO/SINTONIZAR+ RETROCEDER/SINTONIZAR -] no controlo remoto para ajustar os minutos 7. Prima o botão TIME [HORA] na unidade ou no controlo remoto para guardar a hora ou se a unidade for deixada inactiva durante 15 segundos a hora seleccionada será guardada automaticamente. 8. Para alterar o modo como as horas são apresentadas no ecrã, 12 ou 24 Horas, pressione os botões PRESET Radio 1. Com a unidade ligada, prima o botão SOURCE [ORIGEM] na unidade ou controlo remoto para seleccionar as funções de rádio FM ou AM. 2. Para procurar manualmente pelas frequências de rádio, prima repetidamente os botões TUNING+[SINTONIZAR] na unidade ou ‘RW/TUNER+’, ‘FF/TUNER-’ [AVANÇAR RÁPIDO/SINTONIZAR+ RETROCEDER/SINTONIZAR -] no controlo remoto. 3. Para procurar automaticamente pelas frequências de rádio. Prima e mantenha premido os botões TUNING+- [SINTONIZAR] na unidade ou ‘RW/TUNER+’, ‘FF/TUNER-’ [AVANÇAR RÁPIDO/SINTONIZAR+ RETROCEDER/SINTONIZAR -] no controlo remoto. O processo de procura de frequências pára automaticamente quando encontra um sinal forte. 4. O LCD mostra automaticamente a hora se a unidade for deixada inactiva durante 5 segundos, para ver durante alguns instantes a estação de rádio corrente prima o botão PRESET [PREDEFINIR] na unidade ou no controlo remoto. Armazenar A Estação De Rádio Na Memória O MIP199 pode guardar até 10 estações de rádio FM e 10 AM. 1. Seleccione o canal que deseja guardar na memória. 2. Prima o botão ‘MEMORY’ [MEMÓRIA] na unidade ou no controlo remoto, começa a piscar ‘P01’ no LDC frontal. Prima os botões TUNING+- [SINTONIZAR] na unidade ou ‘FF/TUNER+’, ‘RW/TUNER-’ [AVANÇAR RÁPIDO/SINTONIZAR+ RETROCEDER/SINTONIZAR -] no controlo remoto para seleccionar entre as pré-definições ‘P01’ ‘P10’. 3. Prima o botão “MEMORY” para guardar o canal. O visor pára de piscar para indicar que o canal está agora guardado na memória. 4. Prima o botão SOURCE [ORIGEM] para alternar entre as bandas de AM ou FM e repita os procedimentos acima para guardar até 10 frequências de AM ou 10 frequências de FM na memória. Chamar Uma Estação Memorizada 1. Prima o botão ‘SOURCE’ [ORIGEM] para seleccionar rádio AM ou rádio FM. 2. Prima e mantenha premido o botão PRESET [PREDEFINIR] durante 2 segundos 3. Prima os botões TUNING+- [SINTONIZAR/C] na unidade ou ‘FF/TUNER+’, ‘RW/TUNER-’ [AVANÇAR RÁPIDO/SINTONIZAR+ RETROCEDER/SINTONIZAR -] no controlo remoto para seleccionar entre as frequências guardadas. 4. Antenna A unidade tem construída na antena de FM, usa o fio aéreo na parte traseira da unidade para o sinal possível o mais desobstruído de FM iPod 1. Remova a placa de cobertura de ancoragem na parte superior da unidade.Colocar o carregador de ancoragem adequado ao seu iPod. O MIP199 é fornecido com diferentes carregadores de ancoragem universais e 1 placa de cobertura para utilizar com outros dispositivos de áudio portáteis. Número de carregador adaptador 3 4 5 Modelo do iPod Capacidade iPod mini iPod 4G e iPod U2 iPod 4G 4GB e 6GB 20GB 40GB 6 7 U1 iPod Photo iPod PhotO Placa de cobertura universal 20GB e 30GB 40GB e 60GB 2. Encaixe o seu iPod na ligação de ancoragem de 30 pinos. Prima o botão “SOURCE” para seleccionar a função “iPod”. Surge o símbolo iPod no painel frontal. 3. O iPod começa imediatamente a carregar. 4. Utilize a roda do iPod para navegar entre os ecrãs do menu do iPod. 5. Utilize o controlo remoto para controlar, sem fios, as funções reproduzir/pausa, repetir, misturar. Ligações S-Video / Composite Video (compatível apenas com iPod 5ª Geração/ iPod Photo) 1. Repita os passos acima, de 1 a 4. 2. Ligue (ON) a opção “ TV Out ” (Saída para TV) do seu iPod. 3. Ligue um cabo S-Video ou Composite (não incluído) da parte de trás do MIP199 à sua TV. 4. Utilize o iPod para reproduzir e ver fotos ou vídeos na sua TV. Audio In O MIP199 também pode ser utilizado como sistema de som em conjunção com vários outros dispositivos de áudio portáteis como, por exemplo, iPod shuffle, MiniDisc, Leitores MP3 ou Leitores de CD portáteis. 1. Ligue o cabo 3,5mm AUDIO-IN incluído à ficha de auscultadores do dispositivo de áudio e à ficha “AUDIO IN” na parte posterior do MIP199. 2. Prima o botão “SOURCE” para seleccionar a função “AUX”. Surge o símbolo “AUX” no painel frontal. 3. Utilize o MIP199 para reproduzir o som dos seus dispositivos áudio externos. Controlo Remoto Controlo De Silêncio [Somente No Controlo Remoto] 1. Prima o botão ‘MUTE’ [SILÊNCIO] no controlo remoto, o som de áudio será desligado e o indicador de MUTE aparece no LCD frontal. 2. Para cancelar a função Mute [Silêncio] e restaurar o som prima o botão MUTE [SILÊNCIO] novamente ou prima os botões VOLUME + - na unidade ou os botões ‘VOL +’, ‘VOL -’ no controlo remoto. O indicador MUTE desaparecerá . Bass e Treble 1. Prima os botões Bass + ou – no controlo remoto para ajustar o nível de graves da unidade, o nível de graves vai de -6 a +6. Se a alimentação for desligada, o nível de Graves será colocado a 0. 2. Prima os botões Treble + ou – no controlo remoto para ajustar o nível de agudos da unidade, o nível de agudos vai de -6 a +6. Se a alimentação for desligada, o nível de Agudos será colocado a 0. Auscultadores O MIP199 possui uma ligação de "line out" na parte de trás da unidade, permitindo-lhe ligar auscultadores sem saída de áudio das colunas na parte da frente da unidade. Nota: ajuste sempre o volume do som para o nível mínimo antes de ligar os seus auscultadores ao sistema, e só depois ajuste o volume consoante a sua preferência. Dimmer O MIP199 tem um LCD retroiluminado quando a unidade está activa. Para controlar a intensidade da luz, Prima e mantenha premido o botão “DIMMER” na unidade ou controlo remoto. iPod Sincronização O MIP199 oferece a capacidade de sincronização de dados com o seu iPod utilizando um cabo de dados 30pin cabo [não fornecido]. 1. Ligue o 30pin à porta “30pin” na parte de trás do MIP199. 2. Ligue o USB numa porta USB livre do seu PC. 3. O iPod é reconhecido como dispositivo externo para permitir a sincronização do iPod Este símbolo com um raio dentro de um triângulo alerta os utilizadores para a presença de alta voltagem sem isolamento dentro da caixa do produto, representando um perigo de choque eléctrico. O símbolo de ponto de exclamação dentro de um triângulo alerta os utilizadores para a presença de instruções importantes de funcionamento e manutenção na documentação que acompanha este produto. Este dispositivo está em conformidade com a parte 15 das Normas da FCC. A utilização está sujeita às duas condições que se seguem: (1) Este dispositivo não pode provocar interferências nocivas e, (2) este dispositivo tem de aceitar quaisquer interferências recebidas, incluindo interferências que possam provocar um funcionamento indesejável. Caso ocorra algum problema na ligação ou configuração do Logic3 MIP199, contacte a nossa Linha de Apoio Técnico através do número +44 01923 471 000 (poderão aplica-se tarifários internacionais) ou envie um email para [email protected]