1
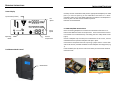
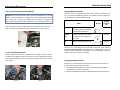
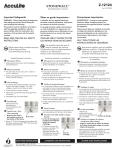
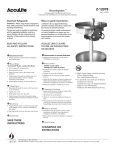
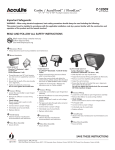
 Installation & User Guide English Version 1.0 SYSTEM ALERTS & TROUBLESHOOTING System Alerts Domino A.L.C. monitors system status and provides both visual and auditory alerts if operation outside of acceptable ranges is detected. In all alert conditions, the System Alert icon will flash repeatedly and an auditory alert will sound for 10 seconds then continue as a short beep once per minute until normal operating conditions are restored. PRODUCT CONTENTS Included with your Domino A.L.C. is everything pictured below (Fig 1 & 2). Before you start the installation, please take a moment to verify that you have all the parts necessary to complete the installation. A A. Radiator Module B. Fluid Heat Exchanger (FHE) C. LGA 1366 Backplate D. LGA 775 Backplate E. AMD CPU Retention Bracket F. Fan Mounts (6) G. Motherboard Stand‐offs (4) H. 10‐24 Phillips Screws (4) Failure Modes Coolant Temperature icon flashing 1. Switch operation to Full mode if currently in Quiet or Performance mode. If coolant temperature does not reduce to within acceptable range or if already in Full mode, proceed to next step. B Figure 1 2. Power cycle computer. If failure mode persists after power cycling, con‐
tact CoolIT Systems for technical assistance. Fan Speed icon flashing 1. Visually check to determine if fan is spinning. If it is not, contact CoolIT Systems for technical assistance. If fan is spinning, proceed to next step. C D 2. Power cycle computer. If failure mode persists after power cycling, con‐
tact CoolIT Systems for technical assistance. Pump Speed icon flashing F G E 1. Power cycle computer. If failure mode persists after power cycling, con‐
tact CoolIT Systems for technical assistance. H Figure 2 Tools Required • #2 Phillips Screwdriver www.coolitsystems.com/support 1‐866‐621‐COOL (2665) OPERATING INSTRUCTIONS INSTALLATION PROCEDURE
Status Display System Alert (flashes) Fan Speed Carefully remove motherboard and position appropriate backplate (LGA 1366 [Part C] or LGA 775 [Part D]) on the underside of the board. It is recom‐
mended to make use of the double‐sided tape provided on the backplate to hold it in place. This will aid with installation process. Remount the motherboard. For AMD AM2/AM2+ Motherboards Pump Speed Operating Mode Coolant Temperature Note: The existing backplate is reused for the installation of Domino A.L.C.. Remove the OEM heat sink from the processor. Then remove heat sink reten‐
tion bracket from motherboard by unscrewing the four Philips head screws (Fig 6). Caution: backplate may fall away from motherboard. If this occurs, remove motherboard then reposition backplate and tape in place. Clean Thermal Compound from CPU Cap using a paper towel or a clean cloth and install the four provided standoffs into the backplate mounting holes (Fig 7). Push Button Mode Control Install standoffs [Part G] into the holes from which you removed the heatsink retention frame. Mode Button Figure 6 Figure 7 PRODUCT INFORMATION LIMITED WARRANTY Disclaimer
Congratulations on your purchase of Domino A.L.C. Features • Superior cooling performance with whisper quiet operation • User selectable modes of operation at the simple push of a button • Self‐regulating temperature control to ensure continuous protection • Intuitive LCD display communicating system status • Visual and auditory alerts should the system require attention • Simple and quick installation • Over 50,000 hours of maintenance‐free operation Supported Processors • Intel 775/1366 • AMD AM2/AM2+ Hardware Requirements • Chassis with 120mm x 120mm rear fan mount Please take the time to register your product at www.coolitsystems.com/warranty CoolIT Systems Product Registration is quick, easy and secure, and creates a record should you require access to our Customer Care Centre in the future. Product registration is voluntary and failure to register will not diminish your warranty rights. Manufactured by: CoolIT Systems Inc. 3920 29th Street NE Calgary, AB Canada T1Y 6B6 1‐866‐621‐COOL (2665) Copyright © CoolIT Systems Inc. All rights reserved. CoolIT Systems Inc. (“CoolIT”) warrants each new Domino A.L.C. against de‐
fects in materials or workmanship for a period of two years from the date of purchase, and agrees to repair or replace any defective Domino A.L.C. without charge. Shipping costs are non‐refundable. This warranty is non‐transferable. All warranty claims must be accompanied by the original proof of purchase. THIS WARRANTY DOES NOT COVER DAMAGE RESULTING FROM ACCIDENT, MISUSE OR ABUSE, LACK OF REASONABLE CARE, SHIPPING DAMAGE, MODIFI‐
CATIONS, THE AFFIXING OF ANY ATTACHMENT NOT PROVIDED WITH THE PRODUCT, LOSS OF PARTS, OR OPERATING COMPONENTS AT SPEEDS OR FUNCTIONS OTHER THAN THOSE SPECIFIED BY THEIR MANUFACTURERS. Use of unauthorized replacement parts or liquid additives will void this war‐
ranty. CoolIT will not pay for warranty service performed by a non‐authorized repair or diagnostic service and will not reimburse the consumer for damage result‐
ing from warranty service performed by a non‐authorized repair service. No responsibility is assumed for any special incidental or consequential damages due to a defective CoolIT product. In order to obtain warranty service, contact our RMA department for informa‐
tion. The product must be shipped postage prepaid to an authorized CoolIT service location. In order to contact our RMA Dept. please go to: www.coolitsystems.com/
support It is suggested that, for your protection, you return shipments of product by insured mail, insurance prepaid. Damage occurring during shipment is not covered by this warranty. Shipping costs are non‐refundable. No other warranty, written or oral, is au‐
thorized by CoolIT Systems Inc. IN NO EVENT SHALL COOLIT OR ITS EMPLOYEES, AGENTS, SUPPLIERS, MANU‐
FACTURERS, OR CONTRACTORS BE LIABLE FOR ANY DAMAGES OF ANY KIND OR CHARACTER, INCLUDING WITHOUT LIMITATION ANY COMPENSATORY, INCIDENTAL, DIRECT, INDIRECT, SPECIAL, PUNITIVE, OR CONSEQUENTIAL DAMAGES, LOSS OF USE, LOSS OF DATA, LOSS OF INCOME OR PROFIT, LOSS OF OR DAMAGE TO PERSONS OR PROPERTY, CLAIMS OF THIRD PARTIES, OR OTHER LOSSES OF ANY KIND OR CHARACTER, AND WHETHER OR NOT THE POSSIBILITY OF SUCH LOSS OR DAMAGE HAS BEEN NOTIFIED TO COOLIT. OPERATING INSTRUCTIONS
INSTALLATION PROCEDURE
Step 1: Prepare CPU and Install Backplates Changing Operation Modes Important: In order to power the system, select an appropriate 3 or 4‐pin fan header to power Domino A.L.C.. Confirm that all Thermal Regulation systems (e.g., Smart Fan or Q‐Fan) are disabled and the header is configured to deliver 100% power. Refer to BIOS information in your Motherboard manual. Domino A.L.C. has 3 selectable operation modes: Quiet, Performance and Full. The system automatically adjusts in all modes to ensure operation is maintained within safe temperature ranges. Display Mode Open the side panel of the computer case and if possible, lay the case on its side. Remove the exhaust fan from the rear of the case as shown (Fig 3). Figure 3 Audible Confirma‐
tion Quiet Ultra quiet operation while provid‐ ing robust overheat protection, even at high temperatures 1 Beep Perform‐
ance Fan speed automatically adjusts for optimum quiet cooling per‐
formance 2 Beeps Full Maximum cooling performance 3 Beeps For LGA 775/1366 Motherboards Domino A.L.C. is shipped with the Performance operation mode selected. To switch operation modes, repeatedly press the Mode button until the desired mode is displayed on the display. The corresponding number of beeps will sound to confirm the selection. Remove OEM heat sink from motherboard by turning each post counter‐
clockwise then pulling the post up and away from the motherboard (Fig 4). Clean Thermal Compound from CPU Cap (IHS) using a paper towel or a clean cloth (Fig 5). Changing Temperature Scale Domino A.L.C. is shipped with the Celsius temperature scale activated. To switch to Fahrenheit, proceed as follows: • Press and hold the Mode button. After 3 seconds the display will flash one temperature scale then the other. • Release the Mode button when the desired temperature scale is shown. Figure 4 Figure 5 INSTALLATION PROCEDURE INSTALLATION PROCEDURE Step 2: Prepare retention brackets Domino A.L.C. is shipped ready for installation into LGA 775 based systems. For LGA 1366 based systems: For AMD based systems: Move pin/spring assemblies to outer holes in Intel CPU Retention Bracket (Fig 8) Remove pin/spring assemblies from Intel Retention Bracket and reinstall into AMD Retention Bracket [Part E] (Fig 9) Figure 11 Figure 12 Step 4: Power Connection Connect the 3‐pin connector on the Radiator Module to the 3– or 4‐pin fan header identified in Step 1. Step 3: Mounting Radiator Module Figure 9 Figure 8 Step 3: Mounting FHE Remove the disposable packaging from the FHE [Part B] to expose the layer of thermal conducting paste. Avoid touching the surface of the paste. Orienting the Radiator Module [Part A] close to its final mounting position at the rear chassis fan location, position the FHE over the CPU. Ensure the mounting screws are aligned with the corresponding holes in the backplate. Align the Radiator Module with the exhaust fan position on the back of chas‐
sis where the original 120mm x 120mm fan was removed. Pull vibration dampen‐
ing rubber fan mounts [Part F] through the holes in the chassis. Figure 13 Important: Rubber fan mounts are designed for stationary operation. If the computer is to be shipped, please replace with screws provided [Part H]. Step 5: Check your work Once the installation is complete, recheck all connections and ensure that the Radiator Module and FHE are securely mounted inside your PC chassis. Figure 10 Thread each of the four screws one full turn to secure in position (Fig 11). Once the system is in place, thread each screw a couple of turns following a cross or X pattern. Repeat pattern until all four screws are fully seated (Fig 12). Before replacing the chassis cover, restore power, turn on the computer and ensure that the Domino A.L.C. fan and pump are running (a slight vibration should be felt when you touch the pump). Once it has been confirmed that the system has been installed correctly, re‐
place the chassis cover and begin realizing the benefits of quiet cooling!