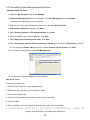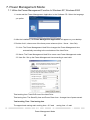
1
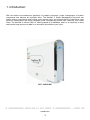
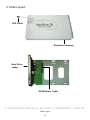
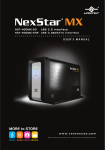
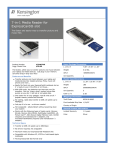
USER MANUAL
w
w
w
.
v
a
n
t
e
c
u
s
a
.
c
o
m
Package Contents
NexStar 3i Power Management 3.5” Hard Drive Enclosure
․Power Management HDD Enclosure x 1
․Software Install CD
x1
․Power Adaptor
x1
․Vertical Stand
x1
․User Manual
x1
․USB Cable
x1
․Screws
x4
TRADEMARKS
MS-DOS, Windows 95 / 98 / NT / 2000 / XP / Vista are trademarks of Microsoft Corporation.
Apple, Macintosh and Mac are trademarks of Apple Computer
*All of the third-party brands and names are the property of their respective owners.
Package Contents
1
CONTENTS
Package Contents .................................................................................................................................................2
1. Introduction .........................................................................................................................................................2
2. Specifications / Features / Power Consumption ...........................................................................................4
3. System Requirements .......................................................................................................................................5
4. Parts Layout ........................................................................................................................................................6
5. Installation ...........................................................................................................................................................7
6. Creating a New Partition / Formatting the Hard Drive ...............................................................................10
6.1 Creating a New Partition ..................................................................................................................10
6.2 Formatting Power Management Hard Drive .................................................................................12
7. Power Management Mode .............................................................................................................................13
7.1 Utilize the Power Management Function In Windows XP, Windows 2000 .............................13
7.2 Power Management mode introduction .........................................................................................15
8. Disconnecting the NexStar 3i ........................................................................................................................16
9. Troubleshooting / FAQ ....................................................................................................................................17
10. Warranty / Contact .........................................................................................................................................18
Contents
2
1. Introduction:
With the advent and subsequent popularity of portable computers, power management of system
components has become an important issue. The NexStar 3i Power Management Enclosure can
reduce energy consumption and cooling costs, reduce noise, and prolong the life of hard drive. Less
electricity consumption with three intelligent power management modes: Idle, Stand By, and Power
Down. The NexStar 3i utilizes USB 2.0, offering speed up to 480Mbps, and it is an ideal way to store
and transfer large amounts of data in an enclosure that matches your style!
NST- 360S2i-WH
Introduction
3
2. Specifications / Features / Power Consumption:
Specifications:
․Device Support:
SATA I/II Hard Drive
․Device Size:
3.5”
․Internal Interface:
SATA
․External interface:
USB 2.0
․HD Capacity:
Up to 1TB
․Data Transfer Rate:
480Mbps (12Mbps w/ USB1.1)
․Power Supply:
AC Adapter
․Material:
Aluminum
․Dimension:
198 x 125 x 33 mm
․Power Management Mode:
Idle / Stand By / Power Down
Feature:
․Power Management: Saves Power and Extends Hard drive Lifetime
․Built-In Automatic Power Management Processor
․Three Intelligent Power Management Modes: Idle/Stand By/Power Down
․Supports 3.5” SATA Hard Drive Up To 1TB
․Transfer Rates Up To 480Mpbs w/ USB 2.0
․Attractive LED Indicates Power / HDD Activity
․Aluminum Casing Cools Down Your Hard Drive
․Hot Swappable: Plug & Play
Power Consumption:
Specifications / Features / Power Consumption
4
3. System Requirements:
․Intel Pentium II 350 MHz Compatible or Mac G3 Processor & Greater
․Microsoft Windows 98SE/ME/2000/XP/Vista or Mac OS 8.6 & Greater
․USB-Equipped System
․For USB 2.0 Speeds, the System Must Support USB 2.0 Specifications
․CD-Rom Drive, If Drivers Are Needed.
System Requirements
5
4. Parts Layout:
LED Cable
Aluminum Housing
Hard Drive
cabby
SATA/Power Cable
Parts Layout
6
5. Installation:
NexStar 3i External 3.5” HDD Enclosure:
Preparing the NexStar 3i:
1) Remove the side of the NexStar 3i with the power and USB connection ports. If it has previously
been screwed in place, remove the screws first.
2) Carefully slide out the side approximately 3 inches.
3) Unplug the red and white cable for the LED.
4) Slide out the rest of the side
Installation
7
Installing the hard drive in the NexStar 3i:
1) Connect the SATA cable and power cable to the hard drive as pictured below.
2) Align the hard drive mounting holes with the holes on the back of the drive caddy. See picture
below.
3) Secure the hard drive onto the drive caddy with the screws provided.
4) Insert the drive caddy back into the aluminum housing. Be sure to reconnect the LED cable
before closing the unit. When reinserting the caddy, also be sure to align the top of the caddy
with the guides on the housing.
Installation
8
Connecting the NexStar 3i to your computer:
1) Connect the type B USB connector to the NexStar 3i and the type A USB connector to an available
USB 1.1/ 2.0 port on your system.
2) Connect the power cable to the NexStar 3i and plug the cable into an available outlet.
3) Turn on the NexStar 3i via the power switch.
4) Your operating system should detect the NexStar 3i and automatically install the necessary drivers
(if you have Mac OS 8.6, you will need to install drivers).
Once your operating system finishes setting up the NexStar 3i, it will mount
your hard drive. On Mac OS systems, the new volume should appear on the
desktop. On a Windows PC, the new volume will appear under My Computer.
NOTE: For new hard drives, you will need to initialize and partition your hard drive before it will appear in
Windows Explorer or on your Mac desktop. Please refer to your hard drive manufacturer's
documentation or read the "Creating a New Partition" section of this manual.
5) Your NexStar 3i External Hard Drive is now ready for use.
Installation
9
6. Creating a New Partition / Formatting the Hard Drive:
6.1 Creating a New Partition:
Note: Most hard drives should come with a CD that includes its installation program. If not, a download
should be available on the manufacturer’s website. The best way to partition a new hard drive is
by using the manufacturers program. However, If that is not possible, please try the following
instead (if using Mac OS 9 or below, please refer to your hard drive documentation for
information on formatting/partitioning the hard drive):
Warning: Doing the following will erase any existing data on the drive. If the drive is damaged and you
wish to recover the data, continuing may overwrite the existing information!
Windows 2000/ XP/ Vista:
1) Right click on "My Computer" and choose Manage.
2) Under “Storage “on the Left pane, select Disk Management
3) Windows should now give you the option to initialize the disk. If not, locate the new drive, right click
on the new disk (where it reads "Disk #") and choose Initialize.
(This step may not be required for some hard drives.)
4) Go through the wizard.
5) Once complete, locate your hard drive in the bottom right pane. Right click on the area with a status
bar (to the right of the "Disk #" area) and choose New Partition.
6) Follow the directions of the wizard. The recommended partition type is "primary" and the
recommended file system is "NTFS." Please note that Windows 2000/XP/Vista limits FAT32
partitions to only 32GB.
7) Once complete, you should now be able to see the drive in Windows Explorer.
Creating A New Partition / Formatting the Hard Drive
10
Mac OS X 10.x.x:
Initializing a Hard Drive:
If you are using a new hard drive, you may need to initialize it first. You can initialize your internal hard
drive using a program called Drive Setup, which is on the Mac OS CD that came with your computer.
1. Start up your computer from the Mac OS CD.
2. Locate the Utilities folder on the Mac OS CD and double-click it to open the folder.
3. Double-click the Drive Setup icon to open the program.
4. In the list of drives, select the drive you want to initialize.
5. Click Initialize.
To format your hard drive with Mac OS Extended format, a method of formatting hard drives that
allows for more efficient use of hard drive storage space, follow the steps below:
1. Click Custom Setup.
2. Select the desired partitioning scheme.
3. Open the Type pop-up menu in the Volume Info area and choose Mac OS Extended Format.
4. Resize the volumes if desired.
5. When ready, click OK.
6. Click Initialize.
If initialization fails, do the following:
1. Choose Initialization Options from the Functions menu.
2. Click the checkbox next to "Low level format", then click OK. Choosing this option adds significant
time to the initialization process.
Creating A New Partition / Formatting the Hard Drive
11
6.2 Formatting Power Management Hard Drive:
Windows 2000/ XP/ Vista:
1. Right click My Computer and select Manage.
2. Computer Management window will appear. Click Disk Management under Storage.
It will list all the Hard Drives in the computer.
3. Right click on the Power Management Hard Drive and click New Partition.
4. New Partition Wizard will appear, click Next.
5. Select Primary partition or Extended partition, click Next.
6. Enter the capacity you need for partition, click Next.
7. Select Assign the following drive letter, click Next.
8. Select Format this partition with the following settings and choose the File system you prefer.
You can enter the Volume label you need. Choose Perform a quick format, click Next.
9. You can see a new partition in the Disk Management.
10. The new Hard Drive will appear in your computer.
Mac OS X 10.x.x:
Formatting a Hard Drive:
1. Start the Disk Utility tool (under Applications)
2. Select the new hard drive you are trying to install
3. Click on the “Erase” tab
4. Choose a volume format and assign a name to the new drive.
5. Click on Erase.
6. Once complete, your new hard drive should be mounted on your desktop.
Creating A New Partition / Formatting the Hard Drive
12
7. Power Management Mode:
7.1 Utilize the Power Management Function In Windows XP, Windows 2000
1. Locate and the Power Management Application in the Software CD. Select the language
you prefer.
2. After the installation, the Power Management Application will appear on your desktop.
3. Double click it, choose one of the three power schemes (Auto、Never、User Set).
3.1 Auto: The Power Management Hard Drive changes the Power Management time
automatically according to the work status of the Hard Drive.
3.2 Never: The Power Management Hard Drive never uses Power Management mode.
3.3 User Set: Set up the Power Management time according to user habit.
Total working time: Total IDLE time of the Hard Drive.
Total saving time: The Stand By time and Power Down time. Average time of power saved:
Total working Time ÷Total saving time
The approximate saving watt: working time × 0.5 watt +saving time × 2 watt
Power Management Mode
13
4. Setup the stand by and Power Down time for the power scheme you choose.
5. Click on OK. The Power Management Hard Drive starts to work.
6. Click Reset to set the time down to zero.
7. click question mark ,which shows you the Saving Watt at present.
Power Management Mode
14
7.2 Power Management mode introduction
After installing the Power Management application, the program will automatically launch.
The application will start to manage the power and the LED light indicates mode status.
1. Active/Operation
It’s the normal work status for data transfer, where the Hard Drive reaches the highest work
speed and power consumption.
a. The Hard Drive works normally.
b. The blue front panel flashes.
2. Idle
If the hard drive is inactive for three seconds, the Power Management program will
automatically switch the mode from Active to Idle.
a. The Hard Drive waits for commands for three seconds.
b. The Idle LED light flashes.
3. Stand By
If the hard drive is inactive for three minutes, the Power Management program will
automatically switch the mode from Idle to Stand By.
a. The Hard Drive waits for commands for three minutes.
b. The Stand By LED light flashes
4. Power Down
If the hard drive is inactive for five minutes, the Power Management program will
automatically switch the mode from Stand By to Power Down..
a. The Hard Drive waits for commands for five minutes.
b. The Hard Drive stops working.
c. The Power Down LED light flashes.
Power Management Mode
15
8. Disconnecting the NexStar 3i:
NexStar 3i Externa/3.5"HDD Enclosure:
Warning: Never remove the NexStar 3i while the hard drive is in use. Doing so may corrupt the data
on the hard drive or damage the hard drive, NexStar 3i, or computer.
Windows 2000/ XP/ Vista:
1) Make sure all operations using the hard drive within the NexStar 3i has ceased.
2) Close any windows and programs pertaining to the NexStar 3i.
3) Double click the green "Unplug or Eject Hardware" icon in the system tray and select [Safely
Remove Hardware]. Select the device you wish to remove and click on [Stop]. The system should
prompt, “lt is now safe to remove the USB device." If not, wait for any programs still using the device
to finish and try again.
4) Turn off the NexStar 3i.
5) Unplug the USB cable from the system.
Mac OS:
1) Make sure all operations using the hard drive within the NexStar 3i has ceased.
2) Close any windows and programs pertaining to the NexStar 3i.
3) From the Desktop, drag the NexStar 3i hard drive to the trash.
4) Turn off the NexStar 3i.
5) Unplug the USB cable from the system.
Disconnecting the NexStar 3i
16
9. Troubleshooting / FAQ:
NexStar 3 Externa/3.5"HDD Enclosure:
Q. What should the jumper settings on my hard drive be set to?
A. We recommend the hard drive be set to MASTER.
Q. My computer recognizes the NexStar 3i, but it does not assign a drive letter to it.
A. You are probably using a brand new hard drive. If not, then your computer may not be able to
recognize the partition on the hard drive because it is damaged or not a valid format. Please refer to
the section "Creating A New Partition" for information on how to create a useable partition on your
drive.
Q. My computer sometimes recognizes the NexStar 3i, but sometimes gives me errors.
A. lf your computer is giving you problems with the NexStar 3i, be sure to connect the USB cable to a
rear port, directly off the motherboard or USB PCI card. The cables connecting front USB ports are
not always properly shielded and cannot properly handle USB 2.0 speeds, thereby corrupting the
signal between the NexStar 3i and the computer.
Q. Why is the data on my hard drive corrupted?
A. Connecting your hard drive to the NexStar 3i is just like connecting a hard drive to the inside of your
computer. The NexStar 3i itself will not corrupt your data. If your data has become corrupt, it is likely
caused by the removal of the NexStar 3i while data was still being written to the hard drive.
CAUTION: Never remove the NexStar 3i while data is being written to the hard drive! Doing so may
cause the hard drive to become corrupt. Make sure all applications being run off the disk and all files
in use are no longer in use before removing the unit.
Troubleshooting / FAQ
17
10. Warranty / Contact:
The NexStar 3i comes with a 1 year limited warranty (90 day parts). If your unit should become
defective within that time frame, please go to http://www.vantecusa.com for information on how to
receive warranty exchange or repair. Cosmetic defects and missing parts are not covered under this
warranty. Please check the contents of the unit to make sure you received all parts. Also, check for any
cosmetic flaws. If any parts are missing or if there are cosmetic defects, please contact the retailer from
which you purchased the unit immediately and ask for a replacement.
Vantec Thermal Technologies
43951 Boscell Rd.
Fremont, CA 94538
Tel: 510-668-0368
Fax: 510-668-0367
website: www.vantecusa.com
Copyright© 2008 Vantec Thermal Technologies. All Right Reserved.
All Registered Trademarks Belong To Their Respective Companies
Contact
18