1
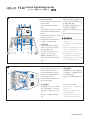
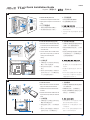
®
A2666
TT-67 Quick Installation Guide
English·繁體中文·한국어· 簡體中文
A
1
2
A. Remove the left panel cover
A. 打開側蓋板
1. Remove the two left panel cover thumb screws.
1. 移除左側板的兩顆手動螺絲。
2. Slightly push the left panel cover backward as
2. 將左側板輕輕地向後方推出。
shown.
1
A. 打開側蓋板
A. 좌측 패널 커버 제거
1. 移除左側板的兩顆手動螺絲。
1. 좌측 패널 커버에 위치한 두 개의 나비나사를
2. 將左側板輕輕地向後方推出。
제거하여 주십시오.
2. 그림과 같이 좌측 패널 커버를 뒤로 살짝 밀어
주십시오.
B
2
1
B. Install the PSU (Power Supply Unit)
B. 安裝電源供應器
1. Remove the screws on the PSU bracket using
1. 用 螺絲起子鬆開電源供應器托架的固
a screw driver, then remove the PSU bracket.
定螺絲,並取下電源供應器托架。
2.I nstall the PSU on the PSU bracket, then
2.將 電源供應器安裝到托架上,並以螺
secure with screws.
3
絲固定。
3. Insert the bracket with the installed PSU in
3. 將 裝好托架的電源供應器置入該槽位
place until it is fully seated (a). Fasten the
中直到對齊孔位(a),並以螺絲固定(b)
screws (b) and connect the power 之後再連接電源線(c)。
cable (c).
c
b
B. 安裝電源
B. PSU (전원 공급 유닛) 설치
1. 用 螺絲起子鬆開電源托架的固定
1. 드라이버를 사용하여 PSU 받침대의 나사
螺絲,並取下電源托架。
2. 將 電源安裝到托架上,並以螺絲
固定。
3. 將 裝好托架的電源置入該槽位中
a
直到對齊孔位(a),並以螺絲固定
(b)之後再連接電源線(c)。
를 풀어주신 후, PSU 받침대를 제거하여
주십시오.
2.PSU를 PSU 받침대에 넣은 후 나사로 조여
주십시오.
3. PSU가 설치된 받침대를 제 자리에 설치하
여 주신 후 (a), 나사를 조이고 (b) 전원 케
이블을 연결하여 주십시오 (c).
C
1
2
C. Install the hard disk
C. 安裝硬碟
1. Remove the screws on the hard disk bracket
1. 用 螺絲起子鬆開硬碟支架的固定螺絲
using a screw driver, then remove bracket.
並取出硬碟支架。
2. Install the hard disk on the bracket and fasten 2.將硬碟裝到支架上,並以螺絲固定。
the screws.
3. 將 裝好支架的硬碟置入該槽位中直到
3. Insert the bracket with the installed hard disk
對齊孔位,並以螺絲固定。
in place until it is fully seated, then fasten the
screws.
3
C. 安裝硬盤
C. 하드 디스크 설치
1. 用 螺絲起子鬆開硬盤支架的固定
1. 드라이버로 하드 디스크 받침대의 나사를
螺絲並取出硬盤支架。
2. 將 硬盤裝到支架上,並以螺絲固
定。
3. 將 裝好支架的硬盤置入該槽位中
直到對齊孔位,並以螺絲固定。
풀어 받침대를 제거하여 주십시오.
2.받침대에 하드 디스크를 설치한 후 나사로
조여주십시오.
3. 하드 디스크가 설치된 받침대를 제 자리에
놓은 후, 나사로 조여주십시오.
Continued at the back
®
TT-67 Quick Installation Guide
English·繁體中文·簡體中文·한국어
D
D. 安裝主機板
D. Install the motherboard
1. Prepare the motherboard screws that came with
your product package.
3
Locate the screw holes on the motherboard bracket.
2.Put the motherboard in place as shown. Make
sure the screw holes are aligned with the holes on
the bracket.
3. Using a screw driver, fasten the screws to secure
the motherboard to the chassis.
4. Connect the cables and install the components according to your motherboard manual.
1
2
1
照主機板上孔位相對應於機殼內主機
板支架的位置鎖上銅柱。
2.將 主機板裝在支架相對應的位置,注
意主機板上孔位須對齊銅柱。
3.以 螺 絲 起 子 將 公 制 螺 絲 固 定 住 主 機
板。
4. 請 參考主機板使用手冊安裝所需的線
材。
D. 마더보드 설치
1. 제품 패키지에 제공된 마더보드 나사를 준비
하여 주십시오. D. 安裝主板
마더보드 받침대의 나사 구멍의 위치를 확인
1. 在配件包內取出銅柱及公制螺絲,
하여 주십시오.
參照主板上孔位相對應於機箱內主
板支架的位置鎖上銅柱。
2.將 主板裝在支架相對應的位置,
注意主板上孔位須對齊銅柱。
3. 以螺絲起子將螺絲固定住主板。
4. 請 參考主板用戶手冊安裝所需的
線材。
E
1. 在配件包內取出銅柱及公制螺絲,參
2.그림과 같이 마더보드를 위치해 주신 후, 마
더보드의 나사 구멍이 받침대의 나사 구멍과
일직선 상이 되도록 하여 주십시오.
3. 드라이버를 사용하여 마더보드가 본체에 단
단히 고정되도록 나사를 조여 주십시오.
4. 케이블을 연결해 주신 후, 마더보드 설명서에
따라 기타 부품을 설치하여 주십시오.
E. Replace the left panel cover
1. Locate the left panel cover tab holes on the
chassis (see the four circles in the figure).
2
2
1.參 照側蓋板內卡溝位置(如圖圈選處
Align and insert the left panel cover hooks to )將側蓋板裝上,再輕輕地向前面板
the tab holes then slightly push the left panel 的方向推直到與其密合。
cover forward until it sits in place.
1
E. 安裝側蓋板
2. Secure the left panel cover with the two thumb 2. 將 先 前 拆 下 的 兩 顆 手 動 螺 絲 鎖 上 固
定。
screws you removed earlier.
E. 安裝側蓋板
E. 좌측 패널 커버 재설치
1.參 照側蓋板內卡溝位置(如圖圈
1.좌측 패널 커버의 고리 구멍을 본체에 위치
選處)將側蓋板裝上,再輕輕地
하여 주십시오.
向前面板的方向推直到與其密
고리를 고리 구멍에 일직선으로 맞춘 후, 合。
앞으로 살짝 밀어주십시오.
2. 將先前拆下的兩顆手動螺絲鎖上
固定。
2. 이전에 패널 커버에서 제거한 두 개의 나비
나사로 좌측 패널 커버를 조여 주십시오.
15G067331000