1
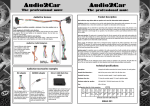
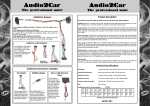
Audio2Car
Audio2Car
The professional mute
The professional mute
Audio2Car harness
Product Description
The Audio2Car range allows OEM car speakers to be used for aftermarket Audio equipment.
Audio2Car allow the car speakers to be used for audio playback from aftermarket Audio equipment. For a complete installation two or more item numbers are required. See description at the last page.
For a complete installation normally a minimum of two item numbers are required.
Audio equipment with build in mute function:
If the Audio equipment is equipped with a build in mute function two item numbers
are required. The 1st item number is the Audio2Car harness. The 2nd item is a
Audio2Car carkit adaptor.
Audio equipment without build in mute function:
If the Audio equipment is not equipped with speaker relays, a Mute-box from Kram
Drive & Talk range can be added together with a Drive & Talk carkit adaptor.
Speaker-function: This is achieved by connecting Audio equipment with build-in speaker relay function or by
using a Mute-box from the Kram range. This way the radio sound is muted and the sound from the aftermarket
Audio equipment is sent through the car speakers. You will achieve a perfect sound without interference from
the car radio.
Mute wire function: The mute-wire is connected from the 24 pin connector to the most used mute position for
the car model. This enables the use of the radios built in mute function. If the radio does not have such function
or the mute exists in a different connector than the ones used on the Audio2Car harness, the mute wire can be
found in a yellow fly-wire fitted with a bullet connector.
Power supply: All Audio2Car cables have an integrated power supply for the Audio equipment in the 24 pin
connector. The constant 12v and the ground supply are normally sourced from the radio supply. This way power
supply of most Audio Equipment can be achieved without cutting the cars wiring loom. The constant 12V wires
are red and the ground wires are black.
Audio2Car Carkit Adaptors
Several different carkit adaptors
are available for Carkits that
have a build in mute function
for 1 or 4 Speakers.
Please see the complete range
of Audio2Car carkit adaptors
at our website:
www.kram.dk
Ignition supply: If an ignition source is available in the radio connector then it will normally also be available in
the 24 pin connector. If an ignition source is not available a constant 12V source is connected to the Ignition pin
via bullet connectors. If a real ignition is required for the chosen Audio Equipment, an IGNIBOX item no. “I” can
be connected to create an artificial ignition. Or an ignition source found elsewhere can be connected to the
bullet with the blue wire. The 12V ignition wires in the Audio2Car cable are blue.
Aux integration
The 4 pin connector on the Audio2Car harness allow a Kram Aux solution to be connected. This will allow the
use of the car sound system amplifier for Music playback and thereby achieving higher sound quality.
Examples of
carkit adaptors
Technical Specifications
Audio2Car Accessories examples
ISO adaptor
This ISO adaptor AA010 is a
universal adaptor for all
carkits with ISO connectors.
Adding this adaptor turns
your Audio2Car cable into a
Kram ISO2CAR solution.
IGNIBOX adaptor
This IGNIBOX ITEM no. “I”
creates an artificial ignition
source. Use this adaptor if
your Audio2Car cable does
not include an ignition source.
This adaptor is plug and play
with your Audio2Car cable.
Drive & talk Mute-box
range
Several different
types of mute-boxes
are available. Adding
one of the boxes will
turn your Audio2Car
cable into a Kram
Drive & Talk solution.
Therefore you will
also need a Drive &
Talk carkit adaptor.
Please see the Complete Drive & Talk
range at our website:
www.kram.dk
Description:
L-shaped with bullet connections for Ground, Constant 12v and Ignition.
Normal Wire dimensions :
AWG 18 for power wires, AWG 20 for all other wires
Standard Fuse sizes:
2 Amp for constant supply, 1 Amp for Ignition supply
Maximum Fuse size:
7,5 Amp for constant supply, 7,5 Amp for Ignition supply
Maximum output pr. speaker:
100 Watt RMS / 200 Watt music power @ 4 Ohm
Size:
400 x 400 mm
Configuration chart for 24 pin connector:
12V
Const.
12V
IGN
Line
Out L-
Line
Out R-
Radio
RR+
Radio
RF+
Radio
LF+
Radio
LR+
Spk
LR+
Spk
LF+
Spk
RF+
Spk
RR+
GND
Mute
Line
Out L+
Line
Out R+
Radio
RR-
Radio
RF-
Radio
LF-
Radio
LR-
Spk
LR-
Spk
LF-
Spk
RF-
Spk
RR-
Connector seen from cable entry side
EN003
Audio2Car
Audio2Car
The professional mute
The professional mute
ignition wire is connected to the constant 12v source with a bullet connector. If an ignition source is needed for
the chosen carkit IGNIBOX item no. “I” can be inserted to create an artificial ignition source or the blue ignition
wire can be disconnected from the red constant 12v and manually connected to an ignition source found elsewhere.
Installation description
for car specific Audio2Car harness
Needed items:
A: Audio2Car harness.
B: Audio2Car carkit adaptor (or Mute-box from our Drive & Talk
range see last page).
C: Carkit.
Note: The Carkit C and Audio2Car carkit adaptor B bought separately.
Installation:
1st: Remove the key from the ignition barrel. This is done to
avoid error messages on the cars electrical system. Note: On some
cars it may even be necessary to remove the ground pole from the
car battery.
2nd: Locate & uncover the radio / amplifier unit. The radio /
amplifier unit is normally found in the front of the car where the
CD-player or radio tuner is located.
Bullet Connectors
5th: Connect the mute wire. If a Mute input exists in the connector on the Audio2Car harness the yellow mute
wire is connected to this position when delivered. If no Mute input is available in the connector then the yellow
mute wire is found close to the male connector fitted with a bullet connector. It can then be manually connected to a mute input. Connecting the mute wire is an option but may be required in some cars to achieve a
full mute of all speakers. Note: Not all cars are equipped with a mute input.
A: Audio2Car Harness
Item number 84xxx
24 pin Connectors
6th: Check fuse size. The fuse on the Audio2Car cable should not be bigger than the ones used on the wiring
loom supplied with the carkit. The fuses on the Audio2Car cable should be replaced with a size similar to the
ones supplied with the carkit.
Note: Never exceed the Maximum Fuse size for the Audio2Car cable. See first page.
B: Audio2Car Adaptor
Item number AAxxx
C: Carkit
Cars with special radio / amplifier locations:
•
BMWs with navigation system often has the radio unit behind side panel in boot. For these cars an
Audio2Car extension cable item no. AE5 is also required.
•
BMW X5 has the radio unit located in the spare wheel well. An Audio2Car extension cable item no.
AE5 is also required.
•
Mercedes A, B, C & CLK class with sound system upgrade (code 810) install on amplifier behind
right side panel in boot just behind the rear wheel arch. An Audio2Car extension cable item no. AE5 is
also required.
•
Mercedes CL & S class with BOSE sound system (code 810) install on amplifier placed in the left
side of the boot below the navigation unit and CD changer unit. It may be necessary to completely
remove the left boot interior panel. An Audio2Car extension cable item no. AE5 is also required.
•
Mercedes ML & GL class with Harman Kardon sound system (code 810) Install on amplifier placed
under the drivers seat. Under the carpet there is small room where the amplifier is located. It may be
necessary to completely remove the drivers seat. An Audio2Car extension cable item no. AE4 is also
required.
•
Renault cars install on CD-player in front, on amplifier located inside dash behind/above glove box,
below front seat or in the boot. An Audio2Car extension cable may be required. Please check the
complete cable list for a description of the radio / amplifier unit location for the specific car model.
•
Volvo C30 with High Performance sound system install on amplifier behind rear side speaker. right
side in left hand drive cars and left side in right hand drive cars. An Audio2Car extension cable item
no. AE5 is also required.
•
Volvo S40 & V50 2004- with High Performance sound system install on amplifier unit behind side
panel in boot. An Audio2Car extension cable item no. AE5 is also required.
•
Volvo XC60, V70, XC70, S80, XC90 from 2006- with High Performance sound system install on
amplifier below front passenger seat. An Audio2Car extension cable item no. AE4 is also required.
3rd: Connect the car-specific cable. Disconnect the connector on the radio / amplifier unit and insert the
Audio2Car harness between the connector and radio / amplifier unit. Note: Some radios may require a security
code to be entered after the power / connectors have been removed.
4th: Connect the blue ignition wire. If an ignition source exists in the connector on the Audio2Car harness the
blue ignition wire is connected to this position. If no ignition source is available in the connector then the blue
7th: Connect the carkit adaptor (or Drive & Talk Mute-box). Connect the carkit adaptor to the 24 pin connector on the Audio2Car harness. Connect the carkit adaptor to the carkit.
Troubleshooting Guide
Carkit does not start up. Check if there is 12V between the black and the red wire and also between the black
and blue wire, in the 24 pin connector, when the car is started. If there is not 12v on both wires please check
the following:
1.
If there is supply on the red constant 12v wire but not on the blue ignition wire the car may require an
alternative ignition source. See installation step 4.
2.
Check that the bullets on the supply wires are properly connected. The supply wires are the red, blue
and black wires.
3.
Check for a blown fuse on the Audio2Car harness or in the cars fuse-box.
The carkit does not turn off when the key is removed from the ignition barrel. Your carkits needs a real ignition source. Please check the following:
1.
Is the blue ignition wire connected to the red constant 12v wire with a bullet connector? If this is the
case then there is no ignition supply in the radio connector. See installation step 4.
2.
Is there an ignition supply on the blue wire. There should be no voltage on the blue wire when there is
no key in the ignition. See installation step 4.
Not all speakers are muted. Try to disconnect the Carkit adaptor (or mute-box) from the Audio2Car harness
then turn on the radio and check the following :
1.
All speakers keep playing: This is the wrong Audio2Car harness for this car / sound system.
2.
Only a few speakers keep playing: The mute wire needs to be connected, see installation step 5 or this
is the wrong Audio2Car harness for this car / sound system.
3.
All speakers are now muted:
•
Carkits with 1 speaker mute: Some carkits can only mute 1 speaker channel with their build
in mute-box. This is normally stated on the label on the carkit adaptor for these carkits, else
please check the carkit manual. If a full mute is desired with these carkits, then this can be
achieved by either connecting the mute wire, see installation step 5. Or adding a mute-box
from our Drive & Talk range.
Carkits with 4 speaker mute: (or when Kram mute-box is used): The carkit is defective,
please replace the carkit.
Radio will not turn on or not working properly after installation.
1.
Please check for a blown fuse at the radio or in the car fuse-box.
2.
Remove the Audio2Car harness and connect the radio to the original car connector. If the radio is now
working replace the Audio2car harness.
•
See our complete Radio Mute program on our website
www.kram.dk