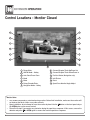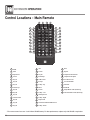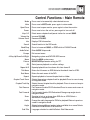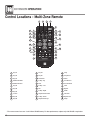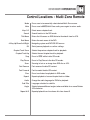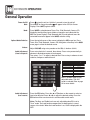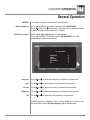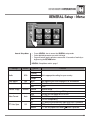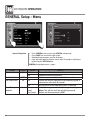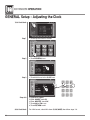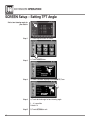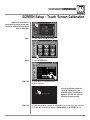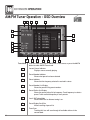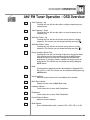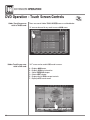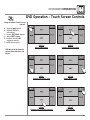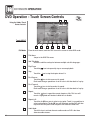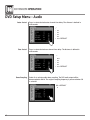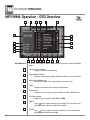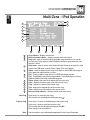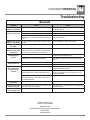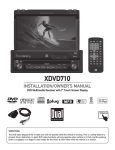
1
XDVDN8290 INSTALLATION/OWNER’S MANUAL DVD Multimedia Receiver with Internal GPS Navigation and 6.5” Touch Screen Display TOUCH Safety Notes: The DVD video display of the in-dash unit will not operate while the vehicle is moving. This is a safety feature to prevent driver distraction. In-dash DVD video functions will only operate when vehicle is in Park and the parking brake is engaged. It is illegal in most states for the driver to view video while the vehicle is in motion. Copyright Notes This product incorporates copyright protection technology that is protected by method claims of certain U.S. patents and other intellectual property rights owned by Macrovision Corporation and other rights owners. Use of this copyright protection technology must be authorized by Macrovision Corporation, and is intended for home and other limited viewing uses only unless otherwise authorized by Macrovision Corporation. Reverse engineering or disassembly is prohibited. Manufactured under license from Dolby Laboratories. “Dolby” and the double-D symbol are trademarks of Dolby Laboratories. Windows Media and the Windows logo are trademarks, or registered trademarks of Microsoft Corporation in the United States and or other countries. iPod is a trademark of Apple Computer, Inc., registered in the U.S. and other countries. The Bluetooth® word mark and logos are owned by the Bluetooth SIG, Inc. and any use of such marks by Collex is under license. NavMate® is a trademark of Horizon Navigation, Inc. The NavMate software and associated materials are protected by copyright in the US and internationally. © 2007 Tele Atlas. All rights reserved. Tele Atlas and the Tele Atlas logo are registered trademarks of Tele Atlas N.V. All other trademarks are property of their respective owners. End-User License Agreement This End-User License Agreement (EULA) is a legal agreement between you (either an individual or a single entity) and HORIZON NAVIGATION, INC. for the operating software and updates thereof that run the digital map database and associated hardware (collectively the “Software”). By installing or using the Software, you agree to be bound by the terms of this Agreement. If you do not agree to the terms of this Agreement, return the Software, along with all other accompanying items in the form they were purchased, within thirty (30) days after such purchase to the authorized dealer from where the Software was purchased, for a full refund of any fees paid. Use of the Software without acceptance of this Agreement is unauthorized and not permitted. 1. License Grant. HORIZON NAVIGATION, INC. grants you a non-exclusive license to use your purchased copy of the Software for your own internal purposes of accessing the digital map database and running the associated hardware and not for service bureau time-sharing, or other similar purposes. 2. Limitations On Use. You are not permitted to copy, modify, decompile, disassemble, or reverse engineer any portion of the Software without the expressed written permission from HORIZON NAVIGATION, INC. 3. U.S. Government End Users. The Software is provided with Restricted Rights. Use, duplication, or disclosure by the Government is subject to restrictions as set forth in subparagraph (c) (1) (II) of the Rights in Technical Data and Computer Software clause at DFARS 252.227-7013 or subparagraphs (c) (1) and (2) of the Commercial Computer Software-Restricted Rights at 48 CFR 52.227-19, as applicable. HORIZON NAVIGATION, INC., 4701 Patrick Henry Dr. Suite 1301 Santa Clara, CA 95054 USA. 4. Indemnity. You agree to indemnify, defend and hold free and harmless HORIZON NAVIGATION, INC., including its licensors, assignees, subsidiaries, affiliated companies, and the respective officers, directors, employees, shareholders, agents, authorized dealers or sales agents, and representatives of each of them from and against any liability, loss, injury, demand, cost, expense, or claim of any kind of character, including but not limited to attorney’s fees, arising out of (a) any use or possession of the Software, or (b) any breach of any warranties or representations made by you in this Agreement or of your obligations under this Agreement. 5. Disclaimer of Warranty. HORIZON NAVIGATION, INC. does not make any warranties or representations, either express or implied, with respect to the software, without limiting the foregoing, HORIZON NAVIGATION, INC. expressly disclaims any implied warranties of quality, performance, merchantability, fitness for a particular purpose or non-infringement. Some states do not allow the exclusion of implied warranties, so some portion of the above exclusion may not apply to you. 6. Limitation of Liability. HORIZON NAVIGATION, INC. shall not be held responsible for any actual, anticipated or speculative loss of profit or direct, indirect, incidental, special, or consequential damages, including, without limitation, loss of revenue, data, or use incurred by you or any third party arising out of your use or possession of the software, whether in an action in contract or tort or based on a warranty, even if HORIZON NAVIGATION, INC. has been advised of the possibility of such damages. 7. Warnings. A. Copies of the digital map database reflect conditions as they existed at various points in time before your receipt of such copies. Accordingly, copies of the digital database map may contain inaccurate or incomplete data or information due to inaccurate or incomplete source materials, the passage of time, road construction, changing conditions, and otherwise. B. Neither the Software nor the digital map database include, analyze, process, consider or reflect any of the following categories of information, i.e., neighborhood quality or safety; population density; availability or proximity of law enforcement, emergency, rescue, medical or other assistance; construction work, zones, or hazards; road and lane closures; various legal restrictions (such as vehicular type, weight, load, height and speed restrictions); road slope or grade; bridge height, width, weight or other limits; road, traffic or traffic facilities safety or conditions; weather conditions; pavement characteristics or conditions; special events; traffic congestion; or travel time. 8. Transfer. This Agreement, including all rights, obligations and representations may be transferred to another individual or single entity, provided the same transfer includes the simultaneous transfer of the associated hardware in which the Software is installed, and further provided that such other individual or single entity accepts all the terms of this Agreement. In the event such individual or single entity to which the Software is transferred does not accept the terms of this agreement, then the License herein automatically terminates. Further use of the Software is unauthorized and not permitted. 9. Governing Law. This Agreement shall be governed by the laws of the State of California, without giving effect to its conflict of laws provisions. XDVDN8290 PREPARATION Table of Contents Page Warning Statement . . . . . . . . . . . . . . . . . . . . . . . . . . . . . . . . . . . . . . . . . . . . . Safety Information/Precautions . . . . . . . . . . . . . . . . . . . . . . . . . . . . . . . . . . . Preparation/Mounting/Wiring . . . . . . . . . . . . . . . . . . . . . . . . . . . . . . . . . . . . . Remote Control Overview . . . . . . . . . . . . . . . . . . . . . . . . . . . . . . . . . . . . . Control Locations - Monitor Closed . . . . . . . . . . . . . . . . . . . . . . . . . . . . . . . . . . Control Locations - Monitor Open . . . . . . . . . . . . . . . . . . . . . . . . . . . . . . . . . Control Locations - Remotes . . . . . . . . . . . . . . . . . . . . . . . . . . . . . . . . . . . . . General Operation . . . . . . . . . . . . . . . . . . . . . . . . . . . . . . . . . . . . . . . . . . . . . . General Setup Menu . . . . . . . . . . . . . . . . . . . . . . . . . . . . . . . . . . . . . . . . . . . . . Setting the Clock . . . . . . . . . . . . . . . . . . . . . . . . . . . . . . . . . . . . . . . . . . . . Anti-theft Code . . . . . . . . . . . . . . . . . . . . . . . . . . . . . . . . . . . . . . . . . . . . . . . Screen Setup. . . . . . . . . . . . . . . . . . . . . . . . . . . . . . . . . . . . . . . . . . . . . ASP Config . . . . . . . . . . . . . . . . . . . . . . . . . . . . . . . . . . . . . . . . . . . . AM/FM Tuner Operation . . . . . . . . . . . . . . . . . . . . . . . . . . . . . . . . . . . . . . . . . Warning Statement . . . . . . . . . . . . . . . . . . . . . . . . . . . . . . . . . . . . . . . DVD Operation . . . . . . . . . . . . . . . . . . . . . . . . . . . . . . . . . . . . . . . . . . . . . . . . DVD Setup . . . . . . . . . . . . . . . . . . . . . . . . . . . . . . . . . . . . . . . . . . . . . . . . . . . . CD Operation . . . . . . . . . . . . . . . . . . . . . . . . . . . . . . . . . . . . . . . . . . . . . . . . . . MP3/WMA Operation . . . . . . . . . . . . . . . . . . . . . . . . . . . . . . . . . . . . . . . . . . . . SD Card . . . . . . . . . . . . . . . . . . . . . . . . . . . . . . . . . . . . . . . . . . . . . . . . . . . . . . . JPEG Operation . . . . . . . . . . . . . . . . . . . . . . . . . . . . . . . . . . . . . . . . . . . . . . . . . Media Compatibility Information . . . . . . . . . . . . . . . . . . . . . . . . . . . . . . iPod Operation . . . . . . . . . . . . . . . . . . . . . . . . . . . . . . . . . . . . . . . . . . . . . . . . . Bluetooth Operation . . . . . . . . . . . . . . . . . . . . . . . . . . . . . . . . . . . . . . . . . . . . . Navigation Operation . . . . . . . . . . . . . . . . . . . . . . . . . . . . . . . . . . . . . . . . . . . . . Multi-Zone Operation . . . . . . . . . . . . . . . . . . . . . . . . . . . . . . . . . . . . . . . . . . . Warranty . . . . . . . . . . . . . . . . . . . . . . . . . . . . . . . . . . . . . . . . . . . . . . . . . . . . . Specifications. . . . . . . . . . . . . . . . . . . . . . . . . . . . . . . . . . . . . . . . . . . . . . . . Troubleshooting . . . . . . . . . . . . . . . . . . . . . . . . . . . . . . . . . . . . . . . . . . . . . . . . . . 3 4 5-7 8 9-11 12 13-16 17-19 20-22 23 24 25-28 29-30 30-34 35 36-44 45-51 52-56 57-60 61-64 65-66 67-68 69-74 75-78 79-84 85-88 89 90 91-92 2 XDVDN8290 PREPARATION WARNING Upon installation of this Monitor/DVD player (“unit”) into a vehicle, the driver of the vehicle must not operate this unit by watching videos or playing video games while driving. Failure to follow this instruction could lead to driver distraction which could result in serious injury or death to the vehicle’s occupants or persons outside the vehicle and/or property damage. Several states prohibit the installation of monitors/DVD players if the screen is visible from the driver’s seat. If you reside in a jurisdiction which has enacted such a law, this unit must not be installed so that the screen is visible from the driver’s seat. When installing this unit in the front console/dashboard, the unit must be positioned so that it is facing the front passenger seat only. Failure to follow this instruction could lead to driver distraction which could result in serious injury or death to the vehicle’s occupants or persons outside the vehicle and/or property damage. This unit is designed so that it may be operated only when the vehicle is in “Park” and the parking brake is fully engaged. To this end, this unit includes a parking brake lock-out feature which prohibits the unit from operating if the vehicle is not in “Park” and/or the parking brake is not fully engaged. When installing this unit, the installer must connect the parking brake detect wire (“Yellow-Blue Lead”) to the parking brake mechanism in order to make the parking brake lock-out feature operable. DO NOT simply ground the parking brake detect wire to a metal portion of the vehicle. Failure to properly install the parking brake lock-out feature could lead to driver distraction which could result in serious injury or death to the driver’s occupants or persons outside the vehicle and/or property damage. Once the parking brake lock-out feature is installed, the owner/user must not attempt to disrupt/neutralize the parking brake lock-out feature by (a) partially engaging the parking brake and/or (b) purchasing/using any device or unit designed to send necessary brake signals to the unit. Failure to follow these instructions could lead to driver distraction which could result in serious injury or death to the driver’s occupants or persons outside the vehicle and/or property damage. When operating this unit, keep the unit’s volume level low enough so that the vehicle’s occupants can hear traffic-related sounds such as police and emergency vehicles. Failure to follow this instruction could lead to driver distraction which could result in serious injury or death to the vehicle’s occupants or persons outside the vehicle and/or property damage. 3 XDVDN8290 OPERATION Safety Information Please read all instructions carefully before attempting to install or operate. Due to its technical nature, it is highly recommended that your DUAL XDVDN8290 is installed by a professional installer or an authorized dealer. This product is only for use in vehicles with 12VDC negative ground only. Safety Notes: The DVD video display of the in-dash unit will not operate while the vehicle is moving. This is a safety feature to prevent driver distraction. In-dash DVD video functions will only operate when vehicle is in Park and the parking brake is engaged. It is illegal in most states for the driver to view video while the vehicle is in motion. To prevent damage or injury: 1. Make sure to ground the unit securely to the vehicle chassis ground. 2. Do not remove the top or bottom covers of the unit. 3. Do not install the unit in a spot exposed to direct sunlight or excessive heat or the possibility of water splashing. 4. Do not subject the unit to excessive shock. 5. When replacing a fuse, only use a new one with the prescribed rating. Using a fuse with the wrong rating may cause the unit to malfunction. 6. To prevent short circuits when replacing a fuse, disconnect the wiring harness first. 7. Use only the provided hardware and wire harness. 8. You cannot view video while the vehicle is moving. Find a safe place to park and engage the parking brake. 9. If you experience problems during installation, consult your nearest DUAL dealer. 10.If the unit malfunctions, reset the unit as described on page 11 first. If the problem still persists, consult your nearest DUAL dealer or call tech assistance @ 1-866-382-5476. 11.To clean the monitor, wipe only with a dry silicone cloth or soft cloth. Do not use a stiff cloth, or volatile solvents such as paint thinner and alcohol. They can scratch the surface of the panel and/or remove the printing. 12.When the temperature of the unit falls (as in winter), the liquid crystal inside the screen will become darker than usual. Normal brightness will return after using the monitor for a while. Additional Notes: 1.When extending the ignition, battery or ground cables, make sure to use automotive-grade cables or other cables with an area of 0.75mm (AWG 18) or more to prevent voltage drops. 2.Do not touch the liquid crystal fluid if the LCD is damaged or broken. The liquid crystal fluid may be hazardous to your health or fatal. If the liquid crystal fluid from the LCD contacts your body or clothing, wash it off with soap immediately. This device complies with part 15 of the FCC rules and regulations. Operation is subject to the following two conditions: 1) This device may not cause harmful interference, and 2) This device must accept any interference received, including interference that may cause undesired operation. 4 XDVDN8290 INSTALLATION Preparation Please read entire manual before installation. Before You Start • Disconnect negative battery terminal. Consult a qualified technician for instructions. • Avoid installing the unit where it would be subject to high temperatures, such as from direct sunlight, or where it would be subject to dust, dirt or excessive vibration. Getting Started • Insert the supplied keys between the radio and the sleeve at the left and right sides, and slide the unit out of the mounting sleeve. Mounting Options 1. Rear ISO-DIN (using OEM factory radio mounting brackets): • Remove factory radio mounting brackets and attach to the left and right sides of the XDVDN8290 chassis. • See diagram below. 2. Front load (using mounting sleeve): • Install mounting sleeve into opening, bending tabs to secure. • Connect wiring harness and antenna as shown on pages 6-7. Consult a qualified technician if you are unsure. • Certain vehicles may require an installation kit and/or wiring harness adapter (sold separately). • Test for correct operation and mount according to your application. • If required, snap desired trim ring into place. • Mount the iplug™ adapter to any smooth clean surface using the supplied double-sided tape or Phillips head screws. Mounting the XDVDN8290 using OEM factory mounting brackets. 5 Mounting the XDVDN8290 using mounting sleeve (front load). XDVDN8290 INSTALLATION Expanded Wiring Diagram - Inputs/Outputs NAVIGATION ANTENNA Wiring Notes: Subwoofer output The SUBWOOFER audio output (Blue RCA) is active in all audio modes and must be connected to an external amplifier. Center output The CENTER audio output (Gray RCA) is only active in DVD 5.1 (6-channel) audio modes. Rear view camera A rear view camera (not included) can be used with the CAMERA input. NEED HELP?? Call our Technical Service Hotline, 1-866-382-5476. Safety Notes: The DVD video display of the in-dash unit will not operate while the vehicle is moving. This is a safety feature to prevent driver distraction. In-dash DVD video functions will only operate when vehicle is in Park and the parking brake is engaged. It is illegal in most states for the driver to view video while the vehicle is in motion. Altering or defeating this safety feature is a violation of law and is prohibited. 6 XDVDN8290 INSTALLATION Wiring Diagram - Optional A/V Connections iPOD 7 XDVDN8290 OPERATION IR Remote Preparation To first use the IR Remote control, you must first pull the battery insulation tape out Notes: • Remove the battery if the remote will not be used for a month or longer • Remove and dispose of battery properly Insert or replacing the Battery: Remove the battery holder Remove the battery from the battery holder Main Remote Install the new battery Make sure to keep the (+) side up Insert the battery holder Multi-zone Remote CAUTION!!! • Do not store battery with metallic objects or materials 8 XDVDN8290 OPERATION Control Locations - Monitor Closed 1 7 2 8 3 9 4 10 5 11 6 12 13 14 1 Power/Mute 8 Channel/Chapter/Track Up/Zoom Out 2 AM/FM Mode - Hotkey 9 Channel/Chapter/Track Down/Zoom In 3 Auto Store/Preset Scan 10 Position Button (Navigation only) 4 Mode 11 Info/Picture 5 Menu 12 Reset 6 Rotary Encoder/Enter 13 Open/Close Monitor/Angle Adjust 7 Navigation Mode - Hotkey Monitor Notes: T his model incorporates a motorized moving monitor. Before final installation, make sure the monitor will not obstruct the dash, shifter or any other controls. • Upon installation, do not attempt to move the monitor by hand. Use the button on the front panel only or the OPEN button on the remote control. • The unit will stop if it encounters any obstacles during the open/close sequence. If this occurs, remove the obstacle and press or OPEN again to resume the monitor open/close sequence. • 9 XDVDN8290 OPERATION Control Functions - Monitor Closed Power On/Off Mute AM/FM Mode - Hotkey AS/PS Press to turn the unit on. Hold for 3 seconds to turn the unit off. Press MUTE to silence the audio, and will appear in the OSD (On Screen Display). Press MUTE again to cancel. Press AM/FM to select radio tuner mode. If the unit is already in tuner mode, press AM/FM to select between FM1, FM2, FM3, and AM bands. Press AS/PS momentarily to start station PRESET SCAN function, Press AS/PS for 2 seconds to start AUTO STORE station preset function in current BAND. Mode Press MODE to select between the unit’s available modes, such as: Tuner, DVD (which includes CD and MP3/WMA playback), iPod, Bluetooth, Camera, SD, Navigation and Auxiliary inputs. Each time the MODE button is pressed the next mode is chosen. Modes of operation are indicated on the OSD. Hold the MODE button for 3 seconds to toggle the Multi-Zone feature on and off. Please read the Multi-Zone section of the manual on page 85 for a full explanation. Menu Press MENU to display the main menu, along with the setup sub-menus. Press MENU again to return to the current mode. Rapid Dial Rotary Encoder Volume Press to toggle between the Volume and Select functions. When idle, push and hold for 3 seconds to enter the Audio Setup Menu. Normally, the rotary controls the volume, which is visible as a number from 0 to 40, to the right of the volume icon displayed on the screen. When the icon is not displayed, turn the rotary to display the volume level. Turning the rotary while the volume is muted will cancel the mute function. Note: To program the default volume level when the unit is turned on: turn the rotary to the desired level, then push and hold the rotary for 3 seconds to program the current volume level. Select Navigation - Hotkey Turning the rotary while it’s in select mode will allow you to perform various functions and settings depending on the mode/screen displayed. Generally, turning the rotary will let you move through the choices and pushing the rotary will select the highlighted choice. Press NAV to select Navigation mode. 10 XDVDN8290 OPERATION Control Functions - Monitor Closed Up Arrow/OUT This button performs different functions depending on the current mode. A detailed description of the OUT button can be found in each individual section. Down Arrow/IN This button performs different functions depending on the current mode. IN A detailed description of the button can be found in each individual section. POS Info/Picture Monitor Open/Close Angle Position Reset Press to center the map on the current vehicle position. Also cancels panning and destination setting. This button only works during navigation mode. Press to display DVD disc information in DVD mode. Holding this button for 3 seconds brings up the Brightness setting, which can be controlled by the rotary IN encoder or by pressing the OUT buttons on the main remote control. Note: The Brightness can not be adjusted in Bluetooth mode. Press momentarily to toggle between fully open and the current angle. Hold for more than 1 second to adjust the view angle up and down and release to keep desired viewing angle. If you experience abnormal operation or, your unit is inoperable, press the RESET button located on the front bottom-right corner of the unit. After a system reset, the unit resets the main processor (but not the default settings). Notes: Use the tip of a pen to access the reset button. To restore the factory default settings, refer to page 21. Monitor Notes: • The angle can also be manually selected via the screen setup menu. • The color of the LCD monitor varies between viewing angles. Select the angle with the most optimum view for your location. • The last position of the monitor can be saved in memory. When “TFT Auto Open” is selected in the General Setup Menu, the monitor will return to its last position automatically the next time the unit is turned on. Caution 11 •Due to its highly technological design, the XDVDN8290 faceplate is NOT removable. Do not attempt to remove the faceplate. • Upon installation, do not attempt to move the monitor by hand. Use the button on the front panel only or the OPEN button on the remote control. • The unit will stop if it encounters any obstacles during the open/close sequence. If this occurs, remove the obstacle and press or OPEN again to resume the monitor open/close sequence. XDVDN8290 OPERATION Control Locations and Functions - Monitor Open 1 3 2 4 1 Disc slot 2 SD card slot 3 Disc-in indicator Red = Disc inserted Blue = No disc inserted 4 When the panel is fully open, press to eject the disc. Safety Notes: The DVD video display of the in-dash unit will not operate while the vehicle is moving. This is a safety feature to prevent driver distraction. In-dash DVD video functions will only operate when vehicle is in Park and the parking brake is engaged. It is illegal in most states for the driver to view video while the vehicle is in motion. 12 XDVDN8290 OPERATION Control Locations - Main Remote 1 2 3 4 5 6 7 8 9 10 11 12 13 14 15 16 17 18 19 20 21 22 23 24 25 26 27 28 29 30 31 32 33 34 35 36 37 38 39 40 1 Mode 16 Info 31 Root 2 Mute 17 Search 32 Repeat 3 Open/Close 18 Key #0 33 Chapter/Track Down/F1 4 Power 19 Band/Stop 34 Chapter/Track Up/F2 5 Key #1 20 Audio Select 35 Fast Reverse/F3 6 Key #2 21 Escape 36 Fast Forward/F4 7 Key #3 22 4-Way - Up 37 Zoom/F5 8 Volume Up 23 Menu 38 Audio/F6 9 Key #4 24 Picture 39 Angle/Music mode (iPod only) 10 Key #5 25 4-Way - Left 40 Sub-Title/Video mode (iPod only) 11 Key #6 26 OK/Play/Pause 12 Volume Down 27 4-Way - Right 13 Key #7 28 Repeat A-B 14 Key #8 29 Title Menu/JPEG thumbnail view 15 Key #9 30 4-Way - Down * The remote control uses one 3 volt Lithium CR2025 battery. For best performance, replace only with CR2025 or equivalent. 13 XDVDN8290 OPERATION Control Functions - Main Remote Mode Press once to incrementally select desired source. Mute Press once to MUTE audio, press again to return audio. Open/Close Power Keys 0-9 Volume Up Volume Down Info Search Band/Stop Audio Select Escape 4-Way-Up/Down/Left/Right Menu Picture OK Repeat A-B Press once to open monitor, press again to close the monitor. Press once to turn the unit on, press again to turn unit off. Direct access chapter/track/preset station for current BAND. Increase VOLUME. Decrease VOLUME. Displays DVD information. Search function in the DVD mode. Press to increment BAND, or STOP while in DVD/MP3 mode. Enter AUDIO Setup mode. Exit current menu. Navigating system and DVD/SD/JPEG menus. Enter the MAIN system menu. BRIGHTNESS parameter setting for TFT. Starts/pauses playback or confirm settings. Repeat playback from time frame A to time frame B. Title Menu Enters the title menu on DVD/Activates thumbnail view for JPEG. Root Menu Enters the main menu of the DVD. Repeat Repeats playback of current chapter/track or folder. Chapter/Track Down Selects the previous chapter/track for playback/Press to zoom in map in navigation mode. Chapter/Track Up Selects the next chapter/track for playback./Press to zoom out map in navigation mode. Fast Reverse Fast reverses the disc/SD/iPod content/Press to access main menu in navigation mode. Fast Forward Fast forwards the disc/SD/iPod content/Change map angle view in navigation mode. Zoom Zooming in/out on an image from DVD disc or JPEG/Select a destination in navigation mode. Audio Change the audio language for DVD disc playback/Return to previous screen in navigation mode. Angle Selects between different angles (when available) for a scene/Selects iPod Music mode/Rotates JPG clockwise. Sub-Title Language selection for subtitle/Selects iPod Video mode. 14 XDVDN8290 OPERATION Control Locations - Multi-Zone Remote 1 2 3 4 5 6 7 8 9 10 11 12 13 14 15 16 17 20 21 23 24 26 27 18 19 22 25 28 29 30 32 31 33 1 Key #1 12 Key #9 23 Stop 2 Key #2 13 Key #0 24 Play/Pause 3 Key #3 14 Title Menu 25 Zoom 4 Multi-Zone Mode 15 4-Way - Up 26 Fast Reverse 5 Multi-Zone Mute 16 Root 27 Fast Forward 6 Key #4 17 4-Way - Left 28 Slow 7 Key #5 18 OK 29 Repeat 8 Key #6 19 4-Way - Right 30 Audio 9 Search 20 Chapter/Track Down 31 Sub-Title 10 Key #7 21 4-Way - Down 32 Repeat A-B 11 Key #8 22 Chapter/Track Up 33 Angle * The remote control uses one 3 volt Lithium CR2025 battery. For best performance, replace only with CR2025 or equivalent. 15 XDVDN8290 OPERATION Control Locations - Multi-Zone Remote Mode Press once to incrementally select desired Multi-Zone source. Mute Press once to MUTE Multi-Zone audio, press again to return audio. Keys 0-9 Search Direct access chapter/track. Search function in the DVD mode. Title Menu Enters the title menu on DVD/Activates thumbnail view for JPG. Root Menu Enters the main menu of the DVD. 4-Way-Up/Down/Left/Right OK Chapter/Track Down Chapter/Track Up Stop Play/Pause Zoom Navigating system and DVD/SD/JPG menus. Starts/pauses playback or confirm settings. Selects the previous chapter/track for playback. Selects the next chapter/track for playback. Press to STOP while in disc/SD mode. Press to Play/Pause in the disc/SD modes. Zooming in/out on an image from DVD disc or JPG. Fast Reverse Fast reverses the disc/SD content. Fast Forward Fast forwards the disc/SD content. Slow Repeat Audio Sub-Title Angle Repeat A-B Press to activate slow playback in DVD mode. Repeats playback of current chapter/track or folder. Change the audio language for DVD disc playback. Language selection for subtitle. Selects between different angles (when available) for a scene/Rotates JPG clockwise. Repeat playback from time frame A to time frame B. 16 XDVDN8290 OPERATION General Operation Power On/Off Mute Mode Optional Mode Selection Volume Audio Adjustment (from front panel) Press to turn the unit on. Hold for 3 seconds to turn the unit off. Press MUTE to silence the audio; will appear in the OSD (On Screen Display). Press MUTE again to cancel. Press MODE to select between Tuner, Disc, iPod, Bluetooth, Camera, SD, Navigation and Auxiliary inputs. Modes of operation are indicated in the OSD (On Screen Display). iPod, Bluetooth and SD card (optional) must be connected/inserted to appear in the MODE selection string. Press the top left corner of the screen to display the OSD menu bar. Press Tuner, Disc, iPod, Bluetooth, Camera, SD, Navigation or Auxiliary in the MAIN menu page to select the desired source. Adjust VOLUME using rotary encoder or the VOL +/- buttons (00-40). Press rotary knob for 3 seconds, then release. Press rotary momentarily to advance to desired parameter to be changed. Turn rotary Q or P to adjust to desired level. Press rotary to advance to next selection, and press and hold to exit. 2-Channel Audio Settings 6-Channel Audio Settings ltem Master Volume Front Left Channel Volume Front Right Channel Volume 00 00 00 R 00 L F R Audio Adjustment (from remote) L A djustable Range 00 to 40 -10 to +10 -10 to +10 Rear Left Channel Volume Rear Right Channel Volume -10 to +10 Center Channel Volume -10 to +10 Subwoofer Volume -10 to +10 -10 to +10 Note: 6-Channel audio is only adjustable when "Full 6CH" mode is selected. Refer to page 49 for more details. Press the SEL button. Press the p or q buttons on the remote to select an item to be adjusted. Press or to adjust the desired setting. Press the ESC button on the remote control to exit the audio control menu. Notes: The Bass and Treble levels are only adjustable when EQ is set to "User” mode. The Loud function compensates for deficiencies in sound ranges at low levels. When the Loud function is on, LOUD is displayed in the OSD. 17 XDVDN8290 OPERATION General Operation INFO/PIC Monitor Brightness CVBS Screen Controls Press PIC momentarily to display DVD disc information. Press and hold PIC for 2 seconds to change monitor BRIGHTNESS: IN Press OUT to increase, to decrease, or turn the rotary to adjust the level up or down. (0 minimum/20 maximum) 10 is default. While in iPod Video playback, Aux or Camera mode: Press and hold PIC for 2 seconds to access PICTURE MENU. Press PIC momentarily to step to next selection: PICTURE MENU SHARPNESS COLOR CONTRAST BRIGHTNESS TINT 10 10 10 10 10 L Sharpness Press OUT or IN to adjust the sharpness (0 minimum/+20 maximum). Color Press OUT or IN to adjust the color (0 minimum/+20 maximum). Contrast Press OUT or IN to adjust the contrast (0 minimum/+20 maximum). Brightness Press OUT or IN to adjust the brightness (0 minimum/+20 maximum). Tint Press OUT or IN to adjust the tint (0 minimum/+20 maximum). Note: Adjustments to Sharpness, Color, Contrast, Brightness, or Tint are only possible while in either iPod video playback, Aux or Camera mode. 18 XDVDN8290 OPERATION General Operation - Main Menu Main Menu Access There are three methods to access the MAIN menu: • Press MENU button on the front panel. • Press MENU button on the main remote control. • Touch the upper left corner of the touch screen. 1 2 3 4 5 6 16 15 7 L 14 13 12 5 11 Touch Access Buttons 1) 2) 3) 4) 5) 6) 7) 8) 9) 10) 11) 12) 13) 14) 15) 16) Rapid Dial Rotary Encoder 19 10 9 8 Touch to access AM/FM TUNER mode. Touch to access NAVIGATION mode (Navigation SD card must be inserted), Touch to access CD/DVD mode (CD/DVD must be inserted). Touch to access CAMERA mode, if optional camera isn't connected, "No Signal Detected" will be displayed. Touch to access BLUETOOTH mode (BLUETOOTH must be activated first). Refer to page 75 for more details. Touch to RETURN to previous screen. Touch to access iPod mode (optional iPod must be connected to activate). Touch to enter STANDBY mode. Touch this button again (or any button) to resume normal operation. Note: VOLUME level can be controlled in STANDBY mode. Touch to access AUXILIARY A/V INPUT mode. Touch to access SD mode (optional SD card must be inserted). Touch to access SCREEN SETUP menu. Touch to access GENERAL SETUP menu. Touch to access ASP Config menu. Touch to access CD/DVD SETUP menu, (CD/DVD must be inserted to function). Touch to access MULTI-ZONE menu. Touch to access MAIN menu. The rotary encoder can also control touch screen functions from the main menu. • Select desired function rotating clockwise or counter-clockwise. • Press to confirm/ENTER. XDVDN8290 OPERATION GENERAL Setup - Menu L General Setup Menu • • • Press GENERAL icon to access the GENERAL setup mode. Select desired parameter you wish to change. Page will return back to previous screen after 10 seconds of inactivity or by pressing the RETURN button. GENERAL Setup Menu matrix - page 1 Settings Default Radio USA Clock adjust Clock Mode AM 12Hr Camera Image Normal Video Format Auto TFT Auto Open Off Options USA S-Amer1 S-Amer2 Europe 00:00 12Hr 24Hr Normal Reverse Auto NTSC PAL On Off Manual Function Set to appropriate setting for your country See adjusting the clock on page 23 for more details PM 6:00 18:00 Normal Image Mirror camera input image 180 degrees System will auto detect NTSC or PAL For NTSC compatibility For PAL compatibility TFT panel will automatically open when IGN is turned on TFT panel will not auto open when IGN is turned on TFT will only open/close when button is pressed 20 XDVDN8290 OPERATION GENERAL Setup - Menu L L General Setup Menu • • • • Press GENERAL icon to access the GENERAL setup mode. Press PAGE icon in the lower right corner. Select desired parameter you wish to change. Page will return back to previous screen after 15 seconds of inactivity or by pressing the RETURN button. GENERAL Setup Menu matrix - page 2 Settings Bluetooth Anti-theft Code Anti-theft active Load Factory defaults 21 Default Off 0000 Off Yes Options Off On ---On Off Are you sure? Yes/Cancel Function Turns off the Bluetooth functionality Enables Bluetooth functionality Must enter password to turn anti-theft on or off System will require a password if main battery power is removed for more then 40 seconds No password will be required if power is removed Load all factory parameters to their original settlings, Notes: This will not reset the anti-theft password. Default anti-theft password is 0000. XDVDN8290 OPERATION GENERAL Setup - Adjusting Radio Frequency Adjusting Radio Frequency L 1 Step 1 Touch top left corner of screen. L 2 Step 2 Touch GENERAL icon. L 3 Step 3 Touch USA. L L 5 4 Step 4 Touch the setting for your region. Step 5 Touch RETURN to exit. 22 XDVDN8290 OPERATION GENERAL Setup - Adjusting the Clock 12Hr Clock Mode L 1 Step 1 1) Touch top left corner of screen. L 2 Step 2 2) Touch GENERAL icon. L 3 Step 3 3) Touch 00:00 area in the CLOCK row. L 7 Steps 4-8 24Hr Clock Mode 23 L L L 8 5 6 4) Keypad will appear. 5) Enter HOURS, touch OK. 6) Enter MINUTES, touch OK. 7) Touch AM or PM to set. 8) Touch RETURN to exit. For 24Hr format, select 24Hr from CLOCK MODE, then follow steps 1-8. XDVDN8290 OPERATION GENERAL Setup - Setting the Anti-theft code Default Anti-theft password is 0000 and is turned off. To turn this feature on, follow the steps below. CAUTION!! This will lock your unit from operating if battery power is disconnected for more than 5 minutes. Step 1 & 2 L 1 L 2 1) Touch top left corner of screen. 2) Touch GENERAL icon. L 4 L 3 Step 3 & 4 Step 5 & 6 Note: it is recommended that you choose your own 4-digit password Step 7 & 8 carefully, write it down somewhere and keep in a safe location. In the event you ever lose or forget your password, call our tech hot line for support on how to unlock your system. Step 9 & 10 3) Touch down arrow icon. 5) Enter 0000, then press OK. 4) Touch ----. L 5 L 6 6) Touch Off. L L L 7 7) Touch On. L 8 8) Touch ---- again. 9) Enter your new 4-digit password, then press OK. 10 9 10) Touch RETURN to exit. 24 XDVDN8290 OPERATION SCREEN Setup - Menu Screen Setup Menu • • • L Press SCREEN icon to access the SCREEN setup mode. Select desired parameter you wish to change. Page will return back to previous screen after 15 seconds of inactivity or by pressing the RETURN button. SCREEN Setup Menu matrix Settings Default Options Brightness 10 0 - 20 Screen Tilt Screen Saver 4 On TS Calibrate No 1-6 Off On No Yes Version Function Press or on the remote or press the rotary once and rotate clockwise/counter-clockwise to adjust the Brightness to the desired setting Select 1 to 6 to adjust the default tilt angle of the screen Select On to activate the screen saver, Off to deactivate Touch Yes to enter the Touch Screen calibration mode Software version of unit System Standby L To conserve the LCD backlight lifespan and eliminate glare while night driving, press STANDBY. The TFT screen will turn off (black out), however all other operations continue to operate. Press any button except VOLUME or MUTE, or touch the screen again to return to normal viewing. 25 XDVDN8290 OPERATION SCREEN Setup - Setting TFT Brightness This will set the default setting for the TFT display brightness. This can also be set by pressing the INFO button on the front TFT panel. Step 1 L 1 1) Touch top left corner of screen. L 2 Step 2 2) Touch SCREEN icon. L 3 Step 3 3) Touch [-] to reduce brightness. L L 5 4 Step 4 4) Touch [+] to increase brightness. 0 - 20 is possible Default = 10 Step 5 5) Touch RETURN to exit. 26 XDVDN8290 OPERATION SCREEN Setup - Setting TFT Angle Set for best viewing angle for your vehicle Step 1 L 1 1) Touch top left corner of screen. L 2 Step 2 2) Touch SCREEN icon. L 3 Step 3 3) Touch a number displayed in SCREEN TILT row. L 5 L 4 Step 4 4) Touch desired angle for best viewing angle. 1 - 6 is possible Default = 4 Step 5 27 5) Touch RETURN to exit. XDVDN8290 OPERATION SCREEN Setup - Touch Screen Calibration Upon initial installation or occasionally, the touch screen may have to be calibrated. Follow these steps as described. Step 1 L 1 1) Touch top left corner of screen. L 2 Step 2 2) Touch SCREEN icon. LL 3 Step 3 & 4 3) Touch No in TS Calibration row. 4) Then touch Yes. L 5 Step 5 & 6 4 Notes: For proper calibration you must touch each pointer for 2 seconds. If pointers are not touched properly, the calibration sequence will start over until the calibration is done correctly. 5) Touch and hold the pointers as indicated on the screen for 2 seconds each. 6) Screen will automatically return to MAIN MENU, touch RETURN to exit. 28 XDVDN8290 OPERATION ASP Config - Audio Settings Notes: Bass Freq Treble Freq Sub Filter These settings affect the quality of the audio in "Downmix" mode only and are primarily for use by a professional installer. For the casual user, it is recommended to only adjust the general sound quality by using the Audio Setup Menu, which is accessed by pressing the SEL button on the remote or pressing the rotary for 3 seconds. Sets the bass center frequency for optimal bass effect. Choices are 60, 80, 100, 130, 150 and 200Hz. Sets the treble center frequency for optimal treble effect. Choices are 10, 12.5, 15 and 17KHz. Sets the subwoofer crossover frequency which affects the subwoofer’s low-pass filter and the “SMALL” speakers’ high-pass filter. Choices are 80, 120 and 160Hz. Notes: This setting has no effect when the subwoofer is set to “OFF” and/or if any other speaker is set to "LARGE". Sub Phase Bass Q-Factor 29 Sets the phase of the subwoofer. Depending on the installation, this setting can be used to change the relative phase of the subwoofer output in relation to the other speakers. Choices are 0˚ and 180˚. This setting alters the sharpness or "Q factor" of the bass output. Choices are 1.0, 1.25, 1.5 and 2.0. XDVDN8290 OPERATION ASP Config - Audio Settings L Notes: FM/AM Gain The Gain settings allow you to customize the relative volume of the various modes to compensate for volume differences between the sources. The range is adjustable between -7 to +7, with 0 being the reference point (default level). Adjusts the relative volume in AM/FM Tuner mode. DVD Gain Adjusts the relative volume in DVD/CD/MP3/WMA mode. iPod Gain Adjusts the relative volume in iPod mode. Bluetooth Gain Aux In Gain SD Card Gain NAVI Gain Adjusts the relative volume in Bluetooth mode. Adjusts the relative volume in Aux In mode. Adjusts the relative volume in SD Card mode. Adjusts the relative volume in Navigation mode. Note that Aux In Gain, SD Card Gain and NAVI Gain are on a separate screen, which is accessed by touching the white arrow at the bottom right corner of the screen. 30 XDVDN8290 OPERATION AM/FM Tuner Operation - OSD Overview 1 2 3 4 5 20 19 6 7 18 17 16 15 14 Tuner Mode 31 13 12 11 10 9 8 From the main menu, touch TUNER icon on the screen, or press the AM/FM button to select AM/FM Tuner mode. 1 Current Source Indicator Displays source currently playing. 2 Preset Number Indicator Shows what preset has been selected. 3 Stereo Indicator Shows that the frequency selected is received in stereo. 4 Preset Number List Display Shows the preset list by preset number. 5 Preset Station List Display Shows the preset station list by frequency. Touch frequency to select a preset. Touch and hold frequency to store presets. 6 Local / DX Tuning Mode Shows when local or distance tuning is on. 7 Preset Display Scroll Bar Allows scrolling of preset list. 8 Tuner Scan Touching this icon will scan through all available stations in the current band. XDVDN8290 OPERATION AM/ FM Tuner Operation - OSD Overview 9 Tune Frequency - Up Touching this icon will tune the radio to a higher frequency by one frequency step. 10 Tune Frequency - Down Touching this icon will tune the radio to a lower frequency by one frequency step. 11 Seek Next Station - Up Touching this icon will tune to the next strong station at a higher frequency. (This function can also be performed by pressing OUT .) 12 Seek Next Station - Down Touching this icon will tune to the next strong station at a lower IN frequency. (This function can also be performed by pressing .) 13 Preset Scan/Auto Station Tune Touching this icon will scan through all presets in the current band. (This function can also performed by pressing the AS/PS button.) Holding this button for more than 2 seconds will automatically program the 12 strongest stations available into the presets in the current band. (This function can also be performed by holding the AS/PS button.) 14 Band Touch band icon repeatedly until the desired band is displayed, FM-1, FM-2, FM-3, or AM. (This function can also be performed by pressing AM/FM button.) 15 Volume Indicator Indicates current volume level, controlled by rotary encoder. 16 Multi-Zone Indicator Displays current status of Multi-Zone mode. 17 Loudness Indicator Touch screen here to enter Audio Setup Menu. 18 EQ Indicator Touch screen here to enter Audio Setup Menu. 19 Current Station Indicator Indicates current frequency. 20 Band Indicator Shows which band the radio is tuned to, FM-1, FM-2, FM-3, or AM. 32 XDVDN8290 OPERATION AM/FM Tuner Operation AM/FM Tuner Mode From the main menu, touch TUNER icon to select AM/FM Tuner mode. Press the AM/FM button. From the remote control or the front panel: Press MODE until TUNER is displayed on the screen. Band Touch on the screen repeatedly until the desired band is displayed, FM-1, FM-2, FM-3, or AM. Press the AM/FM button to switch between bands, FM-1, FM-2, FM-3, AM. From the remote control: Press the BAND button. Manual Tuning Touch Touch on the screen to tune to the next higher frequency step. on the screen to tune to the next lower frequency step. Touch and hold either multiple stations. or on the screen to continue tuning across From the remote control: Touch or to perform manual tuning. Seek Tuning Touch Touch to tune to the next higher strong station. to tune to the next lower strong station. Press OUT to tune to the next higher strong station. IN Press to tune to the next lower strong station. From the remote control: Press or to tune to the next higher strong station. Press or to tune to the next lower strong station. Storing Presets There are 36 FM and 12 AM presets available in 4 bands. After finding a frequency that you would like to store in memory, touch and hold the screen on any of the frequencies in the preset station list until it turns yellow. Auto Store Presets Touch and hold the icon to automatically program the 12 strongest stations available into the presets in the current band. Press and hold the AS/PS button for more than 2 seconds. 33 XDVDN8290 OPERATION AM/ FM Tuner Operation Preset Scan Touching the button will scan through all tunable presets in the current band and play them for 10 seconds each. Press the AS/PS button momentarily. Direct Preset Tuning To select a desired station from the preset station list, touch any of the displayed station frequencies from the list. Use Rapid Dial by pressing in on the rotary, turn clockwise or counter-clockwise, and pressing in again to select the highlighted channel. Use the up and down arrows on screen to scroll through the presets. Once highlighted, simply touch the screen at the appropriate preset. From the remote control: Press or to scroll through the presets. When the correct preset is highlighted press OK. Use the numeric keypad to enter the desired preset number. Scan Tuning Touch SCAN on the screen and it will tune you to all stations available with good reception for 10 seconds at a time. Touch SCAN again to disable. Local Tuning Local tuning lets you tune in radio stations with sufficiently strong signals for good reception. In areas that reception is poor, you can switch from local to distance tuning by touching the LOC button on the screen. 34 XDVDN8290 OPERATION WARNING Upon installation of this Monitor/DVD player (“unit”) into a vehicle, the driver of the vehicle must not operate this unit by watching videos or playing video games while driving. Failure to follow this instruction could lead to driver distraction which could result in serious injury or death to the vehicle’s occupants or persons outside the vehicle and/or property damage. Several states prohibit the installation of monitors/DVD players if the screen is visible from the driver’s seat. If you reside in a jurisdiction which has enacted such a law, this unit must not be installed so that the screen is visible from the driver’s seat. When installing this unit in the front console/dashboard, the unit must be positioned so that it is facing the front passenger seat only. Failure to follow this instruction could lead to driver distraction which could result in serious injury or death to the vehicle’s occupants or persons outside the vehicle and/or property damage. This unit is designed so that it may be operated only when the vehicle is in “Park” and the parking brake is fully engaged. To this end, this unit includes a parking brake lock-out feature which prohibits the unit from operating if the vehicle is not in “Park” and/or the parking brake is not fully engaged. When installing this unit, the installer must connect the parking brake detect wire (“Yellow-Blue Lead”) to the parking brake mechanism in order to make the parking brake lock-out feature operable. DO NOT simply ground the parking brake detect wire to a metal portion of the vehicle. Failure to properly install the parking brake lock-out feature could lead to driver distraction which could result in serious injury or death to the driver’s occupants or persons outside the vehicle and/or property damage. Once the parking brake lock-out feature is installed, the owner/user must not attempt to disrupt/neutralize the parking brake lock-out feature by (a) partially engaging the parking brake and/or (b) purchasing/using any device or unit designed to send necessary brake signals to the unit. Failure to follow these instructions could lead to driver distraction which could result in serious injury or death to the driver’s occupants or persons outside the vehicle and/or property damage. When operating this unit, keep the unit’s volume level low enough so that the vehicle’s occupants can hear traffic-related sounds such as police and emergency vehicles. Failure to follow this instruction could lead to driver distraction which could result in serious injury or death to the vehicle’s occupants or persons outside the vehicle and/or property damage. 35 XDVDN8290 OPERATION DVD Operation - Parking Brake Initialization SAFETY WARNING CAUTION !!! IT'S UNLAWFUL TO OPERATE A VEHICLE WHILE VIDEO IS DISPLAY IN THE DRIVERS VIEWING AREA ENGAGE EMERGENCY BRAKE TO ENJOY VIDEO Front Monitor Video Initialization • The video display of the in-dash unit will not operate while the vehicle is moving. This is a safety feature to prevent driver distraction. In-dash video functions will only operate when vehicle is in Park and the PARKING BRAKE is engaged. It is illegal in most states for the driver to view video while the vehicle is in motion. Refer to local laws in your area. • The vehicle must be in park and the parking brake applied to view video on the in-dash monitor. • As a safety feature, “ENGAGE PARKING BRAKE” blue screen will show on the display when the vehicle's parking brake is not engaged. Video display on the front monitor isn't allowed until the PARKING BRAKE is engaged. By connecting the yellow/blue PARKING BRAKE wire to brake switch circuit as described below, DVD and AUX AV audio can be heard while the vehicle is in motion without engaging the parking brake. Follow these two initialization procedures carefully to allow video playback on on the XDVDN8290 TFT: There are two situations that start the PARKING BRAKE sequence. Parking Brake Initialization Situation 1 First situation is while driving: 1) Stop vehicle, put in Park, make sure PARKING BRAKE is off/released. 2) Depress PARKING BRAKE for 1 second. 3) Release PARKING BRAKE for 1 second. 4) Depress PARKING BRAKE permanently. Note: Once above procedure 1-4 is completed, video will display in about 6 seconds. Parking Brake Initialization Situation 2 Second situation is while already parked and the PARKING BRAKE is already applied: 1) Keep vehicle in Park, PARKING BRAKE should be on. 2) Release PARKING BRAKE for 1 second. 3) Depress PARKING BRAKE for 1 second. 4) Release PARKING BRAKE for 1 second. 5) Depress PARKING BRAKE permanently. Notes: Once 2nd procedure 1-5 is completed, video will display in approx. 6 seconds. The transition time must be less than 2 seconds between depress and release. This procedure will have to repeated when the IGN is turned off. 36 XDVDN8290 OPERATION DVD Operation - Region Management DVD Region Management Some DVD discs can be played only in certain playback modes according to the intentions of the software. As the XDVDN8290 plays discs according to their intentions, some functions may not work as intended. Please be sure to read the instructions provided with each disc. This player has been designed to play back DVD software that has been encoded for specific region areas. It cannot play back DVD software encoded for other region areas than the region areas for which it has been designed. The XDVDN8290 will play discs labeled “Region 1” or “All”. DVD region codes: 1 - USA, Canada 2 - Japan, Europe, South Africa, Middle East 3 - Rep. of Korea, Taiwan, Hong Kong, Parts of Southeast Asia 4 - Australia, New Zealand, Mexico, South America 5 - Eastern Europe, Russia, India, Africa 6 - China DVD Disc Symbols Notes: Some DVD discs can be played only in certain playback modes according to the intentions of the software. As the XDVDN8290 plays discs according to their intentions, some functions may not work as intended. Please be sure to read the instructions provided with each disc. 37 XDVDN8290 OPERATION DVD Operation - Inserting a Disc Eject button DVD Loading Slot Insert CD/DVD with label facing upwards Inserting a Disc Open panel to reveal disc slot by pressing . With the label facing up, insert a standard size disc into the slot. The panel will close and the disc will automatically begin playback. Other sub-menus may have to be pressed to access the DVD movie/music content. Read the directions of your specific DVD disc for other features. Note: If PARENTAL Lock is activated and the disc inserted is not authorized, a 4-digit code must be entered and/or the disc be authorized. See "RATING MENU" on page 53. Note: Only one disc can be inserted at a time. Ejecting the Disc Resetting the Loading Mechanism Press the EJECT button. If the disc loads abnormally or an system error occurs, press and hold the eject button for 3 seconds to reset the loading mechanism. The disc will eject and normal operation should resume. 38 XDVDN8290 OPERATION DVD Operation - Touch Screen Controls Hidden Touch Screen area while in TUNER mode There are several hidden TOUCH SCREEN areas as outlined below: "A" area can be used in any mode to access MAIN menu. L Hidden Touch Screen areas while in DVD mode "A-F" areas can be used in DVD mode to access: A - Displays MAIN menu B - Displays DVD disc information C - Selects PREVIOUS chapter D - Selects NEXT chapter E - Displays the full DVD transport controls F - Displays GOTO search menu L 39 XDVDN8290 OPERATION DVD Operation - Touch Screen Controls Using the hidden Touch Screen Controls A - Displays MAIN menu B - Displays DVD disc information C - Selects PREVIOUS chapter D - Select NEXT chapter E - Displays the full DVD transport controls F - GOTO search menu L L AREA A Access MAIN Menu Note: A DVD disc must be inserted to access these functions and features. AREA B Displays Disc Information L L AREA C Selects PREVIOUS Track AREA D Selects NEXT Track L L AREA E Displays DVD Transport Controls AREA F DVD Search 40 XDVDN8290 OPERATION DVD Operation - Touch Screen Controls 1 Using the hidden Touch Screen Controls 2 Touch AREA E 3 DVD Mode 41 4 5 6 7 8 9 From the main menu, touch the DISC icon on the screen to select DVD mode. 1 Title Menu Jumps to the DVD Title menu. 2 Sub-Title Mode Activates sub-titles and cycles between multiple sub-title languages. 3 Play/Pause Touch the 4 Stop 5 Fast Reverse Touch the icon to fast reverse at 2x speed. Each touch changes speed from 2x to 4x to 8x to 20x then back to 1x play. 6 Fast Forward Touch the icon to fast forward at 2x speed. Each touch changes speed from 2x to 4x to 8x to 20x then back to 1x play. 7 Repeat Touch the icon to repeat the current chapter or title. This icon will remain highlighted until touched a third time to disable. 8 Repeat A-B Touch the A B icon once to select a start point. Touch it a second time to select and end point. The A B icon will illuminate and the DVD will then loop from the start point to the end point until touched a third time. 9 Audio Mode Touch this icon to activate alternate audio modes on DVD's that have alternate audio streams. Touch the icon to temporarily stop or resume playback. icon to stop the chapter where it is. XDVDN8290 OPERATION DVD Operation - Searching a DVD Searching a DVD Searching by Time, Title or Chapter L Touch Area F to bring up the Search Window. The Search Window allows a search for a specific time, title or chapter. To search for a specific time, touch the --:--:-- area and an on-screen keyboard will pop up. Use the keyboard to enter a time and touch OK. (For example, to skip to 1 hour, 12 minutes and 19 seconds into the DVD, touch: 1 1 2 1 9 OK.) Search by TIME example To search for a specific title and/or chapter, touch the --- / --- area and an on-screen keyboard will pop up. Use the keyboard to enter a title and chapter and touch OK. This can be used to select a specific chapter in the current title, a new title or a specific chapter in a new title. (For example, to skip to a specific chapter within the current title, touch the --- on the right and use the keyboard to enter a chapter number, then touch OK. To skip to a different title and start from the beginning, touch the --- on the left and the keyboard to enter a title number, then touch OK. To skip to a specific chapter in a new title: touch the left --- and use the keyboard to enter a title number, DO NOT touch OK, then touch the right --- and use the keyboard to enter a chapter number, Then touch OK.) From the remote control: Press SRCH to bring up the search window, then use the arrows to highlight either the time, title or chapter field and use the numeric keypad to enter the appropriate information and press OK. Notes: Some DVD discs can be played only in certain playback modes according to the intentions of the software. As the XDVDN8290 plays discs according to their intentions, some functions may not work as intended. Please be sure to read the instructions provided with each disc. 42 XDVDN8290 OPERATION DVD Operation Playback Control Touch Area E to bring up the on-screen buttons. Touch to fast forward or to fast reverse. Each subsequent press of the button will change the speed from normal to 2x to 4x to 8x to 20x and back to 1x. Hold the Hold the OUT IN button to fast forward. button to fast reverse. From the remote control: Press to fast forward. Press to fast reverse. Repeat Mode Touch the Repeat button to repeat either a chapter or title. The first touch activates Repeat Chapter mode and a second touch activates Repeat Title mode. When either mode is active, the Repeat button will be illuminated, and touching it a third time will disable Repeat Mode. From the remote control: Press to select Repeat Chapter, Repeat Title and Repeat Off modes. Note: The Repeat Mode can only be changed while the DVD is playing. Repeat A->B T ouch the A B icon once to select a start point. Touch it a second time to select and end point. The A B icon will illuminate and the DVD will then loop from the start point to the end point until touched a third time. From the remote control: Press A B to select a start point and stop point. Press a third time to deactivate. Play/Pause Touching PLAY/PAUSE will temporarily stop playback of the DVD. Touching it again will resume playback, Press the PLAY/PAUSE button to pause or resume the DVD. From the remote control: Press OK to temporarily stop and resume playback. Stop Touch Stop to stop playback. Pressing Play at this point will resume playback. If Stop is touched a second time, then playback stops completely and will restart from the beginning of the disc. From the remote control: Press to stop playback of the current chapter. 43 XDVDN8290 OPERATION DVD Operation Sub-Titles Touch the SUB.T button to activate Sub-Title mode and select a sub-title language. Each touch will cycle the mode from off to language 1, language 2, etc., and back to off. From the remote control: Press the SUB-T button to control Sub-Title mode. Notes: • Not all DVDs have sub-titles and when they do, some will only have 1 language. Therefore this function may be disabled or limited. • The Sub-Title Mode can only be changed while the DVD is playing. Audio Mode Touch the Audio Mode icon to change the audio stream. Each touch will cycle the language. From the remote control: Press the AUDIO button to control the Audio Mode. Notes: • Not all DVDs have multiple languages, therefore this function may be disabled or limited. • The Audio Mode can only be changed while the DVD is playing. DVD Disc Information Touch Area B to bring up the DVD Disc Information, which includes: Current/Total Titles and Chapters, elapsed time for current title, EQ Mode and Loudness setting, current time and Multi-ZONE Indicator. Press the PIC button to bring up the DVD Disc Information. From the remote control: Press the INFO button to bring up the DVD Disc Information. Zoom Mode DVD Title Menu From the remote control: Press the ZOOM button to activate Zoom Mode. Each subsequent press of the button will change the magnification from normal to 1 to 2 to 3 to 4 and back to normal. When Zoom Mode is active, the arrows on the remote will pan the screen up, down, right and left. Touch the Title Menu icon to return to the DVD’s main menu. From the remote control: Press TITLE to return to the DVD’s main menu. Press ROOT to move up one level on the DVD’s menus. (For example, when viewing bonus materials, the ROOT button will return to the bonus menu instead of the main menu.) Pressing ROOT again will usually return to the current chapter. Note: On some DVD’s the TITLE and ROOT buttons may be reversed. 44 XDVDN8290 OPERATION DVD Setup Menu - Language LANGUAGE Setup Menu Note: A DVD disc must be inserted to access these functions and features. With the unit in DVD mode, press AREA A (top left screen) to display the MAIN menu. Press DVD Setup to access the DVD setup menu. L L Press the LANGUAGE icon to select LANGUAGE setup page. Disc Subtitle Press to select desired disc subtitle language. L Audio Language L Press to select desired disc audio language. L DVD Menu English = DEFAULT French Spanish Press to select desired disc menu language. L 45 English French Spanish Auto Off = DEFAULT English = DEFAULT French Spanish XDVDN8290 OPERATION DVD Setup Menu - Audio Audio Setup Menu Note: A DVD disc must be inserted to access these functions and features. With the unit in DVD mode, press AREA A (top left screen) to display the MAIN menu. Press DVD Setup to access the DVD setup menu. L L Press the AUDIO icon to select from the following menus: Pink Noise Press to activate pink noise generator for the desired channel. The pink noise generator is used to set the relative speaker levels for multi-channel playback. L Dynamic Range Control L Downmix (2-channel) Settings Off = DEFAULT Left Right Full 6CH (6-channel) Settings Off = DEFAULT Left Right Left Surround Right Surround Select On to activate dynamic range control. Off = DEFAULT On L 46 XDVDN8290 OPERATION DVD Setup Menu - Audio Center Control Press to select desired center channel time delay. The distance is defined in milliseconds. 5ms 4ms 3ms 2ms 1ms 0ms = DEFAULT L Rear Control Press to select desired rear channel time delay. The distance is defined in milliseconds. 15ms 12ms 9ms 6ms 3ms 0ms = DEFAULT L Down Sampling Select On to activate audio down sampling. The DVD audio output will be downsampled to 48kHz. The original sampling frequency is preserved when Off is selected. Off = DEFAULT On L 47 XDVDN8290 OPERATION DVD Setup Menu - Video Video Setup Menu Note: A DVD disc must be inserted to access these functions and features. With the unit in DVD mode, press AREA A (top left screen) to display the MAIN menu. Press DVD Setup to access the DVD setup menu. L L Press the VIDEO icon to select from the following menus: TV Shape Press to select desired TV shape. L 4:3 16:9 = DEFAULT NORMAL - 4:3 L WIDE - 16:9 Angle Mark Select On to activate angle mark. On = DEFAULT Off L View Mode Press to select desired view mode. FILL Original H FIT W FIT FIT to Screen = DEFAULT Pan Scan L 48 XDVDN8290 OPERATION DVD Setup Menu - Speaker Speaker Setup Menu Note: A DVD disc must be inserted to access these functions and features. With the unit in DVD mode, press AREA A (top left screen) to display the MAIN menu. Press DVD Setup to access the DVD setup menu. L L Press SPEAKER icon to select from the following menus: Speaker Mode Select desired speaker output mode. Full 6CH DownMix = DEFAULT L *Front Speaker Size L Select size of front speaker. Large = DEFAULT Small L Note: *Full 6CH mode must be selected to adjust the front speaker size. 49 XDVDN8290 OPERATION DVD Setup Menu - Speaker *Surround Speaker Size Note: A DVD disc must be inserted to access these functions and features. *Subwoofer Speaker Select size of surround speaker. Large = DEFAULT Small None L Select Present if a subwoofer is included in your system. Present None = DEFAULT L *Center Speaker Size Press to select size of center speaker. Large Small None = DEFAULT L Note: *Full 6CH mode must be selected to adjust the surround speaker size, subwoofer speaker and center speaker size. 50 XDVDN8290 OPERATION DVD Setup Menu - Rating Rating Setup Menu Note: A DVD disc must be inserted to access these functions and features. With the unit in DVD mode, press AREA A (top left screen) to display the MAIN menu. Press DVD Setup to access the DVD setup menu. L L Press the RATING icon to select from the following menus: Enable Parental Lock Password Press ---- to enter a password. L Setting Parental Lock Password Rating Setting L 1. Enter a 4-digit code 2. Write the code down 3. Save in a safe place When unlock symbol is displayed, select desired rating. Parental Password Override 51 L L 1. Kid Safe 2. G 3. PG 4. PG-13 5. PG-R 6. R 7. NC-17 8. Adult = DEFAULT In the event you forget or loose your PARENTAL LOCK password, enter 9991. XDVDN8290 OPERATION CD Operation - OSD Overview 1 2 3 4 20 5 6 19 18 7 8 17 16 15 CD Mode 14 13 12 11 10 9 From the main menu, touch the DISC icon on the screen to select CD mode. 1 Current Source Indicator Displays Source Currently Playing 2 Track Number Indicator Displays current track number and total number of tracks on the disc. 3 Disc Title Indicator Displays current disc title when available. 4 Track Title List Displays up to 6 tracks on the disc in order, with track title, when available. 5 Repeat Touch the icon to repeat current track. This icon will remain highlighted until touched to disable. 6 Shuffle Touch the icon to shuffle all tracks on the disc. This icon will remain highlighted until touched to disable. 52 XDVDN8290 OPERATION CD Operation - OSD Overview 53 7 Scroll bar Allows scrolling of track list. 8 Direct Select Keyboard Touch the icon to display a numeric keyboard. Enter desired track number and touch OK to select it. 9 Track Scan Touch the SCAN icon to listen to 10 seconds of each track in order. This icon will remain highlighted until touched to disable. 10 Fast Forward Touch the icon to fast forward at 2x speed. Each touch changes speed from 2x to 4x to 8x to 20x then to 1x play. 11 Fast Reverse Touch the icon to fast reverse at 2x speed. Each touch changes speed from 2x to 4x to 8x to 20x then to 1x play. 12 Page Up Touch the icon to see the next 6 tracks on the disc. 13 Page Down Touch the icon to see the previous 6 tracks on the disc. 14 Stop 15 Play/Pause Touch the 16 Volume Indicator Indicates current volume level, controlled by rotary encoder. 17 Multi-Zone Indicator Displays current status of Multi-Zone mode. 18 Loudness Indicator Touch screen here to enter Audio Setup Menu. 19 EQ Indicator Touch screen here to enter Audio Setup Menu. 20 Track Time Indicator Shows how much time has elapsed in the current track. Touch the icon to stop the song where it is. icon to temporarily stop or resume playback. XDVDN8290 OPERATION CD Operation Playing CD-DA discs After inserting a CD disc, files will play in numerical order in the directory. L Selecting by Keypad Touch to display keypad. Enter desired track number and press OK. L Selecting by Direct Track Access Touch desired track for DIRECT TRACK access. L L Previous/Next Page Touch to view UP/DOWN pages of available tracks. 54 XDVDN8290 OPERATION CD Operation Page Up/Down The Page Up and Page Down on-screen buttons can be used to see the rest of the tracks on the CD. Use the Direct Select method to play a desired track. From the remote control: Press to display the next page. Press to display the previous page. Track Select Press Press OUT IN button to skip to the next track. button to skip to the previous track. From the remote control: Press to skip to the next track. Press to skip to the previous track. IN Note: Press or button once will return to the beginning of the current track. Press it a second time to skip to the previous track. Direct Select To select a desired track from the track title list, touch any track on the list. Use the up and down arrows on screen to scroll through the tracks. Once highlighted, simply touch the screen at the appropriate track. Press Rapid Dial rotary encoder once. • Select desired track by rotating clockwise or counter-clockwise. • Press to confirm/ENTER. From the remote control: Press or to scroll through the tracks. When the correct track is highlighted press OK. Direct Track Entry Touch the icon to display a numeric keyboard. Enter desired track number and touch OK to select it. From the remote control: Use the numeric keypad to enter the desired track number. Play Control You can use the Fast Forward or Fast Reverse on-screen buttons to speed up the playback of a track. Each subsequent press of the button will change the speed from normal to 2x to 4x to 8x to 20x and back to 1x. Hold the Hold the OUT IN button to fast forward. button to fast reverse. From the remote control: Press to fast forward. Press to fast reverse. 55 XDVDN8290 OPERATION CD Operation Shuffle Mode Touch the Shuffle button to shuffle all of the tracks on the CD. The Shuffle button will be illuminated while Shuffle Mode is active. When the button is illuminated, touching it a second time will disable Shuffle Mode. Notes: The shuffled order of the songs is fixed, therefore the Track Select operations will continue to operate properly within the shuffled order. Therefore using Next Track will move to the next shuffled track, while Previous Track will return to the start of the current track and then a second press will return to the previously played track. Repeat Mode Touch the Repeat button to repeat a track. When Repeat Mode is active, the Repeat button will be illuminated, and touching it again will disable Repeat Mode. From the remote control: Press to select Repeat. Press it a second time to disable Repeat. Note: Shuffle and Repeat modes can not be used simultaneously and engaging one mode will cancel the other mode (if active.) Scan Mode Touch SCAN on the screen to listen to all tracks on the CD for 10 seconds at a time, starting from the first track on the CD. The Scan button will be illuminated while Scan Mode is active. When the button is illuminated, touching it a second time will disable Scan Mode. From the remote control: Press TITLE to activate and disable Scan Mode. Play/Pause Touching Play/Pause will temporarily stop playback of the current track. Touching it again will resume playback, Press PLAY/PAUSE to pause or resume the song. From the remote control: Press OK to temporarily stop and resume playback. Stop Touch Stop to stop playback of the current track. Pressing Play at this point will resume playback. If Stop is touched a second time, then playback stops completely and will restart from the beginning of the CD. From the remote control: Press to stop playback of the current song. 56 XDVDN8290 OPERATION MP3/WMA Operation - OSD Overview 1 2 3 4 5 6 23 7 8 22 9 21 10 20 19 18 MP3/WMA Mode 57 17 15 16 14 13 12 11 From the main menu, touch the DISC icon on the screen to select MP3/WMA mode. 1 Current Source Indicator Displays source currently playing. 2 Song Number Indicator Displays current song number and total number of songs on the disc. 3 Master Song Number List Shows the number of the song relative to the entire disc. 4 Folder Displays the name of the currently selected folder. 5 Filename List Displays up to 6 songs in the current folder in order, with filename. 6 File Type Indicator Displays type of song file, either MP3 or WMA. 7 Repeat Touch icon to repeat current song or folder. This icon will remain highlighted until touched a third time to disable. 8 Shuffle Touch icon to shuffle all songs on the disc. This icon will remain highlighted until touched to disable. XDVDN8290 OPERATION MP3/WMA Operation - OSD Overview 9 Scroll bar Allows scrolling of song list. 10 Direct Select Keyboard Touch the icon to display a numeric keyboard. Enter desired song number and touch OK to select it. 11 Fast Forward Touch icon to fast forward at 2x speed. Each touch changes speed from 2x to 4x to 8x to 20x then to 1x play. 12 Next Folder Pressing this button will select the next available folder. 13 Previous Folder Pressing this button will select the previous available channel. 14 Page Up Touch the icon to see the next 6 songs in the folder. 15 Page Down Touch the icon to see the previous 6 songs in the folder. 16 Information Displays available information for the current song. 17 Stop 18 Play / Pause Touch 19 Volume Indicator Indicates current volume level, controlled by rotary encoder. 20 Multi-Zone Indicator Displays current status of Multi-Zone mode. 21 Loudness Indicator Touch screen here to enter the Audio Setup Menu. 22 EQ indicator Touch screen here to enter the Audio Setup Menu. 23 Elapsed Time Indicator Shows the elapsed time of the current song. Touch icon to stop the song where it is. icon to temporarily stop or resume playback. 58 XDVDN8290 OPERATION MP3/WMA Operation Folder Select Page Up/Down From the remote control: Press to display the next page. Press to display the previous page. Note: Continued operation of the Page Up and Page Down buttons will display the next and previous folders, respectively once the songs in the current folder have all been displayed. Note that the Folder Select and Page Up/Down buttons will not select a song, but simply display more songs on the disc, and if another song is not selected within 5 seconds of the last press then the screen will return to the currently playing song/folder. Song Select Press OUT button to skip to the next song. IN Press button to skip to the previous song. From the remote control: Press to skip to the next song. Press to skip to the previous song. Note: Pressing the or OUT button once will return to the beginning of the current song. Pressing it a second time will skip to the previous song. Direct Select To select a desired song from the filename list, touch any of the displayed filenames from the list. Use the up and down arrows on screen to scroll through the songs. Once highlighted, simply touch the screen at the appropriate name. Press Rapid Dial rotary encoder once. • Select desired track by rotating clockwise or counter-clockwise. • Press to confirm/ENTER. From the remote control: Press or to scroll through the songs. When the correct song is highlighted press OK. Direct Song Entry Touch the icon to display a numeric keyboard. Enter desired song number and touch OK to select it. From the remote control: Use the numeric keypad to enter the desired song number. 59 XDVDN8290 OPERATION MP3/WMA Operation Song Control You can use the Fast Forward on-screen button to speed up the playback of a song. Each subsequent press of the button will change the speed from normal to 2x to 4x to 8x to 20x and back to 1x. Hold the Hold the OUT IN button to fast forward. button to fast reverse. From the remote control: Press to fast forward. Press to fast reverse. Note: Song control only works for MP3 type files and there is no audio output while song control is active. Shuffle Mode Touch the Shuffle button to shuffle all of the songs on the disc. The Shuffle button will be illuminated while Shuffle Mode is active. When the button is illuminated, touching it a second time will disable Shuffle Mode. Note: The shuffled order of the songs is fixed, therefore the Song Select operations will continue to operate properly within the shuffled order. Therefore using Next Song will move to the next shuffled song, while Previous Song will return to the start of the current song and then a second press will return to the previously played song. Repeat Mode Touch the Repeat button to repeat either a song or folder. The first touch activates Song Repeat mode and a second touch activates Folder Repeat mode. When either mode is active, the Repeat button will be illuminated, and touching it a third time will disable Repeat Mode. From the remote control: Press to select Song Repeat, Folder Repeat and Repeat Off modes. Note: Shuffle and Repeat modes can not be used simultaneously and engaging one mode will cancel the other mode (if active.) Play/Pause Touching Play/Pause will temporarily stop playback of the current song. Touching it again will resume playback, From the remote control: Press OK to temporarily stop and resume playback. Stop Touch Stop to stop playback of the current song. Pressing Play at this point will resume or restart playback from the beginning of the current song. If Stop is touched a second time, then playback stops completely and will restart from the beginning of the disc. From the remote control: Press to stop playback of the current song. 60 XDVDN8290 OPERATION SD Card Operation 1 2 3 4 5 6 23 7 8 9 22 21 10 20 19 18 SD Mode 61 17 15 16 14 13 12 11 From the main menu, touch the SD icon on the screen. 1 Current Source Indicator Displays source currently playing. 2 Song Number Indicator Displays current song number and total number of songs on the disc. 3 Master Song Number List Shows the number of the song relative to the entire disc. 4 Folder Displays the name of the currently selected folder. 5 Filename List Displays up to 6 songs in the current folder in order, with filename. 6 File Type Indicator Displays type of song file, either MP3 or WMA. 7 Repeat Touch the icon to repeat current song or folder. This icon will remain highlighted until touched a third time to disable. 8 Shuffle Touch the icon to shuffle all songs on the disc. This icon will remain highlighted until touched to disable. XDVDN8290 OPERATION SD Card Operation 9 Scroll bar Allows scrolling of song list. 10 Direct Select Keyboard Touch the icon to display a numeric keyboard. Enter desired song number and touch OK to select it. 11 Fast Forward Touch the icon to fast forward at 2x speed. Each touch changes speed from 2x to 4x to 8x to 20x then to 1x play. 12 Next Folder Pressing this button will select the next available folder. 13 Previous Folder Pressing this button will select the previous available channel. 14 Page Up Touch the icon to see the next 6 songs in the folder. 15 Page Down Touch the icon to see the previous 6 songs in the folder. 16 Information Displays available information for the current song. 17 Stop 18 Play / Pause Touch the 19 Volume Indicator Indicates current volume level, controlled by rotary encoder. 20 Multi-Zone Indicator Displays current status of Multi-Zone mode. 21 Loudness Indicator Touch screen here to enter the Audio Setup Menu. 22 EQ indicator Touch screen here to enter the Audio Setup Menu. 23 Elapsed Time Indicator Shows the elapsed time of the current song. Touch the icon to stop the song where it is. icon to temporarily stop or resume playback. 62 XDVDN8290 OPERATION SD Card Operation Folder Select Page Up/Down From the remote control: Press to display the next page. Press to display the previous page. Note: Continued operation of the Page Up and Page Down buttons will display the next and previous folders, respectively once the songs in the current folder have all been displayed. Note that the Folder Select and Page Up/Down buttons will not select a song, but simply display more songs on the disc, and if another song is not selected within 5 seconds of the last press then the screen will return to the currently playing song/folder. Song Select Press OUT button to skip to the next song. IN Press button to skip to the previous song. From the remote control: Press to skip to the next song. Press to skip to the previous song. Note: Pressing the or OUT button once will return to the beginning of the current song. Pressing it a second time will skip to the previous song. Direct Select To select a desired song from the filename list, touch any of the displayed filenames from the list. Use the up and down arrows on screen to scroll through the songs. Once highlighted, simply touch the screen at the appropriate name. Press Rapid Dial rotary encoder once. • Select desired track by rotating clockwise or counter-clockwise. • Press to confirm/ENTER. From the remote control: Press or to scroll through the songs. When the correct song is highlighted press OK. Direct Song Entry Touch the icon to display a numeric keyboard. Enter desired song number and touch OK to select it. From the remote control: Use the numeric keypad to enter the desired song number. 63 XDVDN8290 OPERATION SD Card Operation Song Control You can use the Fast Forward on-screen button to speed up the playback of a song. Each subsequent press of the button will change the speed from normal to 2x to 4x to 8x to 20x and back to 1x. Hold the Hold the OUT IN button to fast forward. button to fast reverse. From the remote control: Press to fast forward. Press to fast reverse. Note: Song control only works for MP3 type files and there is no audio output while song control is active. Shuffle Mode Touch the Shuffle button to shuffle all of the songs on the disc. The Shuffle button will be illuminated while Shuffle Mode is active. When the button is illuminated, touching it a second time will disable Shuffle Mode. Note: The shuffled order of the songs is fixed, therefore the Song Select operations will continue to operate properly within the shuffled order. Therefore using Next Song will move to the next shuffled song, while Previous Song will return to the start of the current song and then a second press will return to the previously played song. Repeat Mode Touch the Repeat button to repeat either a song or folder. The first touch activates Song Repeat mode and a second touch activates Folder Repeat mode. When either mode is active, the Repeat button will be illuminated, and touching it a third time will disable Repeat Mode. From the remote control: Press to select Song Repeat, Folder Repeat and Repeat Off modes. Note: Shuffle and Repeat modes can not be used simultaneously and engaging one mode will cancel the other mode (if active.) Play/Pause Touching Play/Pause will temporarily stop playback of the current song. Touching it again will resume playback, From the remote control: Press OK to temporarily stop and resume playback. Stop Touch Stop to stop playback of the current song. Pressing Play at this point will resume or restart playback from the beginning of the current song. If Stop is touched a second time, then playback stops completely and will restart from the beginning of the disc. From the remote control: Press to stop playback of the current song. 64 XDVDN8290 OPERATION JPEG Operation - OSD Overview 1 7 2 3 JPEG Mode 65 4 5 6 JPEG mode works a bit differently from the other modes. There is no separate JPEG mode, rather this mode is accessed within either SD mode or MP3/WMA mode. Whenever a picture is present on an SD card or CD, the unit will switch to the JPEG mode to view it. Each picture is displayed on the screen for 5 seconds, unless paused. JPEG mode will automatically exit when the next file is not a picture, or when STOP is pressed. 1 Touching this zone will bring up the Main Menu for the unit. 2 Touching this zone will skip to the previous file. 3 Stop Touch to stop viewing at the current file. 4 Rotate Right Touch to rotate the image 90º clockwise. 5 Rotate Left Touch to rotate the image 90º counterclockwise. 6 Touching this zone will bring up the on-screen buttons (3, 4 & 5). 7 Touching this zone will skip to the next file. XDVDN8290 OPERATION JPEG Operation Play/Pause Press PLAY/PAUSE to stop the viewer on a specific picture or to resume. From the remote control: Press OK to temporarily stop and resume the viewer. Note: Unlike the music player, when the viewer is paused, moving to the next or previous picture will not automatically resume the slideshow. Next/Previous Touch Area D to skip to the next file/image. Touch Area B to skip to the previous file/image. Press OUT to skip to the next file/image. IN Press to skip to the previous file/image. From the remote control: Press to skip to the next file/image. Press to skip to the previous file/image. Stop Touch to stop the viewer and return to the filename list. Pressing Play at this point will resume playback from the current picture. If Stop is touched a second time, then playback stops completely and will restart from the beginning of the disc/card. From the remote control: Press to stop the viewer. Rotate Right/Left Touch or to rotate the image 90º clockwise or counterclockwise. From the remote control: Press ANGLE to rotate the image 90º clockwise. Zoom Mode From the remote control: Press the ZOOM button to activate Zoom Mode. Each subsequent press of the button will change the magnification from normal to 4/3 to 3/2 to 2 to 3 to 1/2 to 3/4 and back to normal. When Zoom Mode is active, and the image is larger than the screen, the arrows on the remote will pan the screen up, down, right and left. Note: Zoom Mode is only active when the viewer is paused. Thumbnail View From the remote control: Press TITLE to activate Thumbnail View. The screen will display up to 9 mini-pictures at a time, starting from the current picture. Select desired picture with the arrows and press OK to view. Next and Previous will display more mini-pictures, if available. 66 XDVDN8290 OPERATION Media Compatibility Media Compatibility The following types of discs/files are compatible: • CD-ROM (ISO), CD-R, CD-RW, DVD+R/RW, DVD-R/RW • CD-DA, DVD Video • MP3 data • WMA data • JPG images The following types of discs/files are not compatible: • WMA files that are protected by DRM (Digital Rights Management) • WMA lossless format • Discs recorded with Track At Once or packet writing • MP3 PRO format • MP3 playlists • WAV format • WMV format • DivX format • AVI format • MPG format Some recordable DVDs and CDs may be incompatible with this unit, depending on media type and recording method. Playback Order Compatible Recording Formats MP3/WMA playback sequence is based on recorded order of files and begins in the root folder of the disc. Any empty folders or folders that do not include MP3/WMA files are skipped. This unit may not play files in the order they were recorded in. Refer to your recording software’s user’s manual for more information. • ISO9660 level 1 • ISO9660 level 2 • Yellow Book MODE 1 • Yellow Book MODE 2 FORM 1 • Multi session • Maximum files - 1500 • Maximum folder levels - 8 • MPEG-1/2 Audio Layer-3 ISO9660 standards: • Maximum nested folder depth is 8 (including the root folder). • Valid characters for folder/file names are letters A-Z (all caps), numbers 0-9, and “_” (underscore). Some characters may not be displayed correctly, depending on the character type. • This device can play back discs in Joliet and other standards that conform to ISO9660. MP3/WMA written in the formats other than the above may not play and/or their file names or folder names may not be displayed properly. 67 XDVDN8290 OPERATION Media Compatibility Additional MP3/WMA Information An internal buffer provides ESP (Electronic Skip Protection) to virtually eliminate skipping. When playing a disc recorded with regular audio files (CD-DA or .WAV) and MP3/WMA files, the unit will play the MP3/WMA files only. Only MP3 files with filename extension (.mp3) can be played. Only WMA files with filename extension (.wma) can be played. Do not attempt to play discs which contain non-MP3/WMA files with the MP3/WMA extension. Sampling Frequency Rates MP3 32kHz ~ 48kHz WMA 32kHz ~ 48kHz Transfer Bit rates MP3 WMA 40kbps ~ 320kbps constant Variable bit rates 40kbps ~ 192kbps constant Variable bit rates Note: Some files may not play or be displayed correctly, depending on sampling rates and bit rates. Recommended Settings For best results, use the following settings when burning an MP3 disc: 128kbps or higher constant bit rate 44.1kHz or higher sampling frequency For best results, use the following settings when burning a WMA disc: 64kbps or higher constant bit rate 44kHz or higher sampling frequency 68 XDVDN8290 OPERATION iPod Operation - OSD Overview (Optional) 1 2 3 4 5 6 7 25 8 9 10 24 23 22 21 11 12 20 iPod Mode 69 19 17 18 16 15 14 13 From the main menu, touch the iPod icon on the screen. 1 Current Source Indicator Displays source currently playing. 2 Song/Group Number Indicator Displays current song number and total number of songs/groups. 3 Song Number List Shows the number of the song relative to the current group. 4 Artist Displays the name of the artist of the current song. 5 Song/group List Displays up to 6 songs/groups in order. 6 Scroll bar Allows scrolling of song or group list. 7 Video Mode Allows viewing of video files. 8 Repeat Touch the icon to repeat current song. XDVDN8290 OPERATION iPod Operation - OSD Overview (Optional) 9 Shuffle Touch the icon to shuffle the songs in the current group. 10 Group Select Mode Allows selection of songs by various groups. 11 Direct Select Keyboard Touch the icon to display a numeric keyboard for song selection. 12 Return/Back Touch 13 Scan Mode Pressing this button will scan through all songs for 10 seconds. 14 Fast Forward Touch the icon to fast forward at 2x speed. 15 Rewind Touch the icon to rewind at 2x speed. to return to the previous group/menu. 16 Page Up Touch the icon to see the next 6 songs in the folder. 17 Page Down Touch the icon to see the previous 6 songs in the folder. 18 Album Displays the name of the album for the current song. 19 Stop 20 Play / Pause Touch the 21 Volume Indicator Indicates current volume level, controlled by rotary encoder. 22 Multi-Zone Indicator Displays current status of Multi-Zone mode. 23 Loudness Indicator Touch screen here to enter the Audio Setup Menu. 24 EQ indicator Touch screen here to enter the Audio Setup Menu. 25 Elapsed Time Indicator Shows the elapsed time of the current song. Touch the icon to stop the song where it is. icon to temporarily stop or resume playback. 70 XDVDN8290 OPERATION iPod Operation (Optional) Group Select Mode The songs in the iPod are organized by groups. Touching the screen will put the unit into Group Select Mode: on the Once in Group Select Mode select one of the group types from the menu, then select an item in that group. (For example, select the Artist group and the display will change to a list of available artists. Then select an artist from this list to hear all songs from that artist.) Select the Song group to hear all songs on the iPod. Touch the on-screen button to go back to a previous menu. (For example, when playing songs from a particular artist in Artist group mode, touch the Return/Back icon to return to the list of all available artists.) Return/Back Page Up/Down As there are usually more than 6 songs in a given group, the Page Up and Page Down on-screen buttons can be used to see the rest of the songs in the current group. Then use the Direct Select method to play a song from that group. The Page Up and Page Down on-screen buttons can be used to preview the next/ previous pages. From the remote control: Press to display the next page. Press to display the previous page. Note that the Page Up/Down buttons will not select a song, but simply display more songs in the group, and if another song is not selected within 5 seconds of the last press then the screen will return to the currently playing song/group. From the remote control: Press to skip to the next song. Press to return to the beginning of the current song. A second press will skip to the previous song Song Select To select a desired song from the song list, touch any of the displayed songs in the list. Use the up and down arrows on screen to scroll through the songs. Once highlighted, simply touch the screen at the appropriate name. Direct Select Press Rapid Dial rotary encoder once. • Select desired track by rotating clockwise or counter-clockwise. • Press to confirm/ENTER. From the remote control: Press or to scroll through the songs. When the correct song is highlighted press OK. 71 XDVDN8290 OPERATION iPod Operation (Optional) Direct Song Entry Touch the icon to display a numeric keyboard. Select desired song number within the current group and touch OK to select it. From the remote control: Use the numeric keypad to enter the desired song number. Song Control You can use the Fast Forward and Fast Reverse on-screen buttons to play a song forwards or backwards at a higher speed. Touch the same button a second time or press Play to return to normal playback. From the remote control: Press to fast forward. Press to fast reverse. Shuffle Mode Touch the Shuffle button to shuffle the songs in the current group. The Shuffle button will be illuminated while Shuffle Mode is active. When the button is illuminated, touching it a second time will disable Shuffle Mode. Repeat Mode Touch the Repeat button to repeat a song. When Repeat mode is active, the Repeat button will be illuminated, and touching it again will disable Repeat Mode. From the remote control: Press to select Repeat. Press it a second time to disable Repeat. Note: Shuffle and Repeat modes can not be used simultaneously and engaging one mode will cancel the other mode (if active.) Play/Pause Touching Play/Pause will temporarily stop playback of the current song. Touching it again will resume playback, Press the PLAY/PAUSE button to pause or resume the song. From the remote control: Press OK to temporarily stop and resume playback. Stop Touch Stop to stop playback of the current song. From the remote control: Press to stop playback of the current song. 72 XDVDN8290 OPERATION iPod Operation (Optional) Playing photo or video files from iPod Notes: VIDEO/PHOTO FILES are only compatible with G5 iPod. The iPod photo/video display of the in-dash unit will not operate while the vehicle is moving. This is a safety feature to prevent driver distraction. iPod photo/video functions will only operate when vehicle is in Park and the parking brake is engaged. It is illegal in most states for the driver to view video while the vehicle is in motion. L • Touch VIDEO icon, iPod will disconnect and wait for video signal. • Make sure VIDEO OUTPUT is turned on in your iPod. Consult your iPod owner's manual for details. • Press PLAY on your iPod, photos or video will appear on the TFT. L Releasing Video control from iPod iPod will reconnect 73 • Touch AREA F (upper right screen) to reconnect iPod to play music again. XDVDN8290 OPERATION iPod Operation (Optional) Selecting Music By: Playlist Artist Album Genre Song L Touch desired Folder, music will begin to play after selection. Character Support Only alphanumeric characters can be displayed (ASCII type). Artist Name and Album name will only be displayed if included with the song. iPod Compatibility The following models are supported: • Third generation iPod - Version 2.3 • Fourth generation iPod - Version 3.1.1 • Fifth generation iPod - Version 1.1.2 • iPod Photo - Version 1.2.1 • iPod Mini - Version 1.4.1 • iPod Nano - Version 1.2.0 Refer to iPod instruction manual for details on how to obtain the latest software. 74 XDVDN8290 OPERATION Bluetooth® - OSD Overview (Optional) 1 2 3 4 5 11 6 10 9 8 Before using the Bluetooth Bluetooth Mode 75 7 Select the Bluetooth option in the General setup and select On to activate the Bluetooth feature. Refer to page 21 for more details. From the main menu, touch the Bluetooth icon on the screen or, press the Bluetooth icon at the top of the screen. The Bluetooth function must be turned on for the Bluetooth icon to appear at the top of the screen. 1 Current Source Indicator Displays source or current mode. 2 Talk button 3 Display Indicator Phone number display and call status indicator. 4 Bluetooth status indicator When the Bluetooth function is Off, the indicator is black. When the Bluetooth function is On and no phone is connected (paired) to the unit, the indicator will flash blue. When the Bluetooth function is On and a phone is connected (paired) to the unit, the indicator is blue. 5 Return button Touch to RETURN to previous screen. 6 Keypad interface Press 0-9, *, # and + to enter desired phone number. Press C to clear the last digit. Press to answer an incoming call or to place an outgoing call. XDVDN8290 OPERATION Bluetooth® - OSD Overview (Optional) 7 Audio Transfer Button Press to transfer audio between the head unit and mobile phone. 8 End button 9 Setup Menu Icon Press to access Bluetooth setup menu. 10 Phone book Icon Press to access the phone book menu. 11 Keypad Interface Icon Press to display the keypad interface. Press to end a call in progress or to reject an incoming call. Bluetooth Setup Menu Bluetooth Setup Menu matrix Settings Pairing Default Yes Auto Answer Off Connect Manual Options Yes (Pair) Off On Manual Auto Function Press Yes to begin the pairing function. Press Yes again to cancel the pairing process. See page 77 for more details. You must press the Talk button to answer an incoming call. The head unit will automatically answer incoming calls. You must connect the phone to the head unit manually each time. The head unit will automatically connect to a previously paired phone. See page 77 for more details. Notes: Some Bluetooth approved devices may not communicate or work properly with this head unit, depending on the features or specifications of the device. During hands free operation, some noise may be heard when using a mobile device with this head unit, depending on the mobile device and or the communication environment. 76 XDVDN8290 OPERATION Bluetooth® - Setup Menu (Optional) Pairing Before you can use a mobile device with this head unit, it must be authenticated. This is also referred to as "pairing" a device. Note: Please make sure that Bluetooth is activated on your mobile device before you begin the pairing process. Refer to the owner's manual of your mobile device for more details. Step 1 Access Bluetooth setup menu and press Yes to begin the pairing process. The head unit will display "Wait Pairing.." and will search for any nearby Bluetooth device. If you have more than one Bluetooth device, please make sure only the device you want to connect to is powered on. Refer to the owner's manual of your mobile device for more details on searching for Bluetooth devices. Step 2 When prompted by your mobile device, enter 1234 for the PIN or pass code. The device name of the head unit will show up as "MM-BT G1". After the pairing process has completed, the Bluetooth icon will turn solid blue. Notes It is possible to search for previously paired Bluetooth devices from this head unit. It may be possible to search for this head unit from other Bluetooth enabled devices. To search for this head unit from another device (when already connected), press Yes under the Pairing function. The currently connected device will be disconnected and pairing to the new device will be possible. It may also be possible to disconnect this head unit from another mobile device. This unit can remember the last 4 paired mobile devices. It is only possible to connect to one Bluetooth mobile device at a time. When pairing to more than 4 mobile devices, the head unit will delete the phone that was least used to allow for the new pairing (connection). The mobile device that is initially connected will always be remembered (default phone). The MUTE function can not be used during Bluetooth operation. If MUTE is active when a call is received, the audio will automatically be transferred to the mobile device. Auto Answer Connect 77 The head unit will automatically answer incoming calls when the Auto Answer feature is set to On. If the Auto Answer feature is set to Off, the Talk button must be pressed to answer an incoming call. The head unit will automatically connect to a previously connected mobile device when the Connect feature is set to Auto. If the Connect feature is set to Manual, the head unit will not automatically connect to any mobile device. Set the Connect feature to Manual when you do not want to connect to any Bluetooth mobile device. XDVDN8290 OPERATION Bluetooth® - Operation (Optional) Phone Book Menu Incoming Call Screen Dialed Calls Press Dialed Call to retrieve the list of dialed calls from the mobile device. "Searching", then "Loading dialed phone book" will be displayed during the retrieval process followed by "The phone book is done". Touch the desired name to call. Press the page up/down buttons to navigate through the pages. Received Calls Press Received Call to retrieve the list of received calls from the mobile device. "Searching", then "Loading received phone book" will be displayed during the retrieval process followed by "The phone book is done". Touch the desired name to call. Press the page up/down buttons to navigate through the pages. Missed Calls Press Missed Call to retrieve the list of missed calls from the mobile device. "Searching", then "Loading missed phone book" will be displayed during the retrieval process followed by "The phone book is done". Touch the desired name to call. Press the page up/down buttons to navigate through the pages. Making a Phone Call Answering a Phone Call Ending a Phone Call It is possible to make a phone call three different ways: 1. Enter the desired phone number using the keypad interface, then press the Talk button. 2. Enter the desired phone number using the numeric keypad on the main remote control, then press OK. (Bluetooth mode must be selected first.) 3. Select a previous call from the phone book menu. The head unit will answer calls automatically if the Auto Answer feature is set to On. Otherwise, the Talk button must be pressed to answer an incoming call. During an incoming call, the audio is muted for the current source and the incoming call screen will be displayed. Adjust the volume during the call using the rotary encoder volume control. Press the End button on screen or the ESC button on the main remote control to end a call in progress or to reject an incoming call. 78 XDVDN8290 OPERATION Navigation Navigation Mode From the main menu, touch the Navi icon on the screen. The Navigation SD card must be inserted. Note: When powering on the unit, there is a 10-12 second delay before the navigation mode can be selected. Function Buttons The following function buttons are found on many of the navigation screens: Navigating a Route Display menu bar Page up in the displayed list Display map Page down in the displayed list Display main menu Select currently highlighted item The XDVDN8290 maps a route from Point A to Point B (with stops in between if desired) in just three easy steps. 1. Select a destination (see page 80 for details). 2. Voice prompts and highlighted mapping guide to the end point. 3. Arrive at destination. Navigation Screen The following options are found on the main navigation screen. After several seconds of no activity, the system will hide the Menu Bar to maximize the map view. Press at any time to display the Menu Bar. Zoom in the map to show smaller area Zoom out the map to show larger area Return to the map to the current vehicle location Change the map angle view Display information on current map, select Point of Interest 79 XDVDN8290 OPERATION Navigation Navigation Main Menu Press MENU to display the Main Menu: The main menu contains six options: • Go to: Pick a destination for routing. • Edit Favorites: Modify favorite destinations. • Setup: Configure system features • Trip Computer: View trip statistics • Home Address: Route to home address • Office Address: Route to office address Go To The Go To option provides six choices for selecting a destination: 1. Address or Intersection 2. Previous Destination 3. Point of Interest 4. Home Address 5. Office Address 6. Favorites Address or Intersection Use this option to navigate using an exact address or cross street. After selecting the state, search for a specific street by entering the postal code or city name. If the street name is already known, press the Street Name icon. Once the city and street name are selected, start the route (Go To) or enter a specific street address (House Number) or cross street (Intersection). At this time, the Setup Routing Criteria or Find POI Near Destination options can be utilized. To start immediately, select Start Route, and navigation will begin. Follow the voice prompts and highlighted maps to the destination. The screen will also display the time and distance to the next turn and final destination. Previous Destination Point of Interest Press the Previous Destination icon to scroll through and select from a list of recent destinations. Navigating by Point of Interest is often helpful when traveling to a public place or looking for a type of location, such as a gas station or restaurant. After entering the state, search by Category, Name. 80 XDVDN8290 OPERATION Navigation Category City Name Press the City icon to select a location in a specific city. After returning to the main Point of Interest menu, enter additional criteria or press to display all POIs in the city. Select the desired option, then Start Route. Enter the name of the destination, and the unit will display a list of all Point of Interests containing that name. If desired, further refine the search by category or city. Select the desired option, then Start Route. Home Address Select this option to select a home address as the destination. To set a home address, select Edit Favorites from the Navigation Main Menu (see page 84 for detailed instructions). Office Address Select this option to select an office address as the destination. To set up an office address, select Edit Favorites from the Navigation Main Menu (see page 84 for detailed instructions). Favorites Editing a Route Detour Cancel Route Find POI Near Destination 81 Press the Category icon to scroll through and select from a list of categories. After a category is selected, the unit will return to the main Point of Interest menu. Enter additional criteria, or press to search the category. Select a sort option to display the category list in either geographical (Sort by Distance) or alphabetical (Sort by Name) order. Select the desired option, then Start Route. Navigate to a specific location previously stored as a favorite. Select from entries in the Address Book, Trail Book, Trip Book, My POI or Latitude/Longitude. To set up Favorites, select Edit Favorites from the Navigation Main Menu (see page 84 for detailed instructions). To make changes to a route once navigation has begun, press from the navigation screen. Select Edit Route, then choose one of the following options: The detour option allows route adjustment to Avoid Current Road, Avoid Next Road, or Avoid Specific Road. Additional parameters include Detour Distance and Setup Routing Criteria. Select this option to cancel the current route and return to the map screen. Select this option to search for a Point of Interest (POI) near the destination by Category or by Name. XDVDN8290 OPERATION Navigation Edit Favorites The Edit Favorites option provides six choices for storing favorite destinations: 1. Address Book 2. Home Address 3. Office Address 4. Trail Book 5. Trip Book 6. My POI Address Book Add current or previous destinations to the address book for quick access on future trips. Select Add Previous Destination to select from a list of recent destinations. Choose Add Current Location to name and save the current location. Address book entries can also be Edited and Deleted from this screen. Home Address The unit provides several ways to store a home address for future reference. • Address or Intersection - search by Postal Code, City Name or Street Name. • Previous Destination - search list of previous destinations. • Point of Interest - search for a Point of Interest to set as the home address. • Address Book - select an address book entry to set as the home address. Office Address The unit provides several ways to store an office address for future reference. • Address or Intersection - search by Postal Code, City Name or Street Name. • Previous Destination - search list of previous destinations. • Point of Interest - search for a Point of Interest to set as the office address. • Address Book - select an address book entry to set as the office address. Trail Book Leave a trail from the start point to the end point and name/save the trail for future reference with the Trail Book opton. Choose Add, and the unit will prompt for a trail name to be entered. Once the name is confirmed, the unit will remember the trail as it is driven. Press to add a waypoint to the trail. Upon reaching the destination, press and select Stop Trail . Current trails can also be edited and deleted using this option. Trip Book This option allows trips to be created for future reference. This feature is similar to the Trail Book (see above) but tracks on-road rather than off-road driving. My Point of Interest (POI) To add a POI as a favorite, choose Add, then search by Address or Intersection, Previous Destination or general Points of Interest. This option allows POIs to be modified, organized or you can create your own Points of Interest categories. The Setup Display option allows you to customize the POI icons that are visible on the map at various zoom levels. 82 XDVDN8290 OPERATION Navigation Setup The Setup option allows configuration of the following options: 1. Navigation Preferences 2. Display Options 3. User Input Settings 4. Location Reset 5. System Navigation Preferences Display Options User Input Settings Location Reset 83 The following navigation options can be controlled from this screen: The indicates the option is turned on. • Shortest Distance/Shortest Time • Avoid Freeway • Avoid Tolls • Use Ferries • Simulation • Auto Recalculation • Voice Guidance The following display options can be controlled from this screen: The indicates the option is turned on. • Heading Up/North Up • Display Clock • ETA On • Display Status Bar • Display GPS Icon • Display Scale Icon • Display Compass Icon • Display Next Maneuver • Enlarged Intersection The following user input options can be controlled from this screen: The indicates the option is turned on. • Day/Night Settings (Auto, Day, Night) • POI Icon Setup (1/32 mi, 1/16 mi, 1/8 mi) • Distance Unit Settings (Miles, Kilometers / meters, Miles / yards • Set Time (enter using keypad) • Language Settings (select from list) icon icon icon Reset the location of the vehicle symbol using the Location Reset screen. Search for a new location by: • Address or Intersection • Point of Interest • Address Book • Previous Destination XDVDN8290 OPERATION Navigation System This screen allows diagnosis of the GPS reception status and adjustment of the current vehicle symbol position. It also provides information on the current software and map version numbers. • GPS Diagnostics - displays the number of GPS satellites currently in view and in use, along with the GPS satellite time, latitude and longitude. • System Information - displays the version numbers for the system software and mapping. Trip Computer The Trip Computer shows current speed and direction, along with average speed and maximum speed. Press to view the following trip information:. • Average Speed • Maximum Speed • Total Trip Time • Stopped Time • Drive Time • Elevation • ETA • Trip • Odometer • Digital Clock • Current Speed Home Address Select this option to directly access the preset home address and the following options: Start Route, Setup Routing Criteria or Find POI Near Destination. Office Address Select this option to directly access the preset office address and the following options: Start Route, Setup Routing Criteria or Find POI Near Destination. *Please visit our website at www.dualav.com for the latest full-length owner's manual. 84 XDVDN8290 OPERATION General Operation - Multi-Zone Menu Multi-Zone Menu Access There are two methods to access the Multi-Zone menu • Press the MENU button on the front panel, then press Multi-Zone • Touch the upper left corner of the touch screen, then press Multi-Zone 1 2 3 4 5 13 12 11 10 9 L 8 Touch Access Buttons 1 2 3 4 5 6 7 8 9 10 11 12 13 Rapid Dial 85 7 6 Touch to set CD/DVD mode as the Multi-Zone mode, (CD/DVD must be inserted) Touch to set SD mode as the Multi-Zone mode (SD card must be inserted). Touch to set AUXILIARY A/V INPUT mode as the Multi-Zone mode. Touch to access BLUETOOTH mode, (BLUETOOTH must be activated first). Refer to page 21 for more details. Touch to RETURN to previous screen. Touch to set the Multi-Zone mode in STANDBY (Off). Notes: When the Multi-Zone mode is set to STANDBY (Off), the video signal from the 6.5" TFT is shown by default and the Multi-Zone audio is disabled. Press and hold the MODE button on the front panel for more than 2 seconds to change the Multi-Zone mode from STANDBY (Off) to active. Touch to set CAMERA mode as the Multi-Zone mode, if optional camera isn't connected then "No Video Signal" will be displayed. Touch to access SCREEN SETUP menu. Touch to access GENERAL SETUP menu. Touch to access ASP Config menu. Touch to access CD/DVD SETUP menu, (CD/DVD must be inserted to function). Touch to access MULTI-ZONE source menu. Touch to access MAIN source menu. RAPID DIAL can also control touch screen functions from the multi-zone menu • Select desired function rotating clockwise or counter-clockwise • Function will be outlined in yellow • Press to confirm/ENTER XDVDN8290 OPERATION General Operation - Multi-Zone Menu Multi-Zone Operation Independent sources can be played simultaneously on the unit. For example, the AM/FM tuner mode can be selected for the front zone while DVD video is selected for the Multi-Zone source (for headrest monitors, overhead monitors, etc.). Select a Source for the Multi-Zone 1. Press the MENU button, then touch Multi-Zone to access the Multi-Zone menu. Select desired Multi-Zone source. 2. Press MODE on the Multi-Zone remote to select desired Multi-Zone source. 3. Press and hold the MODE button on the front panel to turn the Multi-Zone on. Exit Rear-Zone 1. Touch STANDBY on the Multi-Zone menu. 2. Press and hold the MODE button on the front panel to turn the Multi-Zone off. Notes: If DVD is selected as the front zone source, SD Card is not available for the MultiZone source. If SD Card is selected as the front zone source, DVD is not available for the Multi-Zone source. Since the multimedia processor is shared between optical (disc) and SD Card reader, only one or the other source can be selected at a time. Selecting a Source for the Front Zone 1. Press the MENU button, then touch desired front zone source. 2. Press MODE on the main remote to select desired front zone source. Notes: AM/FM tuner and iPod models will change to a “blue screen” background when any optical mode (DVD, CD, MP3/WMA) or SD Card is selected as the Multi-Zone source. Front Zone Standby To conserve the LCD backlight lifespan or to eliminate glare while night driving, press STANDBY. The TFT screen will black out, however all other operations continue to operate. Press any button except VOLUME or MUTE or touch the screen again to return to normal viewing. 86 XDVDN8290 OPERATION Multi-Zone - AM/FM Tuner Operation 13 12 11 1 10 2 9 8 7 1 2 3 4 5 6 7 8 9 10 11 12 13 87 6 5 4 3 Preset page up/down arrows - press to select the next or previous preset page. Preset number list display - shows the preset station list by frequency. Touch frequency to select a preset. Touch and hold frequency to store presets. Tuner scan - touch to scan through all available stations in the current band, pausing for 10 seconds on each station. Touch again to cancel. SCAN will change to yellow when the scan function is active. Tune frequency up - touching this icon will tune the radio to a higher frequency by one frequency step. Tune frequency down - touching this icon will tune the radio to a lower frequency by one frequency step. AS will change to yellow during the auto station store process. Band - Touch band icon repeatedly until the desired band is displayed FM1, FM2, FM3, or AM. Local/DX tuning mode - press to select between local or distance tuning. Stereo indicator - shows that the frequency selected is received in stereo. ST will change to red during stereo reception. Current station indicator - indicates current frequency. Band indicator - shows current band FM1, FM2, FM3, or AM. Preset indicator - shows what preset has been selected. Main zone mode indicator - displays current main zone source. XDVDN8290 OPERATION Multi-Zone - iPod Operation 1 13 2 12 11 10 9 8 7 1 2 3 4 5 6 7 8 9 10 11 12 13 Next Song Previous Song Note: 6 5 4 3 Clock indicator - displays current time. Multi-zone mode indicator - displays current multi-zone source. Song scan - touch to scan through all available songs, pausing for 10 seconds on each song. Touch again to cancel. SCAN will change to green when the scan function is active. Video mode - touch to access video mode. iPod will disconnect and wait for video signal. Press VID again to cancel. Refer to page 75 for more details. Repeat - touch to repeat current song, touch again to cancel. REP will change to green when the repeat function is active. Stop - Touch to stop the song where it is. STOP will change to green. Play - Touch PLAY to temporarily stop playback. Touch PLAY again to resume playback. PLAY will change to white during pause. Album- displays the name of the album of the current song. Artist - displays the name of the artist of the current song. Song - displays the name of the current song. Time - displays the elapsed time of the current song. Track- displays the track number of the current song. Main zone mode indicator - displays current main zone source. Touch area D to select the next song. (This function can also be performed by pressing .) Touch area C to return to the beginning of the current song. Touch area C again to select the previous song. (This function can also be performed by pressing .) Refer to page 39 for more details. Some characters may not be displayed properly in multi-zone iPod mode. 88 XDVDN8290 OPERATION Limited One Year Warranty This warranty gives you specific legal rights. You may also have other rights which vary from state to state. Dual Electronics Corp. warrants this product to the original purchaser to be free from defects in material and workmanship for a period of one year from the date of the original purchase. Dual Electronics Corp. agrees, at our option, during the warranty period, to repair any defect in material or workmanship or to furnish an equal new, renewed or comparable product (whichever is deemed necessary) in exchange without charges, subject to verification of the defect or malfunction and proof of the date of purchase. Subsequent replacement products are warranted for the balance of the original warranty period. Who is covered? This warranty is extended to the original retail purchaser for products purchased and used in the U.S.A. What is covered? This warranty covers all defects in material and workmanship in this product. The following are not covered: installation/removal costs, damage resulting from accident, misuse, abuse, neglect, product modification, improper installation, incorrect line voltage, unauthorized repair or failure to follow instructions supplied with the product, or damage occurring during return shipment of the product. 89 What to do? 1. Before you call for service, check the troubleshooting guide in your owner’s manual. A slight adjustment of any custom controls may save you a service call. 2. If you require service during the warranty period, you must carefully pack the product (preferably in the original package) and ship it by prepaid transportation with a copy of the original receipt from the retailer to an authorized service center. 3. Please describe your problem in writing and include your name, a return UPS shipping address (P.O. Box not acceptable), and a daytime phone number with your shipment. 4. For more information and for the location of the nearest authorized service center please contact us by one of the following methods: • Call us toll-free at 1-866-382-5476 • E-mail us at [email protected] Exclusion of Certain Damages: This warranty is exclusive and in lieu of any and all other warranties, expressed or implied, including without limitation the implied warranties of merchantability and fitness for a particular purpose and any obligation, liability, right, claim or remedy in contract or tort, whether or not arising from the company’s negligence, actual or imputed. No person or representative is authorized to assume for the company any other liability in connection with the sale of this product. In no event shall the company be liable for indirect, incidental or consequential damages. XDVDN8290 WARRANTY Specifications DVD Player Frequency response: 10Hz-20kHz Channel separation @ 1kHz: >65dB D/A converter: 24 Bit FM Tuner Tuning range: 87.5MHz-107.9MHz Usable sensitivity: 8.5dBf 50dB quieting sensitivity: 10dBf Stereo separation @ 1kHz: 40dB Frequency response: 30Hz-13kHz AM Tuner Tuning range: 530kHz-1710kHz Usable sensitivity: 22uV Frequency response: 30Hz-2.2kHz SD Card Max card size: 2GB SDHC compliant: No Monitor Panel size: 6.5” (165.1 mm) diagonal measurement View angle (up/down/left/right): 40/55/60/60 Resolution: 400 W x 234 H Brightness (cd/m2): 350 Contrast ratio: 350:1 Elements: 280,800 General Operating voltage: 11-16 VDC, negative ground Speaker output impedance: 4~8 ohms Line output voltage: 2 Volts Line output impedance: 200 ohms Chassis dimensions: 7" x 6.3" x 3.9" (178 x 160 x 99 mm) Faceplate dimensions: 6.6" x .7" x 3.8" (167 x 18 x 97 mm) Sleeve dimensions: 7.1" x 3.9" x 4.4" (180 x 99 x 112 mm) Design and specifications subject to change without notice. CEA-2006 Power Standard Specifications (reference: 14.4VDC +/- 0.2V, 20Hz~20kHz) Power Output: 17 Watts RMS x 5 channels at 4 ohms and < 1% THD+N Signal to Noise Ratio: 80dBA (reference: 1 watt into 4 ohms) 90 XDVDN8290 OPERATION Troubleshooting General Problem Unit will not turn on (no power) Cause Yellow wire not connected or incorrect voltage Check connections for proper voltage (11~16VDC) Red wire not connected or incorrect voltage Black wire not connected Check connection to ground Fuse blown Replace fuse Unit has power (but no sound) Speaker wires not connected Check connections at speakers One or more speaker wires touching each other or touching chassis ground Insulate all bare speaker wires from each other and chassis ground Unit blows fuse Yellow or red wire touching chassis ground Check for pinched wire Speaker wires touching chassis ground Check for pinched wire Incorrect fuse rating Use fuse with correct rating Parking brake safety circuit not connected Parking brake not applied Check connections at parking brake Apply parking brake as described on page 36 Reverse circuit not connected Vehicle is not in reverse Check connections at reverse lamp Select reverse gear Unit has audio (but no video) No video display (when in reverse) DVD does not start playback Physical defect in media Wrong region IR remote does not work Excessive skipping Bad Disc appears on display Incorrect Region Code appears on display Front panel will not open/close 91 Action Check media for scratches Use discs labeled "Region 1" or "All" only. Dead battery Replace battery Unit is not mounted correctly Check mounting sleeve Physical defect in media Check media for scratches Focus error or disc is in upside down Press eject or RESET Region code error Use only DVDs labeled “Region 1” or “All” only. Front panel obstructed Remove the obstacle and press open/close sequence. to resume the monitor XDVDN8290 OPERATION Troubleshooting Bluetooth Problem Cause Action Please connect first appears in the display There is no mobile device connected to the head unit Pair and or connect a mobile device to the head unit as described on page 77 Bluetooth function is not active on the head unit Activate Bluetooth function as described on page 21 Bluetooth function is not active on the mobile device Refer to the owner's manual of your mobile device Mobile device will not connect to the head unit A mobile device is already connected to the head unit Disconnect current mobile device first, then connect This head unit can only be connected to one device at desired mobile device a time ERROR! Connect Timeout The time limit for the pairing mobile device has been appears in the display reached Pair the mobile device within 120 seconds Pairing Fail appears in the display The attempted pairing process has failed Retry the pairing process again Mobile device will not connect to the head unit automatically The Connect function is set to Manual. When the Connect function is set to Manual, the head unit will not connect to any mobile device automatically Set Connect function to Auto as described on page 76 Ring tone volume is turned down Increase the volume of the ring tone using the rotary encoder during the ringing process MUTE function is activated on the head unit Press MUTE to cancel the mute function and resume audio Possible road noise or interior interference Close all open windows and turn off any fans or A/C Microphone opening on the front panel is obstructed Clear any obstacles in front of microphone opening Audio is routed to the mobile device Press Audio Transfer to allow audio from the phone to be heard through the speakers Bluetooth audio is heard through the front channel speaker outputs or the front preamp outputs only Adjust fader forward so there is audio to the front speakers. If amplifiers are used only, be sure to use front preamp outputs Bluetooth mode includes memory volume. If Bluetooth volume is set to 0 when a call comes in, no audio will be heard Adjust Bluetooth volume level above 0 Auto Answer function is set to On Set Auto Answer function to Off as described on page 77 Ring tone can not be heard through the speakers Echo or noise is heard during a phone call Call is connected (but no audio can be heard through the speakers) Call is answered automatically Caller ID does not appear The calling mobile device is not set to send the Caller Some devices may not communicate or work properly during incoming call ID or, the service is not available with this head unit XDVDN8290 does not ring Cell phone ringer is set to off when receiving a call Set cell phone ringer to “on” Dual Electronics Corp. Toll Free: 1-866-382-5476 www.dualav.com ©2007 Dual Electronics Corp. All rights reserved. NSA1207-V01 Printed in China 92