1
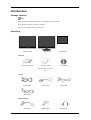
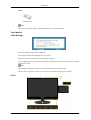
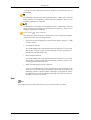
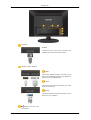
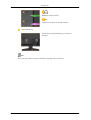
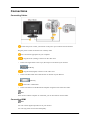
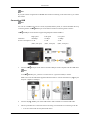
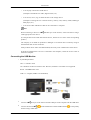
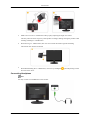
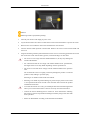
SyncMaster 2263DX
LCD Monitor
User Manual
Introduction
Package Contents
Note
Please make sure the following items are included with your monitor.
If any items are missing, contact your dealer.
Contact a local dealer to buy optional items.
Unpacking
Without stand
With stand
USB Monitor
Manuals
Quick Setup Guide
Warranty Card
User's Guide
(Not available in all locations)
Cables
D-Sub Cable
Power Cord
USB Cable
HDMI Cable
Headphones
USB Cable
Sold separately
DVI Cable
Introduction
Others
Cleaning Cloth
Note
This is only provided for highly polished black products as a product feature.
Your Monitor
Initial Settings
Select the language using the up or down key.
The displayed content will disappear after 40 seconds.
Turn the Power button off and on. It will be displayed again.
It can be displayed up to three (3) times. Make sure to adjust the resolution of your PC before reaching
the maximum count.
Note
The resolution displayed on the screen is the optimal resolution for this product.
Adjust your PC resolution so that it is the same as the optimal resolution for this product.
Front
Introduction
MENU button [MENU/ ]
Opens the on-screen menu and exits from the menu. Also use to exit the OSD menu
or return to the previous menu.
Customized Key
You can customize key assignment for the Custom button according to your preferences.
Note
You can configure the Customized key for a required function via Setup > Customized Key.
Volume button
When OSD is not on the screen, push the button to adjust volume.
>> Click here to see an animation clip
Adjust buttons [
]
Adjust items in the menu.
SOURCE button / Enter button [
]
Push the 'SOURCE/ ', then selects the video signal while the OSD is off. (When
button is pressed to change the input mode, a message appears
the SOURCE/
in the upper left of the screen displaying the current mode -- analog or digital input
signal.)
/ Activates a highlighted menu item.
Note
If you select the digital mode, you must connect your monitor to the graphic card's
DVI port using the DVI cable.
>> Click here to see an animation clip
AUTO button
Use this button for auto adjustment.
(Available in Analog mode only)
>> Click here to see an animation clip
Power button [
] / Power indicator
Use this button for turning the monitor on and off.
/ This light glows blue during normal operation, and blinking blue once as the
monitor saves your adjustments.
Camera
Using this camera, you can view and send video for video chatting.
Mic
Using this microphone, you can view and send audio for video chatting.
Speaker
You can hear sound by connecting the soundcard of your PC to the monitor.
Introduction
- You can only hear sound from this monitor model if it is connected to a PC via
a USB cable.
Use this button to decrease the screen brightness for the 7" USB monitor. The LED
blinks when the screen brightness is decreased to the minimum or when a screen
brightness adjustment is completed.
Use this button to increase the screen brightness for the 7" USB monitor. The LED
blinks when the screen brightness is increased to the maximum or when a screen
brightness adjustment is completed.
Power button [
] / Power indicator
Press the Power button to turn the 7" USB monitor on or off. The Power indicator
is displayed in blue when operating normally.
•
Please activate the afterimage prevention function before using the 7" USB
auxiliary monitor.
•
Activating the function
Turn off the USB monitor and hold down the Power button for five (5) seconds.
The monitor is turned on again and the afterimage prevention program is activated while the LED blinks twice.
•
Deactivating the function
Turn off the USB monitor and hold down the Power button for five (5) seconds.
The monitor is turned on again and the afterimage prevention program is deactivated while the LED blinks once.
•
What is the afterimage prevention function?
If you use the USB auxiliary monitor with the same image remaining on the
screen for a long period of time, an afterimage may develop on the panel. The
afterimage prevention function reduces afterimages on the panel by turning
the USB auxiliary monitor on and off automatically for a short time (about 0.1
seconds) every thirty (30) minutes.
Rear
Note
The configuration at the back of the monitor may vary from product to product.
Introduction
POWER
POWER
Connect the power cord for your monitor to the
POWER port on the back of the monitor.
HDMI / DVI IN / RGB IN
HDMI
Connect the HDMI terminal at the back of your
monitor to the HDMI terminal of your digital output device using a HDMI cable.
DVI IN
Connect the DVI cable to the DVI IN port on the
back of your monitor.
RGB IN
Connect the RGB IN terminal at the back of your
monitor to your computer.
USB connection terminal (Option)
Introduction
UP (USB upstream port)
Connect the
UP port of the monitor and the
USB port of the computer with the USB cable.
DOWN (USB downstream port)
DOWN port of the USB monitor
Connect the
and a USB device with the USB cable.
Note
To use
DOWN (Downstream Port), you have
to connect the
PC.
UP (Upstream Cable ) to the
Make sure to use the USB cable supplied with this
monitor to connect the monitor's
and your computer's USB port.
UP port
Note
For the procedures on connecting the 7" USB
monitor, refer to Connecting the USB Monitor.
Kensington Lock
The Kensington Lock is a device used to physically fix the system when using it in a public
place. The locking device has to be purchased
separately. The appearance and locking method
may differ from the illustration depending on the
manufacturer. Refer to the manual provided with
the Kensington Lock for proper use. The locking
device has to be purchased separately.
Note
The location of the Kensington Lock may be different depending on its model.
Using the Anti-Theft Kensington Lock
1.
Insert the locking device into the Kensington
slot on the Monitor (
locking direction (
/ MIC
) and turn it in the
).
2.
Connect the Kensington Lock cable.
3.
Fix the Kensington Lock to a desk or a heavy
stationary object.
Introduction
Headphone output terminal
MIC
Connect a microphone to the MIC terminal.
Cable holding ring
Fix the cables using the holding ring, as shown in
the figure.
Note
See Connecting Cables for further information regarding cable connections.
Connections
Connecting Cables
Connect the power cord for your monitor to the power port on the back of the monitor.
Plug the power cord for the monitor into a nearby outlet.
Use a connection appropriate for your computer.
Using the D-sub (Analog) connector on the video card.
•
Connect the signal cable to the 15-pin, D-sub port on the back of your monitor.
[RGB IN]
Using the DVI (Digital) connector on the video card.
•
Connect the DVI Cable to the DVI IN Port on the back of your Monitor.
[DVI IN]
Connected to a Macintosh.
•
Connect the monitor to the Macintosh computer using the D-sub connection cable.
Note
If the monitor and the computer are connected, you can turn them on and use them.
Connecting HDMI
Note
You can connect digital output devices to your monitor.
You can enjoy better screen and sound quality.
Connections
Connecting Using a HDMI Cable
1.
Input devices such as digital DVD are connected to the HDMI terminal of the monitor using the
HDMI cable. When all the connections are completed, connect the power cords for the monitor
and DVD (or the device connected to the digital output terminal).
Select HDMI using the SOURCE button.
Connecting Using a DVI to HDMI Cable
1.
Connect the DVI output terminal of a digital output device to the HDMI terminal of the monitor
using a DVI to HDMI cable.
2.
To listen to sound via an external device, refer to the information in its user manual on how to
connect the device.
3.
When all the connections are completed, connect the power cords for the monitor and DVD (or
the device connected to the digital output terminal).
4.
Selet HDMI using the SOURCE button.
Connections
Note
If you just connect using the DVI to HDMI cable without connecting to the sound source, you cannot
hear sound.
Connecting USB
Note
You can use a USB device such as a mouse, keyboard, Memory Stick, or external hard disk drive by
DOWN port of the monitor without connecting them to the PC.
connecting them to the
The
USB port of the monitor supports High-Speed Certified USB 2.0.
Data Rate
High speed
Full speed
Low speed
480 Mbps
12 Mbps
1.5 Mbps
2.5 W
2.5 W
(Max., each port)
(Max., each port)
Power Consumption 2.5 W
(Max., each port)
1.
Connect the
UP port of the monitor and the USB port of the computer with the USB cable.
Note
To use
DOWN port, you have to connect the UP (Upstream Cable) to the PC.
Make sure to use the USB cable supplied with this monitor to connect the monitor's
and your computer's USB port.
UP port
2.
Connect the
3.
The use procedures are as the same as those for using an external device connecting to the PC.
•
DOWN port of the USB monitor and a USB device with the USB cable.
You can connect and use a keyboard and mouse.
Connections
•
You can play a file from a media device.
(Examples of media devices: MP3, digital camera, etc.)
•
You can run, move, copy or delete the files on the storage device.
(Examples of storage devices: external memory, memory card, memory reader, HDD-type
MP3 player, etc.)
•
You can use other USB devices that can be connected to a computer.
Note
When connecting a device to the
cable appropriate to the device.
DOWN port of the monitor, connect the device using a
(For the purchase of the cable and external devices, ask the service center of the corresponding
product.)
The company is not liable for problems or damages to an external device caused by using an
unauthorized cable for the connection.
Some products do not follow the USB standard, and it may cause a malfunction of the device.
If the device malfunctions even if it is connected to the computer, contact the service center of
the device/computer.
Connecting the USB Monitor
•
System Requirements
CPU : 1.73GHz or Later
OS : Windows XP Service Pack2 or later. However, Windows Vista 64bit is not supported.
RAM : 512 MB RAM or more
USB : 1.1 or higher (USB 2.0 recommended)
1.
2.
Connect the
UP port of the monitor and the USB port of the computer with the USB cable.
(
Connect the terminal
monitor using a USB cable.
) of the USB monitor and the USB terminal (
) of the primary
Connections
Note
For more information on the driver installation and usage of the USB monitor, refer to Restrictions on
the 7”USB Monitor .
Installing and Using the USB Monitor
1.
Engage and fix the USB monitor into the groove of the armrest holder.
2.
You can adjust the location of the USB monitor.
Note
You can also adjust the length of the armrest holder after adjusting the location of the USB monitor.
1.
Do not tilt the stand too far backwards when the USB auxiliary monitor is lifted up, as shown in
the figure. This may change the center of gravity of the product resulting in the product falling
causing product damage or personal injury.
2.
When adjusting the angle of the USB auxiliary monitor stand, do not use too much force. This
may cause the stand to break.
Connections
3.
Make sure to use the 7” USB monitor after properly adjusting the angle of its stand.
This may cause the center of gravity of the product to change, leading causing the product to fall
resulting in damage or a malfunction.
4.
When moving a 7” USB monitor, take care not to knock the monitor against something.
The monitor may become scratched.
5.
When disassembling the 7” USB monitor, remove it by holding the
direction of the arrow.
Connecting Headphone
Note
You may connect your headphones to the monitor.
part and pushing it in the
Connections
1.
Connect your headphones to the Headphone connection terminal.
Connecting MIC
Note
You may connect your microphone to the monitor.
1.
Connect the microphone cable to the MIC port on the monitor.
Using the Stand
Monitor Assembly
Simple Stand
Monitor and Bottom
Connections
Swivel stand
Using ( ), You can swivel the monitor left and right at an angle of 350° to set the monitor lengthwise.
The rubber under the stand is to avoid the monitor slide.
When you try to rotate the monitor in the state of the power cord or cable connecting to the monitor,
the power cord of cable can be destroyed.
Tilt angle
Using ( ), You can adjust the tilt angle within a range of -5° forward to 12° backward for the most
comfortable viewing angle.
Attaching a Base
This monitor accepts a 100 mm x 100 mm VESA-compliant mounting interface pad.
Connections
Monitor
Mounting interface pad (Sold separately)
1.
Turn off your monitor and unplug its power cord.
2.
Lay the LCD monitor face-down on a flat surface with a cushion beneath it to protect the screen.
3.
Remove four screws and then remove the stand from the LCD monitor.
4.
Turn the armrest holder upwards or downwards. Remove the screws on the armrest holder and
remove it.
5.
Align the mounting interface pad with the holes in the rear cover mounting pad and secure it with
four screws that came with the arm-type base, wall mount hanger or other base.
•
Do not use screws longer than the standard dimension, as they may damage the
inside of the Monitor.
•
For wall mounts that do not comply with VESA standard screw specifications,
the length of the screws may differ depending on their specifications.
•
Do not use screws that do not comply with the VESA standard screw specifications.
Do not fasten the screws too tightly, as this may damage the product or cause the
product to fall, leading to personal injury.
Samsung is not liable for these kinds of accidents.
•
Samsung is not liable for product damage or personal injury when a non-VESA
or non-specified wall mount is used or the consumer fails to follow the product
installation instructions.
•
To mount the monitor on a wall, you should purchase the wall mounting kit that
allows you to mount the monitor at least 10 cm away from the wall surface.
•
Contact the nearest Samsung Service Center for more information. Samsung
Electronics will not be responsible for damages caused by using a base other than
those specified.
•
Please use Wall Mount according to the International standards.
Troubleshooting
Self-Test Feature Check
Note
Your monitor provides a self test feature that allows you to check whether your monitor is functioning
properly.
Self-Test Feature Check
1.
Turn off both your computer and the monitor.
2.
Unplug the video cable from the back of the computer.
3.
Turn on the monitor.
If the monitor is functioning properly, you will see a box in the illustration below.
This box appears during normal operation if the video cable becomes disconnected or damaged.
4.
Turn off your monitor and reconnect the video cable; then turn on both your computer and the
monitor.
If your monitor screen remains blank after using the previous procedure, check your video controller
and computer system; your monitor is functioning properly.
Warning Messages
If there is something wrong with the input signal, a message appears on the screen or the screen goes
blank although the power indicator LED is still on. The message may indicate that the monitor is out
of scan range or that you need to check the signal cable.
Environment
The location and the position of the monitor may influence the quality and other features of the monitor.
If there are any sub woofer speakers near the monitor, unplug and relocate the woofer to another room.
Remove all electronic devices such as radios, fans, clocks and telephones that are within 3 feet (one
meter) of the monitor.
Useful Tips
A monitor recreates visual signals received from the computer. Therefore, if there is a problem with
the computer or the video card, this can cause the monitor to become blank, have poor coloring, become
Troubleshooting
noisy, and video mode not supported, etc. In this case, first check the source of the problem, and then
contact the Service Center or your dealer.
Judging the monitor's working condition
If there is no image on the screen or a "Not Optimum Mode", "Recommended Mode 1680 x 1050
60 Hz" message comes up, disconnect the cable from the computer while the monitor is still powered
on.
If there is a message coming up on the screen or if the screen goes white, this means the monitor is in
working condition.
In this case, check the computer for trouble.
Check List
Note
Before calling for assistance, check the information in this section to see if you can remedy any problems yourself. If you do need assistance, please call the phone number on the Information section or
contact your dealer.
No images on the screen. I cannot turn on the monitor.
Q:
Is the power cord connected properly?
A:
Check the power cord connection and supply.
Q:
Can you see "Check Signal Cable" on the screen?
A:
(Connected using the D-sub cable)
Check the signal cable connection.
(Connected using the DVI cable)
If you still see an error message on the screen when the monitor is connected properly, check to
see if the monitor status is set to analog.
If you still see an (error) message on the screen when the monitor is connected properly, check
to see if the monitor status is set to analog. Press ‘SOURCE/ ’ button to have the monitor
double-check the input signal source.
Q:
If the power is on, reboot the computer to see the initial screen (the login screen), which can be
seen.
A:
If the initial screen (the login screen) appears, boot the computer in the applicable mode (the
safe mode for Windows ME/XP/2000) and then change the frequency of the video card.
(Refer to the Preset Timing Modes)
If the initial screen (the login screen) does not appear, contact the Service Center or your dealer.
Q:
Can you see "Not Optimum Mode", "Recommended Mode 1680 x 1050 60 Hz" on the screen?
A:
You can see this message when the signal from the video card exceeds the maximum resolution
and frequency that the monitor can handle properly.
A:
Adjust the maximum resolution and frequency that the monitor can handle properly.
Troubleshooting
A:
If the display exceeds WSXGA or 75 Hz, a "Not Optimum Mode", "Recommended Mode
1680 x 1050 60 Hz" message is displayed. If the display exceeds 85 Hz, the display will work
properly but the "Not Optimum Mode", "Recommended Mode 1680 x 1050 60 Hz" message
appears for one minute and then disappears.
Please change to the recommended mode during this one-minute period.
(The message is displayed again if the system is rebooted.)
Q:
There is no image on the screen. Is the power indicator on the monitor blinking at 1 second
intervals?
A:
The monitor is in PowerSaver mode.
A:
Press a key on the keyboard to activate the monitor and restore the image on the screen.
A:
If there is still no image, press the 'SOURCE/ ' button. Then press any key on the keyboard
again to activate the monitor and restore the image on the screen.
Q:
Connected using the DVI cable?
A:
You may get a blank screen if you boot the system before you connect the DVI cable, or disconnect and then reconnect the DVI cable while the system is running as certain types of graphic
cards do not send out video signals. Connect the DVI cable and then reboot the system.
I cannot see the On Screen Display.
Q:
Have you locked the On Screen Display (OSD) Menu to prevent changes?
A:
Unlock the OSD by pressing the [MENU/
] button for at least 5 seconds.
The screen shows strange colors or just black and white.
Q:
Is the screen displaying only one color as if looking at the screen through a cellophane paper?
A:
Check the signal cable connection.
A:
Make sure the video card is fully inserted in its slot.
Q:
Have the screen colors become strange after running a program or due to a crash between applications?
A:
Reboot the computer.
Q:
Has the video card been set properly?
A:
Set the video card by referring to the video card manual.
The screen suddenly has become unbalanced.
Q:
Have you changed the video card or the driver?
A:
Adjust screen image position and size using the OSD.
Q:
Have you adjusted the resolution or frequency to the monitor?
A:
Adjust the resolution and frequency at the video card.
(Refer to the Preset Timing Modes).
Troubleshooting
Q:
The screen can be unbalanced due to the cycle of the video card signals. Readjust Position by
referring to the OSD.
The screen is out of focus or OSD cannot be adjusted.
Q:
Have you adjusted the resolution or frequency on the monitor?
A:
Adjust the resolution and frequency of the video card.
(Refer to the Preset Timing Modes).
LED is blinking but no images on the screen.
Q:
Is the frequency properly adjusted when checking the Display Timing on the menu?
A:
Adjust the frequency properly by referring to the video card manual and the Preset Timing
Modes.
(The maximum frequency per resolution may differ from product to product.)
There are only 16 colors shown on the screen. The screen colors have changed
after changing the video card.
Q:
Have the Windows colors been set properly?
A:
Windows XP :
Set the resolution at the Control Panel → Appearance and Themes → Display → Settings.
A:
Windows ME/2000 :
Set the resolution at the Control Panel → Display → Settings.
Q:
Has the video card been set properly?
A:
Set the video card by referring to the video card manual.
There is a message that reads "Unrecognized monitor, Plug & Play (VESA DDC)
monitor found".
Q:
Have you installed the monitor driver?
A:
Install the monitor driver according to the Driver Installation Instructions.
Q:
See the video card manual to see if the Plug & Play (VESA DDC) function can be supported.
A:
Install the monitor driver according to the Driver Installation Instructions.
There is no image on the screen. I cannot turn on the monitor.
Q:
Check whether the USB cable is connected correctly. Check whether the USB driver is installed.
A:
The USB monitor is recognized as a general USB device on a PC. If you turn the monitor on or
off quickly and repeatedly, a USB device problem may occur. Refer to the USB device Troubleshooting section on the Microsoft customer support website.
1.
Right-click the “My Computer” and click on “Properties”
2.
The Device Manager is displayed.
3.
From the “Action” menu, click ”Scan for hardware changes”. Reboot your PC.
Troubleshooting
The screen of the USB monitor freezes.
Q:
Check the “Hardware acceleration” setting for your USB monitor in the “Display Properties”
window.
A:
Set the “Hardware acceleration” value to “Full”.
For more information on how to configure the settings, click here.
1.
Right-click the “Windows Desktop” and click on “Properties”.
2.
The “Display Properties” window appears.
Select the “Settings” tab and click on “Advanced”.
3.
If the “Properties” window for your monitor is displayed, select the “Troubleshoot” tab.
Move the “Hardware acceleration” slide to “Full”.
My USB monitor is connected but the screen is blank.
Q:
Does the Auto Installation program run when your USB monitor is connected?
A:
Install the "USB Monitor Driver" from the provided CD. For more information on how to install
the driver, refer to "Installing and Using the Software".
I have connected the USB monitor but it does not boot up...
Q:
For the One-Board Type computer which uses an i815 chipset motherboard, change the Legacy
USB support option to [Disabled] in the BIOS Setup menu and reboot the computer.
A:
(Example) Phoenix BIOS
If you turn on the computer, the ”Press F2 to enter SETUP” message is displayed on the bottom
of the screen. Press [F2] to display the BIOS Setup menu.
A:
- Configuring the Settings
Set the Advanced -> Peripheral Configuration (Integrated Peripherals) -> Legacy USB Support
item to [Enabled]. Save the settings and reboot the computer.
A:
- Entering the BIOS Setup screen may differ for each BIOS company. Refer to the user manual
for your PC.
For more information, visit the Microsoft website.
My computer is on and the LED is blinking. However, only a blank screen is displayed on the monitor.
Q:
Check whether your computer is in hibernation mode (The monitor turns off).
A:
Move your mouse or press any key to display the screen again.
Check the following items if there is trouble with the monitor.
Check if the power cord and the video cables are properly connected to the computer.
Check if the computer beeps more than 3 times when booting.
(If it does, request an a service for the main board of the computer.)
If you installed a new video card or if you assembled the PC, check if the installed the adapter(video)
driver and the monitor driver.
Troubleshooting
Check if the scanning ratio of the video screen is set to between 56 Hz ~ 75 Hz.
(Do not exceed 75 Hz when using the maximum resolution.)
If you have problems in installing the adapter (video) driver, boot the computer in Safe Mode, remove
the Display Adapter in the "Control Panel → System → Device Administrator" and then reboot the
computer to reinstall the adapter (video) driver.
Note
If problems repeatedly occur, contact an authorized service center.
Q&A
Q:
How can I change the frequency?
A:
The frequency can be changed by reconfiguring the video card.
A:
Note that video card support can vary, depending on the version of the driver used. (Refer to the
computer or the video card manual for details.)
Q:
How can I adjusts the resolution?
A:
Windows XP:
Set the resolution in the Control Panel → Appearance and Themes → Display → Settings.
A:
Windows ME/2000:
Set the resolution in the Control Panel → Display → Settings.
* Contact the video card manufacturer for details.
Q:
How can I set the Power Saving function?
A:
Windows XP:
Set the resolution in the Control Panel → Appearance and Themes → Display → Screen Saver.
Set the function in the BIOS-SETUP of the computer. (Refer to the Windows / Computer Manual).
A:
Windows ME/2000:
Set the resolution at the Control Panel → Display → Screen Saver.
Set the function in the BIOS-SETUP of the computer. (Refer to the Windows / Computer Manual).
Q:
How can I clean the outer case/LCD Panel?
A:
Disconnect the power cord and then clean the monitor with a soft cloth, using either a cleaning
solution or plain water.
Do not leave any detergent or scratches on the case. Do not let any water enter the monitor.
Q:
How I can clone or extend screen mode?
A:
Open the”Display Properties” window and select the “Settings” tab,
Q:
How can I remove the “USB Monitor Installation Program” completely?
Troubleshooting
A:
Click “Add/Remove Programs” in the “Control Panel”. A list of “currently installed programs”
is displayed.
Select “Samsung UbiSync Monitor” from the list and click “Remove”.
Q:
The screen size of the USB monitor is larger than the actual monitor size.
A:
If the primary monitor has a high resolution, screens are expanded beyond the recommended
resolution in Clone mode (USB monitor).
Q:
The screen size of the USB monitor is smaller than the actual monitor size. The screen is centered
on the monitor.
A:
If the primary monitor has a high resolution, screens are smaller than the recommended resolution in Clone mode (USB monitor).
Q:
I disconnected or turned off my USB monitor but my PC still displays the old monitor information in the Display Properties window.
A:
The deactivated USB monitors are such that the power to them is turned off or their USB cables
are disconnected. To remove this information, you have to remove the “Samsung Ubisync Monitor” program from “Add/Remove Programs” in the “Control Panel”.
If you remove the program you cannot use all the connected USB monitors.
If you want to use the USB monitor again, you have to setup the installation program again.
Q:
Icons and photos are broken or jagged in Clone mode (USB monitor).
A:
This occurs because Windows does not send the screen updating information to Clone mode if
Extended mode is active on a single PC.
We recommend using the monitor in Extend mode.
Note
Before calling for assistance, check the information in this section to see if you can remedy any problems yourself. If you do need assistance, please call the phone number on the Information section or
contact your dealer.