1
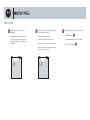
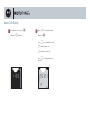
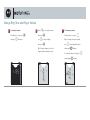
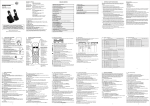
Getting to Know Your Phone
Earpiece
Speakerphone
Signal Strength
Lanyard
Attachment
Battery Strength
Navigation Pad
Action Key
Y
Send Key N
Phonebook Key
H
Battery Door
Latch
End Key O
Headset Jack
and Power
Connector
Microphone
Note: This phone has voice prompts in local languages.
MOTOROLA and the Stylized M Logo are registered in the US Patent & Trademark Office.
© Motorola, Inc. 2006
Certain mobile phone features are dependent on the capabilities and settings of your service provider’s network. Additionally,
certain features may not be activated by your service provider, and/or the provider’s network settings may limit the feature’s
functionality. Always contact your service provider about feature availability and functionality. All features, functionality, and
other product specifications, as well as the information contained in this tutorial, are based on the latest available information
and believed to be accurate at the time of publication. Motorola reserves the right to change or modify any information or
specifications without notice or obligation.
Note: Your phone may not appear exactly as the phone
image above, however, all key locations, sequences, and
functions remain the same.
Voice Help
1
This phone has voice help in local
languages.
2
After you select a language, the phone asks
you if you want voice help.
3
If you want to activate voice help later, enter
***510* and press
The first time you start your phone, the
phone asks you to select a language.
Press the key that corresponds to your
language.
If you want voice help, press 1.
If you do not want voice help, press 2.
If you take no action voice help is activated.
If you selected voice help, a voice prompts
you as you use your phone.
I.
If you want to deactivate voice help later,
enter ***511* and press
I.
Make, End, and Answer Calls
1
From the home screen, enter a number and
press
2
To call a contact from your phonebook:
N.
From the home screen, press
Tips:
To delete the last number, press
a.
Press
h to select name,
then press
To delete all numbers, press and hold
h.
Z.
4
To end a call, press
h.
Tip: To find contacts quickly, press the first
letter of the contact on your keypad.
Example: For a contact starting with the
W indicates call in process.
X indicates call ended or failed.
5
To answer a call, press
N.
To call a phonebook contact using
speed dial:
For contacts 1-9, from the home screen
press and hold the contact number for
two seconds.
For the remaining contacts, from the home
screen enter the contact number, press
N.
letter N, press 6 two times. Press
select the exact name.
3
h to
#, then press N.
Add or Delete Phonebook Contacts
1
To add a contact to your phonebook:
From the home screen, enter a number
and press
Z.
2
Enter the name of your contact and press
3
To delete a contact from your phonebook:
Y.
From the home screen, press
Tip: Press a key more than once to see more
letters. For example, for the letter N, press
6 two times.
Z and
h to select a name.
Press c two times to view U,
then press b.
then press
Send a Text Message
1
From the home screen, press
Y.
C is selected in the menu,
then press Y.
Ensure
2
Enter your message and press
Y.
Tips:
Press a key more than once to see more
letters. For example, for the letter N, press
6 two times.
a
.
To delete the last character, press
To delete all characters, press and hold
h.
To review all characters in your message,
press
b.
3
Z to select a
Enter a number or press
name from your phonebook.
Press
Y to send the message.
Read a Text Message
1
From the home screen, press
press
Y, then
c one time.
2
D is selected in the menu,
then press Y.
Press c to read and scroll through
Ensure
the message.
Tip: To view a previous message,
press
4
To delete a message, scroll to the end of the
message (after the date and time) and press
b.
Note: Text messages are automatically
deleted (oldest to newest) when the SIM
card is full.
d.
3
To reply to a text message, open the
message, then press
Y.
Enter your reply, then press
Y.
View Call History
1
From the home screen, press
then press
c two times.
Y,
2
B is selected in the menu,
then press Y.
Ensure
Press
h to scroll through the calls.
k indicates dialed calls.
j indicates received calls.
c to view time and date of
Press
the call.
Change Ring Tone and Ringer Volume
1
2
To change the ringtone:
From the home screen, press
then press
c three times.
Y,
E is selected in the menu,
then press Y.
Use h to select a ringtone,
then press Y.
Ensure
Tip: To hear the ringtone, scroll to the
ringtone number and wait 3 seconds.
3
To change ringer volume:
From the home screen, press
h.
Tips: To change your ringer to vibrate,
d repeatedly until the phone
vibrates and O displays.
To change your ringer to silent, press d
repeatedly until l displays.
press
Set Alarm
1
From the home screen, press
then press
c four times.
Y,
2
F is selected in the menu, then
press Y.
Ensure
Press the number keys to enter the alarm
time, then press
To turn off the alarm:
From the home screen, press
K displays on your phone when the
alarm is set.
Tip: The alarm remains set until you turn it
O.
Y, then
c four times.
Ensure F is selected in the menu,
then press b two times.
press
Y.
off. To stop alarm ringing, press
3
Set Date and Time
1
From the home screen, press
then press
c five times.
Y,
2
G is selected in the menu, then
press Y.
Ensure
Press the number keys to enter the time,
then press
Y.
3
Press the number keys to enter the date,
then press
Y.
Check Balance (optional)
1
For some phones:
Your balance and expiration date display
automatically:
• at power on
• at the end of an outgoing call
• at the end of an outgoing text message
To check your balance from the home
screen press O. Your balance and
expiration date each display for 2 seconds
before returning to the home screen.
Note: This feature may not be supported
by your service provider. If not, proceed to
step 2.
2
For phones where step 1 does not apply:
Set the check balance key to #. To do this,
enter ***642*, enter your balance inquiry
number, and then press
I.
Once the balance key is set to #, press
and hold # for 2 seconds to view your
balance.
Note: This feature may not be supported by
your service provider.