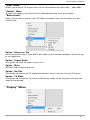
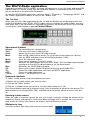
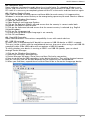
1
WinTV-HVR-Series
WinTV-NOVA-Series
WinTV-PVR-Series
Reference Manual
English
M-HVRNOVAPVR-V1.0-ENG - 25/07/2007
WinTV-HVR-Series
WinTV-NOVA-Series
WinTV-PVR-Series
Reference Manual
Copyright ©Hauppauge Computer Works, 2007
Hauppauge Computer Works, Ltd.
10 Borough High Street
Bank Chambers
London, UK, SE1 9QQ
www.hauppauge.co.uk
Hauppauge Computer Works, Inc.
91 Cabot Court
Hauppauge, NY 11788
www.hauppauge.com
Hauppauge Digital Asia, Pte. Ltd.
Blk 1093, Lower Delta Road #04-05
Tiong Bahru Industrial Estate
Singapore 169204
www.hauppauge.com.sg
Tech Support: (+44) 0207 378 0202
Telephone: (+44) 0207 378 1997
Fax: (+44) 0207 357 9171
[email protected]
Tech Support: (+1) 631 434 3197
Telephone: (+1) 631 434 1600
Fax: (+1) 631 434 3198
Tech Support: (+65) 276 4412
Telephone: (+65) 276 9163
Fax: (+65) 276 9167
I
Content
FCC Statement / CE Statement
1
Introduction
2
The WinTV Application
3
Fundamental operation
3
Setting up your TV channels
6
Configuration of Video Input
9
Changing the Channel List
10
Menu Options
11
WinTV settings Menu
14
Pause, Record and TV Mode
19
Keyboard shortcuts in WinTV
23
WinTV Remote control
24
WinTV-Scheduler
26
WinTV 7 Day EPG
29
The WinTV Radio Application
31
VTPlus application
33
Troubleshooting:
35
HcwDriverInstall gives "INF File Open Failed" error
No DVB-T digital channels found
How-to connect a satellite/cable set top box, VCR or games console
Media Center Notes
My external input connected by S-Video is black and white
Games console slow response
Vista switches to Basic UI when starting WinTV2000
Primary options
TV becomes jumpy while recording
Problems with the IR remote control
"No Tuner Available" message when starting Live TV in MCE / Vista
Warranty Information
35
35
37
39
40
40
40
41
43
44
44
45
II
WinTV Reference Manual
Waste Electrical and Electronic Equipment (WEEE)
The device may not be disposed of with household rubbish. This appliance is labeled in
accordance with European Directive 2002/96/EG concerning used electrical and electronic
appliances (Waste Electrical and Electronic Equipment - WEEE). The guideline determines the
framework for the return and recycling of used appliances as applicable throughout the EU.
To return your used device, please use the return and collection systems available to you.
FCC Statement
Radio Interference Statement:
The WinTV boards have been tested and found to comply with the limits for a Class B digital
device, pursuant to part 15 of the FCC Rules. These limits are designed to provide reasonable
protection against harmful interference in a residential installation. This equipment generates,
uses, and can radiate radio frequency energy and, cause harmful interference to radio communications. However, there is no guarantee that interference will not occur in a particular
installation. If this equipment does cause harmful interference to radio or television reception,
which can be determined by turning the equipment off and on, the user is encouraged to try
to correct the interference by one or more of the following measures:
• reorient or relocate the receiving antenna.
• increase the separation between the equipment and receiver.
• connect the equipment into an outlet on a circuit different from that to which the receiver is
connected.
• consult the dealer or an experienced radio/TV technician for help.
FCC ID: H90WINCAST Assembled in Malaysia
CAUTION: Changes or modifications not expressly approved by the party responsible for
compliance to the FCC Rules could void the user’s authority to operate the equipment.
CE Statement: This equipment has been tested and complies with EN 55013, EN 55020 and
IEC 801-3 part 3 standards.
LEGAL DISCLAIMERS
If you have any feedback regarding the content of this manual we would be happy to receive
your input. Please send any comments to the following address: [email protected]
We have made every effort to ensure that the Text, Pictures and Tables in this manual, and
software programs and hardware are free from errors. However, we cannot guarantee that
errors or omissions do not exist. As a result, we cannot accept liability for any loss, damage
or misunderstanding made directly or indirectly as a result of using our Manual, Software
and/or Hardware.
This manual, as well as the software described in it, is furnished under license and may be
used or copied only in accordance with the terms of such license. The content of this manual
is furnished for informal use only, is subject to change without notice, and should not be construed as a commitment by Hauppauge Computer Works Incorporated. Hauppauge Computer
Works Inc. assumes no responsibility or liability for any errors or inaccuracies that may appear in this book. No part of this publication may be reproduced or transmitted in any form or
by any means, electronic or mechanical, including photocopying, recording, or storing in a
retrieval system, or translating into any language in any form without the express written permission of Hauppauge Digital Europe S.A.R.L.
All manufacturers' names, product names and any registered and unregistered trademarks
mentioned in this manual are used for identification purposes only and remain the exclusive
property of their respective owners.
Trademarks:
Hauppauge logo and WinTV product name: Hauppauge Computer Works, Inc. Windows,
Video for Windows, NetMeeting and Internet Explorer: Microsoft Corporation. Pentium is a
registered trademark of Intel Corporation. All other trade names are the service mark, trademark or registered trademark of their respective holders.
1
WinTV Reference Manual
Introduction
This manual covers all of the WinTV-PVR, WinTV-NOVA and WinTV-HVR models for displaying TV on your PC’s screen. It covers, but is not limited to, the following models:
Personal Video Recorder (Analogue)
WinTV-PVR-USB2
WinTV-PVR-150
WinTV-PVR-250
WinTV-PVR-350
WinTV NOVA Recorder (DVB-T)
WinTV-NOVA-T PCI
WinTV-NOVA-T-USB2
WinTV-NOVA-T-500
WinTV-NOVA-T-Stick
WinTV-NOVA-TD Stick
WinTV-NOVA-S-Plus (DVB-S)
WinTV-NOVA-S-USB2 (DVB-S)
Hybrid Video Recorder (Analogue & DVB-T)
WinTV-HVR-900
WinTV-HVR-1100
WinTV-HVR-1300
WinTV-HVR-1400
WinTV-HVR-3000 (DVB-S)
For models which have particular features (such as the chapter on the DVB-S), we will note
which models these features are available on.
2
WinTV Reference Manual
The WinTV-Application
After the installation of the software from the CD-ROM you find see the shortcut "Hauppauge
WinTV" in the Windows Start menu and on your desktop. To start the WinTV application double left click on your mouse button.
TV mode
Minimize
Volume
Windowed mode
Channel up
Always on top
Close WinTV
Channel down
Configuration
Channel surf
Sound on / off
Last channel
Subtitles on / off
Click your right mouse button in the
TV window to remove toolbars.
Click again to restore toolbars.
Setup Menu
Freeze picture
CFG
Configure Snapshot
Snapshot view
window:
Double click on
each “thumbnail” to
see image full size.
Click and hold your
right mouse button
to see image
options.
Record-Mode
Snapshot still
capture
Current TV
channel
Audio-Type
TV-Mode
Pause-Mode
(Time-Shift)
Playback-Mode
Some control options can be selected by right clicking on the mouse button:
● When watching a "current TV program" a simple right click on the mouse button will display
the current TV list for fast channel changing. You can also change channels by using the
numbers on the keyboard or by pressing the letter on the keyboard for the channel that you
want to view.
● With a right click of the mouse button on the "audio type/language selection" you can change the available audio language settings of the current TV program that you are watching.
● With a right click of the mouse button (hold for 2 seconds) in the TV window the control
options are displayed.
In order to re-size the window, move the mouse pointer to the edge of the TV window. This
changes the mouse pointer into a double arrow. Press and hold the left hand mouse button
and drag the window into the desired size, releasing the left mouse button when finished.
Fundamental operation
Channel changing
You can change channels by using the Channel Up or Channel Down buttons on the WinTV.
You can also type a channel number (for example:27) and WinTV will tune to that channel.
Volume change
With the slide bar on the top left hand side of the WinTV application window you can change
the Volume level. Alternatively you can use the keypad on the keyboard <PgUp> for volume
up or <PgDn> for volume down.
Sound on / off
To mute the sound on or off click on the green button below the slider bar. Alternatively you
can use the keys on the keyboard <CTRL> + <M>.
3
WinTV Reference Manual
Last channel
Clicking the “last channel” button will allow you to quickly change to the last viewed channel.
Surf preview
Clicking on the button "Surf" will show up to 16 still image preview of TV channels that you
have scanned. The screen will gradually fill and double clicking on one of the preview images
will show the selected channel in full screen.
Always on top
With Always on Top, WinTV will always be visible on your Windows desktop on top any
applications. To turn on, click the Always on top button. It will turn green. To turn off, click
this button again. A convenient way to use Always-on-Top is to make the TV window in the
no-title mode small, and to make the TV window in the title mode larger. Then you can switch
very quickly from a small window to a larger one by clicking the right mouse button.
TV mode
Click on the button "TV mode", in order to watch television in the full screen TV mode. With
one click to the right mouse button or press the <ESC> key to leave TV mode.
To hide the WinTV toolbar (No-title mode)
Click your right mouse button in the WinTV’s video window for the no-title mode. To restore
the toolbars (the title mode), once again click your right mouse button in the video window.
You can set the size of the window differently in each mode.
Freeze picture
Click on the button Freeze, around the picture "to freeze". Clicking on Freeze will un Freeze the
picture.
Snapshot
Clicking on the “Camera” symbol will take a snapshot still picture of the Video window that
you are viewing. A "Thumbnail" (preview made smaller) of the still image of the video window
will appear in the snapshot preview border. Double click on the "Thumbnail", to see it in full
size. Now you can save the picture using option in the menu "file"/"save under..." on your hard
disk. Clicking the Button CFG allows you to configure the snapshot function.
Saving several snapshots at the same time
Highlight the first image and then hold down the <SHIFT> key on the keyboard and then
highlight the subsequent images that you want to save. Once you have selected the images
that you want to save release the <SHIFT> key and then right click on a image to select the
SAVE to file option.
Channel-Menu
To display the channel configuration menu <right> click with the mouse button on the TV
window:
4
WinTV Reference Manual
The channel configuration allows you to configure using the following options:
• Position the mouse pointer on the channel that you want to select and click the <Left>
hand mouse button to select.
• Use the <Up> and <Down> and <Left> and <Right> arrow keys on the keyboard to
select the different sub-menu that you want to select and press Enter / Return
• To select a channel list of either TV or Radio you can filter for either TV or Radio channels to
be show in the channel list.
The channel can also be selected by pressing the 1st letter of the channel name on the keyboard.
Channel search
Click on the Button MENU and “Suite Manager” to open the channel manager.
The channel manager is divided into the options "Scan", "Sources", "Devices" and "Channels".
You can select the option by left clicking on the option name, click on the “Sources” to scan
for channels.
5
WinTV Reference Manual
Search for Analogue channels
This section refers to products with RF antenna and Cable tuner.
Click on the Button MENU and “Suite-Manager” to open the channel manager. Select the
<sources> and highlight the <analog> source.
Automatic channel search
Click on "Autoscan...", in order to start the automatic RF antenna channel scan. The channel
frequencies will scan from 1 to 69. When channels are found they will be listed and the scanning will continue. After the completion of the channel scan a new window of an overview of
the scanned frequencies and the number of found programs are will be displayed.
Manual channel search
You can shorten the channel scan if you know the channel numbers for your local transmitter
by entering the numbers into the channel number and click on Tune. Please refer to the troubleshooting section to find out the channel for your location.
Search for DVB-T channels
N
ote: This section refers to products with DVB-T tuner (WinTV-NOVA-T and WinTVHVR series). Select the DVB-T option on the left hand side.
Automatic channel search
Click the <Autoscan> button to start the search for DVB-T channels, ensure that you have
selected your country location. The channel search will count from 1 to 74 and when a signal
is found the box locked will have a tick.
Manual channel search
You can shorten the channel scan if you know the Multiplex Channel Numbers for your local
digital transmitter by entering the numbers into the Channel Number and click on Tune.
Please refer to the troubleshooting section to find out the Multiplex Channel Numbers for
your location.
6
WinTV Reference Manual
Search for DVB-S channels
N
ote: This section refers to products with DVB-S tuner (WinTV-NOVA-S series and
WinTV-HVR-3000).
LNB - Configuration and Channel search
Click on the Button MENU and “Suite-Manager” to open the channel manager. Select the
<sources> and highlight the <DVB-S> source.
LNB - Configuration
To configure the LNB satellite positions left click on the <LNB> configuration.
The "LNB" (Low Noise block) is located on the head of the SAT antenna. "DiSEqC" is a standard for the control of several LNBs over a multi-switch. Select the DiSEqC option that suits
your SAT Dish installation and configuration. The control of up to four LNBs is supported.
No DiSEqC
Select this option if your satellite cable is connected directly to 1 LNB, where only 1 orbital
satellite position can be received. Click the small box before LNB_1 so that it is ticked for use.
Simple DiSEqC
Select this option if your satellite cable is connected to a shift box with “Tone Burst” control
(also called “Mini-DiSEqC”. You have the option to select between 2 satellite positions. Click
the small box before LNB_1 so that it is ticked for use.
7
WinTV Reference Manual
DiSEqC 1.0
By default this option is selected to DiSEqC Level 1.0. You can select between 4 different
satellite positions. The specific settings can be found from the DiSEqC shift box or DiSEqC
multi-toggle documentation.
After selecting the DiSEqC support you select the option on the left hand side which LNB
should be configured, so that the blue line is highlighted and then select on the right hand
side which satellite from the drop down list which will be used for channel scanning.
The frequency data for "Low Osc", "High Osc" and "LNB SWITCH" are preset for the use of
commercial universal LNBs and do not need to be changed. If these values are changed you
can re-set the default options by clicking on the button "default".
Automatic channel search
Click on "Autoscan...", in order to start the automatic satellite channel scan. The channel frequencies scan will depend on the satellite selection that you selected in the option “Satellite
Sources” and “LNB” position. When channels are found they will be listed and the scanning
will continue. After the completion of the channel scan a new window of an overview of the
scanned frequencies and the number of found programs are will be displayed.
Manual channel search
If you know the frequency, symbol rate and polarization of a certain TV or radio program you
can enter the information to perform a manual channel scan. If you select the option "manual
scanning", enter the values there and you click on the button "scan". The programs found on
this transponder frequency will be listed.
For example on the Astra 28.2 East the TV channel BBC News 24 information is:
Transponder data:
You enter:
Frequency: 10.773 MHz
Frequency: 10733000
Symbolrate: 22.000 MSps
Symbolrate: 22000
Polarization: Horizontal
Polarization: Linear_Horizontal
8
WinTV Reference Manual
Configuration a Video Input
When connecting a external source to the WinTV product please ensure that the cables are
connected in the correct order.
N
ote: This section refers to WinTV products with Video Input.
Connecting a Video Recorder or Set top box
We recommend using a SCART to Composite cable for connecting most VCR's and set top
boxes to our devices, this is because unless stated most of these devices will not be able to
output in Svideo, so if you use a SCART to Svideo cable all you will see is a black and white
image.
There may be a switch on the SCART connecting for <IN> or <OUT>, ensure it is set to
<OUT> so that the signal is sent from the SCART to the composite.
If your VCR or Set top box has a S-video output and your WinTV product has S-video input
then you can use a S-video to S-video lead.
You may also need to connect the Red & White RCA phono plugs into the Stereo Line in for
the sound to be transferred. Simply use a Red & White female RCA to Stereo Jack connection.
Configuring the Composite channel
Click on the Button MENU and “Suite-Manager” to open the channel manager. Select the
<sources> and highlight the <Composite> or <S-video> source .
The video format commonly used in Europe is Pal-BGHIDK, type a name for the channel and
a description and click on <Save> and <Close>.
Selecting the composite channel in the channel list
To select the Video Channel that you created <right> click with the mouse button on the TV
window and select the channel list. You should see you the channel name you just created at
the bottom of the channel list.
9
WinTV Reference Manual
Changing the Channel List
Click on the Button MENU and “Suite-Manager” to open the channel manager. Select the
<Channels> tab.
The channel list allows you to see all of the available channels that have been scanned.
Channel-Menu
If you right click on one of the channels on the right hand side you will have some of the following options:
10
WinTV Reference Manual
Programme Delete
To delete a channel you can either highlight and channel and the right click and select delete
or highlight the name of the channel and press the “DELETE” key on your keyboard. In order
to delete the full channel list you can <Select All> and then delete.
Programme Rename
To rename a channel you have to highlight it and then click on the column “Preferred Name”.
You can then edit the name of the channel.
Programme Number Location
1. Highlight the channel that you want to change in the column “Preferred Number”. You can
now enter a new number that is not already assigned to another channel.
2. To move a channel up or down the list, highlight the channel and then click on the “Move
Channel (UP/DOWN) entry.
Favorite channel list
You have the option of creating a favorites channel list in the order that you want. Simply
click on the channel name on the right hand side and drag the channel name to the left on
top of the Favorite group on the left hand side window.
Creating a new favorites group
You can also create a new channel suite if you prefer to create a new favorites group. Click
on the Add Suite and type in a name for the new suite. If you then highlight “All Channels”
you can then drag the channel on the right hand window into the new suite that you have
created. This is useful if you only want some channels to be shown in your TV channels list.
Menu Options
Clicking on the “MENU” button will
give you the following options:
“4 x 3”, “4 x 3 Pan Scan”, “4 x 3 Letter Box”
Select the TV picture aspect ratio 4 x 3.
“16 x 9”
Select the TV picture aspect ratio 16 x 9.
“Select Channel”
Select the channel that you want to view.
“Suite Manager”
Opens the channel suite manager where you can scan for channels and configure video
input.
”Configuration” Menu
Allows you to configure the “Channels...”, “Audio”, “Snapshots...”, “Preferences...” and
“MPEG Settings”.
11
WinTV Reference Manual
“View” Menu
Allows you to set the TV image screen size to a pre-defined size (320 x 240, ..., 800 x 600).
“Options” Menu
To select the option ensure that the tick is selected before the name of the option.
“Select suite”
Allows you to select a specific suite (TV, Radio or favorites), you can also select your own
created suite.
Option - Always on Top
Always on top will always make WinTV be visible on your windows desktop, it will be on top
of any application.
Option - Aspect Radio
This option will force the aspect ratio to 4 x 3.
Option - Mute
Will Mute and un-mute the sound.
Option - No-Title
This option will remove the TV applications borders, so you will only have the TV picture.
Option - TV Mode
This option will change the TV picture to Full Screen mode, so the TV picture will cover the
whole of the desktop.
“Display” Menu
12
WinTV Reference Manual
Display - Freeze
Will stop the TV picture from moving. You can also press: <CTRL> + <F>.
Display - Preferences...
Allows you to configure the “WinTV Preferences”.
“File” Menu
File - Save as
After using the “Snap” button you will be able to save that still image snapshots to different
file formats (e.g. Jpeg, BMP etc).
File - Print...
Allows you to print out the still image snapshot.
File - Print setup
Allows you to configure the printer settings.
File - Copy
Allows you to copy the still image snapshots to the clipboard of Windows.
File - Exit
Will close down the TV application. You can also press <Alt> + <F4> on the keyboard.
“Help” Menu
Help - Help Topics
Opens the online help menu.
Help - Tip of the Day
Shows the tip of the day for useful information about the application.
Help - About
Shows information about the application version files and hardware.
13
WinTV Reference Manual
WinTV Settings
To configure the WinTV application select the “Spanner” button.
Menu - On Screen Display
On Screen Display
The “On Screen Display” allows you to set the amount of time the information bar will be
displayed on the screen. The annunciator font allows you to change the font type and colour
that will be used. Where available Closed Captioning (CC) will show subtitles if selected.
Tab - Title mode (TV picture with application Menu)
4:3 Aspect Ratio
The option "4:3 aspect ratio" determines whether this is automatically selected, if you re-size
the WinTV window with the mouse.
14
WinTV Reference Manual
Enforce Aspect ratio
When checked, the image's aspect ratio is preserved as the WinTV window is scaled.
Selecting Enforce Aspect ratio will round off the height and width dimensions of the television image in order to maintain the proper aspect ratio.
WinTV can operate as a Screen Saver, or can retain your current Screen Saver. If Allow
Screen Saver is checked, choosing the "Use System Screen Saver" option uses any current
screen saver configuration on your computer. Choosing TV Mode uses WinTV (in full-screen
mode) as the system screen saver.
Tab - No Title mode (TV picture only)
No Title Mode Displays the Television inside the application window, without Title and Menu
bars. This configuration dialog provides Aspect Ratio and Screen Saver settings as described
in Title Mode (above).
Tab - TV Mode (Full screen TV)
TV Mode displays the television image using the entire height and width available to the
monitor screen.
Movies - MPEG Settings
DVCR Record File Path
Refers to the save path of the actual recorded Video files during the record mode.
Pause Mode Record Path
Refers to the temporary path of the file that is buffered during the pause mode.
Pause Buffer
This sets the maximum size of the Pause Buffer..
Quality Level
Allows you to set the quality level of the recorded MPEG files files, example “DVD 6Mb” for
analog recordings.
N
ote: For digital WinTV product (DVB-S, DVB-T) the default is "DVD 2048 bytes" and
this cannot be changed (native MPEG quality).
15
WinTV Reference Manual
Snap Shot Settings
Clicking on the CFG icon allows you to configure the Snapshot settings:
Capture resolution
Capture Resolution Images in WinTV are captured at the maximum resolution. When the
image is saved to a file name (below), you select a resolution for the snapshot, from 320 x
240 (minimum) to 1600 x 1200 (actual size).
Fields Captured
Fields Captured Broadcast video uses an interlaced format, in which the odd-numbered scan
lines and even-numbered scan lines are displayed separately; the eye combines them into a
smooth image. On the computer monitor output,, both fields are displayed at once. When
taking a snapshot of a video image with little motion, Capture 2 Fields produces the most
data and the clearest image. However, when taking a snapshot of a video image containing
motion, capturing both fields may result in a blurred image. Therefore, use Capture 1 Field for
best results.
Experiment with these settings to achieve the desired results.
Default
Button Resets Snapshot Configuration to factory defaults.
16
WinTV Reference Manual
Audio Settings
N
ote: This option is only available on a WinTV product that supports this feature and
will only be displayed if you are tuned into a channel or video input that supports
this feature.
Audio Mixer Inputs
Click on this item to display a list of possible selections: WinTV WAVE should be selected.
Current TV Audio preferences
This area enables you to select audio preferences, from the source dependent Available
Modes listing at the bottom of the dialog box.
Current TV Available Modes
The actual (active) setting is highlighted.
17
WinTV Reference Manual
Colour settings (Analogue only)
N
ote: This option is only available on a WinTV product that supports this feature and
will only be displayed if you are tuned into a channel or video input that supports
this feature. Not available for DVB-T or DVB-S channels.
Here the brightness, the contrast, the saturation and chroma can be changed for improving
the picture quality for analog sources. Selecting default changes the settings back to default
settings.
18
WinTV Reference Manual
Pause, Record and TV-Mode
There are four buttons to control the Watching, Recording and Pausing of TV.
TV-Mode
Pause-Mode
Record mode
Playback mode
Clicking on the Pause button will cause the Pause menu to roll down from the WinTV application, while clicking on the Record button will cause the Record menu to roll down.
Clicking on the Record will start a recording of the channel that you are watching. If you click
on the button once, it will record for 15 Minutes, clicking twice will record for 30 minutes,
clicking a third time will record for 45 minutes. Each click will record for another 15 minutes
(So 3 clicks will record for 45 minutes).
Background Record and Dual Tuner mode
N
ote: Only available for the WinTV-NOVA-TD.
The background recorder (BG recorder) allows you to record your program without the
WinTV application opened on your desktop. When the background record starts; a red bullet
icon close to the Windows clock starts. You can end the recording by right clicking on this
icon and selecting terminate recording.
If you are not using WinTV at the same time, the WinTV-NOVA-TD will background record in
Diversity mode, for the best reception quality. If you watch or record another channel (another MUX) at the same time, the WinTV-NOVA-TD will not operate in Diversity mode and will
revert back to Dual tuner mode, therefore, you must have very good reception on both
antennas.
The background record always start using the tuner connected to the main antenna connector (the standard IEC one), so you should always connect your roof antenna to this connector
when using WinTV-NOVATD Indoor at home.
If you located or travelling in an area where the reception is bad, you should not use WinTVNOVA-TD in Dual tuner mode: your recordings could be corrupted.
To change between Dual Tuner and Diversity mode select the Diversity Tool on the Start
Menu / Hauppauge Folder.
Record Pause Playback slow
Time counter
Open file
Skip back to start
Video-Position
Skip back 10 secs
Skip to end Fast rewind
Stop
Playback Fast forward
Skip forward 10 secs
Time counter
The time is specified in a Hour:Minute:Second format..
Record
Clicking the Record button will automatically generate a file name and start recording
your audio/video program.
• The Live TV window will be shown in the TV window
• The time counter will indicate the length of recording
•
When recording using One Touch Record then length of the recording will be shown.
19
WinTV Reference Manual
The quality of the recording and the hard disk space can be specified by clicking the symbol
spanner//Movies/MPEG. If you click on "stop", the timer counter is put back to 00:00:00.
Stop
Clicking the Stop button will stop the video you are recording or playing back.
Play
Clicking the Play button will playback from disk the last video file created. When playing a video, you can rewind, fast forward, replay 10 sec or skip forward 10 sec using
the buttons on the control bar.
Pause
Clicking the Pause button while Playing will pause your audio/video.
Rewind
Clicking the Rewind button will play the video file in reverse. Clicking the Rewind button again will continue the playing of the video.
Fast forward
Clicking the Fast Forward button one time will fast Forward your video at 2X speed.
Clicking the Fast Forward button two times will fast Forward your video at 8X speed.
Clicking the button again will continue playing back at normal speed.
Slow motion
Clicking the Slow Motion button during playback will cause the video to play in slow
motion. Clicking the Slow Motion button again will return the video to normal playback
speed.
File
Clicking the File button opens the File menu. The last file recorded is listed in the File
name box. In the File menu you can:
• Rename your recorded video file: To rename a video file, find the file you would like to
rename, highlight it with your mouse, and click and hold the right mouse button. Go down to
Rename and then you can type in a new name. Remember: You must keep the MPG extension on the file.
• Play a video file previously recorded: Find the file you would like to play, highlight it with
your mouse (one click of the mouse button) and click Open. Then click the Play button.
• Delete recorded video files which you no longer want: Click your right mouse button on the
video file once, go down the menu and click Delete.
Pause-Mode
The pause mode allows you to pause the TV or Video window. Clicking the Pause button on
the WinTV application starts the Pause mode. The Pause Menu will drop down.
Rewind Slow motion Fast forward Skip forward 10 secs
Display counter
Skip back to start
Video position
Skip back 10 secs
Skip to end
Pause
Play
Replay last 10 secs
Skip forward 10 secs
20
WinTV Reference Manual
Pause-Puffer
The Pause buffer is space on your hard disk where video is stored during the Pause mode.
The maximum amount of time which your TV program can be delayed is dependent upon
how much storage space you have set for the Pause buffer. To change the default pause buffer location licking the symbol spanner//Movies/MPEG.
Delay counter
The delay counter indicates the amount of time that the Live video window has been paused.
If the delay counter indicates 00:01:23 then the Live video window has been paused for 1
minute and 23 seconds.
Rewind
Clicking the Rewind button while playing video will rewind the recorded video.
Clicking the Rewind button again will continue the playing.
Pause
Clicking the Pause button causes WinTV to start recording into WinTV's Replay Buffer.
It takes about 10 seconds for the Replay Buffer to be initialized and for Pause to become effective. Un-clicking the Pause button will cause the audio/video program to start playing
from the point where the button was originally clicked.
Most WinTV functions are active while in the Pause or Pause Live mode. For example, you
can change volume, resize the TV window, go into "no-title mode", etc. While in Pause mode,
the Video Position bar shows the amount of the Replay Buffer which is filled with video. For
example, if the Video Position indicator shows halfway, it means that half of the Replay Buffer
is filled. If you find you cannot Pause as many minutes as you would like, increase the size of
the Replay Buffer.
While in Pause mode, the A/V stream is always saved in the Replay Buffer. To stop saving the
A/V stream in the Replay Buffer, you must exit the Pause mode by clicking TV mode.
Slow motion
Clicking the Slow Motion button while playing video will play in Slow Motion. Clicking
the Slow Motion button again, will continue playing normally.
Fast forward
Clicking the Fast Forward button one time will fast forward your video at 2X speed.
Clicking the Fast Forward button two times will fast forward your video at 8X speed.
Replay
While in the Pause mode, hitting the Replay button acts like the Instant Replay you see
on TV broadcast sporting events: the audio/video goes back in time and you repeat
what you have previously seen. Each click of the Replay button causes audio/video to go
back 10 seconds.
For example, if you want to repeat the audio/video you saw 10 seconds ago, you would click
the Replay button once. If you want to see the video you saw one minute ago, you would
need to click the Replay button six times.
For extended replay times, you might find it more convenient to grab the Video Position indicator control bar and move it to the left. Once you let the control bar go, audio/video starts to
play (it might take a few seconds for the WinTV application to start playing).
You might have to move the Video Position indicator to the left and right to find the desired
spot to start replaying audio/video.
While Replaying, your audio/video program continues to be recorded in the Replay Buffer.
Therefore, if you have clicked the Replay button 3 times (so that you are replaying the
audio/video seen 30 seconds ago), the video you see in the WinTV window will be 30
seconds behind the "live" audio/video program.
Skip ahead
Clicking the Skip button will skip the video ahead 10 seconds.
21
WinTV Reference Manual
MPEG compression formats
N
ote: Only available on supported products (PVR / HVR)
The WinTV supports several formats for MPEG video compression, called Quality Levels. The
differences in these formats are:
• The higher the datarate, the better the video quality you see from live TV and your recordings. The higher the datarate, the more disk space which will be required.
• CPU horsepower required during playback and pause mode.
• The compatibility when creating Video CD’s or S-VCD’s.
To configure the MPEG Quality Level, on WinTV click the PREF button (Preferences menu),
then Capture and then the MPEG tab. Here are the video formats and the amount of disk
space per hour used:
MPEG1 VCD .65 Gigabytes/hour
MPEG2 2.0MBits/sec (Full D1) .9 Gigabytes/hour
MPEG2 2.0MBits/sec (Half D1) .9 Gigabytes/hour
MPEG2 12.0 MBits/sec (Full D1) 5.4 Gigabytes/hour
MPEG2 12.0 MBits/sec (CBR) 5.4 Gigabytes/hour
DVD Standard Play 8.0Mbits/sec 3.1 Gigabytes/hour
DVD Long Play 6.2Mbits/sec 2.4 Gigabytes/hour
DVD Extra Long Play 2.5 Mbits/sec 1.2 Gigabytes/hour
SVCD Standard Play 2.5Mbits/sec .8 Gigabytes/hour
N
ote: CBR is constant bit rate, VBR is variable bit rate.
Which record format should you use?
If you would like to burn a DVD, then chose either DVD Standard Play, DVD Long Play or DVD
Extra Long Play. DVD formats record at 720x480 (720x576 with PAL video sources) using 48.0
kHz stereo audio.
If you want to watch the recorded video on your PC, for the best video quality chose MPEG2
12.0MB/sec or DVD Standard Play. If you do not have much disk apace, try the MPEG-2
2.0MB/sec.
SVCD is a nice compromise between video quality and hard disk space. Video is recorded at
480x480 (480x576 for PAL video) at a datarate up to 2.5Mbits/sec.
For creating Video CD’s for playback on your home DVD player, chose the MPEG1 VCD format.
Once chosen, the Quality Level format is set for both the Pause and Record modes. The format cannot be changed while Recording or while in the Pause mode.
DVD players which are compatible with CD’s and MP3’s can also read DVD’s burned using
MPEG video files created with the WinTV.
Creating a DVD
If you plan to burn a DVD using a authoring software package, you should use either the
“DVD Standard Play”, the “DVD Long Play” or “DVD Extra Long Play”. These formats will
allow you to make DVD’s with the following recording lengths:
DVD Standard Play: 1 hour 30 minutes on DVD+R/RW disks
DVD Long Play: 1hour 50 minutes on DVD+R/RW disks
DVD Extra Long Play: 4 hours on DVD+R/RW disks
22
WinTV Reference Manual
Keyboard shortcuts in WinTV
In Live TV-Mode
Plus (+)
Minus (-)
Page Up
Page Down
0-9
Spacebar
Esc
F1
CTRL + M
CTRL + F
CTRL + C
CTRL + P
CTRL + S
CTRL + T
CTRL + I
Alt + M
Alt + P
Alt + R
Alt + F
Alt + F4
Channel Up
Channel Down
Volume Up
Volume Down
Enter a channel number
Take a snapshot still image capture
Exit Full screen TV mode
Open online help
Mute sound on / off
Freeze TV image
Copy to clipboard
Snapshot print
Video source select
Re-size the TV window to and from Full Screen
Show EPG information
Re-size the TV window to default size
Start the Pause-function Timeshift
Start the recording function
Opens the snapshot save options
Close the application
During recording
Plus (+)
Minus (-)
Spacebar
Esc
F1
CTRL + P
CTRL + F
CTRL + C
CTRL + M
CTRL + T
Alt + Q
Alt + R
Alt + P
Alt + F
Alt + N
Alt + F4
Channel Up
Channel Down
Take a snapshot still image capture
Stop recording
Open online help
Snapshot print
Freeze TV image
Copy to clipboard
Mute sound on / off
Re-size the TV window to and from Full Screen
Pause the Live TV window (has no effect on the recording)
Increase record time by 15 min intervals
Start the Pause-function Timeshift
Opens the snapshot save options
Stop recording and return to Live TV mode
Close the application
In TimeShift-Mode (Pause mode)
Plus (+)
Minus (-)
Spacebar
Esc
F1
CTRL + P
CTRL + C
CTRL + M
CTRL + T
Alt + Q
Alt + R
Alt + P
Alt + F
Alt + N
Alt + F4
Channel Up
Channel Down
Take a snapshot still image capture
Exit pause mode
Online Help
Snapshot print
Copy to clipboard
Mute sound on / off
Re-size the TV window to and from Full Screen
Pause the Live TV window
Pause-Mode stops and recording start
Start the Pause-function Timeshift
Opens the snapshot save options
Exit pause mode and return to Live TV mode
Close the application
23
WinTV Reference Manual
WinTV Remote Control
N
ote: This option is only available on a WinTV product that supports this feature.
The WinTV remote control allows you to control the WinTV or Radio application, please ensure the following before trying to use this feature:
1. Infrared Remote control - Has batteries inserted
2. Infrared-Receiver, is fully connected to the IR socket of the WinTV-Card
3. Infrared software is started - The IR icon is on the start bar
Before using starting the IR application please ensure that the IR sensor and WinTV hardware
is fully installed and insert the batteries into the Remote control handset. Position the IR receiver in a position where the signal from the handset can beam can be seen.
Installation of the Remote control software
The WinTV’s remote control software is installed automatically during the
installation of the WinTV applications. The installation will add the shortcut
“AutoStart IR” to the Start-up group and a IR icon next to the time on the windows start bar. If this is not the case, you can manually install the WinTV’s
remote control software from the installation CD-ROM / IR32 folder. Double click on IR32.exe.
Remote Control Buttons
Go:
Power:
TV:
Videos:
Music:
Pictures:
Guide:
Radio:
Arrows & OK:
Back/Exit:
Menu:
Open the “Open the “WinTV Remote” menu or launch MCE
Exit the WinTV application
Start WinTV (as the Red button) / Full screen TV mode on/off
No Function (reserved to the MediaMVP)
No Function (reserved to the MediaMVP)
No Function (reserved to the MediaMVP)
Show/Hide the Now/Next EPG (DVB-T channels only)
Start and Stop WinTV-Radio application (if available)
Select and confirm options in the WinTV Remote menu or the Windows task list.
Stop a recording / Exit pause mode and close the PVR tray (as the Stop button)
Brings up the Windows task list. Use the left and right arrows to change to
other Windows tasks, and click OK. i-Menu is an always active button.
Vol:
Control the audio volume
Prev. Ch:
Swap to last viewed channel
Ch:
Select the next/previous channel
Mute:
Audio on/off
REC:
Open the PVR tray & start a recording. See section Remote Control Buttons
during a Recording
Stop:
Stop a recording / Exit pause mode and close the PVR tray (as the Back/Exit
button)
<<:
Rewind or Volume down
Play:
Open the PVR tray & play back the last recording. If you didn’t record any TV
shows recently, it will open the MyVideos folder.
>>:
Fast forward or Volume up
Replay:
Swap to previous channel (as the Prev.Ch button)
Pause:
Open the PVR tray & pause live TV (pause mode). Clicking again will play
from the point where the button was originally pushed
Skip:
Surf Mode on/off
0-9:
Direct access to channel number
text (*):
Start VTPlus teletext application
Sub/CC (#):
Sub-titles / Closed Caption on/off - if available on the channel
Red Button:
Start the WinTV application (as the TV button)
Green button: Close the WinTV application (as the Power button)
Yellow button: No function
Blue button: Make a Snapshot still image capture
24
WinTV Reference Manual
N
N
ote: The WinTV remove will only work when the WinTV application is the active
application, press the RED button to make it the active application.
Remote Control Buttons during a Recording
ote: Most WinTV functions and remote buttons are disabled when recording
Record button: Set the duration of the recording, by steps of 15 minutes up to 2 hours, then
by steps of 30 minutes up to 4 hours (like the OTR button). Clicking again will disable recording duration. This information is displayed in the PVR tray.
Stop button: Stop recording and close the PVR tray (as the Back/Exit button)
Pause button: Freeze the video. Press the Play or Pause button again to un-freeze the video.
The Pause button has no effect on the recording itself. While the video is frozen, the recording is continued in the background, there is no Rewind, Forward, Skip, Replay function.
Remote Control Buttons when Pausing TV or Playing a Video
N
ote: You cannot change channels when Pausing TV
Record button: Stop current action and start a recording
Stop button: Stop playing or Exit pause mode and close the PVR tray (as the Back/Exit button)
Play button: Play the recorded TV or TV from the pause buffer (if PVR tray opened). Play and
Pause button have alternatively the same function.
<< (Rewind): Play backwards at 8x speed. Clicking again will play paused TV or recorded TV
at 1x
>> (Forward): Play forward at 2x speed. Clicking again will play forward at 8x, then back to
1x
Pause button: Start Pause-Mode (TimeShift). Press Play or Pause again to continue watching
from where you left off
>I (Skip): Skips ahead in the Pause buffer by 10 seconds per click. Holding the Skip button
will auto-repeat, and advances the video about 10 minutes per 15 seconds the button is
depressed
I< (Replay): Skips backward in the Pause buffer by 10 seconds per click. Holding the Replay
button will auto-repeat, and advances the video about 10 minutes per 15 seconds the button
is depressed Quick Jump 0 to 9 buttons: When playing a video, you can quickly skip through
the video by pressing the 0-9 buttons. When you press one of these buttons, you will skip to,
for example, 10% of the video file when you press '1', 20% of the video file when you press
'2' and so forth (% of the length of the file).
During Pause-Mode, any key skips ahead in the Pause buffer to -2 seconds.
25
WinTV Reference Manual
WinTV-Scheduler
WinTV-Scheduler allows you to schedule the recording of TV shows. WinTV-Scheduler, once
it is set, can be closed, and the WinTV application will “wake up” at the desired time and
tuned to the desired channel.
After installation, WinTV-Scheduler can be found by going to Start / Program files /
Hauppauge WinTV.
In order to Schedule a recording click on the “Add Program” button:
The items that need to be set for each event are:
Time to Begin Program: Set the start time. Click on the hour to set the hour, the minute to set
the minute and the second (if you feel this is necessary) to set the second to start the program.
N
N
ote: It takes about 10 seconds to launch the WinTV and set up for recording, so set
the Time to Begin Program to 10 seconds before the time your TV show actually
starts.
Time to End Program: Set to the time to end this event.
ote: you need to leave at least 30 seconds between scheduled programs to give the
recorder time to set up its disk buffers.
Program Period: One time, daily, weekly
26
WinTV Reference Manual
Date to Begin Program: Today's date is the default. Change this if you want to schedule on
another date.
Source selection: Leave set at WinTV to bring up the WinTV at the requested time and on the
requested channel.
Channel selection: Choose one of your scanned channels.
Recording options: Click on Record to File to record your show. Leave this button unchekkked to watch TV at the requested time. You can also name your file to record.
Record in background: The background recorder (BG recorder) allows you to record your
program with out the WinTV application running. If you have a Dual Tuner product you can
record from 1 channel while watching another.
Once these are set, click Set Program. You can add more Events, clicking Set Program after
each event is set. When you are finished click Close. The WinTV program does not have to
be running for the Schedular to work. If WinTV is not running, it takes about 10 seconds to
start Scheduler and to start the recording of TV.
You must make sure Windows Task Scheduler is running properly:
For both Windows 2000 and XP, you must have the Windows task scheduler started and running correctly, or WinTV-Scheduler will not work. For XP, you must also have a password
assigned to log into Windows, which is a requirement for Windows task scheduler.
To be sure Windows task scheduler is running, go to Start/Run and enter services.msc, click
ok. when the Services window appears, find Task Scheduler in the right column and be sure
it is set to started and automatic. If it is not started, you can start it manually. If it is started,
and scheduler is still not working correctly, you can try stopping the service, and restarting it.
You must have a password set to log into Windows XP:
WindowsXP will not run any scheduled events without a username and password the first
thing you should do is create them. You may want refer to the following Microsoft
Knowledge Base article regarding this issue:
http://support.microsoft.com/default.aspx?scid=kb;en-us;316434&Product=winxp
If you Schedule something and it doesn’t run at specific time check the following:
Make sure that your time and time zone are correct. If you are in the East coast you could have
the correct time but wrong time zone. If you are running Windows XP Home or Pro, and
Windows 2000, please make sure that you have given your User account a password to log in.
According to Microsoft, Services require that a user must have a logging password to start.
If you already have a password and it still won’t work, please double check the Task
Scheduler service and restart it. Do the following to do this. Go to Start/Run and type services.msc and click ok. The Services window will open. Search for the Task Scheduler service.
Right click on the Task Scheduler and click on stop. Then, right click on the Task Scheduler
and click on start to restart the service, and then restart your computer to take effect. After all
this try WinTV-Scheduler again.
You should also make sure that you have all Microsoft WindowsXP updates applied to your
system as this can also correct issues with the task scheduler in WindowsXP.
Also, make sure your system is not set to go into hibernate or sleep mode as the scheduler
cannot wake up Windows to start the recording.
The scheduler writes a command line to Windows Scheduled Task so if the WinTV is failing
to launch at the specified time you may want, go into Windows Scheduled Tasks (Start,
Programs, Accessories, System Tools, Scheduled Tasks) and see if you can schedule any
event to occur at a specific time. If you cannot get any other program to begin at a specific
time then the problem is with Windows Scheduled Tasks. You can also check to see if the
command line is being written correctly to Scheduled Tasks. Create a schedule recording in
the WinTV-Scheduler. Then go into Windows Scheduled Tasks and find the job file for the
recording you created. Right mouse click on it and go to Properties. In the Run field you will
see the command line for the recording, it will look something like this:
C:\PROGRA~1\WinTV\WinTV.EXE -c7 -ntod -startr: WinTV_(0).mpg -qdef -limit:3600 -mute
"C:\PROGRA~1\WinTV\WinTV.EXE": Obviously the path to the WinTV application.
"-c#": The channel number you want the WinTV to open up on.
"-ntod": No tip of the day dialog window.
27
WinTV Reference Manual
"-startr:": The name you want for the recorded file.
"-qdef": MPEG quality of the recorded file. Currently there are only two choice here, current
default level (-qdef) and VCD quality (-qvcd).
"-limit:": Length of time in seconds you want the recording to be. This can only be in intervals of 60 seconds.
"-mute": Mutes the application upon starting the recording.
So the above command line will start the WinTV application on channel 7, will mute and
record for one hour at the default MPEG quality setting the application is currently set for.
This recording will be named WinTV_0.mpg.
If you copy the command line and then paste it in the Run program field (Start, Run) and click
on Okay it should start your recording on the channel you specified. If it does it means that
the job is being created properly and again indicates that the problem is with Windows
Scheduled Tasks.
28
WinTV Reference Manual
How to use 7 Day EPG for WinTV (DVB-T only)
1. You should see an icon close to the Windows clock. You will reach the
menus of the 7 Day EPG by a right click on this icon.
2. You should then see the EPG Service window: It show the
status of the EPG service. The buttons below the window
give you the following controls:
• Start/stop the EPG Service
• Modify the current settings
• Open the EPG help file
• Exit the EPG application
To view the EPG guide click 'View EPG' See Step 4 for more
information.
3. Configuring the EPG Service
Click on the 'Settings' button to be shown the EPG configuration window:
- Start with system boot: Starts the EPG Service automatically each time you start your computer.
- Start minimized: Starts the EPG Service minimized in
the system tray.
- Record program ahead/longer: Specifies the recording
overlap before and after a scheduled recording.
- Server Port No: Specifies which port the EPG Service
should run on (Default is port 80 however if you are
hosting your own webpage you will need to alter this).
- Account for remote login: Enter a username/password
to access the EPG service from any other internet enabled computer.
- System Account for recording: Enter the
username/password for the user account you are currently using (the EPG service will use this account to
be able to start up the WinTV application).
4. Viewing the EPG information
From the EPG application window, click 'View EPG' this will open a web page showing the
EPG information, initially the application will need to scan and update the EPG information.
The amount of time it takes to read the data is related to the number of channels in your
DVB-T transmission area. The more channels, the longer it takes to read all of the data, this
may take several minutes:
29
WinTV Reference Manual
5. Scheduling a recording
To schedule a recording, simply click on the Program
title, this will give you more information about that program, from there you can click on 'Schedule for recording'.
When you click a "record" button, the 7 Day EPG schedules a task to record your TV show from a DVB-T channel.
The scheduled task is added to Windows Scheduled
Tasks.
Please note: you need to have a user name and password on your PC in order for he scheduled recordings to
record through Windows Scheduled Tasks.
The scheduled recordings can be viewed and modified
through the WinTV-Scheduler. The format of the file
name is [programs title]_[Time]_[Date].mpg
30
WinTV Reference Manual
The WinTV-Radio application
Depending on which WinTV product you have will depend on if you can listen and record FM
radio on your PC. Please ensure that the FM Radio antenna is connected to the FM connection on the back of the of the WinTV product.
To start the WinTV-Radio application, click the “Start” / “Programs” / “Hauppauge WinTV” and
the “Radio” application shortcut or click on the “Radio” icon.
The 1st start
When you start the radio application for the 1st time the Radio icon will be displayed in the
task bar of Windows (e.g. "87,00 - WinTV radio") while it searches for radio stations, this may
take some time. If no FM antenna is attached no channels will be found. Once it has finished
scanning the radio window is opened.Content Menu
Operational features
Volume:
Tune:
Seek:
Mem:
Mute:
Mono:
Scan:
Min:
CD:
TV:
OFF:
1 to 10:
For controlling the volume level.
Fine tune the current radio channel.
Search for the next active FM radio channel.
Sets an FM radio channel preset. To assign the current station to a preset,
click on MEM and then on one of the Preset buttons (1-30).
Turns the sound off and on.
Force mono reception. Default is stereo.
Searches for new stations until you click “Stop”. Click the Right mouse button
anywhere on the WinTV-radio window to set the Scan mode.
Minimizes the WinTV-Radio window.
Starts your systems Audio CD-player for playing back Audio-CD’s.
Closes the radio application and starts the WinTV application.
Closes the radio application.
Preset 1 - 30 Stations list (1..30)
Keyboard shortcuts
To select a radio preset using the keyboard you must:
1. Search for the radio station you want to select
2. Click on the “Mem” button.
3. Click on a number where you want to save the radio station to (1-10).
Each Preset button holds up to 3 presets each. Press the button to go to the next preset. The
Mem button cycles through FM1, FM2, and FM3 bands to specify where to save a new preset.
Entering station names
When the radio is tuned to a preset the user can assign a name by clicking the mouse on the
frequency display and typing in a name that does not begin with a number. You can use leading spaces to "center" the name in the display. Hit Enter/Return to finish.
Minimize to tray
Left click restores app, right click accesses context menu
31
WinTV Reference Manual
If you click and hold the right hand mouse button on the Radio window then a menu will appear:
Presets: Allows you to select the preset that you have created.
Configure audio...: Select the audio properties.
Scan mode: Allows you to select between preset mode list and all channel list.
Seek mode: Allows you to search for strong signal station or weaker (longer distance)
Remote Tuning: If you select "Use Channel Seek", the keys "CH+"/"CH -" on the remote control has the same function as the key "Seek" in WinTV radio. If you select "By frequency", the
keys "CH+"/"CH -" has the same function as the "Tune" option.
Tool tips: Opens some tips (Tool Tips).
Use Tray: When “Use Tray” is select the application is minimized onto the system tray.
Minimize: Minimize to system tray.
Restore: Restore the application to full screen.
About: Displays information about the radio application
Mute: Sound on / off.
OFF: Turns off the radio application.
Keyboard shortcuts in WinTV-Radio
F1-F10
0 to 9
F11/12
INS
Pg Up/Dn
+/Home
End
O
M
N
T
C
E
S
R
Space
F11/12
DEL
Preset 1-10
Preset 1-10
une Up/Down as defined by Remote Tuning Mode
Add current station as preset if not already defined as preset
Volume Up/Down
Tune Up/Down
Seek Up
Seek Down
Toggle Mono/Stereo Mode
Toggle Mute
Minimize Radio
Close Radio and go to WinTV
Close Radio and go to CD Player
Exit Radio (OFF)
Toggle Scan Mode (Preset or All channels)
Toggle Mem state
Scan to next Preset or Station as defined in Scan Mode
Tune Up/Down as defined by Remote Tuning Mode
Remove existing Preset
32
WinTV Reference Manual
VTPlus application
VTPlus for WinTV is a sophisticated analogue Teletext software application which is only available on the analogue Tuner of the HVR. VTPlus allows you to view multiple teletext pages,
save or print teletext pages and create Dynamic Data Links so that teletext data can be used
in other applications.The WinTV application does not have to be active while the VTPlus teletext application is running.
N
ote: VTPlus uses the channel list of the analogue WinTV for finding the VTplus
information. It is therefore necessary to scan for channels first in WinTV before starting the VTplus application. It is not possible at this time to receive Digital Teletext
(MHEG / BBCi) for DVB-T in the UK.
To start the VTPlus application click on the Start / All Programs / VTPlus for WinTV.
The VTPlus icon border
1.
2.
3.
4.
5.
6.
Reception indicator, as this symbol is red, your requested page is being received.
Script, corresponds with the menu option, see Options Script.
Order the previous page, corresponds with the menu option Page Previous page
Order the next page, corresponds with the menu option Page Next page
Select previous Subpage, corresponds with the menu option Show Previous Subpage
Select next Subpage, corresponds with the menu option Show Next Subpage.
33
WinTV Reference Manual
7. Reveal button, corresponds with the menu option Show Hidden characters. When you use
this button you might see hidden text, like VPS time codes or answers from a Quiz.
8. Change TV Station, corresponds with the menu option Options Change TV Station.
9. Set system clock, corresponds with the menu option Options Set system clock. Click on
this button with your mouse and the received Time from the Teletext channel will be used by
the System clock of your PC.
Receiving a teletext page
To receive a teletext page click on “page” and “new” and then type in a page number (e.g
100) and click on “OK”.
Quick select
Many Teletext pages have a reference to many other Teletext pages. For example in the TV
guide section are a number of page referrals to film background information or any other
additional referred information.
Quick select allows you to select these pages directly. Double click with the left Mouse button
on the page number in the text: A new Window appears and the selected page is being
received. While you Double click on the left Mouse button and at the same time push on the
Shift-Key, no new Window will be opened but the selected page will appear in the original
window.
However you can also work with two windows, one for use as index reference and the other
to display the selected pages. The way to do this is by activating the reception window and
using the right Mouse button in the index Window. The selected pages are being displayed in
the reception window, while the Index window is available for further activities.
With Quick select several pages can be called at once. Mark with a single left mouse click a
page number and start the reception with a left Double click on another page: The distance
between the selected pages may not be more than 11:
Example: "News from Page 112-115" are being selected with a single click on 112 and a
Double click on 115. The multiple page reception will open individual windows for each of
the pages within the selected page numbers.
All Quick select actions also may be done using the right mouse button. In that case a context menu is displayed.
For more information on using VTPlus please refer to the online application Help file.
34
WinTV Reference Manual
Troubleshooting:
If you are having problems using WinTV or Media Center then we firstly recommend updating the drivers for your sound card, graphics card and the operating system. To get the latest
driver versions available for the sound card and graphics card visit the respective manufacturer's websites.
I
MPORTANT! If you have a laptop you will not need to go to the individual manufacturers websites for the latest software, instead go to the website of the manufacturer of
your laptop and search their downloads section for your laptop, updated drivers and
software are typically available for it there.
For updating the operating system go to the Http://www.microsoft.com website and select
Microsoft Update and follow the on screen instructions (If prompted select the "Custom"
option and then install all of the updates that it finds, including software optional and hardware).
The following information and more can be found on the Hauppauge UK Forums:
http://www.hauppauge.co.uk/board/index.php
HcwDriverInstall gives "INF File Open Failed" error
Symptoms
When you run HcwDriverInstall.exe to install drivers, they fail to install and you receive the
following error message: Drivers have NOT been updated. INF File Open Failed. <>
Cause
This error occurs when the INF files to install the drivers are not where HcwDriverInstall.exe
expects them. The most common cause for this is from the user attempting to run
HcwDriverInstall without extracting all files from the .zip archive.
Resolution
All Hauppauge drivers that are packaged within a zip archive must be extracted before you
do anything with them. You can either use the built in zip handling in Windows XP (but
Extract, do not just view) or use a dedicated utility such as WinZip, WinRAR or Zip Genius
(other zip utilities exist).
No DVB-T digital channels found
Symptoms
When you scan for digital channels, either:
A: The scanner runs for several minutes and returns no channels
B: The scanner runs for less than 5 seconds and returns no channels
It is important to identify the amount of time that scanning takes because the troubleshooting
methods differ for each. The time is measured from the point that the "Scan" button changes
from displaying "Stop" back to it's original "Scan" state.
Cause
A: If the scanner runs for several minutes:
A1: Signal problem
A2: Bad driver state
A3: Windows Region Wrong
A4: Poor USB controller
A5: USB 2.0 not used
A6: Faulty WinTV hardware
B: If the scanner runs for less than 5 seconds:
B1: Software configuration issue
Resolution
A1 - Signal problem
Most aerial and cable issues can be identified by running the digital scanning tool,
ScanChannelsBDA-UK.
35
WinTV Reference Manual
A2 - Bad driver state
Some software can leave the card's driver in an invalid state. Try rebooting Windows and
rescan, and if the WinTV is a USB device, disconnect and reconnect. In some rare cases for
PCI cards it is necessary to completely power off the PC at the mains and then back on again.
A3 - Windows Region Wrong
DVB cards are tuned via tuning spaces and these differ for each country. It is important that
Windows is set to the correct country or the wrong tuning space may be used. Check as follows:
1. Click on the Windows Start button
2. Open the Control Panel
3. Open Regional and Language Options
4. Click on the Regional Options tab and ensure that the country is correct under both
Standards and formats and Location.
5. Click on the Advanced tab and ensure that the correct country is selected (e.g. English
(United Kingdom)
6. Click on the Languages tab
7. Ensure that the Default Input Language is set correctly
8. Click OK and Reboot
A4 - Poor USB Controller
Some USB controllers have serious compatibility issues with certain devices.
A5 - USB 2.0 not used
In some cases a motherboard will "decide" to connect a USB 2.0 device at USB 1.x speeds.
This may just be a glitch with the motherboard, but can also occur when using a non-USB 2.0
compliant cable. Older USB cables will not operate at USB 2.0 speeds.
To verify whether your device is running at USB 1.x or USB 2.0 speeds, you can check
through Device Manager:
1. Click on the Windows Start button
2. Select Run and type: devmgmt.msc
3. Device Manager will open. Go to View and then Device by connection
4. Now try to locate the USB controllers in the device hierarchy. They will be located somewhere on a PCI bus, but the location depends on the chipset of your motherboard.
5. When you find them, expand them and their Root Hubs to locate the Hauppauge device.
36
WinTV Reference Manual
USB 1.x - Universal Host Controller (UHCI) or Open Host Controller (OHCI)
USB 2.0 - Enhanced Host Controller (EHCI)
All BDA DVB-t devices should be under an Enhanced Host Controller. If they are not you will
not be able to view any channels.
A6 - Faulty WinTV hardware
One unlikely possibility is that the tuner on the card is physically faulty but this is the least
common cause and you should explore all other avenues first.
B1 - Software configuration issue
When the WinTV doesn't start properly, it can appear to work but not find any digital channels. Please refer to thesupport section on the website for installing the latest version of the
software.
How-to connect a satellite/cable set top box, VCR or games console
Summary
This article explains how to connect any one of the following to your Hauppauge WinTV card:
- Satellite set top box (e.g. Sky, DirecTV)
- Cable set top box (e.g. NTL, Telewest)
- Terrestrial set top box (e.g. Freeview)
- Video Cassette Recorder
- Games console (e.g. X-Box, PS2, Gamecube)
Definition of video types
In this article, the "source" is the device used to provide the signal you want to feed into the
WinTV card, such as a set top box, games console or VCR. These sources can output in a
number of interfaces, which are described below.
RF (coaxial cable)
RF is the type of output that the majority of VHS VCRs will have. An RF modulator inside the
VCR modulates the video/sound onto a spare frequency. This is then transferred over regular
coaxial cable (the same type of cable used for a TV aerial). RF will only provide mono sound,
and the image quality is not as good as with the other methods. It can also be complicated
because you need to be aware which channel your source (e.g. VCR) is set to output on.
Composite
Composite is a step up from RF, but it is still not an ideal solution. Luma (brightness) and
chroma (color) are put onto the same cable, and these can interfere with each other, leading to
poor quality. Composite cables only carry video, and so for audio a separate cable is required.
37
WinTV Reference Manual
S-Video
S-Video (sometimes incorrectly referred to as S-VHS) is superior to Composite, and is the
best quality available with Hauppauge WinTV cards. S-Video separates the luma and chroma
onto separate wires inside the cable. As with Composite, you need to run a separate audio
cable.
RGB
RGB is common in Europe, via the SCART connector. This provides the best quality from
European set top boxes, since it separates red, green and blue, but there are not currently
any TV cards which will accept an RGB input.
Video/Audio inputs
Hauppauge WinTV cards can have a number of video inputs, which you need to be familiar
with.
Antenna-In
- Used for RF inputs
- Recognizable as: Standard TV coax connector, accepts Belling-Lee plug (Europe)
F-connector, accepts screw-on plug (US)
- Selected in WinTV as "Tuner"
Composite In
- Used for Composite video sources
- Recognizable as a yellow phono connector
- Selected in WinTV as "Composite" or "Composite-1"
S-Video In
- Used for:
- S-Video on WinTV cards which have a separate Composite connector (see above)
- S-Video or Composite on WinTV cards which don't have a separate Composite connector
(see above)
- Recognizable as a black, round DIN connector with several pins
- Selected in WinTV as either: Discrete "S-Video" or "S-Video-1" source
Combined "Composite" source, and ticking the "S-Video" box
if using S-Video
Line-In (3.5mm mini-jack)
- Used to provide the audio when using Composite or S-Video
- Recognizable as a standard 3.5mm mini-jack (similar to a headphone jack)
- Retail cards use a 3.5mm mini-jack for line-in
Line-In (2x Phono connectors)
- Used to provide the audio when using Composite or S-Video
- Recognizable as a pair (red and white) of phono connectors
- MCE (OEM) cards use the pair of phono connectors for line-in
Typical SCART to WinTV Connection
The following images depict a typical connection between the SCART connector on a set top
box and a Hauppauge WinTV card.
Retail Cards
38
WinTV Reference Manual
A "SCART to Composite/S-Video" adapter is connected to the SCART-OUT. From there, a
Composite cable runs from the adapter to the Composite-In on the WinTV card. For audio, a
2x Phono to 3.5mm Mini-jack adapter is required. Another option for this would be to purchase a cable which has a 3.5mm mini-jack connector at one end and 2x Phono at the other end,
similar to this:
A "SCART to Composite/S-Video" adapter is connected to the SCART-OUT. From there a
Composite cable runs from the adapter to the Composite-In on the WinTV card. For audio,
twin phono cables run between the adapter and the relevant inputs on the WinTV card.
Media Center Cards
Software Configuration
Once the hardware is all setup, all you need to do is configure the S-Video or Composite
input as a new "channel" in WinTV.
Be aware that while in older versions of WinTV it was possible to select S-Video/Composite
by clicking the green button between the Channel Up and Channel Down buttons - this is no
longer recommended. You should add them as a channel.
To do this, please follow these instructions:
WinTV PVR Suite Manager (Old UI)
1. Start WinTV
2. Click on MENU
3. Select Suite Manager
4. Click on the Add button
5. Select either Composite or S-Video/Composite as appropriate
6. If using S-Video, ensure that the S-Video box is ticked
7. Close Suite Manager
WinTV HVR Channel Manager (New UI)
1. Start WinTV
2. Click on MENU
3. elect Suite Manager
4. Click on the Sources tab at the top
5. Select either Composite Source or S-Video Source as appropriate
6. Click Preview to verify you have selected the correct source
7. Click Add
8. Close the WinTV Channel Manager
Media Center Notes
Be aware that Media Center (MCE2005 and Vista MCE) has limitations in setting up TV channels. It is not possible to mix and match source types, in other words you can have it configured for terrestrial TV OR satellite OR cable. Media Center doesn't make any provision for
adding an auxiliary/external source such as a VCR. If you are using MCE2005 it is recommended that you install software such as WinTVin order to use a VCR or games console, outside
of the MCE interface.
39
WinTV Reference Manual
My external input connected by S-Video is black and white
Symptoms
When you connect an external source such as a games console, VCR or cable/satellite set top
box via S-Video, the picture is in black and white.
Cause
- Simple SCART to S-VIDEO adapters (unpowered) do not convert the signal to S-Video at all
as they just rewire the pins
- VHS VCRs rarely output S-Video over SCART
- Most Sky boxes except for Sky+ don't output S-Video
- Many other set top boxes only output Composite and RGB, no S-Video
Resolution
To get a color image from equipment with just Composite and RGB on the SCART connector
you will have to connect up via Composite.
If you want to get higher quality than Composite, then it will be necessary to use a mains
powered RGB to S-Video converter. If it doesn't require power then it isn't a converter - it is
just a simple adapter and will not do the job.
Games console slow response
Symptoms
When you connect a games console to the WinTV card, you find that the action on screen
responds to button presses slowly - up to 2 seconds after you press a button on the controller.
Cause
The cards above use hardware MPEG encoders, and the encoders are used for live TV too.
The MPEG-encoded stream must be decoded before it can be displayed, and this introduces
a delay.
Resolution
Enable Live Preview mode.
WinTV PVR-150/500
1. Click on the Windows Start button
2. Click on Run
3. Type Regedit in the box and click OK
4. Browse to HKEY_LOCAL_MACHINE\ SOFTWARE\Hauppauge\hcwTVWnd
5. Set LivePreview to 1
WinTV PVR-150/HVR-1300
1. Click on the Windows Start button
2. Click on Run
3. Type Regedit in the box and click OK
4. Browse to HKEY_LOCAL_MACHINE\ SOFTWARE\Hauppauge\hcwTVWnd\Roslyn
5. Set LivePreview to 1
Vista switches to Basic UI when starting WinTV
Symptoms
When you start WinTV on Vista, it switches from the Aero UI to Basic.
Cause
Aero cannot be enabled at the same time as Video Overlay.
Resolution
Set WinTV2000 to use the VMR renderer rather than Overlay:
1. Click on the Windows Start button
2. Go to All Programs, Hauppauge WinTV
3. Open Primary
4. Select Allow VMR
40
WinTV Reference Manual
What are the options in WinTV Primary?
Answer
WinTV Primary is a small utility which sets the preferred video
renderer using by the WinTV software. It will not change the
video renderer for any other software.
There are four main ways to display a video window on the
computer screen:
1. Overlay surface
2. Primary surface
3. VMR surface
VMR7
VMR9
4. DIB Draw
5 DXVA
Overlay and Primary work by transferring the image directly
from the TV Tuner card to the memory of your PC's graphics
card via the AGP or PCI-e bus.
1) Overlay Surface
With an overlay surface, the video signal is transferred into an invisible part of the graphics
card's memory. The graphics card will then take care of the image and make sure that it gets
transferred to the correct area of the visible memory (i.e. visible screen). This allows certain
things to be done in the graphics card hardware, without using up CPU cycles, which equals
lower CPU usage overall, and potentially better quality. Most graphics cards have high quality
multiple-tap scalers for resizing video, as well as features such as deinterlacing and hardware
color space conversion.
Some older graphics cards lack support for video overlay, and as such might not allow an
overlay surface to be created. Occasionally, there are cases where the graphics card (or it's
driver) tells the software/Windows that it can do an overlay surface but then either does not
do so or starts to draw incorrect buttons or destroy other desktop elements.
There are also limitations with regards to overlay such as screen resolution and the number
of overlay surfaces. Most graphics cards (even the latest high-end models) only have ONE
overlay surface. This means that only ONE application can display ONE video via overlay at
any one time. You cannot therefore, have Windows Media Player displaying an AVI file or
DVD with overlay, at the same time as WinTV is displaying TV via overlay.
Overlay may also not work on multiple monitors or on a graphics card TV-Out. Where clone
mode is used, you may find that the secondary output simply has a black rectangle where the
video should be displayed. Please consult your graphics card driver documentation for further information on dealing with overlay and multiple monitors.
2) Primary Surface
With Primary surface (and in contrast to the overlay surface), the video signal is transferred
directly into a visible part of the graphics board memory - right where you will see it.
The drawback of a primary surface is that your graphics board has to be set to at least 16-bits
per pixel color depth. Primary surface also requires more bandwidth on the PCI bus and we
have occasionally seen some graphics boards showing distortions of the video display, especially when using 32 bits per pixel color depth. And finally, a menu or other window covering
the primary surface video display may get overwritten under certain circumstances.
Overlay versus Primary
To help you in troubleshooting and deciding which display mode to use, here are some of
the limitations of primary and overlay surface. In general, we recommend to use the overlay
surface - if your graphics board supports it.
Primary Surface
Primary surface requires that the graphics board is set to 16, 24 or 32 bits per pixel color
depth.
Primary surface requires a higher bandwidth on the PCI/AGP bus. This may result in flashing
lines on the video image, especially at 24 or 32 bits per pixel color depth. Switch back to
16-bits per pixel.
When using primary surface, both fields of the video will get displayed on the PC screen.
This may show as "feathering" and is due to the interlaced nature of the signal.
41
WinTV Reference Manual
Overlay Surface
Some graphics boards do not support overlay surface at all. The overlay option will then
not be available.
Some graphics boards report that they support overlay surface, but they do not. If you
select overlay surface, and your VGA card does not support Overlay, it will default to
Primary surface.
Overlay surface mode uses a keying color to indicate where on the screen video is being
displayed. Placing a window with this keying color above the video will result in the video
showing through.
With an overlay surface, the graphics board participates in manipulating the video before it
gets displayed. This may change the brightness or colors of the image. Some graphics
boards have tools ("gamma correction" etc.) that permit you to adjust this.
Main differences
The difference between Primary Surface and Overlay Surface is that Overlay Surface requires special hardware on the graphics card. You need a graphics card with one of these processors along with drivers that support DirectDraw and DirectX in order to take advantage
of the Overlay Surface feature. Cards with Overlay Surface have an additional video buffer
called an Overlay buffer in addition to the Primary video buffer.
If you use a graphics card that does not have this support, you can use Primary Surface
type of Overlay. Primary Surface still requires Direct Draw and Direct X support, but the
overlay will be processed in the primary video buffer since the card does not have an
Overlay buffer.
The other issues are related to performance due to the fact that Overlay Surface has it's
own Overlay buffer and Primary Surface does not. If you move a window while using
Primary Surface the entire computer screen will refresh as the window is moved. This does
not cause any functional problems but to some users the refreshing of the screen may be
annoying. The other issue is that Primary Overlay may not work at the higher screen resolutions and color depths that your graphics card may allow.
3) VMR
VMR (Video Mixing Renderer) was initially introduced on Windows XP as VMR7 but as of
DirectX 9 it has been available for Windows 2000 too. The two main forms of VMR are VMR7
and VMR9, which use DirectX7 and DirectX9 (and later) hardware respectively. The use of
VMR requires support in the graphics card driver, which will then either allow the use of hardware accelerated features (e.g. when using VMR9 on a DX9-class graphics card) or by partial
hardware acceleration and partial software emulation (e.g. when using VMR9 on a DX8-class
graphics card with DX9-compatible drivers).
Generally, VMR (7) shouldn't be used on anything older than a GeForce2-era card, and VMR9
shouldn't be used on anything older than an nVidia GeForce FX or Radeon 9xxx card. If you
do attempt to use them on older hardware, then one of two things may happen:
1. You will get no video at all (and WinTV will fail to function correctly)
2. You will get poor performance such as slow refresh of the screen, jerkiness or generally
poor quality (blocky etc.)
All VMR renderers make use of the graphics card's 3D engine to render the video, and so
video performance with VMR is dependent upon the 3D gaming performance of the card. In
addition to displaying the video on a 3D surface, additional processes are done via the graphics card hardware including high-quality scaling, deinterlacing and color control. The quality and availability of these again depends upon the graphics card in use.
4) DIB Draw
DIB Draw is a fallback method of displaying video in case of lack of overlay, primary surface
and DirectX support. DIB Draw does not make use of any hardware acceleration at all, and
uses the system CPU to render frames and draw them directly to an area of the screen.
Without any assistance from the graphics card this method is extremely slow and should
only be used for testing. Additionally you cannot use DIB Draw on cards which make use of
software MPEG2 decoders such as the PVR, HVR and Nova range of cards, since these
42
WinTV Reference Manual
If you do have to use DIB Draw, then you have something seriously wrong with the setup of
your system. Some of the possibilities are:
- You don't have graphics card drivers installed, and you are instead using the default fail-safe
VGA mode driver
- You don't have DirectX installed, or your DirectX installation is damaged
- You do have graphics card drivers installed, but they are out of date, or incorrectly installed
- You have a hardware conflict between the graphics card and another component
- Your graphics card has some faulty memory, which only becomes apparent when using
overlay/VMR
- Your graphics card has a faulty GPU, which only becomes apparent when utilizing certain
hardware acceleration features
- You have graphics card hardware acceleration turned all of the way down
5) DXVA
DXVA (DirectX Video Acceleration) is a standardized way of allowing software to make use of
hardware MPEG2 video acceleration/decoding on a graphics card. For example, as most graphics cards on the market today can do hardware motion compensation, hardware iDCT and
hardware adaptive deinterlacing, DXVA provides a way for the MPEG decoder software to
offload these aspects of decoding, from the main CPU, to the graphics card. The result of this
is lower CPU usage when viewing MPEG2 content (such as DVDs or streams from digital TV
or PVR TV cards), as well as potentially higher visual quality from more refined and powerful
deinterlacing methods.
In WinTV Primary, the Use DXVA box determines whether a DXVA connection will be attempted. DXVA can be used for VMR and Overlay renderers. If DXVA is not supported, no harm
will come from ticking this box. However, be aware of older graphics cards such as the nVidia
TNT2, since their drivers report that DXVA is supported, when it isn't, and this can result in
some serious video display issues. As a rule of thumb, DXVA can usually be enabled on
GeForce 4MX and Radeon 9200 and higher graphics cards.
TV becomes jumpy while recording
Symptoms
When viewing TV live, there is no problem, but while recording, there are problems such as
stuttering, pausing and jumping.
Cause
The two main causes of this are:
1. Hard drive controllers that are PCI based
Some SATA and RAID controllers integrated onto motherboards, are PCI-based (this can be
the case even if they are not in a physical PCI slot). There is a finite amount of band width on
the PCI bus (<133MB/s) and additionally there is something called latency to deal with (in
simple terms it affects how long a particular device can demand the attention of the CPU).
You can test whether a SATA device is causing the problem by viewing live TV (not recording) and then doing a disk defrag from the affected drive. If this is the problem then you will
likely find that running defrag causes the same stuttering problems on live TV as you normally see with recorded TV.
2. Anti-virus software scanning the recorded file as it's being written
Most anti-virus software will scan MPG files for viruses on both read and write to the disk
drive. While recording, you are doing a disk write. Some antivirus software will attempt to
scan the file for viruses as it's being written by the recording thread of WinTV2000, and may
also attempt to scan for viruses as it's being read for the viewing thread of WinTV2000. This
can be CPU intensive and also cause delays to the reading/writing.
Resolution
1. Hard drive controllers
The only solution to this is to record to a hard drive that is located on a controller connected
directly to the motherboard's south-bridge. This problem will affect any PCI card from any
manufacturer. The other option would be to use a USB-based device instead. Please see
below for a list of common motherboards with PCI-based SATA controllers.
43
WinTV Reference Manual
2. Antivirus software
Set the recording directory/folder (by default, C:\MyVideos) to the on-access/real-time scanner's exclusion list. This will prevent the recordings from being scanned for viruses without
compromising the security of your system, as would be the case with completely disabling
the anti-virus software.
Problems with the IR remote control
Symptoms
The infra-red remote control doesn't work correctly or intermittently.
Cause
See resolution section below.
Resolution
On some system cases, the IR connector may be too close to the edge, and cause the IR plug
to either not make adequate contact, or fall out of the input. Be sure that the IR plug is connected firmly to the WinTV board, and try holding the connector in, while using the remote to
be sure good contact is being made.
Be sure that the batteries are installed in the remote properly, and that the batteries are fresh.
Re-install the Remote software by double clicking the IR32.EXE file located on your WinTV CD
rom (in the IR32 folder).
Go to start/programs/Hauppauge WinTV/Restart IR. Clicking "Restart IR" will reinitialize the
remote software. It is placed in the Startup Group and will initialize after each reboot, in the
event that it was turned off.
Windows and NT 4.0 may experience some issues with the Remote working properly. If you
are having issues with the remote working in these OS', simply copy the WinTV shortcuts
(from the desktop) to the Windows start menu, and reboot the system.
"No Tuner Avilable" message when starting Live TV in MCE / Vista
Symptoms
When you attempt to view Live TV in Media Center, the following message appears:
“No Tuner Available”
Cause
This message can appear if:
1. You don't have a TV tuner card installed
2. You have installed non-MCE drivers for the TV card
3. The TV card is not functioning
4. The Media Center services are not running
5. Wrong MCE file versions are installed
Resolution
- You don't have a TV tuner card installed
- You have installed non-MCE drivers for the TV card
- You will not be able to use Live TV in Media Center unless you have installed an MCE-compatible TV card. To check whether your TV card is compatible with MCE, please see the links
in See Also at the bottom of this page.
The TV card is not functioning
This may be caused by hardware compatibility issues (e.g. BIOS settings) or incorrectly
installing the drivers. Please consult the See Also links at the bottom of this page for troubleshooting these problems.
The Media Center services are not running
The Media Center Receiver service is essential for Live TV to be functioning in Media Center.
If you believe that you have disabled this service, please re-enable it as follows:
1. Click on the Windows Start button
2. Go to Control Panel
3. Go to Performance and Maintenance
4. Go to Administrative Tools
5. Launch Services
6. Find Media Center Receiver Service in the list and check that it's current status is "Started".
The Startup Type should be "Automatic".
44
WinTV Reference Manual
Hauppauge Warranty Information
Warranty
Hauppauge Computer Works, Inc. warrants the WinTV board to be free from defects in material and workmanship for a period of 2 years from date of initial retail purchase. We will, at
our option, repair or replace a defective product. The limited warranty does not cover any
losses or damage that occur as a result of:
• Improper installation
• Misuse or neglect or operation with faulty equipment
• Repair or modification by anyone other than Hauppauge Computer Works or an authorized
repair agent
Please complete and return the Warranty Registration Form inserted in this manual. To obtain
service under this warranty, contact Hauppauge Computer Ltd
45