1
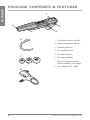
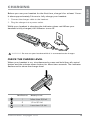
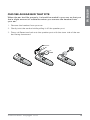
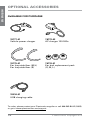
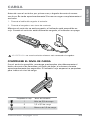
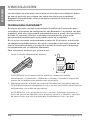
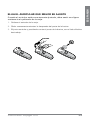
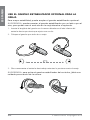
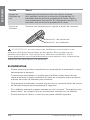
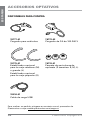
BLUETOOTH® HEADSET
User Guide
Guía del Usuario
EN ENGLISH
TABLE OF CONTENTS
Welcome
3
What is Bluetooth?
3
Package Contents & Features
4
Charging
5
Pairing
6
Custom Fit
8
Headset Controls
11
Indicators
13
Range
13
Hands-Free Features 14
Multipoint (Using more than one Bluetooth device)
15
Optional Accessories 16
Troubleshooting
17
Product Specifications
18
Technical Assistance
18
Limited Warranty
18
Important Safety and Operational Information
19
Regulatory Notices
21
2
Plantronics Voyager 815
Thank you for choosing the Plantronics Voyager™ 815 headset. To get the
most from your new headset, we recommend that you take the following
steps:
1. Read this User Guide, including all the safety information at the end of this
guide, before you use your headset.
2. If you need assistance, please do the following:
• Follow the steps in the “Troubleshooting” section on page 17.
• Contact the Plantronics Technical Assistance Center at 866-363-BLUE (2583)
or visit www.plantronics.com/support.
3. Visit www.plantronics.com/productregistration to register your headset online,
so we can provide you with the best possible service and technical support.
NOTE: If you are considering returning the product, please contact the Technical
Assistance Center first.
What is Bluetooth?
Bluetooth wireless technology provides a way for devices to communicate
with each other using short-range radio frequency instead of wires.
Any two Bluetooth devices can communicate as long as they both have
Bluetooth turned on, they are within range, and they have been paired–a
quick “handshake” that connects the two devices.
Bluetooth range is up to 33 feet (10 meters). Obstructions, such as walls
or other electronic devices, can cause interference or shorten the effective
range. For optimal performance, place your headset and phone on the
same side of your body.
Plantronics Voyager 815
3
EN ENGLISH
Welcome
EN ENGLISH
Package Contents & Features
1
5
2
4
6
3
1. Call control button (on/off)
2. Mute microphone button
3. Volume up/down
4. Extendable boom
7
5. Microphone port
6. Ear loop stabilizer
7. Noise isolating ear buds
(small, medium, and large)
8. AC Charger 100 – 240V
8
4
Plantronics Voyager 815
Before you use your headset for the first time, charge it for at least 1 hour.
It takes approximately 3 hours to fully charge your headset.
1. Connect the charger cable to the headset.
2. Plug the charger into a power outlet.
While your headset is charging the indicator glows red. When your
headset is fully charged, the indicator turns off.
WARNING: Do not use your headset while it is connected to the charger.
Check the charge level
When your headset is on, simultaneously press and hold the call control
button and the volume down button for about two seconds. The indicator
flashes red to show the charge level.
Red Flashes
Battery Level
1
More than 2/3 full
2
1/3 to 2/3 full
3
Less than 1/3 full
Plantronics Voyager 815
5
EN ENGLISH
Charging
EN ENGLISH
Pairing
Pairing is the process of introducing your headset to your phone. Before
using your headset for the first time, you must pair it with your Bluetooth
phone. Normally you need to pair your headset with your phone only once.
To see a demo of the pairing process, visit www.plantronics.com/easytopair.
QuickPair™ Technology
Your new headset includes Plantronics QuickPair technology to simplify
the Bluetooth setup process. The first time you turn your headset on, your
headset automatically enters pairing mode for 10 minutes. Once paired
successfully, your headset stays on for instant use.
If not successfully paired after 10 minutes, your headset automatically
powers off. When you turn the headset on again, it automatically goes into
pairing mode until successfully paired with a Bluetooth phone.
To pair your headset for the first time:
1. Turn ON the Bluetooth feature on your phone.
3
2
4
1
TIP: For most phones, select Settings/Tools > Connections > Bluetooth > On.
See your phone’s user guide for more information.
2. Press and hold the call control button to turn on your headset. (The indicator
flashes red/blue to show that the headset is on and in pairing mode.)
TIP: If you don’t see the red/blue flash, press and hold the call control
button to turn your headset off, and then press and hold the call control
button again until you see the red/blue flash.
3. Use the commands on your phone to locate your headset.
TIP: For most phones, select Settings/Tools > Connections > Bluetooth >
Search > 8XXPlantronics. See your phone’s user guide for more information.
4. When prompted for the passkey, enter 0000.
When pairing is successful, the red/blue indicator on your headset turns off.
Your headset is now connected and ready to use.
6
Plantronics Voyager 815
EN ENGLISH
Subsequent Pairing
If you’ve already paired your headset with another device, follow these
steps:
1. Turn ON the Bluetooth feature on your phone.
TIP: For most phones, select Settings/Tools > Connections > Bluetooth >
On. See your phone’s user guide for more information.
2. Turn the headset off by pressing and holding the call control button until the
indicator turns red and then turns off.
3. Turn the headset back on by pressing and holding the call control button until
the indicator flashes red/blue. The headset remains in pairing mode for 3
minutes.
4. Use the commands on your phone to locate your headset.
TIP: For most phones, select Settings/Tools > Connections >
Bluetooth > Search > 8XXPlantronics. See your phone’s user guide
for more information.
5. When prompted for the passkey, enter 0000.
When pairing is successful, the indicator on your headset turns off. Your
headset is now connected and ready to use.
Plantronics Voyager 815
7
EN ENGLISH
Custom Fit
The Plantronics Voyager 815 headset comes with three sizes of noise
isolating ear buds. We recommend that you try all three ear buds to find
the one that fits snugly in your ear. For added comfort and stability you
can add the optional ear loop.
TIPS:
• For optimum performance and a secure and comfortable fit, the headset
should sit snugly in your ear canal with the microphone pointing towards the
corner of your mouth.
• If the ear bud is too big or too small, the headset may not stay in your ear, or
you may have difficulty hearing.
Put on the headset
1. Hold the headset with the boom pointing directly at your cheekbone and the
ear bud placed comfortably in your ear canal.
2. Gently twist the headset downward while pressing it into your ear canal.
TIP: For optimal voice clarity, point the boom towards the corner of your
mouth. The ear bud should be fully seated to the speaker post to ensure
secure attachment.
WARNING: Select an ear bud that inserts comfortably in the ear canal.
The ear bud should seal but not be forced down the ear canal. If the ear
bud becomes lodged in the ear canal, seek medical attention immediately.
8
Plantronics Voyager 815
When the ear bud fits properly, it should be sealed in your ear so that you
feel a slight amount of resistance when you remove the headset from
your ear.
1. Remove the headset from your ear.
2. Gently twist the ear bud while pulling it off the speaker post.
3. Press a different ear bud onto the speaker post with the stem side of the ear
bud facing downward.
Plantronics Voyager 815
9
EN ENGLISH
Choose an ear bud that fits
EN ENGLISH
Use the optional ear loop stabilizer
For increased stability, you can attach the optional ear loop stabilizer.
TIP: You can attach the ear loop stabilizer on either side of your headset,
so that you can wear the headset on your right or left ear.
1. Insert the ear loop tab into the slot on the under side of the headset until you
feel it click into place.
2. Guide the loop behind your ear.
3. Gently twist headset downward while pressing it into your ear.
TIP: To remove the ear loop stabilizer from your headset, gently pull the
ear loop straight out of its slot.
10
Plantronics Voyager 815
Action
Steps
Turn on the
headset
Press and hold the call control button until the indicator
glows blue.
EN ENGLISH
Headset Controls
Note: When your headset is in standby mode, the indicator is off.
To confirm that your headset is on, press any button or slide the
boom out. You should see a blue light flash or hear a tone.
Turn off the
headset
Press and hold the call control button until the indicator
glows red. When the power is off, the indicator stays off.
Answer a call
Briefly press the call control button, or slide the boom to
the open position.
End a call
Briefly press the call control button, or slide the boom to
the closed position.
Make a call
The call automatically transfers to your headset after you
enter the number on your phone and press send.
Toggle mute
on/off
Press the mute button.
Turn off the
online indicator
Press and hold mute for 2 seconds while the headset is on.
Headset will flash blue 4 times. Repeat action to activate
online indicators. Headset will flash blue 2 times.
Adjust volume
During an active call, press the volume button:
Volume up
Volume down
WARNING: Do not use headphones / headsets at high volumes for an extended
period of time. Doing so can cause hearing loss. Always listen at moderate levels. See
www.plantronics.com/healthandsafety for more information on headsets and hearing.
Plantronics Voyager 815
11
EN ENGLISH
Tips
• If you’re wearing the headset, you hear ascending tones when the power turns
on and descending tones when the power turns off.
• When you receive a call, your phone may ring before your headset rings. Wait
until you hear the ring in your headset to press the call control button and
answer the call.
• To reject a call and send the caller to voice mail, press the call control button for
about 2 seconds.
• If your phone supports voice dialing see “Hands-Free Features” on page 14 and
the instructions that came with your phone.
• When mute is on, a low tone plays every 60 seconds.
12
Plantronics Voyager 815
Action
Light
Tone
Charging
Solid red
None
EN ENGLISH
Indicators
Fully charged
None
None
Low battery
3 red flashes every 10 seconds
3 high tones
every 10 seconds
Pairing
Flashes red and blue
1 low tone
Paired
Flashes blue
1 low tone
Turning on
Solid blue for 2 seconds
Ascending tones
Standby
None
None
Incoming call
3 blue flashes every 2 seconds
3 low tones every
2 seconds
Call in progress
1 blue flash every 2 seconds
None
Missed call
3 purple flashes every 10 seconds
None
Out of range
None
1 high tone
Back in range
None
1 low tone
Turning mute on
None
1 low-high tone
Mute is active
None
1 low tone every
60 seconds
Unmute
None
1 high-low tone
Turning off
Solid red for 4 seconds
Descending tones
NOTE: To turn off the online indicator, see “Headset Controls” on page 11.
Range
To maintain a connection, keep your headset within 33 feet (10 meters) of
the Bluetooth device. If there are obstacles between your headset and the
device you may experience interference. For optimal performance, place
your headset and phone on the same side of your body.
As you move out of range, audio quality degrades. When you are far enough
away to lose the connection, you hear a high tone in the headset. The headset
attempts to reconnect after 30 seconds. If you move back in range later, you
can manually reconnect by pressing the call control button.
NOTE: Audio quality is also dependent upon the device with which the headset is
paired.
Plantronics Voyager 815
13
EN ENGLISH
Hands-Free Features
If your phone and your wireless service provider both support hands-free
operation, you can use the following features:
Action
Steps
Redial the last number
you called
Double-click the call control button. You hear 2 low
tones after the second press.
Voice activated dialing
When the headset is on, press and hold the call
control button for about 2 seconds until you hear 1
low tone.
Reject a call
When your headset rings, press and hold the call
control button for about 2 seconds until you hear 1
long low tone.
Additional Features
Action
Steps
Transfer a call from your
headset to your phone
While a call is in progress, press and hold the call
control button until you hear a low tone.
Transfer a call from your
phone to your headset
While a call is in progress, quickly press and
release the call control button. You will then hear
a low tone.
Enable/Disable online
indicators
Press and hold mute for 2 seconds. Headset will
flash blue 4 times. Repeat action to activate online
indicators. Headset will flash blue 2 times.
NOTE: When the online indicator is disabled, other indicators, such as low battery
and missed call, still function.
14
Plantronics Voyager 815
Plantronics Voyager 815 supports multipoint technology, which allows
you stay connected with two different Bluetooth audio devices. Use one
headset between two different mobile phones.
PAIR ANOTHER BLUETOOTH DEVICE
Repeat the pairing steps with the new device. See “Subsequent Pairing”
on page 7 for instructions.
ANSWER A CALL
An incoming call from either phone rings through to your headset.
• To answer a call, briefly press the call control button.
USING LAST NUMBER REDIAL AND VOICE ACTIVATED
DIALING
The headset initiates a call on the device you most recently used to make
an outgoing call. To use the second phone, initiate the call using the
controls on the second phone. The second phone forms a link with the
headset.
ANSWER A CALL WHILE TALKING ON THE OTHER DEVICE
• Press the call control button once to hang up the existing call, and then press
the call control button again to answer the new call from the other phone.
Plantronics Voyager 815
15
EN ENGLISH
Multipoint (Using more than
one Bluetooth device)
EN ENGLISH
Optional Accessories
Available for Purchase
76777-01
Vehicle power charger
76772-03
AC charger 100-240v
76775-01
Ear loop stabilizer (M/L)
Ear loop stabilizer (S)
76776-01
Ear bud replacement pack
(S, M, L)
76016-01
USB charging cable
To order, please contact your Plantronics supplier or call 866-363-BLUE (2583)
or go to www.plantronics.com/support.
16
Plantronics Voyager 815
Problem
Solution
My headset does
not work with my
phone.
Make sure the headset is fully charged.
Make sure headset is paired with the phone you are trying to use.
Headset was not in pairing mode when mobile phone menu
selections were made. See “Pairing” on page 6.
Incorrect menu selections were made on your mobile phone.
See “Pairing” on page 6.
Your phone did
not locate the
headset.
Turn both your phone and headset off and on, and then
repeat the pairing process on page 6.
I could not enter
my passkey.
Turn both your phone and headset off and on, and then
repeat the pairing process on page 6.
I cannot hear
caller/dial tone.
The headset is not turned on. Press the call control button
for approximately 2 seconds until you hear a tone or see the
indicator glow blue.
Your headset is out of range. Move the headset closer to the
phone or Bluetooth device. See “Range” on page 13.
Your headset battery is drained. Charge your battery using the
AC charger. See “Charging” on page 5.
The listening volume is too low. Press the volume up button
to increase the sound you hear in the headset.
Make sure the ear bud fits properly. See “Custom Fit”
on page 8.
Audio quality is
poor.
Make sure that you have a proper seal on the ear bud. See
“Custom Fit” on page 8.
Callers cannot
hear me.
Mute is turned on. Press the mute button.
The ear buds do
not fit my ear.
Try a different size ear bud. See “Custom Fit” on page 8.
My headset falls
out of my ear.
Use the ear loop stabilizer for increased lateral support. See
“Use the optional ear loop stabilizer” on page 10.
Your headset is out of range. Move the headset closer to the
phone or Bluetooth device. See “Range” on page 13.
Remove the ear bud from your headset, and then wash the
ear bud in warm soapy water. When the ear bud is completely dry, put it back on your headset.
Try a different size ear bud. For a proper fit, the ear bud should
create a seal. When the ear bud fits properly, you should feel a
slight amount of resistance when you remove the headset from
your ear. See page 9 for instructions on choosing an ear bud.
My ear bud needs
to be cleaned.
Remove the ear bud from the headset and wash it in warm
soapy water and rinse thoroughly. When the ear bud is
completely dry, put it back on your headset.
Plantronics Voyager 815
17
EN ENGLISH
Troubleshooting
EN ENGLISH
Product Specifications
Talk time*
battery enables up to 7 hours
Standby time*
up to 160 hours
Range
up to 33 feet (10 meters)
Headset weight
11 grams
Battery type
Lithium ion
Charge time
3 hours for full charge
Version
Bluetooth 2.0 + EDR (Enhanced Data Rate)
Bluetooth Profiles:
Headset Profile (HSP) for talking on the phone.
Hands-free Profile (HFP) for talking on the phone
and operating the phone.
* Performance dependent on battery and may vary by device.
Technical Assistance
The Plantronics Technical Assistance Center (TAC) is ready to assist you.
Call 866-363-BLUE (2583) or visit us on the Web at
www.plantronics.com/support. You can also call the Technical Assistance
Center for accessibility information.
Limited Warranty
This warranty covers defects in materials and workmanship of products
manufactured, sold or certified by Plantronics which were purchased and
used in the United States.
The warranty lasts for one year from the date of purchase of the products.
This warranty extends to you only if you are the end user with the original
purchase receipt.
We will, at our option, repair or replace the products that do not conform
to the warranty. We may use functionally equivalent reconditioned/
refurbished/remanufactured/pre-owned or new products or parts.
To obtain service in the U.S., contact Plantronics at (866) 363-BLUE (2583).
THIS IS PLANTRONICS’ COMPLETE WARRANTY FOR THE PRODUCTS.
This warranty gives you specific legal rights, and you may also have
other rights that vary from state to state. Please contact your dealer or our
service center for the full details of our limited warranty, including items
not covered by this limited warranty.
18
Plantronics Voyager 815
Please read the following safety and operational instructions before using
your Bluetooth headset. Keep these instructions for future reference.
When using your Bluetooth headset, these basic safety precautions and
warnings should be followed to reduce the risk of fire, electric shock,
injury to persons and damage to property.
This symbol
identifies and alerts the user to the presence of important
safety warnings.
WARNINGS
• CHILDREN. Never allow children to play with the product– small parts may be a
choking hazard.
• Check local laws regarding use of a mobile phone and headset while driving. If
you use the headset while driving, ensure your attention and focus remain on
driving safely.
• Observe all signs that require an electrical device or RF radio product to be
switched off in designated areas, such as hospitals, blasting areas, potentially
explosive atmospheres, and aircraft. On aircraft, obey the airline regulations for
use of wireless equipment.
• To reduce the risk of electric shock, explosion or fire use only the supplied
charger or Class 2 AC adapter to charge the headset. Ensure that the voltage
rating (e.g. 120v, 60 Hz) corresponds to the power supply you intend to use.
• Do not disassemble the AC adapter as this may expose you to dangerous
voltages or other risks. Incorrect reassembly can cause electric shock or fire
when the product is subsequently used.
• Do not insert anything into the product because this may cause damage to the
internal components or cause injury to you.
• Avoid contact with liquids. Do not locate this product near water, for example,
near a bathtub, or sink, in a wet basement, or near a swimming pool.
• Discontinue use of product and contact Plantronics if the product overheats,
has a damaged cord or plug, if the product has been dropped or damaged, or if
the product has come into contact with liquids.
Plantronics Voyager 815
19
EN ENGLISH
Important Safety and
Operational Information
EN ENGLISH
• Exposure to high volume sound levels may damage your hearing. Although
there is no single volume setting that is appropriate for everyone, you should
always use your headset or headphones with the volume set at moderate
levels and avoid prolonged exposure to high volume sound levels. The louder
the volume, the less time is required before your hearing could be affected. You
may experience different sound levels when using your headset or headphones
with different devices. The device you use and its settings affect the level of
sound you hear. If you experience hearing discomfort, you should stop listening
to the device through your headset or headphones. To protect your hearing,
some hearing experts suggest that you:
1. Set the volume control in a low position before putting the headset or
headphones on your ears.
2. Limit the amount of time you use headsets or headphones at high volume.
3. Avoid turning up the volume to block out noisy surroundings.
4. Turn the volume down if the sound from the headset or
headphones prevents you from hearing people speaking near you. See
www.plantronics.com/healthandsafety for more information
on headsets and hearing.
BATTERY WARNINGS
To reduce the risk of fire or injury to persons, read and follow these
instructions.
• Charge the headset according to the instructions supplied with the unit.
• Do not expose the battery to high temperatures.
• Do not puncture or otherwise damage the battery. The cell contains corrosive
materials which may damage eyes and skin and may be toxic if swallowed.
• Do not short-circuit the battery, as this may result in a sudden rise in
temperature.
• Do not incinerate the battery.
• Never put batteries in mouth. If swallowed, contact your physician or local
poison control center.
• Dispose or recycle the battery according to local and regional regulatory
requirements. Lithium Ion batteries are recyclable. For more information,
visit www.rbrc.org.
20
Plantronics Voyager 815
EN ENGLISH
Regulatory Notices
FCC Requirements Part 15
Operation is subject to the following two conditions:
1. This device may not cause harmful interference.
2. This device must accept any interference received, including interference that
may cause undesired operation.
1.
This equipment has been tested and found to comply with the limits for a
Class B digital device, pursuant to Part 15 of the FCC Rules.
2.
These limits are designed to provide reasonable protection against
harmful interference in a residential installation. This equipment generates,
uses, and can radiate radio frequency energy and, if not installed and used
in accordance with the instructions, may cause harmful interference to radio
communications.
3.
However, there is no guarantee that interference will not occur in a
particular installation. If this equipment does cause harmful interference to radio
or television reception which can be determined by turning the radio or television
off and on, the user is encouraged to try to correct interference by one or more
of the following measures:
1. Reorient or relocate the receiving antenna.
2. Increase the separation between the equipment and receiver.
3. Connect the equipment into an outlet on another circuit.
4. Consult the dealer or an experienced radio/TV technician for help.
Exposure To Radio Frequency Radiation
This device and its antenna must not be collocated or operated in
conjunction with any other antenna or transmitter. To comply with FCC
RF exposure requirements, only use supplied antenna. Any unauthorized
modification to the antenna or device could void the user’s authority to
operate this device.
Industry Canada Radio Equipment
The term “IC:” before the radio certification number only signifies that
Industry Canada technical specifications were met. Operation is subject to
the following two conditions: (1) this device may not cause interference,
and (2) this device must accept any interference, including interference that
may cause undesired operation of the device. “Privacy of communications
may not be ensured when using this telephone.” This product meets the
applicable Industry Canada technical specifications of the RSS210.
Plantronics Voyager 815
21
ES SpanISH
Contenido
Bienvenido
23
¿Qué es la tecnología Bluetooth?
23
Contenido del paquete y funciones
24
Carga
25
Vinculación
26
Ajuste personalizado
28
Controles de los auriculares
31
Indicadores
33
Alcance
33
Características de manos libres
34
Funcionalidad multipunto (uso con varios dispositivos Bluetooth)
35
Accesorios optativos
36
Solución de problemas
37
Especificaciones del producto
38
Asistencia técnica
38
Garantía limitada
38
Información importante sobre la seguridad y el funcionamiento
39
Avisos sobre normativas
41
22
Plantronics Voyager 815
Gracias por elegir el auricular Voyager™ 815 de Plantronics. Para obtener
el máximo provecho de su nuevo auricular, le recomendamos que siga
estos pasos:
1. Lea esta guía del usuario y toda la información de seguridad que aparece al final
de la guía antes de usar el auricular.
2. Si necesita ayuda, haga lo siguiente:
• Siga los pasos de la sección Solución de problemas, en la página 37.
• Contacto el Centro de asistencia técnica (TAC) de Plantronics en los
números 831-458-7500 para Español y 866-363-BLUE (2583) para Ingles o
visite www.plantronics.com/support.
3. Visite www.plantronics.com/productregistration y registre su producto por
Internet para que podamos proporcionarle el mejor servicio y asistencia técnica
posibles.
NOTa: si está considerando la devolución del producto, póngase en contacto
primero con el Centro de asistencia técnica.
¿Qué es la tecnología
Bluetooth?
La tecnología inalámbrica Bluetooth permite a los dispositivos
comunicarse entre sí por medio de radiofrecuencia de corto alcance
en vez de cables. Dos dispositivos Bluetooth cualesquiera se pueden
comunicar siempre que tengan activada la función Bluetooth, que estén
dentro del alcance y que estén vinculados (un procedimiento rápido que
permite que los dos dispositivos se reconozcan y se conecten).
El alcance máximo del Bluetooth es de 10 metros. Los obstáculos, como
las paredes y otros dispositivos electrónicos, pueden causar interferencias
o reducir el alcance efectivo. Para un rendimiento óptimo, coloque el
auricular y el teléfono del mismo lado de su cuerpo.
Plantronics Voyager 815
23
ES SpanISH
Bienvenido
ES SpanISH
Contenido del paquete y
funciones
1
5
2
4
6
3
1. Botón de control de llamada
(encendido/apagado)
2. Botón Silencio del micrófono
3. Subir/bajar volumen
4. Brazo extensible
7
5. Entrada del micrófono
6. Gancho estabilizador para la
oreja
8
7. Auriculares que aíslan del
ruido (pequeños, medianos y
grandes)
8. Cargador de CA de 100-240 V
24
Plantronics Voyager 815
Antes de usar el auricular por primera vez, cárguelo durante al menos
una hora. Se tarda aproximadamente 3 horas en cargar completamente el
auricular.
1. Conecte el cable del cargador al auricular.
2. Conecte el cargador a una toma de corriente.
Mientras el auricular se está cargando, el indicador está encendido en
rojo. Cuando el auricular está totalmente cargado, el indicador se apaga.
ADVERTENCIA: no use el auricular mientras está conectado al cargador.
Compruebe el nivel de carga
Con el auricular prendido, mantenga presionados simultáneamente el
botón de control de llamadas y el botón de bajar el volumen durante
aproximadamente dos segundos. El indicador rojo empezará a parpadear
para indicar el nivel de carga.
Parpadea en rojo
Nivel de la batería
1
Más de 2/3 de carga
2
1/3 a 2/3 de carga
3
Menos de 1/3 de carga
Plantronics Voyager 815
25
ES SpanISH
Carga
ES SpanISH
Vinculación
La vinculación es el proceso de conectar el auricular con el teléfono. Antes
de usar el auricular por primera vez, debe vincularlo con su teléfono
Bluetooth. Normalmente, sólo es necesario vincular el auricular con el
teléfono una vez.
Tecnología QuickPair™
Su nuevo auricular incluye la tecnología QuickPair de Plantronics para
simplificar el proceso de configuración del Bluetooth. La primera vez que
prenda el auricular, éste pasará automáticamente al modo de vinculación
durante 10 minutos. Una vez vinculado correctamente, el auricular
permanecerá prendido para que pueda usarlo de inmediato.
Si no se ha vinculado correctamente al cabo de 10 minutos, el auricular
se apagará automáticamente. Al volver a prender el auricular, pasará de
nuevo automáticamente al modo de vinculación hasta que lo empareje
correctamente con un teléfono Bluetooth.
Para vincular el auricular por primera vez:
1. Active la función Bluetooth del teléfono.
3
2
4
1
SUGERENCIA: en la mayoría de los teléfonos, seleccione Ajustes/
Herramientas > Conexiones > Bluetooth > Activado. Consulte el manual del
usuario de su teléfono para obtener más información.
2. Mantenga oprimido el botón de control de llamadas para prender el auricular.
(El indicador empezará a parpadear en rojo y en azul para indicar que el auricular
está prendido y en modo de vinculación).
SUGERENCIA: si no parpadea en rojo y en azul, mantenga oprimido el
botón de control de llamadas para apagar el auricular y después, oprímalo
de nuevo hasta que vea que empieza a parpadear en rojo y en azul.
26
Plantronics Voyager 815
SUGERENCIA: en la mayoría de los teléfonos, seleccione Ajustes/
Herramientas > Conexiones > Bluetooth > Buscar > 8XXPlantronics. Consulte
el manual del usuario de su teléfono para obtener más información.
4. Cuando el sistema le pida la contraseña, escriba 0000.
Cuando termine correctamente la vinculación, se apagará el indicador rojo y azul
del auricular. Eso indica que el auricular ya está conectado y listo para usarse.
VinculacionEs posteriores
Si emparejó previamente el auricular con otro dispositivo, siga estos
pasos:
1. Active la función Bluetooth del teléfono.
SUGERENCIA: en la mayoría de los teléfonos, seleccione Ajustes/
Herramientas > Conexiones > Bluetooth > Activado. Consulte el manual
del usuario de su teléfono para obtener más información.
2. Apague el auricular, manteniendo oprimido el botón de control de llamadas
hasta que el indicador cambie a rojo y después se apague.
3. Vuelva a prender el teléfono, manteniendo oprimido el botón de control
de llamadas hasta que el indicador parpadee en rojo y en azul. El auricular
permanece en el modo de vinculación durante 3 minutos.
4. Use los comandos del teléfono para localizar su auricular.
SUGERENCIA: en la mayoría de los teléfonos, seleccione Ajustes/
Herramientas > Conexiones > Bluetooth > Buscar > 8XXPlantronics.
Consulte el manual del usuario de su teléfono para obtener más
información.
5. Cuando el sistema le pida la contraseña, escriba 0000.
Cuando termine correctamente la vinculación, se apagará el indicador del
auricular. Eso indica que el auricular ya está conectado y listo para usarse.
Plantronics Voyager 815
27
ES SpanISH
3. Use los comandos del teléfono para localizar su auricular.
ES SpanISH
Ajuste personalizado
El auricular Voyager 815 de Plantronics incluye tres tamaños de
auriculares que aíslan del ruido. Le recomendamos que pruebe los tres
para determinar cuál se ajusta mejor a su oreja. Para mayor comodidad y
estabilidad, puede agregar el gancho opcional para la oreja.
SUGERENCIAS:
• Para un rendimiento óptimo y un ajuste seguro y cómodo, el auricular debe
quedar bien ajustado al conducto auditivo, con el micrófono dirigido hacia la
comisura de su boca.
• Si el auricular es demasiado grande o demasiado chico, es posible que se salga
de la oreja o bien, que no le permita escuchar correctamente.
Colóquese el auricular
1. Sostenga el auricular con el brazo apuntando directamente hacia su mentón y
el auricular colocado cómodamente en el conducto auditivo.
2. Gire suavemente el auricular hacia abajo mientras lo presiona contra el
conducto auditivo.
SUGERENCIA: para obtener la máxima claridad de la voz, dirija el brazo
hacia la comisura de su boca. El auricular debe estar completamente
asentado en el poste de la bocina para que quede bien fijo.
ADVERTENCIA: seleccione un auricular que pueda insertar
cómodamente en el conducto auditivo. El auricular debe quedar
ajustado, pero no debe insertarse a la fuerza en el conducto auditivo. Si
el auricular se queda atorado en el conducto auditivo, pida ayuda médica
inmediatamente.
28
Plantronics Voyager 815
Cuando el auricular está correctamente ajustado, debe sentir una ligera
resistencia al quitárselo de la oreja.
1. Quítese el auricular de la oreja.
2. Gírelo suavemente mientras lo desprende del poste de la bocina.
3. Elija otro auricular y presiónelo contra el poste de la bocina, con el lado cilíndrico
hacia abajo.
Plantronics Voyager 815
29
ES SpanISH
Elija el auricular que mejor se ajuste
ES SpanISH
Use el gancho estabilizador opcional para la
oreja
Para mayor estabilidad, puede acoplar el gancho estabilizador opcional.
SUGERENCIA: puede conectar el gancho estabilizador por un lado o por el
otro, para poder usar el auricular en la oreja derecha o izquierda.
1. Inserte la lengüeta del gancho en la ranura ubicada en el lado inferior del
auricular hasta que sienta que ajusta con un clic.
2. Coloque el gancho por atrás de su oreja.
3. Gire suavemente el auricular hacia abajo mientras lo presiona contra la oreja.
SUGERENCIA: para quitar el gancho estabilizador del auricular, jálelo con
cuidado para sacarlo de la ranura.
30
Plantronics Voyager 815
Acción
Pasos
Prender el
auricular
Mantenga oprimido el botón de control de llamadas hasta
que se encienda el indicador azul.
Nota: cuando el auricular está en modo En espera, el indicador
está apagado. Para confirmar que el auricular está prendido, oprima
cualquier botón o abra el brazo del micrófono. Verá una luz azul que
parpadea o escuchará un tono.
Apagar el
auricular:
Mantenga oprimido el botón de control de llamadas hasta
que el indicador cambie a rojo. Cuando el auricular se
apaga, el indicador también se apaga.
Contestar el
teléfono
Oprima el botón de control de llamadas o deslice el brazo
del micrófono a la posición abierta.
Colgar
Oprima brevemente el botón de control d e llamadas o
deslice el brazo del micrófono a la posición cerrada.
Marcar
La llamada se transfiere automáticamente al auricular
después de marcar el número en el teléfono y presionar
enviar.
Activar o
desactivar el
silencio
Oprima el botón de silencio.
Plantronics Voyager 815
31
ES SpanISH
Controles del auricular
ES SpanISH
Acción
Pasos
Apagar el
indicador de
uso
Mantenga presionado el botón de silencio durante
dos segundos mientras el auricular está prendido. El
indicador azul de auricular parpadeará 4 veces. Repita
el procedimiento para activar los indicadores de uso. El
indicador azul de auricular parpadeará 2 veces.
Ajustar el
volumen
Durante una llamada activa, oprima el botón de volumen:
Control + de volumen
Control – de volumen
ADVERTENCIA: no use nunca los audífonos o auriculares a un
volumen alto durante periodos prolongados. Esto puede causar
pérdida de audición. Use siempre un volumen moderado. Visite
www.plantronics.com/healthandsafety para obtener más información
acerca de los auriculares y la audición.
Sugerencias
• Si lleva puesto el auricular, escuchará tonos ascendentes al encenderlo y tonos
descendentes al apagarlo.
• Cuando entre una llamada, es posible que el teléfono suene antes de que
suene el auricular. Espere a escuchar el timbre en el auricular antes de oprimir
el botón de control de llamadas para contestar.
• Para rechazar una llamada y enviarla al buzón de voz, oprima el botón de control
de llamadas durante aproximadamente 2 segundos.
• Si su teléfono admite el marcado activado por voz, consulte “Características de
manos libres” en la página 34 y las instrucciones incluidas con su teléfono.
• Si está activado el silencio, sonará un tono grave cada 60 segundos.
32
Plantronics Voyager 815
Acción
Luz
Tono
Carga
Roja continua
Ninguno
Totalmente cargado
Ninguno
Ninguno
Batería baja
Tres flashes rojos cada 10
segundos
3 tonos agudos
cada 10 segundos
Vinculación
Rojo y azul: parpadeo
1 tono grave
Vinculado
Azul: parpadeo
1 tono grave
Encendido
Azul continuo durante 2 segundos
Tonos ascendentes
En espera
Ninguno
Ninguno
Llamada entrante
3 flashes azules cada 2 segundos
3 tonos graves
cada 2 segundos
Llamada en curso
1 flash azul cada 2 segundos
Ninguno
Llamada perdida
3 flashes morados cada 10
segundos
Ninguno
Fuera del alcance
Ninguno
1 tono agudo
Dentro del alcance
Ninguno
1 tono grave
Activando silencio
Ninguno
1 tono grave-agudo
Silencio activado
Ninguno
1 tono grave cada
60 segundos
Silencio desactivado Ninguno
1 tono agudo-grave
Apagando
Tonos
descendentes
Roja continua durante 4 segundos
NOTa: para apagar el indicador de uso, consulte ”Controles del auricular”, en la
página 31.
Alcance
Para mantener la conexión, mantenga el auricular a menos de 10 metros
del dispositivo Bluetooth. Si hay obstáculos entre el auricular y el
dispositivo, podrían haber interferencias. Para un rendimiento óptimo,
coloque el auricular y el teléfono del mismo lado de su cuerpo.
La calidad del sonido disminuye a medida que se aleja del radio de alcance.
Si se aleja lo suficiente como para que se pierda la conexión, escuchará
un tono agudo en el auricular. El auricular intentará volver a conectarse
después de 30 segundos. Cuando vuelva a estar dentro del alcance, puede
reconectarlo manualmente oprimiendo el botón de control de llamadas.
NOTa: la calidad del sonido también depende del dispositivo con el que está
vinculado el auricular.
Plantronics Voyager 815
33
ES SpanISH
Indicadores
ES SpanISH
Características de manos
libres
Si su teléfono y su proveedor de servicios inalámbricos admiten el uso
con manos libres, puede usar las siguientes funciones:
Acción
Pasos
Volver a marcar el
último número
Pulse dos veces el botón de control de llamada.
Escuchará 2 tonos graves después de oprimir el
botón por segunda vez.
Marcación activada
por voz
Cuando el auricular esté prendido, mantenga
oprimido el botón de control de llamadas durante
dos segundos aproximadamente hasta que
escuche un tono grave.
Rechazar una llamada
Cuando suene el timbre en el auricular, mantenga
oprimido el botón de control de llamadas durante
dos segundos aproximadamente hasta que
escuche un tono grave y largo.
Otras funciones
Acción
Pasos
Transferir una llamada
del auricular al teléfono
Durante una llamada, mantenga oprimido el botón
de control de llamadas hasta que escuche un tono
grave.
Transferir una llamada
del teléfono al auricular
Con una llamada en curso, pulse y suelte
rápidamente el botón de control de llamada. Oirá
un tono de llamada grave.
Activar/desactivar los
indicadores de uso
Mantenga presionado el botón de silencio
durante 2 segundos. El auricular parpadeará en
azul 4 veces. Repita el proceso para activar los
indicadores de uso. El auricular parpadeará en azul
2 veces.
NOTa: cuando el indicador de uso está desactivado, los demás indicadores (como el
de batería baja o el de llamadas perdidas) siguen funcionando.
34
Plantronics Voyager 815
El Voyager 815 de Plantronics admite la tecnología multipunto, que
le permite mantenerse conectado con dos dispositivos de audio con
Bluetooth distintos. Use el mismo auricular con dos teléfonos celulares
diferentes.
EMPAREJAMIENTO DE OTRO DISPOSITIVO Bluetooth
Repita los pasos de emparejamiento con el nuevo dispositivo. Consulte
las instrucciones en “Vinculaciones Posteriores”, en la página 27.
CONTESTAR EL TELÉFONO
Las llamadas entrantes de cualquiera de los dos teléfonos suenan en el
auricular.
• Para contestar una llamada, oprima brevemente el botón de control de
llamadas.
USO DE LA REPETICIÓN DEL ÚLTIMO NÚMERO MARCADO
Y EL MARCADO ACTIVADO POR VOZ
El auricular iniciará la llamada en el último dispositivo que utilizó para
marcar. Para usar el segundo teléfono: inicie la llamada usando los
controles del segundo teléfono. El segundo teléfono establece una
conexión con el auricular.
CONTESTAR UNA LLAMADA MIENTRAS HABLA POR EL
OTRO DISPOSITIVO
• Oprima el botón de control de llamadas una vez para colgar la llamada en curso
y, a continuación, vuelva a oprimirlo para contestar la nueva llamada del otro
teléfono.
Plantronics Voyager 815
35
ES SpanISH
Funcionalidad multipunto
(uso con varios dispositivos
Bluetooth)
ES SpanISH
Accesorios optativos
Disponibles para compra
76777-01
Cargador para vehículos
76772-03
Cargador de CA de 100-240 V
76775-01
Estabilizador opcional
para la oreja mediano (M)
o grande (L)
76776-01
Paquete de auriculares de
repuesto (3 tamaños: S, M, L)
Estabilizador opcional
para la oreja pequeño (S)
76016-01
Cable de carga USB
Para realizar un pedido, póngase en contacto con el proveedor de
Plantronics o vaya a www.plantronics.com/support.
36
Plantronics Voyager 815
Problema
Solución
El auricular no
funciona con mi
teléfono.
Asegúrese de que la batería del auricular esté totalmente cargada.
Asegúrese de que el auricular está vinculado con el teléfono que
está intentando usar.
El auricular no estaba en modo de vinculación cuando seleccionó
las opciones del menú del teléfono celular. Consulte “Vinculación”,
en la página 26.
Seleccionó una opción incorrecta en el menú de su celular.
Consulte “Vinculación”, en la página 26.
El teléfono no
pudo localizar el
auricular.
Apague y vuelva a prender tanto el teléfono como el auricular, y
repita el procedimiento de vinculación descrito en la página 26.
No puedo ingresar Apague y vuelva a prender tanto el teléfono como el auricular, y
mi contraseña.
repita el procedimiento de vinculación descrito en la página 26.
No escucho el
tono de marcar o
de llamada.
El auricular no está encendido. Oprima el botón de control de
llamada durante 2 segundos aproximadamente hasta que escuche
un tono o vea que el indicador se ilumina en azul.
El auricular está fuera de alcance. Acerque más el auricular al teléfono
o al dispositivo Bluetooth. Consulte “Alcance” en la página 33.
La batería del auricular está agotada. Cargue la batería con el
cargador de CA. Consulte “Carga”, en la página 25.
El volumen de escucha es demasiado bajo. Presione el botón de
subir el volumen para aumentar el nivel del sonido en el auricular.
Asegúrese de que los auriculares se ajustan correctamente a su
oreja. Consulte “Ajuste personalizado” en la página 28.
La calidad del
sonido es mala.
Asegúrese de que los auriculares se ajustan bien a su oreja. Consulte
“Ajuste personalizado” en la página 28.
La otra persona no La función Silencio está activada. Oprima el botón de silencio.
me oye.
El auricular está fuera de alcance. Acerque más el auricular al
teléfono o al dispositivo Bluetooth. Consulte “Alcance” en la
página 33.
Los auriculares no Pruebe con un tamaño distinto de auriculares. Consulte “Ajuste
se ajustan bien a
personalizado” en la página 28.
mi oreja.
El auricular se me
cae.
Use el estabilizador opcional para la oreja para aumentar el apoyo
lateral. Consulte “Use el gancho estabilizador opcional para la
oreja” en la página 30.
Pruebe con un tamaño distinto de auriculares. Para un ajuste
perfecto, el auricular debe sellar el conducto auditivo. Cuando el
auricular está correctamente ajustado, se debe sentir una ligera
resistencia al intentar sacarlo del conducto auditivo. Consulte en la
página 29 las instrucciones para elegir un auricular.
Necesito limpiar
los auriculares.
Desprenda el auricular de goma, lávelo con agua tibia y jabón, y
enjuáguelo bien. Cuando el auricular esté completamente seco,
puede colocarlo de nuevo.
Plantronics Voyager 815
37
ES SpanISH
Solución de problemas
ES SpanISH
Especificaciones del producto
Tiempo de
conversación*
la batería proporciona hasta 7 horas de conversación
Tiempo de espera*
hasta 160 horas
Alcance
hasta 10 metros
Peso del auricular
11 gramos
Tipo de batería
Iones de litio
Tiempo de carga
3 horas para una carga completa
Versión
Bluetooth 2.0 + EDR (Enhanced Data Rate, velocidad de
datos mejorada)
Funciones de
Bluetooth:
Función de auricular (HSP) para hablar por teléfono.
Función de manos libres (HFP) para hablar por teléfono y
controlar el teléfono.
* El desempeño depende de la batería y puede variar de un dispositivo a otro.
Asistencia técnica
Si necesita ayuda, llame al Centro de asistencia técnica (TAC) de Plantronics
en los números 831-458-7500 para Español y 866-363-BLUE (2583) para
Ingles o visite www.plantronics.com/support. Si desea obtener información
sobre accesibilidad, también puede llamar al Centro de asistencia técnica.
Garantía limitada
Esta garantía cubre los defectos de materiales y mano de obra de los
productos fabricados, vendidos o certificados por Plantronics que se
adquieran y se utilicen en Estados Unidos y Canadá.
La garantía tiene una vigencia de un año a partir de la fecha de compra del
producto.
Esta garantía sólo es válida para el usuario final en posesión de la factura
de compra original.
Los productos que no cumplan con lo estipulado en esta garantía podrán,
según nuestro propio criterio, repararse o sustituirse. Con este fin, podrán
utilizarse piezas o productos que funcionen de forma equivalente. Estas
piezas o productos podrán ser nuevos, de segunda mano, refabricados,
renovados o reacondicionados.
Si necesita servicio en EE. UU., póngase en contacto con Plantronics
llamando al (866) 363-BLUE (2583). Para obtener servicio técnico en
Canadá, llame al (800)540-8363.
38
Plantronics Voyager 815
Esta garantía le otorga derechos legales específicos, a los que se pueden
añadir otros derechos que varían de una jurisdicción a otra. Si desea
obtener más información sobre nuestra garantía limitada y los artículos
que no están cubiertos por esta garantía, póngase en contacto con su
distribuidor o con el centro de servicio.
Información importante sobre la
seguridad y el funcionamiento
Lea las siguientes instrucciones de funcionamiento y seguridad antes de
utilizar su auricular Bluetooth. Conserve estas instrucciones para usarlas
como referencia en el futuro. Cuando use el auricular Bluetooth, debe
seguir estas advertencias y precauciones de seguridad básicas para
reducir el riesgo de incendio, descarga eléctrica, lesiones personales y
daños a la propiedad.
Este símbolo
identifica y avisa al usuario de la presencia de
advertencias de seguridad importantes.
ADVERTENCIAS
• NIÑOS. No deje nunca que los niños jueguen con las piezas pequeñas del
producto; existe riesgo de asfixia.
• Consulte la legislación local referente al uso de auriculares y teléfonos celulares
mientras maneja. Si usa el auricular mientras maneja, asegúrese de mantener
la atención en manejar de manera segura.
• Observe todas las señales que indiquen que debe apagar los dispositivos
eléctricos o de radiofrecuencia en las áreas designadas, como hospitales, zonas
de explosiones, atmósferas potencialmente explosivas o aeronaves. Si viaja
en avión, observe los reglamentos de la línea aérea sobre el uso de equipos
inalámbricos.
• Para reducir el riesgo de incendio, explosión o descargas eléctricas, use
únicamente el cargador suministrado o un adaptador de CA de clase 2 para
cargar el auricular. Asegúrese de que el voltaje (por ejemplo, 120 V, 60 Hz)
indicado sea igual al el de la toma de corriente que pretende utilizar.
• No desmonte el adaptador de AC, ya que eso lo expondría a voltajes peligrosos
y a otros riesgos. Si el producto vuelve a armarse de forma incorrecta, se podría
producir una descarga eléctrica al utilizarlo.
• No inserte nada en el producto, ya que eso podría dañar algún componente
interno u ocasionarle lesiones personales.
• Evite que el producto entre en contacto con líquidos. No coloque este producto
cerca del agua, por ejemplo, cerca de una tina o pileta, en un sótanos con
humedad, o cerca de una piscina.
Plantronics Voyager 815
39
ES SpanISH
ESTA ES LA GARANTÍA COMPLETA QUE OFRECE PLANTRONICS PARA
SUS PRODUCTOS.
ES SpanISH
• Deje de usar el producto y contacte con Plantronics si el producto se
sobrecalienta, si el cable o el enchufe están dañados, si el producto se cayó o
está dañado, o si ha estado en contacto con líquidos.
• La exposición a niveles altos de volumen puede producir daños en el oído.
Aunque no existe un solo ajuste de volumen apropiado para todo el mundo,
utilice siempre sus auriculares con un nivel de volumen moderado y evite la
exposición prolongada a un volumen alto. Mientras más alto sea el volumen,
menos tiempo se necesita para que su oído resulte afectado. Puede probar
a variar el nivel de sonido cuando use auriculares con diferentes dispositivos.
El dispositivo que utilice y su configuración afectarán al nivel de sonido que
escucha. Si siente molestias, debe dejar de escuchar el dispositivo a través de
los auriculares. Para proteger su oído, algunos expertos recomiendan:
1. Establezca el control de volumen en un nivel bajo antes de colocarse los
auriculares o audífonos en los oídos.
2. Limite el tiempo de uso de los auriculares a un volumen elevado.
3. Evitar subir el volumen para contrarrestar el ruido del ambiente.
4. Bajar el volumen si el sonido de los auriculares le impide oír a las personas
que hablan cerca de usted. Visite www.plantronics.com/healthandsafety
para obtener más información sobre los auriculares y la audición.
ADVERTENCIAS RELACIONADAS CON LA BATERÍA
Para reducir el riesgo de incendio y daños personales, lea y siga estas
instrucciones.
• Cargue el audífono siguiendo las instrucciones suministradas con esta unidad.
• No exponga la batería a temperaturas elevadas.
• No perfore ni cause ningún otro tipo de daños a la batería. La celda contiene
materiales corrosivos que pueden causar daños a los ojos y la piel, y son
tóxicos si se ingieren.
• No cortocircuite la batería, ya que esto podría producir un aumento brusco de la
temperatura.
• No incinere la batería.
• Nunca se coloque las baterías en la boca. En caso de ingestión, acuda al
médico o al centro local de toxicología.
• Deseche o recicle la batería de acuerdo con la reglamentación regional.
Las baterías de litio son reciclables. Para obtener más información, visite
www.rbrc.org.
40
Plantronics Voyager 815
ES SpanISH
Avisos sobre normativas
Requisitos de la FCC (sección 15)
La operación está sujeta a las siguientes dos condiciones:
1. Este dispositivo no puede causar interferencias nocivas.
2. Este dispositivo debe aceptar todas las interferencias recibidas, incluidas
aquéllas que puedan causar un funcionamiento no deseado.
1.
Este equipo se comprobó y se confirmó que cumple con los límites
establecidos para un dispositivo digital de clase B, de acuerdo con la parte 15
de las Reglas de la FCC.
2.
Estos límites tienen como finalidad proporcionar una protección
razonable contra las interferencias nocivas en una instalación residencial. Este
equipo genera, usa y puede radiar energía de radiofrecuencia. Si no se instala
y se usa según las instrucciones, puede causar interferencias nocivas a las
comunicaciones por radio.
3.
Sin embargo, no se garantiza que no vayan a producirse interferencias
en una determinada instalación. Si este equipo causa interferencias nocivas
con la recepción de señales de radio o televisión (lo cual puede determinarse
apagando y volviendo a prender el aparato), el usuario puede adoptar algunas
de las medidas siguientes para intentar corregir las interferencias:
1. Reoriente o reubique la antena receptora.
2. Aumente la separación entre el equipo y el receptor.
3. Conecte el equipo a una toma de corriente que esté en otro circuito.
4. Consulte a su distribuidor o pida ayuda a un técnico de radio/TV con
experiencia.
Exposición a la radiación de radiofrecuencia
Este dispositivo y su antena no deben colocarse ni utilizarse conjuntamente
con ninguna otra antena o transmisor. Para cumplir con los requisitos
de exposición a RF de la FCC, use únicamente la antena suministrada.
Cualquier modificación no autorizada de la antena o el dispositivo podría
anular la autorización del usuario para usar este dispositivo.
Equipos de radio de Industry Canada
El término “IC:” antes del número de certificación de radio solo indica
que cumple con las especificaciones técnicas de Industry Canada. El
funcionamiento está sujeto a las dos condiciones siguientes: (1) este
dispositivo no puede causar interferencias y (2) este dispositivo debe
aceptar cualquier interferencia, incluidas aquéllas que causen un
funcionamiento no deseado. “La privacidad de las comunicaciones
con este teléfono no está garantizada”. Este producto cumple con las
especificaciones técnicas de Industry Canada aplicables del RSS210.
Plantronics Voyager 815
41
Plantronics Inc
345 Encinal Street
Santa Cruz, CA 95060 USA
Tel: (800) 544-4660
www.plantronics.com
© 2007 Plantronics, Inc. All rights reserved. Plantronics, the logo design,
Plantronics Voyager, QuickPair, and Sound Innovation are trademarks or
registered trademarks of Plantronics, Inc. The Bluetooth® word mark and
logos are owned by the Bluetooth SIG, Inc. and any use of such marks by
Plantronics, Inc. is under license.
Patents U.S. 5,210,791; 6,903,693 and Patents Pending.
76512-01 (01-08)