1
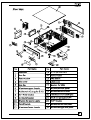
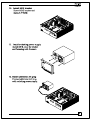
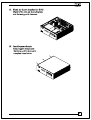
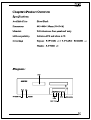
 HE-02
English
Chapter1:Product Overview
Specifications:
Available Color
Dimensions
Materials
M/B compatibility
Silver/Black
445x460x 135mm (WxDxH)
Full Aluminum front panel and body
Full size ATX and Micro ATX
Drive Bays Expose: 5.25"0DD x1 +3.5"CARD READER x1
Hidden: 3.5"HDD x3
Diagram:
VFD
CHIEFTEC
| |
O
С
Y Ï TT? Y?
POWER SW— | RESET | VIC SPEAKER
USB
IEEE 1394
HE-02
Part list:
№ ®
®
Na
| `ч e
“
AN .
a tad
$
я E
К
el N
N
= В
Г
N №
= а
a ЧА
^^
RN
I
SNS. 0
LN
0 № 5
я >
English
No Part Name No Part Name
1 | Rear wall 13 | VFD (IR receiver)
2 | 6cm fan 14 | Power button
3 | Rear window 15 | Rest button
4 | Slot cover 16 | USB cover
5 | 8cm fan 17 | Bracket for USB
6 | Aluminum upper chassis 18 | Aluminum front panel
7 | Additional AC plug for S.P.S. | 19 | Aluminum DVD cover
® | 3.5" HDD bracket 20 | Foot stand with rubber pad
Q | Air duct's bracket 21 | PCB for usb/audio/1394
10 | Bracket for power supply 22 5.25" bracket
11 | On/off switch 23 | Aluminum left side panel
12 | Aluminum lower chassis 24 | Aluminum right side panel
HE-02
English
Loosen 6 screws and pull back
1. Remove upper chassis
DL
о
N
<
=
O
—
D
E
=
D
=
2. Mother Board installation
Secure the M/B to the lower
chassis and fastening all screws.
3. Remove 5.25" bracket
Loosen 6 screws and
demount the bracket.
HE-02
English
4. Install HDD
Install 3.5" HDD onto
upper bracket and fastening
with 4 screws.
5. Install aluminum ODD plate
Tore adhesive paper behind the
ODD plate and stuck it onto the
front panel of ODD.
6. Install ODD
Install 5.25" ODD onto
middle bracket and
fastening with 4 screws.
HE-02
English
7. Install bracket
Install bracket with drives
onto the lower chassis and
fastening with 6 screws.
8. Remove 3.5"HDD bracket
Loosen 4 screws and
demount the bracket.
9. Install 3.5" HDD
Plug 3.5"HDD onto the screw
fastener of lower chassis.
HE-02
English
10. Install HDD bracket
Screw HDD bracket and
fasten 3.5"HDD.
11. Install switching power supply
Install S.P.S. onto the bracket
and fastening with 4 screws.
12. Install additional AC plug
Connect additional AC plug
with switching power supply.
HE-02
13.
14.
English
Fixed air duct's bracket for S.P.S
Place SP.S. onto air duct's bracket
and fastening with 4 screws.
Install upper chassis
Install upper chassis and
fastening with 6 screws to
complete installation.