1
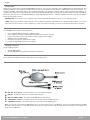
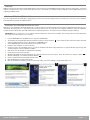
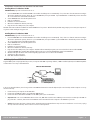
USB MIDISPORT UNO
User Guide
English
© 2006 Avid Technology, Inc. All rights reserved. Product features, specifications, system requirements and availability are subject to change without notice. Avid,
M-Audio and USB MIDISPORT Uno are either trademarks or registered trademarks of Avid Technology, Inc. All other trademarks contained herein are the property of
their respective owners.
English
Introduction
Thank you for purchasing the M-Audio USB MIDISPORT Uno interface. Uno is a class-compliant* 1-in/1-out MIDI interface for USB-equipped PC and
Macintosh computers. Uno’s Universal Serial Bus (USB) connection assures reliable and speedy transfer of MIDI data to and from the computer. The
interface is portable, self-powered, and can be conveniently attached to your computer’s USB port without requiring computer disassembly or an
external power supply. Uno’s sturdy package also includes integrated USB and MIDI cables, eliminating the need for carrying around separate cabling.
Expansion is also easy—if you need additional MIDI ports, simply add more Uno interfaces. Follow the installation instructions in this manual and you
will be up and running in no time.
PLEASE DO NOT connect the Uno to your computer until you have reviewed the installation instructions for your operating system.
* NOTE: Only the latest hardware revision of the Uno is class-compliant and will work under Windows XP or Mac OS X without a driver. If you own an
earlier version of the Uno that is not class-compliant (i.e., it does not install automatically), you’ll need to install the latest drivers from our website.
Features
Uno USB/MIDI Interface offers the following features:
•
•
•
•
•
•
1-in/1-out MIDI via USB connection (16 x 16 MIDI channels)
Class-compliant* installation under Windows XP and Mac OS X (no drivers required)
Full-speed connection to either a PC or Apple computer equipped with a USB port
MIDI input and output LED indicators
Bus-powered—requires no external power supply
Compact and lightweight design for easy transport
Package Contents
The Uno package includes:
•
•
Uno USB MIDI interface
M-Audio MIDISPORT Series CD-ROM for Windows and Macintosh
Before You Connect Your Uno
Please follow the installation instructions that pertain to your operating system.
Feature View
å
ç
é
è
ê
USB cable and connector - Connect this cable to your host computer’s USB port.
USB LED - This LED pulses when Uno is powered and functioning.
MIDI in and MIDI out LEDs - These LEDs indicate MIDI input or output activity.
“TO MIDI OUT” connector - Connect this plug to your external instrument’s MIDI output port.
“TO MIDI IN” connector - Connect this plug to your external instrument’s MIDI input port.
Note: If you become confused with the MIDI cabling, take a look at the arrows found on each MIDI plug. These arrows indicate which way the MIDI
data flows over that connector (i.e., whether the data is going from your keyboard to the computer or whether data is coming from the computer and
going into your MIDI device).
M-Audio USB MIDISPORT Uno User Guide
English • 1
Overview
MIDI is the acronym for “Musical Instrument Digital Interface” and is the protocol used by MIDI keyboards and other devices (sound modules, sequencing
software, virtual instruments, etc.) to communicate with each other. Uno provides your computer with one MIDI input and one MIDI output port, each
supporting 16 MIDI channels.
Windows XP & Mac OS X Installation
If you are using Windows XP or Mac OS X, simply plug in your Uno to the computer’s USB port and you’re ready to go. Since Uno is class-compliant*,
it will work without requiring any additional drivers.
Installation for Advanced Windows XP Users
While Uno is class-compliant*, advanced Windows XP users who intend to use the Uno interface with more than one application at the same time (i.e.,
“multi-client” operation), plan to use long SysEx (system exclusive) commands or are using other class compliant USB devices with audio capabilities
simultaneously should install the special M-Audio drivers for optimal performance. These drivers can be installed by doing the following:
PLEASE NOTE: Do not connect Uno to your computer until the M-Audio driver files have been installed. The following instructions will indicate when
you should connect the interface to your computer.
1.
2.
Insert the MIDISPORT Series CD-ROM into your computer’s CD-ROM drive.
The computer will automatically display the interactive install screen shown in picture 1 . If your computer fails to launch the installer, manually
start the installer by clicking on Start > My Computer > MIDISPORT Series.
3. Select “MIDISPORT Uno” from the drop-down menu and click “Install.”
4. Follow the driver installer’s on-screen instructions.
5. At various points in this installation process, you may be notified that the driver being installed has not passed Windows Logo Testing. Click
“Continue Anyway” to proceed with the installation.
6. Click “Finish” once the installer has completed the installation.
7. Connect your Uno to an open USB port.
8. Windows will identify the interface and will ask if you want to search the Internet for a driver. Select “No, not this time” and press “Next” ( 2 ).
9. Windows will display a “Found New Hardware” Wizard ( 3 ).
10. Choose “Install software automatically” and click “Next.”
11. Once the Wizard has completed, click “Finish.”
12. Once the installation is complete, you will see a message stating, “Your new hardware is installed and ready to use.”
1
M-Audio USB MIDISPORT Uno User Guide
2
3
English • 2
Installation Instructions for Windows 98/Me/2000
Installing Drivers For Windows 98/Me
PLEASE DO NOT plug in Uno until instructed to do so.
1.
2.
3.
4.
5.
6.
Insert the MIDISPORT Series Installer CD-ROM. The installer should begin to run automatically. If not, select “Run” from the Start menu and type
“D:\autorun” (without the quotes), where “D:” is your CD-ROM drive, then press ENTER. If your CD-ROM drive is identified by a letter other than
“D:” use that drive letter in the RUN command line.
Select “MIDISPORT Uno” from the drop-down menu.
Click on “install driver.”
Follow the on-screen instructions.
When the installation has finished, exit setup.
Plug Uno into a free USB port on your computer.
Windows will continue with the installation of USB and MIDI drivers for your Uno. When finished, Windows may prompt you to restart your computer. If
so, please restart and begin using your Uno.
Installing Drivers For Windows 2000
PLEASE DO NOT plug in Uno until instructed to do so.
1.
Insert the MIDISPORT Series Installer CD-ROM. The installer should begin to run automatically. If not, select “run” from the Start menu and type
“D:\autorun” (without the quotes), where ‘D:’ is your CD-ROM drive, then press ENTER. If your CD-ROM drive is identified by a letter other than
“D:” use that driver letter in the RUN command line.
2. Select “MIDISPORT Uno” from the drop-down menu.
3. Click on “install drivers.”
4. Follow the on-screen instructions.
5. When the installation has finished, exit setup.
6. Plug Uno into a free USB port on your computer. Windows will automatically recognize your Uno and ask for the Uno Installer CD-ROM.
7. Select the CD-ROM drive and click “OK.” Windows will then ask you to select the CD-ROM drive again for the MIDI driver.
8. Windows will report the drivers have not been digitally signed. Click “Yes” to continue the installation.
9. Select the “D:” drive once more.
10. Click “OK” and finish installation.
Setting Up Your MIDI Studio
A typical MIDI system setup might include your Uno, a computer with MIDI sequencing software, a MIDI controller keyboard, and a MIDI-compatible
sound module. This setup is illustrated below:
UNO USB MIDI INTERFACE
MIDI
to MIDI in
MIDI Sound Module
USB
to MIDI out
Computer
MIDI Keyboard
In the set-up described above, Uno is being used to route MIDI data between the controller keyboard, the sound module, and the computer. To set up
the Uno in this way:
1.
2.
3.
Connect Uno to your computer via the USB cable.
Connect the “To MIDI Out” cable to your keyboard’s MIDI Out port.
Connect the other cable labeled “To MIDI In” to the MIDI In jack of your sound module.
•
Important note: Uno is not a MIDI THRU device and as such, MIDI data received at Uno’s MIDI in port can never be sent directly to the MIDI out
plug of the Uno. However, data received at the MIDI In can be transmitted from the computer to the MIDI Out of your Uno.
•
Caution: Electrostatic discharges, electrical spikes, and Radio Frequency (RF) interference may cause Uno to malfunction. In such cases, unplug
the unit, wait a few moments, and reconnect it to restore normal operation.
M-Audio USB MIDISPORT Uno User Guide
English • 3
Warranty Terms & Registration
Warranty Terms
M-Audio warrants products to be free from defects in materials and workmanship, under normal use and provided that the product is owned by the
original, registered user. Visit www.m-audio.com/warranty for terms and limitations applying to your specific product.
Warranty Registration
Thank you for registering your new M-Audio product. Doing so immediately both entitles you to full warranty coverage and helps M-Audio develop and
manufacture the finest quality products available. Register online at www.m-audio.com/register to receive FREE product updates and for the chance
to win M-Audio giveaways.
USB MIDISPORT Uno
Tested to comply with
FCC standards
FOR HOME OR STUDIO USE
WARNING: This product contains chemicals, including lead, known to the State of California to cause cancer, and birth defects or other reproductive
harm. Wash hands after handling.
M-Audio USB MIDISPORT Uno User Guide
English • 4
M-Audio USA
5795 Martin Rd., Irwindale, CA 91706
Technical Support
M-Audio Germany
Kuhallmand 34, D-74613 Ohringen, Germany
Technical Support
web:
www.m-audio.com/tech
e-mail:
[email protected]
tel (pro products):
(626) 633-9055
tel
+49 (0)7941 - 9870030
tel (consumer products):
(626) 633-9066
fax:
+49 (0)7941 98 70070
fax (shipping):
(626) 633-9032
Sales
Sales
e-mail:
[email protected]
e-mail:
[email protected]
tel:
+49 (0)7941 98 7000
tel:
1-866-657-6434
fax:
+49 (0)7941 98 70070
fax:
(626) 633-9070
Web
www.m-audio.de
Web
www.m-audio.com
M-Audio Canada
M-Audio U.K.
Floor 6, Gresham House, 53 Clarenden Road, Watford
WD17 1LA, United Kingdom
Technical Support
1400 St-Jean Baptiste Ave. #150, Quebec City,
Quebec G2E 5B7, Canada
Technical Support
e-mail:
[email protected]
e-mail:
[email protected]
phone:
(418) 872-0444
tel:(Mac support):
+44 (0)1765 650072
fax:
(418) 872-0034
tel: (PC support):
+44 (0)1309 671301
Sales
Sales
e-mail:
[email protected]
tel:
+44 (0)1923 204010
phone:
(866) 872-0444
fax:
+44 (0)1923 204039
fax:
(418) 872-0034
Web
www.maudio.co.uk
Web:
www.m-audio.ca
M-Audio Japan
M-Audio France
Floor 6, Gresham House, 53 Clarenden Road, Watford
WD17 1LA, United Kingdom
アビッドテクノロジー株式会社 | エムオーディオ事業部:〒 460-0002 愛知県名古屋市中区丸の内 2-18-10
Avid Technology K.K.:2-18-10 Marunouchi, Naka-Ku, Nagoya, Japan 460-0002
Renseignements Commerciaux
カスタマーサポート(Technical Support)
tel :
0 810 001 105
e-mail :
[email protected]
e-mail :
[email protected]
e-mail (Macintosh 環境専用 ):
[email protected]
Assistance Technique
tel :
052-218-0859(10:00~12:00/13:00~17:00)
PC :
0 820 000 731
セールスに関するお問い合わせ(Sales)
MAC :
0 820 391 191
e-mail:
[email protected]
Assistance Technique
tel:
052-218-3375
e-mail :
fax:
052-218-0875
Web:
www.m-audio.jp
[email protected]
[email protected]
fax :
+33 (0)1 72 72 90 52
Site Web
www.m-audio.fr
060424_Uno_UG_EN01