1
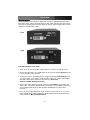
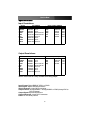
Video Scaler/Converter
DVI to DVI-I PC/HD Scaler Video Converter
DVI2DVI
Instruction Manual
FCC Compliance Statement
This equipment has been tested and found to comply with the limits for a Class B digital
device, pursuant to part 15 of the FCC Rules. These limits are designed to provide
reasonable protection against harmful interference in a residential installation. This
equipment generates, uses and can radiate radio frequency energy and, if not installed
and used in accordance with the instructions, may cause harmful interference to radio
communications. However, there is no guarantee that interference will not occur in a
particular installation. If this equipment does cause harmful interference to radio or
television reception, which can be determined by turning the equipment off and on, the
user is encouraged to try to correct the interference by one or more of the following
measures:
• Reorient or relocate the receiving antenna.
• Increase the separation between the equipment and receiver.
• Connect the equipment into an outlet on a circuit different from that to which the
receiver is connected.
• Consult the dealer or an experienced radio/TV technician for help.
Use of Trademarks, Registered Trademarks, and
other Protected Names and Symbols
This manual may make reference to trademarks, registered trademarks, and other
protected names and/or symbols of third-party companies not related in any way to
StarTech.com. Where they occur these references are for illustrative purposes only and
do not represent an endorsement of a product or service by StarTech.com, or an
endorsement of the product(s) to which this manual applies by the third-party company in
question. Regardless of any direct acknowledgement elsewhere in the body of this
document, StarTech.com hereby acknowledges that all trademarks, registered
trademarks, service marks, and other protected names and/or symbols contained in this
manual and related documents are the property of their respective holders.
Instruction Manual
Table of Contents
Introduction . . . . . . . . . . . . . . . . . . . . . . . . . . . . . . . . . . . . . . . . . . . . . . . . . . . . .1
Before You Begin . . . . . . . . . . . . . . . . . . . . . . . . . . . . . . . . . . . . . . . . . . . . . . . . .1
System Requirements . . . . . . . . . . . . . . . . . . . . . . . . . . . . . . . . . . . . . . . . . . .1
Contents . . . . . . . . . . . . . . . . . . . . . . . . . . . . . . . . . . . . . . . . . . . . . . . . . . . . .1
Installation . . . . . . . . . . . . . . . . . . . . . . . . . . . . . . . . . . . . . . . . . . . . . . . . . . . . . .2
Connecting Devices to the Scaler . . . . . . . . . . . . . . . . . . . . . . . . . . . . . . . . . .2
Using the Scaler/Converter . . . . . . . . . . . . . . . . . . . . . . . . . . . . . . . . . . . . . . . .3
Input Setup . . . . . . . . . . . . . . . . . . . . . . . . . . . . . . . . . . . . . . . . . . . . . . . . . . .3
Output Setup . . . . . . . . . . . . . . . . . . . . . . . . . . . . . . . . . . . . . . . . . . . . . . . . . .3
Picture Adjust . . . . . . . . . . . . . . . . . . . . . . . . . . . . . . . . . . . . . . . . . . . . . . . . .4
H/V Adjust . . . . . . . . . . . . . . . . . . . . . . . . . . . . . . . . . . . . . . . . . . . . . . . . . . . .4
OSD Adjust . . . . . . . . . . . . . . . . . . . . . . . . . . . . . . . . . . . . . . . . . . . . . . . . . . .4
System Information . . . . . . . . . . . . . . . . . . . . . . . . . . . . . . . . . . . . . . . . . . . . .4
Auto Adjust . . . . . . . . . . . . . . . . . . . . . . . . . . . . . . . . . . . . . . . . . . . . . . . . . . .4
Exit . . . . . . . . . . . . . . . . . . . . . . . . . . . . . . . . . . . . . . . . . . . . . . . . . . . . . . . . . .4
Specifications . . . . . . . . . . . . . . . . . . . . . . . . . . . . . . . . . . . . . . . . . . . . . . . . . . .5
Troubleshooting . . . . . . . . . . . . . . . . . . . . . . . . . . . . . . . . . . . . . . . . . . . . . . . . .6
Accessory Products from StarTech.com . . . . . . . . . . . . . . . . . . . . . . . . . . . . .7
Technical Support . . . . . . . . . . . . . . . . . . . . . . . . . . . . . . . . . . . . . . . . . . . . . . . .8
Warranty Information . . . . . . . . . . . . . . . . . . . . . . . . . . . . . . . . . . . . . . . . . . . . .8
i
Instruction Manual
Introduction
Thank you for purchasing a StarTech.com DVI to DVI-I scaler video converter. This
product allows you to convert between a DVI-D source signal and DVI-I(digital + analog
RGB) output. The input resolution is automatically detected while the output resolution
and refresh rate can be selected through an on-screen menu with the buttons located on
the front of the panel.
Features
• Converts DVI-D video input to DVI-I signal output. A DVI-D source can be
displayed onto a DVI-I display, supporting a variety of resolutions
• 48MB frame memory for frame rate conversion
• Input resolution is automatically detected while output resolution and refresh rate can
be selected through an on-screen display menu and front panel push buttons
• On-screen display allowing adjustments to brightness, contrast, color and
Horizontal/Vertical positioning
• DVI output enables an entirely digital rendering of video without the losses associated
with an analog interface
Before You Begin
System Requirements
• A DVI video source
• A display capable of using a DVI-I signal
• Cables necessary to make connections between input, scaler and display
Contents
•
DVI2DVI scaler video converter
•
1 x DVI Cable
•
1 x 5V DC 2Amp Power Adapter
•
1 x User Manual
1
Instruction Manual
Installation
These instructions assume that the display has at least one available input that uses a
DVI-I video signal, and that all the devices have their cables attached. You may need to
disconnect an existing device from the display to make an input available and re-connect
that device using the video scaler.
Front
Back
Connecting Devices to the Scaler
1. Place the scaler near the display and the devices you wish to use with the scaler.
2. Connect the input device (i.e. a DVD player) to the connector labeled DVI Input on the
back of the video scaler converter.
3. Connect the scaler to your display device, using the port marked DVI OUTPUT on the
front of the scaler. If you require a VGA resolution output, use a DVI to VGA adapter
and VGA to VGA cable to make this connection (see Accessory
Products available from StarTech.com).
4. Connect the power adapter (provided) to the port marked DC 5V on the back of the
video scaler. Connect the opposite end to a wall outlet or other suitable power source.
The red light located next to the DC 5V output will illuminate once the scaler is
powered.
5. If you are using a DVI-I display, the scaler converter is now ready to use. If you are
using an RGB (VGA) display, adjustments will be required from within the On-screen
menu (Please see Menu and Adjustments)
2
Instruction Manual
Using the Video Scaler
Once you have connected the desired input and output devices to the video scaler, you
can proceed to test the connection to the television or other display. Turn on the display,
and select the input to which you connected the video switch. Consult the
documentation for your display if you are unsure on how to select A/V inputs. Usually,
there will be a button on the display’s remote or front panel labeled INPUT or A/V. If the
display has multiple inputs, you will need to ensure the input you have selected
corresponds to the connectors on the television you used for the scaler. Power on the
devices you connected to the video scaler. Pressing the MENU button located on the
front of the scaler converter will bring up the on-screen display controls on the screen as
follows:
Input Setup
Output Setup
Picture Adjust
HV Adjust
OSD Adjust
System Information
Auto Adjust
Exit
Using the + or - buttons, move the cursor to your desired selection, then press Menu to
confirm your selection and enter the corresponding sub-menu. Once selected, each
parameter can be adjusted by using the + or - buttons to increase the setting value.
Input set up
When selected, a sub-menu for selecting either YPbPr or RGB as your input signal will
appear. Note: This scaler video converter will automatically detect your input signal,
however manual adjustment of this setting is available by using the + or - buttons located
on the front panel of the scaler video converter. Pressing Menu will save your selection
and exit this sub-menu.
Output set up
When selected, a sub-menu will appear giving you options as to the desired output,
either DVI-A (analog) or DVI-D (digital). Once you have selected the appropriate output
signal, use the + or - buttons to choose the correct resolution/refresh rate. The following
output refresh rates/resolutions are available:
Output modes available for DVI-A (Analog)
PC (RGBHV)
VGA
640x480
60/72/75/85 Hz
VESA85
640x400
85 Hz
VGA70
720x400
70 Hz
SVGA
800x600
60/72/75/85 Hz
XGA
1024x768 60/70/75/85 Hz
Mac
1152x864 70/75 Hz
WXGA
1280x768 60 Hz
1280A
1280x960 60 Hz
SXGA
1280x1024 60/75 Hz
3
HDTV (YPbPr, RGBHV)
1080i -RGB
1920x1080 60
720p -RGB
1280x720 60
576p -RGB
720x576
50
480p -RGB
720x480
60
1080i -YPbPr 1920x1080 60
720p -YPbPr 1280x720 60
576p -YPbPr 720x576
50
480p -YPbPr 720x480
60
Hz
Hz
Hz
Hz
Hz
Hz
Hz
Hz
Instruction Manual
Output modes available for DVI-D (Digital)
VGA
VESA85
VGA70
SVGA
XGA
Mac
WXGA
1280A
SXGA
PC (RGBHV)
640x480
60/72/75/85 Hz
640x400
85 Hz
720x400
70 Hz
800x600
60/72/75/85 Hz
1024x768 60/70/75/85 Hz
1152x864 70/75 Hz
1280x768 60 Hz
1280x960 60 Hz
1280x1024 60/75 Hz
HDTV (RGBHV)
1080i -RGB
1920x1080
720p -RGB
1280x720
576p -RGB
720x576
480p -RGB
720x480
60
60
50
60
Hz
Hz
Hz
Hz
Pressing Menu will save your selection and return you to the main menu.
Picture Adjust
This sub-menu allows you to adjust the contrast, brightness and color of the displayed
image. Using the + and - buttons, select the attribute you wish to change, and use the
Menu button to confirm your selection. Use the + or - buttons to increase or decrease
the amount of the element you are modifying, followed by the Menu button to save.
Repeat this procedure for each element as desired. Once you have made the necessary
adjustments, use the + or - button to navigate to the Exit, which will take you back to the
main menu. NOTE: using the Reset feature will return all adjustments back to the factory
reset values.
HV Adjust
When chosen, a sub-menu will appear, allowing you to adjust the best horizontal and
vertical position of the picture, using the + or - buttons.
OSD Adjust
Allows you to adjust the horizontal and vertical position of the on-screen menu.
System Information
Displays the input and output resolutions and their vertical refresh rate on the screen.
Auto Adjust
When chosen, the scaler will automatically adjust all parameters to the factory preset
values.
Exit
When selected, exits the on-screen display
4
Instruction Manual
Specifications
Input Resolutions:
Digital
VGA
VESA85
VGA70
SVGA
XGA
Mac
WXGA
1280A
SXGA
PC (RGBHV)
640x480
640x400
720x400
800x600
1024x768
1152x864
1280x768
1280x960
1280x1024
60/72/75/85 Hz
85 Hz
70 Hz
60/72/75/85 Hz
60/70/75/85 Hz
70/75 Hz
60 Hz
60 Hz
60/75 Hz
HDTV (YPbPr, RGBHV)
1080i
720p
576p
480p
576i
480i
1920x1080
1280x720
720x576
720x480
720x576
720x480
60
60
50
60
50
60
Hz
Hz
Hz
Hz
Hz
Hz
60
60
50
60
Hz
Hz
Hz
Hz
Output Resolutions:
PC (RGBHV)
VGA
VESA85
VGA70
SVGA
XGA
Mac
WXGA
1280A
SXGA
640x480
640x400
720x400
800x600
1024x768
1152x864
1280x768
1280x960
1280x1024
60/72/75/85 Hz
85 Hz
70 Hz
60/72/75/85 Hz
60/70/75/85 Hz
70/75 Hz
60 Hz
60 Hz
60/75 Hz
HDTV (RGBHV) *
1080i
720p
576p
480p
1920x1080
1280x720
720x576
720x480
*HDTV YPbPr format is only available on Analog output
Input Format: Digital RGBHV, YPbPr or YCbCr
Input Signal: Digital RGB data bitstream
Input Connector: 24-pin DVI-D connector
Output Format: Analog RGBHV + Analog RGBHV or YPbPr(through DVI to
HD-15 adapter)
Output Signal:Digital data bitstream
Output Connector: 24-pin DVI-D connector
Power: 5V 2A center-positive
5
Instruction Manual
Troubleshooting
If you’re having difficulty using the video scaler, try the following solutions based on the
nature of the problem.
No image is being shown on the display.
1) Ensure the video scaler is plugged in and receiving power. One LED indicator on the
front panel will be lit when the switch is receiving power.
2) Try selecting another input on the display and verify which input the scaler is
connected to. Most displays will have their A/V inputs marked with a number, so
ensure the input selected on the screen matches the physical connection between the
scaler and the display.
3) Verify cable connections between the input device, video scaler and display are snug.
Video quality is poor.
1) Verify cable connections between the input device, video scaler and display are snug.
2) Using lengthy cables may cause signal degradation. Try to locate the scaler as close
to the input device and display, as possible.
3) Enter the Picture Adjust sub-menu, ensure that Contrast, Brightness and Color are
set appropriately.
4)Ensure that the proper input signal is selected in the Input Setup sub-menu.
6
Instruction Manual
Accessory Products from StarTech.com
Contact your local StarTech.com dealer or visit www.startech.com for cables or other
accessories that will help you get the best performance out of your new product.
ZENDVI1
Cable ZEN 3.3 ft (1m) DVI Digital Video Cable
ZENDVI2
Cable ZEN 6.6 ft (2m) DVI Digital Video Cable
ZENDVI4
Cable ZEN 13.1 ft (4m) DVI Digital Video Cable
DVIVGAMM6
6 Ft. DVI to VGA Analog Flat Panel Display Cable
DVIVGAMF
DVI to VGA Display Adapter
7
Instruction Manual
Technical Support
StarTech.com’s lifetime technical support is an integral part of our commitment to provide
industry-leading solutions. If you ever need help with your product, visit
www.startech.com/support and access our comprehensive selection of online tools,
documentation, and downloads.
Warranty Information
This product is backed by a one-year warranty. In addition, StarTech.com warrants its
products against defects in materials and workmanship for the periods noted, following
the initial date of purchase. During this period, the products may be returned for repair, or
replacement with equivalent products at our discretion. The warranty covers parts and
labor costs only. StarTech.com does not warrant its products from defects or damages
arising from misuse, abuse, alteration, or normal wear and tear.
Limitation of Liability
In no event shall the liability of StarTech.com Ltd. and StarTech.com USA LLP (or their
officers, directors, employees or agents) for any damages (whether direct or indirect,
special, punitive, incidental, consequential, or otherwise), loss of profits, loss of business,
or any pecuniary loss, arising out of or related to the use of the product exceed the
actual price paid for the product.
Some states do not allow the exclusion or limitation of incidental or consequential
damages. If such laws apply, the limitations or exclusions contained in this statement
may not apply to you.
Revised: January 3, 2006 (Rev. A)
8
Instruction Manual
About StarTech.com
StarTech.com is “The Professionals’ Source for Hard-to-Find Computer
Parts”. Since 1985, we have been providing IT professionals with the
quality products they need to complete their solutions. We offer an
unmatched selection of computer parts, cables, server management
solutions and A/V products and serve a worldwide market through our
locations in the United States, Canada, the United Kingdom and Taiwan.
Visit www.startech.com for complete information about all our products
and to access exclusive interactive tools such as the Parts Finder and the
KVM Reference Guide. StarTech.com makes it easy to complete almost
any IT solution. Find out for yourself why our products lead the industry in
performance, support, and value.
9