1
tangent
DAB TABLE RADIO
USER MANUAL
MODE D'EMPLOI
BEDIENUNGSANLEITUNG
INSTRUCTIEHANDLEIDING
BETJENINGSVEJLEDNING
BRUKSANVISNING
КАУТТООНОЕ
ISTRUZIONI PER L'USO
MANUAL DEL USUARIO
MANUAL DO UTILIZADOR
digital Madio
TABLE OF CONTENTS
English
Francais
Deutsch
Nederlands
Dansk
Svenska
suomi
Italiano
Español
Portugués
NOTES
SPECIFICATIONS
TABLE OF CONTENTS
Table of contents
Important information
Front and rear panel
Using the radio
Connecting the radio
DAB mode
Scanning stations in DAB mode
Manual tuning in DAB mode
Using the INFO function
Saving a station to a preset
FM mode
scanning stations in FM mode
selecting audio mode on FM
AUX mode
Basic functions
Snooze and Mute
Sleep timer
Checking the sleep timer function
Setting the alarm
Resetting the radio
Displaying the firmware version
Frequency list
Specifications
LS MÍ MD WD ND DS DS 00 00 00 sd wd sd UA Ja EA
IMPORTANT INFORMATION
Congratulations on your new radio.
Please read this manual carefully to
avoid malfunction and damage to the
clock radio and to ensure that the radio
will be a source of great pleasure to you
for a very long time,
- Do not expose the clock radio to direct
sunlight, high humidity, dirt, heavy
vibration or extreme temperatures.
. Place the unit on a solid and plane
surface,
. Make sure that there is sufficient
ventilation around the clock radio, Do
not place the unit on a soft surface
such as a carpet. Make sure that there
is a clearance of 20 cm behind the unit.
. Do not open the cabinet, Only qualified
technicians are allowed clean the
internal parts.
- Make sure that liquid and foreign
matter cannot penetrate the unit,
- If service or repair is required, this must
be carried out by qualified technicians.
- Unplug the unit in the following cases:
A. The mains plug or the mains cable is
defective,
B. Foreign matter or liquid has
penetrated the radio.
C. The unit cannot be operated
properly,
D, The unit has fallen down or the
cabinet has been damaged.
8. Store this instruction manual carefully
for future reference,
9. Use a duster or a slightly damp, soft
10.
and non-fluffy rag to clean the radio.
Do not use corrosive or strong
cléaning agents. Make sure that no
moisture penetrates the radio during
cleaning. Unplug the unit before
cleaning.
. Check that the mains voltage
indicated on the back of the clock
radio corresponds to the mains
voltage that the unit is connected to.
. Unplug the unit if the clock radio is
not to be used for a long time.
Disclaimer
Despite extensive efforts we cannot
guarantee that the technical data
Indicated are correct, complete and
updated, We reserve the right to make
technical changes without notice,
FRONT AND REAR PANEL
, en
9,
10.
11.
12.
13.
14.
15.
16.
17.
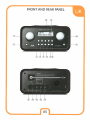
| FRONT AND REAR PANEL
VOLUME: Turn the volume knob to the right to increase the volume or to
the left to decrease the volume of the speakers. This knob will also control
the volume of headphones when connected.
POWER: Press this button to turn the unit on and set it into standby
INFO: Press this button to change between DAB information (program
information, time and date, signal strength, ete.)
Mote: Mot all station send out all the above mentioned informations.
ALARM: This button sets the alarm Function on and off. Press and hold the
button to set the alarm time and source.
SLEEP: This button sets the sleep timer. When the sleep timer is activated
the Tangent DAB table radio will turn off after 15,30, 45,60, 75 or 90
minutes,
AUTO TUNE: Press once in DAB mode to quick scan for DAB stations. Press
and hold the button for two seconds in DAB mode to make a full scan for
DAB station,
Press the button in FM mode to scan up in frequency. Press and hold the
button in FM mode to scan down in frequency.
MODE: This button changes between DAB and FM mode,
1-5 DIGITS: Selects the station saved at the current number. IF the button
is pressed for more than two seconds, à station will be saved at the current
number,
ENTER: This button confirms your choice when choosing DAB stations or
setting the alarm
TUME: Turn the tune knob to the right or to the left to change the
frequency range, or to select between the found DAB stations.
LCD DISPLAY: Liquid Crystal Display. The display shows information such
as the radio station name, date and time, signal strength, etc.
>NOOZE: [On top of the clock radio) Press this button during an alarm to
delay the alarm for 5 minutes.
When the unit is on the SNOOZE button works as a MUTE button.
ANTENMA: The Tangent DAB table radio comes with a telescopic antenna.
To improve FM or DAB reception, adjust the antenna for the best
reception.
POWER INPUT: Use this input to connect the included Tangent DAE table
radio power supply,
LINE OUTPUT: The Tangent DAB table radio can be used as a separate
tuner by connecting it to an amplifier or a receiver,
HEADPHONE: Connect a separate headset to this connecter to listen to
Tangent DAB table radio with a headset, Inserting a headset will turn off
the main speaker
AUX INPUT: Connect a stereo or mono audio source to this input. (Like a
CD player ora TV)
06
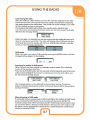
USING THE RADIO
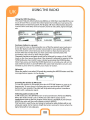
Connecting the radio
Place the radio on a plain surface. Connect the included adaptor to the radio.
Check that all other connections have been made correctly before inserting
the mains plug into the wall socket. Check that the mains voltage is 230-240V
AC5OH? before turning on the power,
The Tangent DAB table radio will go into standby and is ready for use,
Turn the unit on by pressing the power button on the front panel. The display
will show the message below.
TANSENT CAD
TABLE RAL
When the radio is in standby, you can see what mode the radio will start up in,
when it is turned on next time. The radio will display either DAB and the time
or FM and the time. The display will not be as brightly illuminated in standby
mode, as when the unit is turned on.
DAB mode
When the radio is on, select DAB mode by pressing the MODE button until the
message below appears in the display.
ЕЙ == ORE
Scanning for station in DAB moda
When the unit has been turned on, channels must be saved. This is done by
means of the autotune function.
Press the AUTOTUNE button for two seconds. An international search{Full scan}
will be initiated. Note: If the button is only pressed once, the unit will re scan
for the channels already found,
SCA SERVICES SCAN SERVICES
—_ QUIER SCAN FULL SEI
The messages below to the right will be shown when tuning. The picture
below to the left, showing the number of channels found, will be shown when
tuning is finished.
Manual tuning in DAB mode
It is possible to do a manual scan in DAB mode, When the radio is in DAB mode,
press and hold the INFO button for 2 seconds, and then press ENTER, The
manual tuning mode will be activated, and the TUNE knob can be used to tune
up and down, When a frequency with station is found, press enter and you will
be able to choose between the station at the current frequency. Confirm your
choice by pressing ENTER,
USING THE RADIO
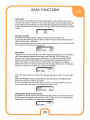
Using the INFO function..
This tuner features information possibilities on DAB that resemble RDS as we
know it from FM. To activate this information from DAB, you must press the
INFO button on the front panel. The display will show information about for
Instance time and date, name of station, name of artist, title, signal strength,
etc.
ПР РЭ |5 23 | ое Pa
| NEXT ОР РЗ. pe VARIED SPEECH DR DAB2 |
UR F< OR PY
2:58 — 14-09-2005 | STERED | IS2K8P5
Saving a station to a preset.
If you want to save a channel under one of the five presets, you must press
down the button with the number concemed for two seconds. When the
channel has been saved and you wish to listen to that channel, press the
button with the number that you have saved the channel under, The
procedure is the same for both FM and DAB,
Channels that have not been saved can be selected by means of the TUNE
knob on the front panel, Note that if the channel is selected by means of the
TUNE knob, you must confirm your choice by pressing the ENTER button.
Note: If you press and hold the ENTER button for 2 seconds, you will set the
auto enter function on and off, When the auto enter function is on, it is not
needed to press enter to confirm your choice of station.
FM mode
When the radio is on, select FM mode by pressing the MODE button until the
message below appears in the display,
DAB => FM
Scanning for station in FM mode
Ter scan for stations in FM mode, press the AUTOTUNE button to scan up in
frequencies. To scan down in frequencies press and hold the AUTOTUNE
button for two seconds. The radio will stop autotuning when it reaches a
station with a adequate signal,
Selecting audio mode on FM
In FM mode press the ENTER button to choose between AUTO and MONO.
When the audio mode is set to AUTO, the radio will in stereo in the
headphones and on the line output when stereo is available. If you choose
MONO the radio will force all outputs to play in MONO,
This function Is used if you are trying to received a radio station with a not
adequate signal. Some stations might be better received in mono when the
signal strength is not adequate,
| 08
BASIC FUNCTIONS
AUX mode
The unit has an auxiliary stereo input. This input can be used to connect an
external CD player or similar to, The radio will change to the auxiliary input by
it self when an external input is connected. To change back to listen to radio,
simply disconnect the external source, and the radio will change back to radio
made,
RUN
: 1.256
Snooze and mute
The SNOOZE button works as MUTE button when the radio ls on,
If you press the SNOOZE button after an alarm has been activated, the alarm
will be delayed for 5 minutes,
When the snooze function is active, the display will show a *Z" next to the bell
that indicates if the alarm has been set
OR 23 JA
NEXT Ori F3: NEWS
Sleep timer
The radio has a sleep timer function, This makes the radio able to turn off by it
self. To activate the sleep function press and hold the SLEEP button for 2
seconds and If the sleep function should be on or off by turning the TUNE
button, and confirm with ENTER Then choose how long there should go
before the radio turns off. Turn the TUNE button, the sleep time changes.
Choose between 15 minutes, 30 minutas, 45 minutes, 60 minutes, 75 minutes,
90 minutes and OFF. Confirm your choise with ENTER.
SLEEP
OT qs
When the sleep timer is activated. The display will show a little *s” on the right
side,
When the POWER button is pressed, the radio will go into standby and the
sleep timer function will be cancelled
It is also possible cancelling the sleep function by choosing off in the sleep
timer menu, the same way as the sleep timer was sat on.
OR F3 5
NEXT ON PS: NEWS
Checking the sleep timer function
To check how much time are left before the sleep timer is activated, Press the
SLEEP button. The display will now show if the sleep timer on or off, and how
much time is left before the sleep timer is activated.
SLEEP
Sr 2300
BASIC FUNCTIONS
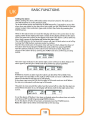
Setting the alarm
Before setting the alarm, DAB radio station must be tuned in. The radio uses
the DAB stations to set the internal clock.
To set the alarm, press and hold the ALARM button for 2 seconds to access the
alarm time set mode. In the alarm time set mode, use the TUNE knob to change
values in alarm time and alarm type, and confirm the choice by pressing the
ENTER button,
When in the alarm time set mode the display will show the current time in the
upper center of the display. The lower center of the display will show the alarm
time. The lower left corner of the display will show if the alarm is ON or OFF. The
lower right comer of the display will show the alarm type.
The onvoff indicator in the lower left corner will start to flash, select on of off by
tuminc the TUNE button and press enter to confirm.
Now the hour indicator of the alarm time will start to flash. Adjust the hour of
the alarm time by turning the TUNE knob and confirm by pressing ENTER.
Now the minute indicator of the alarm time will start to flash. Adjust the
minute of the alarm time by turning the TUNE knob and confirm by pressing
ENTER.
56 ALARM
OFF 08.05 RADIO
The alarm type indicator in the lower right corner will start ta flash. Adjust the
alarm type by turning the TUNE knob and confirm by pressing ENTER.
N 2:56 || 12:56 ma
FF 06.05 Raco | E OF 08:05 BEEP
Mote;
If RADIO is chosen as alarm type, the alarm can be either FM or DAE, If the
alarm type must be DAB, set the radio In DAB mode and turn it off. When the
alarm is activated it will start up in DAB mode,
If the alarm type must be FM, set the radio in FM mode and turn it off. When
the alarm is activated it will start up in FM mode.
The alarm is now set, and the radio must be turned off, In order for the alarm to
work. When the alarm is on, the display will show a bell in the right side of the
screen,
DR P3 E, oe Al
NEXT ON P3. NEWS | ER
To ser the alarm off before It has been activated, enter the alarm time set mode
and choose OFF. Confirm by pressing ENTER 4 times.
To set the alarm off after it has been activated, press the POWER button.
Note: The alarm time will be remembered to the next day.
10
BASIC FUNCTIONS
Resetting the radio
If you want to erase your settings on the radio, including presets, alarm and
sleep settings,
Press and hold the INFO button for 7 seconds. Press the INFO button once
again, and press ENTER. The radio will now reset.
SYSTEM RESET SCAN SERVICES
= _ QUACK SChN
Displaying the firmware version
To display the firmware version, press and hold the INFO button for 2 seconds.
Press the INFO button twice again. The display will show the firmware version
on the second ling, like on the picture below,
Press the INFO button once again to exit the mode.
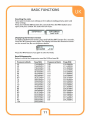
Band Ill frequencies
Below is a list of the frequencies used for DAB on band II:
| Frequency block Freq. Mhz Frequency block Freq. MHz
ЗА 174,928MHz 10N 210,096MHz
56 176.640MHz 108 211 .648MHz
SC 178,352MHz TOC 213.360MHz
sD 180.064MHz 100 215.072MHZ
EA 181.936MHz 114 A16,928MHz
66 183648MHz | 11N 217 088MHz
BC 185.360MHz 11B 218.640MHz
60 187.07 2MHz 11C 220.352MHz
FA 188.9258MHz 110 222.0654MHZ
7B 190.640MHz 124 223.936MHZ
fC 192.352MHz 12N 224.056MHZz
7D 194.064MHz 128 225.648MHZ
BA 195.335 HZ 12 227.360MHz
8B 197. 648MHz 120 229.07 2MHz
BC 199.360MHz 134 230.784MHz
80 201.07 2МНЕ 138 232.4% MHz
oA 202.928MHz 13C 234 208MHz
96 204.640MHz 130 235.7 F6MHz
ЭС 206.352MHz 13E 237 488MHz
Эр 208.064MHz 13F 239. 200MHz
10A 209 936MHz
NOTES
93
NOTES
94
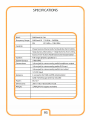
SPECIFICATIONS
Вата:
CAB band Ill FA
Frequency Range:
DAB band ll 174 MHz — 240MHz
FM 87,5 MHz — 108,0 MHz
© Controls;
Power button, Volume knob, Tuning knob, Alarm button,
Sleep button, Info button, 1-5 digit buttons, Auto tuning
button, Enter button, Mode button and Snooze button
Speaker:
Full range dynamic speaker (37)
System Output:
5 Watt RMS
Connections:
3.5mm jack for stereo analog audio headphone output
3.5mm Jack for stereo analog audio AUX input
3.5mm jack far stereo analog audio Line output
12 \ De input
Antenna:
F-connector for DAB and FM antenna input
DAB / FM telescope antenna included
Power:
DC 12 Y
Dimensions:
209 x 118 x 145mm {Wx Hx D)
Weight:
2,40Kg (Power supply and radio!
L ES Lobo 130
a дно 222.05
еее
СОРОК
DESIGN AND ENGINEERING
THE OBJECTIVE OF EVERY TANGENT PRODUCT
IS THAT FUNDAMENTALLY CORRECT
DESIGN CAN PRODUCE A PRODUCT
CAPABLE OF ACHIEVING EXCELLENT
PERFORMANCE AND AFFORDABILITY.
www.tangent-audio.com
Xx
item No: 40258