1
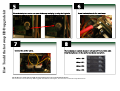
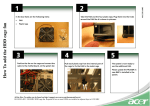
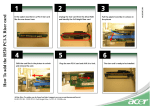
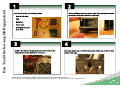
2
In the box there are the following items:
•
Sata to SAS cable
•
FAN
•
Backplane
•
Plastic taps
•
Management cable
(not used)
3
Position the fan on the cage and connect the cable to the
motherboard, on the system fan connector.
Take the FAN and the four plastic taps. Plug them into the holes
around the FAN like it is shown in pictures:
4
Push each plastic tap from the internal part of the cage to fix the FAN
to the metal cage
All the How To guides can be found on http://support.acer-euro.com/documents/howto/
SO.G33SA.002 - G330 Hot Swap HDD upgrade kit. Additional backplane, fan and cables to add Hot Swap HDD feature
46.G33SA.A02
How To add the hot swap HDD upgrade kit
1
How To add the hot swap HDD upgrade kit
Place the backplane on the rear part of the cage and plug it, using the big holes.
7
Connect the power cables.
Screw the backplane to the metal cage
8
The backplane is ready to be used. Just connect the red data cable
from the backplane to the motherboard sata connectors.
HD bay 1 (P0)
HD bay 2 (P1)
HD bay 3 (P2)
HD bay 4 (P3)
All the How To guides can be found on http://support.acer-euro.com/documents/howto/
SO.G33SA.002 - G330 Hot Swap HDD upgrade kit. Additional backplane, fan and cables to add Hot Swap HDD feature
46.G33SA.A02
6
5