1
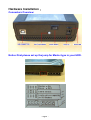
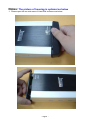
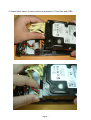
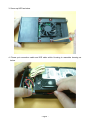
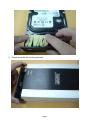
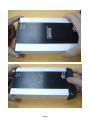
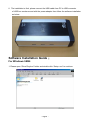
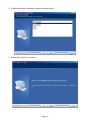
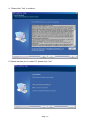
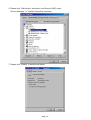
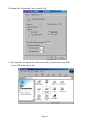
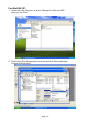
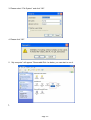
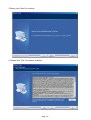
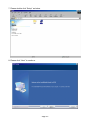
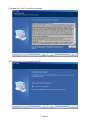
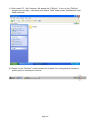
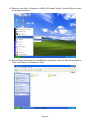
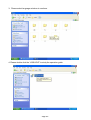
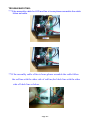
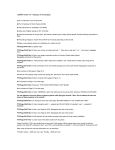
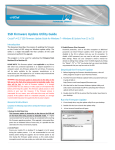
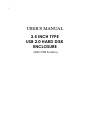
`
USER’S MANUAL
3.5 INCH TYPE
USB 2.0 HARD DISK
ENCLOSURE
(With OTB function)
Index
Page
Introduction……………………………………………………………………………
Features and Specification…………………………………………………………..
Requirements……………………..….……………………………………………….
Package contents…………………..……………….……………………………….
Hardware Installation…..….…………………………………………………………
Software Installation…...…………….……………….………………………………
2
2
2
2
3
9
- Page 1 -
Introduction:
Thanks a lot for you buy the product,it provides an easy way to add more storage space
and portable function for your PC.
Features and Specification:
▲
▲
▲
▲
▲
▲
Interface standard: USB Revsion:2.0
USB connector/cable: One USB B type connector and One USB A to B Cable
Data transfer rate: USB2.0 High Speed up to 480Mbps
Ideal for backup , storage Data files, OTB function
Truly Plug and Play automatic system configuration .
Windows device drivers automatic installation.
Requirements:
IBM or Compatible PC / Apple iMac.G4
USB 2.0 Host or USB 2.0 HUB .
Windows 2000, Windows XP, Windows ME or Windows 98SE operating system
/Mac OS 10.2 or above.
Packing contents:
Item
3.5 Inch HDD Box Enclosure
USB A to B Cable
Screw Sets
Power Adapter
CD Driver (With Manual)
- Page 2 -
Hardware Installation:
Connectors Overview:
Notice:First,please set up the jump for Master type in your HDD.
- Page 3 -
Notes: The picture of housing is optional as below
1. Please open the two side case of Hard Disk enclosure as below.
- Page 4 -
2. Please follow aspect of cable as below to assemble 3.5”Hard Disk and PCBA.
- Page 5 -
3. Screw up HDD as below.
4. Please put connection cable and IDE cable within Housing to assemble housing as
below.
- Page 6 -
5. Please assemble the housing as below.
- Page 7 -
- Page 8 -
6. The installation is final ,please connect the USB cable from PC to USB connector
of HDD box enclosure and with the power adapter then follow the software installation
as below.
Software Installation Guide:
For Windows 98SE:
1. Please open “DriverTrayIcon” folder and double click “Setup. exe” to continue.
- Page 9 -
2. Please select the Language to setup driver as below.
3. Please click “Next” to continue.
- Page 10 -
4. Please click “Yes” to continue.
5. System will ask you to restart PC, please click “Yes”.
- Page 11 -
6. Please click “Disk drivers” and select your Brand of HDD under
“Device Manager ” in “System Properties” as below.
7. Please click “Setting” to continue as below.
- Page 12 -
8. Please click “Removable” type and click “OK”.
9. “My computer” will appear the “Removable Disk”, please format your HDD
if your HDD is be used at first.
- Page 13 -
For Windows ME:
1. Please install the driver as below then please enter “Device Manager”and click “USB
controllers” to continue.
2. Please double click “USB Mass Storage Device” then click “Update Driver”.
3. Please select “Display a list of all better drivers in a specific location, so you can select
the driver you want.” as below to continue.
- Page 14 -
4. Please search the driver as the path C:\Windows to continue .
5. Please click “Finish” or research driver again.
6. Restart your PC .Now , you can start to install program for “AutoBackup ”function
as page18.
- Page 15 -
For Win2000 /XP :
1. Please click “My Computer” and click “Manage”for initial your HDD
when you use it first.
2. Please click “Disk Management” and enter and click “Removable Disk”
to format HDD as below.
- Page 16 -
3. Please select “File System” and click “OK”.
4. Please click “OK”.
5. “My computer” will appear “Removable Disk “as below, you can start to use it.
\
- Page 17 -
AUTOBACKUP FUNCTION INSTALLATION:(Only For Microsoft OS)
Notice: *Please link HDD box to your PC before install backup
application program .
*One touch button function will be used only for main
partition portable HDD.
1. Please double click “FileSync” to install the auto backup function as below or enter that
path as CD-ROM:\OEM\FileSync\HELP.txt for your language to study installation guide.
2. Please double click “Setup” to continue.
- Page 18 -
3.Please click “Next” to continue.
4. Please click “Yes” to continue as below.
- Page 19 -
5. Please click “Finish” as below.
6. Please double click “Gpio” to continue install program for auto backup.
- Page 20 -
7. Please double click “Setup” as below.
8. Please click “Next” to continue.
- Page 21 -
9. Please click “Yes” to continue as below.
10. Please click “Yes” to restart your PC.
- Page 22 -
11. After restart PC, “My Computer “will appear the “FileSync”, if you run the “FileSync”
program as next step , it will save your data to “Data” folder under “AutoBackup” main
folder as below.
12. Please run the “FileSync” under function bar as below for running backup function or
please jump to next step to continue.
- Page 23 -
13. Please run the Start
Programs
the program as below.
USB_HD
Load FileSync
LoadFileSync to open
14. That HDD box will appear the “AutoBackup” main folder, and your data will be saved to
“Data” sub folder of “AutoBackup” folder.
- Page 24 -
15. System will appear the “ FileSync “ block tool view as below, please select your HDD
location and backup your data to portable HDD box now.
- Page 25 -
16. Now, you can start to draggle your data to that right block as below.
(The data path is Portable HDD:\AutoBackup\Data.)
17. When you re-plug out and re-plug in HDD box, you can touch the “AutoBackup button”
to backup your data automatically, the datas will be saved to HDD:\AutoBackup\Data
folder as below.
- Page 26 -
18. Program will ask you to select the File copy mode as below, please select you want to
run item as below.
19. If you want to use the “Set backup time” to auto backup your data by duty cycle, please
set it as below.
- Page 27 -
About Help Operation Guide:
1. Please double click “FileSync” under your HDD icon.
2. Please double click “Help”.
- Page 28 -
3. Please select language as below to continue.
4. Please double click the “USB HELP” to study the operation guide.
- Page 29 -
TROUBLESHOOTING :
****If the assembly cable for LED and fan is loose,please assemble the cable
follow as below.
** If the assembly cable of fan is loose,please assemble the cable follow
the red line with the other side of red line,the black line with the other
side of black line as below.
- Page 30 -
****Please restart your PC and reinstall application program
If you run fail .
****If your O.S is WinME , please update the original driver to new correct
driver as Page 14 for running OTB function.
- Page 31 -