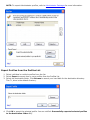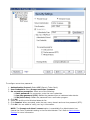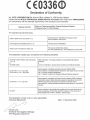
1
Intel(R) PRO/Wireless 3945ABG Network
Connection User Guide
With your wireless network card, you can access wireless networks, share files or printers,
or even share your Internet connection. All of these features can be explored with a wireless
network in your home or office. This wireless local area network (WLAN) solution is designed
for both home and business use. Additional users and features can be added as your
networking needs grow and change.
Your Intel(R) PRO/Wireless 3945ABG Network Connection adapter is compatible with
802.11a, 802.11b and 802.11g wireless standards. Operating at 5 GHz or 2.4 GHz frequency
at speeds of up to 54 Mbps you can now connect your computer to existing high-speed
networks that use multiple access points within large or small environments. Your wireless
adapter maintains automatic data rate control according to access point location to achieve
the fastest possible connection. All of your wireless network connections are easily managed
by Intel(R) PROSet/Wireless software. Profiles that are set up through the Intel PROSet/
Wireless software provide enhanced security measures with 802.1x network authentication.
NOTE: The software is compatible with the Intel(R) PRO/Wireless 3945BG
Network Connection, Intel(R) PRO/Wireless 2915ABG Network Connection and
the Intel(R) PRO/Wireless 2200BG Network Connection.
Table of Contents
●
●
●
●
●
●
●
●
●
●
●
●
●
●
Use Intel PROSet/Wireless Software
Connect to a Network
Use Profiles
Set up Security
Troubleshooting
Administrator Tool
Glossary
Wireless Network Overview
Security Overview
Specifications
Customer Support
Safety and Regulatory Information
Warranty
Adapter Registration
Information in this document is subject to change without notice.
© 2004–2005 Intel Corporation. All rights reserved. Intel Corporation, 5200 N.E.
Elam Young Parkway, Hillsboro, OR 97124-6497 USA
The copying or reproducing of any material in this document in any manner whatsoever
without the written permission of Intel Corporation is strictly forbidden. Intel(R) is a
trademark or registered trademark of Intel Corporation or its subsidiaries in the United
States and other countries. Other trademarks and trade names may be used in this
document to refer to either the entities claiming the marks and names or their products.
Intel disclaims any proprietary interest in trademarks and trade names other than its own.
Microsoft and Windows are registered trademarks of Microsoft Corporation.
*Other names and brands may be claimed as the property of others.
Intel Corporation assumes no responsibility for errors or omissions in this document. Nor
does Intel make any commitment to update the information contained herein.
"Important Notice FOR ALL USERS OR DISTRIBUTORS!!!!
Intel wireless LAN adapters are engineered, manufactured, tested, and quality checked to
ensure that they meet all necessary local and governmental regulatory agency requirements
for the regions that they are designated and/or marked to ship into. Since wireless LANs are
generally unlicensed devices that share spectrum with radars, satellites, and other licensed
and unlicensed devices, it is sometimes necessary to dynamically detect, avoid, and limit
usage to avoid interference with these devices. In many instances Intel is required to
provide test data to prove regional and local compliance to regional and governmental
regulations before certification or approval to use the product is granted. Intel's wireless
LAN's EEPROM, firmware, and software driver are designed to carefully control parameters
that affect radio operation and to ensure electromagnetic compliance (EMC). These
parameters include, without limitation, RF power, spectrum usage, channel scanning, and
human exposure.
For these reasons Intel cannot permit any manipulation by third parties of the software
provided in binary format with the wireless WLAN adapters (e.g., the EEPROM and
firmware). Furthermore, if you use any patches, utilities, or code with the Intel wireless LAN
adapters that have been manipulated by an unauthorized party (i.e., patches, utilities, or
code (including open source code modifications) which have not been validated by Intel), (i)
you will be solely responsible for ensuring the regulatory compliance of the products, (ii)
Intel will bear no liability, under any theory of liability for any issues associated with the
modified products, including without limitation, claims under the warranty and/or issues
arising from regulatory non-compliance, and (iii) Intel will not provide or be required to
assist in providing support to any third parties for such modified products.
Note: Many regulatory agencies consider Wireless LAN adapters to be "modules", and
accordingly, condition system-level regulatory approval upon receipt and review of test data
documenting that the antennas and system configuration do not cause the EMC and radio
operation to be non-compliant."
November 2005
Back to Contents
Use Intel(R) PROSet/Wireless Software: Intel(R) PRO/Wireless
3945ABG Network Connection User Guide
●
●
●
●
●
●
●
●
●
●
Use Intel PROSet/Wireless as your Wireless Manager
Start Intel PROSet/Wireless
Start Intel PROSet/Wireless from the Taskbar
❍
Taskbar Icons
❍
Tool Tips and Desktop Alerts
Intel PROSet/Wireless Main Window
❍
Wireless Networks List
❍
Connection Status Icons
❍
Network Properties
❍
Connection Details
❍
Profiles List
Intel PROSet/Wireless Menus
Tools Menu
❍
Application Settings
❍
Intel Wireless Troubleshooter
❍
Administrator Tool
Advanced Menu
❍
Adapter Settings
❍
Advanced Statistics
❍
Use Windows to Manage Wi-Fi
Profiles Menu
❍
Manage Profiles
❍
Manage Exclusions
Enable and Disable the Radio
Install and Uninstall the Software
Use Intel PROSet/Wireless as your Wireless Manager
Intel(R) PROSet/Wireless is used to setup, edit and manage network profiles to connect to a network. It also includes
advanced settings such as power management and channel selection for setting up ad-hoc networks.
If you use Microsoft(R) Windows(R) XP Wireless Zero Configuration as your wireless manager, you can disable it from the
Microsoft Windows Wireless Network tab.
To disable Microsoft Windows XP Wireless Zero Configuration as your wireless manager:
1.
2.
3.
4.
5.
6.
7.
Click Start > Settings > Control Panel.
Double-click Network Connections.
Right-click Wireless Network Connection.
Click Properties.
Click Wireless Networks.
Verify that the Use Windows to configure my wireless network settings is not selected. If it is, clear it.
Click OK. This confirms that the Intel PROSet/Wireless utility is configured to manage your network profiles.
NOTE: Check that the Application Settings option Notify when another application uses the wireless
adapter is selected. This option prompts you when Microsoft Windows XP Wireless Zero Configuration starts
to manage your network profiles.
Start Intel PROSet/Wireless
To start Intel PROSet/Wireless use one of the following methods:
●
●
●
Click Start > Programs > Intel PROSet Wireless > Intel PROSet Wireless.
Right-click the Taskbar icon
located in the lower right corner of your Windows Desktop to open the Taskbar
menu. Click Open Intel PROSet/Wireless.
Double-click the Taskbar icon to open Intel PROSet/Wireless.
Exit Intel PROSet/Wireless:
To close Intel PROSet/Wireless from the main window use one of the following:
●
●
●
Select File > Exit from the main window.
Click Close.
Click the Close button (X) at the top right corner of the window.
Start Intel PROSet/Wireless from the Taskbar
To start Intel(R) PROSet/Wireless, double-click the Taskbar icon
located in the lower right corner of your Windows
desktop or right-click the Taskbar icon and click Open Intel PROSet/Wireless.
Taskbar Menu Options
The Intel PROSet/Wireless icon displays on the Taskbar located in the lower right corner of your Windows desktop. Rightclick the status icon to display the menu options.
Menu Item
Comments
Open Intel PROSet/Wireless
Click to start Intel PROSet/Wireless when Intel PROSet/Wireless is
your wireless manager. If you select Use Windows to manage WiFi from the Taskbar menu, the menu option changes to Open
Wireless Zero Configuration and Microsoft Windows XP Wireless
Zero Configuration Service is used as your wireless manager. When
you use Microsoft Windows, you cannot use your Intel profiles.
Open Wireless Zero Configuration
Wireless On
If you have Intel PROSet/Wireless installed, the current state of the
radio displays in the Intel PROSet/Wireless main window and on the
Taskbar. Select Wireless On to turn the radio on. Select Wireless
Off to turn the radio off.
If your computer has an external switch installed, use it to switch the
Wireless Off
radio on or off. Refer to your computer manufacturer's
documentation for more information about this switch.
802.11a Radio Off
This option is available only for wireless adapters that support
802.11a, 802.11b, and 802.11g. Select to turn off the 802.11a radio.
NOTE: This setting is unavailable unless it is set in the Administrator
Tool or if your adapter is an Intel(R) PRO/Wireless 2200BG Network
Connection.
Open Intel Wireless Troubleshooter
Opens an application that can assist you to resolve wireless network
connection issues. When a connection issue is detected, a desktop
alert appears at the bottom right corner of your desktop. See Intel
Wireless Troubleshooter for more information.
Connect to Profile
Displays the current profiles in the Profile list. Used also to connect to
a profile.
Use Windows to manage Wi-Fi
Toggles between the Intel PROSet/Wireless and Microsoft Windows
XP Wireless Zero Configuration Service. When you use Microsoft
Windows, you cannot use your Intel profiles.
Use Intel PROSet/Wireless to manage WiFi
Taskbar Icons
The Taskbar icon provides visual indication of the current wireless connection state. The connection status icon is located
on the lower right corner of your Windows desktop. The Taskbar icon can be set to display or be hidden in the Tools
Menu Application Settings.
Icon
Description
Wireless Off: The wireless adapter is off. The wireless device does not
transmit or receive while it is off. Click Wireless On to enable the
adapter. The icon is white and static.
Searching for wireless networks: The wireless adapter searches for
any available wireless networks. The icon is white with animation.
No wireless networks found: There are no available wireless networks
found. Intel PROSet/Wireless periodically scans for available networks. If
you want to force a scan, double-click the icon to launch Intel PROSet/
Wireless and click Refresh. The icon is red.
Wireless network found: An available wireless network is found. Doubleclick the icon to display the Wireless Networks list. Select the network.
Click Connect. The icon is yellow.
Authentication failed: Unable to authenticate with wireless network. The
icon is green with a yellow warning triangle.
Connecting to a wireless network: Flashes while an IP address is being
obtained or an error occurs.
Connected to a wireless network: Connected to a wireless network. A
Tool Tip displays network name, speed, signal quality and IP address. The
icon is green with waves that reflect signal quality. The more waves, the
better the signal quality.
Tool Tips and Desktop Alerts
The Tool Tips and Desktop Alerts provide feedback and interaction. To display Tool Tips, move your mouse pointer over
the icon. Desktop alerts are displayed when your wireless network changes state. For example, if you are out of range of
any wireless networks, a desktop alert is displayed when you come into range.
Select Show Information Notifications in the Application Settings to enable desktop alerts.
Tool Tips
Tool tips display when the mouse pointer rolls over the icon. The tool tips display text for each of the connection states.
Desktop Alerts
When user action is required, a desktop alert displays. If you click the alert, then an appropriate action is taken. For
example when wireless networks are found, the following alert displays:
Action: Click the desktop alert to connect to network in the Wireless Networks list.
Once connected, the alert displays the wireless network that you are connected to, the speed of the connection, signal
quality and IP address.
Desktop alerts are also used to indicate if there is a connection problem. Click the alert to open the Intel Wireless
Troubleshooter.
Intel PROSet/Wireless Main Window
The Intel PROSet/Wireless Main Window allows you to:
●
●
●
●
●
●
●
View the current connection status (signal quality, speed and current network name).
Scan for available wireless networks.
Manage profiles.
Auto-connect profiles to available networks in a specific order defined in the Profile list.
Connect to Infrastructure and Device to Device (ad hoc) networks.
Configure adapter settings.
Troubleshoot wireless connection problems.
Use the Intel PROSet/Wireless to:
●
●
●
●
●
●
View the current connection status (signal quality, speed and current network name).
Scan for available wireless networks.
Manage profiles.
Auto-connect profiles to available networks in a specific order defined in the Profiles list.
Connect to infrastructure and ad hoc networks.
Configure adapter power settings.
Connection Status Icons
The Intel PROSet/Wireless main window displays connection status icons which indicate the current connection status of
your wireless adapter. The Taskbar icon also indicates the current connection status. Refer to Taskbar Icons for more
information.
Main Window Connection Status Description
The icons are used to designate connection status.
Icon
Description
Wireless Off: The radio is not associated to a network. Click the Wireless On button to enable
the radio.
Indicates connection problems including authentication failures.
Searching for wireless networks: The wireless adapter is scanning for any available wireless
networks.
Animated Icons:
No wireless networks found: The adapter does not find any wireless networks.
Wireless network found: An available wireless network is found. You can choose to connect to
available networks displayed in the Wireless Networks list.
Connecting to a wireless network. You are connecting to a wireless network. The crescent
shaped curves switch between green and white until an IP Address is obtained or a connection
error occurs.
Connected to a wireless network: You are connected to a wireless network. The network name,
speed, signal quality, and IP address display the current connection status. Click the Details button
to display details of the current network connection.
Network Name
Network Name (SSID): This is the name of the network that the adapter is connected to. The
Network Name SSID must be the same as the SSID of the access point.
Signal Quality
The signal quality icon bars indicate the quality of the transmit and receive signals between your
wireless adapter and the nearest access point or computer in Device to Device (ad hoc) mode. The
number of vertical green bars indicates the strength of the transmit and receive signals.
The signal quality ranges from excellent to out of range. The following factors affect signal quality:
●
●
●
Properties
Signal quality decreases with distance and is affected by metal and concrete barriers.
Metal objects can reflect signals and cause interference.
Other electrical devices can cause interference.
Provides adapter connection status information. See Properties Button for information.
Wireless On (Off) Switch the radio off and on. Refer to Turn Wireless On or Off for more information.
Help?
Provides help information for this page.
Close
Closes the Intel PROSet/Wireless main window.
Wireless Networks
The Wireless Networks list displays a list of wireless networks within range of the adapter.
Name
Description
The signal strength of the wireless network access point or computer (Device to Device
[ad hoc] mode). The signal strength icon bars indicate that the wireless network or
computer is available for connection but is still not is associated with an access point or
computer (Device to Device [ad hoc] mode).
Network Name
Network Name (SSID): The name of the network that the adapter is connected to.
The Network Name SSID must be the same as the SSID of the access point.
Status
Notification that the adapter is connecting to the wireless network. Once connected, the
status is changed to Connected.
Profiles: Identifies a network in the Wireless Networks list that is connected and has a
profile in the profiles list.
The wireless network uses Network (infrastructure) mode.
The wireless network uses Device to Device (ad hoc) mode.
The wireless network uses Security encryption.
The band frequency being used by the wireless network (802.11a, 802.11b, 802.11g).
The wireless network is on the exclusion list or the profile is configured for manual
connection.
Connect (Disconnect)
Click to connect to a wireless network. Once connected, the button changes to
Disconnect.
Properties
Provides detailed information about the connected network and its access points. See
Network Properties for information.
Refresh
Refreshes the list of available networks. If any new networks are available within the
adapter range, the list is updated to show the new network name.
Wireless On (Wireless Off) Switch the radio off and on. Refer to Wireless Off (On) for more information.
Close
Closes the Intel PROSet/Wireless main window.
Help?
Provides help information for this page.
Network Properties
Click the Properties button on the Intel PROSet/Wireless main window to display the security settings for the wireless
adapter. You can also add profiles to be excluded from automatic connection. If network exclusion is enabled (see
Application Settings) then the Network Properties also indicates if the network is excluded from automatic connection.
Network Properties details
Name
Description
Network Name
Displays the wireless network name.
Band
Current band and frequency being used. Displays Out of Range if no band
and frequency is displayed.
The following bands are listed:
●
●
●
Operation Mode
802.11a
802.11b
802.11g
Displays the current operating mode:
●
Network (Infrastructure)
A wireless network centered around an access point. In this
environment, the access point not only provides communication
with the wired network, but also mediates wireless network
traffic in the immediate neighborhood.
●
Device to Device (ad hoc)
A communication configuration in which every computer has the
same capabilities, and any computer can initiate a
communication session. Also known as a peer-to-peer network
or a computer-to-computer network.
Authentication Level
Displays the current authentication security mode for the profile being used.
The following network authentication levels are listed:
●
●
●
●
●
●
●
Open
Shared
WPA-Enterprise
WPA2-Enterprise
WPA-Personal
WPA2-Personal
Unknown
Displays the 802.11 authentication used by the currently used profile. Refer
to Security Settings for more information.
Data Encryption
The following Data Encryption settings are listed:
●
●
●
●
●
None
WEP
TKIP
CKIP
AES-CCMP
Refer to Security Settings for more information.
Access Points in this Network (0-50)
●
●
●
●
Signal Strength: The Signal strength icon bars indicate the strength
of the transmit and receive signals between your wireless adapter and
the nearest access point.
Displays one of the following icons:
. Indicates the band being
used (802.11a, 802.11b, or 802.11g).
Channel: Displays the current transmit and receive channel being
used for a particular wireless network.
BSSID (Infrastructure operating mode): Displays the twelve-digit
MAC address of the access point of the selected network.
Manage Exclusions
Refer to Manage Exclusions for more information.
Close
Closes the Network Properties.
Help?
Provides help information for this page.
Connection Details
When you are connected to a network, you can click the Details button on the Intel PROSet/Wireless main window to
display the Connection Details.
Connection Details Description
Name
Description
Profile Name
Name of the profile.
Network Name
Network Name (SSID) of the current connection.
IP Address
Internet Protocol (IP) address for the current connection.
Signal Quality
A radio frequency (RF) signal can be assessed by two components:
●
●
signal strength (quantity)
signal quality
The quality of the signal is determined by a combination of factors. Primarily it is composed of
signal strength and the ratio of the RF noise present. RF noise occurs both naturally and
artificially by electrical equipment. If the amount of the RF noise is high, or the signal strength
is low, it results in a lower signal to noise ratio which causes poorer signal quality. With a low
signal to noise ratio, it is difficult for the radio receiver to discern the data information
contained in the signal from the noise itself.
Signal Strength
The signal strength for all received packets. The more green bars displayed, the stronger the
signal.
Adapter MAC
Address
Media Access Control (MAC) address for the wireless adapter.
Band
Indicates the wireless band of the current connection.
●
●
●
Supported Data
Rates
Rates at which the wireless adapter can send and receive data. Displays the speed in Mbps for
the frequency being used.
●
●
●
Radio Frequency
802.11a
802.11b
802.11g
802.11g: 1, 2, 5.5, 6, 9, 11, 12, 18, 24, 36, 48, and 54
802.11b: 1, 2, 5.5, and 11
802.11a: 6, 9, 12, 18, 24, 36, 48, and 54
Displays the frequency of the current wireless connection.
●
●
802.11a: 5.15 GHz to 5.85 GHz
802.11b/g: 2.400 GHz to 2.4835 GHz (dependent on country)
Channel Number
Displays the transmit and receive channel.
Network
Authentication
Displays Open, Shared, WPA-Personal and WPA2-Personal modes, WPA-Enterprise, and WPA2Enterprise. Displays the 802.11 authentication used by the currently used profile. Refer to
Security Overview for more information.
Data Encryption
Displays None, WEP, TKIP or AES-CCMP. Refer to Security Overview for more information.
802.1x
Authentication Type
Displays None, MD5, EAP-SIM, TLS, TTLS, PEAP, LEAP, or EAP-FAST. Refer to Security
Ovewrview for more information.
802.1x
Authentication
Protocol
Displays None, PAP, MD5, GTC, CHAP, MS-CHAP, MS-CHAP-V2 or TLS. Refer to Security
Overview for more information.
CCX Version
Version of the Cisco Compatible Extensions on this wireless connection.
Current TX Power
Cisco Compatible Extensions Power Levels.
Supported Power
Levels
1.0, 5.0, 20.0, 31.6, 50.1 mW
Access Point MAC
Address
The Media Access Control (MAC) address for the associated access point.
Mandatory Access
Point
Displays None, if not enabled. If enabled, from the Mandatory Access Point setting, the access
point MAC address is displayed. This option directs the wireless adapter to connect to an
access point that uses a specific MAC address (48-bit 12 hexadecimal digits, for example,
00:06:25:0E:9D:84).
Repair
Renews the IP Address. If you have trouble accessing the network, verify if the IP address is
valid. If it is 0.0.0.0 or 169.x.x.x, then it is probably not valid. If your network is setup for
automatic network address assignment, then click Repair and request a new IP address.
Close
Closes the page.
Help?
Provides help information for this page.
Profile Management
The Profiles List displays the current user profiles in the order that they are to be applied. Use the up and down arrows to
arrange profiles in a specific order to automatically connect to a wireless network.
Use the Connect button to connect to a wireless network. Once connected, a profile is created in the Profiles list. You
can also add, edit, and remove profiles from the Profiles 'list.
Different profiles can be configured for each wireless network. Profile settings can include, the network name (SSID),
operating mode, and security settings. See Profile Management for more information.
Profiles list
Name
Description
Profile Name
Network settings that allow your wireless adapter to connect to a network access
point (infrastructure mode) or computer (Device to Device [ad hoc]) mode which
does not use an access point. Refer to Set up Profiles for more information.
Network Name
Name of the wireless network (SSID) or computer.
Connection Icons: The network profile status icons indicate the different connection states of the adapter with a
wireless network, the type of operating mode being used, and whether network security is being used.
Blue circle: The wireless adapter is associated with an access point or computer
(Device to Device [ad hoc] mode). If a profile has 802.1x security enabled, this
indicates that the wireless adapter is associated and authenticated.
Indicates infrastructure mode.
Indicates Device to Device (ad hoc) mode.
Indicates an Administrator profile.
The wireless network uses Security encryption.
Arrows
Position profiles in a preferred order for auto-connection.
●
●
Up-arrow: Move the position of a selected profile up in the Profiles list.
Down-arrow: Move the position of a selected profile down in the Profiles list.
Connect
Connect the selected profile for the wireless network.
Add
Use the Profile Wizard to create a new profile. Refer to Create a New Profile for more
information.
Remove
Removes a selected profile from the Profile list. Refer to Delete a Profile for more
information.
Properties
Used to edit the contents of an existing profile. You can also double-click a profile in
the Profile list to edit the profile. Refer to Edit an Existing Profile for more information.
Export/Import: Imports and exports user-based profiles to and from the Profile list.
Wireless profiles can be automatically imported into the Profile list. See Import and
Export Profiles for more information.
Close
Closes the profile management window.
Intel PROSet/Wireless Menus
Use the File, Tools, Advanced, Profiles and Help menus to configure your network settings.
Name
Description
File
Exit: Close the Intel PROSet/Wireless main window.
Use one of these options to start the Intel PROSet/Wireless Software:
●
●
●
Tools
Click Start > Programs > Intel PROSet Wireless > Intel PROSet Wireless.
Right-click the Taskbar icon located in the lower right corner of your Windows
Desktop, and click Open Intel PROSet/Wireless.
Double-click the Taskbar icon to open Intel PROSet/Wireless.
Application Settings: Use to set system wide connection preferences. Refer to
Application Settings for information. Use Ctrl+P from your keyboard as an alternative
to access this feature.
Intel Wireless Troubleshooter: Use to resolve wireless network connection
problems. Use Ctrl+W from your keyboard as an alternative to access this feature.
Refer to Intel Wireless Troubleshooter for more information.
Administrator Tool: Used by administrators or the person who has administrator
privileges on this computer to configure shared profiles (Pre-logon, Persistent and
Voice over IP (VoIP)). Refer to Administrator Tool for more information. Use Ctrl+T
from your keyboard as an alternative to access this feature.
NOTE: The Administrator Tool is available only if it installed during a custom
installation of the Intel PROSet/Wireless software. Refer to Install or Uninstall the
Software for more information on custom installation.
Advanced
Adapter Settings: Displays Adapter Settings which correlates to the settings in the
Microsoft Windows Advanced settings. Refer to Adapter Settings for information. Use
Ctrl+A from your keyboard as an alternative to access this feature.
To access Adapter Settings from Microsoft Windows:
●
●
●
●
Select Network Connections from the Windows Control Panel
Right-click the Wireless Network Connection.
Select Properties from the menu.
Click Configure to display the Advanced settings for the adapter.
Advanced Statistics: Select to determine how the adapter communicates with an
access point. Use Ctrl+S from your keyboard as an alternative to access this feature.
Refer to Advanced Statistics for more information.
Use Windows to manage Wi-Fi: Select to enable Microsoft Windows XP Wireless
Zero Configuration as the wireless manager. Use F10 from your keyboard as an
alternative to access this feature. Refer to Switch to Microsoft Windows XP Wireless
Zero Configuration for more information.
Profiles
Manage Profiles: Select to create or edit profiles. Use Ctrl+R from your keyboard as
an alternative to access this feature.
Manage Exclusions: Select to exclude networks from automatic connection. Refer to
Manage Exclusions for more information. Use Ctrl+M from your keyboard as an
alternative to access this feature.
Help
Intel PROSet/Wireless Help: Starts the online help. Use F1 from your keyboard as
an alternative to access this feature.
To navigate the help window:
●
●
●
●
Press F6 to toggle between the left and right pane. Use the up and down arrow
as an alternative on your keyboard to move up and down within the pane.
To view information, click Contents in the left-side pane or use Alt+C on your
keyboard as an alternative to access this feature.
Double-click on a book icon to open a Contents' topic. Use the up and down
arrows to select a topic and press Enter as an alternative to open the subtopics.
Click Index or Search to look for a specific term. Use Alt+S on your keyboard
as an alternative to access the Search feature.
About: Displays version information for the currently installed application components.
Application Settings (Tools menu)
The settings on this page control the behavior of the Intel PROSet/Wireless software.
Application Settings Description
Name
Description
Adapter
Lists the network adapter that are currently available. It may be either an Intel(R) PRO/
Wireless 3945ABG Network Connection, an Intel(R) PRO/Wireless 3945BG Network
Connection, an Intel(R) PRO/Wireless 2915ABG Network Connection or, an Intel(R) PRO/
Wireless 2200BG Network Connection.
Advanced Settings: The following settings control how Intel PROSet/Wireless behaves and displays information.
Taskbar
Show application icon on the taskbar: Select to display the Taskbar status icon. This icon
resides on the Windows Taskbar (Notification Area). This icon provides the status of your
wireless connection. Clear to not display the Taskbar status icon.
The Taskbar Status Icon provides several functions:
●
●
●
Notifications
Visual feedback for the connection state and wireless activity of your wireless network.
The icon changes color and animation for different wireless activity. See Taskbar Icons
for more information.
Menu: A menu is displayed when you right click the icon. From this menu you perform
tasks such as turn on or off the radio or launch the Intel PROSet/Wireless application.
See Taskbar Menu Options for more information.
Tool tips and desktop alerts. See:Tool Tips and Desktop Alerts for more information.
Show Alert Notifications: Select to display desktop alerts next to the taskbar icon. When
your action is required, a message displays. Only events of high importance trigger a
desktop alert. If the desktop alert is selected, then the appropriate action is taken. Clear to
not display desktop alerts. Refer to Tool Tips and Desktop Alerts for more information.
Select one of the following options:
Information Notifications: These desktop alerts are of lower importance. They do not
require your interaction but can greatly improve the wireless experience.
●
●
Show Information Notifications: Selected by default. All informational desktop
alerts are displayed next to the taskbar status icon. These desktop alerts improve your
wireless experience with notifications when available wireless networks are in range.
They also inform you when a wireless connection has been made or has been lost.
Refer to Tool Tip and Desktop Alerts for more information.
Show a list of available networks in the area when not connected: When Show
Information Notifications is cleared, you can select this item. When the desktop
alerts are disabled, this option allows you to continue to be notified of available
networks when the wireless adapter is not connected.
Notify when another application uses the wireless adapter: When selected, a message
is displayed when other applications are trying to manage your wireless adapter. This is
helpful if you use software provided by a hotspot location (coffee shop, airport terminal). To
take advantage of the Intel PROSet/Wireless features, disable this software when you leave
the hotspot.
Enable TLS rejected certificates notification: Select if you want a warning issued when a
PEAP-TLS certificate is rejected by the authentication server. See Enterprise Security and Set
up the Client for TLS authentication for more information.
Auto Connect
Connect to available network using profiles only: (Default) Connect the wireless
adapter to an available network with a matching profile from the Profiles List. If no matching
profile is found, you are notified (see Notifications). The wireless device remains
disconnected until a matching profile is found or you configure a new matching profile.
Connect to any available network if no matching profile found: Select to connect to a
network automatically if you have not configured a profile and are at a location that has an
open, unsecured wireless network. NOTE: Open networks have no security. You would need
to provide your own security for this wireless connection. One way to secure an open
wireless connection is with Virtual Private Networking (VPN) software.
Connect to any network based on profiles only (Cisco mode): Select to try every
profile in preferred order. This signifies that you are in the vicinity of an access point which
has more than one SSID but only advertises one.
Manage Exclusions
Enable automatic exclude list feature: Select to enable the automatic exclude list
feature. This feature provides a way to exclude access points from automatic connection.
Refer to Manage Exclusions for more information.
Enable manual exclude list feature: Select to enable the manual exclude list feature. This
feature provides a way to exclude networks from automatic connection. Refer to Manage
Exclusions for more information.
Wireless Networks
List
Show column sort headers: Select to display the column names in the Wireless Networks
list. Click on a column header to sort the column in either ascending or descending order.
OK
Save settings and return to the previous page.
Cancel
Closes and cancels changes.
Help?
Provides help information for this page.
Intel Wireless Troubleshooter (Tools menu)
Intel Wireless Troubleshooter is an application that can help you resolve wireless network connection issues. When a
connection issue is detected, a desktop alert appears at the bottom right corner of your desktop. Once you click the
desktop alert, a diagnostic message displays the recommended steps to resolve the connection problem. For example, if
a connection problem occurred because of an invalid password, the Profile Wizard application is launched when you click
a displayed hyperlink. You can also launch Wireless Event Viewer and enable or disable alert notifications. The Intel
Wireless Troubleshooter is supported under Microsoft Windows XP and Microsoft Windows 2000
The Intel Wireless Troubleshooter page contains two panes. Use your left mouse button on the left pane to display a list
of available tools. The right pane displays the current connection issue in a section. Each section has two parts: the error
message and the recommended action. The recommended action contains descriptions about available utilities and helps
to resolve the associated connection issue. If you click a help link, the help text is displayed in a window. If you click the
associated issue resolution link, a program is launched to resolve the connection issue.
Refer to the Troubleshooting section for information on resolving errors.
Name
Description
File
Exit: Exits Intel Wireless Troubleshooter application.
Help
Intel(R) Wireless Troubleshooter Help: Displays online help on the Intel Wireless
Troubleshooter.
About: Displays version information for the Intel Wireless Troubleshooter.
Wireless Event Viewer Launches Wireless Event Viewer.
Disable Notification
Select to disable the alert notifications.
Enable Notification
Select to enable the alert notifications.
Available Help
Date Time error message:
●
●
●
Description of error.
Link to resolve error (if available). See Resolve Errors for more information.
Link to recommended steps to resolve error.
Administrator Tool (Tools menu)
The Administrator tool is for administrators or the person who has administrator privileges on this computer. This tool
allows the administrator to restrict what level of control the users of this computer have over their wireless connections.
This tool is used also to configure common (shared) profiles.
Users cannot modify Administrator settings or profiles unless they have the password for this tool. A password should be
chosen that is secure and not easily guessed.
You can export these settings and profiles as one package to other computers on your network. For more information,
refer to the Administrator Tool section.
Name
Description
Application Settings
An administrator can select which level of control that users have over their wireless
network connections. Refer to Administrator Tool Application Settings.
Administrator Profiles
Enable or disable Persistent, Pre-Logon and Voice over IP (VoIP) profiles on the computer.
Refer to Administrator Tool Profiles.
Adapter Settings
An administrator can select which level of control that users have over their wireless
network connections. Refer to Administrator Tool Adapter Settings.
Software
Select which of the Intel PROSet/Wireless applications are installed on a user's computers.
Refer to Administrator Tool Software.
Administrator
Packages
The Administrator Packages are used to save administrative profiles and other settings. You
can copy or send this self-extracting executable to clients on your network. When it is run,
the contents are installed and configured on the destination computer. Refer to
Administrator Tool Packages.
Change Password
Change the password for the Administrator Tool. See Change Password for more
information.
Close
Closes the page.
Help?
Provides help information for this page.
Adapter Settings (Advanced menu)
The Adapter Settings displays the device properties for the wireless adapter installed on your computer. It may be either
an Intel(R) PRO/Wireless 3945ABG Network Connection, an Intel(R) PRO/Wireless 2915ABG Network Connection or, an
Intel(R) PRO/Wireless 2200BG Network Connection.
Adapter Settings Description
Name
Description
Ad Hoc Channel
Unless the other computers in the ad hoc network use a different channel from the
default channel, there is no need to change the channel.
Value: Select the allowed operating channel from the list.
●
●
802.11b/g: Select this option when 802.11b and 802.11g (2.4 GHz) ad hoc
band frequency is used.
802.11a: Select this option when 802.11a (5 GHz) ad hoc band frequency is
used.
Ad Hoc Power Management Set power saving features for Device to Device (ad hoc) networks.
●
●
●
Disable: Select when connecting to ad hoc networks that contain stations that do
not support ad hoc power management
Maximum Power Savings: Select to optimize battery life.
Noisy Environment: Select to optimize performance or connecting with multiple
clients.
NOTE: This setting is unavailable if the adapter is an Intel PRO/Wireless 3945BG
Network Connection, an Intel PRO/Wireless 2915ABG Network Connection, or an Intel
PRO/Wireless 2200BG Network Connection.
Ad Hoc QoS Mode
Quality of Service (QoS) control in ad hoc networks. QoS provides prioritization of
traffic from the access point over a wireless LAN based on traffic classification. WMM
(Wifi MultiMedia) is the QoS certification of the Wi-Fi Alliance (WFA). When WMM is
enabled, the adapter uses WMM to support priority tagging and queuing capabilities for
Wi-Fi networks.
●
●
WMM Enabled.(Default)
WMM Disabled
NOTE: This setting is unavailable if the adapter is an Intel PRO/Wireless 3945BG
Network Connection, Intel PRO/Wireless 2915ABG Network Connection or an Intel PRO/
Wireless 2200BG Network Connection.
Mixed mode protection
Use to avoid data collisions in a mixed 802.11b and 802.11g environment. Request to
Send/Clear to Send (RTS/CTS) should be used in an environment where clients may not
hear each other. CTS-to-self can be used to gain more throughput in an environment
where clients are in close proximity and can hear each other.
Preamble Mode
Changes the preamble length setting received by the access point during an initial
connection. Always use a long preamble length to connect to an access point. Auto Tx
Preamble allows automatic preamble detection. If supported, short preamble should be
used. If not, use long preamble (Long Tx Preamble).
NOTE: This setting is unavailable if the adapter is an Intel PRO/Wireless 3945ABG
Network Connection.
Preferred Band
Select the operating band. The selections are:
●
●
●
802.11g
802.11a
802.11b
NOTE: This setting is unavailable if the adapter is an Intel PRO/Wireless 3945ABG
Network Connection or Intel PRO/Wireless 2200BG Network Connection.
Roaming Aggressiveness
This setting allows you to define how aggressively your wireless client roams to improve
connection to an access point.
●
●
Throughput Enhancement
Changes the value of the Packet Burst Control.
●
●
Transmit Power
Default: Balanced setting between not roaming and performance.
Lowest: Your wireless client will not roam. Only significant link quality
degradation causes it to roam to another access point.
Enable: Select to enable throughput enhancement.
Disable: (Default) Select to disable throughput enhancement.
Default Setting: Highest power setting
Lowest Minimum Coverage: Set the adapter to a lowest transmit power. Enable you
to expand the number of coverage areas or confine a coverage area. Reduce the
coverage area in high traffic areas to improve overall transmission quality and avoid
congestion and interference with other devices.
Highest Maximum Coverage: Set the adapter to a maximum transmit power level.
Select for maximum performance and range in environments with limited additional
radio devices.
NOTE: The optimal setting is for a user to always set the transmit power at the lowest
possible level still compatible with the quality of their communication. This allows the
maximum number of wireless devices to operate in dense areas and reduce interference
with other devices that this radio shares radio spectrum with.
NOTE: This setting takes effect when either Infrastructure or Ad hoc mode is used.
Wireless Mode
Select which band to use for connection to a wireless network:
●
●
●
●
●
●
802.11a only: Connect the wireless adapter to 802.11a networks only
802.11b only: Connect the wireless adapter to 802.11b networks only
802.11g only: Connect the wireless adapter to 802.11g networks only.
802.11a and 802.11g only: Connect the wireless adapter to 802.11a and
802.11g networks only.
802.11b and 802.11g only: Connect the wireless adapter to 802.11b and
802.11g networks only
802.11a, 802.11b, and 802.11g: (Default) - Connect to either 802.11a,
802.11b or 802.11g wireless networks.
NOTE: These wireless modes (Modulation type) determine the discovered access points
displayed in the Wireless Networks list.
OK
Saves settings and returns to the previous page.
Cancel
Closes and cancels any changes.
Advanced Statistics (Advanced menu)
Provides current adapter connection information. The following describes information for the Advanced Statistics page.
Name
Description
Statistics
Advanced Statistics: This information pertains to how the adapter communicates with
an access point.
Association: If the adapter finds an access point to communicate with, the value is in
range. Otherwise, the value is out of range.
●
●
●
●
●
AP MAC Address: The twelve digit MAC address (00:40:96:31:1C:05) of
the AP.
Number of associations: The number of times the access point has found
the adapter.
AP count: The number of available access points within range of the wireless
adapter.
Number of full scans: The number of times the adapter has scanned all
channels for receiving information.
Number of partial scans: The number of scans that have been terminated.
Roaming: This information contains counters that are related to reasons for the adapter
roaming. Roaming occurs when an adapter communicates with one access point and then
communicates with another for better signal strength.
●
●
●
●
●
Roaming Count: The number of times that roaming occurred.
AP did not transmit: The adapter did not receive radio transmission from
the access point. You may need to reset the access point.
Poor beacon quality: The signal quality is too low to sustain communication
with the access point. You have moved the adapter outside the coverage
area of the access point or the access point's device address information has
been changed.
AP load balancing: The access point ended its association with the adapter
based on the access point's inability to maintain communication with all its
associated adapters. Too many adapters are trying to communicate with one
access point.
AP RSSI too low: The Receive Signal Strength Indicator (RSSI) is too low to
maintain an association with the adapter. You may have moved outside the
coverage area of the access point or the access point could have increased
●
●
its data rate.
Poor channel quality: The quality of the channel is low and caused the
adapter to look for another access point.
AP dropped mobile unit: The access point dropped a computer from the
list of recognizable mobile devices. The computer must re-associate with an
access point.
Miscellaneous: Use this information to determine if an association with a different
access point increases performance and helps maintain the highest possible data rate.
●
●
●
●
Transmit/Receive (Tx/
Rx) Statistics
Received Beacons: Number beacons received by the adapter.
Percent missed Beacons: Percent value for missed beacons.
Percent transmit errors: The percentage of data transmissions that had
errors.
Signal Strength: Signal strength of the access point that the adapter
communicates with displayed in decibels (dBm).
Displays percent values for non-directed and directed packets.
Total host packets: The sum total number of directed and non-directed packets counts.
●
●
Transmit - (Mbps)
Receive - (Mbps)
Non-directed packets: The number of received packets broadcast to the wireless
network.
Directed packets: The number of received packets sent specifically to the wireless
adapter.
Total Bytes: The total number of bytes for packets received and sent by the wireless
adapter.
Reset Statistics
Resets the adapter statistical counters back to zero and begins taking new data
measurements.
Close
Closes and returns to the main window.
Help?
Provides help information for this page.
Use Windows to Manage Wi-Fi (Advanced menu)
The Microsoft Windows XP Wireless Zero Configuration feature provides a built-in wireless configuration utility. This
feature can be enabled and disabled within Intel PROSet/Wireless. Click Use Windows to manage Wi-Fi on the
Advanced menu or the Taskbar menu. If Windows XP Wireless Zero Configuration is enabled, the features in Intel(R)
PROSet/Wireless are disabled.
Manage Exclusions (Profiles menu)
Exclude List Management is available when you either select Manage Exclusions from the Profiles menu or click the
Properties button on the Wireless Networks list.
IMPORTANT: You are not automatically connected to a network or an access point that is in this list.
Use Exclude List Management to exclude entire wireless networks (SSID). For networks with more then one access point,
you may exclude an individual wireless access point (BSSID).
Name
Description
Exclude List Management
●
●
●
●
●
Network Name: Name (SSID) of the wireless network.
Radio: Displays the band if there is a DHCP error.
MAC Address: The Ethernet MAC address of the device.
Reason: Explains why this entry was excluded from automatic connection.
Details: Provides specific information on how the access point was excluded and
how to remove it from exclusion.
This network has been excluded from automatic connection for the following
reasons.
-User has excluded this network manually.
To make this network (or access points) eligible for automatic connection
again, select it and click the Remove button.
Note:
- The Reset button removes all entries except rogue access points from the list.
- Rogue access points are removed from the list when a connection is made to
this access point using valid credentials.
- All excluded access points in a network (other than rogue) are removed from
the list when a profile for that network is applied manually
NOTE: Entries that are dimmed are excluded rouge access points. A rogue access point is
any access point unsanctioned by network administrators. These entries cannot be
removed from the list.
Add
Add a network name (SSID) to the list.
Remove
Remove an entry from the list.
1. Select the entry from the list.
2. Click Remove.
3. You are asked: Do you want to remove the selected item from the Exclude
List?
4. Click Yes to remove the profile from the list.
Reset list
Removes all of the networks and access points from the Exclude List.
Close
Closes page and saves settings.
Help?
Provides help information for this page.
Enable or Disable the Radio
To switch the wireless radio on or off, use one of the following:
●
●
●
The optional hardware radio switch on your computer
Intel PROSet/Wireless software
Microsoft Windows
NOTE: When your computer is switched on, the radio is constantly transmitting signals. In certain
situations, as in an airplane, signals from the radio may cause interference. Use the following methods if you
need to disable the radio and use your notebook without emitting radio signals.
Use the Optional Computer Radio On or Off Switch
If your computer has an external switch installed, use it to switch the radio on or off. Refer to the computer
manufacturer for more information about this switch. If you have Intel PROSet/Wireless installed, the current state of the
radio displays in the Intel PROSet/Wireless main window and on the Taskbar.
Use Intel PROSet/Wireless to Switch the Radio On or Off
From Intel PROSet/Wireless, the radio can be switched on or off. The status icon on Intel PROSet/Wireless displays the
current state of the radio.
From the Intel PROSet/Wireless main Window, click Wireless On or Wireless Off to toggle the radio on or off.
Switch the Radio On or Off from the Taskbar Icon
To switch the radio off or on, click the Taskbar icon and select Wireless On or Wireless Off.
How to use the Device Manager to Disable the Radio
The radio can be disabled (made non-functional) from the Microsoft Windows Device Manager.
NOTE: If you disabled the radio from Microsoft Windows, then you must use Microsoft Windows to turn the
radio on. You cannot use a hardware switch or Intel PROSet/Wireless to enable the radio again.
Microsoft Windows XP
1.
2.
3.
4.
5.
6.
7.
8.
From your desktop, right-click My Computer
Click Properties.
Click Hardware.
Click Device Manager.
Double-click Network adapters.
Right-click the installed wireless adapter.
Choose Disable from the menu.
Click OK.
Install and Uninstall the Software
A Typical install includes the Wireless LAN adapter driver, the Intel PROSet/Wireless software, Intel(R) Smart Wireless
Solutions, and the Intel Wireless Troubleshooter.
The follow features are installed during a Custom installation:
●
●
●
The Administrator Tool
Wireless Management Instrumentation (WMI) Support
Single Sign On Pre-Logon Connect to establish a wireless connection prior to user logon to Windows
To install these features, select Custom during installation. Follow the instructions below to install these features. If Intel
PROSet/Wireless is already installed, see the post-installation instructions.
NOTE: If you plan to use Novell(R) Client(TM) for Windows, it should be installed prior to installation of the
Intel PROSet/Wireless software. If Intel PROSet/Wireless is already installed, you should remove it prior to
installation of Novell Client for Windows.
To install the software:
1.
2.
3.
4.
5.
6.
7.
Insert the Installation CD in your CD drive.
Click Install Software on the Intel PROSet/Wireless Installer screen.
Read the license agreement.
Select I accept the terms in the license agreement.
Click Next.
Click Custom.
Select from the list of features to install:
Intel PROSet/Wireless: The Intel PROSet Wireless application software.
●
●
Install: Click Intel PROSet Wireless. Select Install this feature and all subfeatures. Proceed to
step 8.
Not install: Click This feature will not be available. A red x displays next to the option indicates
that it is not to be installed.
Intel Smart Wireless Solutions: Provides an easy configuration wizard for connection to a wireless router.
●
●
Install: Click Intel Smart Wireless Solutions. Select Install this feature and all subfeatures.
Proceed to step 8.
Not Install: Select This feature will not be available. A red x displays next to the option indicates
that it is not to be installed.
Intel Wireless Troubleshooter: Helps you resolve wireless connection issues.
●
Install: Click Intel Wireless Troubleshooter. Select Install this feature and all subfeatures. Click
Next and proceed to step 8.
●
Not Install: Select This feature will not be available. A red x displays next to the option indicates that it
is not to be installed.
WMI Support: Wireless Management Instrumentation functionality allows administrators who do not have
Intel PROSet/Wireless installed to manage remotely clients that do have Intel PROSet/Wireless installed.
●
●
Install: Click WMI Support. Select Install this feature and all subfeatures. Proceed to step 8.
Not install: Click This feature will not be available. A red x displays next to the option indicates
that it is not be installed.
Administrator Toolkit: Installs the Administrator Tool to the Tools menu. This tool is used to configure
common (shared) profiles. The Administrator Tool is also used by an Information Technology department to
enable or disable features within the Intel PROSet/Wireless software.
●
●
Install: Click Administrator Toolkit . Select Install this feature and all subfeatures. Click Next
and proceed to step 8.
Not Install: Select This feature will not be available. A red x displays next to the option indicates
that it is not to be installed.
Single Sign On: Installs the Single Sign On features.This tool is used to configure common (shared) profiles
with the Administrator Tool.
The Fast User Switching and the Microsoft Windows XP Welcome Screen are disabled when Single Sign On
support is installed.
Single Sign On is targeted to the enterprise environment where users logon to their computer with a user
name, password and typically a domain. Fast User Switching does not support domain log on.
NOTE: Windows Fast User Switching is enabled by default if you use Microsoft Windows XP
Home Edition. It is targeted for the home user; Fast User Switching is also available on
Microsoft Windows XP Professional if you install it on a stand alone or workgroup-connected
computer. If a computer running Microsoft Windows XP Professional is added to a domain, then
Fast User Switching option is not available.
Pre-Logon Connect: A Pre-Logon profile is active once a user logs onto the computer.
●
●
Install: Click Single Sign On. Select Install this feature and all subfeatures. Click Next and
proceed to step 8.
Not Install: Select This feature will not be available. A red x displays next to the option indicates
that it is not to be installed.
8. Click Install. The installed components are listed after the software is installed on your computer.
9. Click OK.
NOTE: When Pre-Logon Connect is installed, you are asked to reboot after installation of the software.
Add Post-Installation Features
If Intel PROSet/Wireless is already installed, follow the instructions below to add the Administrator Tool, Intel Smart
Wireless Solutions, Wireless Management Instrumentation functionality and Pre-Logon Connect:
1.
2.
3.
4.
5.
6.
7.
Click
Click
Click
Click
Click
Click
Click
list.
8. Click
Start > Control Panel > Add or Remove Programs > Intel PROSet/Wireless Software.
Change/Remove.
Modify.
Next.
the red X next to any of the feaures that are not currently installed.
Install this feature and any selected subfeatures.
Modify. After installation, the feature is listed as Installed on the Intel PROSet/Wireless Installer feature
OK.
Uninstall Intel PROSet/Wireless Software
To uninstall Intel PROSet/Wireless:
1.
2.
3.
4.
5.
6.
Click Start > Settings > Control Panel > Add or Remove Programs.
Click Intel PROSet/Wireless Software.
Click Change/Remove.
Click Remove.
Click Next.
You are asked what you would like to do with your current profiles and settings:
You have chosen to completely remove the Intel PROSet/Wireless software.
Select what to do with your current profiles and settings.
●
●
●
Do not save my profiles and settings. Select to completely remove all of your current profiles and
settings. If you reinstall the software, the profiles and settings are no longer available.
Save my profiles and settings in the current format (Intel PROSet/Wireless 10.x). Select to
save your current profiles and settings. If you reinstall the software, your current profiles and settings
are available.
Convert and save my profiles and settings in Intel PROSet/Wireless 9.x format. If you need
to revert to a previous version of Intel PROSet/Wireless software, select to save your settings. After
you have reinstalled the software, your current profiles and settings are available. NOTE: Only
settings applicable to the prior version of the software are available.
6. Make a selection and click OK.
7. Click Yes to restart your computer.
Back to Top
Back to Contents
Trademarks and Disclaimers
Back to Contents
Connect to a Network: Intel(R) PRO/Wireless
3945ABG Network Connection User Guide
●
●
●
Connect to a wireless network
First Time Connection
Other Wireless Managers
Connect to a wireless network
You can connect to a wireless network with one of the following methods.
●
●
●
●
Automatic Connection: If an existing profile matches an available network, you are
automatically connected to that wireless network.
Configure a new profile: Select a wireless network from the list of wireless
networks in the Intel PROSet/Wireless main window. Click Connect. If you
successfully connect, a profile is created in the Profiles list for future use.
Connect to a profile in the Profiles list: You can select a profile from the Profiles
list. To activate it, click Profiles on the Intel(R) PROSet/Wireless main window. Select
the profile in the Profiles list. Click Connect. This allows you to connect to a network
that is lower in the list (if it is available).
Right-click the Taskbar icon located in the lower right corner of your Windows
Desktop. Right click Connect to Profiles. A list of previously configured profiles is
listed. Select a profile.
First Time Connection
Intel PROSet/Wireless automatically detects wireless networks that are within range of your
wireless adapter. When a network is found, a desktop alert notification displays: Wireless
networks found. See Taskbar Icons for more information.
1. Double-click the desktop alert to open the Intel PROSet/Wireless main window.
2. Select a network from the wireless networks list.
3. Click Connect. If the network does not require security authentication, a desktop
alert notifies you that you are connected to the network. Refer to Intel PROSet/
Wireless Main Window and Taskbar for more information about the taskbar menu and
icons.
If you need to add security authentication:
1. The Profile Wizard opens and guides you through the configuration process.
2. Specify a Profile Name. The Profile Name is your name for this network. It can be
anything that helps you identify this network. For example, My Home Network, Coffee
Shop on A Street.
3. Click Next. The Profile Wizard then attempts to detect the network settings of this
network.
4. Continue through the Profile Wizard until completion. Refer to Profile Management and
Security Settings for more information.
5. Click OK to connect to the wireless network.
If you ignore the Wireless networks found desktop alert, Intel PROSet/Wireless displays a
message that prompts: Do you want to connect to a wireless network? Click Yes. The
Intel PROSet/Wireless main window opens. Follow the instructions above to connect to a
wireless network.
In addition to the Taskbar icon, Intel PROSet/Wireless also displays connection status and
available networks. Refer to Intel PROSet/Wireless Main Window for more information.
Other Wireless Managers
If the Intel PROSet/Wireless detects another software application trying to communicate
with the wireless device, you are notified of this behavior.
Microsoft Windows XP Wireless Zero Configuration
To switch from Intel PROSet/Wireless to the Microsoft Windows XP Wireless Zero
Configuration, use either of the following methods:
●
From the Taskbar Menu:
Click Use Windows to manage Wi-Fi to switch to Microsoft Windows XP Wireless Zero
Configuration. Select this option to disable Intel PROSet/Wireless as your current wireless
manager. You can then configure Microsoft Windows XP as your wireless manager.
NOTE: Any wireless profiles created in Intel PROSet/Wireless are not visible in
Microsoft Windows XP Wireless Zero Configuration. If you want to use your Intel
wireless profiles you need to select Use Intel PROSet/Wireless to manage
Wi-Fi from the Taskbar menu.
●
From Intel PROSet/Wireless:
From, the Advanced menu, click Use Windows to manage Wi-Fi in the Intel PROSet/
Wireless application. When you are finished using the Microsoft Windows XP Wireless Zero
Configuration, you can switch back to Intel PROSet/Wireless. Click Enable Intel PROSet/
Wireless on the Intel PROSet/Wireless main window.
To enable Intel PROSet/Wireless as your wireless manager, click Use Intel PROSet/
Wireless to manage Wi-Fi from the Taskbar menu.
Third Party Wireless Software
If you use software provided by a hotspot location (coffee shop, airport terminal), Intel
PROSet/Wireless notifies you and then disables itself. It cannot manage the wireless device
when another wireless manager communicates with the wireless device. To take advantage
of the Intel PROSet/Wireless features, you want to disable or remove this software when you
leave the hotspot.
Back to Top
Back to Contents
Trademarks and Disclaimers
Back to Contents
Profile Management: Intel(R) PRO/Wireless 3945ABG
Network Connection User Guide
●
●
●
●
●
●
●
●
●
What is a Profile?
Profiles List
Profiles List icons
Connect to a Profile
Create a New Profile
Edit an Existing Profile
Remove a Profile
Set a Profile Password
Export and Import Profiles
What is a Profile?
A profile is a saved group of network settings. Profiles are displayed in the Profile List. Profiles are useful
when moving from one wireless network to another. Different profiles can be configured for each wireless
network. Profile settings include the network name (SSID), operating mode, and security settings.
A profile is created when you connect to a wireless network.
1. Select a network from the Wireless Networks list.
2. Click Connect.
3. If the wireless network requires a WEP password or encryption key, enter the password. To change
the security options, click Advanced to open the Profile Wizard Security Settings.
4. Click OK to connect. A profile is created and added to the Profiles list.
The Profile Management Wizard guides you through the settings required to connect with the wireless
network. At completion, the profile is saved and added to the Profiles list. Since these wireless settings are
saved, the next time you are in range of this wireless network you are automatically connected.
Profiles List
The profile list displays a list of existing profiles. When you come in range of a wireless network, Intel
PROSet/Wireless scans the Profile List to see if there is a match. If a match is found, you are automatically
connected to the network.
Profile List Priority Arrows
●
●
Use the up-arrow to move the position of a selected profile up in the profiles list.
Use the down-arrow to move the position of a selected profile down in the profiles list.
Profiles List Icons
The network profile status icons indicate if the adapter is associated with a network, the type of operating
mode being used, and if security encryption is enabled. These icons display next to the profile name in the
profile list.
Name
Description
Profile Name
Profiles are network settings that allow your wireless adapter to connect to
a network access point (Infrastructure mode) or computer (device-todevice [Ad hoc] mode) which does not use an access point.
Network Name
Name of the wireless network (SSID) or computer.
Connection Icons - The network profile status icons indicate the different connection states of the
adapter with a wireless network, the type of operating mode being used, and if network security is being
used.
Blue circle: The wireless adapter is associated with an access point or
computer (Ad hoc mode). If a profile has 802.1x security enabled, this
indicates that the wireless adapter is associated and authenticated.
Indicates Network (Infrastructure) mode.
Indicates Device to Device (ad hoc) mode.
Indicates an Administrator profile.
The wireless network uses Security encryption.
Arrows
Use the arrows to position profiles in a preferred order for auto-connection.
●
●
Up-arrow: Move the position of a selected profile up in the profile
list.
Down-arrow: Move the position of a selected profile down in the
profile list.
Connect
Connect the selected profile for the wireless network.
Add
Create a new profile using the Profile Wizard. Refer to Create a New Profile
for more information.
Remove
Remove a selected profile from the Profile List. Refer to Remove a Profile
for more information.
Properties
Edit the contents of an existing profile. You can also double-click a profile in
the Profile List to edit the profile. Refer to Edit an Existing Profile for more
information.
Export/Import: Import and export user-based profiles to and from the
Profiles list. Wireless profiles can be automatically imported into the
Profiles list. See Import and Export Profiles for more information.
Close
Closes the profile management window.
Connect to a Profile
When you are in range of a wireless network that has a matching profile you are automatically connected
to that network. If a network with a lower priority profile is also in range you can force the connection to
that lower profile. This is achieved from Intel PROSet/Wireless or from the Taskbar icon.
Manually connect to a profile from Intel PROSet/Wireless
1.
2.
3.
4.
Double-click the Taskbar icon to open the Intel PROSet/Wireless main window.
Click Profiles to open the Profiles list.
Select the profile from the Profile list.
Click Connect. Remember that the connection is only made if the wireless network is in range.
Manually connect to a profile from the Taskbar
1.
2.
3.
4.
Right-click the Intel PROSet/Wireless connection Taskbar icon.
Click Connect to Profile.
Select a profile.
Click to start the connection.
Create a New Profile
Select a network from the Wireless Networks list. Click Connect. The Create Wireless Profile Wizard
guides you through the necessary steps to create a profile and connect to the network. During this process,
the Wizard attempts to detect the appropriate security settings for you.
To create a new profile and connect to a wireless network:
1. From the Intel PROSet/Wireless main window, click Profiles.
2. On the Profiles page, click Add to open the Profile Wizard General Settings.
3. Use the General Settings to add the Profile Name, Wireless Network Name, select the Operating
Mode, and access Advanced Settings.
General Settings Description
Name
Description
Profile Name
Name of the wireless network profile.
When you configure a wireless network that was selected from the
Wireless Networks list, the profile name is the same as the Wireless
Network Name (SSID). This name can be changed to be more
descriptive or customized for your personal use.
Examples: My Office Network, Bob’s Home Network, ABC Company
Network
Wireless Network Name (SSID) Name of the wireless network access point used by the wireless
adapter for connection. The SSID must match exactly the name of
the wireless access point. It is case sensitive.
When you configure a wireless network that was selected from the
Wireless Networks list, the SSID is taken from the wireless network
list. You cannot and should not change it.
Blank SSID: If the wireless adapter receives a blank network name
(SSID) from a stealth access point, <SSID not broadcast> is
displayed in the Wireless Networks list. Provide the actual SSID for
the access point. After connection both the blank SSID and the
associated SSID can be viewed in the available networks list.
Operating Mode
Network (Infrastructure): Connect to an access point. An
infrastructure network consists of one or more access points and one
or more computers with wireless adapters. This connection is the
type used in home networks, corporate networks, hotels, and other
areas that provide access to the network and/or the internet.
Device to Device (ad hoc): Connect directly to other computers in
an ad hoc wireless network. This type of connection is useful for
connections between two or more computers only. It does not
provide access to network resources or the internet.
Advanced
Click Advanced to access the Advanced Settings. The Advanced
Settings allows you to set auto-connect or auto-import options,
launch an application, set a profile password or specify a certain
access point address for adapter connection (Mandatory access
point). Refer to Advanced Settings for more information.
Next
Proceeds to the Security Settings page.
OK
Finishes creation of the new profile with the current settings.
Cancel
Closes the Profile Wizard and cancel any changes.
Help?
Provides help information for this page.
4. Click Advanced for the following options:
●
Auto-Connect: Select to automatically or manually connect to a profile.
●
Auto-Import this profile (for network administrators only).
●
Mandatory Access Point: Select to associate the wireless adapter with a specific access point.
●
Password Protection: Select to password protect a profile.
●
Start Application: Specify a program to be started when a wireless connection is made.
Advanced Settings Description
Name
Description
Auto Connect
Automatic (Default): Select to have Intel PROSet/Wireless automatically
connect to this profile when it is in range.
On Demand: Select to prevent automatic connection of a profile when
the network is in range. For example, if there is a cost for a wireless
connection and you did not want to connect automatically when in range.
To connect to the network:
1. Select the network from the Wireless Networks list
2. Click Connect.
Auto Import
Allows a network administrator to easily move the selected profile to other
computers. When the exported file is placed in the Wireless
\AutoImport directory on another computer, Intel PROSet/Wireless
automatically imports the profile.
Mandatory Access Point
Mandatory Access Point: Forces the wireless adapter to connect to an
access point that uses a specific MAC address. Type the MAC address of
the access point (BSSID); 48-bit 12 hexadecimal digits. For example,
00:06:25:0E:9D:84. This feature is not available when ad hoc operating
mode is used.
Clear: Clear current address.
Password Protection
Start Application
1. Password protect this profile (max. 10 characters): Select to
enable a password for the profile. The default setting is cleared for
no profile password.
2. Password: Enter a password. The entered password characters
display as asterisks.
3. Confirm New Password: Reenter the password.
Automatically starts a batch file, executable file, or script whenever you
connect to the profile. For example, start a Virtual Private Network (VPN)
session automatically whenever you connect to a wireless network.
1. Click Enable Start Application.
2. Enter the name of the program that you want to start or click
Browse to locate the file on your hard disk.
3. Click OK to close the Advanced Settings.
OK
Close and save the settings.
Cancel
Close and cancel any changes.
Help?
Help information for this page.
5. From the General Settings, click Next to open the Security Settings.
6. Select the Network Authentication and Data Encryption options. Enter the encryption key
settings and configure the 802.1x settings as required. Refer to Security Settings for more
information.
7. Click OK when you have completed the profile settings. The Profile Wizard ends and you are
returned to the Intel PROSet/Wireless main window. To change or verify the profile settings, click
Back.
8. If you are not currently connected to a network, Intel PROSet/Wireless detects that a new profile has
been added and automatically attempts to connect to this new profile.
9. If you want to manually connect to this profile, click Connect. The connection icon displays the
current connection status. The network name, transmit and receive speeds, and signal quality are
also displayed.
Edit an Existing Profile
To edit an existing profile:
1. Click Profiles on the Intel PROSet/Wireless main window.
2. Select the profile to edit in the Profiles list.
3. Click Properties to open the General Settings.
4. Click Next and Back to navigate through the General and Security Settings:
❍
General Settings. Refer to General Settings for more information.
❍
Security Settings. Refer to Security Settings for more information.
5. Click OK to save the current settings and exit. Click Cancel to exit without saving changes.
Remove a Profile
To remove a profile:
1. Click Profiles on the Intel PROSet/Wireless main window.
2. Select the profile from the list.
3. Click Remove. You are notified that Selected profiles will be permanently removed. Do you
want to continue?
4. Click Yes. The profile is removed from the Profiles list.
If you are still connected to the network:
1. Click Profiles on the Intel PROSet/Wireless main window.
2. Select the profile from the list.
3. Click Remove. You are notified that Selected profiles will be permanently removed. Do you
want to continue?
4. Click Yes. You are notified that <profile name> is active and will be permanently removed.
Do you want to continue?
5. Click Yes. The profile is removed from the Profiles list.
Set a Profile Password
To password protect an existing profile:
1.
2.
3.
4.
5.
6.
7.
8.
9.
10.
Click Profiles on the Intel PROSet/Wireless main window.
Select the profile from the list.
Click Properties to open the General Settings.
Click Advanced to open the the Advanced Settings.
Click Password Protection to open the Password Protection settings.
Click Password protect this profile (maximum 10 characters)
Password: Type the password
Confirm Password: Reenter the password.
Click OK to save the setting and return to the General Settings page.
Click OK to return to the Intel PROSet/Wireless main window.
Export or Import Profiles
Allows you to export and import user-based profiles to and from the Profiles list. Wireless profiles can be
automatically imported into the Profiles list.
NOTE: To export Administrator profiles, refer to Administrator Packages for more information.
Export Profiles from the Profiles List
1. Select individual or multiple profiles from the list.
2. Select Export to export one or more profiles from the Profiles list.
3. Select the destination folder. Click Browse to search your hard disk for the destination directory.
The C:\ drive is the default directory.
4. Click OK to export the selected profile. You are notified: Successfully exported selected profiles
to the destination folder: C:\.
To select multiple profiles:
1. Use your mouse to highlight a profile.
2. Press Ctrl.
3. Click each profile that you want selected. Follow the instructions from Step 2 above to export
multiple profiles.
Import Profiles into the Profiles List
To import profiles manually:
1.
2.
3.
4.
5.
6.
Click Import on the Profiles page.
Select the profile files to import.
Click Import.
You are notified that the profile has been successfully imported.
Click OK.
Click Close to return to the Intel PROSet/Wireless Main Window.
An administrator can set profiles to be imported automatically into the Profiles list. Intel PROSet/Wireless
monitors the import folder on your hard disk for new profile files. Only profiles that have been enabled
through Enable Auto-Import in the Advanced Settings are automatically imported. If a profile of the
same name already exists in the Profiles list, you are notified to either reject the imported profile or accept
it. If accepted, the existing profile is replaced.
All imported user-based profiles are placed at the bottom of the Profiles List.
Password Protected Profiles
Import and export password-protected user-based profiles automatically to remote systems. If a profile is
password protected, the assigned password must be entered before it can be edited. Refer to Set a Profile
Password for more information.
Back to Top
Back to Contents
Trademarks and Disclaimers
Back to Contents
Set Up Profile Security: Intel(R) PRO/Wireless 3945ABG
Network Connection User Guide
Use Intel(R) PROSet/Wireless Software
Personal Security
Personal Security Settings
Set up Data Encryption and Authentication
●
●
Configure
❍
Set
❍
Set
Configure
❍
Set
❍
Set
❍
Set
❍
Set
Profiles for Device to Device (Ad Hoc) Networks
up a Client with Open Authentication and No Data Encryption (None)
up a Client with WEP 64-bit or WEP 128-bit Data Encryption
Profiles for Infrastructure Networks
up a Client with No Data Encryption and No Network Authentication (None)
up a Client with WEP 64-bit or WEP 128-bit Data Encryption
up a Client with WPA-Personal (TKIP) or WPA2-Personal (TKIP) Security Settings
up a Client with WPA-Personal (AES-CCMP) or WPA2-Personal (AES-CCMP) Security Settings
Enterprise Security
Enterprise Security Settings
●
●
Configure Profiles for Device to Device (Ad Hoc) Networks
❍
Set up a Client with Open Network Authentication and No Data Encryption (None)
❍
Set up a Client with Open Network Authentication and WEP Data Encryption
Configure Profiles for Infrastructure Networks
❍
Network Authentication
■
Set up a Client with Shared Network Authentication
■
Set up a Client with WPA-Personal or WPA2 Personal Network Authentication
■
Set up a Client with WPA-Enterprise or WPA2-Enterprise Network Authentication
❍
802.1x Authentication Types
■
Set up a Client with MD5 Network Authentication
■
Set up a Client with WEP Data Encryption and EAP-SIM Network Authentication
■
Set up a Client with TLS Network Authentication
■
Set up a Client with TTLS Network Authentication
■
Set up a Client with PEAP Network Authentication
■
Set up a Client with LEAP Network Authentication
■
Set up a Client with EAP-FAST Network Authentication
Use Intel(R) PROSet/Wireless Software
The following sections describe how to use Intel(R) PROSet/Wireless to set up the required security settings for
your wireless adapter. Refer to Personal Security.
It also provides information about how to configure advanced security settings for your wireless adapter. This
requires information from a systems administrator (corporate environment) or advanced security settings on
your access point (for home users). Refer to Enterprise Security.
For general information about security settings, refer to Security Overview.
Personal Security
Use Personal Security if you are a home or small business user who can use a variety of simple security
procedures to protect your wireless connection. Select from the list of security settings that do not require
extensive infrastructure setup for your wireless network. A RADIUS or AAA server is not required.
●
●
●
●
●
●
Review the Set up Data Encryption and Authentication information to learn about the different security
types.
To add or change the required security settings, click Security Settings for information to set security for
the selected wireless network.
See Profile Management for a description of when to use the Profile Wizard.
See Security Overview for more information about the different security options for wireless networks.
If you want to verify the security settings, select a wireless network in the Wireless Networks list. Click
Details to review the operating mode, authentication level and data encryption.
See Enterprise Security to set 802.1x authentication security.
Personal Security Settings
Personal Security Settings Description
None WEP CKIP TKIP AES-CCMP
Name
Setting
Personal Security
Select to open the Personal Security settings. The security settings that are available
are dependent on the Operating Mode selected in the Profile Wizard: Device to Device
(ad hoc) or Network (Infrastructure).
Data Encryption
If you configure a profile for a Device to Device (ad hoc) network, select
●
●
None: No authentication required.
WEP-64 bit or WEP-128 bit: A network key or password is used for encryption.
If you configure an profile for an Infrastructure network, select:
●
●
●
●
None: No authentication required.
WEP-64 bit or WEP-128 bit: A network key or password is used for encryption.
WPA-Personal (TKIP) or WPA2-Personal (TKIP): WPA-Personal utilizes the
Temporal Key Integrity Protocol (TKIP) for data encryption.
WPA-Personal (AES-CCMP) or WPA2-Personal (AES-CCMP): WPA-Personal
utilizes a new method for privacy protection of wireless transmissions specified
in the IEEE 802.11i standard, AES-CCMP
Advanced
Select to access the Advanced Settings to configure the following options:
●
●
●
●
●
Auto-Connect: Select to automatically or manually connect to a profile.
Auto-Import this profile (for network administrators only).
Password Protection: Select to password protect a profile.
Mandatory Access Point: Select to associate the wireless adapter with a specific
access point.
Start application: Specify a program to be started when a wireless connection
is made.
Back
View the prior page in the Profile Wizard.
OK
Closes the Profile Wizard and saves the profile.
Cancel
Closes the Profile Wizard and cancels any changes made.
Help?
Provides the help information for the current page.
Set up Data Encryption and Authentication
In a home wireless network, you can use a variety of simple security procedures to protect your wireless
connection. These include:
●
●
●
Enable Wi-Fi Protected Access (WPA)
Change your password
Change the network name (SSID)
Wi-Fi Protected Access (WPA) encryption provides protection for your data on the network. WPA uses an
encryption key called a Pre-Shared Key (PSK) to encrypt data before transmission. Enter the same password in
all of the computers and access points in your home or small business network. Only devices that use the same
encryption key can access the network or decrypt the encrypted data transmitted by other computers. The
password automatically initiates the Temporal Key Integrity Protocol (TKIP) for the data encryption process.
Network Keys
WEP encryption provides two levels of security:
●
●
64-bit key (sometimes referred to as 40-bit)
128-bit key (also known as 104-bit)
For improved security, use a 128-bit key. If you use encryption, all wireless devices on your wireless network
must use the same encryption keys.
You can create the key yourself and specify the key length (64- or 128-bit) and key index (the location that a
specific key is stored). The greater the key length, the more secure the key.
Key Length: 64-bit
Pass phrase (64-bit): Enter five (5) alphanumeric characters, 0-9, a-z or A-Z.
Hex key (64-bit): Enter 10 hexadecimal characters, 0-9, A-F.
Key Length: 128-bit
Pass phrase (128-bit): Enter 13 alphanumeric characters, 0-9, a-z or A-Z.
Hex key (128-bit): Enter 26 hexadecimal characters, 0-9, A-F.
With 802.11, a wireless station can be configured with up to four keys (the key index values are 1, 2, 3, and 4).
When an access point or a wireless station transmits an encrypted message that uses a key stored in a specific
key index, the transmitted message indicates the key index that was used to encrypt the message body. The
receiving access point or wireless station can then retrieve the key that is stored at the key index and use it to
decode the encrypted message body.
Personal Security: Configure Profiles for Device to Device (Ad Hoc)
Networks
Set up a Client with Open Authentication and No Data Encryption (None)
In device to device mode, also called ad hoc mode, wireless computers send information directly to other wireless
computers. You can use ad hoc mode to network multiple computers in a home or small office, or to set up a
temporary wireless network for a meeting.
On the Intel(R) PROSet/Wireless main window, select one of the following methods to connect to a device to
device network:
●
●
●
Double-click a ad hoc network in the Wireless Networks list.
Select a network in the Wireless Networks list. Click Connect. The Intel PROSet/Wireless software
automatically detects the security settings for the wireless adapter.
Create a device to device (ad hoc) network profile as described below.
NOTE: Device to Device (ad hoc) networks are identified with a notebook image (
Wireless Networks and Profiles list.
) in the
To create a profile for a wireless network connection with no encryption:
1.
2.
3.
4.
5.
6.
7.
8.
Click Profiles on the Intel PROSet/Wireless main window.
On the Profile page, click Add to open the Create Wireless Profile General Settings.
Profile Name: Enter a descriptive profile name.
Wireless Network Name (SSID): Enter the network identifier.
Operating Mode: Click Device to Device (ad hoc).
Click Next.
Click Personal Security to open the Security Settings.
Data Encryption: The default setting is None, which indicates that there is no security on this wireless
network.
9. Click OK. The profile is added to the Profiles list and connects to the wireless network.
Set up a Client with WEP 64-bit or WEP 128-bit Data Encryption
When WEP data encryption is enabled, a network key or password is used for encryption.
You must enter the key and specify the length (64- or 128-bit) and key index (the location that a specific key is
stored). The more complex the key (mixed letters and numbers), the more secure the key.
To add a network key to a device to device network connection:
1. On the Intel PROSet/Wireless main window, double-click a Device to Device (ad hoc) network in the
Wireless Networks list or select the network and click Connect. When connected, a profile is added to the
Profiles list.
NOTE: Device to Device (ad hoc) networks are identified with a notebook image (
Wireless Networks and Profiles list.
) in the
2. Click Profiles to access the Profiles list. Select the network that you connected to in Step 1.
3. Click Properties to open the Wireless Profile Properties' General Settings. The Profile name and Wireless
Network Name (SSID) display. Device to Device (ad hoc) should be selected as the Operating Mode.
4. Click Next to access the Security Settings.
5. Click Personal Security.
6. Security Settings: The default setting is None, which indicates that there is no security on this wireless
network.
To add a password or network key:
1. Security Settings: Select either WEP 64-bit or WEP 128-bit to configure WEP data encryption with a
64- or 128-bit key.
When WEP encryption is enabled on a device, the WEP key is used to verify access to the network. If
the wireless device does not have the correct WEP key, even though authentication is successful, the
device is unable to transmit data.
2. Password: Enter the Wireless Security Password (Encryption Key).
❍
Pass phrase (64-bit): Enter five (5) alphanumeric characters, 0-9, a-z or A-Z.
❍
WEP key (64-bit): Enter 10 hexadecimal characters, 0-9, A-F.
❍
Pass phrase (128-bit): Enter 13 alphanumeric characters, 0-9, a-z or A-Z.
❍
WEP key (128-bit): Enter 26 hexadecimal characters, 0-9, A-F.
3. Key Index: Up to four passwords may be specified by changing the Key Index.
4. To add more than one password:
❍
Select the Key Index number: 1, 2, 3, or 4.
❍
Enter the Wireless Security Password.
❍
Select another Key Index number.
❍
Enter another Wireless Security Password.
5. Click OK to return to the Profiles list.
Personal Security: Configure Profiles for Infrastructure Networks
An infrastructure network consists of one or more access points and one or more computers with wireless
adapters installed. Each access point must have a wired connection to a wireless network. For home users, this is
usually a broadband or cable network.
Set up a Client with No (None) Data Encryption
On the Intel(R) PROSet/Wireless main window, select one of the following methods to connect to an
Infrastructure network:
●
●
Double-click an Infrastructure network in the Wireless Networks list
Select an Infrastructure network in the Wireless Networks list. Click Connect. The Intel PROSet/Wireless
software automatically detects the security settings for the wireless adapter.
NOTE: Infrastructure networks are identified with an access point image (
Profiles list.
) in the Wireless Networks and
Set up a Client with WEP 64-bit or WEP 128-bit Data Encryption
When WEP data encryption is enabled, a network key or password is used for encryption.
A network key is provided for you automatically (for example, it might be provided by your wireless network
adapter manufacturer), or you can enter it yourself and specify the key length (64- or 128-bit), key format
(ASCII characters or hexadecimal digits), and key index (the location where a specific key is stored). The greater
the key length, the more secure the key.
To add a network key for an Infrastructure network connection:
1. On the Intel PROSet/Wireless main window, double-click an Infrastructure network in the Wireless
Networks list or select the network and click Connect.
NOTE: Infrastructure networks are identified with an access point image (
Networks and Profiles list.
) in the Wireless
2. Click Profiles to access the Profiles list.
3. Click Properties to open the Wireless Profile Properties' General Settings. The Profile name and Wireless
Network Name (SSID) display. Network (Infrastructure) should be selected as the Operating Mode.
4. Click Next to access the Security Settings.
5. Security Settings: The default setting is None, which indicates that there is no security on this wireless
network.
To add a password or network key:
1. Security Settings: Select either WEP 64-bit or WEP 128-bit to configure WEP data encryption with a
64- or 128-bit key.
When WEP encryption is enabled on an access point, the WEP key is used to verify access to the
network. If the wireless device does not have the correct WEP key, even though authentication is
successful, the device is unable to transmit data through the access point or decrypt data received
from the access point.
2. Password: Enter the Wireless Security Password (Pass phrase) or Encryption Key (WEP key).
❍
Pass phrase (64-bit): Enter five (5) alphanumeric characters, 0-9, a-z or A-Z.
❍
WEP key (64-bit): Enter 10 hexadecimal characters, 0-9, A-F.
❍
Pass phrase (128-bit): Enter 13 alphanumeric characters, 0-9, a-z or A-Z.
❍
WEP key (128-bit): Enter 26 hexadecimal characters, 0-9, A- F.
3. Key Index: Change the Key Index to set up to four passwords.
To add more than one password:
Select the Key Index number: 1, 2, 3, or 4.
Enter the Wireless Security Password.
●
Select another Key Index number.
●
Enter another Wireless Security Password.
4. Click OK to return to the Profiles list.
●
●
Set up a Client with WPA-Personal (TKIP) or WPA2-Personal (TKIP) Security Settings
WPA Personal Mode requires manual configuration of a pre-shared key (PSK) on the access point and clients. This
PSK authenticates users a password or identifying code, on both the client station and the access point. An
authentication server is not needed. WPA Personal Mode is targeted to home and small business environments.
WPA2 is the second generation of WPA security that provides enterprise and consumer wireless users with a high
level of assurance that only authorized users can access their wireless networks. WPA2 provides a stronger
encryption mechanism through Advanced Encryption Standard (AES), which is a requirement for some corporate
and government users.
To configure a profile with WPA-Personal network authentication and TKIP data encryption:
1. On the Intel PROSet/Wireless main window, double-click an Infrastructure network in the Wireless
Networks list or select the network and click Connect.
NOTE: Infrastructure networks are identified with an access point image (
Networks and Profiles list.
) in the Wireless
2. Click Profiles to access the Profiles list.
3. Click Properties to open the Wireless Profile Properties' General Settings. The Profile name and Wireless
Network Name (SSID) display. Network (Infrastructure) should be selected as the Operating Mode.
4. Click Next to access the Security Settings.
5. Security Settings: Select WPA-Personal (TKIP) to provide security to a small business network or
home environment. A password, called a pre-shared key (PSK), is used. The longer the password, the
stronger the security of the wireless network.
If your wireless access point or router supports WPA2-Personal then you should enable it on the
access point and provide a long, strong password. The longer the password, the stronger the
security of the wireless network. The same password entered in the access point needs to be used
on this computer and all other wireless devices that access the wireless network.
NOTE: WPA-Personal and WPA2-Personal are not interoperable.
6. Wireless Security Password (Encryption Key): Enter a text phrase with eight to 63 characters. Verify
that the network key matches the password in the wireless access point.
7. Click OK to return to the Profiles list.
Set up a Client with WPA-Personal (AES-CCMP) or WPA2-Personal (AES-CCMP)
Security Settings
Wi-Fi Protected Access (WPA) is a security enhancement that strongly increases the level of data protection and
access control to a wireless network. WPA enforces 802.1x authentication and key-exchange and only works with
dynamic encryption keys. For a home user or small business, WPA-Personal utilizes either Advanced Encryption
Standard - Counter CBC-MAC Protocol (AES-CCMP) or Temporal Key Integrity Protocol (TKIP).
To configure a profile with WPA2-Personal network authentication and AES-CCMP data encryption:
1. On the Profile page, select a profile.
2. Click Properties to open the Wireless Profile Properties' General Settings. The Profile name and Wireless
Network Name (SSID) display. Network (Infrastructure) should be selected as the Operating Mode.
3. Click Next. The Security Settings page opens.
4. Security Settings: Select WPA-Personal (AES-CCMP) to provide this level of security in the small
network or home environment. It uses a password also called a pre-shared key (PSK). The longer the
password, the stronger the security of the wireless network.
AES-CCMP (Advanced Encryption Standard - Counter CBC-MAC Protocol) is the new method for
privacy protection of wireless transmissions specified in the IEEE 802.11i standard. AES-CCMP
provides a stronger encryption method than TKIP. Choose AES-CCMP as the data encryption method
whenever strong data protection is important.
If your Wireless access point or router supports WPA2-Personal then you should enable it on the
access point and provide a long, strong password. The same password entered into access point
needs to be used on this computer and all other wireless devices that access the wireless network.
NOTE: WPA-Personal and WPA2-Personal are not interoperable.
Some security solutions may not be supported by your computer's operating system. You may
require additional software or hardware as well as wireless LAN infrastructure support. Contact your
computer manufacturer for details.
Set Password:
1. Wireless Security Password (Encryption Key). Enter a text phrase (length is between eight and 63
characters). Verify that the network key used matches the wireless access point key.
2. Click OK to return to the Profiles list.
Back to Top
Back to Contents
Enterprise Security
From the Security Settings page you can enter the required security settings for the selected wireless network.
Use Enterprise Security if your network environment requires 802.1x authentication.
●
●
●
●
●
802.1x authentication methods, include passwords, certificates and smart cards.
802.1x authentication types are: MD5, EAP-SIM, LEAP, TLS, TTLS, PEAP, EAP-FAST.
See Profile Management for a description of when the Profile Wizard is launched.
See Security Overview for more information on the different security options for wireless networks.
See Personal Security to set basic WEP or WPA security in a non-enterprise environment (home, small
business).
Enterprise Security Settings
Enterprise Security Settings Description
Name
Setting
Enterprise Security
Select to open the Enterprise Security settings. The security settings
that are available are dependent on the Operating Mode selected:
Device to Device (ad hoc) or Network (Infrastructure).
Network Authentication
If you configure a Device to Device (ad hoc) profile, the default is
Open authentication.
If you configure an Infrastructure profile, select:
●
●
●
●
Data Encryption
●
●
●
●
●
Open authentication: Any wireless station can request
authentication.
Shared authentication: Uses an encryption key known only to
the receiver and sender of data.
WPA-Personal or WPA2 Personal: Uses a password also called a
pre-shared key (PSK).
WPA-Enterprise or WPA2-Enterprise: Use on enterprise
networks with an 802.1x RADIUS server.
None: No encryption.
WEP
CKIP
TKIP
AES-CCMP
Enable 802.1x (Authentication Type) Click to open the following 802.11x authentication types:
●
●
●
●
●
●
●
Cisco Options
MD5
EAP-SIM
TLS
TTLS
PEAP
LEAP
EAP-FAST
Click to view the Cisco Compatible Extensions.
NOTE: Cisco Compatible Extensions are automatically enabled for
CKIP and LEAP profiles.
Advanced button
Select to access the Advanced Settings to configure the following
options:
●
●
●
●
●
Back
Auto-Connect: Select to automatically or manually connect to a
profile.
Auto-Import this profile (for network administrators only).
Mandatory Access Point: Select to associate the wireless
adapter with a specific access point.
Password Protection: Select to password protect a profile.
Start application: Specify a program to be started when a
wireless connection is made.
View the prior page in the Profile Wizard.
Next
View the next page in the Profile Wizard. If more security information
is required then the next Step of the Security page is displayed.
OK
Closes the Profile Wizard and saves the profile.
Cancel
Closes the Profile Wizard and cancels any changes made.
Help?
Provides the help information for the current page.
Enterprise Security: Configure Profiles for Device to Device (Ad Hoc)
Networks
Set up a Client with Open Network Authentication and No (None) Data Encryption
When Open authentication is used, any wireless station can request authentication. The station that needs to
authenticate with another wireless station sends an authentication management frame that contains the identity
of the sending station. The receiving station grants any request for authentication. Open authentication allows
any device network access. If no encryption is enabled on the network, any device that knows the SSID can gain
access to the network.
In Device to Device (ad hoc) mode, wireless computers send information directly to other wireless computers.
You can use ad hoc mode to network multiple computers in a home or small office, or to set up a temporary
wireless network for a meeting.
1. On the Intel(R) PROSet/Wireless main window, select one of the following methods to connect to a device
to device network:
●
Double-click a Device to Device (ad hoc) network in the Wireless Networks list.
●
Select a Device to Device (ad hoc) network in the Wireless Networks list. Click Connect. The Intel
PROSet/Wireless software automatically detects the security settings for the wireless adapter.
NOTE: Device to Device (ad hoc) networks are identified with a notebook image (
Networks and Profiles list.
❍
) in the Wireless
Authentication:
■
If no authentication is required, the network connects without a prompt to enter any log-on
credentials. Any wireless device with the correct network name (SSID) is able to associate
with the network devices.
■
If Data Encryption is required, select WEP. You are asked to select either a 64-bit or 128-bit
encryption level Security Password (Encryption Key) and a Key Index. These values must
match the various devices in your ad hoc network, or data is not transferred.
NOTE: If you need to edit or change the wireless network settings, refer to Profile Management for
more information.
To create a profile for a wireless network connection with no encryption:
1. Click Profiles on the Intel PROSet/Wireless main window.
2. On the Profile page, click Add to open the Create Wireless Profile General Settings.
3.
4.
5.
6.
Wireless Network Name (SSID): Enter the network identifier.
Profile Name: Enter a descriptive profile name.
Operating Mode: Click Device to Device (ad hoc).
Click Next
7. Click Enterprise Security to open the Security Settings.
8. Network Authentication: Open (Selected).
When Open authentication is used, any wireless station can request authentication. The station that
needs to authenticate with another wireless station sends an authentication management frame that
contains the identity of the sending station. T he receiving station grants any request for
authentication. Open authentication allows any device network access. If no encryption is enabled on
the network, any device that knows the SSID can gain access to the network. Device to Device (ad
hoc) networks always operate with Open authentication.
9. Data Encryption: None is the default.
10. Click OK. The profile is added to the Profiles list and connects to the wireless network.
Set up a Client with Open Network Authentication and WEP Data Encryption
On the Intel PROSet/Wireless main window, select one of the following methods to connect to a device to device
network:
1. Double-click a Device to Device (ad hoc) network in the Wireless Networks list.
2. Select a Device to Device (ad hoc) network in the Wireless Networks list. Click Connect. The Intel PROSet/
Wireless software automatically detects the security settings for the wireless adapter.
NOTE: Device to Device (ad hoc) networks are identified with a notebook image (
Wireless Networks and Profiles list.
) in the
3. If Data Encryption is required, you may select WEP. You are asked to select either a 64-bit or 128-bit
encryption level Security Password (Encryption Key) and a Key Index. These values must match the
various devices in your device to device (ad hoc) network, or data is not transferred.
NOTE: If you need to edit or change the wireless network settings, refer to Profile Management for more
information.
To create a profile for a wireless network connection with WEP encryption:
1.
2.
3.
4.
5.
6.
7.
8.
9.
Click Profiles on the Intel PROSet/Wireless main window.
On the Profile page, click Add to open the Create Wireless Profile Wizard's General Settings.
Wireless Network Name (SSID): Enter the network identifier.
Profile Name: Enter a descriptive profile name.
Operating Mode: Click Device to Device (ad hoc).
Click Next.
Click Enterprise Security to open the Security Settings.
Network Authentication: Open is selected (Default). Ad hoc networks only use Open authentication.
Data Encryption: Select WEP. WEP data encryption can be configured with 64- or 128-bit key.If the
wireless device does not have the correct WEP key, the device is unable to transmit or decrypt data.
10. Encryption Level: Select 64- or 128-bit.
11. Wireless Security Password (Encryption Key): Enter the wireless network Password (WEP Key). The
Password is the same value used by the wireless access point or router. Contact your administrator for this
password.
●
●
●
●
Pass phrase (64-bit): Enter five (5) alphanumeric characters, 0-9, a-z, or A-Z.
Hex key (64-bit): Enter 10 hexadecimal characters, 0-9, A-F.
Pass phrase (128-bit): Enter 13 alphanumeric characters, 0-9, a-z, or A-Z.
Hex key (128-bit): Enter 26 hexadecimal characters, 0-9, A-F.
12. Key Index: Select 1, 2, 3, or 4. Up to four passwords may be specified by changing the Key Index.
To change the security settings:
1. Click Profiles on the Intel PROSet/Wireless main window. The network that you just connected to is listed
in the Profiles list.
2. Select the wireless network.
3. Click Properties to open the Wireless Profile Properties General Settings. The Wireless Network Name
(SSID) and Profile Name are already defined. Device to Device (ad hoc) is selected as the operating
mode.
4. Click Next to access the Security Settings.
5. Click Enterprise Security.
6. Network Authentication: Open is the default. No authentication is used.
7. Data Encryption: WEP is selected. You can change the WEP key, key index or encryption level.
8. Click OK to return to the Profiles list after you have completed your changes.
Enterprise Security: Configure Profiles for Infrastructure Networks
An infrastructure network consists of one or more access points and one or more computers with wireless
adapters installed. Each access point must have a wired connection to a wireless network.
Set up a Client with No Authentication or Data Encryption (None)
On the Intel(R) PROSet/Wireless main page, select one of the following methods to connect to an Infrastructure
network:
●
●
Double-click an Infrastructure network in the Wireless Networks list.
Select an Infrastructure network in the Wireless Networks list. Click Connect. The Intel PROSet/Wireless
software automatically detects the security settings for the wireless adapter.
If there is no authentication required, the network connects without a prompt to enter any log-on credentials.
Any wireless device with the correct network name (SSID) is able to associate with other devices in the network.
To create a profile for a wireless network connection with no encryption:
1.
2.
3.
4.
5.
6.
7.
8.
Click Profiles on the Intel PROSet/Wireless main window.
On the Profile page, click Add to open the Create Wireless Profile General Settings.
Profile Name: Enter a descriptive profile name.
Wireless Network Name (SSID): Enter the network identifier.
Operating Mode: Click Network (Infrastructure)
Click Next.
Click Enterprise Security to open the Security Settings.
Network Authentication: Open (Selected).
Open authentication allows a wireless device access to the network without 802.11 authentication. If
no encryption is enabled on the network, any wireless device with the correct network name (SSID)
can associate with an access point and gain access to the network.
9. Data Encryption: None is the default.
10. Click OK. The profile is added to the Profiles list and connects to the wireless network .
Set up a Client with Shared Network Authentication
When Shared Key authentication is used, each wireless station is assumed to have received a secret shared key
over a secure channel that is independent from the 802.11 wireless network communications channel. Shared
key authentication requires that the client configure a static WEP or CKIP key. The client access is granted only if
it passes a challenge-based authentication. CKIP provides stronger data encryption than WEP, but not all
operating systems and access points support it.
NOTE: While shared key would appear to be the better option for a higher level of security, a known
weakness is created by the clear text transmission of the challenge string to the client. Once an
invader finds the challenge string, the shared authentication key can be easily reverse engineered.
Therefore, open authentication is actually, and counter intuitively, more secure. To create a profile
with shared authentication:
1.
2.
3.
4.
5.
6.
7.
Click Profiles on the Intel PROSet/Wireless main window.
On the Profile Page, click Add to open the Create Wireless Profile General Settings.
Profile Name: Enter a descriptive profile name.
Wireless Network Name (SSID): Enter the network identifier.
Operating Mode: Click Network (Infrastructure).
Click Next to access the Security Settings.
Click Enterprise Security.
8. Network Authentication: Select Shared. Shared authentication is accomplished with a pre-configured
WEP key.
9. Data Encryption: Select None, WEP (64- or 128-bit), or CKIP (64- or 128-bit).
10. Enable 802.1x: Disabled.
11. Encryption Level: 64- or 128-bit: When switching between 64- and 128-bit encryption, the previous
settings are erased and a new key must be entered.
12. Key Index: Select 1,2, 3, or 4. Change the Key Index to specify up to four passwords.
13. Wireless Security Password (Encryption Key): Enter the wireless network password (WEP Encryption
Key). This password is the same value used by the wireless AP or router. Contact your administrator for
this password.
●
Pass phrase (64-bit): Enter five (5) alphanumeric characters, 0-9, a-z or A-Z.
●
Hex key (64-bit): Enter 10 hexadecimal characters, 0-9, A-F.
●
Pass phrase (128-bit): Enter 13 alphanumeric characters, 0-9, a-z or A-Z.
●
Hex key (128-bit): Enter 26 hexadecimal characters, 0-9, A-F.
Set up a Client with WPA-Personal or WPA2-Personal Network Authentication
Wi-Fi Protected Access (WPA) is a security enhancement that strongly increases the level of data protection and
access control to a wireless network. WPA enforces key-exchange and only works with dynamic encryption keys.
If your wireless AP or router supports WPA-Personal and WPA2-Personal then you should enable it on the AP and
provide a long, strong password. For personal or home networks without a RADIUS or AAA server, use Wi-Fi
Protected Access Personal.
●
●
WPA-Personal: A wireless security method that provides strong data protection and prevents
unauthorized network access for small networks. It uses Temporal Key Integrity Protocol (TKIP) encryption
or AES-CCMP and protects against unauthorized network access through the use of a pre-shared key (PSK).
WPA2-Personal: A follow-on wireless security method to WPA that provides stronger data protection and
prevents unauthorized network access for small networks.
NOTE: WPA-Personal or WPA2 Personal are not interoperable.
Some security solutions may not be supported by your computer's operating system and may
require additional software or certain hardware as well as wireless LAN infrastructure support. Check
with your computer manufacturer for details.
To add a profile with WPA-Personal or WPA2-Personal network authentication:
1.
2.
3.
4.
5.
6.
7.
8.
9.
Click Profiles on the Intel PROSet/Wireless main window.
On the Profile page, click Add to open the Profile Wizard's General Settings.
Profile Name: Enter a descriptive profile name.
Wireless Network Name (SSID): Enter the network identifier.
Operating Mode: Click Network (Infrastructure).
Click Next to access the Security Settings.
Click Enterprise Security.
Network Authentication: Select WPA-Personal or WPA2-Personal. See Security Overview.
Data Encryption: Select one of the following:
●
TKIP provides per-packet key mixing, a message integrity check and a rekeying mechanism.
●
AES-CCMP (Advanced Encryption Standard - Counter CBC-MAC Protocol) is used as the data
encryption method whenever strong data protection is important.
10. Password: Enter a text phrase from 8 to 63 characters. The longer the password, the stronger the
security of the wireless network. The same password entered into an access points needs to be used on
this computer and all other wireless devices that access the wireless network.
Set up a Client with WPA-Enterprise or WPA2-Enterprise Network Authentication
WPA2-Enterprise requires an authentication server.
●
●
WPA-Enterprise: A wireless security method that provides strong data protection for multiple users and
large managed networks. It uses the 802.1X authentication framework with TKIP encryption and prevents
unauthorized network access by verifying network users through an authentication server.
WPA2-Enterprise: The follow-on wireless security method to WPA that provides stronger data protection
for multiple users and large managed networks. It prevents unauthorized network access by verifying
network users through an authentication server.
NOTE: WPA-Enterprise and WPA2-Enterprise are not interoperable.
To add a profile that uses WPA - Enterprise or WPA2 - Enterprise authentication:
1. Obtain a user name and password on the RADIUS server from your administrator.
2. Certain Authentication Types require that obtain and install a client certificate. Refer to Setting up the
Client for TLS authentication or consult your administrator.
3. Click Profiles on the Intel PROSet/Wireless main window.
4. On the Profile page, click Add to open the Profile Wizard's General Settings.
5. Profile Name: Enter a descriptive profile name.
6. Wireless Network Name (SSID): Enter the network identifier.
7. Operating Mode: Click Network (Infrastructure).
8. Click Next.
9. Click Enterprise Security.
10. Network Authentication: Select WPA-Enterprise or WPA2-Enterprise.
11. Data Encryption: Select one of the following:
❍
TKIP provides per-packet key mixing, a message integrity check and a rekeying mechanism.
❍
AES-CCMP (Advanced Encryption Standard - Counter CBC-MAC Protocol) is used as the data
encryption method whenever strong data protection is important. AES-CCMP is recommended.
12. Enable 802.1x: Selected.
13. Authentication Type: Select one of the following: EAP-SIM, LEAP, TLS, TTLS, PEAP, EAP-FAST.
Set up a Client with WEP Data Encryption and MD5 Network Authentication
MD5 authentication is a one-way authentication method that uses user names and passwords. This method does
not support key management, but does require a pre-configured key if data encryption is used. To add WEP and
MD5 authentication to a new profile:
NOTE: Before you begin, you need to know the user name and password on the RADIUS server that
grants access to the network.
1.
2.
3.
4.
5.
6.
7.
8.
9.
10.
11.
Click Profiles on the Intel PROSet/Wireless main window.
On the Profile page, click Add to open the Profile Wizard's General Settings.
Profile Name: Enter a descriptive profile name.
Wireless Network Name (SSID): Enter the network identifier.
Operating Mode: Click Network (Infrastructure).
Click Next.
Click Enterprise Security.
Network Authentication: Select Open (Recommended).
Data Encryption: Select WEP.
Click 802.1x Enabled.
Authentication type: Select MD5.
Step 1 of 2: Password
1. Encryption Level: Select either 64- or 128-bit.
2. Wireless Security Password (Encryption Key): Enter your network key (wireless security password)
for your wireless network. Verify that the network key matches the wireless AP.
❍
Use pass phrase: Enter a text phrase, up to 5 (64-bit) or 13 (128-bit) alphanumeric characters (09, a-z or A-Z).
❍
Use hex key: Enter up to 10 alphanumeric characters (64-bit, 0-9, A-F) or 26 alphanumeric
characters (128-bit, 0-9, A-F).
3. Key Index: Select 1, 2, 3 or 4. (Default key is 1.)
4. Click Next.
Step 2 of 2: MD5 User
1. Select one of the following credential methods:
❍
Use Windows logon user name and password: The 802.1x credentials match your Windows user
name and password. Before connection, you are prompted for your Windows logon credentials.
NOTE: This option is unavailable if Pre-Logon Connect is not selected during installation of the
Intel PROSet/Wireless software. Refer to Install or Uninstall the Single Sign On Feature.
❍
❍
Prompt for the user name and password: Prompt for your user name and password every time
you log onto the wireless network.
Use the following user name and password: Use your saved credentials to log onto the network.
■
User Name: This user name must match the user name that is set in the authentication
server by the administrator prior to client authentication. The user name is case-sensitive.
This name specifies the identity supplied to the authenticator by the authentication protocol
operating over the TLS tunnel. This identity is securely transmitted to the server only after an
encrypted channel has been established.
■
Domain: Name of the domain on the authentication server. The server name identifies a
domain or one of its sub-domains (for example, zeelans.com, where the server is blueberry.
■
■
zeelans.com). NOTE: Contact your administrator to obtain the domain name.
Password: Specifies the user password. The password characters appear as asterisks. This
password must match the password that is set in the authentication server.
Confirm Password: Reenter the user password.
2. Click OK to save the credentials.
3. Click Connect to connect to the selected wireless network.
If you did not select Use Windows logon on the Security Settings page and also did not configure
user credentials, an Enter Credentials message appears when you attempt to connect to this
profile. Enter your user name, domain, and password. Click OK to access the profile.
4. Click OK to close Intel PROSet/Wireless.
Set up a Client with WEP Data Encryption and EAP-SIM NetworK Authentication
EAP-SIM uses a dynamic session-based WEP key, which is derived from the client adapter and RADIUS server, to
encrypt data. EAP-SIM requires you to enter a user verification code, or Personal Identification Number (PIN), for
communication with the Subscriber Identity Module (SIM) card. A SIM card is a special smart card that is used by
Global System for Mobile Communications (GSM) based digital cellular networks. To add a profile with EAP-SIM
authentication:
1.
2.
3.
4.
5.
6.
7.
8.
9.
10.
On the Profile page, click Add to open General Settings.
Profile Name: Enter a profile name.
Wireless Network Name (SSID): Enter the network identifier.
Operating Mode: Click Network (Infrastructure).
Click Next to access the Security Settings.
Click Enterprise Security.
Network Authentication: Select Open (Recommended).
Data Encryption: Select WEP.
Click Enable 802.1x.
Authentication type: Select EAP-SIM.
EAP-SIM authentication can be used with:
●
●
Network Authentication types: Open, Shared, WPA - Enterprise and WPA2 - Enterprise
Data Encryption types: None, WEP, TKIP, AES-CCMP and CKIP
EAP-SIM User (optional)
1. Specify user name (identity): Click to specify the user name.
●
User Name: Enter the user name assigned to the SIM card.
2. Click OK.
Set up a Client with TLS Network Authentication
These settings define the protocol and the credentials used to authenticate a user. Transport Layer Security (TLS)
authentication is a two-way authentication method that exclusively uses digital certificates to verify the identity
of a client and a server.
To add a profile with TLS authentication:
1.
2.
3.
4.
5.
6.
7.
8.
9.
10.
11.
Click Profiles on the Intel PROSet/Wireless main window.
On the Profile page, click Add to open the Profile Wizard's General Settings.
Profile Name: Enter a descriptive profile name.
Wireless Network Name (SSID): Type the network identifier.
Operating Mode: Click Network (Infrastructure).
Click Next to access the Security Settings.
Click Enterprise Security.
Network Authentication: Select WPA-Enterprise or WPA2-Enterprise.
Data Encryption: Select AES-CCMP (Recommended).
Enable 802.1x: Selected.
Authentication Type: Select TLS to be used with this connection.
Step 1 of 2: TLS User
1. Obtain and install a client certificate, refer to Set up the Client for TLS authentication or consult your
system administrator.
2. Select one of the following to obtain a certificate:
●
Use my smart card: Select if the certificate resides on a smart card.
Use the certificate issued to this computer.
Use a user certificate on this computer: Click Select to choose a certificate that resides on this
computer.
3. Click Next.
●
●
Step 2 of 2: TLS Server
Select one of the following:
1. Select one of the following options:
■
Validate Server Certificate: Select to verify the server certificate.
Certificate Issuer: Click Any Trusted CA as the default or select a certificate
issuer from the list.
■
Specify Server or Certificate Name:
Server or Certificate Name: Enter the server name.
The server name or domain to which the server belongs, depends on which of the
two options below has been selected.
Server name must match the specified entry exactly: When selected, the
server name must match exactly the server name found on the certificate. The
server name should include the complete domain name (for example,
Servername.Domain name).
Domain name must end with the specified entry: When selected, the server
name identifies a domain, and the certificate must have a server name that
belongs to this domain or to one of its subdomains (for example, zeelans.com,
where the server is blueberry.zeelans.com). NOTE: These parameters should be
obtained from the administrator.
NOTE: These parameters should be obtained from the administrator.
2. Click OK to save the setting and close the page.
Set up a Client with TTLS Network Authentication
TTLS authentication: These settings define the protocol and credentials used to authenticate a user. The client
uses EAP-TLS to validate the server and create a TLS-encrypted channel between the client and server. The client
can use another authentication protocol, typically password-based protocols (for example, MD5 Challenge over
this encrypted channel to enable server validation). The challenge and response packets are sent over a nonexposed TLS encrypted channel. The following example describes how to use WPA with AES-CCMP encryption
with TTLS authentication.
To set up a client with TTLS Network Authentication:
1.
2.
3.
4.
5.
6.
7.
8.
9.
Click Profiles on the Intel PROSet/Wireless main window.
On the Profile page, click Add to open the Profile Wizard's General Settings.
Profile Name: Enter a descriptive profile name.
Wireless Network Name (SSID): Enter the network identifier.
Operating Mode: Click Network (Infrastructure).
Click Next to access the Security Settings.
Click Enterprise Security.
Network Authentication: Select WPA-Enterprise or WPA2-Enterprise.
Data Encryption: Select one of the following:
❍
TKIP provides per-packet key mixing, a message integrity check and a rekeying mechanism.
❍
AES-CCMP (Advanced Encryption Standard - Counter CBC-MAC Protocol) is used as the data
encryption method whenever strong data protection is important. AES-CCMP is recommended.
10. Enable 802.1x: Selected.
11. Authentication Type: Select TTLS to be used with this connection.
Step 1 of 2: TTLS User
1. Authentication Protocol: This parameter specifies the authentication protocol operating over the TTLS
tunnel. The protocols are: PAP (Default), CHAP, MD5, MS-CHAP and MS-CHAP-V2. See Security Overview
for more information.
For PAP, CHAP, MD5, MS-CHAP, and MS-CHAP-V2 protocols, select one of these authentication
methods:
●
Use the Windows logon: Select to retrieve the user's credentials from the user's Windows
logon process.
NOTE: This option is unavailable if Pre-Logon Connect is not selected during installation of the Intel
PROSet/Wireless software. Refer to Install or Uninstall the Single Sign On Feature.
●
●
Prompt each time I connect: Select to prompt for user name and password before you
connect to the wireless network. The user name and password must be first set in the
authentication server by the administrator.
Use the following: The user name and password are securely (encrypted) saved in the
profile.
❍
User Name: This user name must match the user name that is set in the
authentication server.
❍
Domain: Name of the domain on the authentication server. The server name identifies
a domain or one of its subdomains (for example, zeelans.com, where the server is
blueberry.zeelans.com). NOTE: Contact your administrator to obtain the domain name.
❍
Password: This password must match the password that is set in the authentication
server. The entered password characters display as asterisks.
❍
Confirm Password: Reenter the user password.
2. Roaming Identity: If the Roaming Identity is cleared, %domain%\%username% is the default.
When 802.1x MS RADIUS is used as an authentication server, the server authenticates the device
that uses the Roaming Identity user name from Intel PROSet/Wireless software, and ignores the
Authentication Protocol MS-CHAP-V2 user name. This feature is the 802.1x identity supplied to
the authenticator. Microsoft IAS RADIUS accepts only a valid user name (dotNet user) for EAP
clients. When 802.1x MS RADIUS is used, enter a valid user name. For all other servers, this is
optional. Therefore, it is recommended to use the desired realm (for example,
anonymous@myrealm) instead of a true identity.
Step 2 of 2: TTLS Server
●
●
●
Validate Server Certificate: Selected.
Certificate Issuer: The server certificate received during the TTLS message exchange must have been
issued by this certificate authority (CA). Trusted intermediate certificate authorities and root authorities
whose certificates exist in the system store are available for selection. If Any Trusted CA is selected, any
CA in the list is acceptable.
Specify Server or Certificate Name: The server name or domain to which the server belongs, whichever
of the following has been selected.
●
●
Server name must match exactly: When selected, the server name entered must match exactly
the server name found on the certificate. The server name should include the complete domain
name (for example, Servername.Domain name).
Domain name must end in specified name: When selected, the server name identifies a domain
and the certificate must have a server name belonging to this domain or to one of its subdomains
(for example, zeelans.com, where the server is blueberry.zeelans.com)
NOTE: These parameters should be obtained from the administrator.
3. Click OK to save the setting and close the page.
Set up a Client with PEAP Network Authentication
PEAP authentication: PEAP settings are required for the authentication of the client to the authentication
server. The client uses EAP-TLS to validate the server and create a TLS-encrypted channel between client and
server. The client can use another EAP mechanism (for example, Microsoft Challenge Authentication Protocol (MS-
CHAP) Version 2), over this encrypted channel to enable server validation. The challenge and response packets
are sent over a non-exposed TLS encrypted channel. The following example describes how to use WPA with AESCCMP or TKIP encryption with PEAP authentication.
To set up a client with PEAP Authentication:
Obtain and install a client certificate. Refer to Set up the Client for TLS authentication or consult your
administrator.
1.
2.
3.
4.
5.
6.
7.
8.
9.
Click Profiles on the Intel PROSet/Wireless main window.
On the Profile page, click Add to open the Profile Wizard's General Settings.
Profile Name: Enter a descriptive profile name.
Wireless Network Name (SSID): Enter the network identifier.
Operating Mode: Click Network (Infrastructure).
Click Next to access the Security Settings.
Click Enterprise Security.
Network Authentication: Select WPA-Enterprise or WPA2-Enterprise.
Data Encryption: Select one of the following:
❍
TKIP provides per-packet key mixing, a message integrity check and a rekeying mechanism.
❍
AES-CCMP (Advanced Encryption Standard - Counter CBC-MAC Protocol) is used as the data
encryption method whenever strong data protection is important. AES-CCMP is recommended.
10. Enable 802.1x: Selected.
11. Authentication Type: Select PEAP to be used with this connection.
Step 1 of 2: PEAP User
PEAP relies on Transport Layer Security (TLS) to allow unencrypted authentication types (for example, EAPGeneric Token Card (GTC) and One-Time Password (OTP) support).
1. Authentication Protocol: Select either GTC, MS-CHAP-V2 (Default), or TLS. Refer to
Authentication Protocols.
2. User Credentials: Select one of the following:
■
Use Windows Logon: Allows the 802.1x credentials to match your Windows user
name and password. Before connection, you are prompted for your Windows logon
credentials.
■
Prompt each time I connect: Prompts for user name and password every time you
log onto the network.
■
Use the following: The user name and password are securely (encrypted) saved in the
profile.
■
User Name: This user name must match the user name that is set in the
authentication server.
■
Domain: Name of the domain on the authentication server. The server name
identifies a domain or one of its subdomains (for example, zeelans.com, where
the server is blueberry.zeelans.com). NOTE: Contact your administrator to obtain
the domain name.
■
Password: This password must match the password that is set in the
authentication server. The entered password characters display as asterisks.
■
Confirm Password: Reenter the user password.
■
Roaming Identity: If the Roaming Identity is cleared, %domain%\%username% is the
default.
When 802.1x MS RADIUS is used as an authentication server, the authentication server
authenticates the device with the Roaming Identity user name from the Intel PROSet/
Wireless utility and ignores the Authentication Protocol MS-CHAP-V2 user name. This
feature is the 802.1x identity supplied to the authenticator. Microsoft IAS RADIUS accepts only
a valid user name (dotNet user) for EAP clients. Enter a valid user name whenever 802.1x MS
RADIUS is used. For all other servers, this is optional, therefore, it is recommended that you
no use a true identity, but instead the desired realm (for example, anonymous@myrealm).
Configure Roaming Identity to support multiple users:
If you use a Pre-Logon or Common connection profile that requires the roaming identity to be
based on the Windows logon credentials, the creator of the profile can add a roaming identity
that uses %username% and %domain%. The roaming identity is parsed and the appropriate
log on information is substituted for the keywords. This allows maximum flexibility in
configuring the roaming identity while allowing multiple users to share the profile.
Please refer to your authentication server user guide for directions about how to format a
suitable roaming identity. Possible formats are:
%domain%\%username%
%username%@%domain%
%username%@%domain%.com
%username%@mynetwork.com
If Roaming Identity is cleared, %domain%\%username% is the default.
Notes about the credentials: This user name and domain must match the user name that is
set in the authentication server by the administrator prior to client authentication. The user
name is case-sensitive. This name specifies the identity supplied to the authenticator by the
authentication protocol operating over the TLS tunnel. This user identity is securely
transmitted to the server only after an encrypted channel has been verified and established.
Authentication Protocols: These parameter specifies the authentication protocols that can operate over
the TTLS tunnel. Below are instructions on how to configure a profile that uses PEAP authentication with
GTC, MS-CHAP-V2 (Default), or TLS authentication protocols. Generic Token Card (GTC)
To configure a one-time password:
1. Authentication Protocol: Select GTC (Generic Token Card).
2. User Credentials: Select Prompt each time I connect
3. On connection prompt for: Select one of the following:
■
Static password: On connection, enter the user credentials.
■
One-time password (OTP): Obtain the password from a hardware token device.
■
PIN (Soft Token): Obtain the password from a soft token program.
4. Click OK.
5. Select the profile on the Wireless Networks list.
6. Click Connect. When prompted, enter the user name, domain and one-time password (OTP).
7. Click OK. You are asked to verify your log in information.
NOTE: The Prompt each time I connect option is unavailable if an Administrator has
cleared the Cache Credentials setting in the the Administrator Tool. Refer to Administrator
Settings for more information.
MS-CHAP-V2. This parameter specifies the authentication protocol operating over the PEAP tunnel.
1. User Credentials: Select one of the following options:
■
Use Windows Logon: Allows the 802.1x credentials to match your Windows user
name and password. Before connection, you are prompted for your Windows logon
credentials.
■
Prompt each time I connect: Prompts for user name and password every time you
log onto the network.
■
Use the following user name and password: The user name and password are
securely (encrypted) saved in the profile.
■
User Name: This user name must match the user name that is set in the
authentication server.
■
Domain: Name of the domain on the authentication server. The server name
identifies a domain or one of its subdomains (for example, zeelans.com, where
the server is blueberry.zeelans.com). NOTE: Contact your administrator to obtain
the domain name.
■
Password: This password must match the password that is set in the
authentication server. The entered password characters display as asterisks.
■
Confirm Password: Reenter the user password.
NOTE:This option is unavailable if Pre-Logon Connect is not selected during installation of the
Intel PROSet/Wireless software. Refer to Install or Uninstall the Single Sign On Feature.
TLS: Transport Layer Security authentication is a two-way authentication method that exclusively uses
digital certificates to verify the identity of a client and a server.
1. Obtain and install a client certificate, refer to Set up the Client for TLS authentication or consult your
system administrator.
2. Select one of the following to obtain a certificate:
■
Use my smart card: Select if the certificate resides on a smart card.
■
Use the certificate issued to this computer: Click Select to choose a certificate that
resides in the machine store.
■
Use a user certificate on this computer. Click Select to choose a certificate that resides
on this computer.
3. Click Next.
Step 2 of 2: PEAP Server
1. Select one of the following options:
■
Validate Server Certificate: Select to verify the server certificate.
Certificate Issuer: Click Any Trusted CA as the default or select a
certificate issuer from the list.
■
Specify Server or Certificate Name:
Server or Certificate Name: Enter the server name.
The server name or domain to which the server belongs, depends on which
of the two options below has been selected.
Server name must match the specified entry exactly: When selected, the server
name must match exactly the server name found on the certificate. The server name
should include the complete domain name (for example, Servername.Domain name).
Domain name must end with the specified entry: When selected, the server name
identifies a domain, and the certificate must have a server name that belongs to this
domain or to one of its subdomains (for example, zeelans.com, where the server is
blueberry.zeelans.com). NOTE: These parameters should be obtained from the
administrator.
Notes about Certificates: The specified identity should match the Issued to identity in the
certificate and should be registered on the authentication server (for example, RADIUS server) that
is used by the authenticator. Your certificate must be valid with respect to the authentication server.
This requirement depends on the authentication server and generally means that the authentication
server must know the issuer of your certificate as a Certificate Authority. Use the same user name
you used to log in when the certificate was installed.
2. Click OK. The profile is added to the Profiles list.
3. Click the new profile at the end of the Profiles list. Use the up and down arrows to change the priority of
the new profile.
4. Click Connect to connect to the selected wireless network.
If you did not select Use Windows logon on the Security Settings page and also did not configure
user credentials, no credentials are saved for this profile. Please enter your credentials to
authenticate to the network.
5. Click OK to close Intel PROSet/Wireless.
PEAP-TLS Certificate Auto Enrollment
In the Application Settings (Advanced Settings), select Intel(R) PROSet TLS Certificate Rejected Warning if
you want a warning issued when a PEAP-TLS certificate is rejected.When a certificate has an invalid field
expiration date, you are notified that you must take one of the following actions:A potential authentication
problem for profile <profile name> has been detected. The expiration date in the associated
certificate may be invalid. Choose one of the following options:
Control
Description
Continue with current parameters.
Continue with the current certificate.
Update certificate manually.
The Select Certificate page opens for you to choose another
certificate.
Update certificate automatically based on the
certificates in the local store.
This option is enabled only when the local store holds one
or more certificates for which the "issued to" and "issued
by" fields match the current certificate and for which the
"expiration date" has not expired. If you choose this option,
the application selects the first valid certificate.
Log off to obtain certificate during log on process
(this does not update the profile and only applies
to certificates configured for auto enrollment).
Logs off the user, who must obtain a proper certificate
during the next log on process. The profile must be
updated to select the new certificate.
Auto enrollment
You are notified to: Please wait while the system is
trying to obtain the certificate automatically. Click
Cancel to end the certificate retrieval.
Do not show this message again.
A user is able to avoid this step in subsequent sessions.
The choice selected is remembered for future sessions.
Set up a Client with LEAP Network Authentication
Cisco LEAP (Light Extensible Authentication Protocol) is an 802.1X authentication type that supports strong
mutual authentication between the client and a RADIUS server. The LEAP profiles settings include LEAP, CKIP
with Rogue AP detection integration. To set up a client with LEAP Authentication:
1.
2.
3.
4.
5.
6.
7.
8.
9.
10.
11.
12.
13.
Click Profiles on the Intel PROSet/Wireless main window.
On the Profile page, click Add. The Create Wireless Profile General Settings opens.
Profile Name: Enter a descriptive profile name.
Wireless Network Name (SSID): Enter the network identifier.
Operating Mode: Click Network (Infrastructure).
Click Next to access the Security Settings.
Click Enterprise Security.
Network Authentication: Select WPA-Enterprise or WPA2-Enterprise.
Data Encryption: Select one of the following:
❍
TKIP provides per-packet key mixing, a message integrity check and a rekeying mechanism.
❍
AES-CCMP (Advanced Encryption Standard - Counter CBC-MAC Protocol) is used as the data
encryption method whenever strong data protection is important. AES-CCMP is recommended.
Enable 802.1x: Selected.
Authentication Type: Select LEAP to be used with this connection.
Click Cisco Options.
Click Enable Cisco Compatible Extensions to enable Cisco Compatible Extensions (CCX) security (Allow
Fast Roaming (CCKM), Enable Radio Management Support, Enable Mixed Cells Mode.).
15. Click Enable Radio Management Support. Use Radio Management to detect rogue access points.
16. Click OK to return to the Security Settings.
LEAP User:
1. Select one of the following authentication methods:
❍
Use the Windows logon user name and password: Allows the 802.1x credentials to match your
Windows user name and password. The user's credentials are retrieved from the user's Windows logon process. The credentials are only used if the user has no password defined in the Windows log-on
credentials or if there is a problem capturing the Windows log-on credentials.
NOTE: This option is unavailable if Pre-Logon Connect is not selected during installation of the
Intel PROSet/Wireless software. Refer to Install or Uninstall the Single Sign On Feature.
❍
❍
Prompt for the user name and password: Select to prompt for the user name and password
before you connect to the wireless network. The user name and password must be first set in the
authentication server by the administrator.
Use the following user name and password: Select to save your user name and password for
future use when an 802.1x authentication profile is used.
■
User Name: This user name must match the user name that is set in the authentication
server by the administrator prior to client authentication. The user name is case-sensitive.
This name specifies the identity supplied to the authenticator by the authentication protocol.
This user's identity is securely transmitted to the server only after an encrypted channel has
been established.
Domain: Name of the domain on the authentication server. The server name identifies a
domain or one of its sub-domains (for example, zeelans.com, where the server is blueberry.
zeelans.com). NOTE: The domain name should be obtained from the administrator.
■
Password: Specifies the user password. The password characters are seen as asterisks. This
password must match the password that is set in the authentication server.
■
Confirm Password: Reenter the user password.
2. Click OK to save the setting and close the page.
■
Cisco Compatible Extensions Options
Cisco Options: Use to enable or disable Radio Management and Mixed Cells Mode or Allow Fast Roaming
(CCKM).
NOTE: Cisco Compatible Extensions are automatically enabled for CKIP, LEAP or EAP-FAST profiles.
To override this behavior, select or clear options on this page.
●
Allow Fast Roaming (CCKM): Select to enable the client wireless adapter for fast-secure roaming. When
a wireless LAN is configured for fast reconnection, an EAP-FAST, EAP-TLS, PEAP-GTC, PEAP-MSCHAPv2 or
LEAP-enabled client device can roam from one access point to another without involving the main server.
Use Cisco Centralized Key Management (CCKM), an access point configured to provide Wireless Domain
Services (WDS), to take the place of the RADIUS server and authenticate the client without perceptible
delay in voice or other time-sensitive applications.
Enable Cisco Compatible Options: Select to enable Cisco Compatible Extensions for this wireless connection
profile.
●
●
Enable Radio Management Support: Select to have your wireless adapter provide radio management to
the Cisco infrastructure. If the Cisco Radio Management utility is used on the infrastructure, it configures
radio parameters, detects interference and rogue access points. Default setting is selected.
Enable Mixed Cells Mode: Select to allow the wireless adapter to communicate with mixed cells. A mixed
cell is a wireless network in which there are both devices that use WEP and devices that do not. Refer to
Mixed Cells Mode for more information. The default setting is cleared.
Set up a Client with EAP-FAST Network Authentication
In Cisco Compatible Extensions, Version 3 (CCXv3), Cisco added support for EAP-FAST (Extensible Authentication
Protocol-Flexible Authentication via Secure Tunneling), which uses protected access credentials (PACs) to
establish an authenticated tunnel between a client and a server.
Cisco Compatible Extensions, Version 4 (CCXv4) improves the provisioning methods for enhanced security and
provides innovations for enhanced security, mobility, quality of service, and network management.
Cisco Compatible Extensions, Version 3 (CCXv3)
To set up a client with EAP-FAST authentication with Cisco Compatible Extensions, version 3 (CCXv3):
1.
2.
3.
4.
5.
6.
Click Profiles on the Intel PROSet/Wireless main window.
On the Profile page, click Add to open the Create Wireless Profile Wizard's General Settings.
Wireless Network Name (SSID): Enter the network identifier.
Profile Name: Enter a descriptive profile name.
Operating Mode: Click Network (Infrastructure).
Click Next to open the Security Settings.
7. Click Enterprise Security.
8. Network Authentication: Select WPA-Enterprise or WPA2-Enterprise.
9. Data Encryption: Select one of the following:
❍
TKIP provides per-packet key mixing, a message integrity check and a rekeying mechanism.
❍
AES-CCMP (Advanced Encryption Standard - Counter CBC-MAC Protocol) is used as the data
encryption method whenever strong data protection is important. AES-CCMP is recommended.
10. Enable 802.1x: Selected.
11. Authentication Type: Select EAP-FAST to be used with this connection.
NOTE: If CCXv4 Application Setting was not installed through an Administrator Package, only EAPFAST User settings are available for configuration. Refer to EAP-FAST User Settings.
Step 1 of 2: EAP-FAST Provisioning
1. Click Disable EAP-FAST Enhancements (CCXv4) to allow provisioning inside a server-unauthenticated
TLS tunnel (Unauthenticated-TLS-Server Provisioning Mode).
2. Click Select server to view any unauthenticated PACs that have already been provisioned and reside on
this computer.
NOTE: If the provisioned PAC is valid, Intel(R) PROSet/Wireless does not prompt the user for
acceptance of the PAC. If the PAC is invalid, Intel PROSet/Wireless fails the provisioning
automatically. A status message is displayed in the Wireless Event Viewer that an administrator can
review on the user's computer.
To import a PAC:
●
●
●
●
●
Click Select server to open the Protected Access Credentials (PAC) list.
Click Import to import a PAC that resides on this computer or a server.
Select the PAC and click Open.
Enter the PAC password (optional).
Click OK to close this page. The selected PAC is added to PAC list.
3. Click Next to select the credential retrieval method or click OK to save the EAP-FAST settings and return
to the Profiles list. The PAC is used for this wireless profile.
Step 2 of 2: EAP-FAST Additional Information
To perform client authentication in the established tunnel, a client sends a user name and password to
authenticate and establish client authorization policy.
1. Click User Credentials to select the credentials retrieval method:
❍
Use the Windows logon user name and password: The user credentials are
retrieved from the Windows log on process.
NOTE: This option is unavailable if Pre-Logon Connect is not selected during
installation of the Intel PROSet/Wireless software. Refer to Install or Uninstall the
Single Sign On Feature.
❍
❍
Prompt for the user name and password: Prompts for user name and password
before you connect to the wireless network. The user name and password must first be
set in the authentication server by the administrator.
Use the following user name and password: The user name and password must be
first set in the authentication server by the administrator.
■
User Name: This user name must match the user name that is set in the
authentication server.
■
Domain: Name of the domain on the authentication server. The server name
identifies a domain or one of its sub-domains (for example, zeelans.com, where
the server is blueberry.zeelans.com). NOTE: Contact your administrator to obtain
the domain name.
■
Password: This password must match the password that is set in the
authentication server. The entered password characters display as asterisks.
■
Confirm Password: Reenter the user password.
2. Click OK to save the settings and close the page. Server verification is not required.
Cisco Compatible Extensions, Version 4 (CCXv4)
To set up a client with EAP-FAST authentication with Cisco Compatible Extensions, version 4 (CCXv4):
1.
2.
3.
4.
5.
6.
7.
8.
Click Profiles on the Intel PROSet/Wireless main window.
On the Profile page, click Add to open the Create Wireless Profile Wizard's General Settings.
Wireless Network Name (SSID): Enter the network identifier.
Profile Name: Enter a descriptive profile name.
Operating Mode: Click Network (Infrastructure).
Click Next to open the Security Settings.
Network Authentication: Select WPA-Enterprise or WPA2-Enterprise.
Data Encryption: Select one of the following:
❍
TKIP provides per-packet key mixing, a message integrity check and a rekeying mechanism.
❍
AES-CCMP (Advanced Encryption Standard - Counter CBC-MAC Protocol) is used as the data
encryption method whenever strong data protection is important. AES-CCMP is recommended.
9. Data Encryption: Select AES-CCMP.
10. Enable 802.1x: Selected.
11. Authentication Type: Select EAP-FAST to be used with this connection.
Step 1 of 3: EAP-FAST Provisioning
With CCXv4, EAP-FAST supports two modes for provisioning:
●
●
Server-Authenticated Mode: Provisioning inside a server authenticated (TLS) tunnel.
Server-Unauthenticated Mode: Provisioning inside an unauthenticated (TLS) tunnel.
NOTE: Server-Authenticated Mode provides significant security advantages over ServerUnauthenticated Mode even when EAP-MSCHAPv2 is being used as an inner method. This mode
protects the EAP-MSCHAPv2 exchanges from potential Man-in-the-Middle attacks by verifying the
server’s authenticity before exchanging MSCHAPv2. Therefore, Server-Authenticated Mode is
preferred whenever it is possible. EAP-FAST peer must use Server-Authenticated Mode whenever a
certificate or public key is available to authenticate the server and ensure the best security practices.
Provisioning of Protected Access Credentials (PAC):
EAP-FAST uses a PAC key to protect the user credentials that are exchanged. All EAP-FAST authenticators are
identified by an authority identity (A-ID). The local authenticator sends its AID to an authenticating client, and
the client checks its database for a matching AID. If the client does not recognize the AID, it requests a new PAC.
NOTE: If the provisioned Protected Access Credential (PAC) is valid, Intel(R) PROSet/Wireless does
not prompt the user for acceptance of the PAC. If the PAC is invalid, Intel PROSet/Wireless fails the
provisioning automatically. A status message is displayed in the Wireless Event Viewer that an
administrator can review on the user's computer.
1. Verify that Disable EAP-FAST Enhancements (CCXv4) is not selected. Allow unauthenticated
provisioning and Allow authenticated provisioning are selected by default. Once a PAC is selected
from the Default Server, you can deselect any of these provisioning methods.
2. Default Server: None is selected as the default. Click Select Server to select a PAC from the default PAC
authority server or select a server from the Server group list. The EAP-FAST Default Server (PAC
Authority) selection page opens.
NOTE: Server groups are only listed if you have installed an Administrator Package that contains
EAP-FAST Authority ID (A-ID) Group settings.
PAC distribution can also be completed manually (out-of-band). Manual provisioning enables you to create a PAC
for a user on an ACS server and then import it into a user's computer. A PAC file can be protected with a
password, which the user needs to enter during a PAC import.
To import a PAC:
1.
2.
3.
4.
Click Import to import a PAC from the PAC server.
Click Open.
Enter the PAC password. (Optional)
Click OK closes this page. The selected PAC is used for this wireless profile.
EAP-FAST CCXv4 enables support for the provisioning of other credentials beyond the PAC currently provisioned
for tunnel establishment. The credential types supported include trusted CA certificate, machine credentials for
machine authentication, and temporary user credentials used to bypass user authentication.
Use a certificate (TLS Authentication)
1. Click Use a certificate (TLS Authentication)
2. Click Identity Protection when the tunnel is protected.
3. Select one of the following:
❍
Use a user certificate on this computer. Click Select to choose the user certificate. Click OK.
Proceed to Step 4.
❍
Use the certificate issued to this computer. Proceed to Step 5.
❍
Use my smart card. Select if the certificate resides on a smart card. Proceed to Step 5.
4. User Name: Enter the user name assigned to the user certificate.
5. Click Next.
Step 2 of 3: EAP-FAST Additional Information
If you selected Use a certificate (TLS Authentication) and Use a user certificate on this computer, click
Next (no roaming identity is required) and proceed to Step 3 to configure EAP-FAST Server certificate settings. If
you do not need to configure EAP-FAST server settings, click OK to save your settings and return to the Profiles
page.
If you selected to use a smart card, add the roaming identity, if required. Click OK to save your settings and
return to the Profiles page.
If you did not select Use a certificate (TLS Authentication), click Next to select an Authentication Protocol.
CCXv4 permits additional credentials or TLS cipher suites to establish the tunnel.
Authentication Protocol: Select either GTC, or MS-CHAP-V2 (Default)
Generic Token Card (GTC)
GTC may be used with Server-Authenticated Mode . This enable peers using other user databases as Lightweight
Directory Access Protocol (LDAP) and one-time password (OTP) technology to be provisioned in-band. However,
the replacement may only be achieved when used with the TLS cipher suites that ensure server authentication.
To configure a one-time password:
1. Authentication Protocol: Select GTC (Generic Token Card).
2. User Credentials: Select Prompt each time I connect
3. On connection prompt for: Select one of the following:
❍
Static Password: On connection, enter the user credentials.
❍
One-time password (OTP): Obtain the password from a hardware token device.
❍
PIN (Soft Token): Obtain the password from a soft token program.
4. Click OK.
5. Select the profile on the Wireless Networks list.
6. Click Connect. When prompted, enter the user name, domain and one-time password (OTP).
7. Click OK.
MS-CHAP-V2. This parameter specifies the authentication protocol operating over the PEAP tunnel.
1. User Credentials: Select one of the following options:
❍
Use Windows Logon: Allows the 802.1x credentials to match your Windows user name and
password. Before connection, you are prompted for your Windows logon credentials.
NOTE: This option is unavailable if Pre-Logon Connect is not selected during installation of the
Intel PROSet/Wireless software. Refer to Install or Uninstall the Single Sign On Feature.
❍
❍
Prompt each time I connect: Prompts for user name and password every time you log onto the
network.
Use the following user name and password: The user name and password are securely
(encrypted) saved in the profile.
■
User Name: This user name must match the user name that is set in the authentication
server.
■
Domain: Name of the domain on the authentication server. The server name identifies a
domain or one of its subdomains (for example, zeelans.com, where the server is blueberry.
zeelans.com).
NOTE: Contact your administrator to obtain the domain name.
■
■
Password: This password must match the password that is set in the authentication server.
The entered password characters display as asterisks.
Confirm Password: Reenter the user password.
2. Roaming Identity: If the Roaming Identity is cleared, %domain%\%username% is the default.
When 802.1x MS RADIUS is used as an authentication server, the server authenticates the device
that uses the Roaming Identity user name from Intel PROSet/Wireless software, and ignores the
Authentication Protocol MS-CHAP-V2 user name. This feature is the 802.1x identity supplied to
the authenticator. Microsoft IAS RADIUS accepts only a valid user name (dotNet user) for EAP
clients. When 802.1x MS RADIUS is used, enter a valid user name. For all other servers, this is
optional. Therefore, it is recommended to use the desired realm (for example,
anonymous@myrealm) instead of a true identity.
Step 3 of 3: EAP-FAST Server
Authenticated-TLS-Server Provisioning Mode is supported using a trusted CA certificate, a self-signed server
certificate, or server public keys and GTC as the inner EAP method.
Validate Server Certificate:
●
●
Validate Server Certificate:
●
Certificate Issuer: The server certificate received during TLS message exchange must be issued by
this certificate authority (CA). Trusted intermediate certificate authorities and root authorities whose
certificates exist in the system store are available for selection. If Any Trusted CA is selected, any CA
in the list is acceptable.
●
Allow intermediate certificates: The server certificate received during negotiation may have been
issued directly by the CA or additionally by one of its intermediate certificate authorities. Select to
allow a number of unspecified certificates to be in the server certificate chain between the server
certificate and the specified CA. If cleared, then the specified CA must have been directly issued by
the server certificate.
Specify Server or Certificate Name: Select if you want to specify your server or certificate name.
The server name or a domain to which the server belongs, depends on which of the two options
below has been selected.
●
●
Server name must match exactly: When selected, the server name entered must match exactly
the server name found on the certificate. The server name should include the fully qualified domain
name (for example, Servername.Domain name).
Domain name must end in specified name: When selected, the server name identifies a domain
and the certificate must have a server name belonging to this domain or to one of its sub-domains
(for example, zeelans.com, where the server is blueberry.zeelans.com).
NOTE: These parameters should be obtained from the administrator.
3. Click OK to close the security settings.
EAP-FAST User Settings
NOTE: If an Administrator Package was installed on a user' computer that did not apply the Cisco
Compatible Extensions, Version 4 Application Setting, only EAP-FAST User settings are available for
configuration.
To set up a client with EAP-FAST authentication:
1.
2.
3.
4.
5.
6.
7.
8.
9.
Click Profiles on the Intel PROSet/Wireless main window.
On the Profile page, click Add to open the Create Wireless Profile Wizard's General Settings.
Wireless Network Name (SSID): Enter the network identifier.
Profile Name: Enter a descriptive profile name.
Operating Mode: Click Network (Infrastructure).
Click Next to open the Security Settings.
Click Enterprise Security.
Network Authentication: Select WPA-Enterprise or WPA2-Enterprise.
Data Encryption: Select one of the following:
❍
TKIP provides per-packet key mixing, a message integrity check and a rekeying mechanism.
❍
AES-CCMP (Advanced Encryption Standard - Counter CBC-MAC Protocol) is used as the data
encryption method whenever strong data protection is important. AES-CCMP is recommended.
10. Enable 802.1x: Selected.
11. Authentication Type: Select EAP-FAST to be used with this connection.
12. Click Cisco Options to select Allow Fast Roaming (CCKM) which enables the client wireless adapter for
fast secure roaming.
EAP-FAST User:
Select the credential retrieval method:
1. Select the user credentials
●
Use the Windows logon user name and password: The user credentials are retrieved from the
Windows log on process.
NOTE: This option is unavailable if Pre-Logon Connect is not selected during installation of the Intel
PROSet/Wireless software. Refer to Install or Uninstall the Single Sign On Feature.
●
●
Prompt for the user name and password: Prompts for user name and password before you
connect to the wireless network. The user name and password must first be set in the authentication
server by the administrator.
Use the following user name and password: The user name and password must be first set in
the authentication server by the administrator.
■
User Name: This user name must match the user name that is set in the authentication
server.
■
Domain: Name of the domain on the authentication server. The server name identifies a
domain or one of its sub-domains (for example, zeelans.com, where the server is blueberry.
zeelans.com).
NOTE: Contact your administrator to obtain the domain name.
Password: This password must match the password that is set in the authentication server.
The entered password characters display as asterisks.
■
Confirm Password: Reenter the user password.
2. Allow automatic provisioning of Protected Access Credentials (PAC):
■
EAP-FAST uses a PAC key to protect the user credentials that are exchanged. All EAP-FAST
authenticators are identified by an authority identity (A-ID). The local authenticator sends its AID to
an authenticating client, and the client checks its database for a matching AID. If the client does not
recognize the AID, it requests a new PAC.
Click PACs to view any PACs that have already been provisioned and reside on this computer. A PAC
must have already been obtained to clear Allow automatic provisioning on the Security Settings.
NOTE: If the provisioned Protected Access Credential (PAC) is valid, Intel(R) PROSet/Wireless does
not prompt the user for acceptance of the PAC. If the PAC is invalid, Intel PROSet/Wireless fails the
provisioning automatically. A status message is displayed in the Wireless Event Viewer that an
administrator can review on the user's computer.
PAC distribution can also be completed manually (out-of-band). Manual provisioning enables you to
create a PAC for a user on an ACS server and then import it into a user's computer. A PAC file can be
protected with a password, which the user needs to enter during a PAC import.
To import a PAC:
1.
2.
3.
4.
5.
Click PACs to open the Protected Access Credentials (PAC) list.
Click Import to import a PAC that resides on this computer or a server.
Select the PAC and click Open.
Enter the PAC password (optional).
Click OK to close this page. The selected PAC is added to PAC list.
6. Click OK to save the EAP-FAST settings and return to the Profiles list. The PAC is used for this wireless
profile.
Back to Top
Back to Contents
●
Trademarks and Disclaimers
Back to Contents
Troubleshooting: Intel(R) PRO/Wireless 3945ABG Network
Connection User Guide
●
●
●
Intel(R) Wireless Troubleshooter
Wireless Event Viewer
Resolve Errors
Intel Wireless Troubleshooter
The Intel Wireless Troubleshooter is an application that can help you resolve wireless network connection issues. When a
connection issue is detected, a desktop alert appears at the bottom right corner of your desktop screen. Once you click
on the desktop alert, a diagnostic message displays the steps recommended to resolve the connection issue. For
example, if a connection issue occurred because of an invalid password, the Profile Wizard application is launched when
you click on a displayed hyperlink. You can also launch Wireless Event Viewer and enable or disable alert notifications.
The Intel Wireless Troubleshooter is supported under Microsoft Windows XP and Microsoft Windows 2000.
Intel Wireless Troubleshooter Description
The Intel Wireless Troubleshooter contains two panes. The left pane displays a list of available tools. The right pane
displays the current connection issue. This pane is divided into two sections: the error message and the recommended
action. The recommended action contains descriptions about available utilities and helps to resolve the associated
connection issue. If you click on a help link, the help text is displayed in a window. If you click on the associated issue
resolution link, a program is launched to resolve the connection issue.
Available Help
Date Time error message:
●
●
●
Description of error.
Link to resolve error (if available). See Resolve Errors below.
Link to recommended steps to resolve error.
Wireless Event Viewer
Launches Wireless Event Viewer.
Disable Notification/Enable
Notification
Select to disable or enable alert notifications.
Menu Options
File
Exit: Click to exit the Intel Wireless Troubleshooter application.
Help
Intel(R) Wireless Troubleshooter Help: Displays online
help on the Intel Wireless Troubleshooter.
About: Displays version information for the Intel Wireless
Troubleshooter.
Wireless Event Viewer
The Wireless Event Viewer program displays a list of error log records. You can save all available log records to a binary
format file for sending to customer support. To launch Wireless Event Viewer, from the Tools menu, click Intel Wireless
Troubleshooter. Click Wireless Event Viewer.
Wireless Event Viewer Description
Name
Description
File
To change the storage location of the log file.
1. Click Settings to open the Wireless Event Viewer Settings.
2. Specify the default folder for saved log files: The current folder is
displayed. The default location is the desktop. Click Browse to specify a
new folder location.
3. Click OK to close and apply the new changes. Click Cancel to close
without applying any changes.
Exit: Click to exit Wireless Event Viewer and return to the Intel Wireless
Troubleshooter.
Help?
Provides help information for this page.
About: Displays version information for the Intel Wireless Troubleshooter.
Wireless Event Viewer
Information
Level: The severity level of the connection issue is indicated by an icon.
The severity levels are:
●
●
●
Information
Error
Warning
Description: Brief description of the connection issue.
Date and Time: Date and time of the detected connection issue. This column
can be sorted in ascending or descending order. Click the column header to
sort the displayed events.
Save As
Saves the available log. Use the suggested name or change it.
Clear
Removes the information in the Wireless Event Viewer.
Resolve Errors
Use the following recommendations to resolve network connection issues detected by Intel Wireless Troubleshooter.
Authentication failed due to invalid user credentials
Authentication failed due to invalid user name
Authentication failed due to an invalid server certificate
Authentication failed due to invalid server credentials
Authentication failed due to invalid server identity
Authentication failed due to an invalid user certificate
Incorrect PIN for retrieving certificate
Authentication failed because the AAA server is unavailable
The wireless adapter failed to get a valid IP address
Authentication failed because timer expired
Smart Card was unexpectedly removed
Disconnection from an Access Point
GSM adapter was unexpectedly removed
The AAA Server Rejected the EAP Method
Administrator Profile Failed to Authenticate
Administrator Profile Failed to Obtain an IP Address from the DHCP Server
The Application Failed to Start
Authentication failed due to invalid user credentials: Reenter
credentials
This authentication error can be caused by invalid user credentials (could be user name, password or other form of user
credentials).
Use the following steps to resolve this error:
1.
2.
3.
4.
5.
6.
Select a TTLS, PEAP, LEAP or EAP-FAST profile from the Profiles list.
Click Properties to open the General Settings.
Click Next to open the Security Settings. Enterprise Security is selected.
The 802.1x Authentication Type should be selected.
Select Use the following for User Credentials.
Verify the User Name, Domain, and password information.
●
If Use Windows logon or Prompt each time I connect is selected, verify that you use the correct user
credentials information when you connect to the wireless network.
7. Click OK to save the settings.
Authentication failed due to invalid user name: Reenter user name
This authentication error can be caused by an invalid user name.
Use the following steps to resolve this error:
1.
2.
3.
4.
Select the appropriate profile from the Profiles list.
Click Properties to open the General Settings.
Click Next to open the Security Settings. Enterprise Security is selected.
Select the appropriate 802.1x Authentication Type.
❍
For TTLS, PEAP, LEAP or EAP-FAST profiles: Use the following option should be selected.
❍
Verify the User Name information.
5. Click OK to save the settings.
Authentication failed due to an invalid server certificate: Select
another certificate
This authentication error can be caused by an invalid server certificate.
Use the following steps to resolve this error:
1.
2.
3.
4.
Select the appropriate profile from the Profiles list.
Click Properties to open the General Settings.
Click Next to open the Security Settings. Enterprise Security is selected.
The appropriate 802.1x Authentication Type is selected.
●
For TTLS and PEAP profiles: Verify that the correct Authentication Type is selected from the list. Click Next
to select another certificate from the list of installed certificates or specify another server or certificate
name. Click OK.
❍
For TLS profiles: Click Select and choose another certificate from the list of installed certificates and click
OK.
Notes about certificates: The specified identity should match who the certificate is issued to and should
be registered on the authentication server (for example, RADIUS server) that is used by the authenticator.
Your certificate must be valid with respect to the authentication server. This requirement depends on the
authentication server and generally means that the authentication server must know the issuer of your
certificate as a Certificate Authority. You should be logged in with the same user name you used when the
certificate was installed.
5. Click Close.
6. Click OK to save the settings.
Authentication failed due to invalid server credentials: Reenter
server credentials
This authentication error can be caused by an invalid server (domain) credential.
Use the following steps to resolve this error:
1.
2.
3.
4.
Select the appropriate profile from the Profiles list.
Click Properties to open the General Settings.
Click Next to open the Security Settings. Enterprise Security is selected.
Select the appropriate 802.1x Authentication Type.
●
For TTLS and PEAP profiles: Select Use the following for user credentials.
■
Verify the domain information.
■
If Use Windows logon or Prompt each time I connect is selected, verify that the correct domain
credentials information is used when you connect to the wireless network.
5. Click OK to save the settings.
Authentication failed due to invalid server identity: Reenter server
name
This authentication error can be caused by invalid server identity information.
Use the following steps to resolve this error:
1.
2.
3.
4.
5.
6.
Select the appropriate profile from the Profiles list.
Click Properties to open the General Settings.
Click Next to open the Security Settings. Enterprise Security is selected.
Select the appropriate 802.1x Authentication Type.
For TTLS and PEAP profiles: Verify that the Roaming Identity server name is correct.
Click OK to save the settings.
Authentication failed due to an invalid user certificate: Reenter
user credentials
This authentication error can be caused by invalid server (domain) credentials.
Use the following steps to resolve this error:
1.
2.
3.
4.
5.
6.
7.
8.
9.
Select the appropriate profile from the Profiles list.
Click Properties to open the General Settings.
Click Next to open the Security Settings. Enterprise Security is selected.
Select the appropriate 802.1x Authentication Type.
For TTLS and PEAP profiles: Verify that the correct Authentication Type is selected.
Click Select and choose another certificate from the list of installed certificates.
Click OK.
For TLS profiles: Click Select and choose another certificate from the list of installed certificates.
Click OK.
Notes about Certificates: The specified identity should match who the certificate is issued to and should
be registered on the authentication server (for example, RADIUS server) that is used by the authenticator.
Your certificate must be valid with respect to the authentication server. This requirement depends on the
authentication server and generally means that the authentication server must know the issuer of your
certificate as a Certificate Authority. You should be logged in with the same user name you used when the
certificate was installed.
9. Click Close.
10. Click OK to save the settings.
Incorrect PIN for retrieving certificate: Reenter PIN
The certificate retrieval failed because of an incorrect PIN.
Recommended action: Enter the correct PIN.
Authentication failed because the AAA server is unavailable
The wireless adapter is associated to the access point, but the 802.1x authentication cannot be completed because of a
response from the authentication server.
Use the following steps to resolve this error:
1. Select the profile
2. Click Connect and attempt to associate with the network and authenticate with the server.
The wireless adapter failed to get a valid IP address
This error can be due to an authentication failure with the network, incorrect encryption keys, or because of a DHCP
server malfunction.
Use the following steps to resolve this error:
1.
2.
3.
4.
5.
Select the appropriate profile from the Profiles list.
Click Properties to open the General Settings.
Click Next to open the Security Settings. Enterprise Security is selected.
Enter the encryption key.
Click OK to save the security settings for the profile.
Authentication failed because timer expired
Authentication failed because the authentication timer expired while this mobile station was authenticating. A rogue
access point or a problem with the RADIUS server could have been the reason for the problem.
Recommended action:
●
●
If a rogue access point is suspected, consider adding this access point to the excluded access point list to prevent
the wireless adapter from connecting to this access point in the future.
If a rogue access point is not suspected, click the profile in the profile list. Click Connect to associate with the
network and attempt to authenticate with the server.
Smart Card was unexpectedly removed
This error occurred because the Smart Card was unexpectedly removed.
Use the following a steps to resolve this error:
1. Insert the Smart Card.
2. Select the 802.1x EAP-SIM authentication profile.
3. Click Connect to try to associate with the network.
Disconnection from an Access Point
The following error messages display when the wireless adapter is disconnected from the network access point.
Disconnect
Disconnect
Disconnect
Disconnect
Disconnect
Disconnect
Disconnect
Disconnect
Disconnect
from
from
from
from
from
from
from
from
from
access
access
access
access
access
access
access
access
access
point
point
point
point
point
point
point
point
point
due
due
due
due
due
due
due
due
due
to
to
to
to
to
to
to
to
to
failed associations.
authentication failures.
TKIP Michael Integrity check failure.
Class 2 frame non-authentication failure.
Class 3 frame non-association failure.
reassociation failure.
Information Element failure.
EAPOL-Key protocol four-way handshake failure.
802.1x authentication failure.
Recommended action: Select the profile. Click Connect and try to associate with the network.
GSM adapter was unexpectedly removed
See Smart Card was unexpectedly removed
The AAA Server Rejected the EAP Method
This error occurs when the AAA Server does not accept the configured authentication.
Use the following steps to resolve this error:
1.
2.
3.
4.
5.
6.
7.
8.
9.
Double-click the Taskbar icon to open Intel PROSet/Wireless.
Click Profiles on the Intel PROSet/Wireless main window.
Select the associated or last-used profile from the Profiles list.
Click Properties to open the General Settings.
Click Next to open the Security Settings.
Verify that Enable 802.1x is selected.
Verify that the correct authentication type is selected.
Enter the required security information.
Click OK. The profile is now reapplied. Intel PROSet/Wireless attempts to connect to the wireless network.
Error Occurred Because the GSM Adapter Was Unexpectedly
Removed
This error occurs when the GSM adapter is not fully inserted or is unexpectedly removed from the mobile station.
Use the following steps to resolve this error:
1.
2.
3.
4.
Reinsert the GSM adapter.
Double-click the Intel PROSet/Wireless Software icon at the bottom right of the screen.
Select the associated or last-used profile from the profiles list.
Click Connect. The profile is now re-applied. Intel PROSet/Wireless Software attempts to connect to the wireless
network.
An Administrator Profile Failed to Authenticate
This error occurs when the credentials in the profile are not accepted by the authenticator (for example, an access point
or AAA server). Please contact your Administrator to resolve this problem.
Administrator Profile Failed to Obtain an IP Address from the DHCP
Server
This error can occur due to an authentication failure with the network, incorrect encryption keys, or because of a DHCP
server malfunction. Please contact your Administrator to resolve this problem.
The Application Failed to Start
The application that you specified to start when this profile connected, could not be found. Verify the path and file name
in the Profile Wizard Advanced Settings.
To verify the path and file name:
1.
2.
3.
4.
5.
6.
From the Intel PROSet/Wireless main window, click Profiles.
Select the Profile.
Click Properties.
Click Advanced.
Click Enable Start Application. Verify that the file name and file location path are correct.
Click OK to close the Advanced Settings.
7. Click OK to close the General Settings and return to the Profiles list.
Back to Top
Back to Contents
Trademarks and Disclaimers
Back to Contents
Administrator Tool: Intel(R) PRO/Wireless 3945ABG
Network Connection User Guide
●
●
●
●
●
●
●
●
●
Set Administrator Password
Administrator Packages
Administrator Profiles
❍
Persistent
❍
Pre-Logon
❍
Voice over IP (VoIP)
Administrator Tool Settings
Application Settings
Adapter Settings
Software
EAP-FAST A-ID Groups
Administrator Tasks
The Administrator Tool is used by the person who has administrator privileges on this computer.
This tool is used to configure common (shared) profiles, pre-logon profiles, and persistent
connection profiles.The Administrator Tool can also be used by an Information Technology
department to configure user settings within the Intel(R) PROSet/Wireless software and to
create custom install packages to export to other systems.
The Administrator Tool is located on the Tools menu. It must be selected during installation of
the Intel PROSet/Wireless software or the feature is not displayed in the Tools menu.
Set Administrator Password
Users cannot modify Administrator settings or profiles unless they have the password for this
tool. When you first access the Administrator Tool, you are required to enter a password. The
password must not exceed 100 characters. Null passwords are not allowed.
1. Enter password: Create a password (maximum 100 characters).
2. Confirm Password: Reenter the password.
3. Click OK. The Open Administrator Package displays.
To change the existing password:
1.
2.
3.
4.
5.
6.
Click Administrator Tool from the Tools menu.
Click Change Password on the password entry form.
Old Password: Enter the existing password.
New Password: Enter the new password.
Confirm Password: Reenter the new password again.
Click OK to save the new password and enter the Administrator Tool.
Administrator Packages
The Administrator Packages are used to save administrative profiles and other settings. You can
copy or send this self-extracting executable to clients on your network. When the executable
runs, the contents are installed and configured on the destination computer.
To create a new package:
1.
2.
3.
4.
5.
6.
7.
8.
9.
10.
On the Tools menu, click Administrator Tool.
Enter your password to the Administrator Tool.
Administrator Package: Click Create a new package.
Click OK.
Select Include Settings on the Profiles, Application Settings, Adapter Settings, or
Software pages to configure the options to be included in the package.
Click Close.
You are notified: The current package is changed. Would you like to save the
changes?
Click Yes. Save the executable file to a directory on the local disk drive.
Click Save. The file is created. NOTE: This process may take several minutes.
Click Finished to view the package contents.
❍
Click Apply this file to this computer if you want to use the package
configuration on the Administrator's computer.
❍
Copy the executable file to any user's computer to install the configuration that has
been saved in the package. It is a silent install.
NOTE: You can also select Save Package on the Administrator Tool File Menu to
save the package.
To edit a package:
1. Access the Administrator Tool.
2. On the Open Administrator Package page, click Open to edit an existing package.
3. Click Browse. Locate the package's executable file.
4. Click Open. Make your updates.
5. Click Close.
6. You are notified: The current package is changed. Would you like to save the
changes?
7. Click Yes. Save the executable file to a directory on the local disk drive.
NOTE: You can also select Open Package on the Administrator Tool File menu to
edit an Administrator Package.
Administrator Profiles
Administrator Profiles are owned and managed by the network administrator or the
administrator of this computer. These profiles are common or shared by all users on this
computer. However, end users cannot modify these profiles. They can only be modified from
the Administrator Tool, which is password protected.
There are three types of Administrator Profiles: Persistent, Pre-Logon/Common and Voice
over IP (VoIP).
Persistent Connection
Persistent profiles are applied at boot time or whenever no one is logged on the computer. After
a user logs off, a Persistent profile maintains a wireless connection either until the computer is
turned off or a different user logs on.
Persistent Connect key points:
●
The following types of profiles can be created as Persistent profiles:
❍
All profiles that do not require 802.1x authentication (for example, Open
authentication with WEP encryption, Open authentication with no encryption).
❍
All profiles with 802.1x authentication that have the credentials saved: MD5, LEAP,
EAP-FAST.
❍
Profiles with security settings that include the "Use the following user name and
❍
password" option.
Profiles that use the machine certificate to authenticate.
NOTE: Intel PROSet/Wireless supports machine certificates. However, they are not
displayed in the certificate listings.
WPA-Enterprise profiles that do not use a user certificate.
❍
WPA-Personal profiles.
Persistent profiles are applied at system power up and after a user logs off.
❍
●
To create a Persistent Profile:
1.
2.
3.
4.
5.
6.
7.
Click Include Profiles.
Click Persistent.
Click Add to open the General Settings.
Wireless Network Name (SSID): Enter the network identifier.
Profile Name: Enter a descriptive profile name.
Operating Mode: Network (Infrastructure) is selected.
Administrator Profile Type: Persistent: Active when no users are logged on is
selected.
8. Click Next.
9. Click Enterprise Security to open the Security Settings. See Enterprise Settings for
802.1x security configuration information.
10. Click OK.
Pre-Logon Connection
Pre-Logon/Common profiles are applied prior to a user log on. If Single Sign On support is
installed, the profile is applied and connection is made prior to the the Windows log on
sequence (pre-logon).
If Single Sign On support is not installed, the profile is applied once the user session is active.
Pre-logon/Common profiles always appear at the top of a the Profiles list. A user can still
prioritize their own profiles that they have created but they cannot reprioritize Pre-logon/
Common Profiles. Since these profiles appear at the top of the profiles list, Intel PROSet/
Wireless automatically attempts to connect to the Administrator profiles first before any user
created profiles.
NOTE: Only administrators can create or export Pre-Logon/Common profiles.
Pre-Logon Connect key points are:
●
●
Pre-Logon Connect is active only at the Windows log on.
The following types of profiles can be created as Pre-Logon profiles:
802.1x MD5, LEAP, EAP-FAST profiles that use either the "Use the Windows logon
user name and password" or "Use the following user name and password"
credentials when configuring the profile's security settings.
❍
802.1x PEAP or TTLS profiles with user or machine certificates (the user must have
administrative rights to use machine certificates).
❍
TLS profiles that use digital certificates to verify the identity of a client and a
server.
❍
EAP-SIM profiles that use a Subscriber Identity Module (SIM) card to validate your
credentials with the network.
❍
All non-802.1x (Open and WEP) Common or User Based profiles.
A Pre-Logon profile is applied at Windows user log-on time.
❍
●
Pre-Logon/Common Connection Status
Pre-Logon support is installed during a Custom install of the Intel PROSet/Wireless software.
Refer to Install and Uninstall the Software for more information.
NOTE: If the Single Sign On or Pre-Logon Connect features are not installed, an
administrator is still able to create Pre-Logon/Common profiles for export to a
user's computer.
The following describes how the Pre-Logon Connect feature functions from system power-up.
The assumption is that there is a saved profile with valid security settings marked with "Use
Windows Logon user name and password" that are applied at the time of Windows log on.
1. After a system power-up, enter your Windows log on domain, user name, and password.
2. Click OK. The Pre-Logon profile Status page displays the progress of the network
connection. After the wireless adapter is connected to the network access point, the
Status page closes and the Windows user logs on.
●
If the corresponding access point rejects your credentials during the Pre-Logon
connect, the profile credentials prompts you for your user credentials.
●
Enter your credentials.
●
Click OK. The profile is applied and the Status page displays the progress of the
connection status until you are logged onto Windows.
●
Click Cancel on the Credentials page to select another profile.
NOTE: A user certificate can only be accessed by a user that has been
authenticated on the computer. Therefore, a user should log onto the computer
once (using either a wired connection, alternate profile or local log in) before using
a pre-logon profile that authenticates with a user certificate
When a user logs off, any wireless connection is disconnected and a persistent profile (if one is
available) is applied. Under certain circumstances it is desirable to maintain the current
connection (for example, if user specific data needs to be uploaded to the server post-log off or
when roaming profiles are used).
Create a profile which is marked as both pre-logon and persistent to achieve this functionality.
If such a profile is active when the user logs off, the connection is maintained.
To create a Pre-Logon/Common Profile:
1.
2.
3.
4.
5.
6.
7.
Click Include Profiles.
Click Pre-Logon/Common.
Click Add to open the General Settings.
Wireless Network Name (SSID): Enter the network identifier.
Profile Name: Enter a descriptive profile name.
Operating Mode: Network (Infrastructure) is selected.
Administrator Profile Type: Pre-logon/Common: Active when a user is logged
on. This profile is shared by all users. This profile type is already selected.
8. Click Next.
9. Click Advanced to open the Advanced Settings. Use the Advanced Settings to set the
following:
❍
Auto-Connect: Select to automatically or manually connect to a profile.
❍
Auto-Import this profile (for network administrators only).
❍
Mandatory Access Point: Select to associate the wireless adapter with a specific
access point.
❍
Password Protection: Select to password protect a profile.
❍
Start application: Specify a program to be started when a wireless connection is
made.
❍
User Name Format:
An administrator can select the user name format for the authentication
server.
The choices are:
❍
❍
❍
❍
user (default)
user@domain
[email protected]
DOMAIN\user
10. Click OK to close the Advanced Settings.
11. Click Enterprise Security to open the Security Settings. See Enterprise Security for
802.1x security configuration information.
12. Click OK to save the profile and add it to the Administrator profiles list.
NOTE: If a Persistent connection was already established, a Pre-Login/Common profile is
ignored if the profile is configured with both Pre-Logon/Common and Persistent
connection options.
Voice over IP (VoIP) Profiles
Intel PROSet/Wireless software supports VoIP third-party soft-phone applications.
Third party VoIP applications support Voice Codecs. Codecs are used to encode voice for
transmission across IP networks. Codecs generally provide a compression capability to save
network bandwidth.
Intel PROSet/Wireless software supports the following International Telecommunications Union
(ITU) codec standards:
Codec
Algorithm
Data Rate
(Kbps)
Comments
ITU
G.711
PCM (Pulse Code Modulation)
64
G.711 with mu-law used in
North America and Japan,
while G.711 with A-law used
in the rest of the world.
ITU
G.722
SBADPCM (Sub-Band
Adaptive Differential Pulse
Code Modulation)
48, 56 and 64
ITU
G.723
Multi-rate Coder
5.3 and 6.4
ITU
G.726
ADPCM (Adaptive Differential
Pulse Code Modulation)
16, 24, 32, and 40
ITU
G.728
LD-CELP (Low-Delay Code
Excited Linear Prediction)
16
ITU
G.729
CS-ACELP (Conjugate
Structure Algebraic-Code
Excited Linear Prediction)
8
An administrator can create profiles that use pre-existing VoIP profiles to configure various
codec data rates and frame rates to improve voice quality in VoIP transmissions.
To create a VoIP profile:
NOTE: Ensure Voice over IP is not disabled in the Administrator Tool Application
Settings. It is enabled by default.
1.
2.
3.
4.
Click Include Profiles.
Select a profile from the list.
Click Properties to open the Create VoIP Profiles page.
Select the Codec bandwidth, application usage and Frame Rate.
Codec
Usage
Frame Rate
●
●
●
●
●
●
●
●
●
●
●
●
●
●
●
●
●
●
●
●
●
●
●
●
●
●
●
●
G711_64kbps
G711_56kbps
G711_48kbps
G722_64kbps
G722_56kbps
G722_48kbps
G722_1_32kbps
G722_1_24kbps
G722_1_16kbps
G723_1_6_4kbps
G723_1_5_3kbps
G726_16kbps
G726_24kbps
G726_32kbps
G726_40kbps
G728_12_8kbps
G728_16kbps
G729_8kbps
G729a_8kbps
G729b_8kbps
G729ab_8kbps
G729d_6_4kbps
G729e_8kbps
G729e_11_8kbps
GIPS_iPCM_VARIABLE
G722_2_VARIABLE
SPEEX_VARIABLE
GIPS_iSAC_VARIABLE
●
●
●
●
●
Interactive
Voice
Audio
Conference
Voice Data
Video
Streaming
Audio
5. Click OK to return to the Profiles list.
6. Click Close to save the profile settings to a package.
Administrator Tool Settings
●
●
●
10
20
30
An Administrator can determine which order Administrator profiles are placed in the
Administrator Tool's Profiles list.
1. Click the Administrator Tool Tools menu.
2. Click Settings to open the Administrator Tool Settings.
❍
Select Insert on Top to always place Administrator profiles at the top of the
Administrator Tool's Profiles list.
❍
Select Insert on Bottom to always place Administrator profiles at the bottom the
Administrator Tool's Profiles list.
3. Click OK to close and return to the Administrator Tool.
Application Settings
An administrator can select which level of control that users have over their wireless network
connections.
To configure Application Settings:
1. Click Include settings.
2. Enable or disable each setting listed in the table below.
Name
Description
802.11a Radio On/Off Control
Select Add 802.11a Radio On/Off Selection to
allow a user to turn on or off the 802.11a radio on
their computer. This adds the 802.11a Radio Off
control to the Taskbar menu and the Intel PROSet/
Wireless main window on a user's computer.
Once this feature is installed on a user's computer,
follow the instructions below to turn on or off the
802.11a radio control.
To turn off the 802.11a Radio:
1. On the Intel PROSet/Wireless Main window,
click the Wireless On button. The list of radio
options are displayed.
2. Select 802.11a Radio Off. The 802.11a radio
is now inactive.
To turn on the 802.11a Radio:
1. On the Intel PROSet/Wireless Main window,
click the 802.11a Radio Off button. The list of
radio options are displayed.
2. Select Wireless On. The 802.11a radio is now
active.
NOTE: This option is available only for wireless
adapters that support 802.11a, 802.11b and 802.11g.
This feature is not installed through an Administrator
Package when a user's computer has an Intel(R) PRO/
Wireless 3945BG Network Connection or an Intel(R)
PRO/Wireless 2200BG Network Connection.
802.1x Authentication
Enable a user to create or connect to profiles that
support different 802.1x authentication EAP types.
Select which 802.1x authentication EAP types you
want enabled on a user’s computer: MD5, EAP-SIM,
LEAP, TLS, TTLS, PEAP, EAP-FAST.
Administrator Tool
Disable access to the Administrator Tool on a user’s
computer.
Application Auto Launch
Select to start a batch file, executable file, or script
automatically when a specific profile connects to the
network. For example, start a Virtual Private Network
(VPN) session automatically whenever a user connects
to a wireless network.
Application On Radio Toggle
Enables a third-party application to disable the Intel
PROSet/Wireless Wireless On or Wireless Off switch.
CCXv4
Select Enable CCSv4 to Enable Cisco Compatible
Extensions, version 4 (CCXv4) features for EAP-FAST
profiles.
NOTE: The EAP-FAST A-ID (Authority Identifier)
Groups feature in the Administrator Tool is
unavailable if CCXv4 is not enabled.
Select which of the following prompts to enable or
disable on a user's computer for EAP-FAST PAC
provisioning:
Turn on prompt and warnings for
unauthenticated provisioning: Option to turn off
prompts and warnings for PAC auto-provisioning if
there is no PAC or there is no PAC that matches the AID sent by the server that it is connected to.
Turn off prompts when switching default server
(A-ID): Option to turn off prompts when a client
encounters a server that has provisioned a PAC before
but is not currently selected as the default server.
Turn off unauthenticated provisioning after PAC
is provisioned: Option to turn off auto-provisioning
automatically after a PAC for that A-ID has been
provisioned.
NOTE: This feature is not installed through an
Administrator Package when a user's computer has an
Intel(R) PRO/Wireless 3945BG Network Connection,
an Intel(R) PRO/Wireless 2915ABG Network
Connection, or an Intel(R) PRO/Wireless 2200BG
Network Connection.
Cache Credentials
Select to save credentials after a user logs on. If the
wireless connection temporarily disconnects, the
saved credentials are used upon reconnection. The
credentials are cleared when the user logs off.
NOTE: if cleared, The Prompt each time I connect
option is unavailable when creating profiles
Device to Device (ad hoc)
Enable or disable whether a user is able to either
create ad hoc profiles or join ad hoc networks.
Select one of the following to enable or disable
whether the user can connect to device to device
networks:
●
●
●
Enable device to device networking.
Enable secure device to device networking only.
Disable device to device networking.
Select to either allow a user to configure profiles with
device to device (ad hoc) settings or prevent
configuration of device to device (ad hoc) profiles.
●
●
Show device to device application settings
Hide device to device application settings.
To remove the Device to device (Ad hoc) operating
mode from the Profile Wizard General Settings, select
both Disable device to device networking and
Hide device to device application settings. This
prevents a user from creating profiles that support
Device to device (Ad hoc) network.
Import and Export
Select to import to or export profiles from a user’s
computer. Enable permits auto import of user profiles
when copied to an auto import folder.
Message On Radio Toggle
Enables a third-party application to notify a user that
the Intel PROSet/Wireless radio is either on or off.
Microsoft Windows XP Coexistence Select Enable Microsoft Wireless Zero
Configuration and Intel PROSet/Wireless to
coexist on this system.
Enable this option to allow Microsoft Wireless Zero
Configuration and Intel PROSet/Wireless to exist
together on this system. When you select this option,
you prevent Microsoft Windows XP Wireless Zero
Configuration Service from being disabled when Intel
PROset/Wireless is enabled.
Pre-Logon Cisco Mode
Enable Cisco Mode during a pre-logon connection.
Cisco access points have the capability to support
multiple wireless network names (SSIDs) but only
broadcast one. In order to connect to such an access
point, an attempt is made to connect with each
profile. This is referred to as Cisco Mode.
NOTE: The pre-logon connection may take longer to
connect.
Profile Connectivity
Select the profile connectivity level on a user’s
computer?
Disable Intel Profile Switching. Users are only able
to connect with the first Pre-Logon (Common) profile
or connect with Pre-Logon profiles only.
●
●
Security Level
Allow the user to connect to all administrator
profiles.
Allow the user to only connect to the first
administrator profile.
Select the security level on a user's computer?
Users are able to connect to profiles only with this
security level.
●
●
Single Sign On
Allow the user to connect to networks with
Personal Security only.
Allow the user to connect to networks with
Enterprise Security.
Select which Administrator Profile types are enabled
on a user computer?
●
●
Persistent Connection: Profiles are active
during start up and when no user is logged onto
the computer.
Pre-Logon or Common Connection: Profiles
are active immediately once a user logs onto
the computer.
Common profiles are enabled if PreLogon features are not installed on a
user’s computer. Common profiles are
active after a user has logged on and the
session becomes active.
Persistent and Pre-Logon or Common
profiles are placed at the top of the user’s
profiles list. They cannot be changed or
deleted by a user.
Voice over IP
Enables a third-party software to use the VoIP
application on a user's computer. The default setting
enables this feature.
Wi-Fi Manager
Select which Wi-Fi manager controls a user’s wireless
connections. Use either the previous logged on user’s
Wi-Fi manager or allow each user to select their
preferred Wi-Fi manager.
●
●
Allow all users to switch between Intel PROSet/
Wireless and Microsoft Windows XP Wireless
Zero Configuration after log on.
Wi-Fi manager at log on is determined by the
active Wi-Fi manager when the last user logged
off
Close
Closes the Administrator Tool.
Help?
Provides help information for this page.
Adapter Settings
To configure Adapter Settings:
1. Click Include settings.
2. For each setting listed in the table below, select one of the following options:
❍
Use default value: Resets the setting on the user machine to the default value.
❍
No change: Maintains the user selected value. The administrator decides not to
enforce all the settings on a user's computer. The user can change the adapter
setting values from the Intel PROSet/Wireless Advanced menu.
❍
Select the value: The administrator selects the value that is to be used on the
user's computer.
Name
Description
Ad Hoc Channel
There is no need to change the channel unless the other
computers in the ad hoc network use a different channel from
the default channel.
Value: Select the allowed operating channel from the list.
●
●
802.11b/g: Select this option when 802.11b and
802.11b (2.4 GHz) ad hoc band frequency is used.
802.11a: Select this option when 802.11a (5 GHz) ad
hoc band frequency is used.
Ad Hoc Power Management Set power saving features for Device to Device (ad hoc)
networks.
●
●
●
Disable: Select when connecting to ad hoc networks
that contain stations that do not support ad hoc power
management
Maximum Power Savings: Select to optimize battery
life.
Noisy Environment: Select to optimize performance or
connecting with multiple clients.
NOTE: This feature is not installed through an Administrator
Package when a user's computer has an Intel(R) PRO/Wireless
3945BG Network Connection, an Intel PRO/Wireless 2915ABG
Network Connection, or an Intel PRO/Wireless 2200BG
Network Connection.
Ad Hoc QoS Mode
Quality of Service (QoS) control in ad hoc networks. QoS
provides prioritization of traffic from the access point over a
wireless LAN based on traffic classification. WMM (Wi-Fi
MultiMedia) is the QoS certification of the Wi-Fi Alliance
(WFA). When WMM is enabled, the adapter uses WMM to
support priority tagging and queuing capabilities for Wi-Fi
networks.
●
●
WMM Enabled.(Default)
WMM Disabled
NOTE: This feature is not installed through an Administrator
Package when a user's computer has an Intel(R) PRO/Wireless
3945BG Network Connection, an Intel PRO/Wireless 2915ABG
Network Connection, or an Intel PRO/Wireless 2200BG
Network Connection.
Mixed Mode Protection
Use to avoid data collisions in a mixed 802.11b and 802.11g
environment. Request to Send/Clear to Send (RTS/CTS)
should be used in an environment where clients may not hear
each other. CTS-to-self can be used to gain more throughput
in an environment where clients are in close proximity and can
hear each other.
Preamble Mode
Changes the preamble length setting received by the access
point during an initial connection. Always use a long preamble
length to connect to an access point. Auto Tx Preamble allows
automatic preamble detection. If supported, short preamble
should be used. If not, use long preamble (Long Tx Preamble).
NOTE: This feature is not installed through an Administrator
Package when a user's computer has an Intel PRO/Wireless
3945ABG Network Connection.
Power Management
Power Management: Allows you to select a balance between
power consumption and adapter performance. The wireless
adapter power settings slider sets a balance between the
computer's power source and the battery.
Select a balance between power consumption and adapter
performance.
PSP - Power Saving Mode
CAM - Constantly Awake Mode
Select one of the Power Saving Mode levels:
PSP CAM: The client adapter is powered up
continuously.
PSP Level 1: PSP set at maximum power.
PSP Levels 2-4: PSP set to maximize power.
PSP Level 5: PSP set to maximize battery life.
PSP Auto: Default in PSP Level 6: Balances
between power consumption and battery life.
NOTE: Power consumption savings vary based on
infrastructure settings.
Roaming Aggressiveness
This setting allows you to define how aggressively a wireless
client roams to improve connection to an access point.
Click Use default value to balance between not roaming and
performance or select a value from the list.
Values:
0: No Roaming: Your wireless client does not
roam. Only significant link quality degradation
causes it to roam to another access point
1-3: Allow Roaming
2: Default: Balances between not roaming and
performance. Click Use default value to select.
4: Maximum Roaming.
Throughput Enhancement
Change the value of the Packet Burst Control.
●
●
Transmit Power
Enable: Select to enable throughput enhancement.
Disable: (Default) - Select to disable throughput
enhancement.
If you decrease the transmit power, you reduce the radio
coverage.
Default Setting: Highest power setting
Values:
TX Minimum: Lowest Minimum Coverage: Set
the adapter to a lowest transmit power. Enable
you to expand the number of coverage areas or
confine a coverage area. Reduce the coverage
area in high traffic areas to improve overall
transmission quality and avoid congestion and
interference with other devices.
TX Level 1
TX Level 2
TX Level 3
TX Maximum: Highest Maximum Coverage:
Set the adapter to a maximum transmit power
level. Select for maximum performance and range
in environments with limited additional radio
devices.
NOTE: The optimal setting is for a user to always set the
transmit power at the lowest possible level still compatible
with the quality of their communication. This allows the
maximum number of wireless devices to operate in dense
areas and reduce interference with other devices that this
radio shares radio spectrum with.
NOTE: This setting takes effect when either Infrastructure or
Ad hoc mode is used.
Wireless Mode
Select which band to use for connection to a wireless network:
●
●
●
●
●
●
802.11a only: Connect the wireless adapter to 802.11a
networks only.
802.11b only: Connect the wireless adapter to
802.11b networks only.
802.11g only: Connect the wireless adapter to
802.11g networks only.
802.11a and 802.11g only: Connect the wireless
adapter to 802.11a and 802.11g networks only.
802.11b and 802.11g only: Connect the wireless
adapter to 802.11b and 802.11g networks only.
802.11a, 802.11b, and 802.11g: (Default) - Connect
to either 802.11a, 802.11b or 802.11g wireless
networks.
NOTE: These wireless modes (modulation types) determine
the discovered access points displayed in the Wireless
Networks list.
OK
Saves settings and return to the previous page.
Close
Closes the page and cancels any changes.
Help?
Provides help information for this page.
Software
Select which of the Intel PROSet/Wireless applications are installed on a user's computers.
1. Select Include Software.
2. Place the Intel PROSet/Wireless installation CD in the CD drive.
3. Specify the Intel PROSet/Wireless Software Installation program: Click Browse
to locate the Autorun.exe file.
4. Click OK.
5. Specify which components you want to export: Select which applications to install
on a user's computer.
❍
Intel Wireless Troubleshooter: Helps you resolve wireless connection issues
❍
Administrator Tool: Installs the Administrator Tool to the Tools menu.
❍
Intel Smart Wireless Solutions: Provides an easy configuration wizard for
❍
❍
connection to a wireless router.
Single Sign On: Installs the Single Sign On features.This tool is used to configure
common (shared) profiles.
Wireless Management Instrumentation: Allows administrators who do not
have Intel PROSet/Wireless installed to remotely manage clients that do have Intel
PROSet/Wireless installed.
NOTE: If you plan to use Novell(R) Client(TM) for Windows, it should be installed
prior to installation of the Intel PROSet/Wireless software. If Intel PROSet/Wireless
is already installed, you should remove it prior to installation of Novell Client for
Windows.
EAP-FAST A-ID Groups
NOTE: This feature is unavailable if CCXv4 is not selected in the Administrator
Tool Application Settings
An Authority Identifier (A-ID) is the radius server that provisions Protected Access Credential
(PACs) A-ID groups. A-ID groups are shared by all users of the computer and allow EAP-FAST
profiles to support multiple PACs from multiple A-IDs.
The A-ID groups can be pre-configured by the administrator and set up through an
Administrator Package on a user's computer. When a wireless network profile encounters a
server with an A-ID within the same group, it uses this PAC without a prompt to the user.
To add an A-ID Group:
1. Select Include A-ID Groups.
2. Click Add. Enter a new A-ID group name.
3. Click OK. The A-ID group is added to the A-ID Group list.
If the A-ID group is locked, then additional A-IDs cannot be added to the group.
To add an A-ID to an A-ID group.
1.
2.
3.
4.
Select a group from the A-ID Groups list.
Click Add in the A-IDs section.
Enter a new A-ID.
Click OK. The A-ID is added to the list.
Administrator Tasks
How to Obtain a Client Certificate
If you do not have any certificates for EAP-TLS (TLS) or EAP-TTLS (TTLS) you must obtain a
client certificate to allow authentication.
Certificates are managed from either Internet Explorer or the Microsoft Windows Control Panel.
Microsoft Windows XP and Microsoft Windows 2000: When a client certificate is obtained,
do not enable strong private key protection. If you enable strong private key protection for a
certificate, you need to enter an access password for the certificate every time this certificate is
used. You must disable strong private key protection for the certificate if you configure the
service for TLS or TTLS authentication. Otherwise, the 802.1x service fails authentication
because there is no logged in user to provide the required password.
Notes about Smart Cards
After a Smart Card is installed, the certificate is automatically installed on your computer and is
chosen from the personal certificate store and root certificate store.
Set up the Client for TLS authentication
Step 1: Obtain a certificate
To allow TLS authentication, you need a valid client certificate in the local repository for the
logged-in user's account. You also need a trusted CA certificate in the root store.
The following information provides two methods for obtaining a certificate:
●
●
From a corporate certification authority (CA) implemented on a Windows 2000 server.
Import a certificate from a file with Internet Explorer's certificate import wizard.
If you do not know how to obtain a user certificate from the CA, consult your administrator for
the procedure.
To install the CA on the local machine:
1.
2.
3.
4.
5.
6.
7.
8.
9.
10.
Obtain the CA and store it on your local drive.
Click Import. The Certificate Import Wizard opens.
Click Next.
Click Browse to locate the certificate on your local drive.
Click the exported certificate.
Click Open.
Click Next.
Click Place all certificates in the following store.
Click Browse to open the Select Certificate Store.
Click Show physical stores.
11.
12.
13.
14.
15.
16.
17.
Click OK.
From the list of stores, scroll up and expand Trusted Root Certificate Authorities.
Click Local Computer.
Click OK.
Click Next.
Click Finish to complete the process.
Reboot after a certificate is installed.
Use Microsoft Management Console (MMC) to verify that the CA is installed in the machine
store.
1.
2.
3.
4.
5.
6.
7.
8.
9.
10.
11.
12.
13.
14.
15.
16.
17.
18.
19.
In the Start menu, click Run.
Enter MMC.
Click OK to open The Microsoft Management Console.
Click File.
Click Add/Remove Snap-in.
Click Add to open the Add Standalone Snap-in page.
Click Certificates.
Click Add.
Click Computer account.
Click Next.
Click Finish.
Click Close.
Click OK.
In the console, click Certificates (Local Computer).
Click Trusted Root Certificate Authorities.
Click Certificates.
Verify that the CA you just installed is listed.
Click File.
Click Exit to close the console.
Obtain a certificate from a Microsoft Windows 2000 CA:
1. Start Internet Explorer and browse to the Certificate Authority HTTP Service (use an URL
such as http://yourdomainserver.yourdomain/certsrv with certsrv being the command
that brings you to the certificate authority. You can also use the IP address of the server
machine. For example, "192.0.2.12/certsrv."
2. Logon to the CA with the name and password of the user account you created on the
authentication server. The name and password do not have to be the same as the
Windows log on name and password of the current user.
3. On the Welcome page of the CA, select Request a certificate task and submit the
form.
4. Choose Request Type: Select Advanced request.
5. Click Next.
6. Advanced Certificate Requests: Select Submit a certificate request to this CA
using a form.
7. Click Submit.
8. Advanced Certificate Request: Select User certificate template.
9. Click Mark keys as exportable.
10. Click Next. Use the provided defaults.
11. Certificate Issued: Click Install this certificate.
NOTE: If this is the first certificate you have obtained, the CA first asks you if it
should install a trusted CA certificate in the root store. This is not a trusted CA
certificate. The name on the certificate is that of the host of the CA. Click Yes. You
need this certificate for both TLS and TTLS.
12. If your certificate was successfully installed, you see the message, "Your new certificate
has been successfully installed."
13. To verify the installation, click Internet Explorer > Tools > Internet Options >
Content > Certificates. The new certificate should be installed in the Personal folder.
Import a Certificate from a File
1.
2.
3.
4.
5.
6.
7.
Open Internet Properties (right-click on the Internet Explorer icon on the desktop.
Select Properties.
Content: Click Certificates. The list of installed certificates appears.
Click Import to open the Certificate Import Wizard.
Select the file.
Specify your access password for the file. Clear Enable strong private key protection.
Certificate store: Click Automatically select certificate store based on the type of
certificate (the certificate must be in the user accounts personal store to be accessible).
8. Proceed to Completing the Certificate Import and click Finish.
To configure a profile with WPA authentication with WEP or TKIP encryption that uses TLS
authentication:
NOTE: Obtain and install a client certificate, refer to Step 1 or consult your
administrator.
Specify the certificate used by Intel PROSet/Wireless
1.
2.
3.
4.
5.
6.
7.
8.
9.
10.
On the Profile page, click Add to open General Settings.
Profile Name: Enter a profile name.
Wireless Network Name (SSID): Enter the network identifier.
Operating Mode: Click Network (Infrastructure).
Click Next to access the Security Settings.
Click Enterprise Security.
Network Authentication: Select Open (Recommended).
Data Encryption: Select WEP.
802.1x Enabled: Selected.
Authentication Type: Select TLS.
Step 1 of 2: TLS User
1. Obtain and install a client certificate.
2. Select one of the following to obtain a certificate:
●
●
●
Use my smart card: Select if the certificate resides on a smart card.
Use the certificate issued to this computer: Click Select to choose a
certificate that resides in the machine store.
Use a user certificate on this computer. Click Select to choose a
certificate that resides on this computer.
3. Click Next.
Step 2 of 2: TLS Server
1. Select one of the following options:
■
Validate Server Certificate: Select to verify the server certificate.
Certificate Issuer: The server certificate received during TLS
message exchange must be issued by this certificate authority
(CA). Trusted intermediate certificate authorities and root
authorities whose certificates exist in the system store are
available for selection. If Any Trusted CA is selected, any CA in
the list is acceptable. Click Any Trusted CA as the default or
select a certificate issuer from the list.
■
Specify Server or Certificate Name:
Server or Certificate Name: Enter the server name.
The server name or domain to which the server belongs,
depends on which of the two options below has been selected.
Server name must match the specified entry exactly:
When selected, the server name must match exactly the server
name found on the certificate. The server name should include
the complete domain name (for example, Servername.Domain
name).
Domain name must end with the specified entry: When
selected, the server name identifies a domain, and the
certificate must have a server name that belongs to this domain
or to one of its subdomains (for example, zeelans.com, where
the server is blueberry.zeelans.com). NOTE: These parameters
should be obtained from the administrator.
Notes about Certificates: The specified identity should match the Issued to
identity in the certificate and should be registered on the authentication server (for
example, RADIUS server) that is used by the authenticator. Your certificate must
be valid with respect to the authentication server. This requirement depends on the
authentication server and generally means that the authentication server must
know the issuer of your certificate as a Certificate Authority. Use the same user
name you used to log in when the certificate was installed.
2. Click OK. The profile is added to the Profiles list.
3. Click the new profile at the end of the Profiles list. Use the up and down arrows to change
the priority of the new profile.
4. Click Connect to connect to the selected wireless network.
5. Click OK to close Intel PROSet/Wireless.
Back to Top
Back to Contents
Trademarks and Disclaimers
Back to Contents
Glossary of Terms: Intel(R) PRO/Wireless 3945ABG
Network Connection User Guide
Glossary
Numerical
A
B
C
D
E
F
G
H
I
L
M
N
O
P
R
S
T W
Term
Definition
802.11
The 802.11 standard refers to a family of specifications developed by the
IEEE for wireless LAN technology. The 802.11 specifies an over-the-air
interface between a wireless client and a base station or between two
wireless clients and provides 1 or 2 Mbps transmission in the 2.4 GHz band
using either frequency hopping spread spectrum (FHSS) or direct sequence
spread spectrum (DSSS).
802.11a
The 802.11a standard specifies a maximum data transfer rate of 54 Mbps
and an operating frequency of 5 GHz. The 802.11a standard uses the
Orthogonal Frequency Division Multiplexing (OFDM) transmission method.
Additionally, the 802.11a standard supports 802.11 features such as WEP
encryption for security.
802.11b
802.11b is an extension to 802.11 that applies to wireless LANS and
provides 11 Mbps transmission (with a fallback to 5.5, 2 and 1 Mbps) in
the 2.4 GHz band. 802.11b uses only DSSS. Throughput data rate 5+
Mbps in the 2.4 GHz band.
802.11g
The 802.11g standard specifies a maximum data transfer rate of 54 Mbps,
an operating frequency of 2.4GHz, and WEP encryption for security.
802.11g networks are also referred to as Wi-Fi networks.
802.1x
802.1x is the IEEE Standard for Port-Based Network Access Control. This is
used in conjunction with EAP methods to provide access control to wired
and wireless networks.
AAA Server
Authentication, Authorization and Accounting Server. A system to control
access to computer resources and track user activity.
Access Point
Access point (AP). A stand-alone wireless hub that allows any computer
that has a wireless network adapter to communicate with another
computer and to connect to the Internet.
ad hoc
network
A communication configuration in which every computer has the same
capabilities, and any computer can initiate a communication session. Also
known as a peer-to-peer network or a computer-to-computer network.
AES-CCMP
Advanced Encryption Standard - Counter CBC-MAC Protocol is the new
method for privacy protection of wireless transmissions specified in the
IEEE 802.11i standard. AES-CCMP provides a stronger encryption method
than TKIP.
Authentication Verifies the identity of a user logging onto a network. Passwords, digital
certificates, smart cards and biometrics are used to prove the identity of
the client to the network. Passwords and digital certificates are also used
to identify the network to the client.
BER
Bit error rate. The ratio of errors to the total number of bits being sent in a
data transmission from one location to another.
Bit Rate
The total number of bits (ones and zeros) per second that a network
connection can support. Note that this bit rate will vary, under software
control, with different signal path conditions.
Broadcast
SSID
Used to allow an access point to respond to clients on a wireless network
by sending probes.
BSSID
A unique identifier for each wireless client on a wireless network. The Basic
Service Set Identifier (BSSID) is the Ethernet MAC address of each adapter
on the network.
A corporate certification authority implemented on a server. In addition,
CA (certificate
Internet Explorer’s certificate can import a certificate from a file. A trusted
authority)
CA certificate is stored in the root store.
CCX
Cisco Compatible eXtension. Cisco Compatible Extensions Program ensures
that devices used on Cisco wireless LAN infrastructure meet the security,
management and roaming requirements.
Certificate
Used for client authentication. A certificate is registered on the
authentication server (i.e., RADIUS server) and used by the authenticator.
CKIP
Cisco Key Integrity Protocol (CKIP) is a Cisco proprietary security protocol
for encryption in 802.11 media. CKIP uses a key message integrity check
and message sequence number to improve 802.11 security in
infrastructure mode. CKIP is Cisco's version of TKIP.
Client
computer
The computer that gets its Internet connection by sharing either the host
computer's connection or the Access Point's connection.
DSSS
Direct Sequence Spread Spectrum. Technology used in radio transmission.
Incompatible with FHSS.
EAP
Short for Extensible Authentication Protocol, EAP sits inside of Point-toPoint Protocol’s (PPP) authentication protocol and provides a generalized
framework for several different authentication methods. EAP is supposed
to head off proprietary authentication systems and let everything from
passwords to challenge-response tokens and public-key infrastructure
certificates all work smoothly.
EAP-FAST
EAP-FAST, like EAP-TTLS and PEAP, uses tunneling to protect traffic. The
main difference is that EAP-FAST does not use certificates to authenticate.
EAP-GTC
The EAP-GTC (Generic Token Card) is similar to the EAP-OTP except with
hardware token cards. The request contains a displayable message, and
the response contains the string read from the hardware token card.
EAP-OTP
EAP-OTP (One-Time Password) is similar to MD5, except it uses the OTP as
the response. The request contains a displayable message. The OTP
method is defined in RFC 2289. The OTP mechanism is employed
extensively in VPN and PPP scenarios but not in the wireless world
EAP-SIM
Extensible Authentication Protocol-Subscriber Identity Module (EAP-SIM)
authentication can be used with:
●
●
Network Authentication types: Open, Shared, and WPA-Enterprise,
WPA2-Enterprise.
Data Encryption types: None, WEP and CKIP.
A SIM card is a special smart card that is used by GSM-based digital
cellular networks. The SIM card is used to validate your credentials with
the network
EAP-TLS
A type of authentication method using EAP and a security protocol called
the Transport Layer Security (TLS). EAP-TLS uses certificates that use
passwords. EAP-TLS authentication supports dynamic WEP key
management.
EAP-TTLS
A type of authentication method using EAP and Tunneled Transport Layer
Security (TTLS). EAP-TTLS uses a combination of certificates and another
security method such as passwords.
Encryption
Scrambling data so that only the authorized recipient can read it. Usually a
key is needed to interpret the data.
FHSS
Frequency-Hop Spread Spectrum. Technology used in radio transmission.
Incompatible with DSSS.
File and
A capability that allows a number of people to view, modify, and print the
printer sharing same file(s) from different computers.
The threshold at which the wireless adapter breaks the packet into multiple
Fragmentation
frames. This determines the packet size and affects the throughput of the
threshold
transmission.
GHz
Gigahertz. A unit of frequency equal to 1,000,000,000 cycles per second.
Host computer
The computer that is directly connected to the Internet via a modem or
network adapter.
Infrastructure
Network
A wireless network centered around an access point. In this environment,
the access point not only provides communication with the wired network,
but also mediates wireless network traffic in the immediate neighborhood.
IEEE
Institute of Electrical and Electronics Engineers (IEEE) is an organization
involved in defining computing and communications standards.
Internet
Protocol (IP)
address
The address of a computer that is attached to a network. Part of the
address designates which network the computer is on, and the other part
represents the host identification.
LAN
Local area network. A high-speed, low-error data network covering a
relatively small geographic area.
LEAP
Light Extensible Authentication Protocol. A version of Extensible
Authentication Protocol (EAP). LEAP is a proprietary extensible
authentication protocol developed by Cisco, which provides a challengeresponse authentication mechanism and dynamic key assignment.
MAC
A hardwired address applied at the factory. It uniquely identifies network
hardware, such as a wireless adapter, on a LAN or WAN.
Mbps
Megabits-per-second. Transmission speed of 1,000,000 bits per second.
MHz
Megahertz. A unit of frequency equal to 1,000,000 cycles per second.
MIC (Michael)
Message integrity check (commonly called Michael).
MS-CHAP
An EAP mechanism used by the client. Microsoft Challenge Authentication
Protocol (MSCHAP) Version 2, is used over an encrypted channel to enable
server validation. The challenge and response packets are sent over a nonexposed TLS encrypted channel.
ns
Nanosecond. 1 billionth (1/1,000,000,000) of a second.
OFDM
Orthogonal Frequency Division Multiplexing.
PEAP
Protected Extensible Authentication Protocol (PEAP) is an Internet
Engineering Task Force (IETF) draft protocol sponsored by Microsoft, Cisco,
and RSA Security. PEAP creates an encrypted tunnel similar to the tunnel
used in secure web pages (SSL). Inside the encrypted tunnel, a number of
other EAP authentication methods can be used to perform client
authentication. PEAP requires a TLS certificate on the RADIUS server, but
unlike EAP-TLS there is no requirement to have a certificate on the client.
PEAP has not been ratified by the IETF. The IETF is currently comparing
PEAP and TTLS (Tunneled TLS) to determine an authentication standard for
802.1X authentication in 802.11 wireless systems. PEAP is an
authentication type designed to take advantage of server-side EAPTransport Layer Security (EAP-TLS) and to support various authentication
methods, including user's passwords and one-time passwords, and Generic
Token Cards.
Peer-to-Peer
Mode
A wireless network structure that allows wireless clients to communicate
with each other without using an access point.
Power Save
mode
The state in which the radio is periodically powered down to conserve
power. When the notebook is in Power Save mode, receive packets are
stored in the access point until the wireless adapter wakes up.
Preferred
network
One of the networks that has been configured. Such networks are listed
under Preferred networks on the Wireless Networks tab of the Wireless
Configuration Utility (Windows 2000 environment) or Wireless Network
Connection Properties (Windows XP environment).
RADIUS
Remote Authentication Dial-In User Service (RADIUS) is an authentication
and accounting system that verifies users credentials and grants access to
requested resources.
RF
Radio Frequency. The international unit for measuring frequency is Hertz
(Hz), which is equivalent to the older unit of cycles per second. One MegaHertz (MHz) is one million Hertz. One Giga-Hertz (GHz) is one billion Hertz.
For reference: the standard US electrical power frequency is 60 Hz, the AM
broadcast radio frequency band is 0.55 -1.6 MHz, the FM broadcast radio
frequency band is 88-108 MHz, and microwave ovens typically operate at
2.45 GHz.
Roaming
Movement of a wireless node between two micro cells. Roaming usually
occurs in infrastructure networks built around multiple access points.
RTS threshold
The number of frames in the data packet at or above which an RTS/CTS
(request to send/clear to send) handshake is turned on before the packet
is sent. The default value is 2347.
Shared Key
An encryption key known only to the receiver and sender of data.
SIM
Subscriber Identity Module card is used to validate credentials with the
network. A SIM card is a special smart card that is used by GSM-based
digital cellular networks.
Silent Mode
Silent Mode Access Points or Wireless Routers have been configured to not
broadcast the SSID for the wireless network. This makes it necessary to
know the SSID in order to configure the wireless profile to connect to the
access point or wireless router.
Single Sign On Single Sign On feature set allows the 802.1x credentials to match your
Windows log on user name and password credentials for wireless network
connections.
SSID
Service Set Identifier. A value that controls access to a wireless network.
The SSID for your wireless network card must match the SSID for any
access point that you want to connect with. If the value does not match,
you are not granted access to the network. Each SSID may be up to 32
characters long and is case-sensitive.
TKIP
Temporal Key Integrity protocol improves data encryption. Wi-Fi Protected
Access utilizes its TKIP. TKIP provides important data encryption
enhancements including a re-keying method. TKIP is part of the IEEE
802.11i encryption standard for wireless LANs. TKIP is the next generation
of WEP, the Wired Equivalency Protocol, which is used to secure 802.11
wireless LANs. TKIP provides per-packet key mixing, a message integrity
check and a re-keying mechanism, thus fixing the flaws of WEP.
TLS
Transport Layer Security. A type of authentication method using the
Extensible Authentication Protocol (EAP) and a security protocol called the
Transport Layer Security (TLS). EAP-TLS uses certificates which use
passwords. EAP-TLS authentication supports dynamic WEP key
management. The TLS protocol is intended to secure and authenticate
communications across a public network through data encryption. The TLS
Handshake Protocol allows the server and client to provide mutual
authentication and to negotiate an encryption algorithm and cryptographic
keys before data is transmitted.
TTLS
Tunneled Transport Layer Security. These settings define the protocol and
the credentials used to authenticate a user. In TTLS, the client uses EAPTLS to validate the server and create a TLS-encrypted channel between
the client and server. The client can use another authentication protocol,
typically password-based protocols, such as MD5 Challenge over this
encrypted channel to enable server validation. The challenge and response
packets are sent over a non-exposed TLS encrypted channel. TTLS
implementations today support all methods defined by EAP, as well as
several older methods (CHAP, PAP, MS-CHAP and MS-CHAPv2). TTLS can
easily be extended to work with new protocols by defining new attributes
to support new protocols.
WEP
Wired Equivalent Privacy. Wired Equivalent Privacy, 64- and 128-bit (64bit is sometimes referred to as 40-bit). This is a low-level encryption
technique designed to give the user about the same amount of privacy
that he would expect from a LAN. WEP is a security protocol for wireless
local area networks (WLANs) defined in the 802.11b standard. WEP is
designed to provide the same level of security as that of a wired LAN. WEP
aims to provide security by data over radio waves so that it is protected as
it is transmitted from one end point to another.
WEP Key
Either a pass phrase or hexadecimal key.
The pass phrase must be 5 ASCII characters for 64-bit WEP or 13 ASCII
characters for 128-bit WEP. For pass phrases, 0-9, a-z, A-Z, and ~!@#$%
^&*()_+|`-={}|[]\:";'<>?,./ are all valid characters.
The hex key must be 10 hexadecimal characters (0-9, A-F) for 64-bit WEP
or 26 hexadecimal characters (0-9, A-F) for 128-bit WEP.
Wi-Fi
Wireless Fidelity. Is meant to be used generically when referring of any
type to 802.11 network, whether 802.11b, 802.11a, or dual-band.
Wireless
Router
A stand-alone wireless hub that allows any computer that has a wireless
network adapter to communicate with another computer and to connect to
the Internet. Also known as an access point.
WLAN
Wireless Local-Area Network. A type of local-area network that uses highfrequency radio waves rather than wires to communicate between nodes.
WPA
Wi-Fi Protected Access (WPA) is a security enhancement that strongly
increases the level of data protection and access control to a wireless
network. WPA is an interim standard that will be replaced with the IEEE’s
802.11i standard upon its completion. WPA consists of RC4 and TKIP and
provides support for BSS (Infrastructure) mode only. (Not compatible with
WPA2.)
WPA2
Wi-Fi Protected Access 2 (WPA2). This is the second generation of WPA
that complies with the IEEE TGi specification. WPA2 consists of AES
encryption, pre-authentication and PMKID caching. It provides support for
BSS (Infrastructure) mode and IBSS (Ad hoc) mode. (Not compatible with
WPA.)
WPAEnterprise
Wi-Fi Protected Access-Enterprise applies to corporate users. A new
standards-based, interoperable security technology for wireless LAN
(subset of IEEE 802.11i draft standard) that encrypts data sent over radio
waves. WPA is a Wi-Fi standard that was designed to improve upon the
security features of WEP as follows:
●
●
Improved data encryption through the temporal key integrity
protocol (TKIP). TKIP scrambles the keys using a hashing algorithm
and, by adding an integrity-checking feature, ensures that the keys
have not been tampered with.
User authentication, which is generally missing in WEP, through the
extensible authentication protocol (EAP). WEP regulates access to a
wireless network based on a computer’s hardware-specific MAC
address, which is relatively simple to be sniffed out and stolen. EAP
is built on a more secure public-key encryption system to ensure
that only authorized network users can access the network.
WPA is an interim standard that will be replaced with the IEEE’s 802.11i
standard upon its completion.
WPA-Personal
Wi-Fi Protected Access-Personal provides a level of security in the small
network or home environment.
WPA-PSK
Wi-Fi Protected Access-Pre-Shared Key (WPA-PSK) mode does not use an
authentication server. It can be used with the data encryption types WEP
or TKIP. WPA-PSK requires configuration of a pre-shared key (PSK). You
must enter a pass phrase or 64 hex characters for a Pre-Shared Key of
length 256-bits. The data encryption key is derived from the PSK.
Back to Top
Back to Contents
Trademarks and Disclaimers
Back to Contents
Wireless Network Overview: Intel(R) PRO/Wireless
3945ABG Network Connection User Guide
About Wireless Network Technology
●
●
●
Select a Wireless Network Mode
Configure a Wireless Network
Identify a Wireless Network
A wireless network connects computers without network cables. Instead computers use
radio communications to send data between each other. You can communicate directly with
other wireless computers, or connect to an existing network through a wireless access point.
When you set up your wireless adapter, you select the operating mode for the kind of
wireless network you want. You can use your Intel(R) PRO/Wireless Network Connections
adapter to connect to other similar wireless devices that comply with the 802.11 standard
for wireless networking.
Select a Wireless Network Mode
Wireless networks can operate with or without access points, depending on the number of
users in the network. Infrastructure mode uses access points to allow wireless computers to
send and receive information. Wireless computers transmit to the access point, the access
point receives the information and rebroadcasts it to other computers. The access point can
also connect to a wired network or to the Internet. Multiple access points can work together
to provide coverage over a wide area.
Device-to-Device mode, also called Ad Hoc mode, works without access points and allows
wireless computers to send information directly to other wireless computers. You can use
Device-to-Device mode to network computers in a home or small office or to set up a
temporary wireless network for a meeting.
Configure a Wireless Network
There are three basic components that must be configured for an 802.11 wireless network
to operate properly:
●
●
●
Network Name: Each wireless network uses a unique Network Name to identify the
network. This name is called the Service Set Identifier (SSID). When you set up your
wireless adapter, you specify the SSID. If you want to connect to an existing network,
you must use the name for that network. If you are setting up your own network you
can make up your own name and use it on each computer. The name can be up to 32
characters long and contain letters and numbers.
Profiles: When you set up your computer to access a wireless network, Intel(R)
PROSet/Wireless creates a profile for the wireless settings that you specify. If you
want to connect to another network, you can scan for existing networks and make a
temporary connection, or create a new profile for that network. After you create
profiles, your computer will automatically connect when you change locations.
Security: The 802.11 wireless networks use encryption to help protect your data.
Wired equivalent privacy (WEP) uses a 64- or 128-bit shared encryption key to
scramble data. Before a computer transmits data, it uses a secret encryption key to
scramble the data. The receiving computer uses this same key to unscramble the
data. If you are connecting to an existing network, use the encryption key provided by
the administrator of the wireless network. If you are setting up your own network you
can make up your own key and use it on each computer.
802.1x authentication is independent of the 802.11 authentication process. The
802.1x standard provides a framework for various authentication and keymanagement protocols. There are different 802.1x authentication types, each
providing a different approach to authentication but all employing the same 802.1x
protocol and framework for communication between a client and an access point
Identify a Wireless Network
Depending on the size and components of a wireless network, there are many ways to
identify a wireless network:
●
●
●
●
●
The Network Name or Service Set Identifier (SSID)—Identifies a wireless
network. All wireless devices on the network must use the same SSID.
Extended Service Set Identifier (ESSID)—A special case of SSID used to identify
a wireless network that includes access points.
Independent Basic Service Set Identifier (IBSSID)—A special case of SSID used
to identify a network of wireless computers configured to communicate directly with
one another without using an access point.
Basic Service Set Identifier (BSSID)—A unique identifier for each wireless device.
The BSSID is the Ethernet MAC address of the device.
Broadcast SSID—An access point can respond to computers sending probe packets
with the broadcast SSID. If this feature is enabled on the access point, any wireless
user can associate with the access point by using a blank (null) SSID.
Back to Top
Back to Contents
Trademarks and Disclaimers
Back to Contents
Security Overview: Intel(R) PRO/Wireless
3945ABG Network Connection User Guide
●
●
●
●
●
●
●
●
WEP Encryption
❍
Open and Shared Key authentication
802.1x Authentication
❍
How 802.1x Authentication Works
❍
802.1x Features
WPA/WPA2
❍
Enterprise Mode
❍
Personal Mode
❍
WPA-Enterprise and WPA2-Enterprise
❍
WPA-Personal and WPA2-Personal
❍
AES-CCMP
❍
TKIP
MD5
TLS
TTLS
❍
Authentication Protocols
PEAP
❍
Authentication Protocols
Cisco Features
❍
Cisco LEAP
❍
Cisco Rogue Access Point Security Feature
❍
Fast Roaming (CCKM)
❍
CKIP
❍
802.11b and 802.11g Mixed Environment Protection Protocol
❍
EAP-FAST
❍
Mixed Cell Mode
❍
Radio Management
WEP Encryption
Use IEEE 802.11 Wired Equivalent Privacy (WEP) encryption to prevent unauthorized
reception of wireless data. WEP encryption provides two levels of security: 64-bit key
(sometimes referred to as 40-bit) or a 128-bit key (also known as 104-bit). For stronger
security, use a 128-bit key. If you use encryption, all wireless devices on your wireless
network must use the same encryption keys.
Wired Equivalent Privacy (WEP) encryption and shared authentication provides protection for
your data on the network. WEP uses an encryption key to encrypt data before transmitting
it. Only computers that use the same encryption key can access the network or decrypt the
encrypted data transmitted by other computers. Authentication provides an additional
validation process from the adapter to the access point.
The WEP encryption algorithm is vulnerable to passive and active network attacks. TKIP and
CKIP algorithms include enhancements to the WEP protocol that mitigate existing network
attacks and address its shortcomings.
Open and Shared Key authentication
IEEE 802.11 supports two types of network authentication methods: Open System and
Shared Key.
●
●
When Open authentication is used, any wireless station can request authentication.
The station that needs to authenticate with another wireless station sends an
authentication management request that contains the identity of the sending station.
The receiving station or access point grants any request for authentication. Open
authentication allows any device network access. If no encryption is enabled on the
network, any device that knows the Service Set Identifier (SSID) of the access point
can gain access to the network.
When Shared Key authentication is used, each wireless station is assumed to have
received a secret shared key over a secure channel that is independent from the
802.11 wireless network communications channel. Shared key authentication requires
that the client configure a static WEP key. The client access is granted only if it passes
a challenge-based authentication.
802.1x Authentication
How 802.1x Authentication Works
802.1x Features
Overview
802.1x authentication is independent of the 802.11 authentication process. The 802.1x
standard provides a framework for various authentication and key-management protocols.
There are different 802.1x authentication types, each provides a different approach to
authentication but all employ the same 802.1x protocol and framework for communication
between a client and an access point. In most protocols, upon the completion of the 802.1x
authentication process, the supplicant receives a key that it uses for data encryption. Refer
to How 802.1x authentication works for more information. With 802.1x authentication, an
authentication method is used between the client and a Remote Authentication Dial-In User
Service (RADIUS) server connected to the access point. The authentication process uses
credentials, such as a user's password that are not transmitted over the wireless network.
Most 802.1x types support dynamic per-user, per-session keys to strengthen the static key
security. 802.1x benefits from the use of an existing authentication protocol known as the
Extensible Authentication Protocol (EAP).
802.1x authentication for wireless LANs has three main components:
●
●
●
The authenticator (the access point)
The supplicant (the client software)
The authentication server (a Remote Authentication Dial-In User Service server
[RADIUS])
802.1x authentication security initiates an authorization request from the wireless client to
the access point, which authenticates the client to an Extensible Authentication Protocol
(EAP) compliant RADIUS server. This RADIUS server may authenticate either the user (via
passwords or certificates) or the system (by MAC address). In theory, the wireless client is
not allowed to join the networks until the transaction is complete.
There are several authentication algorithms used for 802.1x. Some examples are: EAP-TLS,
EAP-TTLS, and Protected EAP (PEAP). These are all methods for the wireless client to
identify itself to the RADIUS server. With RADIUS authentication, user identities are checked
against databases. RADIUS constitutes a set of standards addressing Authentication,
Authorization and Accounting (AAA). Radius includes a proxy process to validate clients in a
multi-server environment. The IEEE 802.1x standard is for controlling and authenticating
access to port-based 802.11 wireless and wired Ethernet networks. Port-based network
access control is similar to a switched local area network (LAN) infrastructure that
authenticates devices that are attached to a LAN port and prevent access to that port if the
authentication process fails.
What is RADIUS?
RADIUS is the Remote Access Dial-In User Service, an Authorization, Authentication, and
Accounting (AAA) client-server protocol, which is used when a AAA dial-up client logs in or
out of a Network Access Server. Typically, a RADIUS server is used by Internet Service
Providers (ISP) to perform AAA tasks. AAA phases are described as follows:
●
●
Authentication phase: Verifies a user name and password against a local database.
After the credentials are verified, the authorization process begins.
Authorization phase: Determines whether a request is allowed access to a resource.
●
An IP address is assigned for the dial-up client.
Accounting phase: Collects information on resource usage for the purpose of trend
analysis, auditing, session time billing, or cost allocation.
How 802.1x Authentication Works
A simplified description of 802.1x authentication is:
●
●
●
●
A client sends a "request to access" message to an access point. The access point
requests the identity of the client.
The client replies with its identity packet which is passed along to the authentication
server.
The authentication server sends an "accept" packet to the access point.
The access point places the client port in the authorized state and data traffic is
allowed to proceed.
802.1x Features
●
●
●
●
802.1x supplicant protocol support
Support for the Extensible Authentication Protocol (EAP) - RFC 2284
Supported Authentication Methods:
❍
EAP TLS Authentication Protocol - RFC 2716 and RFC 2246
❍
EAP Tunneled TLS (TTLS)
❍
PEAP
Supports Microsoft Windows XP and Windows 2000
WPA or WPA2
Wi-Fi Protected Access (WPA or WPA2) is a security enhancement that strongly increases the
level of data protection and access control to a wireless network. WPA enforces 802.1x
authentication and key-exchange and only works with dynamic encryption keys. To
strengthen data encryption, WPA utilizes Temporal Key Integrity Protocol (TKIP). TKIP
provides important data encryption enhancements that include a per-packet key mixing
function, a message integrity check (MIC) called Michael an extended initialization vector
(IV) with sequencing rules, and a rekeying mechanism. With these improvement
enhancements, TKIP protects against WEP's known weaknesses.
The second generation of WPA that complies with the IEEE TGi specification is known as
WPA2.
Enterprise Mode: Enterprise Mode verifies network users through a RADIUS or other
authentication server. WPA utilizes 128-bit encryption keys and dynamic session keys to
ensure your wireless network's privacy and enterprise security. Enterprise Mode is targeted
to corporate or government environments.
Personal Mode: Personal Mode requires manual configuration of a pre-shared key (PSK) on
the access point and clients. PSK authenticates users via a password, or identifying code, on
both the client station and the access point. No authentication server is needed. Personal
Mode is targeted to home and small business environments.
WPA-Enterprise and WPA2-Enterprise: Provide this level of security on enterprise
networks with an 802.1x RADIUS server. An authentication type is selected to match the
authentication protocol of the 802.1x server.
WPA-Personal and WPA2-Personal: Provide this level of security in the small network or
home environment. It uses a password also called a pre-shared key (PSK). The longer the
password, the stronger the security of the wireless network. If your wireless access point or
router supports WPA-Personal and WPA2-Personal then you should enable it on the access
point and provide a long, strong password. The same password entered into access point
needs to be used on this computer and all other wireless devices that access the wireless
network.
NOTE: WPA-Personal and WPA2-Personal are not interoperable.
AES-CCMP - (Advanced Encryption Standard - Counter CBC-MAC Protocol) It is the new
method for privacy protection of wireless transmissions specified in the IEEE 802.11i
standard. AES-CCMP provides a stronger encryption method than TKIP. Choose AES-CCMP
as the data encryption method whenever strong data protection is important.
NOTE: Some security solutions may not be supported by your computer’s
operating system and may require additional software or hardware as well as
wireless LAN infrastructure support. Check with your computer manufacturer for
details.
TKIP (Temporal Key Integrity Protocol) is an enhancement to WEP (Wired Equivalent
Privacy) security. TKIP provides per-packet key mixing, a message integrity check and a
rekeying mechanism, which fixes the flaws of WEP.
MD5
Message Digest 5 (MD5) is a one-way authentication method that uses user names and
passwords. This method does not support key management, but does require a preconfigured key if data encryption is used. It can be safely deployed for wireless
authentication inside EAP tunnel methods.
TLS
A type of authentication method using the Extensible Authentication Protocol (EAP) and a
security protocol called the Transport Layer Security (TLS). EAP-TLS uses certificates which
use passwords. EAP-TLS authentication supports dynamic WEP key management. The TLS
protocol is intended to secure and authenticate communications across a public network
through data encryption. The TLS Handshake Protocol allows the server and client to provide
mutual authentication and to negotiate an encryption algorithm and cryptographic keys
before data is transmitted.
TTLS
These settings define the protocol and the credentials used to authenticate a user. In TTLS
(Tunneled Transport Layer Security), the client uses EAP-TLS to validate the server and
create a TLS-encrypted channel between the client and server. The client can use another
authentication protocol, typically password-based protocols, as MD5 Challenge over this
encrypted channel to enable server validation. The challenge and response packets are sent
over a non-exposed TLS encrypted channel. TTLS implementations today support all
methods defined by EAP, as well as several older methods (PAP, CHAP, MS-CHAP and MSCHAPv2). TTLS can easily be extended to work with new protocols by defining new attributes
to support new protocols.
Authentication Protocols
●
●
●
●
PAP: Password Authentication Protocol is a two way handshake protocol designed for
use with PPP. Authentication Protocol Password Authentication Protocol is a plain text
password used on older SLIP systems. It is not secure.
CHAP: Challenge Handshake Authentication Protocol is a three way handshake
protocol which is considered more secure than PAP (Password Authentication
Protocol).
MS-CHAP (MD4): Uses a Microsoft version of RSA Message Digest 4 challenge and
reply protocol. This only works on Microsoft systems and enables data encryption. This
authentication method causes all data to be encrypted.
MS-CHAP-V2: Iintroduces an additional feature not available with MSCHAPV1 or
standard CHAP authentication, the change password feature. This feature allows the
client to change the account password if the RADIUS server reports that the password
has expired.
PEAP
PEAP is a new Extensible Authentication Protocol (EAP) IEEE 802.1x authentication type
designed to take advantage of server-side EAP-Transport Layer Security (EAP-TLS) and to
support various authentication methods, including users' passwords and one-time
passwords, and Generic Token Cards.
Authentication Protocols
●
●
●
Generic Token Card (GTC): Carries user specific token cards for authentication. The
main feature in GTC is Digital Certificate/Token Card-based authentication. In
addition, GTC includes the ability to hide user name identities until the TLS encrypted
tunnel is established, which provides additional confidentiality that user names are not
being broadcasted during the authentication phase.
MS-CHAP-V2: Refer to MS-CHAP-V2 above.
TLS: The TLS protocol is intended to secure and authenticate communications across
a public network through data encryption. The TLS Handshake Protocol allows the
server and client to provide mutual authentication and to negotiate an encryption
algorithm and cryptographic keys before data is transmitted. Refer to TLS above.
Cisco Features
Cisco LEAP
Cisco LEAP (Cisco Light EAP) is a server and client 802.1x authentication through a usersupplied logon password. When a wireless access point communicates with a Cisco LEAPenabled RADIUS (Cisco Secure Access Control Server [ACS]), Cisco LEAP provides access
control through mutual authentication between client wireless adapters and the wireless
networks and provides dynamic, individual user encryption keys to help protect the privacy
of transmitted data.
Cisco Rogue Access Point Security Feature
The Cisco Rogue Access Point feature provides security protection from an introduction of a
rogue access point that could mimic a legitimate access point on a network in order to
extract information about user credentials and authentication protocols that could
compromise security. This feature only works with Cisco's LEAP authentication. Standard
802.11 technology does not protect a network from the introduction of a rogue access point.
Refer to LEAP Authentication for more information.
Fast Roaming (CCKM)
When a wireless LAN is configured for fast reconnection, a LEAP-enabled client device can
roam from one access point to another without involving the main server. Using Cisco
Centralized Key Management (CCKM), an access point configured to provide Wireless
Domain Services (WDS) takes the place of the RADIUS server and authenticates the client
without perceptible delay in voice or other time-sensitive applications.
CKIP
Cisco Key Integrity Protocol (CKIP) is Cisco proprietary security protocol for encryption in
802.11 media. CKIP uses the following features to improve 802.11 security in infrastructure
mode:
●
●
Key Permutation (KP)
Message Sequence Number
802.11b and 802.11g Mixed Environment Protection Protocol
Some access points, for example Cisco 350 or Cisco 1200, support environments in which
not all client stations support WEP encryption; this is called Mixed-Cell Mode. When these
wireless networks operate in "optional encryption" mode, client stations that join in WEP
mode, send all messages encrypted, and stations that use standard mode send all messages
unencrypted. These access points broadcast that the network does not use encryption, but
allow clients that use WEP mode. When Mixed-Cell is enabled in a profile, it allows you to
connect to access points that are configured for "optional encryption."
EAP-FAST
EAP-FAST like EAP-TTLS and PEAP, uses tunneling to protect traffic. The main difference is
that EAP-FAST does not use certificates to authenticate. Provisioning in EAP-FAST is
negotiated solely by the client as the first communication exchange when EAP-FAST is
requested from the server. If the client does not have a pre-shared secret Protected Access
Credential (PAC), it is able to initiate a provisioning EAP-FAST exchange to dynamically
obtain one from the server.
EAP-FAST documents two methods to deliver the PAC: manual delivery through an out-ofband secure mechanism and automatic provisioning.
●
●
Manual delivery mechanisms are any delivery mechanism that the administrator of the
network feels is sufficiently secure for their network.
Automatic provisioning establishes an encrypted tunnel to protect the authentication
of the client and the delivery of the PAC to the client. This mechanism, while not as
secure as a manual method may be, is more secure than the authentication method
used in LEAP.
The EAP-FAST method is divided into two parts: provisioning and authentication. The
provisioning phase involves the initial delivery of the PAC to the client. This phase only
needs to be performed once per client and user.
Mixed-Cell Mode
Some access points, for example Cisco 350 or Cisco 1200, support environments in which
not all client stations support WEP encryption; this is called Mixed-Cell Mode. When these
wireless network operate in "optional encryption" mode, client stations that join in WEP
mode, send all messages encrypted, and stations that use standard mode, send all
messages unencrypted. These access points broadcast that the network does not use
encryption, but allows clients that use WEP mode to join . When Mixed-Cell is enabled in a
profile, it allows you to connect to access points that are configured for "optional
encryption."
Radio Management
When this feature is enabled your wireless adapter provides radio management information
to the Cisco infrastructure. If the Cisco Radio Management utility is used on the
infrastructure, it configures radio parameters, detects interference and rogue access points.
Back to Top
Back to Contents
Trademarks and Disclaimers
Back to Contents
Specifications: Intel PRO/Wireless 3945ABG Network Connection User Guide
●
●
●
●
Intel
Intel
Intel
Intel
PRO/Wireless
PRO/Wireless
PRO/Wireless
PRO/Wireless
3945ABG Network Connection
3945BG Network Connection
2915ABG Network Connection
2200BG Network Connection
Intel PRO/Wireless 3945ABG Network Connection
Form Factor
PCI Express (TM) Mini Card
Dimensions
Height 200 in x 1.18 in x 0.18 in (50.95 mm x 30 mm
x 4.5 mm)
Antenna Interface
Connector
Hirose U.FL-R-SMT mates with cable connector U.FL-LP066
Dual Diversity Antenna
On-board dual diversity switching
Connector Interface
53-pin Mini Card edge connector
Voltage
3.3 V
Operating Temperature
0 to +80 degrees Celsius
Humidity
50 to 92% non-condensing (at temperatures of 25 ºC
to 55 ºC)
Frequency Modulation
5 GHz (802.11a)
2.4 GHz (802.11b/g)
Frequency band
5.15 GHz - 5.85 GHz
2.400 - 2.4835 GHz
(dependent on country)
Modulation
BPSK, QPSK, 16 QAM, 64
QAM
CCK, DQPSK, DBPSK
Wireless Medium
5 GHz UNII: Orthogonal
Frequency Division
Multiplexing (OFDM)
2.4 GHz ISM: Orthogonal
Frequency Division
Multiplexing (OFDM)
Channels
4 to 12 non-overlapping,
dependent on country
Channel 1-11 (US only)
Channel 1-13 (Japan,
Europe)
Data Rates
54, 48, 36, 24, 18, 12, 9,
6 Mbps
11, 5.5, 2, 1 Mbps
General
Operating Systems
Microsoft Windows XP, Microsoft Windows 2000
Wi-Fi(R) Alliance
certification
Wi-Fi(R) certification for 802.11b, 802.11g, 802.11a,
WPA, WPA2, WMM, EAP-SIM, LEAP, PEAP, TKIP, EAPFAST, EAP-TLS, EAP-TTLS, MD5
Cisco Compatible
Extensions certification
Cisco Compatible Extensions, v4.0
WLAN Standard
IEEE 802.11g, 802.11b, 802.11a
Architecture
Infrastructure or ad hoc (peer-to-peer) operating
modes
Security
WPA-Personal, WPA2-Personal, WPA-Enterprise, WPA2Enterprise, AES-CCMP 128-bit, WEP 128-bit and 64-bit;
802.1x: EAP-SIM, LEAP, PEAP, TKIP, EAP-FAST, EAPTLS, EAP-TTLS, MD5
Product Safety
UL, C-UL, CB (IEC 60590)
Intel PRO/Wireless 3945BG Network Connection
Form Factor
PCI Express (TM) Mini Card
Dimensions
Height 200 in x 1.18 in x 0.18 in (50.95 mm x 30 mm
x 4.5 mm)
Antenna Interface
Connector
Hirose U.FL-R-SMT mates with cable connector U.FL-LP066
Dual Diversity Antenna
On-board dual diversity switching
Connector Interface
53-pin Mini Card edge connector
Voltage
3.3 V
Operating Temperature
0 to +80 degrees Celsius
Humidity
50 to 92% non-condensing (at temperatures of 25 ºC
to 55 ºC)
Frequency Modulation
5 GHz (802.11a)
2.4 GHz (802.11b/g)
Frequency band
5.15 GHz to 5.85 GHz
2.400 - 2.4835 GHz
(dependent on country)
Modulation
BPSK, QPSK, 16 QAM, 64
QAM
CCK, DQPSK, DBPSK
Wireless Medium
5 GHz UNII: Orthogonal
Frequency Division
Multiplexing (OFDM)
2.4 GHz ISM: Orthogonal
Frequency Division
Multiplexing (OFDM)
Channels
4 to 12 non-overlapping,
dependent on country
Channel 1-11 (US only)
Channel 1-13 (Japan,
Europe)
Data Rates
54, 48, 36, 24, 18, 12, 9,
6 Mbps
11, 5.5, 2, 1 Mbps
General
Operating Systems
Microsoft Windows XP, Microsoft Windows 2000
Wi-Fi(R) Alliance
certification
Wi-Fi(R) certification for 802.11b, 802.11g, WPA,
WPA2, WMM, EAP-SIM, LEAP, PEAP, TKIP, EAP-FAST,
EAP-TLS, EAP-TTLS, MD5
Cisco Compatible
Extensions certification
Cisco Compatible Extensions, v4.0
WLAN Standard
IEEE 802.11g, 802.11b
Architecture
Infrastructure or ad hoc (peer-to-peer) operating
modes
Security
WPA-Personal, WPA2-Personal, WPA-Enterprise, WPA2Enterprise, AES-CCMP 128-bit, WEP 128-bit and 64-bit;
802.1x: EAP-SIM, LEAP, PEAP, TKIP, EAP-FAST, EAPTLS, EAP-TTLS, MD5
Product Safety
UL, C-UL, CB (IEC 60590)
Intel PRO/Wireless 2915ABG Network Connection
Form Factor
Mini PCI Type 3A
Dimensions
Width 2.85 in x Length 1.75 in x Height 0.20 in (59.75 mm x 50.95 mm x 5 mm)
Weight
0.7 oz. (12.90 g.)
Antenna Interface Connector
Hirose U.FL-R-SMT mates with cable connector U.FL-LP-066
Dual Diversity Antenna
On-board dual diversity switching
Connector Interface
124-pin SO-DIMM edge connector
Voltage
3.3 Volt
Operating Temperature
0 to +70 degrees Celsius
Humidity
50 to 85% non-condensing
Frequency Modulation
5 GHz (802.11a)
2.4 GHz (802.11b/g)
Frequency band
5.15 GHz - 5.85 GHz
2.400 - 2.472 GHz
(dependent on country)
Modulation
BPSK, QPSK, 16 QAM, 64 QAM
CCK, DQPSK, DBPSK
Wireless Medium
5 GHz UNII: Orthogonal Frequency Division
Multiplexing (OFDM)
2.4 GHz ISM: Orthogonal
Frequency Division
Multiplexing (OFDM)
Channels
4 to 12 non-overlapping, dependent on country
Channel 1-11 (US only)
Channel 1-13 (Japan,
Europe)
Data Rates
54, 48, 36, 24, 18, 12, 9, 6 Mbps
11, 5.5, 2, 1 Mbps
General
Operating Systems
Microsoft Windows XP, Microsoft Windows 2000
Wi-Fi(R) Alliance certification
Wi-Fi(R) certification for 802.11b, 802.11g, 802.11a, WPA, WPA2, WMM, EAP-SIM,
LEAP, PEAP, TKIP, EAP-FAST, EAP-TLS, EAP-TTLS, MD5
Cisco Compatible Extensions certification
Cisco Compatible Extensions, v3.0
WLAN Standard
IEEE 802.11g, 802.11b, 802.11a
Architecture
Infrastructure or ad hoc (peer-to-peer) operating modes
Security
WPA-Personal, WPA2-Personal, WPA-Enterprise, WPA2-Enterprise, AES-CCMP 128bit, WEP 128-bit and 64-bit. 802.1x: EAP-SIM, LEAP, PEAP, TKIP, EAP-FAST, EAPTLS, EAP-TTLS, MD5
Product Safety
UL, C-UL, CB (IEC 60590)
Intel PRO/Wireless 2200BG Network Connection
Form Factor
Mini PCI Type 3B
Dimensions
Width 2.34 in x Length 1.75 in x Height
0.20 in (59.45 mm x 44.45 mm x 5 mm)
Weight
0.7 oz. (12.90 g.)
Antenna Interface Connector
Hirose U.FL-R-SMT mates with cable
connector U.FL-LP-066
Dual Diversity Antenna
On-board dual diversity switching
Connector Interface
124-pin mini PCI edge connector
Voltage
3.3 V
Operating Temperature
0 to +70 degrees Celsius
Humidity
50 to 85% non-condensing
Frequency Modulation
OFDM with BPSK, QPSK, 16QAM, 64QAM,
DBPSK, DQPSK, CCK
Frequency band
2.400 - 2.472 GHz (US)
2.400 - 2.4835 GHz (Japan)
2.400 - 2.4835 GHz (Europe ETSI)
Modulation
OFDM with BPSK, QPSK, 16QAM, 64QAM,
DBPSK, DQPSK, CCK
Channels
Full 14 channel support
Data Rates
1, 2, 5.5, 6, 9, 11, 12, 24, 36, 48 and 54
Mbps
General
Operating Systems
Wi-Fi(R) Alliance certification
Microsoft Windows XP, Microsoft Windows
2000
Wi-Fi(R) certification for 802.11b,
802.11g, 802.11a, WPA, WPA2, WMM,
EAP-SIM, LEAP, PEAP, TKIP, EAP-FAST,
EAP-TLS, EAP-TTLS, MD5
Cisco Compatible Extensions certification Cisco Compatible Extensions, v2.0
WLAN Standard
IEEE 802.11g and 802.11b
Architecture
Infrastructure or ad hoc (peer-to-peer)
operating modes
Security
WPA, LEAP, PEAP, TKIP, EAP-TLS, EAPTTLS, AES (128-bit), WEP 128-bit and 64bit.
Product Safety
UL, C-UL, CB (IEC 60590)
Back to Top
Back to Contents
Trademarks and Disclaimers
Back to Contents
Customer Support: Intel(R) PRO/Wireless 3945ABG
Network Connection User Guide
Customer Support
Intel support is available online or by telephone. Available services include the most up-todate product information, installation instructions about specific products, and
troubleshooting tips.
Online Support
Technical Support: http://support.intel.com/support/go/wireless/wlan/pro3945abg.htm
Network Product Support: http://www.intel.com/network
Corporate Web Site: http://www.intel.com
Back to Contents
Back to Contents
Regulatory Information: Intel(R) PRO/Wireless 3945ABG
Network Connection User Guide
Supported on the Intel(R) PRO/Wireless 3945ABG Network Connection,
Intel(R) PRO/Wireless 3945BG Network Connection, Intel(R) PRO/
Wireless 2915ABG Network Connection and Intel(R) PRO/Wireless
2200BG Network Connection Hardware
Intel(R) PRO/Wireless 3945ABG Network Connection and the Intel(R) PRO/Wireless 3945BG Network Connection
●
●
Information for the User
Regulatory Information
Intel(R) PRO/Wireless 2915ABG Network Connection
●
●
Information for the User
Regulatory Information
Intel(R) PRO/Wireless 2200BG Network Connection
●
●
Information for the User
Regulatory Information
Intel(R) PRO/Wireless 3945ABG Network Connection and the Intel(R)
PRO/Wireless 3945BG Network Connection
The information in this document applies to the following products:
Tri-mode wireless LAN adapters (802.11a/802.11b/802.11g )
Intel(R) PRO/Wireless 3945ABG Network Connection (model WM3945ABG)
Dual-mode wireless LAN adapters (802.11b/802.11g )
Intel(R) PRO/Wireless 3945BG Network Connection (model WM3945BG)
NOTE: Due to the evolving state of regulations and standards in the wireless LAN field (IEEE 802.11
and similar standards), the information provided herein is subject to change. Intel Corporation
assumes no responsibility for errors or omissions in this document. Nor does Intel make any
commitment to update the information contained herein.
Information for the user
Safety Notices
The FCC with its action in ET Docket 96-8 has adopted a safety standard for human exposure to radio frequency
(RF) electromagnetic energy emitted by FCC certified equipment. The Intel(R) PRO/Wireless 3945ABG Network
Connection adapter or the Intel(R) PRO/Wireless 3945BG Network Connection adapter meet the Human
Exposure limits found in OET Bulletin 65, supplement C, 2001, and ANSI/IEEE C95.1, 1992. Proper operation of
this radio according to the instructions found in this manual will result in exposure substantially below the FCC’s
recommended limits.
The following safety precautions should be observed:
●
●
●
●
●
●
●
●
●
●
Do not touch or move antenna while the unit is transmitting or receiving.
Do not hold any component containing the radio such that the antenna is very close or touching any
exposed parts of the body, especially the face or eyes, while transmitting.
Do not operate the radio or attempt to transmit data unless the antenna is connected; if not, the radio
may be damaged.
Use in specific environments:
❍
The use of wireless devices in hazardous locations is limited by the constraints posed by the safety
directors of such environments.
❍
The use of wireless devices on airplanes is governed by the Federal Aviation Administration (FAA).
❍
The use of wireless devices in hospitals is restricted to the limits set forth by each hospital.
Antenna use:
❍
In order to comply with FCC RF exposure limits, low gain integrated antennas should be located at a
minimum distance of 20 cm (8 inches) or more from the body of all persons.
❍
High-gain, wall-mount, or mast-mount antennas are designed to be professionally installed and
should be located at a minimum distance of 30 cm (12 inches) or more from the body of all persons.
Please contact your professional installer, VAR, or antenna manufacturer for proper installation
requirements.
Explosive Device Proximity Warning (see below)
Antenna Warning (see below)
Use on Aircraft Caution (see below)
Other Wireless Devices (see below)
Power Supply (Access Point) (see below)
Explosive Device Proximity Warning
Warning: Do not operate a portable transmitter (such as a wireless network device) near unshielded
blasting caps or in an explosive environment unless the device has been modified to be qualified for such use.
Antenna Warnings
Warning: To comply with the FCC and ANSI C95.1 RF exposure limits, it is recommended for the Intel(R)
PRO/Wireless 3945ABG Network Connection adapter or the Intel(R) PRO/Wireless 3945BG Network Connection
adapter installed in a desktop or portable computer, that the antenna for this device be installed so as to provide
a separation distance of al least 20 cm (8 inches) from all persons and that the antenna must not be co-located
or operating in conjunction with any other antenna or radio transmitter. It is recommended that the user limit
exposure time if the antenna is positioned closer than 20 cm (8 inches).
Warning: Intel(R) PRO/Wireless LAN products are not designed for use with high-gain directional antennas.
Use of such antennas with these products is illegal.
Use On Aircraft Caution
Caution: Regulations of the FCC and FAA prohibit airborne operation of radio-frequency wireless devices
because their signals could interfere with critical aircraft instruments.
Other Wireless Devices
Safety Notices for Other Devices in the Wireless Network: Refer to the documentation supplied with
wireless Ethernet adapters or other devices in the wireless network.
Local Restrictions on 802.11a, 802.11b, and 802.11g Radio Usage
Caution: Due to the fact that the frequencies used by 802.11a, 802.11b and 802.11g wireless LAN devices
may not yet be harmonized in all countries, 802.11a, 802.11b, and 802.11g products are designed for use only
in specific countries, and are not allowed to be operated in countries other than those of designated use. As a
user of these products, you are responsible for ensuring that the products are used only in the countries for
which they were intended and for verifying that they are configured with the correct selection of frequency and
channel for the country of use. The device transmit power control (TPC) interface is part of the Intel(R) PROSet/
Wireless software. Operational restrictions for Equivalent Isotropic Radiated Power (EIRP) are provided by the
system manufacturer. Any deviation from the permissible power and frequency settings for the country of use is
an infringement of national law and may be punished as such.
For country-specific information, see the additional compliance information supplied with the product.
Wireless interoperability
The Intel(R) PRO/Wireless 3945ABG Network Connection adapter or the Intel(R) PRO/Wireless 3945BG Network
Connection are designed to be interoperable with other wireless LAN products that are based on direct sequence
spread spectrum (DSSS) radio technology and to comply with the following standards:
●
●
●
●
IEEE Std. 802.11b compliant Standard on Wireless LAN.
IEEE Std. 802.11g compliant Standard on Wireless LAN.
IEEE Std. 802.11a compliant Standard on Wireless LAN.
Wireless Fidelity (WiFi) certification, as defined by the WECA (Wireless Ethernet Compatibility Alliance).
The Intel(R) PRO/Wireless 3945ABG Network Connection or the Intel(R) PRO/Wireless 3945BG
Network Connection adapter and your health
The Intel(R) PRO/Wireless 3945ABG Network Connection adapter or the the Intel(R) PRO/Wireless 3945BG
Network Connection adapter, like other radio devices, emits radio frequency electromagnetic energy. The level of
energy emitted by this device, however, is less than the electromagnetic energy emitted by other wireless
devices such as mobile phones. The Intel(R) PRO/Wireless 3945ABG Network Connection adapter or the Intel(R)
PRO/Wireless 3945BG Network Connection adapter wireless device operates within the guidelines found in radio
frequency safety standards and recommendations. These standards and recommendations reflect the consensus
of the scientific community and result from deliberations of panels and committees of scientists who continually
review and interpret the extensive research literature. In some situations or environments, the use of the Intel
(R) PRO/Wireless 3945ABG Network Connection adapter or the Intel(R) PRO/Wireless 3945BG Network
Connection wireless devices may be restricted by the proprietor of the building or responsible representatives of
the applicable organization. Examples of such situations include the following:
●
●
Using the Intel(R) PRO/Wireless 3945ABG Network Connection adapter or the Intel(R) PRO/Wireless
3945BG Network Connection adapter equipment on board airplanes, or
Using the Intel(R) PRO/Wireless 3945ABG Network Connection adapter or the Intel(R) PRO/Wireless
3945BG Network Connection adapter equipment in any other environment where the risk of interference
with other devices or services is perceived or identified as being harmful.
If you are uncertain of the policy that applies to the use of wireless devices in a specific organization or
environment (an airport, for example), you are encouraged to ask for authorization to use the Intel(R) PRO/
Wireless 3945ABG Network Connection adapter or the Intel(R) PRO/Wireless 3945BG Network Connection
wireless devices before you turn it on.
Regulatory information
Information for the OEMs and Integrators:
The following statement must be included with all versions of this document supplied to an OEM or integrator,
but should not be distributed to the end user.
●
●
●
●
This device is intended for OEM integrators only.
This device cannot be co-located with any other transmitter.
Please refer to the full Grant of Equipment document for other restrictions.
This device must be operated and used with a locally approved access point.
Information To Be Supplied to the End User by the OEM or Integrator
The following regulatory and safety notices must be published in documentation supplied to the end user of the
product or system incorporating an Intel(R) PRO/Wireless 3945ABG Network Connection or an Intel(R) PRO/
Wireless 3945BG Network Connection in compliance with local regulations. Host system must be labeled with
"Contains FCC ID: XXXXXXXX", FCC ID displayed on label.
The Intel(R) PRO/Wireless 3945ABG Network Connection adapter or the Intel(R) PRO/Wireless 3945BG Network
Connection wireless network device must be installed and used in strict accordance with the manufacturer's
instructions as described in the user documentation that comes with the product. For country-specific approvals,
see Radio approvals. Intel Corporation is not responsible for any radio or television interference caused by
unauthorized modification of the devices included with the Intel(R) PRO/Wireless 3945ABG Network Connection
or the Intel(R) PRO/Wireless 3945BG Network Connection adapter kit, or the substitution or attachment of
connecting cables and equipment other than that specified by Intel Corporation. The correction of interference
caused by such unauthorized modification, substitution or attachment is the responsibility of the user. Intel
Corporation and its authorized resellers or distributors are not liable for any damage or violation of government
regulations that may arise from the user failing to comply with these guidelines.
Local Restriction of 802.11a 802.11b, and 802.11g Radio Usage
The following statement on local restrictions must be published as part of the compliance documentation for all
802.11a, 802.11b, and 802.11g products.
Caution: Due to the fact that the frequencies used by 802.11a, 802.11b, and 802.11g wireless LAN devices may
not yet be harmonized in all countries, 802.11a, 802.11b, and 802.11g products are designed for use only in
specific countries, and are not allowed to be operated in countries other than those of designated use. As a user
of these products, you are responsible for ensuring that the products are used only in the countries for which
they were intended and for verifying that they are configured with the correct selection of frequency and channel
for the country of use. Any deviation from permissible settings and restrictions in the country of use could be an
infringement of national law and may be punished as such.
FCC Radio Frequency Interference Requirements
This device is restricted to indoor use due to its operation in the 5.15 to 5.25 GHz frequency range. FCC requires
this product to be used indoors for the frequency range 5.15 to 5.25 GHz to reduce the potential for harmful
interference to co-channel Mobile Satellite systems. High power radars are allocated as primary users of the 5.25
to 5.35 GHz and 5.65 to 5.85 GHz bands. These radar stations can cause interference with and /or damage this
device.
●
●
This device is intended for OEM integrators only.
This device cannot be co-located with any other transmitter.
USA—Federal Communications Commission (FCC)
This device complies with Part 15 of the FCC Rules. Operation of the device is subject to the following two
conditions:
●
●
This device may not cause harmful interference.
This device must accept any interference that may cause undesired operation.
NOTE: The radiated output power of the Intel(R) PRO/Wireless 3945ABG Network Connection
adapter or the Intel(R) PRO/Wireless 3945BG Network Connection wireless network device is far
below the FCC radio frequency exposure limits. Nevertheless, the Intel(R) PRO/Wireless LAN
wireless network device should be used in such a manner that the potential for human contact
during normal operation is minimized. To avoid the possibility of exceeding the FCC radio frequency
exposure limits, you should keep a distance of at least 20 cm between you (or any other person in
the vicinity) and the antenna that is built into the computer.
Interference statement
This equipment has been tested and found to comply with the limits for a Class B digital device, pursuant to Part
15 of the FCC Rules. These limits are designed to provide reasonable protection against harmful interference in a
residential installation. This equipment generates, uses, and can radiate radio frequency energy. If the
equipment is not installed and used in accordance with the instructions, the equipment may cause harmful
interference to radio communications. There is no guarantee, however, that such interference will not occur in a
particular installation. If this equipment does cause harmful interference to radio or television reception (which
can be determined by turning the equipment off and on), the user is encouraged to try to correct the
interference by taking one or more of the following measures:
●
●
●
●
Reorient or relocate the receiving antenna.
Increase the distance between the equipment and the receiver.
Connect the equipment to an outlet on a circuit different from that to which the receiver is connected.
Consult the dealer or an experienced radio/TV technician for help.
NOTE:The Intel(R) PRO/Wireless 3945ABG Network Connection adapter or the Intel(R) PRO/
Wireless 3945BG Network Connection adapter wireless network device must be installed and used in
strict accordance with the manufacturer's instructions as described in the user documentation that
comes with the product. Any other installation or use will violate FCC Part 15 regulations.
Canada—Industry Canada (IC)
This device complies with RSS210 of Industry Canada.
This Class B digital apparatus complies with Canadian ICES-003, Issue 4, and RSS-210, No 4 (Dec 2000) and No
5 (Nov 2001).
Cet appariel numérique de la classe B est conforme à la norme NMB-003, No. 4, et CNR-210, No 4 (Dec 2000) et
No 5 (Nov 2001)..
"To prevent radio interference to the licensed service, this device is intended to be operated indoors and away
from windows to provide maximum shielding. Equipment (or its transmit antenna) that is installed outdoors is
subject to licensing."
« Pour empêcher que cet appareil cause du brouillage au service faisant l'objet d'une licence, il doit être utilisé a
l'intérieur et devrait être placé loin des fenêtres afinde fournir un écran de blindage maximal. Si le matériel (ou
son antenne d'émission) est installé à l'extérieur, il doit faire l'objet d'une licence. »
Europe Frequency Bands
2.400 - 2.4835 GHz (Europe ETSI)
5.15 - 5.35 GHz and 5.47-5.725 GHz (Europe ETSI)
Low band 5.25 - 5.35 GHz is for indoor use only
5.47 - 5.725 GHz is current not allowed in Czech Republic and France.
Declaration of Conformity
This equipment complies with the essential requirements of the European Union directive 1999/5/EC.
Czech
Intel(R) Corporation tímto prohlašuje, že tento Intel(R) PRO/Wireless 3945ABG Network
Connection (Intel(R) PRO/Wireless 3945BG Network Connection) je ve shodě se základními
požadavky a dalšími p•íslušnými ustanoveními směrnice 1999/5/ES."
Danish
Undertegnede Intel(R) Corporation erklærer herved, at følgende udstyr Intel(R) PRO/Wireless
3945ABG Network Connection (Intel(R) PRO/Wireless 3945BG Network Connection) overholder de
væsentlige krav og øvrige relevante krav i direktiv 1999/5/EF.
Dutch
Hierbij verklaart Intel(R) Corporation dat het toestel Intel(R) PRO/Wireless 3945ABG Network
Connection (Intel(R) PRO/Wireless 3945BG Network Connection) in overeenstemming is met de
essentiële eisen en de andere relevante bepalingen van richtlijn 1999/5/EG.
Bij deze verklaart Intel(R) Corporation dat deze Intel(R) PRO/Wireless 3945ABG Network
Connection (Intel(R) PRO/Wireless 3945BG Network Connection) voldoet aan de essentiële eisen
en aan de overige relevante bepalingen van Richtlijn 1999/5/EC.
English
Hereby, Intel(R) Corporation, declares that this Intel(R) PRO/Wireless 3945ABG Network
Connection (Intel(R) PRO/Wireless 3945BG Network Connection) is in compliance with the
essential requirements and other relevant provisions of Directive 1999/5/EC.
Estonian
Käesolevaga kinnitab Intel(R) Corporation seadme Intel(R) PRO/Wireless 3945ABG Network
Connection (Intel(R) PRO/Wireless 3945BG Network Connection) vastavust direktiivi 1999/5/EÜ
põhinõuetele ja nimetatud direktiivist tulenevatele teistele asjakohastele sätetele.
Finnish
Intel(R) Corporation vakuuttaa täten että Intel(R) PRO/Wireless 3945ABG Network Connection
(Intel(R) PRO/Wireless 3945BG Network Connection) tyyppinen laite on direktiivin 1999/5/EY
oleellisten vaatimusten ja sitä koskevien direktiivin muiden ehtojen mukainen.
French
Par la présente Intel(R) Corporation déclare que l'appareil Intel(R) PRO/Wireless 3945ABG Network
Connection (Intel(R) PRO/Wireless 3945BG Network Connection) est conforme aux exigences
essentielles et aux autres dispositions pertinentes de la directive 1999/5/CE.
Par la présente, Intel(R) Corporation déclare que ce Intel(R) PRO/Wireless 3945ABG Network
Connection (Intel(R) PRO/Wireless 3945BG Network Connection) est conforme aux exigences
essentielles et aux autres dispositions de la directive 1999/5/CE qui lui sont applicables.
German
Hiermit erklärt Intel(R) Corporation, dass sich dieser/diese/dieses Intel(R) PRO/Wireless 3945ABG
Network Connection (Intel(R) PRO/Wireless 3945BG Network Connection) in Übereinstimmung mit
den grundlegenden Anforderungen und den anderen relevanten Vorschriften der Richtlinie 1999/5/
EG befindet". (BMWi)
Hiermit erklärt Intel(R) Corporation die Übereinstimmung des Gerätes Intel(R) PRO/Wireless
3945ABG Network Connection (Intel(R) PRO/Wireless 3945BG Network Connection) mit den
grundlegenden Anforderungen und den anderen relevanten Festlegungen der Richtlinie 1999/5/EG.
(Wien)
Greek
ΜΕ ΤΗΝ ΠΑΡΟΥΣΑ Intel(R) Corporation ∆ΗΛΩΝΕΙ ΟΤΙ Intel(R) PRO/Wireless 3945ABG Network
Connection (Intel(R) PRO/Wireless 3945BG Network Connection) ΣΥΜΜΟΡΦΩΝΕΤΑΙ ΠΡΟΣ ΤΙΣ
ΟΥΣΙΩ∆ΕΙΣ ΑΠΑΙΤΗΣΕΙΣ ΚΑΙ ΤΙΣ ΛΟΙΠΕΣ ΣΧΕΤΙΚΕΣ ∆ΙΑΤΑΞΕΙΣ ΤΗΣ Ο∆ΗΓΙΑΣ 1999/5/ΕΚ
Hungary
Alulírott, Intel(R) Corporation nyilatkozom, hogy a Intel(R) PRO/Wireless 3945ABG Network
Connection (Intel(R) PRO/Wireless 3945BG Network Connection) megfelel a vonatkozó alapvetõ
követelményeknek és az 1999/5/EC irányelv egyéb elõírásainak
Icelandic
Intel lysir her med yfir að thessi bunadur, Intel(R) PRO/Wireless 3945ABG Network Connection
(Intel(R) PRO/Wireless 3945BG Network Connection), uppfyllir allar grunnkrofur, sem gerdar eru i
R&TTE tilskipun ESB nr 1999/5/EC
Italian
Con la presente Intel(R) Corporation dichiara che questo Intel(R) PRO/Wireless 3945ABG Network
Connection (Intel(R) PRO/Wireless 3945BG Network Connection) è conforme ai requisiti essenziali
ed alle altre disposizioni pertinenti stabilite dalla direttiva 1999/5/CE.
Latvian
Ar šo Intel(R) Corporation deklarē, ka Intel(R) PRO/Wireless 3945ABG Network Connection (Intel
(R) PRO/Wireless 3945BG Network Connection) atbilst Direktīvas 1999/5/EK būtiskajām prasībām
un citiem ar to saistītajiem noteikumiem
Lithuanian
Intel(R) Corporation deklaruoja, kad Intel(R) Pro/Wireless 3945ABG Network Connection (Intel(R)
PRO/Wireless 3945BG Network Connection) atitinka 1999/5/EC Direktyvos esminius reikalavimus
ir kitas nuostatas".
Malti
Hawnhekk, Intel(R) Corporation, jiddikjara li dan Intel(R) PRO/Wireless 3945ABG Network
Connection (Intel(R) PRO/Wireless 3945BG Network Connection) jikkonforma mal-ħti•ijiet
essenzjali u ma provvedimenti oħrajn relevanti li hemm fid-Dirrettiva 1999/5/EC
Polish
Niniejszym, Intel(R) Corporation, deklaruj•, •e Intel(R) PRO/Wireless 3945ABG Network
Connection (Intel(R) PRO/Wireless 3945BG Network Connection) spełnia wymagania zasadnicze
oraz stosowne postanowienia zawarte Dyrektywie 1999/5/EC.
Portuguese Intel(R) Corporation declara que este Intel(R) PRO/Wireless 3945ABG Network Connection (Intel
(R) PRO/Wireless 3945BG Network Connection) está conforme com os requisitos essenciais e
outras disposições da Directiva 1999/5/CE.
Slovak
Intel(R) Corporation týmto vyhlasuje, že Intel(R) PRO/Wireless 3945ABG Network Connection (Intel
(R) PRO/Wireless 3945BG Network Connection) sp••a základné požiadavky a všetky príslušné
ustanovenia Smernice 1999/5/ES.
Slovenia
Šiuo Intel(R) Corporation deklaruoja, kad šis Intel(R) PRO/Wireless 3945ABG Network
Connection (Intel(R) PRO/Wireless 3945BG Network Connection) atitinka esminius reikalavimus ir
kitas 1999/5/EB Direktyvos nuostatas.
Spanish
Por medio de la presente Intel(R) Corporation declara que el Intel(R) PRO/Wireless 3945ABG
Network Connection (Intel(R) PRO/Wireless 3945BG Network Connection) cumple con los
requisitos esenciales y cualesquiera otras disposiciones aplicables o exigibles de la Directiva
1999/5/CE.
Swedish
Härmed intygar Intel(R) Corporation att denna Intel(R) PRO/Wireless 3945ABG Network
Connection (Intel(R) PRO/Wireless 3945BG Network Connection) står I överensstämmelse med de
väsentliga egenskapskrav och övriga relevanta bestämmelser som framgår av direktiv 1999/5/EG.
France
Pour la France métropolitaine
2.400 - 2.4835 GHz (Canaux 1à 13) autorisé en usage intérieur
2.400 -2.454 GHz (canaux 1 à 7) autorisé en usage extérieur
Pour la Guyane et la Réunion
2.400 - 2.4835 GHz (Canaux 1à 13) autorisé en usage intérieur .
2.420 - 2.4835 GHz (canaux 5 à 13) autorisé en usage extérieur
Pour tout le territoire Fan-cais:
Seulement 5.15 -5.35 GHz autorisé pour le 802.11a
Belgium
Dans le cas d'une utilisation privée, à l'extérieur d'un bâtiment, au-dessus d'un espace public, aucun
enregistrement n'est nécessaire pour une distance de moins de 300m. Pour une distance supérieure à 300m un
enregistrement auprès de l'IBPT est requise. Pour les enregistrements et licences, veuillez contacter l'IBPT.
In geval van privé-gebruik, buiten een gebouw, op een openbare plaats, is geen registratie nodig, wanneer de
afstand minder dan 300m is. Voor een afstand groter dan 300m is een registratie bij BIPT vereist. Voor
registraties en licenties, gelieve BIPT te contacteren.
5 GHz interface is not allowed at this time.
Japan
Latvia
A license is required for outdoor use for operation in 2.4 GHz band.
Italia
A general authorization is requested for outdoor use in Italy
The use of these equipments is regulated by:
- D.L.gs 1.8.2003, n. 259, article 104 (activity subject to general authorization) for outdoor use and article 105
(free use) for indoor use, in both cases for private use.
- D.M. 28.5.03, for supply to public of RLAN access to networks and telecom services.
L’uso degli apparati è regolamentato da:
- D.L.gs 1.8.2003, n. 259, articoli 104 (attività soggette ad autorizzazione generale) se utilizzati al di fuori del
proprio fondo e 105 (libero uso) se utilizzati entro il proprio fondo, in entrambi i casi per uso privato;
- D.M. 28.5.03, per la fornitura al pubblico dell’accesso R-LAN alle reti e ai servizi di telecomunicazioni.
Greece
A license is required for the outdoor use of band 5.470 – 5.725 GHz.
Belarus
2.4 GHz OFDM (802.11g) is not allowed at this time.
Indonesia
5 GHz interface is not allowed at this time.
Korea
Kuwait
5 GHz interface is not allowed at this time.
Oman
If the modules are less than 100 milliwatts they are unlicensed but if they are more than 100 milliwatts, the user
is responsible for getting a license to operate from Telecommunications Regulatory Authority (TRA) in Sultanate
of Oman.
Taiwan
Pakistan
Pakistan Telecommunication Authority (PTA) Approved
UAE
5 GHz interface is not allowed at this time.
Ukraine
5 GHz interface is not allowed at this time.
Radio approvals
To determine whether you are allowed to use your wireless network device in a specific country, please check to
see if the radio type number that is printed on the identification label of your device is listed in the manufacture
OEM Regulatory Guidance document.
Underwriters Laboratories Inc. (UL) Regulatory Warning
For use in (or with) UL Listed personal computers or compatible.
Intel(R) PRO/Wireless 2915ABG Network Connection
The information in this document applies to the following products:
Tri-mode wireless LAN adapters (802.11a/802.11b/802.11g )
Intel(R) PRO/Wireless 2915ABG Network Connection (model WM3B2915ABG)
Intel(R) PRO/Wireless 2915ABG Network Connection (model WM3A2915ABG)
NOTE: Due to the evolving state of regulations and standards in the wireless LAN field (IEEE 802.11
and similar standards), the information provided herein is subject to change. Intel Corporation
assumes no responsibility for errors or omissions in this document. Nor does Intel make any
commitment to update the information contained herein.
Information for the user
Safety Notices
The FCC with its action in ET Docket 96-8 has adopted a safety standard for human exposure to radio frequency
(RF) electromagnetic energy emitted by FCC certified equipment. The Intel(R) PRO/Wireless 2915ABG Network
Connection adapter meets the Human Exposure limits found in OET Bulletin 65, supplement C, 2001, and ANSI/
IEEE C95.1, 1992. Proper operation of this radio according to the instructions found in this manual will result in
exposure substantially below the FCC’s recommended limits.
The following safety precautions should be observed:
●
●
●
●
●
●
●
●
●
●
Do not touch or move antenna while the unit is transmitting or receiving.
Do not hold any component containing the radio such that the antenna is very close or touching any
exposed parts of the body, especially the face or eyes, while transmitting.
Do not operate the radio or attempt to transmit data unless the antenna is connected; if not, the radio
may be damaged.
Use in specific environments:
❍
The use of wireless devices in hazardous locations is limited by the constraints posed by the safety
directors of such environments.
❍
The use of wireless devices on airplanes is governed by the Federal Aviation Administration (FAA).
❍
The use of wireless devices in hospitals is restricted to the limits set forth by each hospital.
Antenna use:
❍
In order to comply with FCC RF exposure limits, low gain integrated antennas should be located at a
minimum distance of 20 cm (8 inches) or more from the body of all persons.
❍
High-gain, wall-mount, or mast-mount antennas are designed to be professionally installed and
should be located at a minimum distance of 30 cm (12 inches) or more from the body of all persons.
Please contact your professional installer, VAR, or antenna manufacturer for proper installation
requirements.
Explosive Device Proximity Warning (see below)
Antenna Warning (see below)
Use on Aircraft Caution (see below)
Other Wireless Devices (see below)
Power Supply (Access Point) (see below)
Explosive Device Proximity Warning
Warning: Do not operate a portable transmitter (such as a wireless network device) near unshielded
blasting caps or in an explosive environment unless the device has been modified to be qualified for such use.
Antenna Warnings
Warning: To comply with the FCC and ANSI C95.1 RF exposure limits, it is recommended for the Intel(R)
PRO/Wireless 2915ABG Network Connection adapter installed in a desktop or portable computer, that the
antenna for this device be installed so as to provide a separation distance of al least 20 cm (8 inches) from all
persons and that the antenna must not be co-located or operating in conjunction with any other antenna or radio
transmitter. It is recommended that the user limit exposure time if the antenna is positioned closer than 20 cm
(8 inches).
Warning: Intel(R) PRO/Wireless LAN products are not designed for use with high-gain directional antennas.
Use of such antennas with these products is illegal.
Use On Aircraft Caution
Caution: Regulations of the FCC and FAA prohibit airborne operation of radio-frequency wireless devices
because their signals could interfere with critical aircraft instruments.
Other Wireless Devices
Safety Notices for Other Devices in the Wireless Network: Refer to the documentation supplied with
wireless Ethernet adapters or other devices in the wireless network.
Local Restrictions on 802.11a, 802.11b, and 802.11g Radio Usage
Caution: Due to the fact that the frequencies used by 802.11a, 802.11b, and 802.11g wireless LAN devices
may not yet be harmonized in all countries, 802.11a, 802.11b, and 802.11g products are designed for use only
in specific countries, and are not allowed to be operated in countries other than those of designated use. As a
user of these products, you are responsible for ensuring that the products are used only in the countries for
which they were intended and for verifying that they are configured with the correct selection of frequency and
channel for the country of use. The device transmit power control (TPC) interface is part of the Intel(R) PROSet/
Wireless software. Operational restrictions for Equivalent Isotropic Radiated Power (EIRP) are provided by the
system manufacturer. Any deviation from the permissible power and frequency settings for the country of use is
an infringement of national law and may be punished as such.
For country-specific information, see the additional compliance information supplied with the product.
Wireless interoperability
The Intel(R) PRO/Wireless 2915ABG Network Connection adapter is designed to be interoperable with other
wireless LAN products that are based on direct sequence spread spectrum (DSSS) radio technology and to
comply with the following standards:
●
●
●
●
IEEE Std. 802.11b compliant Standard on Wireless LAN.
IEEE Std. 802.11g compliant Standard on Wireless LAN.
IEEE Std. 802.11a compliant Standard on Wireless LAN.
Wireless Fidelity (WiFi) certification, as defined by the WECA (Wireless Ethernet Compatibility Alliance).
The Intel(R) PRO/Wireless 2915ABG Network Connection adapter and your health
The Intel(R) PRO/Wireless 2915ABG Network Connection adapter, like other radio devices, emits radio frequency
electromagnetic energy. The level of energy emitted by this device, however, is less than the electromagnetic
energy emitted by other wireless devices such as mobile phones. The Intel(R) PRO/Wireless 2915ABG Network
Connection adapter wireless device operates within the guidelines found in radio frequency safety standards and
recommendations. These standards and recommendations reflect the consensus of the scientific community and
result from deliberations of panels and committees of scientists who continually review and interpret the
extensive research literature. In some situations or environments, the use of the Intel(R) PRO/Wireless 2915ABG
Network Connection adapter wireless device may be restricted by the proprietor of the building or responsible
representatives of the applicable organization. Examples of such situations include the following:
●
●
Using the Intel(R) PRO/Wireless 2915ABG Network Connection adapter equipment on board airplanes, or
Using the Intel(R) PRO/Wireless 2915ABG Network Connection adapter equipment in any other
environment where the risk of interference with other devices or services is perceived or identified as
being harmful
If you are uncertain of the policy that applies to the use of wireless devices in a specific organization or
environment (an airport, for example), you are encouraged to ask for authorization to use the Intel(R) PRO/
Wireless 2915ABG Network Connection adapter wireless device before you turn it on.
Regulatory information
Information for the OEMs and Integrators:
The following statement must be included with all versions of this document supplied to an OEM or integrator,
but should not be distributed to the end user.
●
●
●
●
This device is intended for OEM integrators only.
This device cannot be co-located with any other transmitter.
Please refer to the full Grant of Equipment document for other restrictions.
This device must be operated and used with a locally approved access point.
Information To Be Supplied to the End User by the OEM or Integrator
The following regulatory and safety notices must be published in documentation supplied to the end user of the
product or system incorporating an Intel(R) PRO/Wireless 2915ABG Network Connection in compliance with local
regulations. Host system must be labeled with "Contains FCC ID: XXXXXXXX", FCC ID displayed on label.
The Intel(R) PRO/Wireless 2915ABG Network Connection adapter wireless network device must be installed and
used in strict accordance with the manufacturer's instructions as described in the user documentation that comes
with the product. For country-specific approvals, see Radio approvals. Intel Corporation is not responsible for any
radio or television interference caused by unauthorized modification of the devices included with the Intel(R)
PRO/Wireless 2915ABG Network Connection adapter kit, or the substitution or attachment of connecting cables
and equipment other than that specified by Intel Corporation. The correction of interference caused by such
unauthorized modification, substitution or attachment is the responsibility of the user. Intel Corporation and its
authorized resellers or distributors are not liable for any damage or violation of government regulations that may
arise from the user failing to comply with these guidelines.
Local Restriction of 802.11a, 802.11b, and 802.11g Radio Usage
The following statement on local restrictions must be published as part of the compliance documentation for all
802.11a, 802.11b, and 802.11g products.
Caution: Due to the fact that the frequencies used by 802.11a, 802.11b, and 802.11g wireless LAN devices may
not yet be harmonized in all countries, 802.11a, 802.11b, and 802.11g products are designed for use only in
specific countries, and are not allowed to be operated in countries other than those of designated use. As a user
of these products, you are responsible for ensuring that the products are used only in the countries for which
they were intended and for verifying that they are configured with the correct selection of frequency and channel
for the country of use. Any deviation from permissible settings and restrictions in the country of use could be an
infringement of national law and may be punished as such.
FCC Radio Frequency Interference Requirements
This device is restricted to indoor use due to its operation in the 5.15 to 5.25 GHz frequency range. FCC requires
this product to be used indoors for the frequency range 5.15 to 5.25 GHz to reduce the potential for harmful
interference to co-channel Mobile Satellite systems. High power radars are allocated as primary users of the 5.25
to 5.35 GHz and 5.65 to 5.85 GHz bands. These radar stations can cause interference with and /or damage this
device.
●
●
This device is intended for OEM integrators only.
This device cannot be co-located with any other transmitter.
USA—Federal Communications Commission (FCC)
This device complies with Part 15 of the FCC Rules. Operation of the device is subject to the following two
conditions:
●
●
This device may not cause harmful interference.
This device must accept any interference that may cause undesired operation.
NOTE: The radiated output power of the Intel(R) PRO/Wireless 2915ABG Network Connection
adapter wireless network device is far below the FCC radio frequency exposure limits. Nevertheless,
the Intel(R) PRO/Wireless LAN wireless network device should be used in such a manner that the
potential for human contact during normal operation is minimized. To avoid the possibility of
exceeding the FCC radio frequency exposure limits, you should keep a distance of at least 20 cm
between you (or any other person in the vicinity) and the antenna that is built into the computer.
Interference statement
This equipment has been tested and found to comply with the limits for a Class B digital device, pursuant to Part
15 of the FCC Rules. These limits are designed to provide reasonable protection against harmful interference in a
residential installation. This equipment generates, uses, and can radiate radio frequency energy. If the
equipment is not installed and used in accordance with the instructions, the equipment may cause harmful
interference to radio communications. There is no guarantee, however, that such interference will not occur in a
particular installation. If this equipment does cause harmful interference to radio or television reception (which
can be determined by turning the equipment off and on), the user is encouraged to try to correct the
interference by taking one or more of the following measures:
●
●
●
●
Reorient or relocate the receiving antenna.
Increase the distance between the equipment and the receiver.
Connect the equipment to an outlet on a circuit different from that to which the receiver is connected.
Consult the dealer or an experienced radio/TV technician for help.
NOTE: The Intel(R) PRO/Wireless 2915ABG Network Connection adapter wireless network device
must be installed and used in strict accordance with the manufacturer's instructions as described in
the user documentation that comes with the product. Any other installation or use will violate FCC
Part 15 regulations.
Canada—Industry Canada (IC)
This device complies with RSS210 of Industry Canada.
This Class B digital apparatus complies with Canadian ICES-003, Issue 4, and RSS-210, No 4 (Dec 2000) and No
5 (Nov 2001).
Cet appariel numérique de la classe B est conforme à la norme NMB-003, No. 4, et CNR-210, No 4 (Dec 2000) et
No 5 (Nov 2001)..
"To prevent radio interference to the licensed service, this device is intended to be operated indoors and away
from windows to provide maximum shielding. Equipment (or its transmit antenna) that is installed outdoors is
subject to licensing."
« Pour empêcher que cet appareil cause du brouillage au service faisant l'objet d'une licence, il doit être utilisé a
l'intérieur et devrait être placé loin des fenêtres afinde fournir un écran de blindage maximal. Si le matériel (ou
son antenne d'émission) est installé à l'extérieur, il doit faire l'objet d'une licence. »
Europe Frequency Bands
2.400 - 2.4835 GHz (Europe ETSI)
5.15 - 5.35 GHz and 5.47-5.725 GHz (Europe ETSI)
Low band 5.25 - 5.35 GHz is for indoor use only
5.47 - 5.725 GHz is current not allowed in Czech Republic and France.
Declaration of Conformity
Declaration of Conformity
This equipment complies with the essential requirements of the European Union directive 1999/5/EC.
Czech
Intel(R) Corporation tímto prohlašuje, že tento Intel(R) PRO/Wireless 2915ABG Network
Connection je ve shodě se základními požadavky a dalšími p•íslušnými ustanoveními směrnice
1999/5/ES."
Danish
Undertegnede Intel(R) Corporation erklærer herved, at følgende udstyr Intel(R) PRO/Wireless
2915ABG Network Connection overholder de væsentlige krav og øvrige relevante krav i direktiv
1999/5/EF
Dutch
Hierbij verklaart Intel(R) Corporation dat het toestel Intel(R) PRO/Wireless 2915ABG Network
Connection in overeenstemming is met de essentiële eisen en de andere relevante bepalingen van
richtlijn 1999/5/EG
Bij deze verklaart Intel(R) Corporation dat deze Intel(R) PRO/Wireless 2915ABG Network
Connection voldoet aan de essentiële eisen en aan de overige relevante bepalingen van Richtlijn
1999/5/EC.
English
Hereby, Intel(R) Corporation, declares that this Intel(R) PRO/Wireless 2915ABG Network
Connection is in compliance with the essential requirements and other relevant provisions of
Directive 1999/5/EC.
Estonian
Käesolevaga kinnitab Intel(R) Corporation seadme Intel(R) PRO/Wireless 2915ABG Network
Connection vastavust direktiivi 1999/5/EÜ põhinõuetele ja nimetatud direktiivist tulenevatele
teistele asjakohastele sätetele.
Finnish
Intel(R) Corporation vakuuttaa täten että Intel(R) PRO/Wireless 2915ABG Network
Connection tyyppinen laite on direktiivin 1999/5/EY oleellisten vaatimusten ja sitä koskevien
direktiivin muiden ehtojen mukainen.
French
Par la présente Intel(R) Corporation déclare que l'appareil Intel(R) PRO/Wireless 2915ABG Network
Connection est conforme aux exigences essentielles et aux autres dispositions pertinentes de la
directive 1999/5/CE.
Par la présente, Intel(R) Corporation déclare que ce Intel(R) PRO/Wireless 2915ABG Network
Connection est conforme aux exigences essentielles et aux autres dispositions de la directive
1999/5/CE qui lui sont applicables.
German
Hiermit erklärt Intel(R) Corporation, dass sich dieser/diese/dieses Intel(R) PRO/Wireless 2915ABG
Network Connection in Übereinstimmung mit den grundlegenden Anforderungen und den anderen
relevanten Vorschriften der Richtlinie 1999/5/EG befindet". (BMWi)
Hiermit erklärt Intel(R) Corporation die Übereinstimmung des Gerätes Intel(R) PRO/Wireless
2915ABG Network Connection mit den grundlegenden Anforderungen und den anderen relevanten
Festlegungen der Richtlinie 1999/5/EG. (Wien).=
Greek
ΜΕ ΤΗΝ ΠΑΡΟΥΣΑ Intel(R) Corporation ∆ΗΛΩΝΕΙ ΟΤΙ Intel(R) PRO/Wireless 2915ABG Network
Connection ΣΥΜΜΟΡΦΩΝΕΤΑΙ ΠΡΟΣ ΤΙΣ ΟΥΣΙΩ∆ΕΙΣ ΑΠΑΙΤΗΣΕΙΣ ΚΑΙ ΤΙΣ ΛΟΙΠΕΣ ΣΧΕΤΙΚΕΣ
∆ΙΑΤΑΞΕΙΣ ΤΗΣ Ο∆ΗΓΙΑΣ 1999/5/ΕΚ.
Hungary
Alulírott, Intel(R) Corporation nyilatkozom, hogy a Intel(R) PRO/Wireless 2915ABG Network
Connection megfelel a vonatkozó alapvetõ követelményeknek és az 1999/5/EC irányelv egyéb
elõírásainak.
Icelandic
Intel lysir her med yfir að thessi bunadur, Intel(R) PRO/Wireless 2915ABG Network Connection ,
uppfyllir allar grunnkrofur, sem gerdar eru i R&TTE tilskipun ESB nr 1999/5/EC
Italian
Con la presente Intel(R) Corporation dichiara che questo Intel(R) PRO/Wireless 2915ABG Network
Connection è conforme ai requisiti essenziali ed alle altre disposizioni pertinenti stabilite dalla
direttiva 1999/5/CE.
Latvian
Ar šo Intel(R) Corporation deklarē, ka Intel(R) PRO/Wireless 2915ABG Network Connection atbilst
Direktīvas 1999/5/EK būtiskajām prasībām un citiem ar to saistītajiem noteikumiem.
Lithuanian
Intel(R) Corporation deklaruoja, kad Intel(R) Pro/Wireless 2915ABG Network Connectionatitinka
1999/5/EC Direktyvos esminius reikalavimus ir kitas nuostatas".
Malti
Hawnhekk, Intel(R) Corporation, jiddikjara li dan Intel(R) PRO/Wireless 2915ABG Network
Connection jikkonforma mal-ħti•ijiet essenzjali u ma provvedimenti oħrajn relevanti li hemm fidDirrettiva 1999/5/EC.
Polish
Niniejszym, Intel(R) Corporation, deklaruj•, •e Intel(R) PRO/Wireless 2915ABG Network
Connection spełnia wymagania zasadnicze oraz stosowne postanowienia zawarte
Dyrektywie 1999/5/EC.
Portuguese Intel(R) Corporation declara que este Intel(R) PRO/Wireless 2915ABG Network Connection está
conforme com os requisitos essenciais e outras disposições da Directiva 1999/5/CE.
Slovak
Intel(R) Corporation týmto vyhlasuje, že Intel(R) PRO/Wireless 2915ABG Network Connection
sp••a základné požiadavky a všetky príslušné ustanovenia Smernice 1999/5/ES.
Slovenia
Šiuo Intel(R) Corporation deklaruoja, kad šis Intel(R) PRO/Wireless 2915ABG Network
Connection atitinka esminius reikalavimus ir kitas 1999/5/EB Direktyvos nuostatas.
Spanish
Por medio de la presente Intel(R) Corporation declara que el Intel(R) PRO/Wireless 2915ABG
Network Connection cumple con los requisitos esenciales y cualesquiera otras disposiciones
aplicables o exigibles de la Directiva 1999/5/CE.
Swedish
Härmed intygar Intel(R) Corporation att denna Intel(R) PRO/Wireless 2915ABG Network
Connection står I överensstämmelse med de väsentliga egenskapskrav och övriga relevanta
bestämmelser som framgår av direktiv 1999/5/EG.
France
Pour la France métropolitaine
2.400 - 2.4835 GHz (Canaux 1à 13) autorisé en usage intérieur
2.400 -2.454 GHz (canaux 1 à 7) autorisé en usage extérieur
Pour la Guyane et la Réunion
2.400 - 2.4835 GHz (Canaux 1à 13) autorisé en usage intérieur .
2.420 - 2.4835 GHz (canaux 5 à 13) autorisé en usage extérieur
Pour tout le territoire Fancais:
Seulement 5.15 -5.35 GHz autorisé pour le 802.11a
Belgium
Dans le cas d'une utilisation privée, à l'extérieur d'un bâtiment, au-dessus d'un espace public, aucun
enregistrement n'est nécessaire pour une distance de moins de 300m. Pour une distance supérieure à 300m un
enregistrement auprès de l'IBPT est requise. Pour les enregistrements et licences, veuillez contacter l'IBPT.
In geval van privé-gebruik, buiten een gebouw, op een openbare plaats, is geen registratie nodig, wanneer de
afstand minder dan 300m is. Voor een afstand groter dan 300m is een registratie bij BIPT vereist. Voor
registraties en licenties, gelieve BIPT te contacteren.
Japan
Latvia
A license is required for outdoor use for operation in 2.4 GHz band. (Translation?)
Italia
A general authorization is requested for outdoor use in Italy
The use of these equipments is regulated by:
- D.L.gs 1.8.2003, n. 259, article 104 (activity subject to general authorization) for outdoor use and article 105
(free use) for indoor use, in both cases for private use.
- D.M. 28.5.03, for supply to public of RLAN access to networks and telecom services.
L’uso degli apparati è regolamentato da:
- D.L.gs 1.8.2003, n. 259, articoli 104 (attività soggette ad autorizzazione generale) se utilizzati al di fuori del
proprio fondo e 105 (libero uso) se utilizzati entro il proprio fondo, in entrambi i casi per uso privato ;
- D.M. 28.5.03, per la fornitura al pubblico dell’accesso R-LAN alle reti e ai servizi di telecomunicazioni.
Greece
A license is required for the outdoor use of band 5.470 – 5.725 GHz.
Belarus
2.4 GHz OFDM (802.11g) is not allowed at this time.
Indonesia
5 GHz interface is not allowed at this time.
Korea
Kuwait
5 GHz interface is not allowed at this time.
Oman
If the modules are less than 100 milliwatts they are unlicensed but if they are more than 100 milliwatts, the user
is responsible for getting a license to operate from Telecommunications Regulatory Authority (TRA) in Sultanate
of Oman.
Taiwan
Pakistan
Pakistan Telecommunication Authority (PTA) Approved
UAE
5 GHz interface is not allowed at this time.
Ukraine
5 GHz interface is not allowed at this time.
Radio approvals
To determine whether you are allowed to use your wireless network device in a specific country, please check to
see if the radio type number that is printed on the identification label of your device is listed in the manufacture
OEM Regulatory Guidance document.
Underwriters Laboratories Inc. (UL) Regulatory Warning
For use in (or with) UL Listed personal computers or compatible.
Regulatory Information: Intel(R) PRO/Wireless 2200BG Network
Connection
Information for the User
Regulatory Information
Information for the user
Safety Notices
The FCC with its action in ET Docket 96-8 has adopted a safety standard for human exposure to radio frequency
(RF) electromagnetic energy emitted by FCC certified equipment. The Intel(R) PRO/Wireless 2200BG Network
Connection meets the Human Exposure limits found in OET Bulletin 65, 2001, and ANSI/IEEE C95.1, 1992.
Proper operation of this radio according to the instructions found in this manual will result in exposure
substantially below the FCC’s recommended limits.
The following safety precautions should be observed:
●
●
●
●
Do not touch or move antenna while the unit is transmitting or receiving.
Do not hold any component containing the radio such that the antenna is very close or touching any
exposed parts of the body, especially the face or eyes, while transmitting.
Do not operate the radio or attempt to transmit data unless the antenna is connected; if not, the radio
may be damaged.
Use in specific environments:
❍
The use of wireless devices in hazardous locations is limited by the constraints posed by the safety
directors of such environments.
The use of wireless devices on airplanes is governed by the Federal Aviation Administration (FAA).
❍
The use of wireless devices in hospitals is restricted to the limits set forth by each hospital.
Explosive Device Proximity Warning (see below)
Antenna Warning (see below)
Use on Aircraft Caution (see below)
Other Wireless Devices (see below)
Power Supply (Access Point) (see below)
❍
●
●
●
●
●
Explosive Device Proximity Warning
Warning: Do not operate a portable transmitter (such as a wireless network device) near unshielded
blasting caps or in an explosive environment unless the device has been modified to be qualified for such use.
Antenna Warnings
Warning: To comply with the FCC and ANSI C95.1 RF exposure limits, it is recommended for the Intel(R)
PRO/Wireless 2200BG Network Connection installed in a desktop or portable computer, that the antenna for this
device be installed so as to provide a separation distance of al least 20 cm (8 inches) from all persons and that
the antenna must not be co-located or operating in conjunction with any other antenna or radio transmitter. It is
recommended that the user limit exposure time if the antenna is positioned closer than 20 cm (8 inches).
Warning: The Intel(R) PRO/Wireless 2200BG Network Connection product is not designed for use with highgain directional antennas. Use of such antennas with these products is illegal.
Use On Aircraft Caution
Caution: Regulations of the FCC and FAA prohibit airborne operation of radio-frequency wireless devices
because their signals could interfere with critical aircraft instruments.
Local Restrictions on 802.11b and 802.11g Radio Usage
All frequencies used by 802.11b and 802.11g are harmonized. Some countries though may not allow 802.11g.
Wireless interoperability
The Intel(R) PRO/Wireless 2200BG Network Connection adapter is designed to be interoperable with any wireless
LAN product that is based on direct sequence spread spectrum (DSSS) radio technology and to comply with the
following standards:
●
●
●
IEEE Std. 802.11b-1999. Standard on Wireless LAN.
IEEE Std. 802.11g compliant. Standard on Wireless LAN.
Wireless Fidelity (WiFi(R)) certification, as defined by the WECA (Wireless Ethernet Compatibility Alliance).
The Intel(R) PRO/Wireless LAN 2200BG Mini PCI adapter and your health
The Intel(R) PRO/Wireless 2200BG Network Connection adapter, like other radio devices, emits radio frequency
electromagnetic energy. The level of energy emitted by this device, however, is less than the electromagnetic
energy emitted by other wireless devices such as mobile phones. The Intel(R) PRO/Wireless 2200BG Network
Connection adapter wireless device operates within the guidelines found in radio frequency safety standards and
recommendations. These standards and recommendations reflect the consensus of the scientific community and
result from deliberations of panels and committees of scientists who continually review and interpret the
extensive research literature. In some situations or environments, the use of the Intel(R) PRO/Wireless 2200BG
Network Connection adapter wireless device may be restricted by the proprietor of the building or responsible
representatives of the applicable organization. Examples of such situations include the following:
●
●
Using the Intel(R) PRO/Wireless 2200BG Network Connection adapter equipment on board airplanes, or
Using the Intel(R) PRO/Wireless 2200BG Network Connection adapter equipment in any other environment
where the risk of interference with other devices or services is perceived or identified as being harmful.
If you are uncertain of the policy that applies to the use of wireless devices in a specific organization or
environment (an airport, for example), you are encouraged to ask for authorization to use the Intel(R) PRO/
Wireless 2200BG Network Connection adapter wireless device before you turn it on.
Regulatory information
The Intel(R) PRO/Wireless 2200BG Network Connection adapter wireless network device must be installed and
used in strict accordance with the manufacturer's instructions as described in the user documentation that comes
with the product. For country-specific approvals, see Radio approvals. Intel Corporation is not responsible for any
radio or television interference caused by unauthorized modification of the devices included with the Intel(R)
PRO/Wireless 2200BG Network Connection adapter kit, or the substitution or attachment of connecting cables
and equipment other than that specified by Intel Corporation. The correction of interference caused by such
unauthorized modification, substitution or attachment is the responsibility of the user. Intel Corporation and its
authorized resellers or distributors are not liable for any damage or violation of government regulations that may
arise from the user failing to comply with these guidelines.
USA—Federal Communications Commission (FCC)
This device complies with Part 15 of the FCC Rules. Operation of the device is subject to the following two
conditions:
●
●
This device may not cause harmful interference.
This device must accept any interference that may cause undesired operation.
NOTE: The radiated output power of the Intel(R) PRO/Wireless 2200BG Network Connection adapter
wireless network device is far below the FCC radio frequency exposure limits. Nevertheless, the Intel
PROSet/Wireless LAN wireless network device should be used in such a manner that the potential
for human contact during normal operation is minimized. To avoid the possibility of exceeding the
FCC radio frequency exposure limits, you should keep a distance of at least 2 cm between you (or
any other person in the vicinity) and the antenna that is built into the computer.
Interference statement
This equipment has been tested and found to comply with the limits for a Class B digital device, pursuant to Part
15 of the FCC Rules. These limits are designed to provide reasonable protection against harmful interference in a
residential installation. This equipment generates, uses, and can radiate radio frequency energy. If the
equipment is not installed and used in accordance with the instructions, the equipment may cause harmful
interference to radio communications. There is no guarantee, however, that such interference will not occur in a
particular installation. If this equipment does cause harmful interference to radio or television reception (which
can be determined by turning the equipment off and on), the user is encouraged to try to correct the
interference by taking one or more of the following measures:
●
●
●
●
Reorient or relocate the receiving antenna.
Increase the distance between the equipment and the receiver.
Connect the equipment to an outlet on a circuit different from that to which the receiver is connected.
Consult the dealer or an experienced radio/TV technician for help.
NOTE: The Intel(R) PRO/Wireless 2200BG Network Connection adapter wireless network device
must be installed and used in strict accordance with the manufacturer's instructions as described in
the user documentation that comes with the product. Any other installation or use will violate FCC
Part 15 regulations.
U.S. Frequency Bands
2.400 - 2.462 GHz
Canada—Industry Canada (IC)
This Class B digital apparatus complies with Canadian ICES-003, Issue 2, and RSS-210, Issue 4 (Dec. 2000).
Cet appariel numérique de la classe B est conforme à la norme NMB-003, No. 2, et CNR-210, No 4 (Dec 2000).
To prevent radio interference to the licensed service, this device is intended to be operated indoors and away
from windows to provide maximum shielding. Equipment (or its transmit antenna) that is installed outdoors is
subject to licensing."
« Pour empêcher que cet appareil cause du brouillage au service faisant l'objet d'une licence, il doit être utilisé a
l'intérieur et devrait être placé loin des fenêtres afinde fournir un écran de blindage maximal. Si le matériel (ou
son antenne d'émission) est installé à l'extérieur, il doit faire l'objet d'une licence. »
Europe—EU Declaration of Conformity
Europe Frequency Bands
2.400 - 2.4835 GHz (Europe ETSI)
Declaration of Conformity
This equipment complies with the essential requirements of the European Union directive 1999/5/EC.
English
Hereby, Intel(R) Corporation, declares that this Intel(R) PRO/Wireless 2200BG Network
Connection is in compliance with the essential requirements and other relevant provisions of
Directive 1999/5/EC.
Finnish
Intel(R) Corporation vakuuttaa täten että Intel(R) PRO/Wireless 2200BG Network
Connection tyyppinen laite on direktiivin 1999/5/EY oleellisten vaatimusten ja sitä koskevien
direktiivin muiden ehtojen mukainen.
Dutch
Hierbij verklaart Intel(R) Corporation dat het toestel Intel(R) PRO/Wireless 2200BG Network
Connection in overeenstemming is met de essentiële eisen en de andere relevante bepalingen van
richtlijn 1999/5/EG.
Bij deze verklaart Intel(R) Corporation dat deze Intel(R) PRO/Wireless 2200BG Network Connection
voldoet aan de essentiële eisen en aan de overige relevante bepalingen van Richtlijn 1999/5/EC.
French
Par la présente Intel(R) Corporation déclare que l'appareil Intel(R) PRO/Wireless 2915ABG Network
Connection est conforme aux exigences essentielles et aux autres dispositions pertinentes de la
directive 1999/5/CE.
Par la présente, Intel(R) Corporation déclare que ce Intel(R) PRO/Wireless 2200BG Network
Connection est conforme aux exigences essentielles et aux autres dispositions de la directive
1999/5/CE qui lui sont applicables.
Swedish
Härmed intygar Intel(R) Corporation att denna Intel(R) PRO/Wireless 2200BG Network Connection
står I överensstämmelse med de väsentliga egenskapskrav och övriga relevanta bestämmelser
som framgår av direktiv 1999/5/EG.
Danish
Undertegnede Intel(R) Corporation erklærer herved, at følgende udstyr Intel(R) PRO/Wireless
2200BG Network Connection overholder de væsentlige krav og øvrige relevante krav i direktiv
1999/5/EF.
German
Hiermit erklärt Intel(R) Corporation, dass sich dieser/diese/dieses Intel(R) PRO/Wireless 2200BG
Network Connection in Übereinstimmung mit den grundlegenden Anforderungen und den anderen
relevanten Vorschriften der Richtlinie 1999/5/EG befindet". (BMWi)
Hiermit erklärt Intel(R) Corporation die Übereinstimmung des Gerätes Intel(R) PRO/Wireless
2200BG Network Connection mit den grundlegenden Anforderungen und den anderen relevanten
Festlegungen der Richtlinie 1999/5/EG. (Wien)
Greek
ΜΕ ΤΗΝ ΠΑΡΟΥΣΑ Intel(R) Corporation ∆ΗΛΩΝΕΙ ΟΤΙ Intel(R) PRO/Wireless 2200BG Network
Connection ΣΥΜΜΟΡΦΩΝΕΤΑΙ ΠΡΟΣ ΤΙΣ ΟΥΣΙΩ∆ΕΙΣ ΑΠΑΙΤΗΣΕΙΣ ΚΑΙ ΤΙΣ ΛΟΙΠΕΣ ΣΧΕΤΙΚΕΣ
∆ΙΑΤΑΞΕΙΣ ΤΗΣ Ο∆ΗΓΙΑΣ 1999/5/ΕΚ.
Icelandic
Intel lysir her med yfir að thessi bunadur, Intel(R) PRO/Wireless 2200BG Network Connection ,
uppfyllir allar grunnkrofur, sem gerdar eru i R&TTE tilskipun ESB nr 1999/5/EC.
Italian
Con la presente Intel(R) Corporation dichiara che questo Intel(R) PRO/Wireless 2200BG Network
Connection è conforme ai requisiti essenziali ed alle altre disposizioni pertinenti stabilite dalla
direttiva 1999/5/CE.
Spanish
Por medio de la presente Intel(R) Corporation declara que el Intel(R) PRO/Wireless 2200BG
Network Connection cumple con los requisitos esenciales y cualesquiera otras disposiciones
aplicables o exigibles de la Directiva 1999/5/CE.
Portuguese Intel(R) Corporation declara que este Intel(R) PRO/Wireless 2200BG Network Connection está
conforme com os requisitos essenciais e outras disposições da Directiva 1999/5/CE.
Malti
Hawnhekk, Intel(R) Corporation, jiddikjara li dan Intel(R) PRO/Wireless 2200BG Network
Connection jikkonforma mal-ħti•ijiet essenzjali u ma provvedimenti oħrajn relevanti li hemm fidDirrettiva 1999/5/EC
New Member States requirements of Declaration of Conformity
Estonian
Käesolevaga kinnitab Intel(R) Corporation seadme Intel(R) PRO/Wireless 2200BG Network
Connection vastavust direktiivi 1999/5/EÜ põhinõuetele ja nimetatud direktiivist tulenevatele
teistele asjakohastele sätetele.
Hungary
Alulírott, Intel(R) Corporation nyilatkozom, hogy a Intel(R) PRO/Wireless 2200BG Network
Connection megfelel a vonatkozó alapvetõ követelményeknek és az 1999/5/EC irányelv egyéb
elõírásainak
Slovak
Intel(R) Corporation týmto vyhlasuje, že Intel(R) PRO/Wireless 2200BG Network Connection sp••a
základné požiadavky a všetky príslušné ustanovenia Smernice 1999/5/ES.
Czech
Intel(R) Corporation tímto prohlašuje, že tento Intel(R) PRO/Wireless 2200BG Network Connection
je ve shodě se základními požadavky a dalšími p•íslušnými ustanoveními směrnice 1999/5/ES."
Slovenia
Šiuo Intel(R) Corporation deklaruoja, kad šis Intel(R) PRO/Wireless 2200BGNetwork
Connection atitinka esminius reikalavimus ir kitas 1999/5/EB Direktyvos nuostatas.
Latvian
Ar šo Intel(R) Corporation deklarē, ka Intel(R) PRO/Wireless 2200BG Network Connection atbilst
Direktīvas 1999/5/EK būtiskajām prasībām un citiem ar to saistītajiem noteikumiem
Lithuanian Intel(R) Corporation deklaruoja, kad Intel(R) Pro/Wireless 2200BG Network Connectionatitinka
1999/5/EC Direktyvos esminius reikalavimus ir kitas nuostatas".
Polish
Niniejszym, Intel(R) Corporation, deklaruj•, •e Intel(R) PRO/Wireless 2200BG Network Connection
spełnia wymagania zasadnicze oraz stosowne postanowienia zawarte
Dyrektywie 1999/5/EC.
France
Pour la France métropolitaine
2.400 - 2.4835 GHz (Canaux 1à 13) autorisé en usage intérieur
2.400 -2.454 GHz (canaux 1 à 7) autorisé en usage extérieur
Pour la Guyane et la Réunion
2.400 - 2.4835 GHz (Canaux 1à 13) autorisé en usage intérieur
2.420 - 2.4835 GHz (canaux 5 à 13) autorisé en usage extérieur
Pour tout le territoire Fan cais:
Seulement 5.15 -5.35 GHz autorisé pour le 802.1
Belgique
Dans le cas d'une utilisation privée, à l'extérieur d'un bâtiment, au-dessus d'un espace public, aucun
enregistrement n'est nécessaire pour une distance de moins de 300m. Pour une distance supérieure à 300m un
enregistrement auprès de l'IBPT est requise. Pour les enregistrements et licences, veuillez contacter l'IBPT.
In geval van privé-gebruik, buiten een gebouw, op een openbare plaats, is geen registratie nodig, wanneer de
afstand minder dan 300m is. Voor een afstand groter dan 300m is een registratie bij BIPT vereist. Voor
registraties en licenties, gelieve BIPT te contacteren.
Latvia
A license is required for outdoor use for operation in 2.4 GHz band.
Italia
The use of these equipments is regulated by:
- D.L.gs 1.8.2003, n. 259, article 104 (activity subject to general authorization) for outdoor use and article 105
(free use) for indoor use, in both cases for private use.
- D.M. 28.5.03, for supply to public of RLAN access to networks and telecom services.
L’uso degli apparati è regolamentato da:
- D.L.gs 1.8.2003, n. 259, articoli 104 (attività soggette ad autorizzazione generale) se utilizzati al di fuori del
proprio fondo e 105 (libero uso) se utilizzati entro il proprio fondo, in entrambi i casi per uso privato;
- D.M. 28.5.03, per la fornitura al pubblico dell’accesso R-LAN alle reti e ai servizi di telecomunicazioni.
Belarus
2.4 GHz OFDM (802.11g) is not allowed at this time.
Korea
Taiwan
Pakistan
Pakistan Telecommunication Authority (PTA) Approved
Radio approvals
To determine whether you are allowed to use your wireless network device in a specific country, please check to
see if the radio type number that is printed on the identification label of your device is listed in the manufacture
OEM Regulatory Guidance document.
Back to Contents
Back to Contents
Warranty: Intel(R) PRO/Wireless 3945ABG
Network Connection User Guide
Product Warranty Information
One-Year Limited Hardware Warranty
Limited Warranty
Intel warrants to the purchaser of the Intel(R) PRO/Wireless 3945ABG Network Connection
PCI Card (the “Product”), that the Product, if properly used and installed, will be free from
defects in material and workmanship and will substantially conform to Intel’s publicly
available specifications for the Product for a period of one (1) year beginning on the date the
Product was purchased in its original sealed packaging.
SOFTWARE OF ANY KIND DELIVERED WITH OR AS PART OF THE PRODUCT IS EXPRESSLY
PROVIDED "AS IS", SPECIFICALLY EXCLUDING ALL OTHER WARRANTIES, EXPRESS,
IMPLIED (INCLUDING WITHOUT LIMITATION, WARRANTIES OF MERCHANTABILITY, NONINFRINGEMENT OR FITNESS FOR A PARTICULAR PURPOSE), provided however, that Intel
warrants that the media on which the software is furnished will be free from defects for a
period of ninety (90) days from the date of delivery. If such a defect appears within the
warranty period, you may return the defective media to Intel for replacement or alternative
delivery of the software at Intel's discretion and without charge. Intel does not warrant or
assume responsibility for the accuracy or completeness of any information, text, graphics,
links or other items contained within the software.
If the Product which is the subject of this Limited Warranty fails during the warranty period
for reasons covered by this Limited Warranty, Intel, at its option, will:
●
●
●
REPAIR the Product by means of hardware and/or software; OR
REPLACE the Product with another product, OR, if Intel is unable to repair or replace
the Product,
REFUND the then-current Intel price for the Product at the time a claim for warranty
service is made to Intel under this Limited Warranty.
THIS LIMITED WARRANTY, AND ANY IMPLIED WARRANTIES THAT MAY EXIST UNDER
APPLICABLE STATE, NATIONAL, PROVINCIAL OR LOCAL LAW, APPLY ONLY TO YOU AS THE
ORIGINAL PURCHASER OF THE PRODUCT.
Extent of Limited Warranty
Intel does not warrant that the Product, whether purchased stand-alone or integrated with
other products, including without limitation, semi-conductor components, will be free from
design defects or errors known as "errata." Current characterized errata are available upon
request. Further, this Limited Warranty does NOT cover: (i) any costs associated with the
replacement or repair of the Product, including labor, installation or other costs incurred by
you, and in particular, any costs relating to the removal or replacement of any Product
soldered or otherwise permanently affixed to any printed circuit board or integrated with
other products; (ii) damage to the Product due to external causes, including accident,
problems with electrical power, abnormal, mechanical or environmental conditions, usage
not in accordance with product instructions, misuse, neglect, accident, abuse, alteration,
repair, improper or unauthorized installation or improper testing, or (iii) any Product which
has been modified or operated outside of Intel’s publicly available specifications or where the
original product identification markings (trademark or serial number) have been removed,
altered or obliterated from the Product; or (iv) issues resulting from modification (other than
by Intel) of software products provided or included in the Product, (v) incorporation of
software products, other than those software products provided or included in the Product
by Intel, or (vi) failure to apply Intel-supplied modifications or corrections to any software
provided with or included in the Product.
How to Obtain Warranty Service
To obtain warranty service for the Product, you may contact your original place of purchase
in accordance with its instructions or you may contact Intel. To request warranty service
from Intel, you must contact the Intel Customer Support ("ICS") center in your region
(http://support.intel.com/support/notebook/centrino/sb/CS-009883.htm) within the
warranty period during normal business hours (local time), excluding holidays and return the
Product to the designated ICS center. Please be prepared to provide: (1) your name, mailing
address, email address, telephone numbers and, in the USA, valid credit card information;
(2) proof of purchase; (3) model name and product identification number found on the
Product; and (4) an explanation of the problem. The Customer Service Representative may
need additional information from you depending on the nature of the problem. Upon ICS’s
verification that the Product is eligible for warranty service, you will be issued a Return
Material Authorization ("RMA") number and provided with instructions for returning the
Product to the designated ICS center. When you return the Product to the ICS center, you
must include the RMA number on the outside of the package. Intel will not accept any
returned Product without an RMA number, or that has an invalid RMA number, on the
package. You must deliver the returned Product to the designated ICS center in the original
or equivalent packaging, with shipping charges pre-paid (within the USA), and assume the
risk of damage or loss during shipment. Intel may elect to repair or replace the Product with
either a new or reconditioned Product or components, as Intel deems appropriate. The
repaired or replaced product will be shipped to you at the expense of Intel within a
reasonable period of time after receipt of the returned Product by ICS. The returned Product
shall become Intel’s property on receipt by ICS. The replacement product is warranted under
this written warranty and is subject to the same limitations of liability and exclusions for
ninety (90) days or the remainder of the original warranty period, whichever is longer. If
Intel replaces the Product, the Limited Warranty period for the replacement Product is not
extended.
WARRANTY LIMITATIONS AND EXCLUSIONS
THIS WARRANTY REPLACES ALL OTHER WARRANTIES FOR THE PRODUCT AND INTEL
DISCLAIMS ALL OTHER WARRANTIES, EXPRESS OR IMPLIED INCLUDING, WITHOUT
LIMITATION, THE IMPLIED WARRANTIES OF MERCHANTABILITY, FITNESS FOR A
PARTICULAR PURPOSE, NON-INFRINGEMENT, COURSE OF DEALING AND USAGE OF TRADE.
Some states (or jurisdictions) do not allow the exclusion of implied warranties so
this limitation may not apply to you. ALL EXPRESS AND IMPLIED WARRANTIES ARE
LIMITED IN DURATION TO THE LIMITED WARRANTY PERIOD. .NO WARRANTIES APPLY
AFTER THAT PERIOD. Some states (or jurisdictions) do not allow limitations on how
long an implied warranty lasts, so this limitation may not apply to you.
LIMITATIONS OF LIABILITY
INTEL’S RESPONSIBILITY UNDER THIS OR ANY OTHER WARRANTY, IMPLIED OR EXPRESS,
IS LIMITED TO REPAIR, REPLACEMENT OR REFUND, AS SET FORTH ABOVE. THESE
REMEDIES ARE THE SOLE AND EXCLUSIVE REMEDIES FOR ANY BREACH OF WARRANTY. TO
THE MAXIMUM EXTENT PERMITTED BY LAW, INTEL IS NOT RESPONSIBLE FOR ANY DIRECT,
SPECIAL, INCIDENTAL, OR CONSEQUENTIAL DAMAGES RESULTING FROM ANY BREACH OF
WARRANTY OR UNDER ANY OTHER LEGAL THEORY (INCLUDING WITHOUT LIMITATION,
LOST PROFITS, DOWNTIME, LOSS OF GOODWILL, DAMAGE TO OR REPLACEMENT OF
EQUIPMENT AND PROPERTY, AND ANY COSTS OF RECOVERING, REPROGRAMMING, OR
REPRODUCING ANY PROGRAM OR DATA STORED IN OR USED WITH A SYSTEM CONTAINING
THE PRODUCT), EVEN IF INTEL HAS BEEN ADVISED OF THE POSSIBILITY OF SUCH
DAMAGES. Some states (or jurisdictions) do not allow the exclusion or limitation of
incidental or consequential damages, so the above limitations or exclusions may
not apply to you. THIS LIMITED WARRANTY GIVES YOU SPECIFIC LEGAL RIGHTS, AND
YOU MAY ALSO HAVE OTHER RIGHTS THAT VARY BY STATE OR JURISDICTION. ANY AND
ALL DISPUTES ARISING UNDER OR RELATED TO THIS LIMITED WARRANTY SHALL BE
ADJUDICATED IN THE FOLLOWING FORUMS AND GOVERNED BY THE FOLLOWING LAWS:
FOR THE UNITED STATES OF AMERICA, CANADA, NORTH AMERICA AND SOUTH AMERICA,
THE FORUM SHALL BE SANTA CLARA, CALIFORNIA, USA AND THE APPLICABLE LAW SHALL
BE THAT OF THE STATE OF DELAWARE. FOR THE ASIA PACIFIC REGION (EXCEPT FOR
MAINLAND CHINA), THE FORUM SHALL BE SINGAPORE AND THE APPLICABLE LAW SHALL
BE THAT OF SINGAPORE. FOR EUROPE AND THE REST OF THE WORLD, THE FORUM SHALL
BE LONDON AND THE APPLICABLE LAW SHALL BE THAT OF ENGLAND AND WALES IN THE
EVENT OF ANY CONFLICT BETWEEN THE ENGLISH LANGUAGE VERSION AND ANY OTHER
TRANSLATED VERSION(S) OF THIS LIMITED WARRANTY (WITH THE EXCEPTION OF THE
SIMPLIFIED CHINESE VERSION), THE ENGLISH LANGUAGE VERSION SHALL CONTROL.
IMPORTANT! UNLESS OTHERWISE AGREED IN WRITING BY INTEL, THE INTEL PRODUCTS
SOLD HEREUNDER ARE NOT DESIGNED, OR INTENDED FOR USE IN ANY MEDICAL, LIFE
SAVING OR LIFE SUSTAINING SYSTEMS, TRANSPORTATION SYSTEMS, NUCLEAR SYSTEMS,
OR FOR ANY OTHER MISSION CRITICAL APPLICATION IN WHICH THE FAILURE OF THE
INTEL PRODUCT COULD CREATE A SITUATION WHERE PERSONAL INJURY OR DEATH MAY
OCCUR.