1
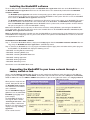
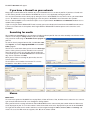
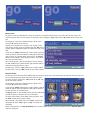
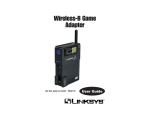
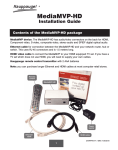
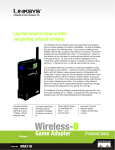
MVP_prod_v1.5 Feb 21, 2005
Overview
Hauppauge's MediaMVP is a low cost thin-client device which bridges the home PC with home TV and A/V equipment, via
wired or wireless local area network connections (wireless versions will be available at a later date). It takes high quality digital audio (MP3 music), digital video (MPEG-1 and MPEG-2 videos), digital pictures (JPEG and GIF digital pictures) and other
multimedia content in the form of IP packet streams and renders the content onto video and audio equipment such as TV
sets, TV monitors or plasma monitors, and home theater A/V systems.
The MediaMVP connects to the home LAN via its built-in wired
(10/100Mbps Ethernet) or wireless network interfaces.
When used in conjunction with a Hauppauge WinTV-PVR installed in a
PC, a complete home TV and digital media distribution system can be
made. Television is recorded on the home PC with the WinTV-PVR, and
then watched on a TV set through the MediaMVP via the home LAN.
The MediaMVP is located at the TV set, and decodes videos sent to
the MediaMVP over the home LAN for viewing on the TV set. It also
provides media decoding for MP3 music and JPEG/GIF digital pictures. The MediaMVP displays on the TV screen lists of media which
can be played through the MediaMVP, plus menus for organizing the
lists and for playing play lists.
While playing music, the MediaMVP can also play a digital picture slide
show.
Driven by a powerful RISC CPU engine (>350 DMIPS) running the
Linux operating system, and with dedicated special purpose multimedia hardware components, the MediaMVP is a full-blown network multimedia decoder device with superior computing and digital audio and
video processing capacities. The application running on the MediaMVP
is loaded from the PC, therefore allowing updateable software via Internet downloads.
Installing the MediaMVP software
There are two parts to the MediaMVP operation: the MediaMVP device application which runs on the MediaMVP device, and
the MediaMVP PC Server application which runs on a PC. Both of these are automatically installed from the MediaMVP
Installation CD-ROM.
The MediaMVP device application runs on the Linux operating system. When you turn on MediaMVP, you will see a
screen on your TV set, which is the inital screen created by MediaMVP’s Linux system. After this screen, the MediaMVP
device loads the MediaMVP device application from the PC.
The MediaMVP PC Server application is installed on any PC which is on the same subnet as the MediaMVP. This means
that the PC should be connected to the same router or hub as the MediaMVP. The MediaMVP PC Server application
loads the MediaMVP device application onto the MediaMVP after it is powered on, and then provides all of the information you see on your TV set after the MediaMVP is running.
Note: for the MediaMVP device to operate, the PC must be turned on, running Windows, and running the MediaMVP PC
Server application. Also, the PC needs to be on the same network subnet as the MediaMVP. If the PC is not turned on, the
MediaMVP device application will not load.
Note: the MediaMVP application is loaded each time the MediaMVP has its power turned on. If you download a new version
of MediaMVP for the Hauppauge web site, you need to disconnect the power to the MediaMVP, then reconnect, to allow the
new application to be loaded.
Installation of the MediaMVP software:
Step 1: To install the MediaMVP software, simply run the Setup program from the MediaMVP Installation CD-ROM. After running setup, the MediaMVP PC Server application is automatically started.
Step 2: Connect the MediaMVP to a TV set, plug the wall mounted power supply into a wall outlet and the power plug into
the MediaMVP. The MediaMVP will display the following screens:
- MediaMVP: checking Ethernet connectivity
- MediaMVP: contacting DHCP server
- MediaMVP: contacting MediaMVP Bootserver
- MediaMVP: Loading application
- MediaMVP: Starting application
- MediaMVP: Contacting servers
You will then see the MediaMVP Main menu.
Connecting the MediaMVP to your home network through a
router, switch or hub
Using a standard Ethernet network cable (the Ethernet cable supplied or any Ethernet cable of length less than 300 feet),
plug one end into the LAN port of the MediaMVP, and the other end of the Ethernet cable into a LAN port of a network hub,
router or switch. You can use 10Mbit or 100Mbit router/switches. If you are using your own cables, use category 5 Ethernet
cable for best results.
When you have made this connection, boot your PC and run
the MediaMVP Setup program.
This should take a few minutes
and is automatic.
After the MediaMVP Setup program has been run, turn on the
MediaMVP by plugging in the
power adapter.
The MediaMVP will display a
message for about 1 minute
“Searching for PC server”. After
about a minute, it will find the
PC which it is connected to and
display a message “Loading
application”.
A few seconds later the
MediaMVP Main Menu will appear.
If you have a firewall on your network
Many people install firewalls on PC networks to prevent unauthorized access to data in your PC. If you have a firewall such
as Zone Alarm, you will need to allow the MediaMVP to access a server application running on your PC.
Here are four firewall alert menus which pop up during the first use of MediaMVP. For each of these alerts, you should allow
access. To avoid these messages from popping up each time you use MediaMVP, select ‘Remember this question’.
There are two MediaMVP services which will require access to your network: HcwSMS.exe and MVPMedia.exe Grant access
to both of these programs.
If you are using the built-in WindowsXP Firewall, currently you need to disable this firewall for the MediaMVP to work correctly. Please check our web site for updates which might allow the WindowsXP Firewall to operate at the same time as the
MediaMVP.
Searching for media
After installing the MediaMVP, there are two ways of finding media on your PC. You can either manually search for the media
from the TV set using the Settings menu, or you can automatically search for media using the MediaMVP Search program on
your PC.
To start the Search program from the PC, click Windows Start,
then Programs, and under Hauppauge MediaMVP run the Search
Folders program.
You will see a menu which allows you to select the Media Type
(music, videos, pictures) and the directories to be searched.
Once you stat the search, any directory with the media type
selected will appear in the Search Results box. To add a directory, click on it and then click Add.
When you are finished searching for your media, close the
Search application.
The directories selected will be listed on the TV set in the
MediaMVP’s Video, Music, Pictures menus.
Menus
Main menu
The main menu guides the MediaMVP user to play Music, Videos or Pictures. Also, the Main menu is where the user can navigate to media stored on their PC server through the Settings button.
Note: your PC must be running and both the PC and MediaMVP must be connected to your network before the Main menu
will be displayed on your TV set. It takes about 1 minute for the Main menu to be displayed after you turn on the MediaMVP.
The right and left arrows on the remote control are used to navigate through the Videos, Pictures, Music and Settings submenus. To access the Main menu at any point, click “Go” on the remote control.
Music menu
The Music menu will show MP3 files which are located in selected directories on the users PC. You can play a music file
(indicated by the music icon next to the file name) by either clicking the “Play” button or the “OK” button on the remote control.
To navigate to a sub menu (indicated by the ‘folder’ icon),
click the “OK” button on the remote.
Playlists are indicated by the ‘playlist’ icon. To play a complete playlist, simply cursor to a playlist and click “OK” on the
remote control. Supported playlists are: M3U, PLS, B4S, and
ASX.
If you click the “Menu” button on the remote conrol, a pop up
menu will appear which will allow the sorting of the music by
date or name, or a random order of music files. An “Play all”
option is also available, which will play all of the music located in the current directory.
After selecting music, you can play Picture files by clicking
the “Go” button on the remote control, right arrow to Pictures,
and then entering the Pictures menu.
To stop music, click the “Stop” button on the remote control.
To mute music, click the “Mute” button on the remote control.
Pictures menu
The Pictures menu will show JPG, JPEG or GIF files which are located in selected directories on your PC. You can play a picture file (indicated by the thumb nail of the picture over the
file name) by either clicking the “Play” button or the “OK” button on the remote control.
To navigate to a sub menu (indicated by the ‘folder’ icon),
click the “OK” button on the remote.
If you click the “Menu” button on the remote control, a pop up
menu will appear which will allow the sorting of the pictures
by date or name, or a random order.
A “Play all” option is also available which will play a slideshow
of all of the pictures located in the current directory.
To return to the Pictures menu while viewing a picture, click
the “Back” button on the remote control.
While running a slideshow, you can hit “Pause” to pause the
slideshow. Hit either “Pause” again or “Play” to resume the
slideshow.
When viewing pictures, the Skip ahead button on the remote control will move 6 pictures forward, while the Skip back button will
skip back 6 pictures.
Videos menu
The Videos menu will show MPG, MPEG-1 or MPEG-2 files
which are located in selected directories on the users PC. You
can play a video file (indicated by the thumb nail of the picture
over the file name) by either clicking the “Play” button or the
“OK” button on the remote control.
Types of video files supported are MPEG1 and MPEG2, from
less then 1 Mbit/sec up to 10 Mbits/sec. The maximum data
rate might be limited by your local area network speed.
To navigate to a sub menu (indicated by the ‘folder’ icon), cursor to the folder and click the “OK” button on the remote.
If you click the “Menu” button on the remote control, a pop up
menu will appear which will allow the sorting of the videos by
date or name, or a random order.
To return to the Video menu while watching a video, click the
“Stop” button on the remote control.
To fast forward through a video, click the “Fast forward” button on the remote.
To pause the video while playing, click the “Pause” button on the remote.
To rewind through the video, click the “Rewind” button on the remote.
While playing videos, the audio volume can be adjusted through the Vol+ and Vol - keys.
Settings menu
The Settings menu is where you can chose the directories on your PC where your Music, Video and Pictures media is
stored. Also, the Settings menu has a Configuration menu where you can set the video format (NTSC or PAL), video size (4:3
or 16:9), and flicker reduction (none, low, medium, high) for your TV set.
When you enter the Settings:music, Settings:video or Settings:pictures menus, you will see a listing of directories (such as
My Documents) and drives (disk drives, floppy drives or CD-ROM drives) on your PC. The drives listed will be from any drive
which is accessable from your PC. This will include both local and network drives.
To select media within a drive, scroll down to the directory (C:\ for example) and then hit the OK button on your remote control.
To select subdirectores, scroll down to the directory and hit the OK button. You will see if the media type you are looking for
(music, videos, pictures) exists in the directory chosen by having any existing media listed.
To add a directory, hit the green button on the remote. If you would like to delete a directory
from the list you see when entering Videos, Music or Pictures from the Main menu, hit the red
button on the remote.
Power
button
Go
button
Remote control
Power button: the Power button will bring the MediaMVP into a standby mode, and will turn
off the video output. It will not turn off the MediaMVP completely. When you click the Power
button again, the MediaMVP will resume from standby and turn on its video output.
Back
button
If you want to reset MediaMVP, you need to remove the power plug for a few seconds, then
reconnect it.
Go button: brings up the Main menu. For example, when in any menu, clicking on the Go but-
OK
button
ton will bring up the Main menu.
OK button: the OK button is similar to the Enter key on a keyboard.
Menu button: brings up the Sub menu. For example, when in the Music menu, clicking on the
Menu button will bring up the sub menu allowing the selection of Play all / Sort by date / Sort
by name / Random.
Sub
menu
button
Mute
Play
Fast
rewind
Back button: goes back to the previous menu. For example, if you have entered a directory
and you’d like to return to the previous directory, click the Back button.
Pause button: will pause the music, video or slideshow currently playing. Click Play or Pause
again to continue playing from where you left off.
Vol- and Vol+ buttons: will MediaMVP can control the volume on your TV set by using internal
hardware in the MediaMVP. This means you can adjust the audio volume without having to
use your TV sets remote control.
Record
Skip
back
Fast
forward
Stop
Pause
Skip
ahead
Skip ahead and Skip back: the Skip ahead and Skip back buttons are used to skip 6 items ahead or backwards when in the
media lists (music, videos and pictures). When viewing Pictures, the skip ahead will move 6 pictures forward, while the Skip
back will skip back 6 pictures.
Connecting MediaMVP directly to a laptop or PC
You can connect the MediaMVP directly to a PC or laptop. To do this, you will need a 'crossover' cable, which you can either
buy at a computer store or make yourself.
Here is how you connect the MediaMVP directly to your PC or laptop:
1.
Purchase or make a cross over Ethernet cable. Examples of a crossover cable are the Belkin CAT 5e Crossover Cable
for computer-to-computer connection
2.
Connect one end of the crossover cable to the LAN port on the MediaMVP, and the other end to the LAN port on your PC
or laptop
3.
Make sure the MediaMVP software is installed on your PC. See “Installing
the MediaMVP software” section.
4.
Set a fixed IP address on your PC when using a crossover cable.
When using a direct connection with a network crossover cable, you need
to set a static IP address on your PC.
To do this, click Start / Settings / Control Panel / Network connections. Double
click on Local Area Connection and then click Properties. Click on Internet
Protocol(TCP/IP). Double click Advanced and you will see the Internet Protocal
(TCP/IP) Properties menu.
Uncheck Obtain an IP address automatically.
In the IP address box, enter 192, then 123, then 1, then 1.
When you hit the Tab key, the subnet mask will fill in to 255.255.255.0
Click OK and then OK again to complete the disabling of DHCP.
If you would like to reenable DHCP, simply click the Obtain an IP address
automatically box, and your system will be configured for use on a network instead of the direct PC to MediaMVP connection.
5.
Connect the MediaMVP to the TV set, and turn on the MediaMVP. You
should see the 'Searching for PC server' on the TV set. On the PC, you
should see a Windows massage say 'Ethernet connection found'
Since the direct connection from a MediaMVP to a PC is very fast, you will get maximum performance on all music, video and
picture media.
Connecting MediaMVP to wireless networks
You can connect your MediaMVP to wireless networks by using a 'Wireless Game Adapter', which is sold in many computer
stores.
Note: While wireless B networks can handle data at up to 4Mbits/sec, and will work fine with audio and picture files, video
files require more 'bandwidth' for transmitting from the PC to the MediaMVP. Your videos will stutter and stop if a wireless network runs out of bandwidth. For best results, you should use video files with the following characteristics:
-
standard VCD files should play fine, since they normally record at no more than 1.1Mbits/sec.
-
standard SVCD files should play fine, since they normally record at no more than 2.2 Mbits/sec
-
when recording MPEG-2 files with the WinTV-PVR's, limit the record format to 'DVD Extra Long Play'. These files use a
datarate of 4.4 Mbits/sec. They are at the upper limit of most wireless B networks, but they should play o.k. on otherwise
unused wireless networks.
Here is how you connect the MediaMVP to a Wireless Game Adapter:
-
use a Linksys 'Wireless-B Game Adapter', model number WGA11B or equivalent
-
connect an Ethernet network cable to the MediaMVP's RJ-45 jack
-
connect the other end of the Ethernet network cable to the LAN port on the 'Wireless-B Game Adapter'
-
on the 'Wireless-B Game Adapter', set the crossover switch setting to 'X'
-
on the 'Wireless-B Game Adapter', set the channel selector to 'In'
-
you will need to disable encryption on your wireless router. On the wireless router Setup Menu, set the 'WEP Encryption'
to 'No'. Read your Wireless Router manual for instructions on running the Wireless Router Setup Menu.
Plug in the MediaMVP, and turn on the 'Wireless-B Game Adapter'. You will see the two lights on the front of the 'Wireless-B
Game Adapter' turn on and flash.
The MediaMVP will go through the loading proceedure, and you will see the sequence 'Searching for PC server', 'Loading
Application', 'Contacting Servers', and then you will see the Main Menu.
MediaMVP Capabilities
-
MediaMVP runs in a client/server system, where the MediaMVP receives display screens and media files from the PC
based Server. The on-screen displays rendered by the MediaMVP on the TV set is formed on the PC Server. The PC
Server can be either Windows XP Home, Windows XP Professional or Windows2000, and can be used for any normal PC
task while it acts as the Server for the MediaMVP in the background.
-
MediaMVP can run on networks where the PC serving the media content is on the same sub network as the MediaMVP.
The MediaMVP cannot “see” PCs which are on networks beyond its local router or subnet.
-
The MediaMVP runs a Linux operating system and performs two basic functions: rendering the On-screen display commands onto the TV monitor, and taking digital media files and decoding them into an analog form. It also takes remote
control clicks and sends them back to the Server for processing.
-
The MediaMVP offers general purpose processing power >350 DMIPS, plus dedicated hardware decode support for
MPEG-2 Transport Stream, MPEG-2 MP@ML, and MP3 Audio.
-
Supports MPEG Video rates ranging from 1.5 Mbps to 8 Mbps (higher in bursts), limited by the LAN bandwidth
-
The MediaMVP will decode full CCIR601 resolution NTSC and PAL encoded MPEG-2 bit streams in real time, up to and
including 720x480 (NTSC) or 720x576 (PAL). It will upscale lower resolution video to full screen. For example, MediaMVP
will take 320x240 VCD video and play it full screen. It also offers a tunable Anti-Flicker Filter.
-
The MediaMVP's on-screen display rendering engine provides 24-bit Direct Color (YUV) with 8-bit alpha blending
-
The MediaMVP has a range of audio and video outputs which are available in different models. A/V options include SVideo, composite video, YPbPr, and RGB outputs, plus left and right channel audio, in either RCA jacks or a SCART connector.
-
NTSC and PAL output support in all models, software switchable.
Specifications
Peripheral and A/V Interfaces
-
A/V RCA Jacks: S-Video, Composite video, Left audio, Right audio
-
Optional SCART connector: S-Video, Composite video, Left audio, Right audio plus RGB and YprPb (SCART connector
replaces A/V RCA Jacks)
-
IR Remote Control receiver
System Specifications
Processor:
Media MVP O.S:
Server O.S.:
Network support:
Native media format decode:
Media format via transcode:
Power supply:
Operating indicators:
Size:
Operating temperature:
EMI certifications:
350 MIPS IBM PowerPC
Linux, with application bootloaded from the server
Windows XP or Windows 2000
RJ45 Ethernet 10/100Mbps
MP3, JPEG, MPEG-1, MPEG-2
DivX, WMA, WMV, Internet radio
6V at 1 amp
Power LED on front panel, network activity indications on rear panel
160 x 143 x 29 cm
0 - 70 degrees C, non-condensing
FCC/ CE
Tips for using Internet radio with the MediaMVP
This version of MediaMVP software allows you to listen to Internet Radio stations through your TV set via the MediaMVP.
MediaMVP software accomplishes this by opening a special MediaMVP link to the Internet radio station, and then taking the
audio coming from that link and “streams” it over the network to the MediaMVP, where the audio is output to the TV set.
Note: to play an Internet radio station through the MediaMVP, the Internet radio station must do two things:
-
it must transmit audio in either MP3 or in WMA formats. Some radio stations transmit using Real audio, which the
MediaMVP cannot currently play.
-
the Internet radio station must be accessable via a direct Internet link. In other words, you need to be able to put a URL
in Internet Explorer and reach the Internet radio station directly without going through any levels of indirection. An example of a website which has direct links to Internet radio stations is Shoutcast.
Step 1: create a link to an Internet radio station on your PC
Open Internet Explorer and go to a page with Internet Radio stations. Shoutcast is one example: http://www.shoutcast.com.
emember: you must be selecting Internet radio
stations which can be directly accessed by your
browser (and not via a redirected URL). There
are many Internet radio stations which do not allow a
direct link to the station. These Internet radio stations
cannot be played by MediaMVP.
R
Choose an Internet Radio station or program and
use your RIGHT mouse button to click on the button
which allows you to listen to a station (for example,
the Tune In button in Shoutcast). When you click
your RIGHT mouse button, a Pop-Up Menu will
appear. Choose Add to MVP Favorite Radio
Stations.
A window will pop up saying MVP radio Station. You
will be asked to name your added Radio station. You
can do so if you like, or leave the default. You can
also place the radio station in a category (you will
see these categories on your TV set via the
MediaMVP). When you are finished naming your
radio station, click OK.
Step 2: Add radio stations to the MediaMVP media list
Now we need to add the Internet Radio station directory to the
MediaMVP media list so that the MediaMVP can "see" them.
On your Windows screen, click Start / Programs
/HauppaugeMediaMP then Search for Media. (this program also can
be found in Program Files/Hauppauge MediaMVP directory)
Under Media Type: choose Radio Stations and click on Search.
After a few moments, you will see a list of directories on your
local hard disks which have MediaMVP links to Internet Radio
stations. Click on those directories you would like to have
MediaMVP list on your TV set, click Add and then click on Save.
Step 3: Playing an Internet radio station on the MediaMVP
Click the Go button on the MediaMVP remote. Click on the Radio button. If you have set up the directories (the paragraph
above), you will see a MyRadio listing. Go to this directory. In the directory, you will see a list of Internet radio stations you
have made links to.
To start playing an Internet radio station, use your remote control to select the station and then click the Play button.
If you click on a radio station and the audio does not start within a few seconds, the radio station cannot be accessed by the
MediaMVP. One reason for this is that this station cannot be accessed directly (it uses redirection to get to the station).
Another reson might be that the radio station does not transmit audio in one of the formats MediaMVP can play (currently
MP3 and WMA).
How the Internet radio stations are named, stored and played by the MediaMVP:
When you are browsing Internet radio stations while in Internet Explorer, and you right click on a link to an Internet radio station, the MediaMVP application running on the PC makes a note of the URL the link is pointing to. The MVP Radio Station
pop up menu then is run, allowing you to name the link and also put the link into a category (for example: Jazz), and then a
file is created in the My Radio directory with that name. The file extension is .MVP, and within the file is the URL of the radio
station.
When you want to play a radio station, the MediaMVP application running on the PC opens that file, goes to the URL within
the file and then streams the audio over your network to the MediaMVP, where the audio is then played out to your TV set.
If the file holds a link which is not valid (a link which does not directly point to an Internet radio station), then the MediaMVP
radio software waits for about 1 minute before it senses that it cannot open the URL and find a radio station. MediaMPV will
then return to the Radio menu.
Tips for DivX playback
MediaMVP's new software release supports the playback of AVI-files, which have been compressed with the DivX codec.
For a successful playback, the DivX codec has to be installed on your PC where the MediaMVP software is running. A DivX
codec can be downloaded direclty from DivX: http://www.divx.com/divx/ (Note: chose the “standard codec”).
Known Issues:
-
simultaneous playback of DivX videos are not possible from multiple MediaMPVs.
-
DivX playback requires a minimum 1.8 Gigahertz Pentium4 processor or faster in your PC. If your processor is not fast
enough, you will lose lip synch as you watch your videos.
-
MediaMVP can scale DivX videos up to full screen, but can only do this on videos of exactly 320x240 or 640x480. If your
videos are another format, they will be “letterboxed” on your TV set.
-
After using the Fast-Forward and Fast-Rewind buttons a loss of speech synchronization may occur.
Tips for WMA-Audio format
To play WMA files (Windows Media Audio) with the MediaMVP, the installation of Windows Media Player 9 is required.