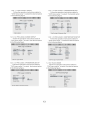
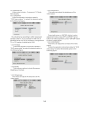
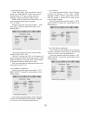
1
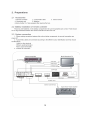
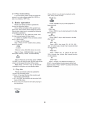
CONTENT
CAUTION cms smi amotio wm is hh a a a A we A ASE 2
1. Brief Instructión ol CONOS mamma CE 3
Z: Preparalons sisson ANA 5
A: | AGO DOUE EN SB MA HEN SR es 5
22 Battery installation of remote CONtrOÏlCT Licissicimmanessmenmaneeanoce nano ecn ae 5
20 NN) MN. 5
a Flar Mode SELINO eur A A SS TB eS SE RS HENS 6
3: BASICONeraloN sie AUN Le a e MA aaa 6
TEL ONE mua eee ANN AIN MI A 6
4d DÉS GTI emma ao 7
ПОТ ООВ CSS sana an 7
E FIG MODO aer» MD RN Na a 7
4.3 SUDIDE ==. 0=0na A AAA A AAA A een ce 7
SAG NE SE RRS BES 7
4.5 Language ascenso et Aaa Mi sen oss avo si eas sie 7
4.6 THEIRBIIM -== == ae 7
MEN eE EN 7
45 DIFOCUOI KO sua nea Ne ia es 7
A0 INDE TT 7
40 Te ses cena meet 7
411 RSpegtiarma o O asu TA E 7
A. CEE 8
B13 ZOOM sremescemeecanasa queen AAA EVE EE SE 8
UR ND UIT BTN Tera ios SA BB RE SE AR SE 8
4.15 Program sessseresseensssnessssnsssrmiemimimesssssssssssssassssassssanssstnssssssstarsssessssesssissisiimseessssssssasssrassssnsssnes 8
4.18 SIOW cussions insu Dn a Ci An e da 8
5. Setting Of The System ................ee.rreserereceorrconeerencenescenesveneeonseveaseevaseeeseov5ereve]senaceNETANe: 8
6 Operation of Mp3 and MPEG A TUNGION cana arr ETES 17
Ta JPEG ……—rmmecomenmenentennnenenn nn ones sen inn i iio e A SE 17
Oy HGUDIS ENCON QUIE exce CEE EE 18
Y. Disc protection cusses iris rm ei a as re ae 18
BE NECROTIC is y TTM 19
11: PURCHONÉ enr SORA dan AAA AAA à 20
CAUTION:
To reduce the risk of electric shock, do not
remove cover. Refer servicing to qualified service
personnel.
Please read the manual carefully before operation.
Keep it in a safe place for future reference.
USAGE NOTES OF DVD PLAYER
Please don't put the player at following position.
Sun shining or heat radiation place, such as
heater, stoves or other appliances that produce
heat.
Top of other heat radiation device.
Bad ventilation or dusty, high moisture, unsteady
or vibration place or expose the unit to rain or
water.
Nearby the high power speaker or on the same
stand with speaker. Keep it away from shock
to protect its normal working conditions.
Don't play the disc that is scratched, bent or
cracked to prevent the unit from damage.
USAGE NOTES OF POWER
SUPPLY
® The power supply required is AC 110/220V 60/50Hz.
9 When not planning to use this unit for long
periods of time, disconnect the AC power plug
from the outlet.
e To prolong its service life, the changeover period
between switch-on and switch-off, should not be
less than ten seconds.
DVD PLAYER
1. Full compatible with DVD, CD, Mp3 with
high error correction ability.
2. Read Picture CD to realize digital Picture displaying.
3. 10 bit digital video converter, the resolutions
is more than 500 lines.
4. 192KHz/24bit digital audio converter, high quality
of sound effect, professional Hi-Fi level.
5. Video component signal output, S-video output,
composite video output, optical and coaxial
output for selection.
6. 8 kinds of language, 32 kinds of caption mode
can be selected and play with various angles.
7. Various of screen selection of TV display and
you may select preferred story section to view.
8. Professional digital karaoke effect.
9. Full function intelligent upgrade.
10. Progressive scan video output.
192-KHz/24-bit Digital/analog
(D/A) converter
This latest conversion technology matches
software of 192KHz sampling frequency and 24-bit
data, this giving you perfect sound quality without
distortion.
DIGITAL AUDIO OUTPUT
The coaxialffiber optic output enables the user
to connect external 6-channel AV amplifier and
process or with built-in Dolby digital codes and
MPEG or DTS modulating capacity using only
one cord, so that you can enjoy different DVD
and CD conveniently.
Component video output
Component video output (Y, Pb, Pr) enables
you to enjoy real DVD effect. It renders pure colour
signals as they are, and without any video noise.
AC-3 decoding and DTS signal
Output
This appliance decodes Dolby AC-3 signal
source, and outputs the signal through analog 6
channels.
Also, it can output DTS signal through coaxial or
optical.
1. Brief instruction of controls
Front panel function:
De RIRE Tics Rois ind @ NERY LA
Ou | 4 le | om AL) > 10 p= >
© à © @ ® O ®
1. POWER 6. STOP
2. VFD SCREEN 7. PREVIOUS
3. SENSOR 8. PLAY/PAUSE
4. DISC TRAY 9. NEXT
5. OPEN/CLOSE 10. L/R
Back panel function:
NOOO 1 42
O h ; = He id o | © à — a
1.2 CH output jack 7. Component output jack for Progressive Scan
2.5.1CH SW output jack 8. Video output jack
3.5.1CH CEN output jack 9. S-Video output jack
4.5.1CH SUR output jack 10. Digital signal optical output jack
5.5.1CH FRONT output jack 11. Scart output jack
6. Digital signal coaxial outputjack 12. VGA output jack for Progressive Scan
Remote Control
CONDUSONU
D
2
a)
4
©
6)
7
@
©
10
ar
12
13
14
15
16
17
18
19
20
29
. STANDBY
. PROGRAM
. PAL/NTSC
‚SUBTITLE
.0~9NUMBERKEY
. LANGUAGE
. ANGLE
UP
. SETUP
| STANDRY
Joo
>0 ©
So ©
00
00!
IS
|:
|
|
SETUP EN REPEAT
o НН
FUNC + |
MUTE
STEP MODE
10.
11
LEFT
. FUNG-
12.
13.
14.
15.
16.
NE
18:
DOWN
ZOOM
PBC
TITLE
PREVIOUS
NEXT
SLOW
RESUME
MENU
ESCAN/NORMAL
19.
20.
21.
22,
23.
24.
25.
26.
27.
PAUSE
MUTE
STEP
OPEN/CLOSE
DISPLAY
TIME
REPEAT
RIGHT
PLAY/ENTER
® ®
ООО © B® 98966 8
DE
28.
29.
30.
Sl.
Je.
33.
34.
35.
36.
37.
FUNC+
STOP
RESUME
MENU
A-B
FWD
REV
FUNC SELECT
PSCAN/NORMAL
MODE
2. Preparations
2.1 Accessories
1. Remote controller 2. Audio/Video cable 3. User's manual
4. Guarantee card 5. Batteries
(check whether itis fully equipped after opening the box)
2.2 Battery installation of remote controller
Place two AAA batteries in the battery compartment. Be sure the polarities are correct. There should
be no large obstacles between the remote controller and the main unit.
2.3 System connection
1. When making connection between this unit and other components, be sure all connection are
power-off.
2. Audio/Video cables are connected according to the different colour identification and they should
be fitted firmly.
Yellow to video terminal
White to audio terminal(L)
Red to audio terminal(R)
3. Scheme of connection
( N
Stereo amplifier Multi Standard TV
5.1CH input
ami
YUV input
n
| Video input
=
ka 3
ро
—_
S-Video input
2 CH input
VGA input
SCART input
Optical, Coaxial input |
n Digital Home Theater amplifier
2.4 Play mode setting
If you found the picture could not spread all
screen or no color, please select PAL, NTSC or
auto by pressing <N/P> key.
3. Basic operation
Please use remote control to operate the
function as described below:
Once all the connection of the system have
been done, this machine will be ready for service.
Prior to play, make sure to complete the following
preparatory operations.
1. Switchon TV and select AV mode. If it's
S-Video connect select S-Video mode.
2. Switch on amplifier if it is connected, select
AC-3 or DVD mode.
3. Plug-in of DVD player.
Step 1: Press sTANDBY button, Disc Loading
shown on screen.
La
STANDBY
If there is no disc, NO DISC shown on screen:
Step 2: Press <OPEN/CLOSE> keyon the
front panel, the tray comes out automatically.
E
Laa
Step 3: Place disc on the tray, press <OPEN/
CLOSE> key to close the tray, the disc type will be
shown on the upper left comer of the screen.
Note: Press <STANDBY> key on the remote
controller to bring the unit into standby status.
3.1 Play disc
Please use remote control to operate the
function as described below:
® Once it has read the disc, this machine will
start playing automatically.
e |f it is a DVD, the machine will show the DVD
menu or title menu.
© lfitis a CD, this machine will start playing in
the sequence.
PLAY key:
»
Press <PLAY> key to return playback while
disc stop, pause orstep.
PAUSE key:
и
Press <PAUSE> key to put the playback in
temporary hal.
a
PREV key:
Press <PREV> key to skip backward to the title
before current.
1
NEXT key:
Press <NEXT> key to skip forward to the title
after current.
H
REV key:
Press <REV> key toget 2X, 4X, 8X, 16X,
32X or nomal play circular fast reverse function
on disc playing.
He
FWD KEY:
Press <FWD> key to get 2X, 4X, 8X, 16X,
32X or normal play circular fast forward function
on disc playing.
n
STOP KEY:
Press <STOP> key first time to follow by a
<PLAY> key will allow an auto resume to the last
played location. Press <STOP> key twice will halt the
playback complete!y.
4. Description of function
Please use remote control to operate the
function as described below:
4.1 Screen display
DISPLAY
In the condition of DVD disc playing, press
<DISPLAY> key on the remote controller to display
the single elapsed time, single remain time, total
elapsed time, total remain and other information of
the disc.
4.2 Play mode
Press <N/P> key one by one to get NTSC,
PAL, MULTI display on the screen.
4.3 Subtitle
This function may enable you to select multi
subtitle languages (as many as 32 kinds and only
for the disc with multi subtitle encoded). Press
<SUBTITLE> key to get desired display.
For example, to select language 2 from
8 options.
4.4 Angle
During athletic match, concert or theatrical
program, press <ANGLE> key continually on
remote controller to select various angle to
view the same image (This operation works
only for the disc with multi angle encoded).
4.5 Language
There are 8 kinds of language for selection.
Press < LANGUAGE> key to select language
(This operation works only for the disc with multi
language encoded).
For example, to select language 1 from 2
language options, sound field effect AC-3,
2channels, English.
46 Title
For DVD disc playing, press <TITLE> key to
get title menu.
4.7 Menu
Press <MENU > key return to main menu for
DVD disc playing.
4.8. Direction key
There are four direction keys to assist in
navigation. They are normally use while in title,
navigation, and setup menu.
4.9 Number key
Press relevant number key to play the favourite
chapter or title according to the number on the menu.
4.10 TIME
For disc playing, press < TIME > key to goto desire
title, chapter and time.
TIME
Press number to input time, title, chapter, then
press <Play> key to begin playing.
4.11 Repeat from A to B
First time pressing <A-B> key to set initial point.
(A): A-B
Second time pressing <A-B> key to set end
point (B). After setting, the program repeats
playing from A to B. Third time pressing <A-B>
key to cancel repeat.
4.12 Repeat
REPEAT
For DVD disc playing, press <REPEAT> key to
repeat title, chapter, all or close repeat.
4.13 ZOOM
The picture may be enlarged by up to 4 times
to facilitate you to enjoy a particular action or still
picture. Press <ZOOM> key 6 times, the zoom
scales will be 2x, 3x, 4x, 1/2, 1/3 and 1/4
respectively. Pressing direction key to move the
screen while zoom in. Pressing the button once
again will return to normal play status.
4.14 Volume
Press <VOLUME+> key to increase volume,
press <VOLUME-> key to reduce volume till to no
volume output.
4.15 PROGRAM
In the condition of disc playing, press
<PROGRAM> key on remote controller to come
nto program status; Enter the track numbers
desired, 2, 4, 6 and 8, for example, you can
choose the <EXIT> on the screen to remove the
numbers.
If you enter wrong number, then using
direction key move the corsor to start button, then
<ENTER> key to start playing.
To exit the programmed play mode, simply
press the <PROGRAM> key to exit it.
4.16 SLOW
Press <SLOW> key to repeatedly, you will
enjoy the slow motion at a 1/2x, 1/4x, 1/8x and
1/16x slower forward speed, ora 1/2x, 1/4x, 1/8x
and 1/16x slower backward speed and normal
backward speed.
5. SETTING OF THE SYSTEM
1. DVD menu setting
Press the SETUP button on the remote controller,
the SETUP MENU (main) will be displayed.
1. After accessing the SETUP Menu, press the
direction buttons for up and down movement to
select an item desired, then press the <ENTER> button
to confirm your entry and move to the sub-menu.
Use the left and right direction buttons to move the
pointer, and the up and down direction buttons to
select the option desired. Also, press the <ENTER>
button to confirm your selection, press left direction
button to return the last menu. Now, setup of this
current function is completed.
2. To end the setup, press the SETUP button
again. In the SETUP MENU, you may choose any
of the following options as you like.
1.1 GENERAL SETUP
This option is used to set up TV screen format,
video functions and DVD functions, with options of
"TV Display", "Angle Mark", "Osd Language", "Captions"
"Screen Saver", "Last Memory".
General Setup Page
TV Display Ps
Angle Mark On
OSD Lang Eng
Captions Off
Screen Saver Off
Last Memory Off
1.1.1 TV form
Follow the operating instructions stated in "DVD
MENU SETUP" to select the desired option in the
following figure.
8 è&
nlav
Angle Mark On Normal/LB
OSD Lang Eng Wide
Captions Off
Screen Saver Off
LastMemory Off
Set TV Display Mode
Note:
1). Irrespective of what screen format you have
selected, if your screen displays in 4:3 format, the
picture will be shown in that format anyway.
2). For DVDs, the screen format is convertible.
3). If your screen displays in 4:3 format, when a
DVD with 16:9 display format is used, the picture
will be flattened.
E 4:3 16:9
screen
un Normal Full vi Mailb Wid
format orma ull view ailbox ide screen
4:3
E. o. E” en e.
o о o o o o o o o o
16:9
oo — 00 oo — 60 о — © A... oo — 00
en 56 Iss а) co со en
1.1.2 Angle Mark
When a DVD providing multiple angles is used,
the user may select a particular shooting angle.
Follow the operating instructions stated in "DVD
MENU SETUP" to select the desired option in the
following figure.
General Setup Page
TV Display
OSD Lang
Captions Off
Screen Saver Off
Last Memory Off
Set Angle Mark
1.1.3 Osd Language
The user may use this item to set the language
of the setup menu and screen display to English or
Chinese.
General Setup Page
TV Display Ps
Angle Mark On
he МН 0 Eng lish
Captions Off Italian
Screen Saver Off
Last Memory Off
Set OSD Language
1.1.4 Captions
According to the following figure to selected setting.
8 Me x
General Setup Page
TV Display Ps
Angle Mark On
Last Memory Off
Closed Caption
1.1.5. SCREEN PROTECTION
Select in " General setup " menu to get Screen
protection Setting according to the following figure.
Ma x
General Setup Page
TV Display Ps
Angle Mark On
OSD Lang Eng
Screen Saver
1.1.6. Memory Play Setting
According to the following figure to get Selected
Setting.
General Setup Page
TV Display Ps
Angle Mark On
OSD Lang Eng
Captions Off
Screen Saver Off
Set Last Memory State |
1.2. AUDIO SETUP
Includes Analog Audio, digital audio set up, Dolby
digital setup, equalizer setup, 3 D process.
8 x
Dolby Digital Setup
Equalizer
3D Processing
Go to Speaker Setup Page
1.2.1 SPEAKER SETUP
This submenu options include Downmix Mode ,
Front, Center, Rear, Subwoofer, DRC.
1.2.1.1 DOWNMIX MODE
Follow the operating instructions stated in "DVD
MENU SETUP" to select the desired option in the
following figure.
SPEAKER SETUP PAGE
| LT/RT
Front Speaker LRG =— siereo
Center Speaker On V SURR
Rear speaker LRG Off
Sub Woofer On
DRC Auto
Set Downmix Mode
This setting is suitable for films. If you only need
two channels to enjoy music, it's recommended to
select the second option. Where 5.1 theater sound is
available, the fourth option is recommended.
1.2.1.2 FRONT SPEAKER
When set center, rear and subwoofer to “off ”
and front to “Large ” ,then front audio signal can
be mixed from center, rear and sub woofer speakers,
Usually it is set to “Small ”.
Speaker Setup Page
Center Speaker On
Rear speaker LRG
Sub Woofer On
DRC Auto
Setup Front Speaker
Front speaker is set to Large or Small.
1.2.1.3 CENTER SPEAKER
Follow the operating instructions stated in "DVD
MENU SETUP" to select the desired option in the
following figure.
Speaker Setup Page
Downmix Off
Front Speaker LRG
IRA
Rear speaker |
Sub Woofer On
DRC Auto
Setup Center Speaker
The central speaker is set to Large, Small or Off.
1.2.1.4 REAR SPEAKER
The rear speaker is set to Large, Small or Off.
Follow the operating instructions stated in "DVD
MENU SETUP" to select the desired option in the
following figure.
a 8 x
Speaker Setup Page
Downmix Off
Front Speaker LRG
Center S On
Sub Woofer on
DRC Auto Off
Setup Rear Surround Speaker
1.2.1.5 SUB WOOFER
The woofer speaker is set to ON or OFF.
Follow the operating instructions stated in "DVD
MENU SETUP" to select the desired option in the
following figure.
в x
Speaker Setup Page
Downmix Off
FrontSpeaker LRG
Center Speaker On
Rear speaker LRG
DRC ut
Setup Subwoofer
1.2.1.6 OUTPUT DYNAMIC COMPRESS
This function can compress audio signal with wide
dynamic range proportionally to reduce intense
impact to speakers.
Follow the operation instructions stated in ‘DVD
menu setup ” to select the desired option in the
following figure.
Speaker Setup Page
Downmix Off
Front Speaker LRG
Center Speaker On
Rear speaker LRG
Sub Woofer On
Post DRC
Setup output dynamic compress.
Output dynamic compress is set to
or “Auto”
1.2.2 DIGITAL AUDIO SETUP
Includes digital audio output and LPCM
output.
1.2.2.1 DIGITAL AUDIO OUTPUT
Dolby digital or DTS signals can be output
through OPTICAL or COAXIAL in rear panel.
Follow the operation instructions stated in
“DVD menu setup ” to select the desired option
in the following figure.
E“ On ” , c Off ”
11
SPDIF Setup Page
Spdif Output RAW. SPDIF Off
LPCM Out 48K SPDIF/RAW
SPDIF/PCM
Setup SPDIF
1.2.2.2 LPCM OUTPUT
Follow the operation instructions stated in “ DVD
menu setup ” to select the desired option in the
following figure.
8 » © x 8 x
SPDIF Setup Page
Spdif Output RAW
96K
Set LPCM SPDIF Output Rate
1.2.3 DOLBY DIGITAL SETUP
Dolby digital setup includes L+R and dynamic
range compress.
1.2.3.1 L+R SETUP
Follow the operation instructions stated in
“DVD menu setup ” to select the desired option
Dolby Digital Setup
in the following figure.
L-mono
R-mono
Mix-mono
mic
Dual Mono (1+1) Setup
If you have Dolby digital output in your
amplifier/decoder,you may select stereo, Left,
right and mixed sound accordingly.
1.2.3.2 DYNAMIC RANGE COMPRESS
Follow the operation instructions stated in
“DVD menu setup ” to select the desired option
in the following figure.
Dolby Digital Setup
Dual Mono
== FULL
— 3/4
— 4/2
— 1/4
OFF
Dynamic Range Compression
1.2.4 EQUALIZER SETUP
Includes equalizer type,bass enhancer,
subwoofer and treble enhancer.
1.2.4.1 EQUALIZER TYPE
Follow the operation instructions stated in
“DVD menu setup ” to select the desired option
in the following figure.
Bass boost Rock
Super bass off Pop
Treble boost Off Live
Dance
Techno
Classic
Soft
Select Equalizer Type
1.2.4.2 BASS ENHANCER
Follow the operation instructions stated in
“DVD menu setup ” to select the desired option
in the following figure.
Treble boost Off
Bass boost
Bass is set to ON or OFF
12
1.2.4.3 SUB WOOFER
Follow the operation instructions stated in
“DVD menu setup ” to select the desired option
in the following figure. |
Equalizer Page
EQ Type
Bass boost
None
Off
Treble boost
Super bass
Subwoofer is set to ON or OFF
1.2.4.4 TREBLE ENHANCER
Follow the operation instructions stated in
“DVD menu setup ” to select the desired option
in the following figure.
Equalizer page
None
Off
EQ Type
Bass Boost
On
Treble Boost
Treble enhance is set to ON or OFF.
1.2.5 3D PROCESS SETUP
This submenu option includes Pro Logic ll,
Reverb Mode.
1.2.5.1 PROLOGIC II SETUP
Follow the operation instructions stated in
“DVD menu setup ” to select the desired option
in the following figure.
Goto Pro Logic || setup page.
1.2.5.1.1 PRO LOGIC II SETUP
Follow the operation instructions stated in
“DVD menu setup ” to select the desired option
in the following figure.
PRO Logic II CONFIG
Mode a Mus Off
Panorama Off Auto
Dimension 00
Center Width 03
PRO LOGIC Il
1.2.5.1.2 PRO LOGIC II MODE SETUP
Follow the operation instructions stated in
“DVD menu setup ” to select the desired option
in the following figure.
PRO Logic || CONFIG
PRO Logic Il Off
Panorama off Movie
Dimension 00 Pro logic
Center Width 03 Auto
Set Pro Logic II Mode
1.2.5.1.3 PRO LOGIC II PANORAMA SETUP
Follow the operation instructions stated in
“DVD menu setup ” to select the desired option
in the following figure.
PRO Logic Il CONFIG
PRO Logic II
Mode Mus
Dimension 00
Center Width 03
Set Pro logic || Panorama Control
1.2.5.1.4 PRO LOGIC || DIMENSIÓN SETUP
Follow the operation instructions stated in
“DVD menu setup ” to select the desired option
in the following figure.
нех
PRO Logic [| CONFIG
PRO Logic II Off Size -3
Mode Mus Size -2
Off Size <i
Size 1
Size 2
Size 3
Center Width 03
Set Pro logic || Dimension Size
1.2.5.1.5 PRO LOGIC II CENTER WIDTH SETUP
Follow the operation instructions stated in
“DVD menu setup ” to select the desired option
in the following figure.
ax
PRO Logic Il CONFIG
PRO Logic II Off Level O
Mode Mus Level 1
Pamorama off Level 2
Dimension 00 Level 3
Center Width 03 Level 4
Level 5
Level 6
Level 7
Set Pro logic Il Center Width
1.2.5.2 Reverb MODE
Follow the operation instructions stated in
“DVD menu setup ” to select the desired option
in the following figure.
3d Processing Page
Pro Logic ||
Concert
Living Room
Hall
Bathroom
Cave
Arena
Church
Reverb Mode
13
1.3 VIDEO SETUP
Video setup includes : Component, TV Mode,
Video Quality.
1.3.1 Component
Follow the operation instructions stated in
“DVD menu setup ” to select the desired option
in the following figure.
VIDEO SETUP PAGE
Quality
Component
You should set up according to which output jack
connect to the TV. If you connect TV with YUV, it
should be set to YUV; If you connect to a Progressive
TV or PC monitor, it should set to VGA.
1.3.2 TV Mode
Follow the operation instructions stated in
"DVD menu setup" to select the desired option in
the following figure.
z x @ x
VIDEO SETUP PAGE
SE
Quality Progressive
Set P-SCAN On/Off
1.3.3 Quality
This submenu options include Sharpness,
Brightness, Contrast.
1.3.3.1Sharpness
This menu can adjust the sharpness of the
video output.
- 8 x
Video Quality Setup
High
Medium
Brightness 00
Contrast 00
Sharpness
14
1.3.3.2 Brightness
This menu can adjust the brightness of the
video output.
; мех
Video Quality Setup
Sharpness а
Contrast Ре
Brightness
Press right arrow or <ENTER> button to enter
adjustment mode; press LEFT and RIGHT arrow
buttons to make adjustment, press <ENTER> button
to return to setup menu.
1.3.3.3 CONTRAST
This menu can adjust the contrast of the video
putput.
Follow the operation instructions stated in "DVD
menu setup" to select the desired option in the
following figure.
Video Quality Setup
Sharpness
Brightness Low
Contrast
1.4 PREFERENCE SETUP
During stop mode, press the SETUP button to
access the PREFERENCE SETUP menu, which
includes items of TV type, subtitle, disc menu
language, parental, password, default values .
Preset values are essential to a DVD player. The
user may change these items as desired.
1.4.1 TV TYPE
Follow the operation instructions stated in ‘DVD
menu setup ” select the desired the option in the
following figure.
Preference Page
NTSC! PAL
ENG Multi
Subtitle ENG | NTSC
Disc Menu ENG
Parental
Default
Set TV Standard
This product supports output of various system,
including AUTO, NTSC, PAL.
1)If your TV set has only NTSC or PAL system, the
screen will blink and become colourless when a wrong
system is selected. In this case, press the N/P button
on the Remote Control to switch the TV TYPE.
2)For more information of output format, refer to the
instructions of your TV set.
1.4.2 DUBBING LANGUAGE
Follow the operating instructions stated in "DVD
MENU SETUP" to select the desired option in the
following figure.
Subtitle
Spanish
Disc Menu ENG Chinese
Parental Japanese
Default Korean
Russian
Thai
Preferred Audio Language
This machine provides English, French, Spanish,
Chinese and Japanese Korean, Russian, Thailand
as the built-in disc dubbing language options.
15
1.4.3 SUBTITLE
This machine provides English, French, Spanish,
Chinese and Japanese as the built-in subtitle
languages. When a DVD is played, the user may
hide the subtitle or choose any of them as the
preset subtitle language.
Follow the operating instructions stated in "DVD
MENU SETUP" to select the desired option in the
following figure.
TV Type English
Audio French
Subtitle | Spanish
Disc Menu Chinese
Parental Japanese
Default Korean
Russian
Thai
1.4.4 DISC MENU LANGUAGE
This machine provides English, French, Spanish,
Chinese, Japanese Korean, Russian, Thailand and
OFF as the film's menu language options.
Follow the operating instructions stated in "DVD
MENU SETUP" to select the desired option in the
following figure.
TV Type
Audio
Subtitle Spanish
Disc Menu Chinese
Parental Japanese
Default Korean
Russian
Thai
Preferred Menu Language
1.4.5 Parental
Follow the operating instructions stated in "DVD
MENU SETUP" to select the desired option in the
following figure.
нех
Preference Page
TV Type NTSC 1 KID SAF
Audio ENG 2G
Subtitle ENG 3PG
Disc Menu ENG 4 PG 13
Parental 5 PGR
Default 6R
7 NC 17
For a film to be restricted for children, the film
class may be set according to label marking on the
disc.
1.4.6 DEFAULT
This option will resume the original settings of
this machine.
Follow the operating instructions stated in "DVD
MENU SETUP" to select the desired option inthe
following figure.
Preference Page
TV Type NTSC
Audio ENG
Subtitle ENG
Disc Menu ENG
Parental
Load Factory Setting
16
1.5 PASSWORD SETUP
Follow the operation instructions stated in
“DVD menu setup ” to select the desired option in
the following figure.
1.5.1 PASSWORD MODE
Gex
Password Setup Page
Password
Password Mode
1.5.2 PASSWORD
The default is “136900” The user may change
it using this option.
Followthe operating instructions stated in
“DVD MENU SETUP ” to select the desired option
in the following figure.
Password Setup Page
Password Mode
Change Password
6. OPERATION OF MP3 & MPEG4
FUNCTION
MP3 is an audio compression mode using Level
3 of the international standard MPEG, whereby
sound signal is compressed in a rate of 12:1. A MP3
disc can record music for play of over 600 minutes
or record over 170 songs, rivaling Cds in sound
quality.
MPEG4 is the latest compression standard
developed by MPEG(Motion Picture Experts Group).
To play a MP3 or MPEG4 disc
Select the track using direction buttons
1. Follow the basic operating instructions to insert
a MP3 or MPEG4 disc, this machine will start to
search the information on the disc and show it in
the display.
2. Press direction key to select MP3 or MPEG4 file and
press <ENTER> key to play.
Repeat play
Using this function, the user will be able to enjoy
a particular song or all the songs on the disc over
and over again.
1. Choose a particular song to be repeated.
2. Press the <REPEAT> button you can choose
Shuffle, Random, Single, Repeat One, Repeat All and
Repeat Off function.
Other functions:
When a MP3 disc is played, volume control, pause
and forward and backward search will also be available.
The operations are the same with those of CDs.
17
7.JPEG
JPEG adopting the most efficient compression is
widely used as picture storage type flattened and
stored format.
Even if pictures are compressed 15-20 times. they
still have good effect. Supported by most picture
processing software, fit for picture storage, it has small
data and easy use .This machine can read. JPEG-
format picture CD disc.
Select to play by menu
1. Put in disc, the machine searches disc information and
main menu displays on screen. Press number key
from 1 to select picture, press play key to make sure.
2. Press direction key to select picture, then press
<Enter> key to make sure.
3. In condition of stop, press direction key to select
other pictures.
4. In condition of stop, select the first line file item on
the right, then press play key to return to upper menu.
Other functions:
When playing picture CD. The machine allows pause,
repeat and browsing. Use the Next or Previous key to
browse.
Press <Zoom> key to enlarge picture. While in zoom
mode press fast forward or backward key to control
the zoom scale. To move the view area of the enlarged
picture, use the direction keys.
In view mode, pictures can be rotated with direction keys.
The type of slide show transition can be selected from
the navigation menu or simply by pressing <Program>
key.
8. Trouble shooting guide
For your convenience, we have enlisted
some points to help solve problems you might
encounter while using DVD player.
No sound
@ Make sure the good connection between
player and other appliances such as power
amplifier or TV.
@ Make sure the right operation on TV and
power amplifier.
No picture
@ Make sure the good connection between
player and other appliances such as TV.
O Make sure TV works well.
O Make sure the DVD player is in correct mode.
Disc does not play
O Make sure the disc is loaded correctly (label
side is facing up on the disc tray).
O Make sure the disc is clear.
Remote controller does not work
O Move the obstacle between player and remote
controller away.
@ Point the remote controller at the remote
control sensor.
@ Check the battery.
Picture dividing
@ Make sure the disc is clear and no any
scratch on it.
@ For the player is controlled by micro-
computer, if encountering problem, switch off
the power first, and switch on again in a few
second, by then if no mistake is displayed, the
player could work well.
SAFE MODE
The main unit will be in safe mode if it does not
respond to any operation due to interference by
accident or strong noise signals. To resolve this
problem, you must pull out the power cord and
plug it in again later 10 seconds.
Notes on Condensation
Occasionally, condensation may occur within the device,
resulting in drops of water forming on the optical pick-up
inside the unit. This is much like the condensation that
takes place on a glass of cold water. This condensation
may affect the overall performance of the machine.
18
Condensation occurs when:
1) It is moved from a cold area to a warm area.
2) Its surrounding area is exposed to a sudden change
in temperature, for example, when located near an
air-conditioner.
3) In summer, the unit is moved from a hot and humid
environment immediately into an air-conditioned room.
4) The device is in a humid environment.
9. CARE OF DISCS
Protection
a. When loading or removing the discs, always
hold them by the center and edge.
b. Do not stick or write anything on the surface.
Protect discs against any fingerprint.
Cleaning
Wipe the discs from time to time using a soft
cloth. Always wipe from the center toward the edge.
Storage
a. Never warp the discs. During no-sue periods,
store them in their cases, which should be kept
vertically. Do not expose discs to high temperature,
dampness or extremely low temperature, or else it
may cause damage to the discs
b. Do not expose discs to direct sunlight.
The DVD player contains laser devices. The top cover
of the DVD module acts as a protective housing.
Laser radiation is dangerous when the top cover is
removed or opened. Avoid direct exposure to beam
during service or repair.
Manufactured under license from Dolby Laboratories.
"Dolby", "Pro logic", and the double-D Symbol are
trademarks of Dolby Laboratories.
This product incorporates copyright protection
technology that is protected by method claims of certain
U.S. patents and other intellectual property rights owned
by Macrovision Corporation and other rights owners.
Use of this copyright protection technology must be
authorized by Macrovision Corporation, and is intended
for home and other limited viewing uses only unless
otherwise authorized by Macrovision Corporation.
Reverse engineering or disassembly is prohibited.
10. Technical Specification
Type SVX12778
Play mode NTSC/PAL/AUTO
Disc mode DVD,CD,MP3,CD-R, JPEG Picture CD,MPEG-4
Resolution — 500 lines
Video S/N ratio =56dB
Frequency response
20Hz-20KHz:+/-1dB
Audio S/N ratio =90dB
Dynamic range =90dB
Distortion <1%
D/A converter 192KHz/24bit
Video output 1Vp-p(75 Q)
S-Video output
Y: 1Vp-p(75 Q) C: 0.3Vp-p(75 Q)
Audio output
Digital audio output
coaxial, optical
AC-3 5.1 channel output
Power Voltage 110V/220V 60/50Hz
Power consumption 25W
Size 430(W) x 38 (H) x 248 (D) mm
Weight 3.0Kg
Specifications are subject to change without notice.
19
11. Functions
® Completely compatible with MPEG4.
® The decoding ability of MPEG4 is up to 10 MBPS which is more excellent
than others (2~3.5 MBPS)
e With advanced anti-shock technology, it have enhance the functions of
error correction & anti-shock.
® With powerful video DAC (108MHz, 12 Bit) and supporting the function of
Progressive Scan.
® Build-in 2D graphics accelerator improves the visual quality.
e With powerful audio DAC, it supports DOLBY AC-3/ DTS/WMA/MP3
Play Back
e Puta disk with correct operation, machine will load and show the message:
e Using the direction keys (up, down, left & right) on the keypad to choose the
title which would like to play, then choose the movie which would like to
play by same direction keys and operate the Play key. It could play by
using the number keys to choose the movie directly.
20