1
E
Digital Audio Player
User's Manual
TU
Contents
Inserting a Battery -------- 4
Power ON / Power OFF ---- 5
HOLD Function te 5
MODE MENU nement RG 7
DISPLAY MENU ----=--<--8
"Setting up ID TAGS ------ 8
*LCD CONTRAST --------- 8
MEMORY ===> 9
«Setting up Backlight/Color 9
FILE MENÜ = seems 10
*Delete one file ----------- 10
"Delete all files ----------- 10
*Formatting / Upgrade ---- 11
PLAYER MENO === 12
INTRO playback ---------- 12
«Setting up Playback Speed -- 12
*REPEAT / EQUALIZER --- 13
ENCODE MENU ----------- 14
«Setting up CD SYNC ----- 14
«Setting up SYNC sensitivity 15
Setting up sound quality ---- 15
Listening to Music ----------- 16
Search the Folder ---------- 16
Select the EQ -------------- 17
Setting up Repeat Mode ------ 17
Setting up Loop Repeating ---- 4
MP3 ENCODING -------------
FM RADIO — —
MODE MENU ------------ 19
SHARE Ненси 19
*Delete a Stored Frequency -- 19
Listening to FM Radio ------- 20
Manual Frequency Storage --- 20
Automatic Frequency Storage 20
Automatic Deleting a Stored Frequency 21
FM Encoding -+------------21
Function & Structure of MENU 22
RECORD MENU ---------- 23
«Setting up VAD/VAD sensitivity 23
*Setting up Sound Quality-- 23
*Setting up Recording Voice 24
a a to Volts нение - 24
casions ED
Specication ПОЛИ
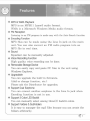
Features
1
: 1
j |
e]
|
1
1
A 9
[|
* MP3 & WMA Playback
MP3 is an MPEGI Layer3 audio format.
WMA is a Microsoft Windows Media audio format.
* FM Reception
Listening to an FM program is made easy with the Auto Search function.
Encoding Function
MP3 files can be made using the Line In jack on the main
unit. You can also convert an FM radio program into an
MP3 file in real time.
# Sound
Equalizer can be manually adjusted.
> Voice Recording Function
High quality voice recording can be done.
> Removable Storage Device
You can easily copy and paste PC files to the unit using
Windows Explorer.
# Upgradable
You can upgrade the built-in firmware.
(Add or change function, etc.)
Please ask the Distributor for upgrades.
# Support Dual Earphone
You can connect another earphone to the Line In jack when
Encoding function is not in use.
# Support 3 Color LED Backlit
You can manually select among three(3) backlit colors.
# Support Folders & SubFolders
It is easy to manager the mp3 files because you can create the
folders arbitrarily.
A
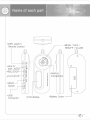
Name of each part
*EAR. JACK1/
Remote Control *MENU / NAVI /
REW/FF / VOLUME
*Line In/
EAR. JACKZ
Switch
2 E
*
au *LCD display *Battery Cover
Name of each part
*Playback/Recording/Pause/
INTRO Playback Display
Te peed *Remaining Battery
*Equalizer Capacity Display
| nd | *Hepeat mode
*Volume __ В Display
Display
|
di » A-B LIVE RD ra
da
Ги
001/006
М]
ETS 00:03:16 Av
— Ш | +RECORD /
«File Name *HOLD ENCODE
*SYNC «yap Display
Displa
Ni Bok Isplay Display
total files *Recording Time/ *Mode display
Playback Time (MUSIC/VOICE/FM RADIO)
*Number of
current file
© I CY EVEN To alo)
| operating
>+ Inserting a Battery
Inserting or changing of the battery should be done when
unit 1s off.
Slide the cover in the direction of the arrow to open.
Insert a battery in the correct direction, as illustrated below,
then slide cover back on.
(Battery : AAA, LRO3 or UM-4 or equivalent)
*Battery life time
Battery | at recording | at earphone
mode playback
"AAA" over over
Alkaline 6 hrs 8 hrs
Preparation for
operating
> Power ON
Set HOLD switch to the OFF position and press the PLAY/
STOP button for 2 second.
The unit will then power on.
+ Power OFF
Press the PLA Y/STOP button for 2 second when the unit
is on standby.
The unit will then power off.
«Note :
- The unit will automatically Turn OFF to conserve battery
life, when the unit is left on standby for over 1 minute.
- You can also turn off the power by pressing the PLAY/
STOP button for 2 seconds.
x HOLD Function
Under Hold mode, buttons will not work.
Slide the HOLD switch on the player in the direction of
the arrow.
When a button is pressed, "HOLD" message will appears
on the display.
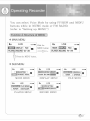
in Voice Recorder
Description of button
Vas
Button — [Operation When Stop | Playing Recording | Using FM RADIO
PLAY/STOP Selected file playback Frequency
SHORT ait from NENU | Stop playback aus search mode
— LONG | Power OFF Power OFF Power OFF Power OFF
FF/REW File search Frequency search
MENU search | File search for stored,
SHORT | VES/NO, MENU search,
ON/OFF select YES/NOgelect
Fast forward or Frequency
LONG |Fast file search rewind in playing auto search
Enter MENL mode,
SHORT Enter MENU mode,| Change EQ MENU setup,
MENU setup mode stop the auto
channel save mode
Enter = Enter channel save mode,
LONG NAVIGATION mode| A7>B Fepeat Channel save/delete
Volume up/down| Volume Volume u
p/
MENU search,
Folder search up/down Boni
cp Start recording | Setup A<->B |Stop recording | Start or stop
ECIOTOP = or encoding Repeat or encoding | radio program
EQ SHORT Change EQ mode
(Only Remote)| Change repeat MUSIC
FM RADIO ON Ge répéa
LONG mode Player ON
STOP Exit from : Exit from
top Playback
(Only Remote) Menu mode Hop Flay Stop Recording Menu mode
«Note :
- LONG: Longer than 1 second, Short : Less than 1 second.
- The EQ and STOP buttons are only located on the Remote
control.
"6
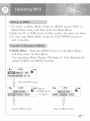
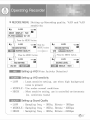
Operating MP3
Setting up MENU
1. To switch to Menu Mode, Press the MENU button While in
Music/Voice mode, and then enter the Main Menu.
à. Slide the FF or REW button briefly to select the menu vou want.
3. To exit from Menu Made, press the PLAY/STOP button or
wait 5 seconds.
Function & Structure of MENU
3 MODE MENU : Press the MENU button in the Main Menu,
and then enter the Sub Menu.
You can select Music Player, FM Radio or Voice Recorder by
using FF/REW and MENU buttons.
Wal LIVE =)
IE DISPLAY ALE] 9
PLAYER ENCODE] Ver 1.00
Press the MENU button.
La LIVE e Slide the Mu LIVE ou
MODE SETTING FF/REW button MODE SETTING =
— FM RADIO
Press the MENU button. Press the MENU button.
| Operating MP3
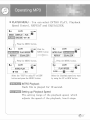
* DISPLAY MENU : You can set up ID TAG3, BACKLIGHT
COLOR, BACKLIGHT TIME and LCD CONTRAST. Also, you
can see the total memory size and remaining memory size.
ul LIVE ¿e
МООЕ | ЭГ РЕ |8
PLAYER [ENCODE Ver1.00
| | Press the MENU button.
i | LIVE aa | Slide the LIVE i
[ZE contrast memory M8 | FF/REW button | HEE ТАС] ВТС memory] EE
(COLOR | BL TIME MI | ——— [Conor] 1. TIME UNE
Press the MENU button,
Kr LIVE CE) qu Mal LIVE сео:
| ID TAG3 в | LCD CONTRAST
Oo ON MOFF o— 9
Select the "ON" by using the FF or REW
button and press the MENU button.
Setting up ID TAG3
ID TAGS ON : Display song name
ID TAG3 OFF : Display Filename
Setting up LCD CONTRAST
Set the LCD contrast by using FF or REW button.
The setting range of the contrast adjusts from
0 to 9.
"8
Operating MP3
1
1
|
e]
|
1
Ч 1
РО |
[|
| LIVE E
[wove | 7525) Г се | #8
Ver 1.00
Press the MENU button.
x | LIVE æux| Slide the dal LIVE De
[mios [compas] MENE © MENU button [D TAGS | [CONTRAST| memory) 68
mr | == (IL TIME) EN
Gi
Press the MENU button. Press the MENU button,
LIVE PE “a LIVE E
CREMAN memory | 120me E | BACKLIGHTCOLOR | ©
CEOTAUNENORT] 24708 | RED |
Select the color by using the FFor REW
button and press the MENU button.
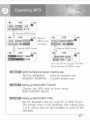
Verify the total and remain memory size
TOTAL MEMORY : Built-in memory size
REMAIN MEMORY : Available memory size
Setting up BACKLIGHT COLOR
Change the LED color as below order,
RED->GREEN->BLUE
Setting up BACKLIGHT TIME
Set the Backlight time by using FF or REW button.
The setting range of the Backlight time adjusts from
| 10 9. always turn on the backlight or turn off the
backlight.
ло
Operating MP3
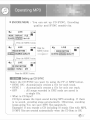
* FILE MENU : You can select file delete, format and font &
firmware upgrade function.
Ki LIVE =
[moe | piseLay IEEE
PLAYER | [ENCODE] Ver 1.00
Press the MENU button.
Mu LIVE ez Side the Mail LIVE CE) e
ERASE ALL 9 | MENU button [ERASE FILE]
| FORMAT || UPGRADE | || FORMAT || UPGRADE
Press the MENU button. Press the MENU button.
Mal LIVE Zi LIVE A
ERASE 1 FILE El | ERASE ALL FILES в
It's my life ‚mp3 mM YES © NO
Select the file you want delete Select the "YES" by using the FF or
and press MENU button REW button and press the MENU button
Mul | LIVE De Li LIVE aber
| ERASE 1 FILE m | ERASEALLFILES |
Erasing!! 010/016
E Delete one file
Delete all files
"0
Operating MP3
“ui LIVE a]
[MODE ][DISPLAY] NGN ES
| PLAYER | [ENCODE Ver 1.00
Press the MENU button.
Mal y LIVE ez) Slide the Mil LIVE Ea
\[ERASE FILE | [ERASEALL |B | MENU button | [ERASE FILE | [ERASE ALL | 8
| BO | UPGRADE | a
| Press the MENU button.
Ml y LIVE De
FORMAT Er
MYES [INO
Select the "YES" by using FF or REW button and press the MENU button.
dal y LIVE сю в
Forma | В
Formatting!! 38%
Formatting
All files will be deleted when formatting the built-in
memory.
Firmware upgrade 6: Font download
Download the latest Firmware and display fonts from
distributor's homepage
(refer to "Firmware upgrade & Font download")
fi
Operating MP3
* PLAYER MENU : You can select INTRO PLAY, Playback
Speed Control, REPEAT and EQUALIZER.
| MODE | DISPLAY) FILE =
NE] ENCODE| Ver 1.00
Press the MENU button.
Mil LIVE =| Slide the Ч LIVE =
PLAY SPEED|E9 | MENU button | [INTRO PLAY | (TET) 9
| REPEAT || EQUALIZER | сес || REPEAT | EQUALIZER
I Press the MENU button. Press the MENU button.
Ma || LIVE E hi LIVE au
[INTRO PLAY PLAY SPEED] HE
mM YES E NO SLOWÑ—- FAST
Select the "YES" by using FF or REW Select the "playback speed vou want
button and press the MENU button. by using the FF or REW button.
INTRO Playback
Each file is played for 10 second.
Setting up Playback Speed
The setting range of the playback speed, which
adjusts the speed of the playback, has 6 steps.
Operating MP3
СМ LIVE CE) i
[MODE ]DisPLar | FILE] 9
EME ENCODE) Ver 1.00
7 Press the MENU button.
1 í i
Mu y LIVE De Slide the Mai LIVE De
| INTRO PLAY | [PLAY SPEED MENU button | INTRO PLAY | PLAY SPEED]
со |[ ВЕРЕАТ | ERVIN:
Д FRI MENU Dita IL prs MENU button.
Mal LIVE a i LIVE a
EEE MENA cussic | #8
(REPEAT ALL|| RANDOM | “LIVE | POP || ROCK
Setting up Track Repeating
Select the Repeat mode vou want by using the
FF or REW button.
Setting up EQ
Select the EQ mode you want by using the FF
or REW button.
Operating MP3
2
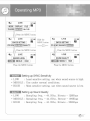
*k ENCODE MENU : You can set up CD SYNC, Encoding
quality and SYNC sensitivity.
Чл LIVE = f=
MODE DISPLAY FILE |9
PLAYER | EINE Ver 1.00
Press the MENU button.
da || LIVE me Slide the di LIVE a=
ENCODSETTING | Ÿ | MENU button | | ENCOD SETTING |
SILENCE QUALITY — SILENCE
Press the MENU button.
L
da LIVE me
CD SYNC SETTING
Press the MENU button,
Setting up CD SYNC
Select the CD SYNC you want by using the FF or REW button.
* SYNC ON : Automatically creates a file for each track.
* SYNC 1 : Automatically creates a file for only one track.
* OFF : All songs recorded in ENC mode are saved in
a single file.
* What is CD Sync?
CD Sync senses the input sound during MP3 encoding, If there
ls no sound, encoding stops automatically. Otherwise, encoding
keeps going. You can save MP3 files separately.
Example) If you encode a CD including 10 music files with MP3,
10 MP3 files are created automatically when the CD Sync to ON,
ая
Operating MP3
2
Mal LIVE CE =
MODE ||DISPLAY| FILE El
PLAYER (=9e)1= Ver 1.00
| Press the MENU button.
Md | LIVE Del ide the di LIVE =
[encoosering | 8 MENU button [Enconserin |B
cD SYNC| ESTES QUALITY! сп | [cD SYNC SILENCE [FTWix]
| Press the MENU button.
Li LIVE CT (RE
Press the MENU button.
т
LIVE CE) =
_sLencELEveL]) 8 SOUND QUALITY | 8
MOTA | MIDDLE || HIGH | BIT [MIDDLE || HIGH |
Press the MENU button. Press the MENU button.
Setting up SYNC Sensitivity
* LOW : Least sensitive setting, use when sound source is high.
« MIDDLE : Use under normal conditions.
« HIGH = : Most sensitive setting, use when sound source is low.
Setting up Sound Quality
+ LOW : Sampling freq. - 44, 1Khz, Bitrate - 128Kbps
* MIDDLE : Sampling freg. - 44, 1Khz, Bitrate - 196Kbps
* HIGH : Sampling freq. - 44. 1Khz, Bitrate - 224Kbps
9
Operating MP3
Listening to Music
First, insert the battery and connect the earphones to the player
1. Turn ON power by pressig the PLAY/STOP button.
2. Select the music file you want by using the FF or REW button.
3. When you press the PLAY/STOP button, the music file is played.
4, When you press the PLAY/STOP button while playing the
music stops.
+ Search the Folder(NAVIGATION)
1. Press the NAVI/MENU button for
To VOICE over 2 seconds.
ROOT 2, Select the desired folder by pressing
EC the VOL+/- button.
T SAMPLE 3. To move to the lower folder, push
. FF(>>)button. if there is no lower folder
SAMPLE! _$ ,
CLA it will be displayed _f on the screen.
4, To move to the upper folder, push REW(#«)button.
5. To select the folder, press the NAVI/MENU button for over
2 seconds.
*The MUSIC folder is the ROOT folder.
*The maximum folder name length is 8 characters. If the
folder name length is over & characters, the folder name 1s
displayed 6 characters and "~1",
и 16
Operating MP3
2
+ Select the EQ
While playing music files, press the MENU button briefly.
EQ mode will be changed in below order.
NORMAL -> CLASSIC > LIVE > POP > ROCK
*Use the MENU button to select the desired EQ.
+ Setting up Repeat Mode
While playing music files, press the MENU button for over
2 second. repeat mode will be changed in below order,
(1) > All = All — RD
*Use the scroll MENU) button to select the desired mode.
( 1) : To repeat one track
All : To play all the tracks in order one time
( AN”) : To repeat all tracks
RD : To play tracks at random
* Setting up Loop Repeating
1. Starting Point
While playing music files, press the REC button briefly at
the beginning of the loop you want to set. A-B icon will
be blinking.
2. Ending Point
Press the REC button briefly again to set the end of the loop.
A-B icon appears in the display. the loop is played repeatedly.
*Note :
- Press the REC button briefly to cancel the loop.
- Loop Repeat is automatically released if you slide the
No search button.
m7
Operating MP3
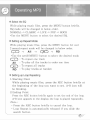
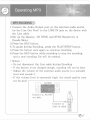
MP3 ENCODING
1. Connect the Audio Output port on the external audio source
(or the Line Out Port) to the LINE IN jack on the device with
the Line cable.
2. Set up the Quality, CD SYNC and SYNC Sensitivity in
Encode Menu.
3. Press the REC button.
4. To pause during Encoding, press the PLAY/STOP button.
D. Press the button once again to continue recording.
6, Press the REC button while recording to stop the encoding,
and a new encoding file will be created.
* Notice :
- Do not disconnect the Line cable during Encoding
- If the battery is not charged enough, encoding will not be done
- Adjust the volume of the external audio source to a suitable
level and encode it
- If the volume level is extremely high, the sound quality may
not be good
AUDIO
Connect to AUDIO
out jack
Connect to
Line in Jack
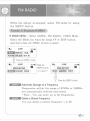
FM RADIO
While the player is stopped, select FM mode by using
the MENU button.
Function & Structure of MENU
*k MODE MENU : Select MUSIC, FM RADIO, VOICE Mode.
Select the Mode you want by using FF or REW button.
And then press the MENU button to select.
Wl LIVE = a
EE ose rie |B
PLA | ENCODE] Ver 1.00
Press the MENU button.
du | LIVE es Slide the dl LIVE сова
| MODE SETTING _ B MENU button MODE SETTING) E
IIT FFM RADIO] VOICE | —— [music GEN VOICE |
y Press the MENU button
Automatic Storage of a Frequency
Frequencies within the range of 87MHz to 108MHz
are automatically selected and stored.
* Note : You can store up to 20 frequencies,
Delete a Stored Frequency
You can delete a stored frequency 1 to 20.
a" ig
FM RADIO
©
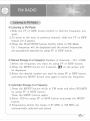
Listening to FM Radio
* Listening to FM Radio
l.Slide the FF or REW button briefly to find the frequency you
want.
2. To move to the next or previous channel, slide the FF or REW
button for 3 second.
3. Press the PLAY/STOP button briefly while in FM Mode.
Ch 1 frequency will be displayed and the stored frequencies
are successively searched by using FF or REW button.
** Manual Storage of a Frequency(Number of channels : Ch1-Ch20)
1. Select the frequency vou want by using FF or REW button.
2. Press the MENU button for 3 second, (M1 on the screen will
be displayed.
3. Select the channel number you want by using FF or REW button
and press the MENU button once again to store the frequency.
* Automatic Storage of a Frequency
1. Press the MENU button while in FM mode and select SEARCH
by using FF or REW button.
Press the MENU button again.
2. Select YES by using FF or REW button and press the MENU
button.
3. Frequencies within the range of 87 MHz to 108 MHz are
automatically selected and stored.
a 20
FM RADIO
©
4. Frequencies are automatically stored, starting from Ch 1.
Mi LIVE CEE de:
| SEARCH CHANNEL |
OYES MNO
*Press the MENU button, if you want to stop searching and
saving the frequency,
# Manual Delete a Stored Frequency
1. Press the PLAY/STOP button, and then will be displayed
frequency and (6/1.
2. Select the channel number you want to delete by using FF or
REW button.
J. Press the MENU button for 3 second, and then will be displayed
(| and delete a selected frequency.
* Automatic Delete a Stored Frequency
|. Press the MENU button while in FM mode and select
DELETE by using FF or REW button.
Press the MENU button again.
à. Select YES by using FF or REW button and press the MENU
button. Wal LIVE =)
3. After deletin, 87 MHz will be | DELETEALL CHANNELS]
displayed on the screen. TOYES m NO
* FM Encoding
1. Press the REC button during FM Mode to start the encoding.
2. To stop the encoding, press the REC button again.
Then a new file will be created and stored to the RADIO folder.
Ma
Operating Recorder
You can select Voice Mode by using FF/REW and MENU
buttons while in MUSIC mode or FM RADIO.
(refer to "Setting up MENU")
Function & Structure of MENU
>E MAIN MENU
| Ma LIVE uE Slide the Ml LIVE =)
ИТР pisPLAY|[ FILE | MENU button [MODE | ЕЯ | FILE |
PLAYER] RECORD) Ver 1.00 —— PLAYER] RECORD| Ver 4.00
Press the MENU button.
* SUB MENU
Mai LIVE =) Mai LIVE e | Mal LIVE ou
_ MODE SETTING | gm | |ICHETEN CONTRAST MEMORY py | | FETISH [ERASE ALL | poy
ILLITE Fr RADIO] VOICE | [COLOR | ert. Ti] NE | FORMAT | [ UPGRADE |
MODE MENU DISPLAY MENU FILE MENU
| чм LIVE a a Ma LIVE De
EN [PLAY SPEED) pa е
| REPEAT |[EQUALIZER |
PLAYER MENU RECORD MENU
À
o
Operating Recorder
>
1
* RECODE MENU : Setting up Recording guality, VAD and VAD
sensitivity
€ LIVE De
| MODE DISPLAY FILE =
PLAYER [=eel5{) Ver 1.00
Press the MENU button.
I
Mu y LIVE CE ez | Slide the Mil LIVE Cou
RECORD SETTING | | MENU button RECORD SETTING | E
— 1 I
META SILENCE [QUALITY —
| | Press the MENU button.
TENE QUALITY
Press the MENU button.
Aal LIVE a LIVE su
| VAD SETTING EJ | SILENCE LEVEL | @
| _vaoon | INE HIGH |
Setting up VAD(Voice Activity Detection)
Setting up VAD sensitivity
* LOW : Least sensitive setting, use when high background
noise is present
* MIDDLE : Use under normal conditions
+ HIGH =: Most sensitive setting, use in controlled enviornments
(ex. conference rooms)
Setting up Sound Quality
* LOW : Sampling freg. - 16Khz, Bitrate - 16Kbps
* MIDDLE : Sampling freg. - lóKhz, Bitrate - 34Kbps
« HIGH : Sampling freg. - l6Kbz, Bitrate - 64Kbps
3
8, Operating Recorder
||
|
Recording Voice
1. Press the REC button to begin voice recording while in
Voice Mode.
2. To stop the recording, press the REC button again and a
new voice file will be created.
« Note :
- If the memory is full, the Voice Recording is stopped
automatically,
- The Voice Recording is also enabled in Music Mode.
- To record voice, be sure nothing is connected to the
LINE IN jack.
- Voice recording does not work in FM Mode or when the
Line cable is connected,
* Listening to Voice
First, insert the battery and connect the earphones to the player
1. Turn on the unit by pressig the PLAY/STOP button.
2. Select the voice file you want by using the FF or REW button.
3. Press the PLAY/STOP button, the file is played.
4, When vou press the PLAY/STOP button while playing, the
playback stops.
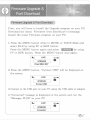
Firmware Upgrade &
Font Download
Firmware Upgrade & Font Download
First, you will have to install the Upgrade program on your PC.
Download the latest Firmware from distributor's homepage.
Install the latest Firmware program on your PC.
1. Press the MENU button while in MUSIC or VOICE Mode and
select FILE by using FF or REW button.
Press the MENU button again and select by using
FF or REW button. Press the MENU button once again.
Mal LIVE => (в
| UPGRADE
Press MENU KEY
2. Press the MENU button, "Connect USB" will be displayed on
the screen.
di LIVE = =
| UPGRADE
Connect USB
3. Connect to the USB port on your PC using the USB cable or adaptor.
4, "Connected" message is displayed on the screen and run the
"Manager PLUS" on your PC.
Li LIVE D =
| UPGRADE | в
Connected
Firmware Upgrade &
Font Download
5. After completing the file transfer, you must disconnect
the USB cable and power off by using PLAY/STOP button.
<New Font Download >
Device > Select Device Font
<New Firmware Upgrade>
Device -> Device Upgrade
1. Turn on the unit and connect to PC
2, Open Windows Explorer on PC
3, Select the file to save and drag-and-drop it into the removable
disk icon.
+Notice :
The "Don t Remove USB" message will appear during file
download or upload. Disconnecting the USB cable while
"Don't Remove USB" is displayed may cause malfunction of
the unit.
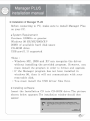
== Manager PLUS
installation manual
Installation of Manager PLUS
Before connecting to PC, make sure to install Manager Plus
on your PC,
e System Requirement
Pentium 133MHz or greater
Windows 98 SE/ME/2000/XP
20MB of available hard disk space
CD-ROM drive
USB port(1. 1) supported
«Note :
- Windows ME, 2000 and XP can recognize the driver
without installing the provided program. However, you
must install the program in order to format and upgrade.
- If the Manager program has not been installed in
windows 98, then it will not communicate with your
removable disk.
- You must install the USB driver files first.
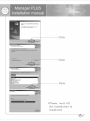
* Installing software
Insert the Installation CD into CD-ROM drive. The picture
shown below appears. The installation window should then
appear.
Manager PLUS
installation manual
ow nah rd oman ml arica ag PL o
Es crec Tocorón cio Kai
Click
Click
Click
*Please, wait till
the installation is
completed.
Manager PLUS
installation manual
Ina all hisld Wisard Compluiy
Seluo has frehed miaing Manager PLUS on your compañes.
© Ho, | val estart my computer Eater
«Installation is finished,
and the short-cut icon
will appear on the
BA mo] e Y desktop.
Anova amy da Nom les: dips, ied then chick Рае lo
complets setup
* To remove Manager PLUS
Click Start — Settings — Control Panel —
Program Add/Deletion.
+ mA Taokbar & Start Menu.
À] Folder Options...
A Active Desktop
m_ 29
pd=lp
Manager PLUS
installation manual
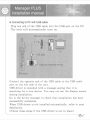
+ Connecting to PC with USB cable
Plug one end of the USB cable into the USB port on the PC.
The unit will automatically turn on.
Connect the opposite end of the USB cable to the USB cable
port on the left side of the unit.
USB driver is installed with a message saying that it is
searching for a new device. You may not see the display screen
during installation.
Go to the device manager to check that installation has been
successfully completed.
When USB driver is not installed automatically, refer to next
description.
(Follow these steps if the USB driver is not in place)
PET
Manager PLUS
|
|
|
1
|
|
|
|
1
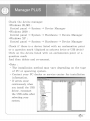
Check the device manager.
*Windows 98, ME :
Control panel => System — Device Manager
«Windows 2000 :
Control panel > System —> Hardware —> Device Manager
*Windows XP :
Control panel — System —> Hardware —> Device Manager
Check if there is a device listed with an exclamation point
or a question mark (displayed as unknown device or USB device)
Click on the device listed with an exclamation point or a
question mark
And then delete and re-connect.
«Note :
- The installation method may vary depending on the type
of PC or operating system.
- Contact your PC dealer or service center for installation
information.
— If errors occur
continuously when
you install the USB
driver, reconnect
the USB cable after
rebooting your
system.
Ree
Cautions
sk Cautions in Operating
1. Do not place the product in the following condition and/or places :
- Where temperatures reach above 120°F,
- Dusty place.
- Near heaters or any type of heat sources.
- In a car with windows closed, especially in the summer,
- Damp places, like a sauna or bathroom.
2. Any excessive force on the LCD display could cause damages
to it and to the over all LCD functions.
3. A magnetic card such as a credit card or subway communication
ticket may not work once it is placed on or close to the speaker.
4. The seller holds no liability for any damages caused by misuse
of the product and any claims from the third party.
5. The seller holds no liability for any lost messages which are
caused by repair or any other troubles.
:k Cautions in Using Battery
1. Do not short circuit, disassemble, heat or put batteries in
the fire. Battery acid could cause bodily harm if exposed to
the skin or eyes.
à. Do not use different kind of battery.
3. Remove the battery, if the unit will not be in use for over
a months time.
* Cautions for Safety
1. Remove the battery when there are malfunction caused
by smoke and heat.
2. Do not use the device where electronic product operation
is prohibited like inside an airplane.
3. Do not operate when driving or walk, to prevent accidents
or distractions.
Fon
Specification
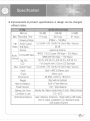
>+ Improvements of product, specifications & design can be changed
without notice.
Memory 128 MB 256 MB 512MB
“ Max. Recording Time 17 Hours 34 Hours 51 Hours
Frequency Range | au ~ 108 MHz
FM | Audio Output | (L)10mW + (R) 10mW (16 Ohm) Max. Volume
Radio | S/N Ratio 55 dB
Antena ‘Earphone Antena
Audio | Format/Bit Rate MPEG 1/2/2.5 Layer 3(8 Kbps ~ 320 Kbps)
Formal WMA/ASF(32 Kbps ~ 192 Kbps)
Tag Info ID3 VI, 103 \/2 2. 0, 103 V2 3. 0, D3 V2 4.0
LCD Full Graphic with 3 Color LED Backlight
Max. Output Power | (L)10mW + (R) 10mW (16 Ohm) Max. Volume
Input Built in MIC & Stereo Jack
Cuput Stereo Jack
Dimensions 39.6(W) x 93(H) x 16(D)mm
Weight 35g (without battery)
Memory Medium Built in Flash Memory
Power Source 1.5V, "AAA alkaline
Battery Life Time | Recording: rvs / Playback: cwer Brrs [Volume -10, Bitrate : 126Kbps,Contruous)
Condition to use 0C~407C
Optional Accessory | User's Manual, Earphone, 1AAA battery, USE Cable,
Line-in Cable, Installation CO, Necklace strap,
USB adaptor{Option)