1
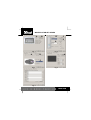
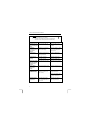
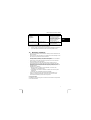
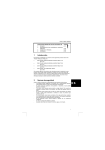
WIRELESS TABLET SERIES
U K
User’s manual
D E
F R
I T
E S
P L
N L
P T
G R
V2.0
WIRELESS TABLET SERIES
Thank you for your purchase. Register your product via our Internet site at
www.trust.com/register, so that you will be eligible for optimal guarantee and service support. You
will also be automatically informed of the development of your and other Trust products.
U K
D E
F R
I T
E S
P L
N L
P T
G R
WIRELESS TABLET SERIES
A
B
B
C
D
A
Fig. 2
Fig. 1
A
B
A
C
Fig. 3
Fig. 5
Fig. 4
TRUST WIRELESS TABLET SERIES
1
Introduction
This instruction manual is for users of the following TRUST WIRELESS TABLETS:
•
•
•
•
U K
TRUST 1200 WIRELESS SCROLL TABLET (Model 1200)
TRUST 400 WIRELESS TABLET (Model 400)
TRUST 200 WIRELESS TABLET (Model 200)
TRUST 100 WIRELESS TABLET (Model 100)
Basic knowledge of computers is necessary to install this device.
Note:
The term wireless refers to the wireless pen (and mouse) which is (are)
supplied with this device. The tablet is connected to the computer via a
wire.
Note:
The item number depends on which device you have purchased. Look at
the bottom of the tablet or on the box for the correct item number.
Note:
All the tablets have a pen. There are different accessories, depending on
the device that you have purchased, such as a mouse or a mouse with a
scroll wheel. Look at the contents of the box for the accessories supplied
with your device.
2
Approval
This device meets the essential requirements and other relevant conditions of the
applicable European directives. The Declaration of Conformity (DoC) is available at
www.trust.com/item no./ce (for example, www.trust.com/14070/ce).
This wireless device works using induction instead of radio signals. It meets the
essential requirements and other relevant conditions of R&TTE Directive 1999/5/EC
and can be used in all EU countries. There may be restrictions for the use of this
device outside of the EU. If this device is used outside of the EU, check whether this
device meets the local regulations.
3
Preparing the tablet for use
3.1
Inserting the batteries
NOTE:
Inserting the batteries incorrectly will damage the device.
NOTE:
Only replace the batteries with the same type of alkaline or rechargeable
batteries (AAA).
Read the Quick Installation Guide for more information.
4
Installation
NOTE:
The latest driver can be downloaded from www.trust.com/item no. Check
whether a new driver is available and use this for the installation.
NOTE:
Make sure all other programs are closed during the installation.
1
TRUST WIRELESS TABLET SERIES
NOTE:
Install the driver before connecting the tablet.
4.1
Installing the driver
Read the Quick Installation Guide for instructions on how to install the driver.
5
Installing the software
Corel Painter Essentials is a drawing program which you can use with your Trust
Tablet. The drawing program is on a separate CD-ROM.
5.1
Installing Corel Art Dabbler
NOTE:
Make sure all other programs are closed during the installation.
NOTE:
In the example, the CD-ROM drive is indicated by “D:\”. This may be
different for your computer.
1.
2.
3.
6
Insert the Trust installation CD-ROM into your CD-ROM drive. The drawing
program will start automatically. If it does not start automatically, carry out
the following.
a) Select 'Run' from the start menu.
b) Type [D:\English\Setup.exe] to install the program in English,
[D:\German\Setup.exe] to install the program in German or
[D:\French\Setup.exe] to install the program in French.
Follow the on-screen instructions.
After the files have been installed, click ‘Finish’ to complete the installation
process.
Using the tablet
NOTE:
Remove the pen/mouse from the work area if you use a different mouse
(serial, PS/2 or USB).
6.1
Configuring the work area
Click the tablet icon in the right-hand corner of the taskbar. Figure 1 will appear.
A
For selecting the measurement unit (inches or
centimetres).
B
For selecting the tracking mode.
6.1.1
Tracking mode
Pen (Absolute): The position of the cursor is the same for both the tablet and the
monitor.
Mouse (Relative): A small movement on the tablet produces a big movement on the
monitor. This can be used to increase the size of the work area by, for example,
using two monitors.
2
TRUST WIRELESS TABLET SERIES
6.1.2
Using the tablet with two monitors
It is possible to increase the monitor area by using two monitors.
To do so, you must have installed a video card (VGA card) with two monitor outputs
on your computer. You can also install a second video card on your computer,
although this will not work for some types of video card. If it does not work, contact
the supplier or manufacturer of your video card.
If you install a second video card, see the instruction manual provided with the video
card.
6.2
1.
2.
6.2.1
1.
2.
6.2.2
1.
U K
Configuring the pen
Click the tablet icon in the right-hand corner of the taskbar. Figure 1 will
appear.
Click the 'Buttons' tab. Figure 2 will appear.
Configuring the buttons
A
Assigns a function to button 1.
B
Assigns a function to button 2.
C
Returns to the default settings.
D
Automatic settings.
E
Configures the pen’s pressure.
Various functions can be assigned to buttons A and B on the pen. To assign
a different function, click the arrow on the right-hand side.
If you wish to undo the settings, click ‘Default’ (D) to return to the default
settings.
Configuring the sensitivity
3.
4.
The pen pressure can be altered by moving the slide bar (E) up or down.
The ‘Auto Setting’ (D) option must be unselected. The lower the percentage,
the higher the sensitivity.
Click ‘Test’ to test the pen’s pressure. An empty drawing window will appear
in which you can test the pen’s pressure.
Click the ‘X‘ in the top right-hand corner to close the window.
Click 'OK' to save the settings.
6.3
Mouse settings (only for models 1200, 400 and 200)
NOTE:
Depending on the device you have purchased, the box will contain either
a mouse or a mouse with a scroll wheel.
Click the tablet icon in the right-hand corner of the taskbar. Figure 1 will
appear.
Click the 'Mouse' tab. Figure 3 will appear.
A
Mouse pointer speed.
B
Configures the mouse for left-handed or righthanded use.
C
Function of the middle mouse button.
Configure the mouse functions in the window which is displayed.
After you have made the desired alterations, click ‘OK’ to save the settings.
If the mouse does not work optimally, you can solve this by unselecting
‘Auto Setting’ in the ‘Buttons’ tab and manually changing the settings.
Click 'OK' to save the settings.
2.
1.
2.
3.
4.
5.
6.
3
TRUST WIRELESS TABLET SERIES
6.4
1.
2.
3.
4.
Configuring the work area
Click the tablet icon in the right-hand corner of the taskbar. Figure 1 will
appear.
Click the ‘Control’ tab. Figure 4 will appear.
Alter the desired work area and click ‘OK’ to save the settings. The work
area has now been configured as desired.
Click 'OK' to save the settings.
Click ‘Full Area’ (A) to use the entire work area.
6.5
Configuring the function buttons
The function buttons F1 to F12 correspond to the function buttons on your keyboard.
The function buttons on your tablet will mostly be used for programs such as
Microsoft Word or Microsoft Excel.
All models
Function
New
F1
Open
F2
Close
F3
Save
F4
Exit
F5
Cut
F6
Copy
F7
Paste
F8
Model 200 / 400 / 1200
Function
Undo
F9
Control
F10
Panel
Explorer
F11
WWW
F12
Model 1200
Function
E-mail
F13
Word
F14
Excel
F15
F16
to
F24
6.5.1
1.
2.
3.
4.
4
Description
Opens a new document in a program.
Opens a file in, for example, a program.
Closes a file in, for example, a program.
Saves a file in, for example, a program.
Closes a program.
Cut function.
Copy function.
Paste function.
Description
Undoes the last operation.
Opens the Windows Control Panel.
Opens Windows Explorer.
Opens your Internet browser.
Description
Opens your e-mail program.
Opens Microsoft Word.
Opens Microsoft Excel.
These can be defined by the user.
Assigning functions to the function buttons (only for model
1200)
Double-click the tablet icon in the right-hand corner of the taskbar. Figure 1
will appear. Click the 'Function Key' tab. Figure 5 will appear.
Click ‘Page down’ or ‘Page up’ to scroll to the desired function button
Write the Internet address in the white bar or click ‘…’ and search for the file
name of the desired program and click the file once to select it.
Click ‘OK’ to confirm the selection.
TRUST WIRELESS TABLET SERIES
5.
7.
Select ‘Screen Hint’. The functions of the function buttons will then be visible
on the screen when these are approached using the tablet mouse or the
tablet pen.
Click 'OK' to save the settings. Repeat points 2, 3 and 4 for the other
function buttons.
Click ‘OK’ again.
7
Tablet functions
6.
All the tablets have a pen. There are different accessories, depending on the device
that you have purchased, such as a mouse or a mouse with a scroll wheel. See the
Quick Installation Guide for a summary of the tablet functions.
8
Using the software
Corel Art Dabbler is a drawing program which you can use with your Trust Tablet.
8.1
Working with Corel Art Dabbler
1.
2.
3.
4.
Open Corel Art Dabbler.
Click ‘Edit’ and select ‘Add page’
Open the tool drawer by pulling on the handle
Click the tools and the tool size (the red triangle) that you wish to use. Close
the drawer after you have made your selection.
5.
Select the colour that you wish to use from the current colour pallet at the
front of the colour drawer or open the colour drawer and select a new colour
pallet. Close the drawer when you are finished.
6.
Open the structure drawer to select the paper.
7.
Draw a picture in the drawing field. The line will become thicker by pressing
harder.
8.
Once you are finished, click ‘File’ and then ‘Save page as…’. Type the file
name and select a file format, for example, BMP.
9.
Click ‘Save’.
10.
Click ‘File’ and select ‘Quit’ to close the program.
For more information, see the Corel Art Dabbler instruction manual included on the
CD-ROM.
9
9.1
Troubleshooting
Replacing the point of the pen
When the point of the pen becomes worn, it can be replaced with one of the two
spare points which are supplied with the device.
Carry out the following to replace the point of the pen.
1.
Hold the pen firmly and carefully pull the point of the pen out of the pen
using the metal pen point remover.
2.
Insert the new point into the pen by carefully pushing it into the pen.
3.
The pen is now ready for use.
5
U K
TRUST WIRELESS TABLET SERIES
Method
1.
Read the solutions given below.
2.
Check for up-to-date FAQs, drivers and instruction
manuals on the internet (www.trust.com/Item No.)
!
Problem
Windows does not
detect a new device
after connecting the
tablet.
Cause
The computer's USB port
does not work.
Possible solution
The tablet is
marked with an
exclamation mark ‘!’
in the ‘Device
Manager’.
The tablet is connected to a
USB hub which does not
have a power supply.
Connect the tablet to a USB
hub which has a power
supply or to a USB port on
your computer.
The pen/mouse
arrow shakes.
The tablet has been placed
too close to the monitor
causing interference.
Position the tablet further
away from the monitor.
The tablet/mouse
does not do
anything.
The battery has been
inserted incorrectly.
The battery is empty.
The pen only works
in the relative mode
whilst the absolute
mode has been
selected.
The pen/ tablet
mouse reacts too
slowly or too
quickly.
The point of the pen is worn.
Reinsert the battery (see
chapter 3.1).
Replace the battery (see
chapter 3.1).
Replace the point of the pen
as described in chapter 9.1.
The pen’s sensitivity has not
been set correctly.
Adjust the pen/tablet mouse
settings (see chapter 6.2).
The mouse buttons
do not work or do
not work correctly.
The pen has not been
configured correctly which
causes the mouse to not
work correctly.
See chapter 6.3 for
instructions on how to
configure the buttons.
The default mouse
(serial or PS/2) no
longer works.
6
The default mouse has a
conflict with the pen and the
tablet, so these devices no
longer work.
Delete the USB port from
the Device Manager and
reinstall it.
Unselect ‘Auto Setting’ and
manually configure the
sensitivity in the ‘Buttons’
tab.
Remove the pen and the
tablet mouse from the tablet
when using the mouse.
TRUST WIRELESS TABLET SERIES
Does the tablet
work with other
(drawing)
programs?
The problem is not
listed here.
The latest FAQs are
available on the Internet.
The mouse function always
works, although the
sensitivity is not supported
by all drawing programs.
Contact the manufacturer of
the software program to find
out which functions the
program supports.
Go to www.trust.com/item
no. for FAQs and other
product information.
If you still have problems after trying these solutions, please contact one of the Trust
Customer Care Centers. You can find more information at the back of this instruction
manual. Please have the following information available:
•
The item number. This can be found on the bottom of the tablet or on the box.
•
A good description of what does not work and when the problem occurs.
10
Warranty conditions
- Our products have a two-year manufacturer's warranty which is effective from the
date of purchase.
- If there is a fault, return the product to your dealer and include a description of the
fault, the proof of purchase and all the accessories.
- During the warranty period, you will receive a similar product if one is available. If
no similar product is available, your product will be repaired.
- Please contact our help desk for missing components, such as the instruction
manual, software or other components.
- The warranty becomes invalid if the product has been opened, if there is
mechanical damage, if the product has been misused, if alterations have been
made to the product, if the product has been repaired by a third party, in the case
of negligence or if the product has been used for a purpose other than that
originally intended.
- Excluded from the warranty:
• Damage caused by accidents or natural disasters, such as fire, flood,
earthquakes, war, vandalism or theft.
• Incompatibility with hardware or software not stated in the minimum system
requirements.
• Accessories, such as batteries and fuses (if applicable).
- Under no circumstances will the manufacturer be held responsible for any
incidental or consequential damage, including the loss of income or other
commercial losses resulting from the use of this product.
Copyright disclaimer
It is forbidden to reproduce any part of this instruction manual without the permission
of Trust International B.V.
7
U K
SERVICE CENTRE
24 HOURS free service: www.trust.com
Residents in the UK and Ireland should contact:
UK Office
Mon - Fri
Phone
+44-(0)845-6090036
From 8:00 - 16:00
Fax
+31-(0)78-6543299
I residenti in Italia possono contattare:
lun - ven
Ufficio italiano
9:00 – 17:00
Telefono
+39-(0)51-6635947
Fax
+31-(0)78-6543299
Les habitants de la France et de l’Afrique du Nord peuvent contacter :
Bureau français
Lundi-vendredi
Téléphone
+33-(0)825-083080
De 9:00 à 17:00
Fax
+31-(0)78-6543299
Kontaktadresse für Einwohner Deutschlands:
Deutsche Geschäftsstelle
Mo – Fr
Telefon
+49-(0)2821-58835
9:00 - 17:00
Fax
+31-(0)78-6543299
Los habitantes de España pueden ponerse en contacto con:
Oficina española
lun – viernes
De las 9:00 a las 17:00
Teléfono
+34-(0)902-160937
horas
Fax
+31-(0)78-6543299
Osoby mieszkające na terytorium Polski powinny skontaktować się:
Biuro w Polska
Pon do pią
Tel
+48-(0)22-8739812
w godz 09:00-17:00
Fax
+31-(0)78-6543299
Inwoners van Nederland kunnen contact opnemen met:
Kantoor Nederland
ma – vr
Tel
+31 (0)78-6543387
9:00 - 17:00 uur
Fax
+31-(0)78-6543299
All other countries / Alle anderen Länder / Tous les autres pays
Tutti gli altri paesi / Todos los demás países / Alle andere landen
Mon - Fri
From 9:00 - 17:00
European Head Office
Phone
+31-(0)78-6549999
Fax
+31-(0)78-6543299