1
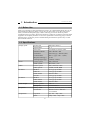
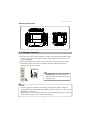
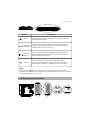
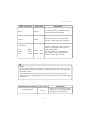
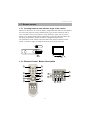
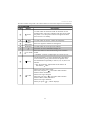
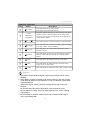
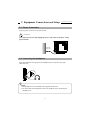
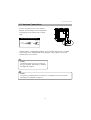
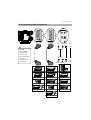
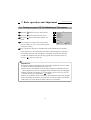
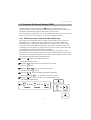
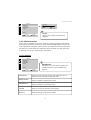
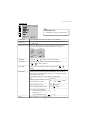
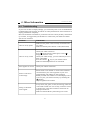
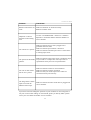
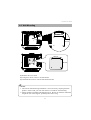
20"
LCD TV
User's Manual
Notices:
1 Please read this manual cautiously and completely
before operating your LCD TV.
2 Please kindly reserve this user's manual because
you may need it in the near future.
3 Please record the LCD TV's model number and serial
numbers in the following blanks.
* You can find the model No. on the label attached on the
back of the LCD TV and quote this information to your
dealer when you require service.
Model number:
Serial number :
Important Safety Instructions
1
2
3
4
5
6
7
8
9
10
11
12
13
14
15
16
17
18
19
20
Read these instructions.
Keep these instructions.
Heed all warnings.
Follow all instructions.
Do not use this apparatus near water.
Clean only with dry cloth.
Do not block any ventilation openings. Install in accordance with the manufacturer's
instructions.
Do not install near any heat sources such as radiators, heat registers, stoves, or other
apparatus (including amplifiers) that produce heat.
Do not defeat the safety purpose of the polarized or grounding type plug. A polarized
plug has two blades with one wider than the other. A grounding type plug has two
blades and a third grounding prong. The wide blade or the third prong are provided
for your safety. If the provided plug does not fit into your outlet, consult an
electrician for replacement of the obsolete outlet.
Protect the power cord from being walked on or pinched particularly at plugs,
convenience receptacles, and the point where they exit from the apparatus.
Only use attachments/accessories specified by the manufacturer.
Use only with the cart, stand, tripod, bracket, or table specified
by the manufacturer, or sold with the apparatus. When a cart is
used, use caution when moving the cart/apparatus combination to
avoid injury from tip-over.
Unplug this apparatus during lightning storms or when unused for long periods of time.
Refer all servicing to qualified service personnel. Servicing is required when the
apparatus has been damaged in any way, such as power-supply cord or plug is
damaged, liquid has been spilled or objects have fallen into the apparatus, the apparatus
has been exposed to rain or moisture, does not operate normally, or has been dropped.
Apparatus shall not be exposed to dripping or splashing and no objects fill with liquids,
such as vases, shall be placed on the apparatus.
To reduce the risk of electric shock, do not remove cover (or back). No user-serviceable
parts inside. Refer servicing to qualified service personnel.
The readily operable appliance coupler will serve as the disconnect device of this
apparatus.
The apparatus must be connected to a mains socket outlet with a protected earthing
connection.
Keep 10cm minimum distance around the apparatus for sufficient ventilation.
Spent or discharged batteries must be recycled or disposed of properly in compliance
with all applicable laws. For detailed information, contact your local county solid waste
authority.
CAUTION
RISK OF ELECTRIC SHOCK
DO NOT OPEN
WARNING: TO REDUCE THE RISK OF FIRE OR
ELECTRIC SHOCK, DO NOT EXPOSE THIS
PRODUCT TO RAIN OR MOISTURE.
The lightning flash with arrow head symbol, within an equilateral triangle, is
intended to alert the user to the presence of uninsulated "dangerous voltage"
within the product's enclosure that may be of sufficient magnitude to constitute
a risk of electric shock to persons.
The exclamation point within an equilateral triangle is intended to alert the
user to the presence of important operating and maintenance (servicing)
instructions in the literature accompanying the appliance.
Caution: These servicing instructions are for use by qualified service personnel only.
To reduce the risk of electric shock do not perform any servicing other than that
contained in the operating instructions unless you are qualified to do so.
Maintenance
If any of following occurs, unplug the LCD TV and contact your distributor or qualified
technician to repair the LCD TV:
1 The power cord or plug is damaged.
2 Liquid enters the LCD TV.
3 LCD TV is damp or wet.
4 LCD TV is damaged.
5 LCD TV malfunctions.
Note: DO NOT attempt to repair the LCD TV by yourself. There are high voltages inside
the cabinet which poses a risk of electric shock.
Changing parts
If the LCD TV requires new parts, ask the technician for written proof the new parts
are specified by the manufacturer and function are the same as the original parts.
Safety inspection
After the LCD TV is repaired, be sure to ask the technician (in accordance with the
manufacturer's requirements) to conduct a routine safety inspection to make sure the
LCD TV is safe. If the LCD TV has been used longer than its life, please contact
qualified technician for repair.
User's record
You can find the serial number and model on the back of the LCD TV. Be sure to provide
the model and serial number when you contact your distributor.
Note: Please read and comply with all warnings, cautions, and instructions in the manual
thoroughly. Failing to do so may void your warranty. Modifying the LCD TV in such a
manner not approved by this manual will also void your warranty.
FCC Compliance Statement
This device complies with Part 15 of the FCC Rules. Operation is subject to the following
two conditions:
(1) this device may not cause harmful interference, and (2) this device must accept any
interference received, including interference that may cause undesired operation.
Note: This equipment has been tested and found to comply with the limits for a Class B
digital device, pursuant to part 15 of the FCC Rules. These limits are designed to provide
reasonable protection against harmful interference in a residential installation. This
equipment generates uses and can radiate radio frequency energy and, if not installed and
used in accordance with the instructions, may cause harmful interference to radio
communications. However, there is no guarantee that interference will not occur in a
particular installation. If this equipment does cause harmful interference to radio or
television reception, which can be determined by turning the equipment off and on, the
user is encouraged to try to correct the interference by one or more of the following
measures:
Reorient or relocate the receiving antenna
Increase the separation between the equipment and receiver
Connect the equipment into an outlet on a circuit different from that to which
the receiver is connected
Caution: To comply with the limits for an FCC Class B computing device, always use
the signal cord and power cord supplied with this unit. The Federal Communications
Commission warns that changes or modifications to the unit not expressly approved by
the party responsible for compliance could void the user's authority to operate the
equipment.
European Notice
Products with the CE Marking comply with both the EMC Directive (89/336/EEC),
(93/68/EEC) and the Low Voltage Directive (73/23/EEC) issued by the Commission
of the European Community.
Contents
Important Safety Instructions
I. Introduction
1-1 Before Use
1-2 Specifications
1-3 Package Contents
1-4 Installation
1-5 Front panel controls
1-6 Back panel connections
1-7 Remote control
1-7-1 Inserting batteries and effective range of the remote
1-7-2 Remote Control Button Description
01
01
02
03
04
05
07
07
07
II. Equipment Connections and Setup
2-1 Power Connection
2-2 Connecting with Headphone
2-3 Antenna Connections
2-4 Connecting Other Components
11
11
12
13
III. Basic operation and Adjustment
3-1 Turning on your LCD TV & Watching a TV program
3-2 Using the On Screen Display(OSD)
3-2-1 OSD Main Menu contents & OSD switch loop
3-2-2 OSD Instruction
3-2-2-1 DISPLAY
3-2-2-2 ADVANCED
3-2-2-3 TV
3-2-2-4 AUDIO
3-2-2-5 SYSTEM
14
15
15
16
16
17
18
20
20
IV. Other Information
4-1 Troubleshooting
4-2 Wall Mounting
21
23
20" LCD TV User's Manual
1 Introduction
1-1 Before Use
Please you go through our brief specification as below to get a understanding about our LCD TV
basic feature and connectivity before you use our LCD TV to watch TV or other video source.
When you skimmed through this page, I think it will bring you to know about our product
specification and if you want to know more about how to adjust our TV and how to link up which
equipment can completely maximize our LCD TV's performance. Please keep going to read the
following pages. At last after you have finished reading the instructions, put the away in a safe
place for future reference.
1-2 Specifications
Display panel
Tuner
Video
SCART 1
SCART 2
Audio Output
Requlation
Temperature
Screen Size
Aspect Ratio
Pixel Pitch
Number of Pixels
Luminance
Contrast Ratio
Response time (typ.)
Viewing angles (typ.)
Colour system
Audio system
Colour system
Video system
RGB In
Video In
Audio In/Out
TV Out
RGB In
Video In/Out
Audio In/Out
Built-in speaker
Headphone
Safety / EMC
Accessories
Operation
Stock
01
408 (H) x 306 (V)
4:3
0.2125(H) x 0.6375(V) mm
640 x R.G.B. x 480
450 nits (typ.) / 400 nits (min.)
400 : 1 (typ.) / 300 : 1 (min.)
16 ms
150 (H) / 130 (V)
PAL, SECAM
B/G, D/K, I, L/L'
PAL, SECAM, NTSC
CUBS, S-VHS, RGB
0.7 Vp.p @ 75 Ohm
1.0 Vp.p @ 75 Ohm
500 m V Rms
1.0 Vp.p @ 75 Ohm
0.7 Vp.p @ 75 Ohm
1.0 Vp.p @ 75 Ohm
500 m V Rms
3W x 2
3.5 mm Jack x 1
UL/cUL, TUV-GS, FCC, CE, BSMI
Remote control / Batteries /
User Manual
0 C 0% ~ 40 C 90%
-20 C 10% ~ 60 C 90%
20" LCD TV User's Manual
Dimensional Overview
94.6 mm
307 mm
409 mm
460 mm
118 mm
476.4 mm
1-3 Package Contents
Since the glass can be easily scratched or broken, please handle the product gently.
Never place the unit on a surface with the glass facing downwards unless it is on
protective padding.
When opening the carton, please check the product is in good condition and all
standard accessories and items are included. (Remote control and two AAA
batteries; LCD TV user manual)
1
2
3
4
5
6
7
8
9
0
R
P
P
IMPORTANT: Save the original box
and all the packing material for feature
shipping needs.
NOTE:
1.In some regions or countries, even through partially power outlets' shapes are
totally different from their explanatory drawings, their connectivity and operation
methods are all the same.
2.Ddepending on your purchasing region we will put required accessories inside our
product accessory box for our users use/connecting.
02
20" LCD TV User's Manual
1-4 Installation
Please read the user manual carefully before performing the installation.
The power consumption of the display is approximately 75 watts. When an
extension cord is required, use one with the correct power rating. The cord
must be grounded and the grounding feature must not be defeated.
The product should be installed on a flat surface to avoid tipping. Space should be
maintained between the back of the product and the wall for proper ventilation. If
you would like mount the TV to the wall, please see Preparing the LCD for Wall
Mounting, for additional information.
Avoid installing the product in the kitchen, bathroom or other place with high
temperature or high humidity dust or smoke, so as not to shorten the service life
of the electronic components.
Please ensure the product is installed with the screen in landscape orientation. Any
90 clockwise or counterclockwise installation may induce poor ventilation and
successive component damage.
03
20" LCD TV User's Manual
1-5 Front panel controls
POWER / Remote
sensor window
Standby
indicator
Button
POWER / Remote
sensor window
Headphone
Connector
Headphone
Description
Use this button to switch the LCD-TV between on and
standby modes.
The power indicator will glow green when the power is
on.
The power indicator will glow red when the LCD-TV
is in standby.
The power indicator will not glow if the power cord
is unplugged.
Color Code
Description
Green
For connecting the earphone.
04
20" LCD TV User's Manual
Button
Description
MENU
Use this button to display and adjust the software-controlled
features of this LCD-TV.
PROGRAM
FUNCTION
Use these two buttons to switch between preprogrammed
channels. When the OSD MENU was turn ON, use these to
switch between functions to adjust.
VOLUME
ADJUST
Use these two buttons to make the sound softer and louder.
When the OSD MENU was turn ON, use these to adjust the
particular value of a function.
SOURCE
Use this button to change between video input signals.
Press the SOURCE button repeatedly to scroll through the
following list of inputs: TV, VIDEO, SCART 1, SCART 2.
NOTE:
As long as either
button or
button is pressed whatever the inputted
source from a video source to your LCD set, It will immediately turns to TV inputted
source to display image on the screen.
P
P
1-6 Back panel connections
05
20" LCD TV User's Manual
Video Connectors
Description
Color Code
Scart 1
Black
Use this connectors to attach the decoder
or other audiovisual equipment.
Scart 2
Black
Use this connectors to attach the VCR
recorder or other audiovisual equipment.
White
S-Video: 1 DIN, 2 RCA jacks. S-Video is
superior to Composite Video but not as
good as Component.
AV: 3 RCA jacks. Use the composite
video cable to attach a popular device
such as a VCR or game console.
Video Input
LeftAudio
RightAudio
AV
S-Video Yellow Black
Red
NOTE:
Video inputs share the same AUDIO- In socket(R/L) with S-Video on our LCD TV
sets. To prevent malfunction, do not use "Video in" and "S-Video" at the same time
on the same socket.
In our interior detection program, we setup the S-Video input terminal as a top
priority over the AV input terminal. Only S-Video output will be seen with this kind
of connection.
Antenna input Connector
Color Code
Description
VHF / UHF Input
Silver
Attach your TV antenna or analog
cable service here. (75ohm coaxial
cable with F-type connector)
06
20" LCD TV User's Manual
1-7 Remote control
1-7-1 Inserting batteries and effective range of the remote
Remove the back cover to reveal the battery compartment and make sure the batteries
are inserted the right way round. Suitable battery types for this remote are UM-4,
AAA, IEC R03 1.5V. Do not combine a used, old battery with a new one or mix
battery types. Remove dead batteries immediately to prevent acid from leaking into
the battery compartment. Dispose of them in a designated disposal area.
The performance of the remote control will deteriorate beyond a distance of five
meters or outside an angle of 30 degrees from the centre of the television.
30
1-7-2 Remote Control Button Description
1
2
5
1
2
3
4
5
6
7
8
9
0
R
6
9
3
14
4
18
7
10
17
8
P
15
16
11
P
13
12
21
07
20
19
20" LCD TV User's Manual
The index number corresponds to the callout number for each button depicted in the illustration.
TV FUNCTION
Index
Button
1
Power
2
Mute
3
4
Number
Button Pad
R (Return)
5
6
7
8
Description
Use this button to switch the LCD-TV between on and
standby modes. The power indicator will glow green when
the power is on. The power indicator will glow red when
the LCD-TV is in standby.
Use this button to turn the volume off completely.
Press two digits for channels 01 through 99.
Use this button to see the previous channel.
Turns the on screen information display on.
Pic-mode
Press this button to select from among 5 user situation
modes.
< Standard
Nature High bright
Cinema User >
Sleep
The SLEEP feature is used to automatically shut off this
LCD-TV after a preset period of time has passed. Press
the SLEEP button repeatedly to select 0, 30, 60, 90 or 120
minutes.
< OFF 30 minutes 60 minutes 90 minutes
120 minutes OFF >
Audio
When receiving a stereo signal.
Each time you press "
", the audio mode switches
between Stereo and Mono.
When receiving a bilingual.
Each time you press "
", the audio mode switches
between Mono, Dual, and Dual 2.
When receiving a monaural.
When you press "
", "Mono" displays.
08
20" LCD TV User's Manual
OSD FUNCTION
Index
Button
Menu
9
/
10
(Volume)
11
P
/
P
(Channel)
12
Source
Description
Press this button to activate the OSD menu. To exit, press
the button again.
Press these buttons to Adjust volume up/down. When OSD
menu had turned on. These buttons will be became to
for OSD to change direction to adjust the value and confirm
your selection.
Press these buttons to Select channel up/down.When
OSD menu had turned on. These buttons will be became
to
for OSD to change direction to select item you
want to adjust.
Use this button to choose the video input sources:
<TV Video Scart 1 Scart 2 TV >
NOTE:
As long as either P
button or P
button is pressed whatever the inputted
source from a video source to your LCD set, It will immediately skip back to TV
inputted source to display image on the screen.
09
20" LCD TV User's Manual
ADDITION FUNCTION
Index
Button
13
14
15
Teletext
Colour
(Red/Green/
Yellow/Blue)
Description
Press this button to activate Teletext.
Press again to mix Teletext with TV.
When the Teletext is turned on. You can select the pages
displayed in the coloured brackets at the button of the
screen by pressing the corresponding colour (R/G/Y/B)
on the remote control.
Page Up/Page Down Press these buttons to select next page or previous page.
16
Subpage
Press this button to reveal the secondary page by entering
its 4-digit number. (when available)
17
Reveal
Press this button to reveal hidden information such as
answers to a quiz.
18
Presets
Press this button to store your favorite Teletext pager in
memory and recall them quickly by using the colour
button.
19
Hold
Press this button to hold the scrolling of text pages.
20
Size
Press this button to change the font size: Full screen,
Upper screen, Lower Screen.
21
Index
Press this button to display the main index. (usually P.100)
[Caution]
The remote control should be kept dry and away from heat sources. Avoid
humidity.
If the display responds erratically to the remote control or does not respond
at all, check the batteries. If the batteries are low or exhausted, replace them
with fresh batteries.
When not using the remote control for a long period of time, remove the
batteries.
Do not take apart the batteries, heat them, or throw them into a fire.
Do not subject the remote control to undue physical stress, such as striking
or dropping it.
Do not attempt to clean the remote control with a volatile solvent. Wipe it
with a clean, damp cloth.
10
2 Equipment Connections and Setup
20" LCD TV User's Manual
2-1 Power Connection
Plug the power cord into an AC wall socket.
[Caution]
Turn off your LCD TV and unplug the power cord when not used for a long
period of time.
Household
power outlet
2-2 Connecting with Headphone
Plug the headphone mini-plug into the headphone jack location on the right
side of the set.
NOTE:
1. The headphone is not included in the supplied accessories.
2. No sound will be heard from the main unit speakers when connecting the
headphone set.
11
20" LCD TV User's Manual
2-3 Antenna Connections
To enjoy a clearer picture, use an outdoor
antenna. The following is a brief explanation
of connecting to an antenna with a coaxial
cable.
VHF Only Or VHF / UHF Or Cable
VHF / UHF
75-Ohm
Coaxial Cable
Rear of TV
Antenna cables - commercially available. If your outdoor antenna uses a 75-Ohm
coaxial cable with a standard DIN 45325 plug (IEC 169-2), Plug it into the IN
terminal at the rear of the TV.
NOTE:
Consult the Dealer or Service Center for
the type of splitter, RF switch or combiner
that might be required.
NOTE:
To watch TV program, please see "Section 3.1 Turning on your LCD TV and
watching a TV program" on page 14.
12
20" LCD TV User's Manual
2-4 Connecting Other Components
white
white
NOTE:
The S-Video
terminal has
priority over
the AV terminal,
when the
"Video" to be
connected.
red
red
yellow
black
or
red
Video
white
Audio(L) Audio(R)
S-Video
VCR
Decoder
Game console
Video disc player
Video disc player
Video disc player
Camcorder
VCR
Decoder
Satellite receiver
Camcorder
Satellite receiver
13
VCR
20" LCD TV User's Manual
3 Basic operation and Adjustment
3-1 Turning on your LCD TV & Watching a TV program
1
Press the
TV
button to turn on the LCD TV.
2
Press the
button and select TV source.
3
Press the
mode.
button and choose OSD to TV
4
Use "Country" to choose your living country.
COUNTRY
CH-SCAN
MANUAL SCAN
PR-EDIT
FINE TUNE
RECALL
(If your country or city is not in the list, please
: SELECT
: ENTER
MENU: EXIT
choose the "other")
5
Use "CH SCAN" function to automatically search and add all TV channels
to the channel list. (This will take a few minute, the tuning process will find
all available channels.) The "PR-EDIT" will display on the screen when the
"CH SCAN" finalized. You can edit the program list now (Please see P.19)
or press
button to watch TV.
IMPORTANT:
If no picture situation displayed on the screen after powered on your set. Please
you check the following conditions are ok or not.
1 Please check to see whether or not the video cable that connected from your
video equipment to your set is plugged firmly and without any miss-plugged?
2 Please you make sure whether or not this display source is the very one you
selected correctly by switching the
button?
If above two conditions all have been done and without any other miss-plugged
or miss-switching circumstance occurred after you checked, please you directly
contact with your local dealer for further after-service assistance.
14
20" LCD TV User's Manual
3-2 Using the On Screen Display (OSD)
General end users can directly press the
button to switch the input source
and know about presently what input source linking up with their sets by the source
information indication that appeared on the left top of the screen.
After selecting the system mode, you can use OSD menu to adjust your LCD TV and
the LCD TV will save your settings, even if you turn off the television.
3-2-1 OSD main menu contents & OSD switch loop
By and large, our OSD menu mainly includes 5 main menus for users select and
adjustment. These 5 main menus of our OSD menu are respectively DISPLAY,
ADVANCED, TV, AUDIO and SYSTEM and so on. What is more, These 5 main
menus also include some adjustment functions inside their sub menus. With a view
to mastering your set quickly, we suggest that our end users need to spend their time
in studying this user manual cautiously and completely.
Each adjustment function of the each sub menu inside each one of above 5 main
menus is clearly and evidently illustrated on our user manual. Please you refer to our
illustrations to practically manipulate your set and you will understand how to switch
our OSD menu and each function adjustment hint.
1
Press the
button and the Main Menu will
be displayed on the screen.
2
Press the
Press the
3
Press the
/
P
button to select the menu you want.
P
button.
/
P
button to select a menu option
P
and then press the
4
Press the
/
button.
buttons to make appropriate adjustments.
(You can Press the
5
Press the
/
P
P
buttons to select other items)
button to exit or after 30 seconds the OSD screen
will disappear automatically.
P
P
P
P
select Main Menu
select Sub Menu
back to last Menu
or
P
adjustment
P
select next function
adjustment
back to last Menu
15
20" LCD TV User's Manual
DISPLAY
CONTRAST
18
CONTRAST
BRIGHTNESS
SHARPNESS
COLOR
: SELECT
RECALL
: SELECT
: ENTER
MENU: EXIT
: ADJUST
MENU: BACK
NOTE:
Items in gray cannot be selected and
adjusted.
3-2-2 OSD Instruction
With a view to assuring our end users' LCD sets working normally and maximize
their display performance without any other artificial maladjustment when our end
users adjusted our OSD menu. Please read our user manual cautiously firstly and it
will help you to understand some adjustment hints and make you clear about how
to fine-tune your set up to high display performance.
3-2-2-1 DISPLAY
DISPLAY
CONTRAST
BRIGHTNESS
SHARPNESS
COLOR
RECALL
: SELECT
: ENTER
MENU: EXIT
IMPORTANT:
Adjust the screen with the "Pic-mode" into
"USER" function to use the "DISPLAY"
function.
CONTRAST
Adjust to increase picture contrast and deepen the color, or
decrease picture contrast and soften the color.
BRIGHTNESS
Adjust to brighten or darken the picture.
SHARPNESS
Adjust to sharpen or soften the picture.
COLOR
Adjust to increase or decrease color intensity.
RECALL
Resets all settings to the factory default.
16
20" LCD TV User's Manual
3-2-2-2 ADVANCED
ADVANCED
GREEN ENHANCEMENT
SKY ENHANCEMENT
RED ENHANCEMENT
SKIN TONE
GAMMA
RECALL
: SELECT
: ENTER
MENU: EXIT
GREEN ENHANCEMENT Select to give the white colors a neutral tint.
SKY ENHANCEMENT
Select to give the white colors a blue tint.
RED ENHANCEMENT
Select to give the white colors a red tint
SKIN TONE
Use this function to choose the favorite skin color.
GAMMA
Changes the color space.
RECALL
Resets all settings to the factory default.
IMPORTANT:
Adjust the screen with the "Pic-mode" into "USER"
function to use the "ADVANCED" function.
17
20" LCD TV User's Manual
3-2-2-3 TV
TV
IMPORTANT:
Available for TV input source only.
: SELECT
COUNTRY
CH-SCAN
MANUAL SCAN
: ENTER
MENU: EXIT
Use this function to select the country of you inhabit.
Use this function to automatically search and all TV channels
to channel list.
Press the
button to enter the manual scan table. You can
use the following item to search and edit the TV channel.
SEARCH
471.25MHz
CHANNEL
C21
SYSTEM
PROG NO
PAL-BG
P21 ABCDE
SAVE
EXECUTE
: SELECT
: ADJUST
MENU: BACK
SEARCH
Press the "
CHANNEL
If you know the number of the channel. Then press the
"
""
""
" button to search TV channel.
" button to search it.
SYSTEM
Select the correct display system by pressing the "
button.
PROG NO
Channel names will be assigned automatically when channel
information is broadcast, these names can be changed, allowing
you to assign new names.
Following to explain how to assign the channel name
NTSC-M
PAL-BG
PAL-DK
PAL-I
SECAM-BG
SECAM-L
To
Then press
change program number, select a
the "
""
letter, number or symbol
P
P
move on the next letter,
the "
" button
move back the previous letter
the "
" button
The characters available are:
Letters of the alphabet (A, B, C, ...... , Z)
Numbers (0, 1, 2, ...... , 9)
Special characters (space, , , , * , )
SAVE
""
Select "DONE" to save this program.
18
"
SECAM-DK
" button
20" LCD TV User's Manual
PR-EDIT
Press "
" button to turn up the PR-EDIT table.
PROG
CH
FREQ
SYSTEM
NAME
P1
P2
P3
P4
P5
C21
C22
C23
-----
471
479
487
-----
PAL-BG
PAL-BG
PAL-BG
-----
AAAAA
BBBBB
CCCCC
-----
: SELECT
: SELECT
R : ENTER
: ENTER
MENU: EXIT
To
Process
Swap two
programs.
1. Press "R" button to highlight the channel you wish to
change in gray.
2. Use the "
""
" button to select which
program number to switch.
3. Press "R" button again to swap this two program.
P
P
Cancel
useless
program
1. Press "
""
" to select which program you want
to cancel.
2. Use " " button to cancel it.
Edit
program
1. Press "
""
" to select which program you want
to edit.
2. Use "
" button to enter the "Manual Scan" table.
3. Follow Manual Scan process to edit. (please see P.18)
4. Press "
" button to back to PR-EDIT table.
Quit
PR-EDIT
table
P
P
P
Press "
P
" button to back to previous menu.
FINE TUNE Manually adjust the frequency for variation of each channels to get
better image quality, but it will be fixed the frequency after adjustment
unless re-scan.
19
20" LCD TV User's Manual
3-2-2-4 AUDIO
AUDIO
BASS
TREBLE
BALANCE
AUDIO MODE
RECALL
: SELECT
: ENTER
MENU: EXIT
BASS
TREBLE
BALANCE
AUDIO MODE
Adjusts the volume of bass.
Adjusts the volume of treble.
Adjusts the balance of left and right sound channels.
Select the audio situation
RECALL
Resets all settings to the factory default.
OFF
Loudness
Surround
Loudness/Surround
3-2-2-5 SYSTEM
SYSTEM
LANGUAGE
AUTO CONTRAST
RECALL
: SELECT
: ENTER
MENU: EXIT
LANGUAGE
Changes the language of the OSD menu. Options include
English, Deutsch,
,
, Italiano,
,
,
AUTO CONTRAST Use this function ,the LCD will to adjust the contrast
automatically, when there are obvious change in picture.
RECALL
Resets all settings to the factory default.
20
20" LCD TV User's Manual
4 Other Information
4-1 Troubleshooting
If your LCD set fails to display abruptly, you can directly refer to our recommendation
troubleshooting hints as below to find out its exactly defected root cause and restore its
display performance completely.
But if the anomalous circumstance you met has not been solved yet after you followed
up our hints, we suggest that you had better to contact with your dealers for further
after service assistance.
Problem
Check item
There is no any power.
Make sure AC power cord is securely connected to the
AC socket.
Make sure the DC power button is ON (Green LED).
There is no any sound.
Check your audio connection.
Press
on the remote control again, so that
disappears from the screen.
Check your audio settings, your TV audio may be set to
SAP or minimum.
Press the Volume
key on your remote control
Make sure that headphones are not connected.
Snow appears on screen.
Check your antenna connection.
Power is ON but no
screen image.
Wrong or abnormal
colors appear.
Please check to see whether or not the video cable that
connected from your video equipment to your set is
plugged firmly and without any miss-plugged?
Please you make sure whether or not this display source
is the very one you selected correctly by switching the
button?
Adjust brightness and contrast.
If any colors (red, green, or blue) are missing, check the
video cable to make sure it is securely connected. Loose
or broken pins in the cable connector could cause an
improper connection.
Make sure that the HUE system settings are correct.
21
20" LCD TV User's Manual
Problem
Check item
Remote Control does not
work.
Make sure batteries are inserted correctly.
Batteries could be weak.
Duplicate or "Ghost"
channels located during
scan.
Use the " CH ADD/ERASE " function to " ERASE "
duplicate or unwanted channels from the database of
active channels.
You cannot see a picture.
Make sure that the power cord is plugged into a
grounded electrical outlet.
Make sure that the power button is turned on.
Make sure that the selected input source is connected to
a working input source.
The picture has abnormal
patterns.
Make sure that the video input source is within the range
of your LCD TV. Compare the video input source's
specifications with your LCD TV specifications.
You can not hear sound
but can see a picture.
Make sure that the volume is not turned down.
Make sure that the sound is not muted.
Make sure that your audio input source cables are
connected securely and correctly.
The image from S-Video
input but to hear the
different sound input.
Make sure that the S-Video sound cable is plugged into
correct terminal.
If you have still some ambiguous questions in your mind that is concerning how to
use your LCD set after reading our user manual, please you directly make a phone
call to your local dealer for further service assistance.
22
20" LCD TV User's Manual
4-2 Wall Mounting
100 mm
100 mm
100 mm
100 mm
(1) Remove this TV's stand.
(2) Using four "4x10" screws to fix wall mount.
(3) And hook the LCD TV onto the wall mount bracket.
NOTE:
1. The rack for wall-mounting installation is not an accessory coupling with this
product. Please order your own rack if there is a need for wall mounting.
2. Please purchase a standard wall-mounting rack. Be sure to check the maximum
weight the rack could support, preferably more than 14 kg.
23