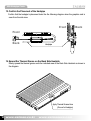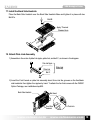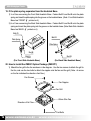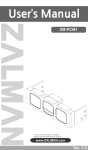
1
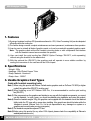
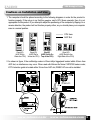
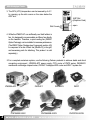
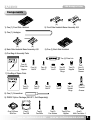
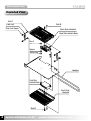
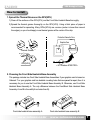
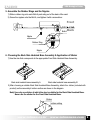
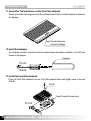
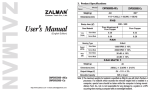
VGA Heatpipe Cooler
This Manual Contains the Following Languages for Product
Installation :
●
English Language
●
For a better understanding of the installation process, watch the installation video
clip at our website (www.zalman.co.kr)
www.zalman.co.kr
www.zalmanusa.com
VGA Heatpipe Cooler
1. Features
1) By using a heatpipe, heat from GPU(sometimes referred to VPU, Video Processing Unit) can be dissipated
efficiently without a cooling fan
2) The fanless design ensures complete noiselessness and semi-permanent, maintenance-free operation.
3) It can be used on virtually all kinds of graphics cards, so it can be reused with upgraded graphics cards.
Note : The graphics cards without the heatsink mounting holes or with components that interfere
with the heatsink cannot accommodate this product.
4) User can install the quiet cooling fan (ZM80C Option Package 'ZM-OP1', sold separately)
without using the bracket for fan attachment.
5) With the optional fan (ZM-OP1), the graphics card will operate in more stable condition by
cooling the memories on the card as well as VGA chipset.
2. Specifications
- Weight : 325g
- Heatpipe : Gold Plated Copper Tube
- Dissip. Material : Aluminum
- Dissip. Area : 1200Cm2
3. Usable Graphics Card Types
Cards with heatsink mounting holes
Note 1) When using this product with Matrox Parhelia series graphics cards or GeForce FX 5800 (or higher
model), the optional fan (ZM-OP1) must be used.
Note 2) When installing on an ATI Radeon 9800 Pro, it is recommended to use the quiet cooling
fan (ZM-OP1).
Note 3) If the components on the graphics card interfere in any way with the heatsink components, you cannot
use this heatsink. In such a case, you should immediately stop installation and return the product.
Note 4) Since the heatsink weighs 325g, the graphics card equipped with this heatsink should be attached
tightly inside the PC case with a screw when installing. Also special care should be taken while the
computer is moved. (Zalman Tech. Co., Ltd. is not responsible for any damage to a system or a
graphics card occurring when moving a computer.)
Note 5) The heatsink occupies an adjacent PCI slot.
Note 6) Before using this product for any other VGA chipset, please check the compatibility at Zalman’s
website(www.zalman.co.kr)
2
www.zalman.co.kr
www.zalmanusa.com
VGA Heatpipe Cooler
Cautions on Installation and Use
1. The computer should be placed according to the following diagrams in order for the product to
function properly. If the set-up is so that the graphics card’s GPU faces upwards, then it is not
appropriate for this product. If you attempt to adjust the positioning of the computer by flipping it in a
reverse direction, the product will not function properly either, so you should place your computer
case in a normal position.
CPU Here
AGP Slot
Good (O)
(AGP Slot is
Under the CPU)
Good (O)
(AGP Slot is
Under the CPU)
Bad (X)
(AGP Slot is On
Top of the CPU)
Good (O)
(AGP Slot is to the
Right Side of the CPU)
2. As shown in figure, if the northbridge cooler is 25mm tall(or bigger)and located within 5.5mm from
AGP slot, an interference may occur. When used with Zalman No Noise CNPS7000 series cooler,
if CPU retention guide is located within 35 mm from AGP slot, ZM80C-HP can not be installed.
www.zalman.co.kr
www.zalmanusa.com
3
VGA Heatpipe Cooler
3. The GPU (VPU) temperature can be lowered by 4~5℃
by opening up the slot covers on the case below the
AGP slot .
AGP Slot
(Graphics Card)
open
Slot Covers
4. While the ZM80C-HP can sufficiently cool itself without a
fan, it is designed to accommodate an 80mm fan directly
on the heatsink. Therefore, a quiet cooling fan (ZM80C
Option Package) can be installed to increase performance.
(The ZM80C Option Package (see Components section, #9)
is composed of a slim 80mm fan [80x80x15], a fan grill,
and necessary parts for attaching. This product is sold
separately.)
5.For a complete noiseless system, use the following Zalman products to achieve stable and silent
computing environment : ZM300A-APF power supply, CPU cooler of CNPS series, ZM-NB47J
mainboard northbridge chipset cooler, ZM-2HC1 heatpipe HDD cooler and ZM-F1 system fan.
ZM300A-APF
CNPS6000-XXXX
4
www.zalman.co.kr
ZM-2HC1
ZM-NB47J
CNPS6500B-XXXX
ZM-F1
CNPS7000-XXXX
www.zalmanusa.com
VGA Heatpipe Cooler
Components
(A)
1) One (1) Front Side Heatsink
(B)
2) Front Side Heatsink Base Assembly A,B
3) One (1) Heatpipe
(A)
(B)
4) Back Side Heatsink Base Assembly A,B
5) One (1) Back Side Heatsink
6) One Bag of Assembly Parts
Two (2) Plate Link
Four (4)
Plate Link
Nipples
Four (4)
Bolt-B
Four (4)
Bolt-C
Two (2)
Nut-A
Two (2)
Rubber
Rings
7) One Bag of Spare Parts
Two (2)
Bolt-B
Two (2)
Bolt-C
Two (2)
Bolt-D
Two (2)
Nut-B
Two (2)
Nipples
Two (2)
Rubber
Rings
One (1)
Thermal
Grease
One (1)
Thermal
Grease
8) One (1) Screwdriver
9) ZM80C Option Package (ZM-OP1, Sold Separately)
One(1) 80mm
Slim Fan
One(1)
Fan Grill
Two(2)
Fan Bolts
www.zalman.co.kr
Two(2)
Fan Screws
Two(2) Fan
Nipples
One(1)
Multi Connector 1
www.zalmanusa.com
5
VGA Heatpipe Cooler
Exploded View
Bolt-C
Bolt-B
Plate Link
Plate Link Nipple
Back Side Heatsink
Back Side Heatsink Base
Nut-A
Nipple
Rubber Ring
Heatpipe
Front Side
Heatsink Base
Front Side
Heatsink
Bolt-B
6
www.zalman.co.kr
www.zalmanusa.com
VGA Heatpipe Cooler
How to Install
1. Spread the Thermal Grease on the GPU(VPU)
1) Clean off the surfaces of the GPU(VPU) and the Front Side Heatsink Base thoroughly.
2) Spread the thermal grease thoroughly on the GPU(VPU). Using a thick piece of paper is
recommended for spreading. Many GPUs(VPUs) are concave (center is lower than around
the edges), so you should apply more thermal grease at the center of the chip.
Protective Frame for Core
Graphics Core
Thermal Grease
GPU(VPU)
< ATI Radeon 9700 PRO>
2. Choosing the Front Side Heatsink Base Assembly
This package includes two Front Side Heatsink Base Assemblies. If your graphics card is based on
Geforce4 Ti or your graphics card has heatsink mounting holes that are spaced far apart, then it is
necessary for you to use the Front Side Heatsink Base Assembly B. Otherwise, use Front Side
Heatsink Base Assembly A. The only difference between the Front/Back Side Heatsink Base
Assembly A and B is the width(A is shorter than B).
Front side heatsink base assembly A
www.zalman.co.kr
Front side heatsink base assembly B
www.zalmanusa.com
7
VGA Heatpipe Cooler
3. Locate where the Front Side Heatsink Base Assembly is to be Installed
The arrow (FRONT ) should be pointing in the direction of the slot connector when the front
side heatsink base is facing in the appropriate direction, as shown in the diagram below.
(Be sure to confirm the positioning. This is very important.)
Front Side Heatsink Base
Groove for Heatpipe
Front
(O)
Slot Connector
(X)
Front Side of the Graphics Card [with the GPU(VPU)]
4. Install the Front Side Heatsink Base Assembly
1)The Front Side Heatsink Base Assembly should be centered and tightly pressed onto the center
of the GPU(VPU).
2) Unscrew the Bolt-D half a turn, and rotate the plate spring to insert the Bolt-A into the heatsink
mounting hole. (Note : Do not unscrew the Bolt-D completely!)
3) After the Front Side Heatsink Base Assembly is in place, tighten the Bolt-D
Note) If the plate spring loosens from the base assembly, refer to the installation step #19 to
re-assemble it, and start again from the beginning.
Front Side Heatsink Base
Bolt-D
Plate Spring
Bolt-A
graphics Card
Heatsink Mounting Hole
Heatsink Mounting Hole
Front
8
www.zalman.co.kr
www.zalmanusa.com
VGA Heatpipe Cooler
5. Assemble the Rubber Rings and the Nipples
1) Slide a rubber ring onto each Bolt-A protruding out of the back of the card.
2) Screw the nipples onto the Bolt-A, and tighten it with a screwdriver.
Front
Bolt-A
Back
Nipple
Rubber Ring
Nipple
6. Choosing the Back Side Heatsink Base Assembly & Application of Sticker
1) Use the size that corresponds to the appropriate Front Side Heatsink Base Assembly.
Back side heatsink base assembly A
Back side heatsink base assembly B
2) After choosing a suitable Back Side Heatsink Base Assembly, attach the sticker (included with
product) on the assembly’s bottom surface as shown in the diagram.
Note) Use only one sticker of which the size is suitable for the Back Side Heatsink Base.
Never use the sticker for the Front Side Heatsink Base.
Sticker
bottom surface
www.zalman.co.kr
www.zalmanusa.com
9
VGA Heatpipe Cooler
7. Locate where the Back Side Heatsink Base Assembly is to be Installed
1) The arrow (BACK ) should be pointing in the direction of the slot connector when the Back
side heatsink base is facing in the appropriate direction, as shown in the diagram below.
(Be sure to confirm the positioning. This is very important.)
2) Unscrew the Bolt-D half a turn, and rotate the plate spring so the nipple protrudes through
the hole of the plate spring. (Note: Do not unscrew the Bolt-D completely!)
3) After the Back Side Heatsink Base Assembly is in place, tighten the Bolt-D.
Back
Back Side Heatsink Base
Back Side Heatsink Base
Groove for Heatpipe
Groove for Heatpipe
(O)
Slot Connector
Nipple
(X)
Back
Front
8. Install the Back Side Heatsink Base Assembly
1) Tighten the Nut-A onto the nipple that now has the plate spring in place.
2) Make sure that the two heatsink base assemblies are symmetrically placed in reference to the
graphics card, then tighten the Bolt-D completely.
Nut-A
Back
Bolt-D
Front
Nut-A
Nipple
Bolt-A
10 www.zalman.co.kr
Plate Spring
Rubber Ring
Rubber Ring
www.zalmanusa.com
Nut-B
VGA Heatpipe Cooler
9. Confirm the Placement of the Two Heatsink Base Assemblies
Confirm that the two heatsink base assemblies are symmetrically placed in reference to the graphics
card as shown in the diagram. Then, tighten Bolt-A and Bolt-D again so that they will not become
loose.
Front
Back
Front
Back
10. Spread the Thermal Grease on the Front Side Heatsink Base
Evenly spread the thermal grease onto the indicated area of the Front Side Heatsink Base as
shown in the diagram.
Apply Thermal
Grease Here
Thermal Grease
(Front Side Heatsink Base)
Front
www.zalman.co.kr
www.zalmanusa.com 11
VGA Heatpipe Cooler
11. Spread the Thermal Grease on the Front Side Heatsink
Evenly spread the thermal grease onto the indicated area of the Front Side Heatsink as shown in
the diagram.
Apply Thermal Grease Here
(Groove for Heatpipe)
12.Install the Heatpipe
The heatpipe should be inserted on the two heatsink base assemblies (installed on the GPU) as
shown in the diagram.
Heatpipe
Front
Back
13. Install the Front Side Heatsink
Place the Front Side Heatsink over the Front Side Heatsink Base and slightly screw in the two
Bolt-B’s.
Bolt-B
Apply Thermal Grease Here
Front
12 www.zalman.co.kr
www.zalmanusa.com
VGA Heatpipe Cooler
14. Spread the Thermal Grease on the Back Side Heatsink Base
1) Slightly turn the heatpipe in the direction of the arrow in the first diagram, and spread the
thermal grease on the base’s groove for the heatpipe. Turn the heatpipe back placing it into
the groove and re-tighten the Bolt-B installed in step #13.
ck
Ba
ck
a
B
Apply Thermal Grease Here
(Groove for Heatpipe)
2) Evenly spread the thermal grease onto the indicated area only.
Thermal Grease
Apply Thermal
Grease Here
(Back Side Heatsink Base)
Back
www.zalman.co.kr
www.zalmanusa.com 13
VGA Heatpipe Cooler
15.Confirm the Placement of the Heatpipe
Confirm that the heatpipe’s placement looks like the following diagram when the graphics card is
seen from the side view.
Front
Back
Front
Back
Heatpipe
16.Spread the Thermal Grease on the Back Side Heatsink
Evenly spread the thermal grease onto the indicated area of the Back Side Heatsink as shown in
the diagram.
Apply Thermal Grease Here
(Groove for Heatpipe)
14 www.zalman.co.kr
www.zalmanusa.com
VGA Heatpipe Cooler
17. Install the Back Side Heatsink
Place the Back Side Heatsink over the Back Side Heatsink Base and tighten it in place with two
Bolt-B’s.
Bolt-B
Apply Thermal
Grease Here
ck
Ba
18. Attach Plate Link Assembly
1) Assemble in the order of plate link nipple, plate link, and bolt C, as shown in the diagram.
Plate Link Nipple
Plate Link
Bolt C
}
Plate Link
Assembly
2) Insert the 2 bolt heads on plate link assembly about 5mm into the grooves on the front/back
side heatsinks then tighten the nipples by hand. To attach the fan that comes with the ZM80C
Option Package, see installation step #20.
Back Side Heatsink
Bolt Head
Front Side
Heatsink
www.zalman.co.kr
Plate Link
www.zalmanusa.com 15
VGA Heatpipe Cooler
19. If the plate spring separates from the Heatsink Base
1) In a Case concerning the Front Side Heatsink Base : Fasten Bolt-D and Nut-B onto the plate
spring and insert the plate spring into the groove on the heatsink base. (Note : Front Side Heatsink
Base has ‘FRONT ’ printed on it)
2) In a Case concerning the Back Side Heatsink Base : Fasten Bolt-D and Nut-B onto the plate
spring and insert the plate spring into the groove on the heatsink base. (Note: Back Side Heatsink
Base has ‘BACK ’ printed on it)
Bolt-D
Bolt-D
Plate Spring
Plate Spring
Nut-B
Nut-B
Bolt-A
(For Front Side Heatsink Base)
(For Back Side Heatsink Base)
20. How to Install the ZM80C Option Package (ZM-OP1)
1) Attach the fan grill to the fan as shown in the diagram. Use the two screws to attach the grill to
the fan, and use the two bolts to attach the nipples onto the fan and the grill. (Note: An arrow
on the fan indicates the direction of air flow.)
Fan Screws
Fan Nipples
Fan Grill
80mm Slim Fan
Direction of Air Flow
Fan Bolts
16 www.zalman.co.kr
www.zalmanusa.com
VGA Heatpipe Cooler
2) Slide in the fan and the fan grill assembly to the back side heatsink as shown in the diagram.
The bolt head should protrude into the groove of the heatsink. After centering the fan
on the heatsink, tighten the fan nipples.
Fan Nipple
Back Side Heatsink
Back Side
Heatsink
Fan Bolt's Head
3) Insert the 2 bolt heads on plate link assembly about 5mm into the grooves on the front/back
side heatsinks then tighten the nipples by hand.
Bolt Head
Plate Link
www.zalman.co.kr
www.zalmanusa.com 17
VGA Heatpipe Cooler
Things to Check
1. The heatpipe installed on the graphics card should look exactly like the diagram below labeled (O).
Check the diagram to see if you have correctly installed it.
Front
Back
Heatpipe
GPU
(O)
(X)
(X)
(X)
2.After reinstalling the graphics card, turn on the computer, and check to see that the Front Side
Heatsink and the Back Side Heatsink are at similar temperatures. (Leave the computer running
for a few minutes and then confirm the temperature difference by turning the computer off and
touching both of the heatsinks with your hands.)
If the two heatsinks are not at similar temperatures, check the following :
1) Is the thermal grease properly spread onto the five areas ?
2) Are the GPU and the Front Side Heatsink Base tightly in contact ?
3) Is the heatpipe properly contacting the heatsinks ?
3. Zalman does not recommend overclocking the graphics card. We are not responsible for any damages
caused by overclocking.
4. Read the manual fully before installing the product. If you are not confident in installing the product,
contact your local reseller for assistance. Please note that Zalman is not responsible for any problems
caused by the incorrect installation of the product on the graphics card.
5. If the heatpipe is tampered with or scratched by a sharp object, it may not function properly.
Please handle with care.
6. After successfully installing the graphics card, do not shake or exert excessive force on any of the
heatsinks. If you do, the bolts or the nuts that hold the plate spring may become loose.
* Warranty Period : 3 Years. Covers free after-sales service (shipping cost not included)
* The specifications of any product may change without prior notice to improve the performance thereof.
18 www.zalman.co.kr
www.zalmanusa.com