1
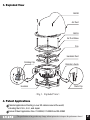
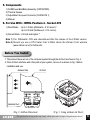
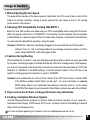
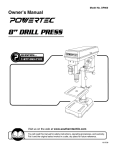
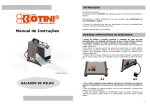
CNPS5700D-Cu
User’
s Manual
(English Edition)
http://www.zalman.co.kr
E-mail : [email protected]
1. Features
1) ZALMAN CPU coolers do not generate noise or vibration in Silent Mode.
2) Pure copper as the base material ensures excellent heat dissipation.
3) New user-friendly design creates ease in installing and removing the product.
4) Use of an 80mm fan maximizes airflow for optimized cooling conditions.
5) The adjustable fan speed connector(FAN MATE 1) enables one to control the noise
and performance of the fan to your preference.
6) Use of the Air Duct results in lowered internal system and power supply temperatures, which
increase the stability of the computer system.
7) Those of you who do not mind the noise produced from a fan can replace the default fan with
a faster one for maximum possible performance.
* If you wish to OVERCLOCK, set the fan to Normal Mode first.
* Zalman Tech. Co., Ltd. is not responsible for any damages that arise from CPU OVERCLOCKING.
2. Specifications
1) Weight (with Air Duct)
: 500g(1)
Weight (without Air Duct) : 430g
2)Dimensions (with Air Duct)
: 125(L) X 125(W) X 150(H) mm
Dimensions (without Air Duct) : 125(L) X 125(W) X 67(H) mm
3) Dissipation Area : 1270 Cm2
4) Thermal Resistance : Approx. 0.37 °C/W (Silent Mode)
Approx. 0.27 °C/W (Normal Mode)
5)Fan
* Bearing Type : 2-Ball
* Speed : 1700RPM 10 % (Silent Mode)
3100RPM 10 % (Normal Mode)
* Noise : 20 dB 10% (Silent Mode)
34 dB 10% (Normal Mode)
6) FAN MATE 1
* Voltage : 5V ~ 11V 2%
* Capacity : 6W Maximum
Note1)The maximum weight for a heatsink is specified as 450g by Intel for a Pentium 4. Should a
heatsink, which exceeds the relevant weight limit, be installed in a computer, special care should
be taken when moving the computer. Zalman Tech. Co., Ltd. is not responsible for any damage
to a system or a CPU that occurs when moving a computer with an overweight heatsink.
* The specifications of any product may change without prior notice to improve the performance thereof.
1
3. Exploded View
Bolt-B
Air Duct
Bolt-A
Air Duct Base
Fan
Heatsink Duct
Rotating Clip
Retention Guide
Static Clip
Heatsink
<Fig. 1. Exploded View>
4. Patent Applications
Patents Applications Pending in over 20 nations around the world,
including the U.S.A., E.U., and Japan
Korean Patent Application Nos. 01-69984, 01-69985 and 02-23963
* The specifications of any product may change without prior notice to improve the performance thereof.
2
5. Components
1) FHS(Flower HeatSink) Assembly (CNPS5700D)
2) Thermal Grease
3) Adjustable Fan speed Connector (FAN MATE 1)
4) Manual
6. For Use With : INTEL Pentium 4 - Socket 478
1) Silent Mode : Up to 1.8 GHz (Willamette - 0.18 micron) (1)
Up to 2.8 GHz (Northwood - 0.13 micron)
2) Normal Mode : 2.8 GHz and Higher (2)
Note 1) The ‘Willamette’ CPU was discontinued after the release of the 2.0GHz version.
Note 2) Should you use a CPU faster than 2.8GHz check the Zalman Tech website
(www.zalman.co.kr) for further info.
Before You Install
1. This product blows air out of the computer system through the Air Duct as shown in Fig. 2.
2. If the Air Duct interferes with other parts of your system, remove it as shown in Fig. 3 before
installation and use.
Exhaust Fan
Air Duct
Heatsink Duct
<Fig. 2. Airflow Direction>
<Fig. 3. Using without Air Duct>
* The specifications of any product may change without prior notice to improve the performance thereof.
3
How to Install
1. Thinly spread the thermal grease on the CPU core’s surface contacting the FHS.
2. Hook the static clips on the mainboard’s Retention Guide as shown in Fig. 5. To identify the static
clips, refer to Fig. 1.
Air Duct
Heatsink Duct
Static Clip
Thermal Grease
Retention Guide
Retention Guide
<Fig. 4. Spreading Thermal Grease>
<Fig. 5. Hooking Static Clips>
3. Press the Air Duct in the direction of the arrow and make sure the Heatsink Duct is settled onto
the Retention Guide as shown in Fig. 6.
4. While pressing the Air Duct, rotate the rotating clips on the Heatsink Duct and hook them onto
the Retention Guide as shown in Fig. 7. To identify the rotating clips, refer to Fig. 1.
Rotating Clip
Retention Guide
<Fig. 6. Settling Heatsink Duct>
<Fig. 7. Hooking Rotating Clips>
* The specifications of any product may change without prior notice to improve the performance thereof.
4
5. Slightly unscrew the Bolt-B on the Air Duct and turn the top part of the duct to the left or right so
that the duct faces the exhaust fan as shown in Fig. 8. Then, screw in three Bolt-B’s tightly to hold
its position.
Caution) If the Air Duct cannot face the exhaust fan as shown in Fig. 8 even after turning
the duct fully, separate the duct from the Air Duct Base, make appropriate adjustments
to the direction of the duct, and reassemble the duct. See Figs. 2 and 9 for a better
understanding.
Exhaust Fan
Driver
Adjust
Bolt-B
<Fig. 8. Adjusting the Air Duct>
<Fig. 9. Assembling the Duct>
6. Connect FAN MATE 1 to the mainboard & the fan as shown in Fig. 10.
FAN MATE 1
3-Pin Connector
Speed Control Knob
3-Pin Connector
(from CNPS 5700D)
Mainboard
<Fig. 10. Connecting FAN MATE 1>
* The specifications of any product may change without prior notice to improve the performance thereof.
5
Usage & Caution
1. When Adjusting the Fan Speed
The exhaust fan must be at the same speed or faster than the CPU cooler’s fan in order for this
product to perform optimally. Having a slower exhaust fan can cause a drop in the cooling
performance of the product.
2. Checking CPU Compatibility & Using FAN MATE 1
Read ‘For Use With’ section and make sure your CPU is compatible before using the CPUcooler.
When the speed control knob on FAN MATE 1 is turned fully counter-clockwise, the fan operates
in Silent Mode at a minimum speed. When it is turned fully clockwise, it operates in Normal Mode.
You can select the desired fan speed by turning the knob.
Caution) FAN MATE 1 has been specifically designed to be used with the fan of this product.
Zalman Tech. Co., Ltd. is not responsible for any damage caused to systems or CPUs
when using FAN MATE 1 with other types of fans.
3. Cautions During Booting
When booting the computer, it may automatically power down after an alarm sound is generated
by a system monitoring program to indicate that the the CPU fan is rotating slowly. If this happens,
you may turn the speed control knob fully clockwise to increase the fan speed and set “CPU Fan
Detected” to “Disabled” in the BIOS settings, or set the slowest rotation of the CPU fan in the
system monitoring program to less than or equal to 1500RPM.
Caution) Some mainboards do not boot if the rotation of the CPU fan is below a certain RPM.
If the BIOS is updated, Silent Mode can be used. For more information on updating
BIOS, please refer to your mainboard manufacturer’s web site. Even in a case where
the RPM of fans does not get measured in Silent Mode, performance will not be affected.
4. If you remove the Air Duct, cooling performance may deteriorate.
5. Creating a Complete Noiseless System
Use the following Zalman products to achieve stable and silent operation of your computer :
Noiseless Power Supply, CNPS series CPU Cooler, Fanless Cooler for Northbridge Chipset &
Video Card and Noiseless Fan.
For more inquiries regarding our products, visit our website(www.zalman.co.kr).
* The specifications of any product may change without prior notice to improve the performance thereof.
6