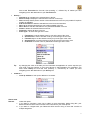
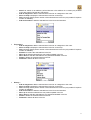
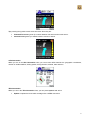
1
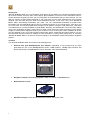
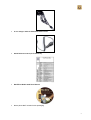
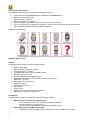
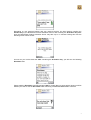
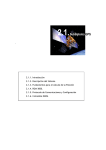
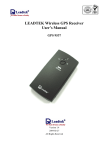
www.66.com
ROUTE 66 Mobile 2005
The 1st onboard GPS navigation solution
for Symbian Series 60 Smartphone
User Manual
Version 1.1
September 2004
ROUTE 66: Best by a Mile!
Copyright © 1993-2004 ROUTE 66. All rights reserved. ROUTE 66 and the ROUTE 66 logo are registered trademarks. Data copyright © NAVTEQ B.V.
IMPORTANT REMARK: No part of this publication may be multiplied, be stored in a databank and electronically, mechanically, through photocopying, on
sound carriers or in any other way be copied, without the explicit written approval of ROUTE 66. Symbian, Symbian OS and other associated Symbian
marks are all trademarks of Symbian Ltd. All other marks are the property of their respective owners. The information contained in this document is subject
to change without prior notice.
Introduction
"ROUTE 66 Mobile 2005" turns your Symbian smart phone all at a sudden into a powerful navigation system
up to house number accuracy! After a short plug & play installation, turn-by-turn voice instructions and onscreen directions will guide you from your current position to the destination that you have entered. You can
add any number of intermediate waypoints to your route that you may have selected from your personal
contacts, your favourites and your most recent destinations as well. If you miss a turn, then "ROUTE 66
Mobile 2005" immediately recalculates your route. You can automatically download up-to-date traffic
information from the ROUTE 66 internet site via a GPRS connection to your smart phone, even when you
are on the road. This non-stop FREE service helps you via dynamic routing to avoid traffic jams, road works
or accidents and is currently available in Great Britain, Germany, the Netherlands, France and Italy. What's
more? You can display the map in night colours to keep a clear view on the road even when you are driving
at night or in bird view to display the map as you would see it if you could fly like a bird. In addition to all this,
you can navigate to any of the many points-of-interest like hotels, restaurants and petrol stations. You can
even dial them directly to make for example a hotel reservation or inquiry before going there! In summary,
"ROUTE 66 Mobile 2005" is a must for everyone looking for an affordable, flexible and powerful navigation
system!
Contents
The "ROUTE 66 Mobile 2005" kit consists of the following items:
2
•
Reduced Size (RS) MultiMediaCard plus adapter. Depending on the product that you have
purchased the size of the MultiMediaCard will be 32 MB (Athens), 128 MB (Alps, Benelux and
Iberian Peninsula) or 256 MB (Britain, France, Germany, Italy and Scandinavia).
•
Navigation software and entire geographic map preinstalled on MultiMediaCard
•
Bluetooth GPS receiver
•
ROUTE 66 lanyard to wear the Bluetooth GPS receiver around your neck
•
In-car charger cable for Bluetooth GPS receiver
•
Quick Reference Card plus Product key
•
ROUTE 66 Mobile 2005 User Manual
•
Smart phone NOT included in this packaging
3
Smart phone specifications
Your Symbian smart phone must have the following specifications:
•
•
•
•
•
•
•
A free slot for an extra MultiMediaCard or Reduced Size MultiMediaCard
Bluetooth wireless technology
Symbian OS v6.1 or higher
Series 60 platform 1.0 or higher
Optional: a GPRS connection to download up-to-date traffic information
For an up-to-date list of compatible smart phones, please consult our website at http://www.66.com
Not compatible with Symbian UIQ and Windows Mobile
Supported smart phones:
Bluetooth GPS receiver
Features
The Bluetooth GPS receiver has the following features:
•
•
•
•
•
•
•
•
•
•
•
•
•
•
•
Chipset: SiRF StarII
High sensitivity 12 channels receiver
Position accuracy: 10 meters
Cold/Warm/Hot time-to-first-fix: 45/38/8 seconds
Reacquisition time: 100 ms
Supports NMEA-0183 and SiRF protocol
Compatible with Bluetooth devices with Serial Port Profile (SPP)
Battery life: > 7 hours
Dimensions: 70 x 41 x 23 mm
Weight: 60 grams
Connection: Bluetooth
LED display
Power switch
RF MCX connector for external GPS antenna
Manufacturer: RoyalTek Company Ltd.
LED Display
The LED display consists of 3 LEDs that have the following meaning:
•
•
4
Battery Status LED (leftmost red/yellow LED)
o Red: the battery power is low, charging is required immediately.
o Yellow: the battery is being charged.
o Off: the battery is fully charged, the battery has adequate power.
GPS Status LED (green LED in the middle)
o Flashing green light: the GPS receiver is switched on and the GPS position is fixed.
•
o Steady green light: the GPS receiver is switched on but the GPS position is not yet fixed.
Bluetooth Status LED (rightmost blue LED)
o Flashing blue light: the Bluetooth connection is established.
Getting started
To start using “ROUTE 66 Mobile 2005”, you have to carry out the following steps:
•
•
•
•
•
Step 1: Charge the battery of the Bluetooth GPS receiver
1. Before you can use the Bluetooth GPS receiver, the battery has to be fully charged. In order
to do so, you have to connect the charger cable to the power jack of the GPS receiver and to
plug it into the cigarette lighter outlet of your car. While the battery is being charged, the
Battery Status LED will show a yellow light. Note that the Bluetooth GPS receiver standard
comes with a fully charged battery.
2. As soon as the battery is fully charged, the Battery Status LED will turn off. Now you can
unplug the charger cable from the GPS receiver and from the cigarette lighter outlet of your
car.
Step 2: Switch on the Bluetooth GPS receiver and wait for a fixed GPS position
1. After you have switched on the Bluetooth GPS receiver, the GPS Status LED will initially
show a steady green light to indicate that the GPS position has not been fixed yet.
2. After the position has been fixed, the GPS Status LED will change into a flashing green light.
Now the Bluetooth GPS receiver is ready to be connected to your smart phone.
Step 3: Insert the MultiMediaCard into your smart phone and launch “ROUTE 66 Mobile 2005”
1. In case your smart phone only supports Reduced Size MultiMediaCards (see the
documentation of your smart phone) you have to remove the adapter.
2. Insert the MultiMediaCard into your smart phone. See the documentation of your smart
phone for how to insert the MultiMediaCard.
3. Switch on your smart phone and launch “ROUTE 66 Mobile 2005”.
Step 4: Activate “ROUTE 66 Mobile 2005”
1. If you are launching “ROUTE 66 Mobile 2005” for the first time, you are automatically
requested to activate the product. See below how to activate your product.
Step 5: Start navigating
1. Select Start from the Options menu, enter a search text that contains information about the
address where you want to go, press Options and select Search, select your destination
from the list of search results, press Options and select Navigate to.
2. As soon as you select Navigate to, the smart phone will automatically carry out a search for
Bluetooth devices in your neighbourhood. Select the Bluetooth GPS receiver and set it as
the Default GPS receiver.
3. After the Bluetooth connection between the smart phone and the Bluetooth GPS receiver
has been established, the Bluetooth Status LED will show a flashing blue light and you can
start navigating.
Product activation
Before you can start using "ROUTE 66 Mobile 2005”, you have to activate the product first. In order to do
this, you should go to the Applications view, push the joystick up or down and left or right to select
“ROUTE 66 Mobile”, next press Options and select Open.
This opens the Product activation view.
5
You can now press Options and select:
•
Preferences to select the language of the user interface and voice prompts. You should go to
Language to change the language and to Select map to select the map that you want to activate.
After you have done so you should press Back.
•
Activate via SMS > to open the view in which you have to enter the Product key.
Enter the 8-character Product key that you can find on the Quick Reference Card. Note that the
product key is not case sensitive. If you do not wish to be informed about new ROUTE 66 products
and free updates, push the joystick down and press it to deselect the checkbox. Next press
Activate. A message will be displayed to confirm that your Product key was sent via the Short
Message Service (SMS) to the ROUTE 66 Product Activation Server.
6
Depending on your physical location and your network provider, the time between sending the
Product key to the ROUTE 66 Product Activation Server and receiving the Activation key back
from the ROUTE 66 Product Activation Server may take up to 15 minutes! During this time the
following screen will be shown:
As soon as you receive back the SMS containing the Activation key, you will see the following
Disclaimer text:
Please read the Disclaimer carefully and press OK to confirm that you agree with it. Next you will be
asked if you want to see the Disclaimer when launching “ROUTE 66 Mobile 2005” next time:
7
Press OK to skip the Disclaimer when launching “ROUTE 66 Mobile 2005” again. After you have
done so you will see the ROUTE 66 splash screen and you will hear the text “Welcome to
ROUTE 66!” at the same time.
This completes the product activation.
Important: please note that the following restrictions apply to the use of the Product key:
•
•
•
•
You can use the same Product key on the same smart phone using different SIM cards as many
times as you want.
You can use the same Product key on a second smart phone using different SIM cards only 1 week
after the first activation.
You can use the same Product key on a third smart phone using different SIM cards only 1 month
after the first activation.
It is strongly recommended not to delete the SMS containing the Activation key so that you can use
the same Activation key later again.
Description of the menus
Below you can find a description of the menus of “ROUTE 66 Mobile 2005”.
Map view
When you are in the Map view, you can press Options and select:
•
•
•
•
8
1 Start* (press 1) to start searching for an address, point-of-interest, favourite, contact or recent
destination on which different operations can be performed (see Start).
* Select this option if you want to start navigating with your Bluetooth GPS receiver to a single
destination without any intermediate waypoints.
Plan a route** to define a list of waypoints that can be used for navigation or to calculate a route
(see Plan a route).
** Select this option:
1. if you want to calculate a route just to obtain a route description. While doing this, your Bluetooth
GPS receiver does not have to be connected to your smart phone.
2. if you want to navigate with your Bluetooth GPS receiver along a route that consists of multiple
waypoints.
Points-of-interest > to search for points-of-interest like hotels, restaurants or petrol stations.
o around cursor to search for points-of-interest like hotels, restaurants or petrol stations
around the current position of the cursor on the map.
o around GPS position to search for points-of-interest like hotels, restaurants or petrol
stations around the current GPS position.
o around departure to search for points-of-interest like hotels, restaurants or petrol stations
around the point of departure of the route.
o around destination to search for points-of-interest like hotels, restaurants or petrol stations
around the destination of the route.
Zoom >
o to GPS position to zoom to the current GPS position (only enabled if a GPS receiver is
connected to the smart phone).
o to entire map to display the entire map.
o to route to zoom to the route (only enabled if a route has been calculated).
o
o
•
•
to departure to zoom to the departure point of the route (only enabled if a route has been
calculated).
to destination to zoom to the destination point (only enabled if a route has been calculated
or when you are navigating).
* in (press *) to zoom in on the map.
# out (press #) to zoom out on the map.
o
o
View >
o 2 Turn arrows (press 2) to display the turn-by-turn arrows (see Turn arrows).
o GPS Information (press 3) to display the GPS information (only enabled if a GPS receiver
has been connected, see GPS Information).
o TMC Information (press 4) to display the list of traffic messages (see TMC Information).
o Route description to display the list of driving directions (only enabled if a route has been
calculated, see Route description).
o Legend to display the list of different map items and their colours (see Legend).
o About Mobile 2005 to display the copyright information and version number.
Preferences to customize the application (see Preferences).
Tip: pressing the joystick reveals some shortcuts. Here they are:
•
•
•
•
•
•
•
•
•
•
Navigate to cursor to navigate to the current position of the cursor on the map.
Add cursor > to add the current position of the cursor on the map to the favourites or to the
waypoints.
Information to display a label with information about a specific item on the map.
Preferences to customize the application (see Preferences).
5 Normal/Full screen (press 5) to switch between full screen and normal screen.
6 2D/3D perspective (press 6) to switch between 2D and 3D perspective.
7 Day/Night colours (press 7) to display the map in night colours or day colours.
8 Update TMC (press 8) to update the list of traffic messages via a GPRS connection.
9 Sound on/off (press 9) to switch between sound on and off.
0 Latest instruction (press 0) to repeat the latest voice instruction.
Start
When you are in the Start view, you can press Options and select:
•
Locations >
9
o
o
o
o
o
o
Search to search for an address, point-of-interest or the address of a contact (only enabled
if you have entered at least two characters).
Navigate to to navigate to the selected item in the list.
Show on map to display the selected item in the list on the map.
Dial to directly dial the phone number of the selected item in the list (only enabled if a phone
number is available).
Add to favourites to add the selected item in the list to the favourites.
Route type > to select the type of the route.
1.
2.
3.
4.
5.
•
Favourites >
o Navigate to to navigate to the selected item in the list.
o Show on map to display the selected item in the list on the map.
o Dial to directly dial the phone number of the selected item in the list (only enabled if a phone
number is available).
o Rename to rename the selected item in the list.
o Move up to shift the selected item one position upward in the list.
o Move down to shift the selected item one position downward in the list.
o Delete to delete the selected item from the list.
o Delete all to delete all items in the list.
o Route type > to select the type of the route.
1.
2.
3.
4.
5.
Tip:
10
Fastest/Car to set the fastest route by car as the type of the route.
Shortest/Car to set the shortest route by car as the type of the route.
Fastest/Lorry to set the fastest route by lorry as the type of the route.
Shortest/Lorry to set the shortest route by lorry as the type of the route.
Pedestrian to set the route for pedestrians as the type of the route.
by changing the order of the tabs you can customize the application in such a way that you
only need a few key strokes on your smart phone to start navigating. For example if you
have made Favourites the first tab, then pressing “1”, followed by “9” makes you start
navigating to the 9th destination in your Favourites list.
•
History >
o Navigate to to navigate to the selected item in the list.
o Show on map to display the selected item in the list on the map.
o Dial to directly dial the phone number of the selected item in the list (only enabled if a phone
number is available).
o Add to favourites to add the selected item in the list to the favourites.
o Move up to shift the selected item one position upward in the list.
o Move down to shift the selected item one position downward in the list.
o Delete to delete the selected item from the list.
o Delete all to delete all items in the list.
o Route type > to select the type of the route.
1.
2.
3.
4.
5.
Tip:
•
Fastest/Car to set the fastest route by car as the type of the route.
Shortest/Car to set the shortest route by car as the type of the route.
Fastest/Lorry to set the fastest route by lorry as the type of the route.
Shortest/Lorry to set the shortest route by lorry as the type of the route.
Pedestrian to set the route for pedestrians as the type of the route.
by changing the order of the tabs you can customize the application in such a way that you
only need a few key strokes on your smart phone to start navigating. For example if you
have made History the first tab, then pressing “1”, followed by “9” makes you start
navigating to the 9th destination in your History list.
Contacts >
o Look up address to look up the address of a contact.
Plan a route
Remark:
select this option:
1. if you want to calculate a route just to obtain a route description. While doing this, your
Bluetooth GPS receiver does not have to be connected to your smart phone.
2. if you want to navigate with your Bluetooth GPS receiver along a route that consists of
multiple waypoints.
11
Tip:
select Start if you want to start navigating with your Bluetooth GPS receiver to a single destination
without any intermediate waypoints.
When you are in the Plan a route view, you can press Options and select:
•
•
•
Add waypoint to search for an address, point-of-interest, favourite, contact or recent destination
(see Add waypoint) and add as a waypoint to your route.
Calculate to calculate the route between the waypoints (only enabled if at least two waypoints have
been defined).
Route type > to select the type of the route.
1.
2.
3.
4.
5.
•
•
•
•
•
•
Fastest/Car to set the fastest route by car as the type of the route.
Shortest/Car to set the shortest route by car as the type of the route.
Fastest/Lorry to set the fastest route by lorry as the type of the route.
Shortest/Lorry to set the shortest route by lorry as the type of the route.
Pedestrian to set the route for pedestrians as the type of the route.
Move up to shift the selected item one position upward in the list.
Move down to shift the selected item one position downward in the list.
Delete to delete the selected item from the list.
Delete all to delete all items in the list.
Save route to save the waypoints of the route for later use.
Open route to open a route that you have saved before.
Tip: pressing the joystick reveals some shortcuts. Here they are:
•
•
Add waypoint to search for an address, point-of-interest, favourite, contact or recent destination
(see Add waypoint) and add as a waypoint to your route.
Calculate to calculate the route between the waypoints (only enabled if at least two waypoints have
been defined).
Add waypoint
When you are in the Add waypoint view, you can press Options and select:
•
12
Locations >
o
o
o
o
o
Search to search for an address, point-of-interest or the address of a contact (only enabled
if you have entered at least two characters).
Add as waypoint to add the selected item in the list as a waypoint to the route.
Show on map to display the selected item in the list on the map.
Dial to directly dial the phone number of the selected item in the list (only enabled if a phone
number is available).
Add to favourites to add the selected item in the list to the favourites.
•
Favourites >
o Add as waypoint to add the selected item in the list as a waypoint to the route.
o Show on map to display the selected item in the list on the map.
o Dial to directly dial the phone number of the selected item in the list (only enabled if a phone
number is available).
o Rename to rename the selected item in the list.
o Move up to shift the selected item one position upward in the list.
o Move down to shift the selected item one position downward in the list.
o Delete to delete the selected item from the list.
o Delete all to delete all items in the list.
•
History >
o Add as waypoint to add the selected item in the list as a waypoint to the route.
o Show on map to display the selected item in the list on the map.
o Dial to directly dial the phone number of the selected item in the list (only enabled if a phone
number is available).
o Add to favourites to add the selected item in the list to the favourites.
o Move up to shift the selected item one position upward in the list.
o Move down to shift the selected item one position downward in the list.
o Delete to delete the selected item from the list.
o Delete all to delete all items in the list.
13
•
Contacts >
o Look up address to look up the address of a contact.
Select
When you are in the Select view and you have selected the radius in which you want to search for selected
categories of points of interest, you can press Options and select:
•
•
•
•
•
Navigate to to navigate to the selected item in the list.
Show on map to display the selected item in the list on the map.
Dial to directly dial the phone number of the selected item in the list (only enabled if a phone number
is available).
Add to favourites to add the selected item in the list to the favourites.
Add as waypoint to add the selected item in the list as a waypoint to the route.
Turn arrows
When you are in the Turn arrows view, you can push the joystick up or down to step forward or backward
through the route and to simultaneously hear the voice instructions.
14
Tip: pressing the joystick reveals some shortcuts. Here they are:
•
•
5 Normal/Full screen (press 5) to switch between full screen and normal screen.
9 Sound on/off (press 9) to switch between sound on and off.
GPS Information
When you are in the GPS Information view, you can monitor GPS data like the geographic coordinates,
number of visible satellites, driving speed, driving direction, altitude, date and time.
TMC Information
When you are in the TMC Information view, you can press Options and select:
•
Update to update the list of traffic messages via a GPRS connection.
15
•
Show on map to display the selected item in the list on the map.
•
Clear to delete all traffic messages and calculate the route again.
Traffic information is available for selected countries and selected products (see the table below).
Product title
ROUTE 66 Mobile Alpenländer 2005
ROUTE 66 Mobile Pays Alpins 2005
ROUTE 66 Mobile Athens 2005
ROUTE 66 Mobile Benelux 2005
ROUTE 66 Mobile Bénélux 2005
ROUTE 66 Mobile Britain 2005
ROUTE 66 Mobile Deutschland 2005
ROUTE 66 Mobile France 2005
ROUTE 66 Mobile Italia 2005
ROUTE 66 Mobile Península Ibérica 2005
ROUTE 66 Mobile Skandinavien 2005
ROUTE 66 Mobile Skandinavia 2005
Availability of traffic information
No
No
The Netherlands
United Kingdom
Germany
France
Italy
No
No
Route description
When you are in the Route description view, you can press Options and select:
•
•
16
Show on map to display the selected item in the list on the map.
Dial to directly dial the phone number of the selected item in the list (only enabled if a phone number
is available).
Legend
When you are in the Legend view, you can select:
•
Cities/Symbols to show how cities and road numbers are displayed on the map.
•
Roads to show how different types of roads are displayed on the map.
•
Areas/GPS to show how areas and arrows are displayed on the map.
•
Icons to show how points-of-interest are displayed on the map.
17
Preferences
When you are in the Preferences view, you can select:
•
General >
o Full screen to display the application on the entire screen (On/Off).
o Backlight to select when the backlight of the screen should be switched on (Always
on/During navigation/Always off).
o Volume to adjust the volume of the voice instructions.
o Language to select the language of the user interface and voice instructions.
o Units to select the distance units (Kilometres/Miles).
o Order of tabs to change the order of the Locations, Favourites, Contacts and History tabs.
Tip:
•
18
by changing the order of the tabs you can customize the application in such a way that you
only need a few key strokes on your smart phone to start navigating. For example if you
have made Favourites the first tab, then pressing “1”, followed by “9” makes you start
th
navigating to the 9 destination in your Favourites list. Of course you create a similar
behaviour with the destinations listed in the History list.
Map >
o Night colours to display the map in night colours (On/Off).
o Show favourites to display the favourites on the map (On/Off).
o Points-of-interest to select which categories of points-of-interest you want to display on the
map.
o Rotate map to rotate the map in the direction in which you are driving during navigation
(On/Off).
o 3D perspective to display the map in 3D perspective (On/Off).
o Viewing angle to adjust the angle under which the map is displayed in 3D perspective.
o Scale to display the scale on the map (On/Off).
o Select map to select which map you want to use.
•
Navigation >
o Route type to select the type of the route (Fastest/Car, Shortest/Car, Fastest/Lorry,
Shortest/Lorry, Pedestrian).
o TMC interval to select the update interval of the traffic messages (Never, 10/20/30 minutes).
o Default GPS to select the default GPS receiver.
o Default GPRS to select the default GPRS connection (On/Off).
o Avoid motorways to avoid motorways when calculating a route (On/Off).
o Avoid toll roads to avoid toll roads when calculating a route (On/Off).
o Avoid ferries to avoid ferries when calculating a route (On/Off).
o Time indication to display the estimated time of arrival or remaining travel time (Arrival
time/Travel time).
o Automatic zooming to automatically zoom in on the map near road intersections during
navigation (On/Off).
o Safety speed to adjust the speed at which the arrows instead of the map are displayed.
o Alarm speed to set the speed at which you will be warned that you are driving too fast.
o Alarm type to select the type of alarm that will warn you when driving too fast (Acoustic
alarm/Visual alarm).
•
Speed >
to adjust the speeds on different types of road to reflect your personal style of driving.
Customer Support
19
If you have any questions regarding the use of “ROUTE 66 Mobile 2005”, please send an e-mail to
[email protected]. You can also visit the ROUTE 66 web site (http://www.66.com/) from time to time in order
to stay informed about free updates and our latest offers.
License agreement
This is a legal agreement between you, the end user, and ROUTE 66 Geographic Information BV,
Ridderkerk, The Netherlands ("ROUTE 66").
IF YOU DO NOT AGREE TO THE TERMS OF THIS AGREEMENT, PROMPTLY RETURN THE CDROM/FLOPPY DISK/MEMORY CARD/DOWNLOAD PACKAGE, THE HARDWARE AND ACCOMPANYING
ITEMS - PROVIDED THEY HAVE NOT BEEN USED - TO THE PLACE YOU OBTAINED THEM. IF YOU
HAVE ALREADY PAID FOR THE SOFTWARE AND/OR HARDWARE ROUTE 66 OR ITS AUTHORIZED
DISTRIBUTOR FROM WHOM YOU OBTAINED THE SOFTWARE AND/OR HARDWARE, WILL REFUND
YOU THE PURCHASE PRICE PROVIDED YOU PROVIDE ROUTE 66 WITH PROOF OF PURCHASE AND
PAYMENT.
BY BREAKING THE SEAL OF THE CD-ROM/FLOPPY DISK/MEMORY CARD, PRESSING THE "I AGREE"
BUTTON FOR A DOWNLOAD, OR BY USING THE SOFTWARE AND/OR HARDWARE YOU ARE
AGREEING TO BE BOUND BY THE TERMS OF THIS AGREEMENT.
YOU REPRESENT AND WARRANT THAT YOU HAVE THE RIGHT AND THE AUTHORITY TO ENTER
INTO THIS LICENSE AGREEMENT AND THAT YOU ARE OVER THE AGE OF MAJORITY. IF NOT, YOU
MAY NOT USE THE SOFTWARE AND/OR HARDWARE.
The License is subject to Law of the Netherlands and the District Court of Rotterdam is the only competent
court for disputes related to this License or the use of the Software and/or Hardware. The United Nations
Convention on Contracts for the International Sales of Goods is hereby excluded from application to this
License.
1) GRANT OF LICENSE: This ROUTE 66 License Agreement ("License") permits you to use the ROUTE 66
computer program and the digital (map) data included in the accompanying package acquired with this
License on any single computer, provided the Software is installed on only one computer at any time and
provided the Software is combined only with one (1) navigation system. This License is non-exclusive and
non-transferable.
This License does not imply any rights to future upgrades or updates of the Software. The use of any
upgrades or updates of the Software is governed by this License and may be subject to additional payments.
2) COPYRIGHT: The copyrights and other intellectual or proprietary rights to the Software and Hardware are
owned by ROUTE 66 or its suppliers. You may either (a) make one copy of the Software solely for backup or
archival purposes, or (b) transfer the Software to a single medium provided you keep the original solely for
backup or archival purposes. You may not copy the product manual(s) or written materials accompanying the
Software. You only become the owner of the material data carrier and you do not acquire the ownership of
the Software.
3) OTHER RESTRICTIONS: The hiring, lending, public performance and broadcasting of Software and
Hardware are prohibited. You are not permitted to fully or partly modify the Software, to analyze it by means
of reverse-engineering, to decompile or disassemble the Software, or to make products derived from it. If you
wish to obtain information that is necessary to ensure the interoperability of the Software with third party
software, please contact ROUTE 66 at [email protected]. You are explicitly prohibited from downloading the
digital maps and programs contained in the Software or from transferring these to another data carrier or
computer.
4) CONFIDENTIALITY: You acknowledge and agree that the Hardware and Software was developed at
considerable time and expense by ROUTE 66 and is confidential to and a trade secret of ROUTE 66. You
agree to maintain the Software in strict confidence and not to disclose or provide access thereto to any
person. If you would nevertheless grant another person (unauthorized) access to the Hardware and/or
Software, you guarantee that such person accepts the terms and conditions of this License and you will
indemnify ROUTE 66 and its authorized distributors against any claim of such person.
20
MANUFACTURER'S LIMITED WARRANTY AND LIMITATION OF LIABILITY:
1) You may only use the Software and Hardware after having read the instructions supplied with it before you
use it. If you have any difficulty using the Software and Hardware, consult the instructions to check you are
using it correctly.
2) The use of the Software and Hardware in a navigation system means that calculation errors can occur,
caused by local environmental conditions and/or incomplete data. ROUTE 66 cannot warrant that the
ROUTE 66 product and data carrier operates error-free.
3) ROUTE 66 warrants to you that the Hardware will be free from defects in workmanship and materials for a
period that is the shorter of (a) one (1) year from the date that the Hardware was first purchased by you and
(b) the period ending upon your breach of any term of the License ("Warranty Period"). During the Warranty
Period the Hardware will be repaired or replaced at ROUTE 66's option ("Limited Warranty"), without charge
to you for either part or labour. This warranty covers the prompt replacement of the data carrier only. If the
Hardware is repaired or replaced during the Warranty Period, the Warranty Period will expire five (5) months
from the date of replacement or repair. This Limited Warranty does not apply to normal wear and tear, if the
Hardware is opened or repaired by someone not authorized by ROUTE 66 and does not cover repair or
replacement of any Hardware or part thereof damaged by: misuse, moisture, liquids, proximity or exposure to
heat and accident, abuse, non-compliance with the instructions supplied with the Software and/or Hardware,
neglect or misapplication. The Limited Warranty does not cover physical damage to the surface of the
Hardware.
4) Repair or replacement of the Hardware is the exclusive remedy provided to you. This Limited Warranty is
in lieu of all other warranties, express or implied, including any implied warranty or condition of
merchantability and/or quality or fitness for a particular use or purpose and/or any implied warranty or
condition of non-infringement. Neither ROUTE 66 nor any authorized distributor of ROUTE 66 shall in any
way be liable to you and you hereby waive any direct, indirect, economic, special, commercial, incidental,
exemplary or consequential damages (including without limitation), lost profits, loss of business revenue or
earnings, lost data, damages caused by delay or failure to realize expected savings (arising from or in
connection with the use or performance of the Software and/or Hardware, even if ROUTE 66 or an
authorized distributor of ROUTE 66 are aware of the possibility of such damages). This limitation is intended
to apply and does apply without regard to whether such damages are claimed, ascertained or brought in an
action or claim sounding in tort (including negligence) of contract, or other warranty, or any other law or form
of action. In no event shall ROUTE 66's liability to you or to any third party claiming through you, exceed the
purchase price of the Hardware and/or Software you purchase. This Limited Warranty shall not exclude or
limit the liability of ROUTE 66 for death or personal injury caused by the negligence of ROUTE 66, in
jurisdictions which do not allow such exclusion or limitation.
5) You cannot transfer this Limited Warranty to another person.
6) This Limited Warranty gives you specific legal rights and you may also have other rights that vary from
country to country. Some countries may not allow the exclusion or limitation of damages. If this Limited
Warranty is held to be invalid or unenforceable, such invalidity or unenforceability shall not invalidate or
render unenforceable the entire Limited Warranty, but rather the Limited Warranty shall be construed as if
not containing the particular invalid or unenforceable provision or provisions, and the rights and obligations of
each party shall be construed and enforced accordingly.
21