1
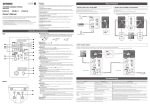
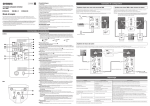
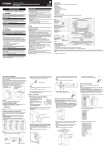
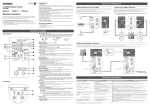
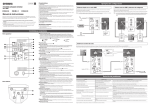
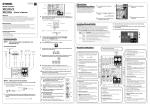
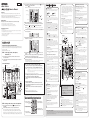
ZN42690 EN 3 Set the fader and all knobs ([GAIN] knob, Level knobs, Speakers [ Headphones [ MIXING CONSOLE ] knob, and ] knob) to the minimum. Controls and Functions 3MIC/LINE input jacks For connecting to a microphone, an instrument, or an audio device. These jacks support both XLR and phone plugs. [GAIN] knobs Welcome XLR Thank you for purchasing the Yamaha AG03 Mixing Console. Please read this manual thoroughly to get the most out of the product and ensure long-term, trouble-free use. After reading this manual, keep it readily available for future reference. For the remainder of this manual, the word "mixer" is used instead of "Mixing Console." Speakers [ ] knob Headphones [ ] knob Main Features 4 5 • Audio interface supports up to 24-bit/192 kHz recording. • An intuitive Loopback function enables fast and easy live webcasting. • Yamaha's premium “D-PRE” mic preamp provides high resolution sound. Make sure that the volume of the powered speakers is set to minimum. Turn on the power to connected devices in the following order: Instruments, audio devices Mixer's [ ] switch Powered monitor speakers. NOTICE Follow this order to avoid loud, unexpected noise from the speakers. Reverse the order when Included Accessories turning the power off. • USB cable (1.5 m) • Technical Specifications (English only): Includes general specifications, input/output characteristics, block diagram, dimensions, and jack and plug list. • CUBASE AI DOWNLOAD INFORMATION: Contains the access code necessary for downloading the Steinberg DAW software Cubase AI. • Owner's Manual (this leaflet) 6 If a microphone or instrument is connected to channel 1, set the [GAIN] knob to the 12 o'clock position. Slide the fader to the position indicated by the thick line, and turn the Level knobs to the 3 o'clock position. The "Yamaha Steinberg USB Driver" might be required for computer input/output. Visit the following Yamaha website for details on downloading and installing the driver, and making the necessary settings. http://www.yamahaproaudio.com/ag/ 2 Connect speakers, microphones, and instruments referring to the connection example below. Connection Example Electric guitar Microphones Electric keyboard Foot switch (Yamaha FC5) Audio device 8 Set the Speakers [ position. 9 Speak into your microphone, play your instrument, or play your audio device, and adjust the volume on the powered monitor speakers. ] knob and the Headphones [ ] knob to the 12 o'clock 10 If no sound is heard, of if you want to adjust the volume, follow the instructions in the boxed section below. If you still do not hear the sound after doing the following steps, please refer to the checklist in the "Troubleshooting" section at the back of this booklet. 1 Speak into your microphone or play your instrument, turning the [GAIN] knob to the right so that the corresponding [PEAK] LED flashes briefly. •If the [PEAK] LED does not light even if the [GAIN] knob has been turned fully to the right, raise the volume of the sound source (instrument, etc.). If no sound is heard or the volume does not increase after step 1: 2 If the [PAD] switch or [GAIN] switch is turned on (O), set the fader and Level knob fully to minimum, and then turn off (N) the switches. 3 Slowly slide the fader or turn the Level knob until the desired volume is reached. NOTICE •Please read the safety precautions for the USB power adapter or USB mobile battery that you are using. 1 2 Set the fader and the Level knob fully to the minimum, and then turn on (O) the [PAD] switch or [GAIN] switch on the channel for which you want to decrease the volume. Slowly slide the fader or turn the Level knob until the desired volume is reached. If the volume does not decrease after the above steps: 3 Output current: 0.5 A or greater NOTE If a microphone is connected to the [HEADSET] microphone input jack, the sound from the microphone or instrument connected to the MIC/LINE input jack 3 on channel 1 is cut off. Rear panel [HEADSET] headphones [ ] input jacks switch on (O) and off (N). Otherwise, noise may be produced. 8[+48V] phantom switch / [+48V] LED When this switch is turned on (O), the [+48V] LED lights and DC +48 V phantom power is supplied to the XLR plug on MIC/ LINE input jack 3. Turn this switch on when using a phantompowered condenser microphone. NOTICE Be sure to leave this switch off (N) if you do not need phantom power. Follow the important precautions below, in order to prevent noise and possible damage to external devices as well as the mixer if you turn this switch on (O). •Be sure to leave this switch off (N) when you connect a device that does not support phantom power to channel 1. •Make sure to turn this switch off (N) when connecting/disconnecting a cable to/from channel 1. 1 2 ^ Lower the volume of the instrument or audio device. Mixer Basics: Where Your Sound Goes If you are using condenser microphones, turn on (O) the [+48V] phantom power switch. 1 Input the sound from a STEP 2 Getting sound to the speakers or headphones. 1 Make sure that all switches including the [ pressed (N). 2 Use the included USB cable to connect your computer to the mixer. ] (Standby/On) switch are not When using the [USB 2.0] terminal on the mixer's rear panel, refer to the notice "Precautions when using the [USB 2.0] and [5V DC] terminals." When connecting a tablet or other device that cannot provide power to the mixer, connect a commercially available USB power adapter or USB mobile battery to the [5V DC] terminal (micro B). NOTE If a headphone plug is connected to the [HEADSET] & Front panel B[ microphone or instrument 5 Output the sound from speakers or headphones Channel number ] (Standby/On) switch 4 5 6 7 8 9 can cause the mixer to malfunction. After switching the [ Rapidly switching the [ * ( A B C D E ) ! @ If the level of the sound sent to the computer exceeds -10 dBu, [SIG] (green) turns on; if the level reaches 3 dB before clip level (+7 dBu), [PEAK] (red) turns on. To send an appropriate volume to the computer, adjust the volume of each channel until [SIG] remains lit and [PEAK] flashes only momentarily when there is a loud sound. D[AUX] input jack This is an auxiliary input jack. It supports a stereo mini plug. You can connect a smartphone or other device and use applications to trigger sound effects or background music. Use the controls on the connected device to adjust volume. G H E[MONITOR MUTE] switch When this switch is on (O), sound input to channels 1 and 2G is not output from the [MONITOR OUT] jacks ^ &, headphones [ ] output jack (, and [HEADSET] headphones [ ] output jack A (direct monitoring is OFF). FSpeakers [ ] knob** $ % Adjust the volume sent to the device connected to the [MONITOR OUT] jacks ^ &. GHeadphones [ )[PEAK] LED Determines the basic volume for channel 1. Adjust this knob so that the [PEAK] LED ) flashes briefly when singing or playing the loudest. This button turns on the compressor and equalizer (yellow LED lights). The default settings reduce unwanted lowfrequency noise and variations in vocal level, and have parameters that are suitable to webcasting. #[EFFECT] button* This button turns on the effects on channel 1 (yellow LED lights). The default settings have reverb turned on to add a natural spaciousness to the sound. ] switch to standby, wait for at least six seconds before turning it on again. F # NOTE Slide the fader to minimum before toggling the [PAD] switch ![GAIN] knob ] switch between on and standby in succession CLevel meter * You can use a dedicated application to set the detailed settings for [COMP/EQ] @ and [EFFECT] #. Visit the following Yamaha website for details. http://www.yamahaproaudio.com/ag/ n Resetting @ and # to factory default settings Turn the [ ] switch B on (O) while pressing and holding down the [COMP/EQ] button @. $Fader %Level knobs Set the volume balance between each channel. : Adjust the volume of the sound input from the microphone or other source connected to channel 1. : Adjust the volume of the sound input from the guitar, electric keyboard, or other source connected to channel 2. : Adjust the volume of the sound input from the computer via the [USB 2.0] terminal. 4 Final adjustment of the channels flows rightward ] output jack ( is cut off. NOTICE and effects of each channel. 3 The sound from all ] output jack, the sound output from the 3 Turning the switch on (O) will attenuate the sound input to channel 1. If you hear distortion or the [PEAK] LED ) lights frequently even if the [GAIN] knob ! is turned fully to the left, turn this switch on. 2 Adjust the volume, tone, volume of the mixed sound headphones [ headphones [ For turning the power of the unit to standby (N) and on (O). 9[PAD] switch Lights when the volume of input sound is too high. If it is lit, turn the [GAIN] knob ! to the left to lower the volume. ] output jack For connecting to the headphone for your headset. Normally this plug is color-coded in light green. The same sound as for the headphones [ ] output jack ( is output. •Slide the fader on channel 1 to minimum before turning this switch on (O)/off (N). on (O) and off (N). Otherwise, noise may be produced. ] input jack For connecting to the microphone plug for your headset. Normally this plug is color-coded in pink. The audio input here is sent to channel 1. Output voltage: 4.8 V to 5.2 V @[COMP/EQ] button* NOTE A[HEADSET] microphone [ •Use a USB power adapter or USB mobile battery that can supply power via a USB micro B plug based on the following USB standards: ] knob G) fully to "0" Speakers [ ] knob F and Headphones [ (minimum). Sudden high level peaks caused by the switching operation can damage external devices as well as the hearing of those present. 6LINE [ ] output jack For connecting to a set of headphones. This jack supports a stereo phone plug. To connect headphones or earphones with stereo mini plugs, you can use the [HEADSET] headphones output jack A. For connecting to a commercially available USB power adapter or USB mobile battery. Use this terminal when connecting the mixer to a tablet or other device that cannot supply power to the mixer. A USB power adapter or USB mobile battery is not included with the mixer. For switching the input on channel 2. Turn this switch on (O) when directly connecting an instrument with high output impedance, such as an electric guitar or electric bass, to the Guitar [ ] input jack 4. Turn this switch off (N) when ] input connecting a line-level instrument to the Line [ jack 6. When this switch is turned on, use an unbalanced cable with phone plugs to connect the instrument to the mixer. The mixer will not operate correctly if a balanced cable is used. n To decrease the volume: Rear panel Computer (Headphones [ 2[5V DC] terminal 5[GUITAR/LINE] switch NOTE Turn the Level knob to minimum before turning the [GAIN] as possible. Smartphone For connecting to an instrument, such as an electric guitar or an electric bass. This jack support phone plugs. This jack is disabled when the [GUITAR/LINE] switch 5 is off ( N). Determines the basic volume for channel 2/3. Turn this switch on (O) if you hear distortion. NOTE •For optimum volume when using a microphone, place the microphone as close to the sound source Headset Please do not connect any device to [USB 2.0] terminal other than personal computers or tablet devices. ] input jack (channel 2G) 4Guitar [ 7[GAIN] switch n There is no sound, or you need to increase the volume Headphones Phone For connecting to line-level devices such as an electric keyboard or an audio device. Use the [L/MONO] jack on channel 2 for instruments, etc. with mono output. In this case, the sound input to the [L/MONO] jack is output from both the L channel and R channel on the mixer. This jack is disabled when the [GUITAR/LINE] switch 5 is on (O). Preparation: Download and install drivers. Turn off the power of all speakers, instruments, and other devices to be connected to the mixer. For connecting to a separately-sold foot switch (Yamaha FC5, etc.). When the [EFFECT] button # is turned on, the effected sound can be muted with a foot switch. The [EFFECT] button LED flashes while the effected sound is muted. http://www.yamahaproaudio.com/ag/ When operating this switch, turn all output controls (such as the Quick Start Guide 1 *[FOOT SW] jack CAUTION 7 STEP 1 Connecting speakers, microphones, instruments, etc. Connect powered monitor speakers. These jacks support phone plugs (balanced/unbalanced). NOTICE Level knobs Fader Multi-purpose 3-channel mixer with audio interface, ideal for live webcasting ^[MONITOR OUT] jacks (RCA jacks) &[MONITOR OUT] jacks (phone jacks) For connecting to a computer using the included USB 2.0 cable. When connected to a computer, the computer supplies power to the mixer and audio data can be sent between the mixer and computer. A USB driver might be required for computer input/output. You can download the driver from the following Yamaha website, and install it on your computer. (Minimum: Lower fader to the bottom setting. Turn knobs fully to the left.) Owner’s Manual Powered monitor speakers 1[USB 2.0] terminal n Tips on volume adjustment Use the [PAD] switch, [GAIN] knob/[GAIN] switch, and fader/Level knobs to adjust volume. However, the [PAD] switch and [GAIN] knob/[GAIN] switch should not be adjusted again once they have been set optimally. Normally, the fader/Level knobs are used to adjust volume. For details about each function, see "Controls and Functions". ] knob** Adjust the volume to headphones connected to the Headphones [ ] output jack ( and [HEADSET] headphones [ ] output jack A. ** The Speakers [ ] knob and Headphones [ adjusted separately. ] knob can be H[TO PC] slide switch Select the sound to send to the computer. [DRY CH 1-2G]: Sends the sound after [GAIN] knob adjustments from channel 1 and the sound immediately after the [GAIN] switch from channel 2G directly to the computer. The sound that is sent is not affected by Level knob adjustments. The sounds input to channels 1 and 2G (guitar and vocal, etc.) can be recorded separately, as with an audio interface. [INPUT MIX]: The sound input into the mixer and mixed in stereo is sent to the computer. Sound input from the computer is not sent back to the computer. [LOOPBACK]: The sound input into the mixer and the sound played on the computer are mixed in stereo and sent to the computer. This setting is used primarily for webcasting. NOTE To prevent feedback when using DAW software, use either [DRY CH1-2G] or [INPUT MIX]. Recording Mounting to a Microphone Stand Recording requires the download and installation of DAW software. The unit can be mounted onto a microphone stand as illustrated at right, by using the optionally available Yamaha BMS-10A microphone stand adapter. For instructions on mounting, refer to the BMS-10A Owner's Manual. Visit the following Yamaha website for details on downloading and installing the Steinberg DAW software Cubase AI, and making the necessary settings. At that time, also refer to the included CUBASE AI DOWNLOAD INFORMATION for important information. http://www.yamahaproaudio.com/ag/ PRECAUTIONS PLEASE READ CAREFULLY BEFORE PROCEEDING Please keep this manual in a safe place for future reference. WARNING Always follow the basic precautions listed below to avoid the possibility of serious injury or even death from electrical shock, short-circuiting, damages, fire or other hazards. These precautions include, but are not limited to, the following: General Specifications Webcasting Set the [TO PC] slide switch H to [LOOPBACK]. Input Channels Mono (MIC/LINE): 1 including HEADSET MIC (Plug-in Power), Stereo (LINE)/ Mono (GUITAR): 1, USB IN: 1, AUX IN: 1 Output Channels MONITOR OUT: 2, PHONES: 2 including HEADSET PHONES Bus Stereo: 1 Input Channel Function DSP (CH1) Level Meter USB Audio Phantom Power Voltage Sound input from the computer Channels 2/3 Channel 1 Visit the following Yamaha website for details on webcasting. http://www.yamahaproaudio.com/ag/ Troubleshooting • This device contains no user-serviceable parts. Do not open the device or attempt to disassemble the internal parts or modify them in any way. If it should appear to be malfunctioning, discontinue use immediately and have it inspected by qualified Yamaha service personnel. 26 dB PAD When set to [LOOPBACK], the following signals are mixed and sent to the computer. Do not open Water warning COMP/EQ, EFFECT (SPX Reverb) PEAK LED LED turns on when the signal reaches 3 dB below clipping level. USB Output Level 2x2 point LED meter [PEAK, SIG] 2 IN / 2 OUT USB Audio Class 2.0 compliant, Sampling Frequency: Max 192 kHz, Bit Depth: 24-bit • Do not expose the device to rain, use it near water or in damp or wet conditions, or place on it any containers (such as vases, bottles or glasses) containing liquids which might spill into any openings. If any liquid such as water seeps into the device, turn off the power immediately and disconnect the USB cable from the computer. Then have the device inspected by qualified Yamaha service personnel. +48 V FOOT SW EFFECT Mute on/off Power Requirements DC 5 V, 500 mA • Never insert or remove a USB cable with wet hands. Fire warning Power Consumption Max. 2.5 W • Do not put burning items, such as candles, on the unit. A burning item may fall over and cause a fire. Dimensions (WxHxD) 129 mm × 63 mm × 202 mm (5.1" x 2.5" x 8.0") If you notice any abnormality Net Weight 0.8 kg (1.8 lbs) Optional Accessory Foot Switch: FC5, Mic Stand Adaptor: BMS-10A Operating Temperature 0 to +40°C • When one of the following problems occur, immediately turn off the power switch and disconnect the USB cable from the computer. Then have the device inspected by Yamaha service personnel. Power does not come on. Did you properly connect the mixer and a computer by using the included USB cable? Did you press the [ ] (Standby/On) switch? Did you download and install the Yamaha Steinberg USB Driver from the following Yamaha website? http://www.yamahaproaudio.com/ag/ Did you properly connect the external devices such as microphones, and powered monitor speakers? Are any connecting cables shorted or damaged? • Do not place the device in a location where it may come into contact with corrosive gases or salt air. Doing so may result in malfunction. Connections • Before connecting the device to other devices, turn off the power for all devices. Before turning the power on or off for all devices, set all volume levels to minimum. Maintenance • Remove the USB cable from a computer when cleaning the device. Handling caution • Avoid inserting or dropping foreign objects (paper, plastic, metal, etc.) into any gaps or openings on the device. If this happens, turn off the power immediately and disconnect the USB cable from the computer. Then have the device inspected by qualified Yamaha service personnel. [For business users in the European Union] If you wish to discard electrical and electronic equipment, please contact your dealer or supplier for further information. [Information on Disposal in other Countries outside the European Union] This symbol is only valid in the European Union. If you wish to discard these items, please contact your local authorities or dealer and ask for the correct method of disposal. ] knob, or the Headphones [ ] knob set Are the [PEAK] (red) indicators of the level meter lit? Adjust the fader and Level knobs to appropriate levels. Lowering the volume with the Speakers [ ] knob or the Headphones [ ] knob will not affect the [PEAK] indicators on the level meter. Is the volume from a connected device too loud? Lower the volume of the connected device. Are the [PAD] switch and [GAIN] switch turned off (N)? Turn these switches on (O). If the volume of the sound source is too loud, turning off (N) these switches might result in distorted sound. Is the [TO PC] slide switch set to [LOOPBACK]? If this switch is set to [LOOPBACK] when using DAW software, a loop might be produced depending on the settings of the DAW software, possibly resulting in feedback. When recording while listening to the sound via a computer, be sure to set this switch to a setting other than [LOOPBACK]. The sound of vocals and speech isn't clear enough. Turn on the [COMP/EQ] button (yellow LED lights). The default settings for this button have parameters that are suitable for webcasting, reducing unwanted low-frequency noise and variations in vocal level. No effect is applied. Did you turn on the [EFFECT] button (yellow LED lights)? (weee_eu_en_01) • Do not use speakers or headphones for a long period of time at a high or uncomfortable volume level, since this can cause permanent hearing loss. If you experience any hearing loss or ringing in the ears, consult a physician. Yamaha cannot be held responsible for damage caused by improper use or modifications to the device, or data that is lost or destroyed. (PA_en_4) NORTH AMERICA Yamaha Canada Music Ltd. 135 Milner Avenue, Toronto, Ontario, M1S 3R1, Canada Tel: 416-298-1311 U.S.A. Yamaha Corporation of America 6600 Orangethorpe Avenue, Buena Park, CA 90620, U.S.A. Tel: 714-522-9011 CENTRAL & SOUTH AMERICA MEXICO Yamaha de México, S.A. de C.V. Av. Insurgentes Sur 1647 Piso 9, Col. San José Insurgentes, Delegación Benito Juárez, México, D.F., C.P. 03900 Tel: 55-5804-0600 BRAZIL Yamaha Musical do Brasil Ltda. Rua Joaquim Floriano, 913 - 4º andar, Itaim Bibi, CEP 04534-013 São Paulo, SP. BRAZIL Tel: 011-3704-1377 VENEZUELA To avoid the possibility of malfunction/ damage to the product, damage to data, or damage to other property, follow the notices below. • Do not use the device in the vicinity of a TV, radio, stereo equipment, mobile phone, or other electric devices. Otherwise, the device, TV, or radio may generate noise. • Do not expose the device to excessive dust or vibration, or extreme cold or heat (such as in direct sunlight, near a heater, or in a car during the day), in order to prevent the possibility of panel disfiguration, unstable operation, or damage to the internal components. • Do not place vinyl, plastic or rubber objects on the device, since this might discolor the panel. • When cleaning the device, use a dry and soft cloth. Do not use paint thinners, solvents, cleaning fluids, or chemicalimpregnated wiping cloths. • Condensation can occur in the device due to rapid, drastic changes in ambient temperature—when the device is moved from one location to another, or air conditioning is turned on or off, for example. Using the device while condensation is present can cause damage. If there is reason to believe that condensation might have occurred, leave the device for several hours without turning on the power until the condensation has completely dried out. • Do not apply oil, grease, or contact cleaner to the faders. Doing so may cause problems with electrical contact or fader motion. • When turning on the AC power in your audio system, always turn on the power amplifier LAST, to avoid speaker damage. When turning the power off, the power amplifier should be turned off FIRST for the same reason. 1. IMPORTANT NOTICE: DO NOT MODIFY THIS UNIT! This product, when installed as indicated in the instructions contained in this manual, meets FCC requirements. Modifications not expressly approved by Yamaha may void your authority, granted by the FCC, to use the product. • Always set the [ 2. IMPORTANT: When connecting this product to accessories and/ \or another product use only high quality shielded cables. Cable/s supplied with this product MUST be used. Follow all installation instructions. Failure to follow instructions could void your FCC authorization to use this product in the USA. 3. NOTE: This product has been tested and found to comply with the requirements listed in FCC Regulations, Part 15 for Class “B” digital devices. Compliance with these requirements provides a reasonable level of assurance that your use of this product in a residential environment will not result in harmful interference with other electronic devices. This equipment generates/uses radio frequencies and, if not installed and used according to the instructions found in the users manual, may cause interference harmful to the operation of other electronic devices. Compliance with FCC regulations does not guarantee that interference will not occur in all installations. If this product is found to be the source of interference, which can be determined by turning the unit “OFF” and “ON”, please try to eliminate the problem by using one of the following measures: Relocate either this product or the device that is being affected by the interference. Utilize power outlets that are on different branch (circuit breaker or fuse) circuits or install AC line filter/s. In the case of radio or TV interference, relocate/reorient the antenna. If the antenna lead-in is 300 ohm ribbon lead, change the lead-in to co-axial type cable. If these corrective measures do not produce satisfactory results, please contact the local retailer authorized to distribute this type of product. If you can not locate the appropriate retailer, please contact Yamaha Corporation of America, Electronic Service Division, 6600 Orangethorpe Ave, Buena Park, CA90620 The above statements apply ONLY to those products distributed by Yamaha Corporation of America or its subsidiaries. * This applies only to products distributed by YAMAHA CORPORATION OF AMERICA. For details of products, please contact your nearest Yamaha representative or the authorized distributor listed below. CANADA • Avoid setting all equalizer controls and faders to their maximum. Depending on the condition of the connected devices, doing so may cause feedback and may damage the speakers. FCC INFORMATION (U.S.A.) Is the [PEAK] LED lit? Lower the [GAIN] knob, or turn on (O) the [PAD] switch. (class b korea) • Do not rest your weight on the device or place heavy objects on it, and avoid use excessive force on the buttons, switches or connectors. Yamaha Music Latin America, S.A., Sucursal Argentina Olga Cossettini 1553, Piso 4 Norte, Madero Este-C1107CEK Buenos Aires, Argentina Tel: 011-4119-7000 Handling and maintenance (class B) (FCC DoC) • Do not insert your fingers or hands in any gaps or openings on the device. • If this device should be dropped or damaged, immediately turn off the power switch, disconnect the USB cable from the computer, and have the device inspected by qualified Yamaha service personnel. By disposing of these products correctly, you will help to save valuable resources and prevent any potential negative effects on human health and the environment which could otherwise arise from inappropriate waste handling. Did you properly adjust the [GAIN] knob, fader, Level knobs, Speakers [ ] knob, and Headphones [ ] knob to appropriate levels? Are the [PAD] switches and [GAIN] switches turned on (O)? Turn these switches off (N). If the volume of the sound source is too soft, turning on (O) these switches might result in no audible sound. Sound is faint, distorted, or noisy. Responsible Party : Yamaha Corporation of America Address : 6600 Orangethorpe Ave., Buena Park, Calif. 90620 Telephone : 714-522-9011 Type of Equipment : Mixing Console Model Name : AG03 This device complies with Part 15 of the FCC Rules. Operation is subject to the following two conditions: 1) this device may not cause harmful interference, and 2) this device must accept any interference received including interference that may cause undesired operation. See user manual instructions if interference to radio reception is suspected. * This applies only to products distributed by YAMAHA CORPORATION OF AMERICA. - There is a sudden loss of sound during use of the device. NOTICE If you are using webcasting software, is the volume adjusted appropriately in the software? COMPLIANCE INFORMATION STATEMENT (DECLARATION OF CONFORMITY PROCEDURE) • Before moving the device, remove all connected cables. - Some object has been dropped into the device. This symbol on the products, packaging, and/or accompanying documents means that used electrical and electronic products should not be mixed with general household waste. For proper treatment, recovery and recycling of old products, please take them to applicable collection points, in accordance with your national legislation and the Directives 2002/96/EC. For more information about collection and recycling of old products, please contact your local municipality, your waste disposal service or the point of sale where you purchased the items. Is the [MONITOR MUTE] switch turned on (O)? (bottom_en_01) • Do not place the device in an unstable position where it might accidentally fall over. ARGENTINA Did you turn on the power of connected electric instruments and external devices, and the powered monitor speakers? Are the [GAIN] knob, fader, Level knobs, Speakers [ too high? Serial No. Information for Users on Collection and Disposal of Old Equipment No sound. Model No. Location - It emits unusual smells or smoke. The contents of this manual apply to the latest specifications as of the printing date. Since Yamaha makes continuous improvements to the product, this manual may not apply to the specifications of your particular product. To obtain the latest manual, access the Yamaha website then download the manual file. Since specifications, equipment or separately sold accessories may not be the same in every locale, please check with your Yamaha dealer. The model number, serial number, power requirements, etc., may be found on or near the name plate, which is at the bottom of the unit. You should note this serial number in the space provided below and retain this manual as a permanent record of your purchase to aid identification in the event of theft. Always follow the basic precautions listed below to avoid the possibility of physical injury to you or others, or damage to the device or other property. These precautions include, but are not limited to, the following: - The USB cable becomes frayed or damaged. For other specifications, see the included "Technical Specifications." Check the following items before contacting a Yamaha dealer. If the symptoms are not improved, contact your nearest Yamaha dealer. CAUTION ] (Standby/On) switch to the standby position when the device is not in use. Connectors XLR-type connectors are wired as follows (IEC60268 standard): pin 1: ground, pin 2: hot (+), and pin 3: cold (-). Precautions when using the [USB 2.0] and [5V DC] terminals When connecting the computer to the [USB 2.0] connector, make sure to observe the following points. Failing to do so risks freezing the computer and corrupting or losing the data. If the computer or the mixer freezes, restart the application software or the computer OS, or turn the mixer's [ ] (Standby/On) switch to standby and then on again. Yamaha Music Latin America, S.A., Sucursal Venezuela C.C. Manzanares Plaza P4 Ofic. 0401- Manzanares-Baruta Caracas Venezuela Tel: 58-212-943-1877 PANAMA AND OTHER LATIN AMERICAN COUNTRIES/ CARIBBEAN COUNTRIES Yamaha Music Latin America, S.A. Torre Banco General, Piso No.7, Marbella, Calle 47 y Aquilino de la Guardia, Ciudad de Panamá, República de Panamá Tel: +507-269-5311 EUROPE THE UNITED KINGDOM/IRELAND Yamaha Music Europe GmbH (UK) Sherbourne Drive, Tilbrook, Milton Keynes, MK7 8BL, U.K. Tel: 01908-366700 MALTA Olimpus Music Ltd. The Emporium, Level 3, St. Louis Street Msida MSD06 Tel: 02133-2144 NETHERLANDS/BELGIUM/ LUXEMBOURG Yamaha Music Europe Branch Benelux Clarissenhof 5-b, 4133 AB Vianen, Netherlands Tel: 0347-358 040 FRANCE Yamaha Music Europe 7 rue Ambroise Croizat, Zone d'activites Pariest, 77183 Croissy-Beaubourg, France Tel: 01-64-61-4000 ITALY SWITZERLAND/LIECHTENSTEIN Yamaha Music Europe GmbH Branch Switzerland in Zürich Seefeldstrasse 94, 8008 Zürich, Switzerland Tel: 044-387-8080 AUSTRIA/BULGARIA Yamaha Music Europe GmbH Branch Austria Schleiergasse 20, A-1100 Wien, Austria Tel: 01-60203900 CZECH REPUBLIC/HUNGARY/ ROMANIA/SLOVAKIA/SLOVENIA Yamaha Music Europe GmbH Branch Austria (Central Eastern Europe Office) Schleiergasse 20, A-1100 Wien, Austria Tel: 01-60203900 POLAND/LITHUANIA/LATVIA/ESTONIA Yamaha Music Europe GmbH Branch Poland Office ul. Wrotkowa 14 02-553 Warsaw, Poland Tel: 022-500-2925 PA37 Yamaha Music & Electronics (China) Co.,Ltd. 2F, Yunhedasha, 1818 Xinzha-lu, Jingan-qu, Shanghai, China Tel: 400-051-7700 INDIA Yamaha Music India Pvt. Ltd. Spazedge building, Ground Floor, Tower A, Sector 47, Gurgaon- Sohna Road, Gurgaon, Haryana, India Tel: 0124-485-3300 INDONESIA PT. Yamaha Musik Indonesia (Distributor) Yamaha Music Center Bldg. Jalan Jend. Gatot Subroto Kav. 4, Jakarta 12930, Indonesia Tel: 021-520-2577 Yamaha Music Europe GmbH, Branch Italy Viale Italia 88, 20020 Lainate (Milano), Italy Tel: 02-935-771 KOREA Yamaha Music Europe GmbH Ibérica, Sucursal en España Ctra. de la Coruna km. 17,200, 28231 Las Rozas (Madrid), Spain Tel: +34-91-639-88-88 MALAYSIA Philippos Nakas S.A. The Music House 147 Skiathou Street, 112-55 Athens, Greece Tel: 01-228 2160 SINGAPORE Yamaha Music Europe GmbH Germany filial Scandinavia JA Wettergrensgata 1, Västra Frölunda, Sweden Tel: +46 31 89 34 00 TAIWAN Yamaha Music Europe GmbH, Tyskland – filial Denmark Generatorvej 8B, DK-2730 Herlev, Denmark Tel: 44 92 49 00 THAILAND SPAIN/PORTUGAL GREECE SWEDEN/FINLAND/ICELAND DENMARK NORWAY Yamaha Music Europe GmbH Germany Norwegian Branch Grini Næringspark 1, N-1361 Østerås, Norway Tel: 67 16 78 00 RUSSIA Yamaha Music (Russia) LLC. Room 37, bld. 7, Kievskaya street, Moscow, 121059, Russia Tel: 495 626 5005 OTHER EUROPEAN COUNTRIES Yamaha Music Europe GmbH Siemensstraße 22-34, 25462 Rellingen, Germany Tel: +49-4101-3030 GERMANY Yamaha Music Europe GmbH Siemensstraße 22-34, 25462 Rellingen, Germany Tel: 04101-3030 ASIA THE PEOPLE’S REPUBLIC OF CHINA AFRICA Yamaha Music Gulf FZE Office JAFZA 16-512, P.O.Box 17328, Jebel Ali - Dubai, UAE Tel: +971-4-881-5868 MIDDLE EAST TURKEY Yamaha Music Europe GmbH Merkezi Almanya Türkiye İstanbul Şubesi Maslak Meydan Sokak No:5 Spring Giz Plaza Bağımsız Böl. No:3, 34398 Şişli İstanbul Tel: +90-212-999-8010 CYPRUS Yamaha Music Korea Ltd. 8F, 9F, Dongsung Bldg. 158-9 Samsung-Dong, Kangnam-Gu, Seoul, Korea Tel: 02-3467-3300 Yamaha Music (Malaysia) Sdn., Bhd. No.8, Jalan Perbandaran, Kelana Jaya, 47301 Petaling Jaya, Selangor, Malaysia Tel: 03-78030900 Yamaha Music (Asia) Private Limited Block 202 Hougang Street 21, #02-00, Singapore 530202, Singapore Tel: 65-6747-4374 Yamaha Music & Electronics Taiwan Co.,Ltd. 3F, No.6, Section 2 Nan-Jing East Road, Taipei, Taiwan R.O.C. Tel: 02-2511-8688 Siam Music Yamaha Co., Ltd. 3, 4, 15 and 16th floor, Siam Motors Building, 891/1 Rama 1 Road, Wangmai, Pathumwan, Bangkok 10330, Thailand Tel: 02-215-2622 VIETNAM Yamaha Music Vietnam Company Limited 15th Floor, Nam A Bank Tower, 201-203 Cach Mang Thang Tam St., Ward 4, Dist.3, Ho Chi Minh City, Vietnam Tel: +84-8-3818-1122 OTHER ASIAN COUNTRIES Yamaha Corporation Sales & Marketing Division Nakazawa-cho 10-1, Naka-ku, Hamamatsu, Japan 430-8650 Tel: +81-53-460-2312 OCEANIA AUSTRALIA Yamaha Music Australia Pty. Ltd. Level 1, 99 Queensbridge Street, Southbank, Victoria 3006, Australia Tel: 3-9693-5111 COUNTRIES AND TRUST TERRITORIES IN PACIFIC OCEAN Yamaha Corporation Sales & Marketing Division Nakazawa-cho 10-1, Naka-ku, Hamamatsu, Japan 430-8650 Tel: +81-53-460-2312 Yamaha Music Europe GmbH Siemensstraße 22-34, 25462 Rellingen, Germany Tel: 04101-3030 OTHER COUNTRIES Yamaha Music Gulf FZE Office JAFZA 16-512, P.O.Box 17328, Jebel Ali - Dubai, U.A.E Tel: +971-4-881-5868 HEAD OFFICE Yamaha Corporation, Audio Products Sales and Marketing Division Nakazawa-cho 10-1, Naka-ku, Hamamatsu, Japan 430-8650 • U se an AB type USB cable. USB 3.0 cable cannot be used. • B efore connecting the computer to the [USB 2.0] terminal, exit from any power-saving mode of the computer (such as suspend, sleep, standby). • Turn the [ ] switch to standby before connecting cables to the [USB 2.0] and [5V DC] terminals. • Be sure to quit any open applications and turn the [ ] switch to standby before unplugging cables from the [USB 2.0] and [5V DC] terminals. • Wait for six seconds or more whenever turning the mixer's [ ] switch from standby to on or from on to standby. Information About this manual • The illustrations as shown in this manual are for instructional purposes only. • Steinberg and Cubase are registered trademarks of Steinberg Media Technologies GmbH. • The company names and product names in this manual are the trademarks or registered trademarks of their respective companies. Yamaha Pro Audio global web site: http://www.yamahaproaudio.com/ Yamaha Manual Library http://www.yamaha.co.jp/manual/ Manual Development Department ©2015 Yamaha Corporation Published 01/2015 MWZC*.*-01A0 Printed in Indonesia