1
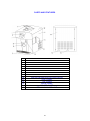
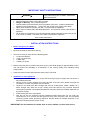
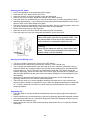
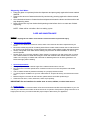
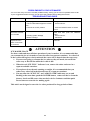
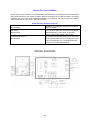
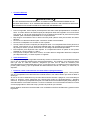
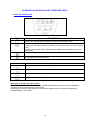
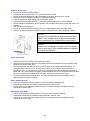
ICE/WATER DISPENSER DISPENSADOR DE AGUA Y HIELO INSTRUCTION MANUAL MANUAL DE INSTRUCCIONES Model Number No. de Modelo WIMD332PC-IS BEFORE USE, PLEASE READ AND FOLLOW ALL SAFETY RULES AND OPERATING INSTRUCTIONS. La sección en español empieza en la página 15. Avanti has a policy of continuous improvement on its products and reserves the right to change materials and specifications without notice. AVANTI PRODUCTS LLC P.O. Box 520604 - Miami, Florida 33152 www.avantiproducts.com TABLE OF CONTENTS Appliance Safety 3 Important Safeguides 4 Help Us Help You 5 Parts and Features 6 Electrical Connection \ Extension Cord \ Surge Protector 7 Important Safety Instructions 8 Installation Instructions 8 Before Using Your Appliance 8 Installation of Your Appliance 8 Operating Your Appliance 9 Control Panel Description 9 Operating instructions 10 - 11 Care and Maintenance 11 Cleaning Your Appliance 11 Space Requirements 11 Power Failure 11 Troubleshooting Guide 12 Service for Your Appliance 13 Wiring Diagram 13 Your Avanti Products Warranty 14 Instrucciones en Español 15 – 20 Registration Information and Registration Card 23 2 APPLIANCE SAFETY YOUR SAFETY AND THE SAFETY OF OTHERS ARE VERY IMPORTANT. We have provided many important safety messages in this manual for your appliance. Always read and obey all safety messages. This is the safety alert symbol. This symbol alerts you to Potential hazards that can kill or injure you and others. All safety messages will follow the safety alert symbol And either the words” DANGER”, “WARNING” or “CAUTION”. Danger means that failure to heed this safety statement may result in severe personal injury or death. Warning means that failure to heed this safety statement may result in extensive product damage, serious personal injury, or death. Caution means that failure to heed this safety statement may result in minor or moderate personal injury, property or equipment damage. All safety messages will alert you to know what potential hazard is, tell you how to reduce the chance of injury, and let you know what can happen if the instructions are not followed. 3 IMPORTANT SAFEGUIDES Before the appliance is used, it must be properly positioned and installed as described in this manual, so read the manual carefully. To reduce the risk of fire, electrical shock or injury when using the appliance, follow basic precaution, Including the following: • • • • • • • Plug into a grounded 3-prong outlet, do not remove grounding prong, do not use an adapter, and do not use an extension cord. It is recommended that a separate circuit, serving only your appliance be provided. Use receptacles that cannot be turned off by a switch or pull chain. Never clean appliance parts with flammable fluids. These fumes can create a fire hazard or explosion. And do not store or use gasoline or other flammable vapors and liquids in the vicinity of this or any other appliance. The fumes can create a fire hazard or explosion. Before proceeding with cleaning and maintenance operations, make sure the power line of the unit is disconnected. Do not connect or disconnect the electric plug when your hands are wet. Unplug the appliance or disconnect power before cleaning or servicing. Failure to do so can result in electrical shock or death. Do not attempt to repair or replace any part of your appliance unless it is specifically recommended in this manual. All other servicing should be referred to a qualified technician. FOLLOW WARNING CALL OUTS BELOW ONLY WHEN APPLICABLE TO YOUR MODEL • • • • • • • • • • • • • • • Use two or more people to move and install appliance. Failure to do so can result in back or other injury. To ensure proper ventilation for your appliance, the front of the unit must be completely unobstructed. Choose ° a well-ventilated area with temperatures above 60°f (16 c) and below 90°f (32°c). This unit must be installed in an area protected from the element, such as wind, rain, water spray or drips. The appliance should not be located next to ovens, grills or other sources of high heat. The appliance must be installed with all electrical, water and drain connections in accordance with state and local codes. A standard electrical supply (115 v ac only, 60 hz), properly grounded in accordance with the national electrical code and local codes and ordinances is required. Do not kink or pinch the power supply cord of appliance. The fuse (or circuit breaker) size should be 15 amperes. It is important for the appliance to be leveled in order to work properly. You may need to make several adjustments to level it. All installation must be in accordance with local plumbing code requirements. Make certain that the pipes are not pinched or kinked or damaged during installations. Check for leaks after connection. Never allow children to operate, play with or crawl inside the appliance. If you use the drainage container, you must set the drain select switch to off or the water can overflow from the drainage container Although the unit has been tested at the factory, due to long-term transit and storage, the first batch of cubes must be discarded. Do not use solvent-based cleaning agents of abrasives on the interior. These cleaners may damage or discolor the interior. Do not use this apparatus for other than its intended purpose. 4 Help us help you… Write down the model and serial numbers. Read this guide carefully. You'll find them on a plate located on the rear wall of the ice maker. It is intended to help you operate and maintain your new ice maker properly. Please write these numbers here: Keep it handy to answer your questions. If you don't understand something or you need more help, please call: ____________________________________ Date of purchase Avanti customer service 800-220-5570 ____________________________________ Model number Keep proof of original purchase date (such as your sales slip) with this guide to establish the warranty period. ____________________________________ Serial number Use these numbers in any correspondence or service calls concerning your ice maker. If you received a damaged ice maker, immediately contact the dealer (or builder) that sold you the ice maker. Save time and money. Before you call for service, check the troubleshooting guide. It lists causes of minor operating problems that you can correct yourself. If you need service details, including your telephone number, and send it to: We're proud of our service and want you to be pleased. If for some reason you are not happy with the service you receive, here are some steps to follow for further assistance. First, contact the people who serviced your ice maker. Explain why you are not pleased. In most cases, this will solve the problem. Next, if you are still not pleased, write all the Customer Service Avanti Products th 10880 NW 30 Street Miami, Fl 33172 USA 5 PARTS AND FEATURES 1 2 3 4 5 6 7 8 9 10 11 12 13 14 15 ICE BIN ACCESS LID FRONT COVER PANEL LCD DISPLAY CONTROL PANEL ICE DISPENSER OUTLET ICE DISPENSER ACTUATOR WATER DRIP TRAY WITH COVER COLD WATER DISPENSER OUTLET FAN VENT WATER RESERVOIR ACCESS DOOR SIDE PANEL TOP PANEL BACK PANEL POWER CORD DRAIN HOLE WITH CAP 6 Electrical connection WARNING IMPROPER USE OF THE GROUNDED PLUG CAN RESULT IN THE RISK OF ELECTRICAL SHOCK. IF THE POWER CORD IS DAMAGED, HAVE IT REPLACED BY AN AUTHORIZED AVANTI PRODUCTS SERVICE CENTER. This appliance should be properly grounded for your safety. The power cord of this appliance is equipped with a three-prong plug which mates with standard three prong wall outlets to minimize the possibility of electrical shock. Do not under any circumstances cut or remove the third ground prong from the power cord supplied. For personal safety, this appliance must be properly grounded. This appliance requires a standard 115/120 Volt AC ~/60Hz electrical ground outlet with three-prong. Have the wall outlet and circuit checked by a qualified electrician to make sure the outlet is properly grounded. When a standard 2-prong wall outlet is encountered, it is your responsibility and obligation to have it replaced with a properly grounded 3-prong wall outlet. The cord should be secured behind the appliance and not left exposed or dangling to prevent accidental injury. The appliance should always be plugged into its own individual electrical outlet which has a voltage rating that matches the rating label on the appliance. This provides the best performance and also prevent overloading house wiring circuits that could cause a fire hazard from overheated. Never unplug the appliance by pulling the power cord. Always grip the plug firmly and pull straight out from the receptacle. Repair or replace immediately all power cords that have become frayed or otherwise damaged. Do not use a cord that shows cracks or abrasion damage along its length or at either end. When moving the appliance, be careful not to damage the power cord. EXTENSION CORD Because of potential safety hazards under certain conditions, it is strongly recommended that you do not use an extension cord with this appliance. However, if you must use an extension cord it is absolutely necessary that it be a UL/CUL-Listed, 3-wire grounding type appliance extension cord having a grounding type plug and outlet and that the electrical rating of the cord be 115 volts and at least 10 amperes. SURGE PROTECTOR Most electrical appliances use a series of electric control boards to operate. These boards are very susceptible to power surges and could be damaged or destroyed. If the appliance is going to be used in an area or if your city / country is prone to power surges / outages; it is suggested that you use a power surge protector for all electrical devices / appliances you use. The surge protector that you select must have a surge block high enough to protect the appliance it is connected to. If you have any questions regarding the type and size of surge protector needed contact a licensed electrician in your area. Damages due to power surges are not considered a manufacturer covered defect and will void your product warranty. 7 IMPORTANT SAFETY INSTRUCTIONS To reduce the risk of fire, electrical shock, or injury when using your ice maker, follow these basic precautions: WARNING • • • • • • Read all instructions before using the ice maker. Danger or Warning: risk of child entrapment. Child entrapment and suffocation are not problems of the past. Junked or abandoned appliances are still dangerous. . . Even if they will “just sit in the garage a few days.” Never allow children to operate, play with, or crawl inside the appliance. Never clean ice maker parts with flammable fluids. The fumes can create a fire hazard or explosion. Do not store or use gasoline or any other flammable vapors and liquids in the vicinity of this or any other ice maker. The fumes can create a fire hazard or explosion. -Save These Instructions- INSTALLATION INSTRUCTIONS Before Using Your Ice Maker • Remove the exterior and interior packing. • Check to be sure you have all of the following parts: • 1 Instruction Manual • 1 Drip Tray Assembly • 1 Water Cup • 1 Plastic Ice Scoop • Before connecting the ice maker to the power source, let it stand upright for approximately 2 hours. This will reduce the possibility of a malfunction in the cooling system from handling during transportation. • Clean the interior surface with lukewarm water using a soft cloth. Installation of Your Appliance • Place your ice/water dispenser on counter that is strong enough to support the unit when it is fully loaded with water. • Allow 5 inches of space between the back and sides of the unit, which allows the proper air circulation to cool the compressor and condenser. • Locate the unit away from direct sunlight and sources of heat (stove, heater, radiator, etc.). Direct sunlight may affect the acrylic coating and heat sources may increase electrical consumption. Extreme cold ambient temperatures may also cause the ice/water dispenser not to perform properly. • Avoid locating the unit in moist areas. • Plug the unit into an exclusive properly installed-grounded wall outlet. Do not under any circumstances cut or remove the third (ground) prong from the power cord. Any questions concerning power and/or grounding should be directed toward a certified electrician or an authorized Avanti Products service center. IMPORTANT: Do not install the Ice maker near an oven, radiator, or other heat source. 8 OPERATING YOUR ICE MAKER Control Panel Description Display Meanings and How to operate ADD WATER Water level in reservoir is not sufficient to begin the ice making cycle. Using the water cup included with the unit, fill the water reservoir up to the line marked “MAX”. ICE MAKING CYCLE STATUS When the fan is rotating this means the unit is currently in the ice making cycle. When the fan is stopped this mean the unit is not currently making ice. If there is an “S” at the top right corner of the fan symbol, this means the small sized ice cubes has been selected. If there is an “L” at the bottom right corner of the fan symbol, this means the large sized ice cubes has been selected. DISPENSING ICE The unit will show this icon while dispensing ice. ICE BIN IS FULL After you dispensed or removed the ice, unit will restart automatically. Button Operation Press this button to select the small sized ice cubes This is the DEFAULT setting. Press this button to select the large sized ice cubes. Press this button to dispense cold water. Press this button to turn the unit ON / OFF or to reset the ice making cycle. Ice Size Selector The size selection will stay as selected unless changed or there is a power failure. For the most efficient operation when ambient temperature is below 15°C (59ºF) use the small cube size setting. 9 Starting your Ice maker • Plug in the appliance to an appropriate power supply • Press the ON / OFF button to turn the unit on. • Open the reservoir cover door located on the right side panel. • Remove any dust or foreign objects that may be in the water reservoir • Using the water cup included with your unit, fill the water tank up to the area marked “MAX”: • Dispense approximately 1 cup of water by pressing the button marked WATER on the control panel to clear out the water dispenser system. • Open the drain plug located at the rear of the unit to drain out any remaining water, make sure you have a bucket or other object to collect the water to avoid spillage. • Return the drain plug to its original position. • Open the reservoir cover door and fill the reservoir to the max position. • Close the reservoir cover door and press the ON/OFF to turn the unit off. Warning: Never add water past the line marked “MAX”, this will cause water to flow out of the reservoir and soak electronic components inside the unit. Warning: Never fill the dispenser with any liquid other than water. This will cause damage to the dispensing systems and void the warranty. Starting the Ice Making Cycle • • • • • Turn the unit ON by pressing the “Power ON / OFF” button. Select desired ice cube size by pressing the “SELECT” BUTTON (S or L). The ice-maker will automatically check the water level in the reservoir periodically. The ice maker will detect any shortage of water and will stop the ice-making cycle, the ADD WATER indicator will be lit. Turn the unit OFF by pressing the Power ON / OFF button and fill the reservoir with water. Press the Power ON / OFF button again to restart the ice-making cycle after the ADD WATER indicator goes out the ice-maker will begin It’s normal operation cycle automatically. When the ice cubes are collected and reach the bin-full sensor, the ice maker will stop operating and the ICE FULL indicator will be illuminated. There are two sizes of ice cubes available, therefore the larger the ice cube selected, the longer the time it will take to complete the cycle. When the ambient temperature is lower than 15°C (59ºF), the small or medium ice cubes sizes are recommended to avoid ice cubes clumping together. Dispensing ice. • Place the glass or cup directly below the dispenser and press gently against the dispenser actuator. • Remove the amount of ice as desired by continuously pressing against the dispenser actuator. • Once the desired amount of ice has been dispensed release the dispenser actuator and the machine will stop dispensing ice. • Never remove the cup from below the dispensing outlet before the ice or water are finished dispensing. 10 Dispensing Cold Water. • Place the glass or cup directly below the dispenser and press gently against the button marked WATER. • Remove the amount of water as desired by continuously pressing against the button marked water. • Once the desired amount of water has been dispensed release the button and the machine will stop dispensing water. • Never remove the cup from below the dispensing outlet before the ice or water are finished dispensing. NOTE: Water will be cold after a few ice-making cycles. CARE AND MAINTENANCE Caution Failure to unplug the ice maker could result in electrical shock or personal injury. • • • • • • • • • • Cleaning Your Ice Maker To ensure the cleanliness of the ice cubes, water in the reservoir should be replaced every 24 hours. Remove the drain plug to drain remaining water from the water reservoir when the ice maker will not be used for long period of time. Screw the drain plug back in place after the water has been drained. Always change with fresh water before starting ice production at initial installation or after long shut-off periods. Please clean your Ice maker regularly. When cleaning, unplug the unit and remove the ice cubes. Use a diluted solution of water and vinegar to clean the inside and the outside surface of the Ice maker. Do not spray Ice maker with chemicals or diluted agents such as acids, gasoline or oil. Rinse thoroughly before starting. Space Requirements During transportation, the incline angle of the cabinet should not be over 45° Do not turn the Ice maker upside down. Problems could occur in the compressor and sealed system. The Ice maker should be placed horizontally on a properly leveled surface. To ensure proper ventilation for your Ice maker allow 6” of space at the top, the back and on each side. Before using the Ice maker for the first time, please wait 2 hours after positioning it. Clean the inner liner, ice-bin, water box, water cup frequently. IMPORTANT: Do not install the Ice maker near an oven, radiator, or other heat source. Power Failure Most power failures are corrected within a few hours and should not affect the temperature of your ice maker if you minimize the number of times the ice-bin is opened. If the power is going to be OFF for a longer period of time, you need to take the proper steps to disconnect your appliance. 11 PROBLEMS WITH YOUR ICE MAKER? You can solve many common ice maker problems easily, saving you the cost of a possible service call. Try the suggestions below to see if you can solve the problem before calling the servicer. TROUBLESHOOTING GUIDE PROBLEM POSSIBLE CAUSE Unit does not start. 1. Not plugged in. 2. The circuit breaker tripped or a blown fuse. 3. The unit is at OFF position. Compressor and fan motor work but no ice made Ice can't be dispensed even there is ice inside ice reservoir 1. Air blocked the water system. 2. Cooling system leakage 3. Water shortage 1. Ice melt together because long time RESOLVING 1. Plug unit in. 2. Call for service. 3. Push the ON/OFF button to switch unit on. 1. Open the drain hose to release some water and then push the ON/OFF button. 2. Call for service. 3. Add water 1. Take out the ice cubes from ice re\servoir. ATTENTION ICE MAKER USAGE For best results and most efficient operation of your ice-maker, it is recommended that you consume the ice as it is made or store the cubes in a separate container. Ice cubes left in the ice-bin will begin to slowly melt and the water will re-deposit into the water tray. • If you are not going to consume the ice cubes as they are made, do not fill the water tray to the full line while the ice-bin is full. • When the red “ICE FULL” indicator is on, remove the cubes and store in a separate suitable container. • If you plan to leave the unit running overnight, it is recommended that you remove any cubes left in the bin and store in a separate container. • If at any time the “ICE FULL” and “ADD WATER” indicators are on and flashing at the same time, push the POWER button, remove all the ice from the drawer, check and fill water when needed, wait for 3 minutes and then push Power button to start the ice making again. This unit is not designed to store the ice cubes produced for long periods of time. 12 Service For Your Ice Maker We are proud of our customer service organization and the network of professional service technicians that provide service on your Avanti ice maker. With the purchase of your Avanti ice maker, you can be confident that if you ever need additional information or assistance, the Avanti Products Customer Service team will be here for you. Just call us toll-free. Product information 800-323-5029 Part orders 800-220-5570 In-home repair service 800-220-5570 Avanti Products Customer Services Whatever your questions are about our products, help is available. You may order parts and accessories that will be delivered directly to your home, by personal check, money order, master card, or visa. An Avanti Products authorized service center will provide expert repair service, scheduled at a time that is convenient for you. Our trained servicers know your ice maker inside and out. WIRING DIAGRAM 13 Staple your sales receipt here. Proof of original purchase date is needed to obtain service under warranty. YOUR AVANTI PRODUCTS WARRANTY WHAT IS COVERED – LIMITED ONE-YEAR WARRANTY Avanti Products warrants that the product is free from defects in materials and/or workmanship for a period of twelve (12) months from the date of purchase by the original owner. The foregoing timeline begins to run upon the date of purchase, and shall not be stalled, tolled, extended, or suspended for any reason whatsoever unless described in detail in the warranty document. For one year from the date of purchase by the original owner, Avanti products will, at its option, repair or replace any part of the product which proves to be defective in material or workmanship under normal use. Avanti Products will provide you with a reasonably similar product that is either new or factory refurbished. During this period Avanti Products will provide all parts and labor necessary to correct such defects free of charge, so long as the product has been installed and operated in accordance with the written instructions in this manual. In rental or commercial use, the warranty period is 90 days. All Avanti appliances of 4.2 cubic feet capacity or less must be brought/sent to the appliance service center for repair. LIMITED SECOND THROUGH FIFTH YEAR WARRANTY For the second through the fifth year from the date of original purchase, Avanti Products will provide a replacement compressor free of charge due to a failure. You are responsible for the service labor and freight charges. In rental or commercial use, the limited compressor warranty is one year and nine months. Costs involved to move the product to the service center and back to the user’s home, as maybe required, are the user’s responsibility. WARRANTY EXCLUSIONS / WHAT IS NOT COVERED: The warranty coverage described herein excludes all defects or damage that are not the direct fault of Avanti Products, including without limitation, one or more of the following: • A failure to comply with any applicable state, local, city, or county electrical, plumbing and/or building codes, regulations, or laws, including failure to install the product in strict conformity with local fire and building codes and regulations. • Any external, elemental and/or environmental forces and factors, including without limitation, rain, wind, sand, floods, fires, mud slides, freezing temperatures, excessive moisture or extended exposure to humidity, lightning, power surges, structural failures surrounding the appliance, and acts of God. • Shipping and handling costs associated with the • Content losses of food or other content due to replacement of the unit. spoilage. • Repairs performed by unauthorized servicers. • Incidental or consequential damages • Service calls that are related to external problems, • Parts and labor costs for the following will not be such as abuse, misuse, inadequate electrical power, considered as warranty: accidents, fire, floods, or any other acts of God. • Light bulbs and/or plastic housing. • Failure of the product if it is used for other than it • Plastic cabinet liners. intended purpose. • Punctured evaporator that voids the warranty on • The warranty does not apply outside the Continental the complete sealed system. USA. • Surcharges including but not limited to, any after hour, weekend, or holiday service calls, tolls, ferry trip charges, or mileage expense for service calls to remote areas. In no event shall Avanti Products have any liability or responsibility whatsoever for damage to surrounding property, including cabinetry, floors, ceilings, and other structures and/or objects around the product. Also excluded from this warranty are scratches, nicks, minor dents, and other cosmetic damages on external surfaces and exposed parts; Products on which the serial numbers have been altered, defaced or removed; service visits for customer education, or visits where there is nothing wrong with the product; correction of installation problems (you are solely responsible for any structure and setting for the product, including all electrical, plumbing and/or other connecting facilities, for proper foundation/flooring, and for any alterations including without limitation cabinetry, walls, floors, shelving etc., as well as the resetting of breakers or fuses. OUT OF WARRANTY PRODUCT Avanti Products is under no obligation, at law or otherwise, to provide you with any concessions, including repairs, pro-rates, or product replacement, once this warranty has expired. WARRANTY – REFRIGERATION - COMPRESSOR 14 MEDIDAS DE PRECAUCION IMPORTANTES Para reducir el riesgo de un incendio, choque eléctrico o daños personales cuando use la máquina para dispensar hielo, siga estas precauciones básicas. ADVERTENCIA • • • • • • • Lea todas las instrucciones antes de usar la máquina para dispensar hielo. Peligro o Advertencia: riesgo de niños atrapados. Los niños atrapados o sofocados no so un problema del pasado. Electrodomésticos abandonados aun son peligrosos…aun cuando “solo estarán en el garaje un par de días”. Antes de botar su máquina para dispensar hielo: Retire la bandeja de hielo. Nunca permita que los niños operen, jueguen con o se introduzcan en la máquina. Nunca limpie la máquina para dispensar hielo o las piezas con líquidos inflamables. Los vapores pueden causar peligro de fuego o explosión. No guarde ni use gasolina u otros vapores o líquidos inflamables cerca a este u otra máquina para dispensar hielo. Los vapores pueden causar peligro de fuego o explosión. -guarde estas instrucciones - INSTRUCCIONES DE INSTALACION Antes de usar su Máquina para dispensar Hielo • Retire el empaque interno y externo. • Verifique que haya recibido las siguientes piezas: • 1 Manual de instrucciones • 1 Bandeja contra goteras • 1 Vaso para llenar el tanque de agua • 1 Espátula plástica Antes de conectar su electrodoméstico a la corriente eléctrica, ubíquelo en posición vertical sobre una superficie plana por lo menos por 2 horas. Esto reducirá la posibilidad de malfuncionamiento en el sistema de enfriamiento por el manipuleo durante el transporte. Limpie la superficie interior con agua tibia usando un trapo suave. • • Instalación de su electrodoméstico • Ubique su electrodoméstico en un piso que sea lo suficientemente fuerte para soportar su peso cuando esté totalmente lleno o cargado. Para nivelar el electrodoméstico, ajuste las patas delanteras. • Deje aproximadamente 5 pulgadas de espacio entre la parte trasera y los costados de su electrodoméstico, así permitirá la circulación de aire necesaria para enfriar el compresor. • Mantenga su electrodoméstico alejado del aire caliente, vapor o líquidos que puedan salpicarlo, ya que la unidad podría averiarse. • Los rayos solares directos pueden malograr la capa acrílica, y las fuentes de calor pueden ocasionar un aumento en el consumo eléctrico. Manténgalo lo más alejado posible del agua para prevenir algún choque eléctrico. Evite los sitios húmedos y los ambientes extremadamente fríos ya que esto puede afectar la eficiencia del enfriamiento de su electrodoméstico. • Evite ubicar su electrodoméstico en áreas mojadas o muy húmedas. • Conecte el electrodoméstico a un enchufe de pared exclusivo con conexión a tierra. Bajo ninguna razón se debe retirar la tercera punta del enchufe. Cualquier consulta con respecto a la energía y/o cable de tierra debe ser dirigida a un electricista certificado o autorizado por el Servicio Técnico de Avanti Products. IMPORTANTE: No instale la Máquina para dispensar hielo cerca a un horno, radiador u otras fuentes de calor. 15 Conexión Eléctrica ADVERTENCIA EL USO INAPROPIADO DEL ENCHUFE A TIERRA PUEDE OCASIONAR RIESGO DE UN CHOQUE ELECTRICO. SI EL CORDON SE DAÑASE, LLEVELO A UN CENTRO DE SERVICIO AUTORIZADO POR AVANTI PRODUCTS PARA QUE SE REEMPLACE. • • • • • • • Para su seguridad, esta máquina para dispensar hielo debe estar apropiadamente conectada a tierra. El cordón eléctrico de esta máquina para dispensar hielo está equipado con un enchufe de tres puntas, el cual encaja perfectamente en los receptáculos/enchufes de pared de tres puntas estándar, para minimizar la posibilidad de un choque eléctrico. Bajo ninguna circunstancia corte o retire la tercera punta (cable a tierra) del enchufe del cordón eléctrico. Nunca use un cable de extensión para conectar la unidad a la electricidad. Nunca use un adaptado con enchufe de solo 2 puntas. Si solo puede conectar la máquina para dispensar hielo a un receptáculo/enchufe de pared de 2 puntas, comuníquese con un electricista calificado para que reemplace ese receptáculo/enchufe de pared por uno de 3 puntas, de acuerdo con los códigos de electricidad aplicables. Esta máquina para dispensar hielo requiere un receptáculo/enchufe de pared de tres puntas estándar de 115/120 voltios a.c.~/60hz. Para prevenir cualquier daño físico o lesión, el cordón debe ser asegurado detrás de la máquina para dispensar hielo y no estar expuesto o colgando. Cable de Extensión Debido al posible riesgo de seguridad causado bajo ciertas circunstancias, se recomienda firmemente que no use un cable de extensión para este electrodoméstico. Sin embargo, si no tiene otra opción mas que usar un cable de extensión, asegúrese que este sea un cable de extensión para electrodomésticos que este listado bajo UL/CUL, que tenga enchufe y receptáculo para enchufe de tres puntas (cable a tierra) y que la capacidad del cordón eléctrico sea de 115 voltios y no menos de 10 amperios. Protector contra variaciones de corriente eléctrica (Surge Protector). La mayoría de electrodomésticos utilizan una series de paneles de control para operar. Estos paneles son muy susceptibles a las variaciones de corriente eléctrica, las cuales causan que estos se dañen o destruyen. Si vive en un área o ciudad done hay muchas variaciones de corriente o apagones, se recomienda que utilice un protector contra variaciones de corriente para todos los electrodomésticos y aparatos eléctricos. El protector que elija debe bloquear una variación de electricidad alta para poder proteger el electrodoméstico al cual está conectado. Por favor contáctese con un electricista licenciado en su área si tuviera preguntas en referencia al tipo y tamaño de protector que necesita. Daños debido a variaciones de electricidad no se consideran un defecto del fabricante y podrían anular la garantía. 16 OPERANDO SU MÁQUINA PARA DISPENSAR HIELO PANEL DE CONTROLES ICONO DESCRIPCION El nivel del agua en el depósito de agua no es suficiente para hacer un ciclo de hacer hielo. Agrega agua al depósito hasta la línea marcada “MAX” Este ícono significa el estado del ciclo de hacer hielo Cuando el ícono esté moviendo, significa que el sistema está en un ciclo de hacer hielo. Cuando el ícono esté sólido, significa que el sistema se ha terminado el ciclo de hacer hielo Este icono significa que la máquina para hacer hielo está dispensando hielo La bandeja de hielo está llena, el icono aparecerá hasta que el nivel de hielo se baja por dispensar o el hielo se derrite. Botón Operación Oprima para seleccionar cubos de hielo pequeño Oprima para seleccionar cubos de hielo grande Oprima para dispensar agua Oprima para encender o apagar la unidad Selección de tamaño de cubo de hielo El tamaño de cubo de hielo seleccionado se quedará fijo hasta que se oprima un botón cambiando el tamaño o haya una perdida de Fuente de luz. Para la mejor y más eficiente operación selecciona el tamaño pequeño cuando la temperatura ambiental baja de 15ºC (59ºF). 17 Antes de hacer hielo • Enchufe la unidad al tomacorriente. • Oprima el botón marcado ON / OFF para encender la unidad. • Abra la puerta del depósito de agua localizada en la parte derecha de la unidad. • Remueva cualquier objeto que esté en el depósito de agua. • Llene el depósito de agua hasta la línea marcada “MAX” • Oprima el botón marcado “WATER” y dispense aproximadamente un vaso de agua. • Abra el desagüe localizado en el lado posterior de la unidad para vaciar el resto del agua en el depósito. • Cierre el tapón del desagüe. • Abra la puerta del depósito de agua y llena con agua hasta la línea marcada “MAX”. • Cierre la puerta del depósito de agua y oprime el botón ON/OFF para apagar la unidad. AVISO: Nunca llene el depósito de agua pasada la línea “MAX”, esto causara que el agua se desborde y gotee encima de los componentes electrónicos. AVISO: Nunca llene el depósito de agua con otro líquido que no sea agua. Esto causara daños al sistema e invalida su garantía. Como hacer hielo • • • • Oprime el botón ON / OFF para encender la unidad. Oprime el botón marcado Small o Large para seleccionar el tamaño del cubo de hielo para empezar el ciclo de hacer hielo. El sistema medirá automáticamente el nivel de agua en el depósito periódicamente. El sistema avisará cuando el nivel de agua este menos de lo necesario para hacer hielo y apagara el ciclo. En el caso de que tenga que agregar agua, llene el depósito y oprima el botón ON / OFF parar apagar la unidad. Oprima el botón ON / OFF para encender la unidad de nuevo y selecciona el tamaño de cubo para empezar el ciclo de hacer hielo. Cuando la bandeja de hielo está llena, la unidad se parara de hacer hielo hasta que se dispensa hielo o el hielo se derrite. Como dispensar hielo • Coloca el vaso abajo del dispensador y oprima el actuador de dispensar. • Después de dispensar la cantidad de hielo deseada, retire el vaso. • Nunca retire el vaso del dispensador hasta que la maquina termine completamente de dispensar el hielo o agua. Dispensing Cold Water. • Coloca el vaso abajo del dispensador y oprima el botón marcado WATER. • Después de dispensar la cantidad de agua deseado, retire el vaso. • Nunca retire el vaso del dispensador hasta que la maquina termine completamente de dispensar el hielo o agua. 18 CUIDADO Y MANTENIMIENTO Precaución Asegúrese de desconectar la máquina para dispensar hielo de la electricidad antes de limpiarla, de lo contrario puede ocasionar un choque eléctrico o daño personal. • • • • • • • • • • Limpiando su máquina para dispensar hielo Para asegurar la higiene en los cubos de hielo, el agua del tanque debe ser reemplazada cada 24 horas. Cuando la máquina para dispensar hielo no sea usada por un período de tiempo largo, retire el tapón del drenaje para que el agua remanente del tanque sea descartada. Coloque el tapón del drenaje nuevamente en su sitio después que toda el agua haya sido drenada. Siempre use agua fresca antes de empezar la producción de hielo durante la instalación inicial o después de largos períodos de inactividad. Por favor limpie su máquina para dispensar hielo regularmente. Cuando la limpie, desconecte la unidad de la electricidad y retire los cubos de hielo. Use una solución diluida de agua y vinagre para limpiar el interior y el exterior de la superficie de la máquina para dispensar hielo. No rocíe la máquina para dispensar hielo con substancias químicas o agentes diluidos, tales como ácidos, gasolina o aceite. Enjuague bien antes de empezar el funcionamiento. Requerimientos de espacio El ángulo de inclinación de la unidad durante el transporte no debe exceder los 45 grados. No ponga la máquina para dispensar hielo de cabeza ya que esto puede producir problemas en el compresor y el sistema sellado. La máquina para dispensar hielo debe ser colocada sobre una superficie correctamente nivelada. Para asegurar ventilación apropiada para su máquina para dispensar hielo, deje 6” de espacio encima de la superficie, la parte posterior y los lados. Antes de usar la máquina para dispensar hielo por primera vez, por favor espere 2 horas después de colocarla en su posición final. Limpie la superficie interna, el contenedor del hielo, el tanque de agua y el recipiente para rellenar el tanque de agua con mucha frecuencia. IMPORTANTE: No instale la máquina para dispensar hielo cerca a un horno, radiador ni otra fuente de calor. Falta de electricidad Cuando la electricidad se va, la mayoría de las veces esta regresa en unas pocas horas y no debe afectar la temperatura de su máquina para dispensar hielo siempre y cuando ud. minimice las veces que se abra la puerta del contenedor del hielo. Si la electricidad va a estar desconectada por un largo período de tiempo, entonces debe tomar los pasos apropiados y desconectar la unidad. 19 PROBLEMAS CON SU MÁQUINA PARA DISPENSAR HIELO? Ud. puede resolver muchos problemas simples de máquina para dispensar hielo fácilmente, ahorrándose el costo de una visita del servicio técnico. Pruebe las sugerencias a continuación para ver si con ellas puede resolver el problema antes de llamar al técnico. GUIA PARA RESOLVER PROBLEMAS Problema Causa Posible El compresor no funciona normalmente, tiene un sonido. El indicador para añadir mas agua está encendido. El voltaje es menor que el recomendado. Las luces indicadoras están apagadas. Se voló un fusible / la máquina no esta conectada o no hay electricidad / voló el interruptor. La temperatura del agua en el contenedor de hielo o del ambiente es muy baja. Los cubos de hielo son muy grandes y se están pegando unos a otros. Todas la condiciones para el ciclo de dispensar hielo están correctas pero no hay hielo. Los indicadores de Alerta y de Contenedor de Hielo Lleno están encendidos. El tanque de agua no está suficientemente lleno. Fuga o goteo de refrigerante / el sistema sellado esta bloqueado. El tanque de agua no gira. 20 Sugerencias Apague la máquina para dispensar hielo y no la encienda hasta que el voltaje vuelva a la normalidad. Presione el botón POWER, llene de agua el tanque, espere 3 minutos y luego encienda la unidad presionando el botón POWER. Reemplace el fusible / verifique que la máquina esta enchufada / encienda la máquina. Apague la máquina y reprograme el ciclo de dispensar hielo. Luego de apagar la máquina enciéndala otra vez. Reemplace la unidad. Verifique si hay cubos de hielo bloqueados. 21 22 Registration Information Thank you for purchasing this fine Avanti product. Please fill out this form and return it to the following address within 100 days from the date of purchase and receive these important benefits: AVANTI PRODUCTS LLC P.O.Box 520604 – Miami, Florida 33152 Protect your product: We will keep the model number and date of purchase of your new Avanti product on file to help you refer to this information in the event of an insurance claim such as fire or theft. Promote better products: We value your input. Your responses will help us develop products designed to best meet your future needs. ---------------------------------------------------(detach here)------------------------------------------------------------- Avanti Registration Card Name Model # Serial # Address Date Purchased Store / Dealer Name City State Area Code Phone Number Zip Did You Purchase An Additional Warranty Extended None Reason for Choosing This Avanti Product: Please indicate the most important factors That influenced your decision to purchase this product: Price Product Features Avanti Reputation Product Quality Salesperson Recommendation Other: ___________________ Friend / Relative Recommendation Warranty Other: ___________________ Comments: E-mail Address Occupation As your Primary Residence, Do You: Own Rent Your Age: under 18 18-25 26-30 31-35 36-50 over 50 Marital Status: Married Single Is This Product Used In The: Home Business How Did You Learn About This Product: Advertising In-Store Demo Personal Demo 23 WIMD332PC-IS - 03262014 PRINTED IN CHINA 24