1
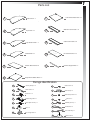
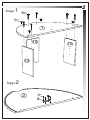
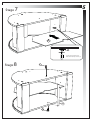
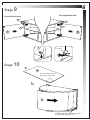
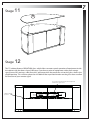
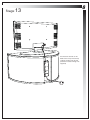
AISIRIUSMDA1
Assembly Instructions
CAUTION
There are many small components used
in the construction of this unit.
These should be kept away from
young children during assembly
Care and Safety Notes
- Do not use fixings other than those supplied.
- Do not place very hot or very cold items against or in close proximity to any glass surface, unless
--adequately thick mats are used to prevent such items from coming into contact with the glass.
- Do not use the glass as a chopping surface. Do not strike glass with hard or pointed items.
- When cleaning glass panels, use a damp cloth or leather with washing up liquid or soft soap in
--necessary; do not use washing powders or any other substance containing abrasives since these can
--scratch glass.
- Do not sit or stand on glass surfaces.
- Do not use solvent or abrasive cleaners for cleaning; Use a damp cloth when cleaning.
- Only use genuine replacement parts
- Do not over tighten screws or use power tools to assemble.
ISSUE A
1
Parts List
1
Base Panel x 1
7
2
Top Panel x 1
8
Walnut Front Profile x 2
3
Top Glass Panel x 1
9
Oak Front Profile x 2
4
Glass Shelf x 1
10
Inner Side Panel x 3
5
Plastic Side Panel x 2
11
Centre Support Bar x 1
6
Right Hand Glass Door x 1
Left Hand Glass Door x 1
Fixings Identification
A
Screw (40mm) x 12
B
Steel Dowel x 4
C
Steel Cam x 4
D
Double Mag Catch x 1
K
M5 Screw x 3
E
Screw (M3 x12mm) x 4
L
M6 Bolt (30mm) x 1
F
Foot x 4
M
Screwdriver x1
N
4mm Allen Key x1
O
Centre Foot x1
G
H
Grub Screw x 8
I
Shelf Clamp x 3
J
Shelf Clamp Screw x 3
Door Hinge Plate x 4
Stage 1
F
2
A
x6
x4
1
10
10
10
Stage 2
2
E
D
x4
Stage 3
A
3
x6
2
Stage 4
B x2
This TV cabinet is supplied with both
Walnut (8) & Oak (9) finish front profiles.
Please select your desired profile before
commencing Stage 4.
8or9
x2
4
Stage 5
C
x4
8or9
Ensure Cam locks are fully
tightened by turning clockwise
8or9
Stage 6
K
I
x3
x3
Select the shelf position that best suits your
equipment before fixing shelf clamps (I) in
position
5
Stage 7
4
J
Secure the shelf in place
with shelf clamp screws (J)
Stage 8
L
11
O
6
Stage 9
Front right hand view
Front left hand view
G x2
G x2
H x4
H x4
7
6
G x2
H x4
Stage 10
a
5
Remove protective film
from plastic side panels
b
5
locate edge of plastic side panel (5) into
groove on front profile (8 or 9)
7
Stage 11
3
Stage 12
This TV cabinet features BEAMTHRU glass which allows remote control operation of equipment inside
the cabinet with the doors closed. However, if you have a peice of equipment with a poor remote
signal (some SKY receivers suffer from this), please position the particular unit on the glass shelf in the
middle position. This will then place the unit behind the unprinted window on the glass doors to allow
full function of your remote signal.
Poor signal unit situated behind unprinted
window on glass doors
Shelf in middle
position
8
Stage 13
An extension socked can be
fixed to the rear panel to keep
all plugs & cables out of view
(extension socket & fixings not
supplied)