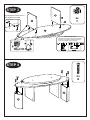
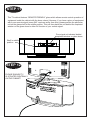
1
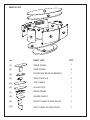
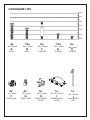
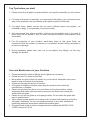
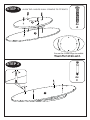
ASSEMBLY INSTRUCTIONS
Black Oval TV Cabinet For TV’s up to 50”
FLOOR AREA
2.0M X2.0M
1.0 hr
APPROXIMATE ASSEMBLY TIME
2 PERSON ASSEMBLY
REQUIRED ASSEMBLY SPACE
REQUIRED ASSEMBLY TOOLS
ASSEMBLED DIMENSIONS
1150mm
470mm
410mm
MDAGS2610AI
ISSUE A - 125011
PARTS LIST
6
5
2
8
2
7
4
9
10
4
1
3
no.
PART LIST
QTY
(1)
BASE PANEL
1
(2)
SIDE PANEL
2
(3)
ROTATING BASE ASSEMBLY
1
(4)
SIDE PROFILE
2
(5)
TOP PANEL
1
(6)
GLASS TOP
1
(7)
REAR PANEL
1
(8)
GLASS SHELF
1
(9)
RIGHT HAND GLASS DOOR
1
(10)
LEFT HAND GLASS DOOR
1
HARDWARE LIST
6cm
5cm
4cm
3cm
2cm
1cm
0cm
4x
M6 x 35mm
A
BOLT
8x
12 x 10mm
F
CAM LOCK
12x
M6 x 25mm
B
BOLT
4x
15 x 10mm
G
SHELF PEG
8x
M6 x 38mm
C
12x
M3 x 14mm
D
CAM PIN
SCREW
4x
1x
M3 x 14mm
H
DOOR HINGE
PLATE
60 x 40 x 20mm
I
DOUBLE MAG
CATCH
8x
M4 x 5mm
E
SCREW
1x
M4 x 65mm
J
4mm ALLEN
KEY
Top Tips before you start!
1. Please check that all parts are present before you start the assembly of your furniture.
2. For ease and speed of assembly, we recommend that before you commence each
step of the assembly, that you identify all the parts required for that step.
3. For larger items, please ensure that you have sufficient space and people ( as
indicated on page 1) to assemble your product safely
4. We recommend that, where possible, all items are assembled near to the area in
which they will be placed in use, to avoid moving the product unnecessarily once
assembled.
5. For the protection of your furniture, particularly items of high gloss finish, we
recommend that the product is placed on a protected surface during assembly to
prevent any damage.
6. During assembly please take care not to over-tighten any fittings, as this may
damage the product.
Care and Maintenance of your Furniture
•
•
•
•
•
•
•
•
•
Please periodically check all fittings and re-tighten as necessary.
Please do not sit or stand on this item.
Never allow any kind of liquid to remain on your furniture, Absorption can cause
wood to warp or finishes to de-laminate
Please do not drag and pull your furniture.
If the glass is chipped or broken, stop using the product and consult the
manufacturer or supplier.
Please do not place very hot or very cold items on the glass surface, unless
adequately thick table mats are used to prevent such items from coming into
contact with the glass.
Please do not use the glass as a chopping surface. Do not strike the glass with
hard or pointed items.
When cleaning glass panels use a damp cloth or leather with washing up liquid or
soft soap if necessary, do not use washing powders or any other substances
containing abrasives since these substances scratch glass.
The glass used in this product is toughened and complies with BS EN 121501:2000, clauses 8.3 & 8.4
STEP 1
ALIGN THE 4 HOLES IN ALL 3 PANELS TO FIT BOLTS
3
4x
A
1
Ensure the 4 holes align to enable
STEP 2
4x
C
1
STEP 3
2
ENSURE PANELS ARE FITTED IN
THE CORRECT POSITION.
4x
F
2
LARGE GAP
SMALL GAP
1
X4
WHEN FITTING CAMS
ENSURE STARTING POSITION IS CORRECT
BEFORE YOU INSERT CONNECTING BOLT
TURN CLOCKWISE UNTIL SECURE
F
CORRECT
WRONG
STEP 4
6x
B
4
4
STEP 5
4x
C
4x
D
1x
I
5
D
I
STEP 6
MAG CATCH AT THIS SIDE
5
6x
B
4x
F
X4
F
WHEN FITTING CAMS
ENSURE STARTING POSITION IS CORRECT
BEFORE YOU INSERT CONNECTING BOLT
TURN CLOCKWISE UNTIL SECURE
CORRECT
WRONG
STEP 7
CAREFULLY ALIGN GLASS
TOP & PLACE ONTO CABINET
6
STEP 8
8x
D
7
STEP 9
4x
G
8
STEP 10
4x
H
H
10
9
E
8x
E
STEP 11
This TV cabinet features ‘REMOTE FRIENDLY’ glass which allows remote control operation of
equipment inside the cabinet with the doors closed. However, if you have a piece of equipment
with a poor remote signal (some SKY receivers suffer from this), please position the particular
unit on the glass shelf in the middle position. This will then place the unit behind the unprinted
window on the glass doors to allow full function of your remote signal.
Poor signal unit situated behind
unprinted window on glass doors
Shelf in middle
position
STEP 12
PLEASE ENSURE TV
IS SITUATED CENTRALLY
ON THE CABINET