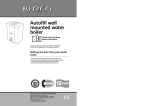
1
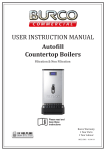
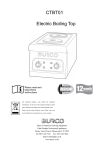
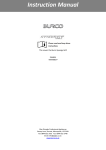
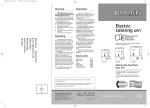
• Fill up to maximum quantity as before. Cleaning Auto-fill operation Unplug the coffee maker and allow to cool. Wipe all external surfaces including the hotplate with a damp cloth and dry thoroughly. The glass jug and filter basket should be washed in warm soapy water. Rinse and dry all parts thoroughly. Rinse the airpot out with hot water. Rinse the water reservoir occasionally with cold water. Never use harsh or abrasive cleaners. No parts are suitable for cleaning in a dishwasher. 6 Press the auto-fill button, the unit will start to fill automatically. When the coffee maker has reached full capacity the unit will cease filling and the filling neon will illuminate to indicate that it is full. Marketing Department Burco Appliances Ltd Talbot Road Mexborough South Yorkshire S64 8AJ Affix postage stamp here 7 Place the empty decanter (glass jug or airpot) in the correct position below the brew head. • Ensure that the lid of the airpot is open and leave the tubular/spout insert in place. 8 Switch the power on at the wall socket, and then the power on the coffee maker 9 Depress the brew button to start the brew cycle. The brew neon will illuminate during the brewing cycle. 10 When the brew cycle is complete and the indicator neon turns off the coffee maker will continue to dispense for around 1 minute. 11 On the glass jug model, you may place the first decanter full of freshly brewed coffee on the top hot plate and immediately brew another glass jugful. 12 To switch on the top hotplate depress the upper hotplate button. Remember to switch off again when no longer in use. Warning: The coffee maker and hotplate are very hot and remain hot for some time after switching off. Descaling If you operate in a hard water area, we recommend that your coffee maker is descaled at regular intervals, e.g. every 3-6 months or as required. If the water filters through more slowly than usual, it is a sign that descaling is necessary. If the brew cycle fails to operate switch the appliance off and unplug from the power supply. Remove the rear cover and check to see if you can press the button down on the side of the boiler. If the button proprietary descaler. Follow the manufacturers instructions, and then operate the coffee maker with just water 3 times before making coffee. IMPORTANT: Failure to descale will invalidate your guarantee. Helpline If you have any difficulty with your appliance, do not hesitate to call us. Please have the following information ready to enable our staff to deal with your query quickly. • Name of the product. • Model number and serial number as shown on the underside of the appliance. Guarantee This coffee maker is guaranteed for a period of 12 months from the date of purchase against defective materials or faulty workmanship. This guarantee is given subject to the coffee maker being used in accordance with the instructions, on the supply voltage marked on it and to the usual fair wear and tear conditions. The guarantee does not cover consequential damage arising out of any failure acceptable under guarantee, nor does it cover damage resulting from misuse, accident or unauthorised alterations to the coffee maker. In any communication with the supplier, manufacturer or service department, it is essential to quote the serial number marked on the coffee maker. Proof of purchase will be required. This guarantee, in no way diminishes the buyer’s statutory rights. Please fill in and return the tear off section to register the guarantee with Burco. Commercial filter coffee maker Airpot auto-fill filter coffee maker H: 565mm W: 205mm D: 380mm Weight: 5.3kg (dry with no Airpot) Capacity 1 x 2.2L Airpot Model no. 78500 SKU 444448557 Getting the best from your coffee maker... • Safety first Caution must be used when working with hot water, coffee or steam. • Run water through your coffee maker before first use Glass jug manual fill filter coffee maker Burco products are intended for commercial use as detailed in these instructions. Please read and keep these instructions H: 435mm W: 205mm D: 380 mm (inc cables) Weight: 5kg (dry with no carafes) Capacity 2 x 1.7L glass carafes Model no. 78501 444448558 • Descale as appropriate for the hardness of the water in your area It is important to descale as the performance of your coffee maker may be impaired by limescale and other impurities in the water supply. • Install a water filtration system For best taste and long appliance life telephone Burco for information. Burco has a policy of continuous improvement in product quality and design. The Company, therefore, reserves the right to change the specification of its models at any time. presses down and clicks, then descale the unit before next operation. If problem persists then contact the Burco Helpline. To descale, we recommend you use an appropriate 5 Burco Commercial Catering Equipment Glen Dimplex Professional Appliances Stoney Lane, Prescot, Merseyside, L35 2XW Tel 0871 222 5118 Fax 0871 222 9636 Email [email protected] www.burco.co.uk CP78500MUK rev 2 6/08 Important safety instructions The use of any electrical appliance requires the following common sense safety rules. Primarily there is danger of injury or death and secondly the danger of damage to the appliance. These are indicated in the text by the following two conventions: WARNING: Danger to the person! IMPORTANT: Damage to the appliance! In addition we offer the following safety advice. • Ensure the coffee maker is used on a firm, flat surface. • Do not use the coffee maker outdoors. • Do not place the coffee maker on a highly polished wooden surface as damage may occur to the surface. • Do not place the coffee maker on or near hot surfaces such as a hob or radiant rings or near a naked flame. Other safety considerations • • • • • Product safety • Never use warm or hot water to fill the water reservoir. • Do not overfill the water reservoir. • For the best flavour and long appliance life always use a water filtration system. Failure to protect your appliance from scale will invalidate your guarantee. • Disconnect the coffee maker from the mains supply when cleaning or not in use. Treating scalds • Keep the outside of the coffee maker area clean • Run cold water over the and dry at all times. affected area immediately. • Do not touch hot surfaces. Do not stop to remove Always use handles or clothing, get medical help knobs. quickly. • Do not immerse the coffee maker in water or other 2 Personal safety • Ensure the lid of the glass jug is securely in place before pouring. • Take care to pour hot coffee slowly and carefully without tipping the glass jug too fast. • Do not fill above the capacity of the water level or 1.9L on the auto-fill. • Do not use the glass jug in a microwave. • Do not touch metal parts until the unit has cooled. • Do not place an empty glass jug on a hotplate when it is switched on except immediately before brewing. Check that the voltage on the rating plate of your appliance corresponds with your house electricity supply which must be A.C. (Alternating current). If the socket outlets in your home are not suitable for the Airpot auto/manual fill model ‹ Installation Components Before using your coffee maker the first time, or if it is ever completely empty, operate the coffee maker with water only. The coffee maker requires 0.5L of water to prepare it for use. ⁄ ¤ ‹ › fi fl ‡ · ‚ „ ‰ Â Ê Electrical requirements › plug supplied with this appliance the plug should be removed and the appropriate one fitted. WARNING: The plug removed from the mains lead, if severed, must be destroyed as a plug with a bared flexible cord is hazardous if engaged into a live socket outlet. Should the fuse in the 13 amp plug require changing a 13 amp BS1362 fuse must be fitted. WARNING: This appliance must be earthed. Reservoir cover Upper hotplate ‘on’ neon ‘Full’ indicator neon ‘Brewing in process’ neon Filter basket Insulated airpot decanter Glass jug decanter ‘Power on’ indicator neon ‘On/off’ button Upper hotplate button Brew button Auto-fill button Upper hotplate Glass jug manual fill model ⁄ ⁄ Â ¤ ‰ › fi fi fl Ê ‰ „ ‡ · · ‚ ‚ 3 The airpot auto-fill model unit should be connected to the mains water supply using the hose assembly supplied. The use of a stop cock is recommended to isolate the unit from the water supply for servicing. 4 5 Before first use • • the green fill neon will illuminate. When filled press the brew button to start the brew cycle. The green brew neon will illuminate during the brew cycle. The water will continue to flow for a further minute after the brew cycle is completed. Empty the decanter (glass jug or airpot) and the coffee machine is ready to use. Half a litre of water will remain in the coffee maker boiler and hoses. You must be aware of this when moving the machine or when the coffee maker is subject to freezing temperatures. If the coffee maker is ever fully drained down you must repeat the preparation steps again. Making coffee Preparation 1 Slide empty filter basket into position and place an empty decanter (glass jug or airpot) in position underneath the brew head. • Ensure that the lid of the airpot is open and leave the tubular/spout insert in place. 2 Pour a coffee jug or measuring jug full of water into the cold water reservoir (glass jug manual fill model 1.7 litres max and auto-fill model 1.9 litres). 3 Put the plug into the wall socket and switch on. Switch on the coffee maker by pressing the on/off button. • For auto-fill operation, turn the coffee maker on and press the auto-fill button. The unit will automatically start to fill and when ready 1 Ensure the coffee maker is switched off. 2 Ensure that the spring is fitted correctly into the brew basket. The spring must lie flat in the bottom of the filter basket. 3 Place a paper (cup cake) filter into the brew basket 4 Put the required amount of coffee into the filter paper dependant on taste, 75 90g per brewing. 5 Slide the brew basket into place. Manual fill operation 6 Lift the reservoir cover and pour the required amount of cold water into the coffee machine and close the cover. 4 Guarantee registration Appliance model Serial no. Date of purchase Customer name Address If you would like information about Burco water filtration please indicate how you would like to be contacted below and we will contact you shortly: By telephone, number: CUT HERE & DETACH Location • liquid and always ensure the electrical connections are kept dry. Do not operate any appliance with a damaged cord or plug or after the appliance malfunctions or has been damaged in any manner. Ring the helpline number for advice on examination and repair. The use of attachments or tools not recommended or sold by Burco Commercial Catering Equipment may cause fire, electric shock or injury. Do not use abrasive cleaners on the outside of the coffee maker, they may scratch the surface. Clean only with a soft damp cloth. Do not use the coffee maker for anything other than its intended purpose. Do not leave the coffee maker unattended during filling or brewing. Ensure the power cord never touches the hotplate. By fax, number: By email, address: Alternatively please telephone our sales team on 01282 427241 Please help us to further improve our products by ticking the main reason for purchase Price Styling/Appearance Previous Burco ownership Dealer recommendation Service back-up Features Other (please state) Where did you buy your Burco appliance ? Dealer/Retailer Would you like more information on Burco products? Yes No