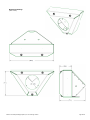
1
INSTALLATION MANUAL – SHD-B-100C Heavy Duty Corner Mount
Unpacking
Unpack carefully. This is mechanical equipment and should be
handled with care. If an item appears to have been damaged in
shipment, replace it properly in its carton and notify the shipper. If
any items are missing, notify Broadsight Systems, Inc. The shipping
carton is the safest container in which the unit may be transported.
Save it for possible future use.
3.
Hold Backbox up to installation surface and use holes in Backbox
as a template. Mark hole locations for drilling.
4.
Set Backbox aside and drill out mounting surface as needed.
5.
Service
If the unit ever needs repair service, the customer should contact
Broadsight Systems, Inc. for a return materials authorization (RMA)
and shipping instructions.
Attach Backbox to mounting surface using appropriate anchors
and fasteners. Each fastener should have a minimum 200 lbs
pull-out strength. Run cable into backbox.
6.
Attach compatible camera to the Mounting Plate using
appropriate fasteners. Make power/video/data connections to
the camera.
Care and Maintenance
Perform routine maintenance to keep the unit dust free.
7.
Model Designation
SHD-B-100C
Heavy Duty Corner Mount
Reinstall Mounting Plate by slipping Captive Fastener heads over
the Notches in the Backbox. Secure Mounting Plate by
reinstalling #8-32 screws and washer (from Step 2).
8.
Description
The Heavy Duty Corner Mount is designed to mount a camera in the
corner of a room that requires maximum protection to the camera.
The unit is designed to accommodate multiple camera models.
Carefully slide Cover over the dome bubble (not shown); avoid
scratching the dome bubble. Align holes in Cover with Tabs in
Backbox. It may be safest to leave the plastic film on the dome
bubble as long as possible.
9.
Secure Cover by replacing ¼-20 Tamper Resistant fasteners and
washers (from Step 1).
Hardware Kit – SBD-B-100C
None
Tools Required
TT-27 Tamperproof Torx Bit or Wrench
Cross Recessed (Phillips Head) Screwdriver
Camera Mounting Hardware
Backbox Mounting Hardware
Appropriate Sized Drill Bits
Certification
Camera installation should be performed by a licensed professional
and conform to the National Electrical Code (NEC) and any applicable
local codes.
Tabs (x3)
Installation
1. Remove Cover by loosening three (3) Tamper Resistant screws
using the designated Torx bit or wrench. Set cover aside.
2.
Remove Mounting Plate by loosening four (4) #8-32 screws and
washers. Lift Mounting Plate slightly to unhook it from Backbox.
#8-32 x 3/8” Phillips Head Screws (x4)
and #8” Flat Washer (x4)
Notches (x2)
Backbox
¼-20 x 1/2” TamperResistant Torx Screw (x3) and
1/4” Flat Washer (x3)
Mounting Plate
Cover
Compatible Model List
SNV-5084, SNV-5084R, SNV-6084, SNV-6084R,
SNV-7084, SNV-7084R, SNV-8080
Made in the USA by Broadsight Systems, Inc. for Samsung Techwin
Page 1 of 2
Dimensional Drawings
(Units: Inches)
Made in the USA by Broadsight Systems, Inc. for Samsung Techwin
Page 2 of 2