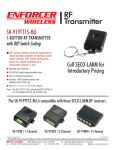
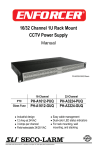
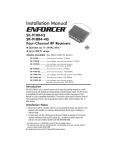
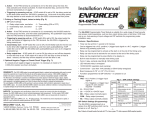
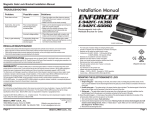
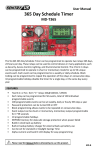
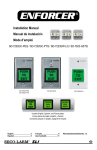
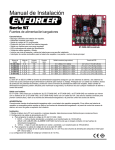
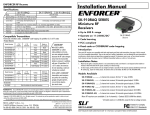
1
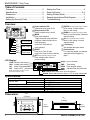
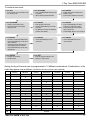
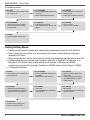
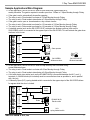
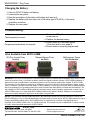
SA-027WQ 7-Day Timer Manual Automate the following: Lighting Systems Access Controls Security Systems Environmental Controls 12~24 VAC/VDC Program up to 60 flexible events Holiday function (up to 99 days) Easy-to-read backlit LCD Adjustable output time Programmable security code lock out Memory saved if power fails 12 or 24 hr clock format Enclosed terminals for safer installation Mode selection button for manual relay operation 16 Schedules including daily, weekly, weekends, etc. Backup battery included* Form C relay output (10A@120VAC/28VDC) Egress input terminal *Preserves clock time only. External power must be present for relay to function. Note: Products with model numbers that end with “Q” or that have a round green “Q” sticker are RoHS compliant. ENFORCER 7-Day Timer Table of Contents: Overview ....................................................... 2 Specifications ................................................ 2 Dimensions.................................................... 2 Installation ..................................................... 3 Setting the Security Code ............................. 3 Setting the Time ............................................ 4 Entering Events.......................................... 4-6 Setting Holiday Mode .................................... 6 Sample Applications/Wire Diagram .............. 7 Troubleshooting ............................................ 8 Overview: (+) (–) Power Input 12~24 VAC/VDC N.C. COM N.O. Relay Output N.O. GND N.O. Egress Input LCD Display: CODE HOLI ON OFF Power Indicator LED Glows blue when power is ON. Relay Indicator LED Glows red when relay is active. MODE Enter mode selection Toggle Automatic (relay will follow programs) / Manual (relay will not follow programs) Hold 3-sec: Relay will exit mode selection RESET Press once: Turn off relay Hold 3-sec: Reset to factory defaults SET See Programming section for details Enter settings mode / Move to previous setting. SU-SA Day of the week Security code setting Holiday mode setting Relay is ON Relay is OFF NOTE: If both ON & OFF show, event is programmed to ‘Pulse’ mode. ENTER See Programming section for details Enter setting / Confirm setting / Move to next setting. DOWN See Programming section for details Move to previous setting / Decrease selected setting. UP See Programming section for details Move to next setting / Increase selected setting. LCD Display See detailed description below. Terminal block For connection details, see Sample Applications/Wire Diagram on page 7. TIME Time setting PROG Event program setting Indicates time (hours:minutes) AM / PM Indicates when set in 12-hr clock format Event # Shows which event is active, or F/P for relay output mode Specifications: Operating voltage Current draw Standby Active Relay rating Backup battery Weight Dimensions Dimensions: 12~24 VAC/VDC 15mA@12VDC 70mA@12VDC 10A@120VAC/28VDC 1 x CR-2016 (included) 4.6-oz (130g) 43/16” x 31/16” x 11/4” (107 x 78 x 31 mm) 43/16” (107mm) 49/16” (116mm) 31/16” (78mm) 2 11/4” (31mm) SECO-LARM U.S.A., Inc 7-Day Timer ENFORCER Installation: 1. Mount the 7-Day Timer where the alpha-numeric display can be easily seen, and the keys can be pressed. 2. Connect 12~24 VAC/VDC to the power input terminals marked (+) and (-). 3. Remove the cover from the device. Remove the paper battery protector from the backup battery (CR-2016, included). NOTE: The paper protector prevents the battery from being drained during product shipment. If the protector is not removed, the backup battery will fail to function. 4. Connect the device that will be controlled to the relay N.O. or N.C. and COM terminals. NOTE: If connecting the timer to a DC-powered electromagnetic or electric lock, connect a 1N4004 diode (not included) as close as possible to, and in parallel with, the lock (see page 7). This absorbs possible electromagnetic interference to prevent operation of the lock from damaging the timer. A 1N4004 diode is not required for AC-powered locks. 5. Ensure the connected device operates within the specifications of the relay. Egress Input: (optional, switch not included) 1. The 7-Day Timer features a N.O. Egress input which can be used with an optional N.O. switch which, when pressed, will cause the 7-Day Timer relay to activate. 2. Connect the switch between the N.O. Egress input and ground Setting the Security Code: If the security code feature is enabled, a 4-digit code must be entered before performing any operations. Use the UP/DOWN keys to input the code, and ENTER/SET to move to the next/previous code digit. Entering the incorrect code will return to the main screen. The default code is 0000. Press SET Press ENTER Press ENTER If the security code is enabled, enter the security code CODE flashes Enters the security code setting CODE is solid The first digit of the security code flashes Use UP/DOWN keys to select the first digit of the security code Enter the second digit of the security code Repeat for each digit The default code is 0000 Press ENTER Press ENTER Press ENTER Use the DOWN key to enable the security code Use the UP key to disable the security code CODE will display when security code enabled If the security code is enabled then enter the new code twice If the security code is disabled then the main screen is displayed Exits the security code setting Returns to the main screen Security Code Reset: To reset the security code to the factory default (0000), press and hold the SET, ENTER, UP & DOWN keys for 3 seconds. SECO-LARM U.S.A., Inc 3 ENFORCER 7-Day Timer Setting the Time: Set the current time in 12- or 24- hour clock format. Note: The backup battery will preserve clock time during power failure To set the time: Press SET Press UP/DOWN Press ENTER If the security code is enabled, enter the security code Press until TIME setting mode is selected When selected, TIME will flash Enters the time setting mode TIME is solid Use the UP/DOWN keys to select the day of the week SU MO TU WE TH FR SA Press ENTER Press ENTER Press ENTER Use the UP/DOWN keys to select the current hour Use the UP/DOWN keys to select the current minute AM or PM flashes (depending on current time) Use the UP/DOWN keys to select 12- or 24-hour clock Default is 24-hour Press ENTER Exits the time setting mode Returns to the main screen Entering Events: 4 The 7-Day Timer can store up to 60 events. When an event is active, the event number will show on the LCD. In fixed mode, ON or OFF will show on the LCD. Fixed mode means the relay will activate with one event and deactivate with another event. In pulsed mode, ON and OFF will both show on the LCD. Pulsed mode means the relay will activate for a set period of time and then automatically turn off. NOTE 1: The timer only executes future events. For example, a Monday 8:00 AM event that is programmed at 10:00 AM on Monday will not execute and come into effect until the following Monday at 8:00 AM. NOTE 2: Only one event can be scheduled for each minute. Subsequent events set to the same day/hour/minute will not be saved. SECO-LARM U.S.A., Inc 7-Day Timer ENFORCER To create a new event: Press SET Press UP/DOWN Press ENTER If the security code is enabled, enter the security code Press until PROGRAM setting mode is selected When selected, PROG will flash Enters the program setting mode PROG is solid Event number flashes in lower left Press UP/DOWN Press ENTER Press ENTER Select event number to edit Press and hold to scan rapidly through events Enter program edit mode Use the UP/DOWN keys to set the event day 16 different event day combinations (see the chart below) Press UP/DOWN keys to select Fixed (F) or Pulsed (P) output Fixed: Relay will turn on until an OFF event occurs Pulsed Relay will turn on for set time Press ENTER Press ENTER Press ENTER If Fixed is chosen then ON flashes: Press UP/DOWN keys to set ON or OFF command If Pulsed is chosen then ON and OFF displayed and :01 flashes: Press UP/DOWN keys to set relay operate time Press UP/DOWN keys to set event hour Press UP/DOWN keys to set event minutes Press ENTER Press SET Confirm current event Set next event Exits the program setting mode Returns to main screen Setting for day of the week can be programmed in 16 different combinations. Combinations, in the order they appear, are as follows: (combination will show onscreen when selected) SUNDAY 1 MONDAY TUESDAY WEDNESDAY THURSDAY FRIDAY 2 3 4 5 6 7 8 9 10 11 12 13 SECO-LARM U.S.A., Inc 16 14 15 SATURDAY Disabled 5 ENFORCER 7-Day Timer To disable an event: Press SET Press UP/DOWN Press ENTER If the security code is enabled, enter the security code Press until PROGRAM setting mode is selected When selected, PROG will flash Enters the program setting mode PROG is solid Event number flashes in lower left Press UP/DOWN Press ENTER Press ENTER Select event number to disable Press and hold to scan rapidly through events Enter program edit mode Press UP/DOWN keys until no days appear Press to confirm The event is now disabled Press SET Exits the program setting mode Setting Holiday Mode: Holiday mode is used to temporarily suspend all programmed events for up to 99 days. Each holiday period is active only once and will not repeat. Holiday duration must be a multiple of 24 hours. When holiday mode is active, the number of holiday days remaining are displayed on the LCD. Holiday mode will only become active once the start time is reached. For example, if on Monday at 10:00AM a 3-day holiday period is set to begin on Monday at 8:00AM, suspension of events will only begin Tuesday at 8:00AM, and run until Friday at 7:59AM. To schedule a holiday: Press SET Press UP/DOWN Press ENTER If the security code is enabled, enter the security code Press until HOLIDAY setting mode is selected When selected, HOLI will flash Press ENTER Press ENTER Press ENTER Holiday duration starts flashing Use UP/DOWN keys to set holiday duration (in 24 hour increments) Hours flash Use UP/DOWN keys to set holiday hours start time Minutes flash Use UP/DOWN keys to set holiday minutes start time Enters the holiday setting mode HOLI is solid Holiday start day starts flashing Use UP/DOWN keys to select holiday start day Press ENTER Exits the holiday setting mode Returns to the main screen 6 SECO-LARM U.S.A., Inc 7-Day Timer ENFORCER Sample Applications/Wire Diagram: N.C. COM N.O. N.O. GND VDC/VAC Power supply INPUT EGRESS DRY RELAY OUTPUT 12~24 In this application, the SA-027WQ is used to open and close a gate based on a weekly schedule. The gate is required to remain open from 7:00am to 7:00pm Monday through Friday. If the gate is set to automatically close after opening: The relay is set in Fixed mode to activate at 7:00am Monday through Friday The relay is set in Fixed mode to deactivate at 7:00pm Monday through Friday If the gate is set to open or close based on a dry contact closure: The relay is set in Pulse mode to activate for :02 seconds at 7:00am Monday through Friday The relay is set in Pulse mode to activate for :02 seconds at 7:00pm Monday through Friday A wireless remote (such as the SK-919TD1S-UP) activates the wireless receiver (such as the SK-910RBQ), which is connected to the egress input of the SA-027WQ. This will activate the gate when the timer is not in use. Gate operator SK-910RBQ Wireless receiver SK-919TD1S-UP Wireless transmitter N.C. COM N.O. N.O. GND Power supply VDC/VAC INPUT EGRESS DRY RELAY OUTPUT 12~24 In this application, the SA-027WQ is used to keep an entry door unlocked during normal business hours. The relay is set in Fixed mode to activate at 8:00am Monday through Friday. The relay is set in Fixed mode to deactivate at 5:00pm Monday through Friday. A fail safe electric door strike (such as the SD-996C-NUQ) is connected between the N.C. and (–) terminals. A 1N4004 diode (not included) must be connected as close as possible to, and in parallel with, the lock. A Normally Open (N.O.) spring-loaded switch connected to the egress input of the SA-027WQ allows for egress while the door is locked. SECO-LARM U.S.A., Inc Diode SD-996C-NUQ Electric strike N.O. spring-loaded switch 7 ENFORCER 7-Day Timer Changing the Battery: 1. Use one CR-2016 button cell battery. 2. Unscrew the rear panel. 3. Note the orientation of the button cell battery and remove it. 4. Replace the battery with one fresh cell of the same type (CR-2016), in the same orientation as before. 5. Replace the rear panel. Troubleshooting: Time frequently incorrect Ensure the 7-Day Timer has a reliable power source. Replace the backup battery. Programmed event does not execute Ensure relay is in Automatic Mode (Overview section, see page 2). Ensure event is correctly programmed. Also Available from SECO-LARM: 365-Day Annual Timer Delayed Egress Timer Multipurpose Timers SA-027Q SA-025EQ SA-025Q/SA-026Q WARRANTY This SECO-LARM product is warranted against defects in material and workmanship while used in normal service for a period of one (1) year from the date of sale to the original consumer customer. SECO-LARM’s obligation is limited to the repair or replacement of any defective part if the unit is returned, transportation prepaid, to SECO-LARM. This Warranty is void if damage is caused by or attributed to acts of God, physical or electrical misuse or abuse, neglect, repair, or alteration, improper or abnormal usage, or faulty installation, or if for any other reason SECO-LARM determines that such equipment is not operating properly as a result of causes other than defects in material and workmanship. The sole obligation of SECO-LARM, and the purchaser’s exclusive remedy, shall be limited to replacement or repair only, at SECO-LARM’s option. In no event shall SECO-LARM be liable for any special, collateral, incidental, or consequential personal or property damages of any kind to the purchaser or anyone else. NOTICE The information and specifications printed in this manual are current at the time of publication. However, the SECO-LARM policy is one of continual development and improvement. For this reason, SECO-LARM reserves the right to change specifications without notice. SECO-LARM is also not responsible for misprints or typographical errors. Copyright © 2012 SECO-LARM U.S.A., Inc. All rights reserved. This material may not be reproduced or copied, in whole or in part, without the written permission of SECO-LARM. Made in Taiwan U.S.A., Inc. 16842 Millikan Avenue, Irvine, CA 92606 Tel: 800-662-0800 / 949-261-2999 Fax: 949-261-7326 8 Website: www.seco-larm.com E-mail: [email protected] PITSW1 Order Part # 763-177% MiSA-027WQ_1208.docx SECO-LARM U.S.A., Inc