1
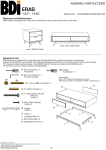
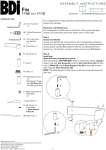
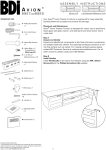
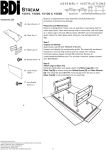
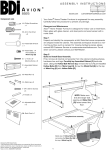
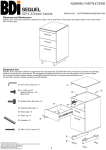
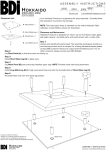
assembly instructions
M irage
8222
bdiusa.com
[email protected]
Your Mirage Home Theater Furniture is engineered for easy assembly.
Carefully follow this procedure to prevent any damage.
2.
Component List
3.
2.
1.
2.
Placement and Maintenance
Your Mirage Home Theater Furniture is designed for indoor use on level
floors. Clean glass with glass cleaner; steel parts and wood veneer with a
moist cloth.
3.
1.
A - Cabinet Assembly
x1
Step 1
Unpack and Identify
Unpack and identify the components at left. Note that some components
are shipped inside the cabinet. The assembly workspace should be a nonmarring surface such as carpet. For missing hardware pieces, please
contact BDI Customer Service at [email protected]. For all
other concerns, please contact your BDI Retailer.
2.
B - Adjustable Shelf x 4
2.
3.
2.
1.
3.
1.
2.
Step 2
Shelves Installation
Adjustable Shelf Pins may be repositioned, allowing you to raise or lower
the adjustable shelf to the desired level.
2.
2.
C - Removable Back Panel x1
D - Phillips Screwdriver
x1
E - Allen Wrench x 1
1.
1.
3.
3.
Install Adjustable Shelf (B) inside the left and right cabinet area. *Note:
To place the adjustable shelf inside the cabinet, the shelf may be tilted
sideways to clear the door opening.
A
2
1
B
C
E
Designed by Al Glass and Cristian Wicha.
These distinctive product configurations are protected by US and international
patents, trade dress, and/or copyright laws.
BDI are trademarks of Becker Designed, Inc.
All Rights reserved. ©2009, BDI
Made in China. 8222REV102609v2
Level your cabinet (if needed)
The adjustable leveler glides on the bottom of the cabinet are
accessible from inside the cabinet using the Allen Wrench
(E). If your floor is uneven, you may extend one or more of the
levelers (with the provided Allen Wrench (E)) to attain a level,
stable cabinet placement.
1
Step 3
Adjust Door Hinges (if needed)
If the cabinet’s door appears out of alignment, this can be corrected
with minor adjustment to the European hinges on each door.
Because these hinges are infinitely adjustable, adjusting one hinge
element can sometimes cause the need for adjustments to other
elements. But with a few adjustments, you can modify the orientation of
the cabinet door to make sure that it hangs evenly.
2.*
3.
2.
*
2.
3.
1.
1.
Use a Phillips screwdriver to adjust Mirage’s door hinges:
• By adjusting Screw 1, the door will move LEFT or RIGHT
within the frame. Make minor adjustments at both top and
bottom hinges for best results.
• By adjusting Screw(s) 2, the door will move UP or DOWN
within the frame (the top and bottom hinges must be adjusted
the same degree).
NOTE: Loosen Screws 2 one complete turn, raise or lower door, then hold in position while tightening Screws 2 (on both hinges).
• By adjusting Screw 3 the entire door will move IN or
OUT, opening or closing the gap between the door frame and
cabinet. (This screw rarely needs adjustment.)
Step 4
Reverse Door-Swing (if desired)
Mirage Tower features a reversible door assembly so that you can
open either from the left or the right.
To reverse the door’s orientation,
1. Remove the Door by actuating both of its quick-release hinges;
carefully place the detached Door aside.
2. Using a Philips head screwdriver, remove both Hinge Plates
from the interior wall of the cabinet by loosening the screws holding
it in place.
3. Install both Hinge Plates to the opposite interior wall at the predetermined locations.
4. Re-install the Door by connecting each Door Hinge to the
relocated Hinge Plates.
The Mirage 8222 features an opening at the top area of the back
surface that can accommodate a small fan for the purpose of active
cooling. BDI does not supply fans, but you may find several on the
market which are compatible with the size and shape of this opening.
2
assembly instructions
bdiusa.com [email protected]