1
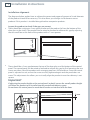
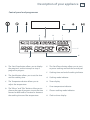
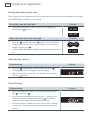
Steam oven OS60NDTX models Installation instructions and User guide NZ AU GB IE Contents Introduction Steaming Safety and warnings Environmental protection Installation instructions Choosing the location Recessed fitting Installation alignment Electrical connection Description of your appliance Operation Presentation of your oven Accessories Control panel and programmer Using your appliance Setting and adjusting the time Adjusting the contrast Timer function Immediate steaming Pre-programmed cooking times for the different functions Shutdown during cooking At the end of cooking Water management Programmed cooking Child safety Description of functions Cooking table Care and cleaning Cleaning the outer surfaces Cleaning the inside of the oven Cleaning the water supply pipe Cleaning the steam generator Cleaning the discharge spout Changing the bulb Troubleshooting Warranty and service Important! SAVE THESE INSTRUCTIONS The models shown in this User Guide may not be available in all markets and are subject to change at any time. For current details about model and specification availability in your country, please visit our local website listed on the back cover or contact your local Fisher & Paykel dealer. 1 2 3 4 7 7 8 9 11 11 12 13 14 14 14 15 16 16 16 16 17 18 19 20 22 22 22 22 22 23 24 25 2 Introduction Steaming Steaming has many advantages if used correctly. Healthy and natural, steaming helps food to retain its taste. A light or herby sauce adds that little touch that makes all the difference. It does not give off any smells. There is no need to flavour the cooking water with herbs or spices. However, fish can be flavoured by cooking it on a bed of seaweed or poultry on a bed of rosemary or tarragon. Meat, fish and vegetables can be cooked together. Pasta, rice and purées can be gently heated without any risk of sticking or drying. Making cream desserts, custard tarts, rice puddings, etc. is easy... if you cover them with foil the water from the condensation will not wet them. There is no need to add salt before cooking, or even any cooking water. To give meat a better appearance, brown it first all over in hot butter in the frying pan. Compared with boiling, steaming only offers advantages: It is fast: cooking starts immediately while the cooking time for food in a pan of water only starts from when the water begins to boil. It is healthy: the vitamins (those known as hydrosoluble) and mineral salts are well preserved because they barely dissolve in the condensed water that covers the food. Furthermore, no fat is used to aid cooking. Steaming preserves the taste of the food. It does not add any flavour or grilled or fried taste and does not take any flavour away because there is no dilution in the water. Opposite side of the coin: there is no point in cooking fish that is not fresh in this way or vegetables that have been forgotten about in the fridge for a week: the results would be catastrophic! Steaming does not allow tastes or smells to mix, so don’t hesitate to save time and money by cooking fish and a dessert side by side but without touching, for example. Steaming is also suitable for blanching, reheating or even keeping warm, especially sauces. First of all, put poultry, veal, pork, etc. in the frying pan with very little fat to give them an appetising golden appearance. Then finish cooking them by steaming. Cut into small pieces, food cooks more quickly and evenly than if it is cooked whole. Safety and warnings 3 Important! Keep this user guide with your appliance. If this appliance is ever sold or transferred to another person, ensure that the new owner receives the user guide. Please become familiar with these recommendations before installing and using your appliance. They were written for your safety and the safety of others. Important safety instructions ■ ■ ■ ■ ■ Children of less than 8 years old must be kept away from the appliance unless continuously supervised. This appliance can be used by children aged from 8 years and above, and persons with reduced physical, sensory or mental capabilities or lack of experience and knowledge, if they have been given supervision or instruction concerning the use of the appliance in a safe way and they understand the hazards involved. Cleaning and user maintenance shall not be done by children without supervision. It is advisable to supervise children to make sure that they do not treat the appliance as a toy. Do not use steam cleaning appliances. This appliance has been designed for cooking with the door closed. WARNING: The accessible parts of the appliance can become very hot during use. Make sure not to touch the heating elements situated inside the oven. It is advisable to keep young children away from the appliance. 4 Safety and warnings Important safety instructions ■ ■ ■ ■ ■ ■ ■ ■ This appliance is designed for household use. It is exclusively intended for cooking food. This oven does not contain any asbestos-based component. When you receive the appliance, unpack or have it unpacked immediately. Give it an overall general inspection. Make note of any concerns or reservations on the delivery slip and make sure to keep a copy of this form. Your appliance is intended for standard household use. Do not use it for commercial or industrial purposes or for any other purpose than that for which it was designed. Do not modify or attempt to modify any of the characteristics of this appliance. This would be dangerous to your safety. Keep young children away from the appliance while it is in use. You will thus avoid them getting burned by knocking over a cooking receptacle. Never pull your appliance by the door handle. During cooking, make sure that the door of your oven is properly closed so that the seal operates correctly. The appliance becomes very hot during use. Do not touch the heating elements inside the oven. You risk serious burns. Safety and warnings Important safety instructions ■ ■ ■ ■ ■ ■ Use oven gloves when putting your dishes in or taking them out of the oven. After cooking, never pick up a baking dish with your bare hands. Do not place heavy loads on the open door of the oven and make sure that children cannot climb or sit on it. For any cleaning of the inside of the oven, the oven must be switched off. In addition to the accessories supplied with your oven, only use dishes that are resistant to high temperatures (follow the manufacturers’ instructions). After using your oven, make sure that all controls are in the off position. 5 6 Safety and warnings Environmental protection This appliance’s packaging material is recyclable. Help recycle it and protect the environment by dropping it off in the municipal receptacles provided for this purpose. Your appliance also contains a great amount of recyclable material. It is marked with this label to indicate the used appliances that should not be mixed with other waste. This way, the appliance recycling organised by your manufacturer will be done under the best possible conditions, in compliance with European Directive 2002/96/EC on Waste Electrical and Electronic Equipment. Contact your town hall or your retailer for the used appliance collection points closest to your home. We thank you doing your part to protect the environment. Important! ■ ■ ■ Installation should only be performed by installers and qualified technicians. This appliance complies with the following European directives: Low Voltage Directive 73/23/EEC amended by Directive 93/68/EEC for affixing of EC marking. Electromagnetic Compatibility Directive 89/336/EEC amended by Directive 93/68/EEC for affixing of EC marking. EC Regulation No. 1935/2004 on materials and articles intended to come into contact with foodstuffs. Installation instructions 50 20 10 50 Two installation options: Option ‘A’ - oven only (overall height 457 mm) Option ‘B’ - oven + lower trim kit accessory (overall height 478 mm) 7 Note: If you are installing an appliance directly over another, you have the option of using the supplied black metal shelf cover to conceal the shelf front that would be visible between the two appliances. This needs to be fitted before the lower trim kit and/or appliance is installed. Refer to the instructions packed with the shelf cover accessory kit. 550 400 23 450 (option 'A') 597 470 470 550 min. 55 560 0m 445 450 (option 'A') 378 (option 'B') in. Lower trim (optional accessory, purchased separately) 478 (option 'B') 457 560 (option 'A') (option 'B') Important! Choosing the location If you choose Installation option B, you will need to install the lower trim kit BEFORE you install the appliance. Refer to the instructions packed with the lower trim kit. The diagrams above determine the dimensions of a unit where you will be able to install your oven. This appliance can be installed as an under the counter or column oven. Recessed fitting Centre the oven in the unit to guarantee a minimum distance of 20mm with the adjacent unit. The recessed unit must be made of heat-resistant material (or coated with this type of material). For increased stability, fasten the oven to the unit with 2 screws through the holes provided for this purpose on the lateral uprights. 1) Make a Ø 2 mm hole in the wall of the unit to avoid the wood splitting. 2) Fasten the oven with the 2 screws. Note: To ensure that your installation is compliant, do not hesitate to contact a household appliance specialist. Important! We accept no liability in the event of an accident or incident resulting from grounding that is nonexistent, faulty or incorrectly fitted. If the electrical installation in your household requires modification for you to connect your appliance, contact a qualified electrician. If the oven presents any anomaly, disconnect the oven from the power supply or remove the fuse from the oven connection line. 8 Installation instructions Installation alignment The diagrams below explain how to achieve the correct and proper alignment of visual elements of the product should it be necessary. This also allows you to align visual elements across products if this product is installed alongside other companian products. ■ Inspect the product to check if the gaps are correct There should be a minimum 5 mm gap at the base of the product (ie from the bottom of the door glass to the shelf ). The product can be raised or lowered to achieve this gap by adjusting the two small feet at the front of the product with a 7 mm spanner. + + 5 mm ■ There should be a 5 mm gap between the top of the door glass and the bottom of the control panel. The control panel can be raised or lowered to achieve this gap by first loosening the two screws on either side of the product with a tamper proof torx 20 Screwdriver. Once the control panel is adjusted to suit, ensure the screws are fully tightened again and the panel does not move. This adjustment also allows you to visually align the product incase the cabinetry is not square. Important! If adjusting the product height or the control panel (or both), ensure the overall product height still allows the product to be installed into the preconfined cabinetry space. Do not lower the control panel so much that it touches or interferes with the door. 5 mm Installation instructions 9 Electrical specifications ■ ■ ■ Electrical connection rating: 1.78 kW Voltage/frequency: 220-240 V / 50 Hz Current: 10 A Please verify electrical specifications by checking the appliance rating label. Electrical connection Electrical safety should be ensured by correct recessed fitting. During fitting and maintenance operations, the appliance should be disconnected from the mains and the fuses should cut out or removed. ■ ■ ■ ■ ■ ■ The electrical connection should be made before the appliance is put in place in the unit. Check that: The mains power is sufficient The power cables are in good condition The diameter of the wires complies with the installation regulations. The oven is connected to a single phase 220-240 V 50 Hz supply using a 1.5 mm2 cable and connected to earth. The supply must be protected by a suitably rated circuit breaker in accordance with the installation regulations. A suitable isolating switch providing full disconnection from the mains power supply is incorporated in the permanent wiring, mounted and positioned to comply with the local wiring rules and regulations. The isolating switch must be of an approved type and provide a 3 mm air gap contact separation in all poles (or in all active [phase] conductors if the local wiring rules allow for this variation of the requirements) The isolating switch will be easily accessible to the customer with the oven installed. Important! The earth wire (green and yellow) is connected to the connected to the earth of the installation. terminal of the appliance and should be If the power cable is damaged, it must be replaced by the manufacturer, its After-Sales Service or similarly qualified persons to avoid danger. 10 Description of your appliance 11 Operation The water contained in the tank reaches the inside of the oven via a pipe. This water is transformed into steam through contact with a hot surface placed at the bottom of the oven: This is the steam generator. It is not necessary to add water to the dish being cooked. To guarantee AUTHENTIC STEAMING, your oven comes with a set of dishes specially designed for perfect steaming. Important! You MUST fill the water tank to the maximum level before cooking. Fit the tank in its housing by pressing it in AS FAR AS IT WILL GO until you feel it RUN OVER A NOTCH. Important! The appliance becomes hot during cooking. Hot steam escapes when you open the door of the appliance. Keep children away. Presentation of your oven Control pad Indicator Water tank Water feed pipe Steam generator Discharge spout 12 Description of your appliance Accessories Two-piece steaming dish Food support dish (Fig.1) Stainless steel dish perforated to avoid contact between the food and the condensation water. Fig.1 Drip tray (Fig.2) Stainless steel tray for collecting the water from condensation. Fig.2 Tip: For steaming, place dish Fig.1 over dish Fig.2 so that they do not nest into each oher (diagram opposite). This is to ensure enough space for the condensate water to collect in the drip tray. If the dishes nest, the food may cook in water rather than steam. For storage, place dish Fig.1 over dish Fig.2 in the same direction so that they nest into each other. Support rack (fig.3) Stainless steel removable support rack: must be placed in the oven. Fig.3 Tip: The dishes are dishwasher safe. Removable tank (Fig.4) Tank for supplying your oven with water independently. Capacity of approx. 1 litre (maximum level). Tip: The use of slightly hard water will make it easier to maintain your oven. Important! The use of demineralised water is prohibited (not suitable for consumption). The use of softened water may damage the surface of the steam generator. It is best to use bottled mineral water. Fig.4 Description of your appliance 13 Control panel and programmer A B D C G H E I J K F A The Start/Stop button allows you to display the programs, and to interrupt or stop a program in progress B The clock button allows you to set the time and the cooking time C The Temperature button allows you to adjust the temperature D The “Minus” and “Plus” buttons allow you to choose the type of program; to put the time forward or back and to increase or decrease the cooking time and the temperature E The Start/Pause button allows you to start or pause cooking and lock the control pad F Cooking time and end of cooking indicator G Cooking mode indicator H Timer display I Oven temperature indicator J Chosen cooking mode indicator K Clock or timer display 14 Using your appliance Setting and adjusting the time After connecting your appliance or after a long period without it being connected to the mains, the “12:00” button will flash on the display. To set the time on the clock ■ Display Set the time using the + and - buttons then validate by pressing the button. 12:0 0 0 6: 30 When the time has to be changed Display ■ Press the button then press twice. The time will flash. Program the new time (e.g. 7:30) using the + and - buttons. ■ Validate by pressing ■ A beep will be emitted to confirm that the new time has been set. 0 6 :30 . 0 7: 30 Adjusting the contrast Programming Display ■ Press the button then a few seconds later press until the indication -CO- appears on the display. , ■ Adjust the contrast using the + or - buttons and validate with the button. Timer function Programming ■ You can program the “Timer” function of your oven. Press the button then . ■ Adjust the programming time using the - / + buttons, for example 1 minute. Validate by pressing . The display shows the time again but the countdown starts. ■ Once the time has ended, the timer emits a series of beeps to warn you. These beeps can be stopped by pressing any button. Display Using your appliance 15 Immediate steaming Your oven has 8 steaming functions: Important! In all cases, do not start the oven without water in the tank. Cooking with immediate start and timer programmed at 100°C: Programming Display ■ Press the button then the + button to select the required function, here , (100°C). ■ Validate using the cooking time. button to access adjustment of the Setting the cooking time if necessary: ■ 0:25 flashes (pre-programmed time). ■ Adjust by pressing the + or - buttons. E.g.: 30 minutes ■ Validate by pressing the button. Adjusting the temperature ■ Press the button, “100 C” flashes. ° ■ Adjust by pressing the - button to change the temperature. E.g.: 80°C ■ Make sure that your door is properly closed. ■ Validate your choice by pressing the button then press the same button again to start the cooking. ■ Your oven will start up and count down minute by minute. ■ If necessary, stop the cooking by pressing second. for one Important! This appliance is designed to operate with the door closed. Tip: In order not to alter the cooking results, do not open the door of the appliance during cooking. 16 Using your appliance Pre-programmed cooking times for the different functions Cooking Temperature °C Pre-programmed time Minimum adjustment time Maximum adjustment time 100 25 min 5 min 1 hour 85 15 min 5 min 1 hour 75 15 min 5 min 1 hour 90 20 min 5 min 1 hour 95 30 min 5 min 1 hour 80 15 min 5 min 1 hour 55 30 min 5 min 1 hour 60 30 min 5 min 1 hour Shutdown during cooking At any time, you can stop cooking by pressing the button (hold it down for around 1 second). If the steam generation has not yet started (around 1 minute), the oven will stop immediately and the time will disappear. If the steam generation has already started, the time changes to 3 minutes and a countdown will start, with the steam being evacuated prior to opening. At the end of cooking 0:00 flashes. Emission of intermittent beeps for 3 minutes. To stop the beeps, press the button or open the door. Important! The tank MUST be emptied. Water management ■ ■ In the event of a problem connected with the water circuit during cooking, the symbol flashes and a beep sounds. This fault is connected with: an empty tank. an incorrectly fitted tank. After checking these two points, close the door again and restart cooking by pressing the button. Using your appliance 17 Programmed cooking Delayed cooking with end of cooking time selected: Delayed cooking is possible in all cases except for the defrost functions: Programming Display ■ The procedure is the same as for immediate cooking then, after validating the cooking time, ■ Press the , button twice. The end of cooking time is displayed and flashes to show that adjustment is now possible. For example: It is 12:30. You have programmed a cooking time of 25 min. The end of cooking time displayed is 12:55. ■ Adjust the end of cooking time by pressing the + or buttons For example: End of cooking 14:00. ■ Validate by pressing the button. An animation takes place intermittently after a few minutes, indicating that delayed cooking is in progress. After these actions, the start of heating is delayed so that the cooking ends at 14:00. At the end of cooking (end of programmed time), ■ ■ ■ The oven shuts down The cooking time indicator flashes at 0:00. A series of beeps is emitted for several minutes. These beeps can be definitively stopped by pressing the button. The display shows the time of day. Tip: At any time you can view or modify the end of cooking by pressing the programming if you wish, press the button. button. To cancel your 18 Using your appliance Child safety You can program the “CHILD SAFETY” function to prevent unauthorised start-up of your oven. Programming Display With the oven switched off, ■ Press the button ■ Then the button for 5 seconds. Two beeps are emitted to confirm that your oven is temporarily locked. An indication appears at the top left of the display. No program is now available. To cancel: ■ Press the button for 5 seconds. The indication disappears and the clock is displayed. ■ Two beeps are emitted to confirm the procedure. Description of functions Functions Temperature °C Cooking Examples of cooking 100 Steaming most often used Vegetables and meat 85 For cooking fragile foodstuffs Fragile whole fish (trout) 75 Cooking fragile fish Sardine, red mullet fillets 90 For cooking fragile foodstuffs, fruit, stewed fruit 95 80 Terrines, poultry pâté. Heating up ready meals Gentle heating Melting chocolate, butter. Fruit just warm to be eaten immediately Defrosting fish fillets before coating with breadcrumbs. 55 Slow defrosting without risk of cooking 60 Baked eggs; keeps stuffed tomatoes in shape. Ramekins, custard, etc. Red fruits that have to kept cold (for tarts and coulis) Defrosting meat before grilling (e.g.: sausages) 19 20 Cooking table Food Time °C Preparation Artichokes (small) 40 to 45 min 100 placed upside down on the plate Asparagus 35 to 40 min 100 Reduce time for tips only Broccoli 18 min 100 florets Carrots 20 to 22 min 100 thinly sliced Celeriac 25 to 30 min 100 thinly cut Pumpkin 15 to 20 min 100 diced Mushrooms 15 min 100 thinly sliced Any quantity 30 to 35 min Vegetables Cabbage family 22 min Brussels sprouts 100 30 to 35 min 10 to 15 min 100 Crosnes 20 min 100 20 min Spinach 100 35 min Shellfish Fruit sliced (fresh) stir during cooking (frozen) stir during cooking Chicory 30 min 100 trunk removed and cut in 2 Fennel 22 min 100 lengthwise cut in 2 Green beans 30 to 35 min 100 Turnip 15 to 20 min 100 Peas fresh 20 to 25 min 100 Leeks 25 min 100 Potatoes 25 min 40 to 45 min Coquilles St Jacques 10 to 12 min Mussels/ Winkles Crab/Crayfish 100 These times depend on the nature, thickness and freshness of the vegetables. Follow the instructions shown in the “preparation” column. Cauliflower florets Cabbage shredded Courgettes Comments The cooking time is the same irrespective of the quantity to be cooked. E.g.:1 or 4 artichokes — same cooking time. To control the level of cooking, pierce the thickest part of the vegetable, if it is cooked there will be no resistance. diced cut in 2 sliced whole 90 with flavourings 20 to 25 min 95 with flavourings 25 min 95 Lobster 30 to 35 min 95 Scampi 12 to 15 min 90 Apples/ peaches/ pears 10 to 15 min 90 whole, peeled Stewed 25 min 95 fruit sliced in Creamed 10 min 90 ramekins Lay crabs, etc. on a bed of algae. depends on weight Time depends on ripeness. Cooking table Food Time °C Preparation Pike 25 to 30 min 85 whole (1 kg) Cod/Hake 13 to 15 min 85 steaks (180 g)* Bream 20 to 25 min 85 whole (1 kg) Haddock 15 min 75 fillets Herring 20 min 85 whole (200 g) Pollock (black and yellow) 15 to 20 min 85 steaks (180 g) Monkfish 15 min 80 depends on thickness Mackerel 20 min 85 whole (250 g) Whiting 15 min 75 fillets Skate 25 to 30 min 80 Red mullet 15 min 80 Mullet/Sole 10 min 75 fillets whole (200 g) Dogfish 20 min. 85 6 large pieces (6 to 10 cm long) Salmon 15 to 20 min 85 steaks (180/200 g) Tuna 20 to 25 min 100 steaks (180/200 g) Trout whole (1kg) 20 to 25 min 100 whole (200 g) 13 to 15 min. Beef 15 to 30 min 100 Roast 800 g : 55 to 60 min. Pork (medallions) 25 min 100 Chicken legs: 35 to 40 min. (white) 20 to 25 min 100 (Paupiettes) 25 min 95 Roast turkey: 50-60 min. Morteau sausage 400 g Poultry Comments *Steaks: Round pieces of fish 2 to 3 cm thick (180/200g) per person. Buy the freshest produce. Place whole fish on the dish or on a bed of bayleaves, fennel or another aromatic herb. At the end of cooking, remove the skin, which will come away very easily. Then brown using another dish. 20 min 90 Puddings 10 to 15 min 90 7 min. 100 Boiled: placed directly on rack. 8 min. 100 Soft: placed directly on rack. 10 to 12 min. 100 Hard 100 Poached: break onto an individual plate, place on rack and cover with cling film. 90 Baked Eggs Sausages Use very fresh eggs stored at room temperature. Rice, Pasta, Semolina Meat Fish Any quantity Place directly in a dish, cover with water or milk. Steam is not enough to saturate these foodstuffs that swell. Place a sheet of foil over the dish to avoid drops of water falling down. Rice pudding 5 to 6 min. 30 min. 100 100 g washed rice - 20 cl milk - 2 dessertspoons sugar 200 g (/ litre water) Semolina 20 min. 100 21 Fluff up with a fork at the end of cooking. 22 Care and cleaning Cleaning the outer surface To clean the window of the electronic programmer and the oven door, use a soft cloth soaked in a glass cleaning product. Do not use abrasive products or hard metallic scourers to clean the glass door as this could scratch the surface and cause the glass to break. Cleaning the inside of the oven (after each use) Rub the inside of the oven with a dry cloth after the steam generator has cooled or leave the inside of the oven to dry with the door slightly open. Cleaning the water supply pipe (once a month) Remove the water supply pipe by unscrewing it. Remove any lime scale deposit that there may be inside the pipe (using a fine, sharp object such as a skewer or a knitting needle). Cleaning the steam generator (once a month) Pour ⁄ glass of white vinegar into the generator. Leave to act for a few minutes, then clean and rinse with water. Do not use a sponge or abrasive powders or kettle descaler. Cleaning the discharge spout Remove the discharge spout by pulling it upwards, wipe it and put it back in place using the three notches provided for this purpose. Important! Do not use a steam cleaning appliance. Care and cleaning 23 Important! ■ ■ ■ SAFETY: Make sure that the appliance is disconnected from the power supply before replacing the bulb to avoid any risk of electric shock. Act when the appliance has cooled down. To unscrew the viewing panel and the bulb, use a rubber glove, which will make it easier to remove. Changing the bulb ■ ■ ■ ■ ■ ■ ■ The bulb is located inside the oven on the back wall. Disconnect your oven from the mains before any intervention on the bulb to avoid any electric shock. Turn the lamp cover a quarter turn to the left. Unscrew the bulb in the same direction. Bulb Lamp cover Bulb characteristics: 15 W - 0-240 V 300°C - Base E 14 Change the bulb and then fit the lamp cover back into position, making sure that the seals are correctly placed. Reconnect your oven. 24 Troubleshooting You have a question about whether or not your oven is working properly. This does not necessarily mean that there is a breakdown. In any case, check the following points: You notice that... Possible causes What to do? Your display does not light up. No power supply to oven. Check the power supply (fuse). Electronic card is not working. Call Customer Care. Water or steam leaking through the door during cooking. The door is not closed properly. Call Customer Care. The light in your oven no longer works. The light is not working. Change the bulb. Your oven is not connected to the power supply or the fuse has blown. Make sure your oven is connected to the power supply or change the fuse. The door seal is faulty. Important! Repairs to the appliance must only be carried out by professionals. Repairs not carried out within the rules can be a source of danger for the user. Tip: In any case, if your intervention is not sufficient, contact Customer Care immediately. Warranty and service 25 Before you call for service or assistance ... Check the things you can do yourself. Refer to the ‘Installation instructions’ and your ‘User guide’ and check that: 1 2 your product is correctly installed you are familiar with its normal operation. If after checking these points you still need assistance, please see you ‘Service and warranty’ booklet for warranty information and Customer Care contact details, or contact us through our website listed on the back cover. BRANDT APPLIANCES SAS 7 rue Henri Becquerel 92500 RUEIL MALMAISON MADE IN FRANCE 230V ~ 50 Hz Fisher & Paykel Appliances Model no Serial no. Copy these from the serial label of your appliance. The serial label is located at the top left-hand side of the oven frame. Date of purchase Contact details Dealer name www.fisherpaykel.com Copyright © Fisher & Paykel 2013. All rights reserved. The product specifications in this booklet apply to the specific products and models described at the date of issue. Under our policy of continuous product improvement, these specifications may change at any time. You should therefore check with your Dealer to ensure this booklet correctly describes the product currently available. NZ AU GB IE F&P PN - 590261 D CZ5701544 03.2013