1
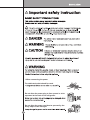
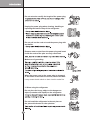
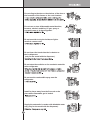
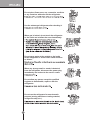
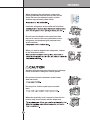
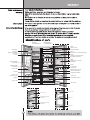
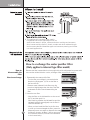
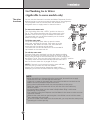
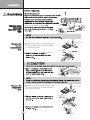
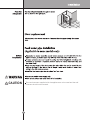
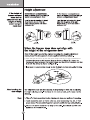
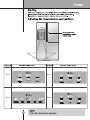
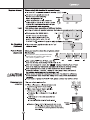
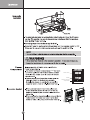
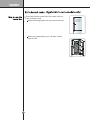
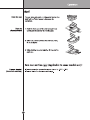
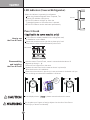
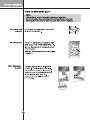
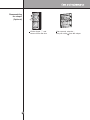
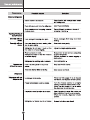
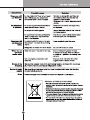
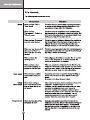
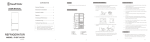
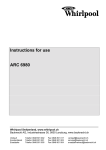
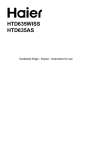
MFL67229887
2
4
4
5
13
How to exchange the water purifier
(Only applies to internal type filter model)
No Plumbing Ice & Water (Applicable to some models only)
14
14
15
16
17
17
Height adjust
18
When the freezer door does not align with the
height of the refrigerator door
18
19
19
26
27
LED indicator (Freezer/Refigerator)
28
Pure N Fresh
28
29
29
V Fresh box
29
29
30
31
Energy - Saving Method
31
32
34
34
35
40
1.When connecting the power
The dedicated outlet should be used.
Do not allow the power plug to face upward or to be
squeezed at the back of the refrigerator.
Do not allow the power cord bent or pressed by the
heavy object to be damaged.
Do not extend or modify the length of the power plug.
Unplug the power plug when cleaning, handling or
replacing the interior lamp of the refrigerator.
Do not pull out the cord or touch the power plug with
wet hands.
Remove water or dust from the power plug and insert
it with the ends of the pins securely connected.
Make sure of grounding.
When the power cord or the power plug is damaged
or the holes of the outlet are loosed, donot use them.
It may cause electric shock or short circuit to make fire.
2. When using the refrigerator
Do not place the heavy object or the dangerous
object (container with liquid) on the refrigerator.
Do not install the refrigerator in the wet place or
the place which water or rain splashes.
Do not cling to the door or the shelves of the door or
the home bar of the freezer or the cool chamber.
Do not use or store inflammable materials ether,
benzene, alcohol, medicine, LP gas, spray or
cosmetics near or in therefrigerator.
Do not use drier to dry the inside,nor light a
candle to remove odor.
Do not insert the hands into the ice bucket or
the ice dispenser.
(only for the model with the dispenser).
Do not store the medicine or the academic materials
at the refrigerator.
Do not use the combustible spray near the
refrigerator.
Install in places away from the fire such as the
place where flammable gas is lesked.
Supply the automatic ice maker with drinkable water
only (only for the model with the dispenser).
Do not place flower vase, cup, cosmetics, medicine
or any container with water on the refrigerator.
Use the submerged refrigerator after checking it.
When gas is leaked, do not touch the refrigerator
or the outlet and ventilate the room immediately.
Do not spray water at the outside or the inside
of the refrigerator or do not clean it with benzene
or thinner.
When any strange smell or smoke is detected
from the refrigerator, disconnect the power plug
immediately and contact to the service center.
Do not allow any person except the qualified
engineer to disassemble, repair or alter the
refrigerator.
Do not use the refrigerator for non-domestic
purpose (storing medicine or testing material,
using at the ship, etc.).
When disposing the refrigerator, remove the
packing materials from the dooe or take off the
doors but leave the shelves in palce so that
children may not easily climb inside.
Install the refrigerator on the solid and level floor.
Do not insert the hands or the metal stick into
the exit of cool air, the cover, the bottom of the
refrigerator, the heatproof grill (exhaust hole)
at the backside.
When you want to dispose the refrigerator, contact
to the down-block office.
Violating this direction may cause injury or damage
house or furniture. Always be careful, please.
Do not touch food or containers at the freezer
with wet hands.
Do not put ice in thin crystal cup or ceramic
ware.
When the electricity is off, remove ice from the ice
bucket (only for the model with the dispenser).
Wait for 5 minutes or longer when reconnecting
the plug.
Do not put bottle in the freezer.
Pull out the power plug not by grasping the cord
but the plug of its end.
Do not install the refrigerator in the wet place or the
place which water or rain splashes.
Do not insert the hands into the bottom of the
refrigerator.
Carry the refrigerator with the handle bar at the
bottom of the front and the top of the rear.
Because opening or closing the door of the
refrigerator may cause injury to the person
around it, be careful, please.
Do not open or close the refrigerator door when holding the
handle of the freezer door.
Do not put any living animal in the refrigerator.
1. When connecting the power
Prevent the power cord from being squeezed or imprinted if the
refrigerator is pushed in after the power plug is extracted during the
installation.
When moving your appliance away from the wall, be careful not to
roll over or damage the power cord.
Be sure to use grounded exclusive proper voltage consent for
the power plug.
If the supply cord is damaged,it must be replaced by the
manufacturer or its service agent or a similarly qualified
person in order to avoid any hazard.
2. When using the refrigerator
Prevent children from entering the product.
Opening and closing the door of the refrigerator vigorously
may cause the stored food in the refrigerator basket to fall
by shock and hurt the foot, so take precautions.
Do not put heavy things on the Home Bar.
(Only for the models with the Home Bar)
In case of thunder and lightning, or not in use for a
long period of time, detach the power plug.
Do not insert the hands into the ice bucket or
the ice dispenser.
Do not remove the cover of the automatic ice maker.
(Only for the models with automatic ice maker)
Do not place the food in disorder inside the refrigerator.
WARNING : Risk of child entrapment.
Freezer
Compartment
Refrigerator
Compartment
Lamp
Dairy corner
Automatic
Icemaker
Drawer cover/Shelf
(Optional)
Lamp
Filter (Optional)
Lamp
Refreshment center (Optional)
Shelf
Pure N Fresh(Optional)
Egg Box (Optional)
Drawer/Shelf
(Optional)
Shelf
Refreshment center
(Optional)
Drawer/Shelf
(Optional)
Door rack
V Fresh box
(Optional)
Shelf
No Plumbing Ice &
Water (Optional)
Vegetable drawer
Drawer
Door rack
Drawer Cover
Door rack
Drawer
Vegetable drawer
Door rack
Door rack
Type-2
Type-1
Dairy corner
Refreshment center
(Optional)
Dairy corner
Door rack
Refreshment center
(Optional)
Door rack
6. This appliance is intended to be used in
household and similar applications such as
staff kitchen areas in shops, offices and other working environments;
farm houses and by clients in hotels, motels and other residential type
environments;bed and breakfast type environments;catering and similar
non-retail applications.
How to
disassemble the
filter
How to exchange
How to exchange the water purifier filter
(Only applies to internal type filter model)
Because the filter is assembled on the top right side of the refrigerator lamp case and it
removes the residual chlorine or odor, exchange a filter once every 6 months.
1. Disassemble the water purifier filter.
- Turn the filter to exchange in counterclockwise
direction by 90 degrees. (1) Pull out the filter to
the front side (2).
- Because water collected in the filter may drip,
put a bowl slightly larger than the size of the filter
underneath the filter when disassembling the
filter.
2. Insert the new filter.
- Align the filter on the indicated line on the control
box (1) and then push it in.
After checking whether the indicated line and the
indicated locking line are aligned, turn the filter in
clockwise direction (2).
- When you have install the filter for the first time
or when you have exchanged the filter, press the
dispenser button once again to dispense the water
y
for about 3 minutes (or about 1 liter) to remove an
air or residual charcoal. (Charcoal is not hazardous
to the human body.)
No Plumbing Ice & Water
(Applicable to some models only)
The other
functions
You can use the Automatic ice maker and Water Dispenser function
without having to connect an external water pipe to the refrigerator.
The refrigerator uses an internal water tank located on the
refrigerator door to supply water for these functions.
To remove the water tank:
Turn the locking dial to the “OPEN” position as shown in
Fig.(1). Then hold and pull the cap of the water tank in the
direction of the arrow in Fig.(2) to release the water tank.
The water tank can now be lifted carefully out of the door
basket for filling or cleaning.
To fill the water tank:
Lift up the clamps on both sides to open the water
tank cover, and then fill the tank. Pour water up to the
marked line (3ℓ). When the tank is full, close the tank
cover and lock the clamps on both sides.
The water tank can also be filled from the removable fill
cap located on the water tank lid.
To refit the water tank:
Place the filled water tank back into the door basket and align
the pick up nozzle to the water pipe spigot as shown in Fig (3).
Firmly push the tank so that the water pick up nozzle locates into
the spigot. Fig (4). Then turn the locking dial to the “CLOSED” position.
The pump motor will then automatically operate when this is
done so that the water line is purged of any air.
NOTE: If the tank is not inserted correctly, water will leak
from the pick up nozzle onto the door basket.
Always wait 15 seconds after dispensing water before
attempting to remove the water bottle for filling or cleaning.
NOTE
When assembling or disassembling the water tank, be careful not to apply
excessive force as it can damage the water tank.
If there is no water in the water tank, you will not be able to use the Auto Ice
Maker function and Water Dispenser function.
Using other liquid besides water can cause problems to the pump.
When the water in the water tank is low, the size of the ice cubes may
become smaller.
It’s a good idea to clean out the water initially before filling it with water
and placing it into position.
The method of using the Dispenser and Ice Maker is the same as other common
Dispenser models.
Because the water tank can get heavy,don’t let children use or hold the water
tank, especially with one hand.
As the ice maker uses water from the water tank, you may hear the water pump
operating 8~10 times per day.
15
ng.
b
Removing the hinge cover b ,
Upper hinge cover
Removing the hinge cover,and Main PCB
cover by loosening the screws.Separate
all connection wires.
Main PCB cover
counter
Removing the hinge cover,and Main PCB
cover by loosening the screws.Separate
all connection wires.
Upper hinge cover
Main PCB cover
CAUTION
The new hose-sets supplied with the appliance are to be used and that old
hose-sets should not be reused.
Open the door and lift it up with the lower height,use the (+) type screwdriver to
HEALTH GUARD
Type-1
Type-3
POWER
REPLACE
HOLD 5SECS
POWER
REPLACE
HOLD 5SECS
PURE N FRESH
Type-2
PURE N FRESH
Type-4
Note
The display will automatically turn off after 20 seconds for power saving.
(The ‘DISPENSER’ is still on)
Every time the user presses the button,
the function will switch in the order of
‘off’->‘auto’->‘power’->‘off’.
(Optional)
shall
Drawer Cover
Drawer
Bottom of freezer
compartment
24
25
Press and hold the center left of the crisper until you
hear a clicking sound.
With more storage space you can store more food.
With more storage space, you can store various
types of food.
26
Press and hold
until you hear a
clicking sound
27
LED indicator (Freezer/Refrigerator)
When the indicator is operating in refrigerator
When the freezer/refrigerator door is opened, The
built-in LED indicator will light up.
This LED indicator will light up when the
freezer/refrigerator or Home bar door is opened.
This LED indicator can be used semi-permanently.
LED Lamp
Pure N Fresh
How to use
the Pure N Fresh
Pure N Fresh is already installed on the refrigerator wall,
so installation is not needed.
Please use containers with tight lids to place spicy food.
Otherwise the odor will be absorbed by other food.
PURE N FRESH
Disassembling
and installing
the Pure N Fresh
PURE N FRESH
Hold the case of Pure N Fresh, rotate it counterclockwise about 15
degrees as shown in (a).
Take out Pure N Fresh from the case.
Replace the new Filter into the case as shown in picture (b)
(Note the direction of installation).
Place the unit as shown in picture (c), insert and rotate it clockwise until you
hear a clicking sound and the installation is finished.
The word
"FRONT"
should face
outward.
(a)
If the display shows "
(b)
Index line
(c)
", please contact local service center.
Do not place your fingers or foreign objects into the fan of the filter to
avoid injury or lanuch accidentally.
28
V Fresh box
The refrigerator drawer is for storing
vegetables or meats.
Press the V Fresh switch for several times
and the food can keep fresh for longer time.
V Fresh switch
29
30
from care
Energy-Saving Method
Install the fridge in a shady,cool and well-ventilated place.
Do not open and close the door frequently if not necessary.
Please do not keep the door open for a long time, close door in the shortest time.
Allow hot food to cool prior to storing.
Too much food are not advised to be put in. Enough space should be kept for
cool air circulating freely.
Do not set the temperature of refrigerator lower than needed.
Do not put the food near the temperature sensor.
Food need’t store is not advised to be put in.
Place the deep-frozen food for thawing intorefrigerator; they can be used for
cooling the refrigerator.(Applicabe to some models only)
Clean up the back cover and anti-condensation pipe termly (once a year) to
make sure heat exchange in gear.(Applicabe to some models only)
Do not block air vents with food.( Applicabe to some models only)
32
Disassembling
the crisper
(Optional)
Lift the crisper ① and
remove it from the door.
33
After removal, raise the ②
and pull out the 3 from the crisper.
34
35
36
37
38
39
40
LG Customer Information Center
☎ LG SERVICE : (UNITED KINGDOM) 0844-847-5454
Register your product Online!
www.lg.com