1
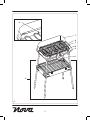
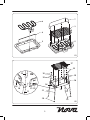
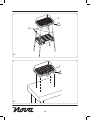
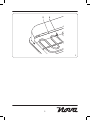
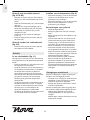
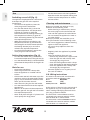
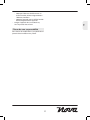
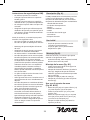
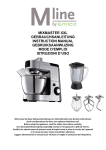
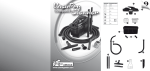
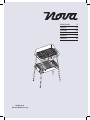
Nederlands English Français Deutsch Español Italiano 110422 Nova Electric Barbecue Top 6 10 14 18 22 25 6 7 4 3 5 2 1 8 A 2 7 4 3 9 5 5 B1 17 10 12 16 4x 10 12 12 14 13 15 14 11 13 11 10 14 13 11 10 3 B2 5 18 (4X) 19 B3 5 18 (4X) B4 4 5 6 C 5 NL • Gebruik het apparaat niet in de buurt van badkuipen, douches, wastafels of andere voorzieningen die water bevatten. • Dompel het apparaat niet onder in water of andere vloeistoffen. Verwijder het apparaat niet met uw handen indien het apparaat is ondergedompeld in water of andere vloeistoffen. Verwijder onmiddellijk de netstekker uit het stopcontact. Gebruik het apparaat niet opnieuw indien het apparaat is ondergedompeld in water of andere vloeistoffen. Gefeliciteerd! U heeft een apparaat van Nova aangeschaft. Ons doel is om kwaliteitsproducten met een smaakvol ontwerp en tegen een betaalbare prijs te bieden. We hopen dat u gedurende vele jaren plezier zult hebben van dit apparaat. Veiligheidsinstructies Het apparaat kan worden gebruikt door kinderen vanaf 8 jaar en door personen met een lichamelijke, zintuiglijke, geestelijke of motorische handicap of zonder de benodigde ervaring en kennis indien ze onder toezicht staan of instructies krijgen over hoe het apparaat op een veilige manier kan worden gebruikt alsook de gevaren begrijpen die met het gebruik samenhangen. Kinderen mogen niet met het apparaat spelen. Reiniging en onderhoud mogen niet worden uitgevoerd door kinderen tenzij ze ouder zijn dan 8 jaar en onder toezicht worden gehouden. Houd het apparaat en het netsnoer buiten bereik van kinderen jonger dan 8 jaar. Elektrische veiligheid • Controleer voor gebruik altijd of de netspanning overeenkomt met de spanning op het typeplaatje van het apparaat. • Sluit het apparaat aan op een geaard stopcontact. Gebruik indien nodig een geaarde verlengkabel met een geschikte diameter (minimaal 3 x 1,5 mm2). • Installeer voor extra bescherming een reststroomvoorziening (RCD) met een nominale bedrijfsstroom die kleiner is dan of gelijk is aan 30 mA. • Het apparaat mag niet worden bediend door middel van een externe timer of een apart afstandsbedieningssysteem. • Zorg ervoor dat er geen water in de pluggen van het netsnoer en het verlengsnoer kan komen. • Draai het netsnoer en het verlengsnoer altijd volledig uit. • Zorg ervoor dat het netsnoer niet over de rand van een werkblad hangt. Zorg ervoor dat het netsnoer niet per ongeluk verstrengeld raakt of de oorzaak van een struikeling kan vormen. • Houd het netsnoer uit de buurt van warmtebronnen, olie en scherpe randen. • Controleer het netsnoer en de netstekker op tekenen van beschadiging. Gebruik het apparaat niet als het netsnoer of de netstekker beschadigd of defect is. Indien het netsnoer of de netstekker beschadigd of defect is, moet het door de fabrikant of een erkend servicecentrum worden vervangen. • Trek niet aan het netsnoer om de netstekker van de netvoeding te verwijderen. Algemene veiligheid • Lees voor gebruik de gebruiksaanwijzing zorgvuldig door. Bewaar de gebruiks aanwijzing voor toekomstig gebruik. • Gebruik het apparaat en de accessoires uitsluitend voor hun beoogde doeleinden. Gebruik het apparaat en de accessoires niet voor andere doeleinden dan beschreven in de gebruiksaanwijzing. • Gebruik het apparaat niet als een onderdeel of een accessoire beschadigd of defect is. Indien een onderdeel of een accessoire beschadigd of defect is, moet het door de fabrikant of een erkend servicecentrum worden vervangen. 6 NL • Verwijder de netstekker van de netvoeding wanneer het apparaat niet in gebruik is, voor montage- of demontage werkzaamheden en voor reinigings- en onderhoudswerkzaamheden. • Gebruik het apparaat niet in de buurt van waterbassins, zoals vijvers of zwembaden. • Verplaats het apparaat niet wanneer het is ingeschakeld of nog heet is. Verwijder de netstekker uit het stopcontact en wacht totdat het apparaat is afgekoeld. • Berg het apparaat op een droge plaats op wanneer het niet in gebruik is. Zorg ervoor dat kinderen geen toegang hebben tot opgeborgen apparaten. Veiligheidsinstructies voor BBQ • Gebruik het apparaat niet buitenshuis. • Plaats het apparaat op een stabiel en vlak oppervlak. • Plaats het apparaat op een hittebestendig en spatvrij oppervlak. • Plaats het apparaat niet op een kookplaat. • Zorg ervoor dat er voldoende ruimte rondom het apparaat is voor het ontsnappen van de warmte en voor voldoende ventilatie. • Bedek het apparaat niet. Beschrijving (fig. A) Uw 110402 Nova BBQ is ontworpen voor braden of grillen van voedsel zonder gebruik van vet. Het apparaat is uitsluitend geschikt voor gebruik binnenshuis. Het apparaat is uitsluitend geschikt voor huishoudelijk gebruik. 1.Draaischijf thermostaat 2.Temperatuurindicator 3.Grillrooster 4.Verwarmingselement 5.Tafel 6.Waterniveau-indicator 7.Windscherm 8.Tafelonderstel Voordat u verdergaat, vragen wij graag uw aandacht voor de volgende punten: - Bedek het grillrooster niet met aluminium folie. - Bedek het grillrooster niet met aluminium platen. • Houd het apparaat uit de buurt van warmtebronnen. • Zorg ervoor dat het apparaat niet in contact komt met brandbaar materiaal. • Gebruik geen houtskool of gelijksoortige brandbare brandstoffen. • Gebruik het apparaat niet als u handen nat zijn. Gebruik het apparaat niet als u blootvoets bent. • Pas op voor hete delen. De oppervlakken die zijn gemarkeerd met een waarschuwings symbool voor hete oppervlakken worden heet tijdens gebruik. De toegankelijke oppervlakken kunnen heet worden wanneer het apparaat in gebruik is. Het buitenoppervlak kan heet worden wanneer het apparaat in gebruik is. • Het grillrooster wordt zeer heet tijdens gebruik. Raak het hete grillrooster niet aan. • Gebruik ovenhandschoenen indien u het apparaat tijdens of kort na gebruik moet aanraken. • Gebruik het apparaat niet in regenachtige omstandigheden. Gebruik het apparaat niet in vochtige omgevingen. Eerste gebruik • Reinig het apparaat. Zie het gedeelte “Reiniging en onderhoud”. • Reinig het grillrooster met een vochtige doek. Droog het grillrooster grondig. Assemblage (fig. B) Voordat u verdergaat, vragen wij graag uw aandacht voor de volgende punten: - Verwijder voor assemblage altijd de netstekker uit het stopcontact. Assembleren van de tafel (fig. B1) • Plaats de uiteinden van de stang (9) in de gaten in de tafel (5). • Plaats het verwarmingselement (4) op de tafel (5). Zorg ervoor dat het verwarmings element (4) op de juiste wijze wordt ondersteund door de stang (9). • Plaats het grillrooster (3) op de tafel (5). • Plaats het windscherm (7) op de tafel (5). 7 NL Gebruik met het tafelonderstel (fig. B2 & B3) Instellen van de temperatuur (fig. A) • Draai de draaischijf (1) van de thermostaat rechtsom om de temperatuur van het grillrooster (3) te verhogen. • Draai de draaischijf (1) van de thermostaat linksom om de temperatuur van het grillrooster (3) te verlagen. • Monteer de voeten (10) aan het onderste deel (11) en het bovenste deel (12) van de poten. • Steek het onderste deel (11) in het bovenste deel (12). • Monteer een lange steunbeugel (13) en een korte steunbeugel (14) aan de poten met behulp van een bout (15) en een vleugelmoer (16). • Plaats het rek (17) op de steunbeugels (13 & 14). • Plaats de tafel (5) met de voeten (18) op de poten (19). Aanwijzingen voor gebruik • Bereid de ingrediënten. • Reinig het grillrooster met een vochtige doek. • Plaats het apparaat op een stabiel en vlak oppervlak. • Vul het waterreservoir met water tot de maximummarkering op de waterniveauindicator (fig. C). Vul het waterreservoir niet verder dan de maximummarkering. • Plaats de netstekker in het stopcontact. • Draai de draaischijf van de thermostaat om de gewenste temperatuur in te stellen. • Wacht 10 minuten totdat de temperatuur indicator uit gaat. Het grillrooster heeft de gewenste temperatuur bereikt. • Let op: Kleine stukken grillen of braden beter en sneller dan grote stukken. • Stel de thermostaat in op basis van de te gebruiken ingrediënten. Experimenteer met de gewenste kooktijd en de gewenste temperatuur om de beste resultaten te verkrijgen. Gebruik zonder het tafelonderstel (fig. B4) • Plaats de tafel (5) met de voeten (18) op een stabiel en vlak tafelblad. Gebruik In- en uitschakelen (fig. A) Het apparaat is voorzien van een thermostaat die het grillrooster op de gewenste temperatuur houdt. • Plaats de netstekker in het stopcontact om het apparaat in te schakelen. • Draai de draaischijf van de thermostaat (1) om de gewenste temperatuur in te stellen. De temperatuurindicator (2) blijft aan terwijl de thermostaat het verwarmings element (4) verhit. De temperatuurindicator (2) gaat uit wanneer het verwarmings element (4) de gewenste temperatuur heeft bereikt. • Terwijl het apparaat is ingeschakeld, zal de temperatuurindicator (2) aan- en uitgaan wanneer de thermostaat het verwarmings element (4) in- en uitschakelt om de gewenste temperatuur te behouden. • Verwijder de netstekker uit het stopcontact om het apparaat uit te schakelen. Reiniging en onderhoud Voordat u verdergaat, vragen wij graag uw aandacht voor de volgende punten: - Verwijder voor reiniging en onderhoud de netstekker uit het stopcontact en wacht totdat het apparaat is afgekoeld. - Dompel het apparaat niet onder in water of andere vloeistoffen. Voordat u verdergaat, willen wij graag dat u uw aandacht vestigt op de volgende punten: - Gebruik geen bijtende of schurende reinigingsmiddelen om het apparaat te reinigen. - Gebruik geen scherpe voorwerpen om het apparaat te reinigen. 8 NL • Controleer het apparaat regelmatig op mogelijke schade. • Reinig het apparaat na ieder gebruik: - Verwijder eventuele resten met keukenpapier. - Reinig het grillrooster met een vochtige doek. Droog het grillrooster grondig. - Reinig het verwarmingselement met een vochtige doek. Droog het verwarmings element grondig. - Reinig het apparaat met een vochtige doek. Droog het apparaat grondig. • Berg het apparaat op op een droge plaats, buiten bereik van kinderen. Disclaimer Wijzigingen voorbehouden; specificaties kunnen zonder opgave van redenen worden gewijzigd. 9 Congratulations! EN You have purchased a Nova appliance. Our aim is to provide quality products with a tasteful design and at an affordable price. We hope that you will enjoy this appliance for many years. Safety instructions The appliance can be used by children from 8 years and above and by persons with a physical, sensory, mental or motorial disability, or lack of experience and knowledge if they are supervised or instructed on how to use the appliance in a safe way and understand the hazards involved. Children shall not play with the appliance. Cleaning and maintenance shall not be made by children unless they are older than 8 years and supervised. Keep the appliance and the mains cable out of the reach of children younger than 8 years. General safety • Read the manual carefully before use. Keep the manual for future reference. • Only use the appliance and the accessories for their intended purposes. Do not use the appliance and the accessories for other purposes than described in the manual. • Do not use the appliance if any part or any accessory is damaged or defective. If a part or an accessory is damaged or defective, it must be replaced by the manufacturer or an authorised repair agent. • Do not use the appliance near bathtubs, showers, basins or other vessels containing water. • Do not immerse the appliance in water or other liquids. If the appliance is immersed in water or other liquids, do not remove the appliance with your hands. Immediately remove the mains plug from the wall socket. If the appliance is immersed in water or other liquids, do not use the appliance again. Electrical safety • Before use, always check that the mains voltage is the same as the voltage on the rating plate of the appliance. • Connect the appliance to an earthed wall socket. If necessary, use an earthed extension cable of a suitable diameter (at least 3 x 1.5 mm2). • For additional protection, install a residual current device (RCD) with a rated residual operating current that does not exceed 30 mA. • The appliance is not intended to be operated by means of an external timer or separate remote-control system. • Make sure that water cannot enter the contact plugs of the mains cable and the extension cable. • Always fully unwind the mains cable and the extension cable. • Make sure that the mains cable does not hang over the edge of a worktop and cannot be caught accidentally or tripped over. • Keep the mains cable away from heat, oil and sharp edges. • Regularly check the mains cable and the mains plug for signs of damage. Do not use the appliance if the mains cable or the mains plug is damaged or defective. If the mains cable or the mains plug is damaged or defective, it must be replaced by the manufacturer or an authorised repair agent. • Do not pull the mains cable to disconnect the mains plug from the mains. • Disconnect the mains plug from the mains when the appliance is not in use, before assembly or disassembly and before cleaning and maintenance. Safety instructions for BBQ • Do not use the appliance outdoors. • Place the appliance on a stable and flat surface. • Place the appliance on a heat-resistant and splash-proof surface. • Do not place the appliance on a hob. • Make sure that there is sufficient space around the appliance to allow heat to escape and provide sufficient ventilation. • Do not cover the appliance. 10 5.Table 6.Water level indicator 7.Windshield 8.Table support • Keep the appliance away from heat sources. • Make sure that the appliance does not come into contact with flammable material. • Do not use charcoal or similar combustible fuels. • Do not operate the appliance if your hands are wet. Do not operate the appliance if you are barefoot. • Beware of hot parts. The surfaces marked with a caution symbol for hot surfaces are liable to become hot during use. The accessible surfaces can become hot when the appliance is operating. The outer surface can become hot when the appliance is operating. • The grill rack becomes very hot during use. Do not touch the hot grill rack. • Use oven gloves if you need to touch the appliance during or shortly after use. • Do not use the appliance in rainy conditions. Do not use the appliance in humid surroundings. • Do not use the appliance near water basins, such as ponds or swimming pools. • Do not move the appliance while it is switched on or is still hot. Remove the mains plug from the wall socket and wait until the appliance has cooled down. • Store the appliance in a dry place when not in use. Make sure that children do not have access to stored appliances. • Clean the appliance. Refer to the section “Cleaning and maintenance”. • Clean the grill rack with a damp cloth. Thoroughly dry the grill rack. Initial use Assembly (fig. B) Before you proceed, we need you to pay attention to the following notes: - Before assembly, always remove the mains plug from the wall socket. Assembling the table (fig. B1) • Insert the ends of the rod (9) into the holes in the table (5). • Place the heating element (4) onto the table (5). Make sure that the heating element (4) is properly supported by the rod (9). • Place the grill rack (3) onto the table (5). • Place the windshield (7) onto the table (5). Use with the table support (fig. B2 & B3) • Mount the feet (10) to the lower part (11) and the upper part (12) of the legs. • Insert the lower part (11) into the upper part (12). • Mount a long support bracket (13) and a short support bracket (14) to the legs using a bolt (15) and a wingnut (16). • Place the base rack (17) onto the support brackets (13 & 14). • Place the table (5) with the feet (18) onto the legs (19). Description (fig. A) Your 110402 Nova BBQ has been designed for frying or grilling food without using fat. The appliance is suitable for indoor use only. The appliance is suitable for domestic use only. 1.Thermostat dial 2.Temperature indicator 3.Grill rack 4.Heating element Use without the table support (fig. B4) • Place the table (5) with the feet (18) onto a stable and flat tabletop. 11 EN Before you proceed, we need you to pay attention to the following notes: - Do not cover the grill rack with aluminium foil. - Do not cover the grill rack with aluminium trays. Use EN Switching on and off (fig. A) The appliance is equipped with a thermostat that keeps the grill rack at the required temperature. • To switch on the appliance, insert the mains plug into the wall socket. • Turn the thermostat dial (1) to set the required temperature. The temperature indicator (2) remains on while the thermostat heats the heating element (4). The temperature indicator (2) goes off when the heating element (4) has reached the required temperature. • While the appliance is switched on, the temperature indicator (2) will illuminate and extinguish as the thermostat switches the heating element (4) on and off to maintain the required temperature. • To switch off the appliance, remove the mains plug from the wall socket. Setting the temperature (fig. A) • Turn the thermostat dial (1) clockwise to increase the temperature of the grill rack (3). • Turn the thermostat dial (1) counterclockwise to decrease the temperature of the grill rack (3). Hints for use • Prepare the ingredients. • Clean the grill rack with a damp cloth. • Place the appliance on a stable and flat surface. • Fill the water reservoir with water up to the maximum mark on the water level indicator (fig. C). Do not exceed the maximum mark when you fill the water reservoir. • Insert the mains plug into the wall socket. • Turn the thermostat dial to set the required temperature. • Wait for 10 minutes until the temperature indicator goes off. The grill rack has reached the required temperature. • Note: Small pieces will grill or fry better and more quickly than large pieces. • Set the thermostat to suit the ingredients. Experiment with the required cooking time and the required temperature to achieve the best results. Cleaning and maintenance Before you proceed, we need you to pay attention to the following notes: - Before cleaning or maintenance, remove the mains plug from the wall socket and wait until the appliance has cooled down. - Do not immerse the appliance in water or any other liquids. Before you proceed, we would like you to focus your attention on the following notes: - Do not use aggressive or abrasive cleaning agents to clean the appliance. - Do not use sharp objects to clean the appliance. • Regularly check the appliance for possible damage. • Clean the appliance after each use: - Remove any residues with a paper towel. - Clean the grill rack with a damp cloth. Thoroughly dry the grill rack. - Clean the heating element with a damp cloth. Thoroughly dry the heating element. - Clean the appliance with a damp cloth. Thoroughly dry the appliance. • Store the appliance in a dry place, out of the reach of children. U.K. Wiring instructions The wires in the mains lead are coloured in accordance with the following code: BLUE NEUTRAL BROWN LIVE GREEN/YELLOW EARTH As the colours of the wire in the mains lead of this appliance may not correspond with the colour markings identifying the terminals on your plug, proceed as follows: The wire which is coloured BLUE must be connected to the terminal which is marked with the letter N or coloured black. The wire which is coloured BROWN must be connected to the terminal which is marked with the letter L or coloured red. 12 EN The wire which is coloured GREEN/YELLOW must be connected to the terminal which is ) and is coloured marked with the letter E or ( GREEN or GREEN/YELLOW. If a 13Amp (BS1363) plug is used, a 13Amp (BS1362) fuse must be fitted, or if any other type of plug is used, a 13Amp fuse must be fitted, either in the plug or adaptor, or on the distribution board. Warning! This appliance must be earthed. Disclaimer Subject to change; specifications can be changed without further notice. 13 Félicitations! FR Vous avez acheté un appareil Nova. Nous souhaitons vous proposer des produits de qualité associant un design raffiné et des prix accessibles. Nous espérons que vous profiterez longtemps de cet appareil. Instructions de sécurité Cet appareil peut être utilisé par des enfants 8 ans ou plus et des personnes présentant un handicap physique, sensoriel, mental ou moteur voire ne disposant pas des connaissances et de l’expérience nécessaires en cas de surveillance ou d’instructions sur l’usage de cet appareil en toute sécurité et de compréhension des risques impliqués. Les enfants ne doivent pas jouer avec l’appareil. Le nettoyage et la maintenance ne doivent pas être confiés à des enfants sauf s’ils ont 8 ans ou plus et sont sous surveillance. Maintenez l’appareil et le cordon d’alimentation hors de portée des enfants de moins de 8 ans. Sécurité générale • Lisez avec soin le manuel avant utilisation. Conservez le manuel pour référence future. • Utilisez l’appareil et ses accessoires uniquement pour leurs fins prévues. N’utilisez pas l’appareil et ses accessoires pour tout autre objet que celui exposé dans le manuel. • N’utilisez pas l’appareil si une pièce ou un accessoire quelconque est endommagé ou défectueux. Si une pièce ou un accessoire quelconque est endommagé ou défectueux, il doit être remplacé par le fabricant ou par un réparateur agréé. • N’utilisez pas l’appareil à proximité d’une baignoire, d’une douche, d’un lavabo ou d’autres récipients contenant de l’eau. • Ne plongez pas l’appareil dans l’eau ou autres liquides. Si l’appareil est plongé dans l’eau ou d’autres liquides, ne retirez pas l’appareil avec vos mains. Débranchez immédiatement la fiche secteur de la prise murale. Si l’appareil est plongé dans l’eau ou autre liquide, ne l’utilisez pas à nouveau. Sécurité électrique • Avant toute utilisation, vérifiez que la tension du secteur correspond à celle indiquée sur la plaque signalétique de l’appareil. • Connectez l’appareil à une prise murale mise à la terre. Si nécessaire, vous pouvez utiliser une rallonge d’un diamètre adapté (au moins 3 x 1,5 mm2). • Pour maximiser la protection, installez un dispositif de courant résiduel (RCD) présentant une intensité de service résiduelle nominale inférieure ou égale à 30 mA. • L’appareil n’est pas conçu pour être utilisé avec une minuterie externe ou un système de télécommande séparé. • Assurez-vous que l’eau ne peut pas s’infiltrer dans les contacts de prise du cordon d’alimentation et de la rallonge. • Déroulez toujours complètement le cordon d’alimentation et la rallonge. • Assurez-vous que le cordon d’alimentation ne pend pas sur le bord d’un plan de travail et ne peut pas être happé ou faire trébucher quelqu’un accidentellement. • Maintenez le cordon d’alimentation à l’écart de la chaleur, de l’huile et des bords tranchants. • Vérifiez régulièrement l’état du cordon d’alimentation et de la fiche secteur. N’utilisez pas l’appareil si le cordon d’alimentation ou la fiche secteur est endommagé ou défectueux. Si le cordon d’alimentation ou la fiche secteur est endommagé ou défectueux, il doit être remplacé par le fabricant ou par un réparateur agréé. • Ne tirez pas sur le cordon d’alimentation pour débrancher la fiche secteur du secteur. • Débranchez la fiche secteur du secteur lorsque l’appareil n’est pas utilisé, avant le montage ou le démontage de même qu’avant le nettoyage ou l’entretien. 14 • Ne déplacez pas l’appareil s’il est sous tension ou encore chaud. Retirez la fiche secteur de la prise murale et attendez que l’appareil refroidisse. • Rangez l’appareil dans un endroit sec lorsqu’il n’est pas utilisé. Assurez-vous que les enfants ne puissent pas accéder aux appareils rangés. • N‘utilisez pas l‘appareil à l‘extérieur. • Placez l’appareil sur une surface plane et stable. • Placez l’appareil sur une surface résistante à la chaleur et aux projections. • Ne placez pas l’appareil sur une plaque de cuisson. • Assurez-vous que l’appareil dispose d’un dégagement suffisant pour que la chaleur se dissipe tout en assurant une ventilation satisfaisante. • Ne couvrez pas l’appareil. Description (fig. A) Votre BBQ 110402 Nova a été conçu pour frire ou griller les aliments sans graisse. L‘appareil est réservé à un usage à l‘intérieur. L’appareil est réservé à un usage domestique. 1.Molette de thermostat 2.Témoin de température 3.Étagère de grill 4.Élément chauffant 5.Table 6.Indicateur de niveau d’eau 7.Pare-vent 8.Support de table Avant de procéder, vous devez faire attention aux remarques suivantes : - Ne couvrez pas l’étagère de grill avec un papier d’aluminium. - Ne couvrez pas l’étagère de grill avec de plateaux d’aluminium. • Maintenez l’appareil à l’écart des sources de chaleur. • Assurez-vous que l’appareil n’entre en contact avec aucune matière inflammable. • N’utilisez pas de charbon ou des combustibles similaires. • N’utilisez pas l’appareil avec les mains mouillées. N’employez pas l’appareil si vous êtes pieds nus. • Attention aux pièces chaudes. Les surfaces marquées d’un symbole d’attention aux surfaces chaudes peuvent devenir chaudes durant l’utilisation. Les surfaces accessibles peuvent devenir chaudes lorsque l’appareil fonctionne. La surface extérieure peut devenir chaude lorsque l‘appareil fonctionne. • L’étagère de grill devient très chaude pendant l’utilisation. Ne touchez pas l’étagère de grill chaude. • Utilisez des gants de cuisine si vous devez toucher l’appareil pendant ou juste après l’utilisation. • N’utilisez pas l’appareil par un temps pluvieux. N’utilisez pas l’appareil dans un environnement humide. • N’utilisez pas l’appareil à proximité de bassins d’eau, comme les étangs ou piscines. Utilisation initiale • Nettoyez l’appareil. Consultez la section “Nettoyage et entretien”. • Nettoyez l’étagère de grill avec un chiffon humide. Séchez soigneusement l’étagère de grill. Montage (fig. B) Avant de procéder, vous devez faire attention aux remarques suivantes : - Avant le montage, débranchez toujours la fiche secteur de la prise murale. Assemblage de table (fig. B1) • Insérez les extrémités de tige (9) dans les orifices de la table (5). • Placez l’élément chauffant (4) sur la table (5). Assurez-vous que l’élément chauffant (4) est bien soutenu par la tige (9). • Placez l’étagère de grill (3) sur la table (5). • Placez le pare-vent (7) sur le support de table (5). 15 FR Instructions de sécurité pour le BBQ Utilisation avec le support de table (fig. B2 & B3) FR • Montez les pieds (10) sur la partie inférieure (11) et la partie supérieure (12) des pattes. • Insérez la partie inférieure (11) dans la partie supérieure (12). • Montez une patte de support longue (13) et une patte de support courte (14) sur les pattes avec un boulon (15) et un écrou papillon (16). • Placez l’étagère de base (17) sur les pattes de support (13 & 14). • Placez la table (5) avec les pieds (18) sur les pattes (19). Utilisation sans le support de table (fig. B4) • Places la table (5) avec les pieds (18) sur une table stable et plate. Utilisation Mise en marche et arrêt (fig. A) L’appareil comporte un thermostat maintenant l’étagère de grill à la température requise. • Pour mettre l’appareil en marche, insérez la fiche secteur dans la prise murale. • Tournez la molette du thermostat (1) sur la température requise. Le témoin de température (2) reste allumé tant que le thermostat chauffe l’élément chauffant (4). Le témoin de température (2) s’éteint dès que l’élément chauffant (4) atteint la température requise. • Tant que l’appareil est sous tension, le témoin de température (2) s’allume et s’éteint à mesure que le thermostat allume puis éteint l’élément chauffant (4) afin d’entretenir la température requise. • Pour arrêter l’appareil, retirez la fiche secteur de la prise murale. Réglage de la température (fig. A) • Tournez la molette du thermostat (1) dans le sens horaire pour augmenter la température de l’étagère de grill (3). • Tournez la molette du thermostat (1) dans le sens anti-horaire pour réduire la température de l’étagère de grill (3). Conseils d’usage • Préparez les ingrédients. • Nettoyez l’étagère de grill avec un chiffon humide. • Placez l’appareil sur une surface plane et stable. • Remplissez le réservoir d’eau avec de l’eau jusqu’au repère maximum sur l’indicateur de niveau d’eau (fig. C). Ne dépassez pas le repère maximum lorsque vous remplissez le réservoir d’eau. • Insérez la fiche secteur dans la prise murale. • Tournez la molette du thermostat sur la température requise. • Attendez 10 minutes pour que le témoin de température s’éteigne. L’étagère de grill a atteint la température requise. • Remarque : les petites portions sont plus faciles et plus rapides à griller ou à frire que celles plus grandes. • Réglez le thermostat selon les ingrédients. Expérimentez les durées de cuisson et les températures requises pour obtenir les meilleurs résultats. Nettoyage et entretien Avant de procéder, vous devez faire attention aux remarques suivantes : - Avant le nettoyage ou l’entretien, retirez la fiche secteur de la prise murale et attendez que l’appareil refroidisse. - Ne plongez pas l’appareil dans l’eau ou autres liquides. Avant de procéder, nous souhaiterions que vous preniez connaissance des remarques suivantes : - N’utilisez pas de produits de nettoyage agressifs ou abrasifs pour nettoyer l’appareil. - Ne nettoyez pas l’appareil avec des objets coupants. • Contrôlez régulièrement les éventuels dommages sur l’appareil. • Nettoyez l’appareil après chaque utilisation : - Éliminez tous les résidus avec une serviette en papier. - Nettoyez l’étagère de grill avec un chiffon humide. Séchez soigneusement l’étagère de grill. 16 FR - Nettoyez l’élément chauffant avec un chiffon humide. Séchez soigneusement l’élément chauffant. - Nettoyez l’appareil avec un chiffon humide. Séchez soigneusement l’appareil. • Rangez l’appareil dans un endroit sec, hors de portée des enfants. Clause de non responsabilité Sous réserve de modifications ; les spécifications peuvent être modifiées sans préavis. 17 Herzlichen Glückwunsch! Sie haben ein Nova Gerät erworben. Unser Ziel ist es, Qualitätsprodukte mit einem geschmack vollen Design zu einem erschwinglichen Preis anzubieten. Wir hoffen, dass Sie viele Jahre Gefallen an diesem Gerät finden. DE Sicherheitsanweisungen Das Gerät kann von Kindern ab 8 Jahren und von Personen mit einer körperlichen, sensorischen, geistigen oder motorischen Behinderung oder einem Mangel an Erfahrung und Kenntnissen verwendet werden, sofern diese Personen beaufsichtigt oder über den sicheren Gebrauch des Geräts unterrichtet wurden und die damit verbundenen Gefahren verstanden haben. Kinder dürfen mit dem Gerät nicht spielen. Die Reinigung und Wartung darf nur dann von Kindern durchgeführt werden, wenn sie älter als 8 Jahre sind und beaufsichtigt werden. Halten Sie das Gerät und das Netzkabel aus der Reichweite von Kindern, die jünger als 8 Jahre sind. Allgemeine Sicherheit • Lesen Sie das Handbuch vor dem Gebrauch genau durch. Bewahren Sie das Handbuch zur künftigen Bezugnahme auf. • Verwenden Sie das Gerät und sein Zubehör nur für den Zweck, für den es konstruiert wurde. Verwenden Sie das Gerät und sein Zubehör nicht für Zwecke, die nicht in diesem Handbuch beschrieben sind. • Verwenden Sie das Gerät nicht, wenn ein Teil oder Zubehör beschädigt oder defekt ist. Ist ein Teil oder Zubehör beschädigt oder defekt, muss es vom Hersteller oder einem autorisierten Reparaturbetrieb ausgetauscht werden. • Verwenden Sie das Gerät nicht in der Nähe von Badewannen, Duschen, Bassins oder anderen Wasserbehältern. • Tauchen Sie das Gerät niemals in Wasser oder andere Flüssigkeiten ein. Falls das Gerät in Wasser oder andere Flüssigkeiten eingetaucht wurde, nehmen Sie es nicht mit Ihren Händen heraus. Ziehen Sie sofort den Netzstecker aus der Wandsteckdose. Falls das Gerät in Wasser oder andere Flüssigkeiten eingetaucht wird, darf es nicht mehr verwendet werden. Elektrische Sicherheit • Vergewissern Sie sich vor dem Gebrauch stets, dass die Netzspannung mit der Spannung auf dem Typenschild des Geräts übereinstimmt. • Schließen Sie das Gerät an eine geerdete Wandsteckdose an. Verwenden Sie nötigenfalls ein geerdetes Verlängerungskabel mit einem geeigneten Durchmesser (mindestens 3 x 1,5 mm2). • Lassen Sie als zusätzliche Schutzmaßnahme einen Fehlerstromschutzschalter (FI-Schutz schalter) installieren, der einen NennFehlerstrom von 30 mA nicht überschreitet. • Das Gerät ist nicht dafür ausgelegt, von einer externen Zeitschaltuhr oder einem Fernsteuersystem betrieben zu werden. • Stellen Sie sicher, dass kein Wasser in die Steckkontakte des Netzkabels und in das Verlängerungskabel eindringen kann. • Wickeln Sie das Netzkabel und das Verlängerungskabel stets vollständig ab. • Vergewissern Sie sich, dass das Netzkabel nicht an der Kante einer Arbeitsplatte hängen bleibt und nicht versehentlich daran gezogen oder darüber gestolpert wird. • Halten Sie das Netzkabel von Hitzequellen, Öl und scharfen Kanten fern. • Kontrollieren Sie das Netzkabel und den Netzstecker regelmäßig auf Anzeichen von Beschädigung. Verwenden Sie das Gerät nicht, wenn das Netzkabel oder der Netzstecker beschädigt oder defekt ist. Ist das Netzkabel oder der Netzstecker beschädigt oder defekt, muss das Teil vom Hersteller oder einem autorisierten Reparaturbetrieb ausgetauscht werden. 18 • Ziehen Sie niemals am Netzkabel, um den Netzstecker aus der Wandsteckdose zu ziehen. • Ziehen Sie den Netzstecker aus der Wandsteckdose, wenn das Gerät nicht gebraucht wird, sowie vor der Zerlegung bzw. dem Zusammenbau und vor der Reinigung und Wartung. • Verwenden Sie das Gerät nicht in der Nähe von Wasserbassins wie beispielsweise Teichen oder Schwimmbecken. • Bewegen Sie das Gerät nicht, so lange es eingeschaltet oder noch heiß ist. Ziehen Sie den Netzstecker aus der Wandsteckdose und warten Sie, bis das Gerät abgekühlt ist. • Bewahren Sie das Gerät bei Nichtgebrauch an einem trockenen Ort auf. Vergewissern Sie sich, dass Kinder keinen Zugang zu den aufbewahrten Geräten haben. Sicherheitsanweisungen für BBQ DE • Verwenden Sie das Gerät nicht im Freien. • Stellen Sie das Gerät auf eine stabile, flache Oberfläche. • Stellen Sie das Gerät auf eine hitzebeständige und spritzgeschützte Oberfläche. • Stellen Sie das Gerät nicht auf ein Kochfeld. • Stellen Sie sicher, dass rund um das Gerät ausreichend Platz vorhanden ist, damit die Wärme entweichen kann und eine ausreichende Belüftung gewährleistet ist. • Decken Sie das Gerät nicht ab. Beschreibung (Abb. A) Ihr 110402 Nova BBQ ist zum Braten und Grillen von Speisen ohne Verwendung von Fett konstruiert. Das Gerät ist nur für den Gebrauch in geschlossenen Räumen geeignet. Das Gerät ist nur für den Hausgebrauch geeignet. 1.Thermostatregler 2.Temperaturanzeige 3.Grillrost 4.Heizelement 5.Tisch 6.Wasserstandanzeige 7.Windschutz 8.Tischstütze Bevor Sie fortfahren, beachten Sie bitte unbedingt die folgenden Hinweise: - Decken Sie den Grillrost nicht mit Alufolie ab. - Decken Sie den Grillrost nicht mit Aluschalen ab. • Halten Sie das Gerät von Wärmequellen fern. • Stellen Sie sicher, dass das Gerät nicht mit entzündlichem Material in Berührung kommt. • Verwenden Sie keine Holzkohle oder ähnliche Brennstoffe. • Betreiben Sie das Gerät nicht mit nassen Händen. Betreiben Sie das Gerät nicht barfuß. • Vorsicht vor heißen Teilen. Die mit einem Warnsymbol gekennzeichneten Flächen werden beim Gebrauch heiß. Die zugänglichen Oberflächen können beim Gebrauch sehr heiß werden. Die Außenfläche kann beim Gebrauch sehr heiß werden. • Der Grillrost wird beim Gebrauch sehr heiß. Berühren Sie den heißen Grillrost nicht. • Verwenden Sie Ofenhandschuhe, wenn Sie das Gerät während oder kurz nach dem Gebrauch berühren müssen. • Verwenden Sie das Gerät nicht unter regnerischen Bedingungen. Verwenden Sie das Gerät nicht in feuchten Umgebungen. Erster Gebrauch • Reinigen Sie das Gerät. Siehe Abschnitt “Reinigung und Wartung”. • Reinigen Sie den Grillrost mit einem feuchten Lappen. Trocknen Sie den Grillrost gründlich ab. Zusammenbau (Abb. B) Bevor Sie fortfahren, beachten Sie bitte unbedingt die folgenden Hinweise: - Ziehen Sie vor dem Zusammenbau immer den Netzstecker aus der Wandsteckdose. Zusammenbau des Tisches (Abb. B1) • Stecken Sie die Enden der Stange (9) in die Löcher im Tisch (5). • Setzen Sie das Heizelement (4) auf den Tisch (5). Vergewissern Sie sich, dass das Heizelement (4) richtig von der Stange (9) gehalten wird. 19 • Legen Sie den Grillrost (3) auf den Tisch (5). • Setzen Sie den Windschutz (7) auf die Tischstütze (5). Verwendung mit Tischstütze (Abb. B2 & B3) DE • Montieren Sie die Füße (10) am unteren Teil (11) und den oberen Teil (12) der Beine. • Setzen Sie den unteren Teil (11) in den oberen Teil (12) ein. • Montieren Sie eine lange Halteklemme (13) und eine kurze Halteklemme (14) unter Verwendung eines Bolzens (15) und einer Flügelmutter (16) an den Beinen. • Setzen Sie den Bodenrost (17) auf die Halteklemmen (13 & 14). • Setzen Sie den Tisch (5) mit den Füßen (18) auf die Beine (19). Verwendung ohne Tischstütze (Abb. B4) • Stellen Sie den Tisch (5) mit den Füßen (18) auf eine stabile ebene Tischplatte. Gebrauch Ein- und Ausschalten (Abb. A) Das Gerät ist mit einem Thermostat ausgestattet, der den Grillrost auf der gewünschten Temperatur hält. • Stecken Sie den Netzstecker in die Wandsteckdose, um das Gerät einzuschalten. • Drehen Sie den Thermostatregler (1), um die gewünschte Temperatur einzustellen. Die Temperaturanzeige (2) bleibt eingeschaltet, während der Thermostat das Heizelement (4) erhitzt. Die Temperaturanzeige (2) erlischt, sobald das Heizelement (4) die gewünschte Temperatur erreicht hat. • Solange das Gerät eingeschaltet ist, leuchtet die Temperaturanzeige (2) auf, und sie erlischt, wenn der Thermostat das Heizelement (4) ein- und ausschaltet, um die gewünschte Temperatur aufrechtzuerhalten. • Ziehen Sie den Netzstecker aus der Wandsteckdose, um das Gerät auszuschalten. Einstellen der Temperatur (Abb. A) • Drehen Sie den Thermostatregler (1) im Uhrzeigersinn, um die Temperatur des Grillrosts (3) zu erhöhen. • Drehen Sie den Thermostatregler (1) gegen den Uhrzeigersinn, um die Temperatur des Grillrosts (3) zu verringern. Hinweise für den Gebrauch • Bereiten Sie die Zutaten vor. • Reinigen Sie den Grillrost mit einem feuchten Lappen. • Stellen Sie das Gerät auf eine stabile, flache Oberfläche. • Füllen Sie den Wasserbehälter bis zur Maximalmarke auf der Wasserstandanzeige mit Wasser (Abb. C). Überschreiten Sie beim Füllen des Wasserbehälters nicht die Maximalmarke. • Stecken Sie den Netzstecker in die Wandsteckdose. • Drehen Sie den Thermostatregler, um die gewünschte Temperatur einzustellen. • Warten Sie 10 Minuten, bis die Temperatur anzeige erlischt. Der Grillrost hat die gewünschte Temperatur erreicht. • Hinweis: Kleine Stücke grillen und braten besser und schneller als große Stücke. • Stellen Sie den Thermostat auf eine für die Zutaten geeignete Temperatur ein. Probieren Sie die für die besten Ergebnisse erforderliche Garzeit und Temperatur aus. Reinigung und Wartung Bevor Sie fortfahren, beachten Sie bitte unbedingt die folgenden Hinweise: - Ziehen Sie vor der Reinigung und Wartung stets den Netzstecker aus der Wandsteckdose und warten Sie, bis das Gerät abgekühlt ist. - Tauchen Sie das Gerät niemals in Wasser oder andere Flüssigkeiten ein. Bevor Sie fortfahren, richten Sie bitte Ihre Aufmerksamkeit auf folgende Hinweise: - Verwenden Sie keine aggressiven oder scheuernden Mittel, um das Gerät zu reinigen. - Verwenden Sie keine scharfen Gegenstände, um das Gerät zu reinigen. 20 DE • Kontrollieren Sie das Gerät regelmäßig auf mögliche Schäden. • Reinigen Sie das Gerät nach jedem Gebrauch: - Entfernen Sie etwaige Rückstände mit einem Papier-Küchentuch. - Reinigen Sie den Grillrost mit einem feuchten Lappen. Trocknen Sie den Grillrost gründlich ab. - Reinigen Sie das Heizelement mit einem feuchten Lappen. Trocknen Sie das Heizelement gründlich ab. - Reinigen Sie das Gerät mit einem feuchten Lappen. Trocknen Sie das Gerät gründlich ab. • Bewahren Sie das Gerät bei Nichtgebrauch an einem trockenen und für Kinder unerreichbaren Ort auf. Haftungsausschluss Änderungen vorbehalten; die Daten können ohne Vorankündigung geändert werden. 21 ¡Enhorabuena! Ha adquirido un aparato Nova. Nuestro objetivo es suministrar productos de calidad con un diseño elegante a un precio asequible. Esperamos que disfrute de este aparato durante muchos años. ES Instrucciones de seguridad El aparato puede ser utilizado por niños a partir de los 8 años y por personas con una discapacidad física, sensorial, mental o motora, o que no tengan experiencia ni conocimientos, sin son supervisados o instruidos en el uso del aparato de forma segura y entienden los riesgos implicados. Los niños no pueden jugar con el aparato. Los niños no podrán realizar la limpieza ni el mantenimiento del aparato a menos que tengan más de 8 años y cuenten con supervisión. Mantenga el aparato y el cable eléctrico fuera del alcance de los niños menores de 8 años. Seguridad general • Lea detenidamente el manual antes del uso. Conserve el manual para consultas posteriores. • Utilice el aparato y los accesorios únicamente para sus respectivos usos previstos. No utilice el aparato ni los accesorios para otros fines que los descritos en este manual. • No utilice el aparato si hay alguna pieza o accesorio dañado o defectuoso. Si una pieza o un accesorio está dañado o es defectuoso, éste debe ser sustituido por el fabricante o un servicio técnico autorizado. • No utilice el aparato cerca de bañeras, duchas, lavabos u otros recipientes que contengan agua. • No sumerja el aparato en agua ni otros líquidos. Si el aparato se sumerge en agua u otros líquidos, no saque el aparato con las manos. Retire inmediatamente el enchufe eléctrico de la toma de pared. Si el aparato se sumerge en agua u otros líquidos, no vuelva a utilizarlo. Seguridad eléctrica • Antes del uso, compruebe siempre que la tensión de red sea la misma que se indica en la placa de características del aparato. • Conecte el aparato a un enchufe con toma de tierra. En caso necesario, utilice un cable alargador con toma de tierra de un diámetro adecuado (al menos 3 x 1,5 mm2). • Para una protección adicional, instale un dispositivo de corriente residual (DCR) con una corriente operativa residual nominal que no supere los 30 mA. • El aparato no se ha diseñado para funcionar mediante un temporizador externo o un sistema de control remoto independiente. • Asegúrese de que no pueda entrar agua en los enchufes de contacto del cable eléctrico y el cable alargador. • Desenrolle siempre totalmente el cable eléctrico y el cable alargador. • Asegúrese de que el cable eléctrico no cuelgue por encima del borde de una superficie de trabajo y pueda engancharse accidentalmente o tropezarse con él. • Mantenga el cable eléctrico alejado del calor, del aceite y de las aristas vivas. • Compruebe periódicamente el cable eléctrico y el enchufe eléctrico para ver si muestran señales de daños. No utilice el aparato si el cable eléctrico o el enchufe eléctrico está dañado o defectuoso. Si el cable eléctrico o el enchufe eléctrico está dañado o defectuoso, éste debe ser sustituido por el fabricante o un servicio técnico autorizado. • No tire del cable eléctrico para desconectar el enchufe de la red eléctrica. • Desconecte el enchufe de la red eléctrica cuando el aparato no esté en uso, antes del montaje o el desmontaje y antes de la limpieza y el mantenimiento. 22 Instrucciones de seguridad para BBQ Antes de continuar, es necesario que preste atención a las siguientes notas: - No cubra la rejilla con papel de aluminio. - No cubra la rejilla con bandejas de aluminio. • Mantenga el aparato alejado de fuentes de calor. • Asegúrese de que el aparato no entre en contacto con materiales inflamables. • No utilice carbón ni combustibles similares. • No utilice el aparato con las manos mojadas. No utilice el aparato si se encuentra descalzo. • Tenga cuidado con las piezas calientes. Las superficies marcadas con un símbolo de precaución de superficies calientes pueden calentarse durante el uso. Las superficies accesibles pueden calentarse cuando el aparato está funcionando. La superficie exterior puede calentarse cuando el aparato está funcionando. • La rejilla se calienta mucho durante el uso. No toque la rejilla caliente. • Utilice guantes de horno si necesita tocar el aparato durante el uso o inmediatamente después. • No utilice el aparato en condiciones de lluvia. No utilice el aparato en entornos húmedos. • No utilice el aparato cerca de lugares con agua, como estanques o piscinas. • No mueva el aparato mientras esté encendido o aún esté caliente. Retire el enchufe eléctrico de la toma de pared y espere hasta que se haya enfriado el aparato. • Almacene el aparato en un lugar seco cuando no lo utilice. Asegúrese de que los niños no tengan acceso a los aparatos almacenados. Descripción (fig. A) La BBQ 110402 Nova se ha diseñado para freír o hacer al grill alimentos sin utilizar grasa. El aparato es adecuado sólo para uso interior. El aparato es adecuado sólo para uso doméstico. 1.Rueda del termostato 2.Indicador de temperatura 3.Rejilla 4.Elemento calefactor 5.Mesa 6.Indicador de nivel de agua 7.Paraviento 8.Soporte de mesa Uso inicial • Limpie el aparato. Consulte la sección “Limpieza y mantenimiento”. • Limpie la rejilla con un paño húmedo. Seque bien la rejilla. Montaje (fig. B) Antes de continuar, es necesario que preste atención a las siguientes notas: - Antes del montaje, retire siempre el enchufe eléctrico de la toma de pared. Montaje de la mesa (fig. B1) • Inserte los extremos de la varilla (9) en los orificios de la mesa (5). • Coloque el elemento calefactor (4) sobre la mesa (5). Asegúrese de que el elemento calefactor (4) esté correctamente soportado por la varilla (9). • Coloque la rejilla (3) sobre la mesa (5). • Coloque el paraviento (7) sobre el soporte de mesa (5). Uso con el soporte de mesa (fig. B2 & B3) • Monte los pies (10) en la parte inferior (11) y la parte superior (12) de las patas. • Inserte la parte inferior (11) en la parte superior (12). • Monte un soporte largo (13) y un soporte corto (14) en las patas con un perno (15) y una tuerca de mariposa (16). • Coloque la rejilla de base (17) sobre los soportes (13 & 14). 23 ES • No utilice el aparato en el exterior. • Coloque el aparato sobre una superficie estable y plana. • Coloque el aparato sobre una superficie resistente al calor y a prueba de salpicaduras. • No coloque el aparato sobre una placa de cocinado. • Asegúrese de que haya suficiente espacio alrededor del aparato para permitir que el calor escape y ofrecer suficiente ventilación. • No cubra el aparato. • Coloque la mesa (5) con los pies (18) sobre las patas (19). Uso sin el soporte de mesa (fig. B4) • Coloque la mesa (5) con los pies (18) sobre una encimera estable y plana. Uso Encendido y apagado (fig. A) ES El aparato está equipado con un termostato que mantiene la rejilla a la temperatura deseada. • Para encender el aparato, inserte el enchufe eléctrico en la toma de pared. • Gire la rueda del termostato (1) para ajustar la temperatura deseada. El indicador de temperatura (2) permanece encendido mientras el termostato calienta el elemento calefactor (4). El indicador de temperatura (2) se apaga cuando el elemento calefactor (4) ha alcanzado la temperatura deseada. • Mientras el aparato está encendido, el indicador de temperatura (2) se enciende y se apaga cuando el termostato enciende y apaga el elemento calefactor (4) para mantener la temperatura deseada. • Para apagar el aparato, retire el enchufe eléctrico de la toma de pared. Ajuste de la temperatura (fig. A) • Gire la rueda del termostato (1) en sentido horario para aumentar la temperatura de la rejilla (3). • Gire la rueda del termostato (1) en sentido antihorario para disminuir la temperatura de la rejilla (3). Consejos de uso • Prepare los ingredientes. • Limpie la rejilla con un paño húmedo. • Coloque el aparato sobre una superficie estable y plana. • Llene el depósito de agua con agua hasta la marca de máximo en el indicador de nivel de agua (fig. C). No supere la marca de máximo cuando llene el depósito de agua. • Inserte el enchufe eléctrico en la toma de pared. • Gire la rueda del termostato para ajustar la temperatura deseada. • Espere 10 minutos hasta que se apague el indicador de temperatura. La rejilla ha alcanzado la temperatura deseada. • Nota: Los alimentos de menor tamaño se asarán o freirán mejor y más rápido que los de mayor tamaño. • Ajuste el termostato en función de los ingredientes. Experimente con el tiempo de cocinado y la temperatura deseados para lograr los mejores resultados. Limpieza y mantenimiento Antes de continuar, es necesario que preste atención a las siguientes notas: - Antes de la limpieza o el mantenimiento, retire el enchufe eléctrico de la toma de pared y espere hasta que se haya enfriado el aparato. - No sumerja el aparato en agua ni otros líquidos. Antes de continuar, nos gustaría que centre su atención en las siguientes notas: - No utilice productos de limpieza agresivos o abrasivos para limpiar el aparato. - No utilice objetos afilados para limpiar el aparato. • Compruebe periódicamente si el aparato presenta algún daño. • Limpie el aparato después de cada uso: - Elimine los residuos con un papel de cocina. - Limpie la rejilla con un paño húmedo. Seque bien la rejilla. - Limpie el elemento calefactor con un paño húmedo. Seque bien el elemento calefactor. - Limpie el aparato con un paño húmedo. Seque bien el aparato. • Almacene el aparato en un lugar, fuera del alcance de los niños. Descargo de responsabilidad Sujeto a cambios; las especificaciones pueden modificarse sin previo aviso. 24 Congratulazioni! • Non immergere l’apparecchio in acqua o in altri liquidi. Se l’apparecchio viene immerso in acqua o in altri liquidi, non rimuovere l’apparecchio con le mani. Rimuovere immediatamente la spina di alimentazione dalla presa a parete. Se l’apparecchio viene immerso in acqua o altri liquidi, non riutilizzare l’apparecchio. Avete acquistato un apparecchio Nova. Il nostro scopo è quello di fornire prodotti di qualità con un design gradevole, ad un prezzo interessante. Ci auguriamo che possiate usufruire di questo apparecchio per molti anni a venire. Istruzioni per la sicurezza L’apparecchio può essere utilizzato da bambini di almeno 8 anni e da persone con ridotte capacità fisiche, sensoriali, mentali o motorie oppure senza la necessaria pratica ed esperienza sotto la supervisione di un adulto o dopo aver ricevuto adeguate istruzioni sull’uso in sicurezza dell’apparecchio e aver compreso i possibili rischi. I bambini non devono giocare con l’apparecchio. I bambini non devono eseguire interventi di manutenzione e pulizia almeno che non abbiano più di 8 anni e non siano controllati. Tenere l’apparecchio e il cavo di alimentazione fuori dalla portata di bambini di età inferiore agli 8 anni. • Prima dell’uso, verificare sempre che la tensione di rete corrisponda alla tensione riportata sulla targhetta nominale dell’apparecchio. • Collegare l’apparecchio a una presa a parete dotata di messa a terra. Se necessario, utilizzare un cavo di prolunga con conduttore di messa a terra di diametro adatto (almeno 3 x 1,5 mm2). • Come ulteriore protezione, installare un interruttore differenziale (RCD) con una corrente residua di funzionamento nominale non superiore a 30 mA. • L’apparecchio non è previsto per essere azionato mediante timer esterno o telecomando. • Verificare che l’acqua non penetri negli spinotti del cavo di alimentazione e del cavo di prolunga. • Srotolare sempre completamente il cavo di alimentazione e il cavo di prolunga. • Verificare che il cavo di alimentazione non rimanga impigliato nel bordo di sporgenze o ripiani e non possa costituire fonte di rischio di incidenti o cadute. • Tenere il cavo di alimentazione lontano da fonti di calore, olio e spigoli taglienti. • Controllare regolarmente l’eventuale presenza di danni sul cavo e sulla spina di alimentazione. Non usare l’apparecchio se il cavo di alimentazione o la spina sono danneggiati o difettosi. Se il cavo di alimentazione o la spina sono danneggiati o difettosi, devono essere sostituiti dal fabbricante o da un centro di assistenza autorizzato. • Per scollegare la spina di alimentazione elettrica, non tirare mai il cavo di alimentazione. Sicurezza generale • Leggere attentamente il manuale prima dell’uso. Conservare il manuale per future consultazioni. • Utilizzare l’apparecchio e gli accessori esclusivamente per gli scopi previsti. Non utilizzare l’apparecchio e gli accessori per scopi diversi da quelli descritti nel manuale. • Non usare l’apparecchio se presenta parti o accessori danneggiati o difettosi. Se una parte o un accessorio sono danneggiati o difettosi, devono essere sostituiti dal fabbricante o da un centro di assistenza autorizzato. • Non usare l’apparecchio in prossimità di vasche da bagno, docce, bacinelle o altri recipienti contenenti acqua. 25 IT Sicurezza elettrica • Se l’apparecchio non viene utilizzato, prima di eseguire operazioni di montaggio o smontaggio e prima di effettuare interventi di pulizia e manutenzione, scollegare sempre la spina dalla rete di alimentazione elettrica. Istruzioni di sicurezza per BBQ • Non usare l‘apparecchio in ambienti esterni. • Collocare l’apparecchio su una superficie uniforme e stabile. • Collocare l’apparecchio su una superficie resistente al calore e agli schizzi. • Non collocare l’apparecchio su un piano di cottura. • Verificare che attorno all’apparecchio vi sia sufficiente spazio per consentire la fuoriuscita del calore e fornire un’adeguata ventilazione. • Non coprire l’apparecchio. IT Prima di procedere, è necessario porre attenzione alle seguenti note: - Non coprire la griglia con un foglio di alluminio. - Non coprire la griglia con vassoi di alluminio. • Tenere l’apparecchio a distanza da fonti di calore. • Verificare che l’apparecchio non entri in contatto con materiale infiammabile. • Non utilizzare carbone o combustibili analoghi. • Non usare l’apparecchio con le mani bagnate. Non azionare l’apparecchio a piedi nudi. • Porre attenzione alle parti riscaldate. Le superfici contrassegnate con un simbolo di attenzione per superfici calde sono soggette a riscaldarsi durante l’uso. Quando l’apparecchio è in funzione le superfici accessibili possono diventare molto calde. Quando l‘apparecchio è in funzione la superficie esterna può diventare molto calda. • Durante l’uso, la griglia diventa molto calda. Non toccare la griglia calda. • Qualora fosse necessario toccare l’apparecchio durante o poco tempo dopo l’uso utilizzare dei guanti da forno. • Non utilizzare l’apparecchio in condizioni di pioggia. Non utilizzare l’apparecchio in ambienti umidi. • Non utilizzare l’apparecchio vicino a bacini d’acqua, quali laghetti o piscine. • Non spostare l’apparecchio mentre è acceso o ancora caldo. Rimuovere la spina di alimentazione dalla presa a parete e attendere che l’apparecchio si raffreddi. • Riporre l’apparecchio in un luogo asciutto quando non viene utilizzato. Assicurarsi che i bambini non abbiano accesso agli apparecchi riposti. Descrizione (fig. A) Il BBQ 110402 Nova è stato progettato per friggere o grigliare cibi senza uso di grassi. L‘apparecchio è adatto esclusivamente per l‘uso al coperto. L’apparecchio è adatto esclusivamente per uso domestico. 1.Quadrante del termostato 2.Spia della temperatura 3.Griglia 4.Elemento riscaldante 5.Piano 6.Indicatore del livello dell’acqua 7.Parabrezza 8.Supporto del piano Primo utilizzo • Pulire l’apparecchio. Consultare la sezione “Pulizia e manutenzione”. • Pulire la griglia con un panno umido. Asciugare a fondo la griglia. Montaggio (fig. B) Prima di procedere, è necessario porre attenzione alle seguenti note: - Prima del montaggio, rimuovere sempre la spina di alimentazione dalla presa a parete. Montaggio del piano (fig. B1) • Inserire le estremità della barra (9) nei fori sul piano (5). • Collocare l’elemento riscaldante (4) sul piano (5). Verificare che l’elemento riscaldante (4) sia adeguatamente sostenuto dalla barra (9). • Collocare la griglia (3) sul piano (5). • Collocare la parabrezza (7) sul piano (5). 26 Utilizzo con il supporto del piano (fig. B2 & B3) • Per ridurre la temperatura della griglia (3), ruotare in senso antiorario il quadrante del termostato (1). • Montare i piedini (10) nella parte inferiore (11) e parte superiore (12) delle gambe. • Inserire la parte inferiore (11) nella parte superiore (12). • Installare una staffa di supporto (13) e una staffa di supporto corta (14) sulle gambe utilizzando un bullone (15) e un dado a farfalla (16). • Collocare la rastrelliera della base (17) sulle staffe di supporto (13 & 14) • Collocare il piano (5) con i piedini (18) sulla gambe (19). • Preparare gli ingredienti. • Pulire la griglia con un panno umido. • Collocare l’apparecchio su una superficie uniforme e stabile. • Riempire il serbatoio dell’acqua fino al segno di livello massimo posto sull’indicatore del livello dell’acqua (fig. C). Riempiendo il serbatoio dell’acqua non superare il segno indicatore del massimo livello. • Inserire la spina di alimentazione nella presa a parete. • Ruotare il quadrante del termostato per impostare la temperatura desiderata. • Attendere 10 minuti fino allo spegnimento della spia della temperatura. La griglia ha raggiunto la temperatura richiesta. • Nota: Pezzi piccoli arrostiranno o friggeranno meglio e più rapidamente rispetto ai pezzi grossi. • Impostare il termostato in base agli ingredienti. Per ottenere risultati migliori fare delle prove con i tempi di cottura necessari e la temperatura richiesta. Utilizzo senza supporto del piano (fig. B4) • Collocare il piano (5) con i piedini (18) su una superficie piatta e stabile. Uso Accensione e spegnimento (fig. A) L’apparecchio è dotato di un termostato che mantiene la griglia alla temperatura desiderata. • Per accendere l’apparecchio, inserire la spina di alimentazione nella presa a parete. • Ruotare il quadrante del termostato (1) per impostare la temperatura desiderata. La spia della temperatura (2) rimane accesa mentre il termostato scalda l’elemento riscaldante (4). Una volta che l’elemento riscaldante (4) ha raggiunto la temperatura richiesta, la spia della temperatura (2) si spegne. • Mentre l’apparecchio è acceso, la spia della temperatura (2) si illumina e si spegne quando il termostato accende e spegne l’elemento riscaldante (4) per mantenere la temperatura richiesta. • Per spegnere l’apparecchio, rimuovere la spina di alimentazione dalla presa a parete. Pulizia e manutenzione Prima di procedere, è necessario porre attenzione alle seguenti note: - Prima di eseguire interventi di pulizia e manutenzione, rimuovere la spina di alimentazione dalla presa a parete e attendere che l’apparecchio si raffreddi. - Non immergere l’apparecchio in acqua o in altri liquidi. Prima di procedere, si prega di porre attenzione alle seguenti note: - Per pulire l’apparecchio non utilizzare detergenti aggressivi o abrasivi. - Non utilizzare oggetti affilati per pulire l’apparecchio. Impostazione della temperatura (fig. A) • Controllare l’apparecchio a intervalli regolari, verificando che non sia danneggiato. • Pulire l’apparecchio dopo ogni uso: - Con un asciugamano di carta rimuovere tutti i residui. • Per aumentare la temperatura della griglia (3), ruotare in senso orario il quadrante del termostato (1). 27 IT Suggerimenti per l’uso - Pulire la griglia con un panno umido. Asciugare a fondo la griglia. - Pulire l’elemento riscaldante con un panno umido. Asciugare a fondo l’elemento riscaldante. - Pulire l’apparecchio con un panno umido. Asciugare a fondo l’apparecchio. • Riporre l’apparecchio in un luogo asciutto, fuori dalla portata dei bambini. Clausola di esclusione della responsabilità Soggetto a modifica; le specifiche possono subire variazioni senza preavviso. IT 28 29 30 31 © 2013 Nova 04/13/V3