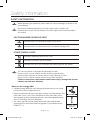
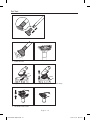
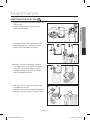
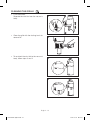
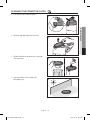
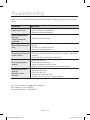
1
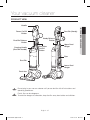
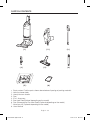
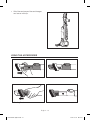
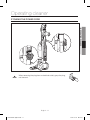
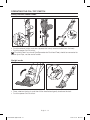
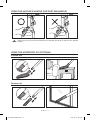
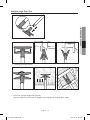
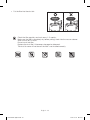
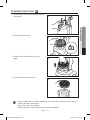
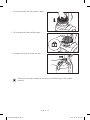
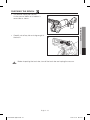
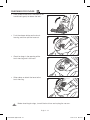
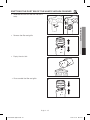
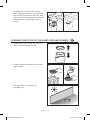
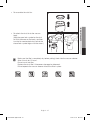
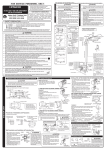
SU10F70 SERIES
Vacuum Cleaner
user manual
✻ Please read the User Manual thoroughly before operating the vacuum.
✻ For indoor use only.
English
Thank you for purchasing a Samsung product.
DJ68-00709C (EN)-05.indd 1
2014. 10. 28. �� 11:41
Contents
YOUR VACUUM CLEANER
07
BEFORE USING THE VACUUM
CLEANER
09
OPERATING CLEANER
11
MAINTENANCE
17
07 Product view
08 Carton contents
09 Assemble the handy vacuum, pipe, and
2 in 1 accessory
10 Using the accessories
11 Stowing the power cord
12 Operating the On / Off switch
13 Operating the Brush bar On / Off switch
13 Resetting the overload protector
14 Using the vacuum's handle
(The dust bin handle)
14 Using the accessory kit (optional)
17 Emptying the dust bin
18 Cleaning the grille
19 Cleaning the premotor filter
21 Cleaning the filter
23 Checking the brush
24 Checking for clogs
25 Emptying the dust bin of the handy
vacuum cleaner
26 Cleaning the filter of the handy vacuum
cleaner
TROUBLESHOOTING
28
DJ68-00709C (EN)-05.indd 2
2014. 10. 28. �� 11:41
Safety information
SAFETY INFORMATION
WARNING
WARNING
Before operating the appliance, please read this manual thoroughly and retain it for
your reference.
Because the following operating instructions cover various models, the
characteristics of your vacuum cleaner may differ slightly from those described in
this manual.
CAUTION/WARNING SYMBOLS USED
WARNING
CAUTION
Indicates that a risk of death or serious injury exists.
Indicates that a risk of personal injury or material damage exists.
OTHER SYMBOLS USED
Indicates something you must NOT do.
Indicates instructions you must follow.
Indicates that you must disconnect the power plug from the socket.
WARNING
This vacuum cleaner is designed for household use only.
Do not use this vacuum cleaner to clean building waste or debris.
Clean the filters regularly to prevent fine dust from collecting in them.
Do not use this vacuum cleaner with any of the filters removed.
Failure to meet these requirements could cause injury, damage the vacuum
cleaner, and void your warranty.
Notes on the energy label
• Declared energy efficiency and cleaning performance class on carpet
can be met with the motorized brush.
• When the hard floor has joints and gaps, please use the enclosed "Eco
Hard Floor" brush with "Pipe (Connector for Eco Hard Floor) which
are designed to meet the energy efficiency and cleaning performance
class on hard floor with joints and gaps.
• The values provided on the energy label have been determinded
according to the prescribed measuring process (in accordance with
EN60312 - 1).
Eco Hard Floor
pipe
(Connector for Eco
Hard Floor)
English - 03
DJ68-00709C (EN)-05.indd 3
2014. 10. 28. �� 11:41
Safety information
IMPORTANT SAFETY INSTRUCTIONS
When using an electrical appliance, you should always follow these
basic precautions:
READ ALL INSTRUCTIONS BEFORE USING YOUR UPRIGHT
VACCUM
WARNING – TO REDUCE THE RISK OF FIRE, ELECTRIC
SHOCK, OR INJURY:
1. Do not leave the vacuum cleaner unattended when it is plugged
in. Unplug it from the outlet when your are not using it and before
servicing.
2. Do not use outdoors or on wet surfaces.
3. Do not allow the vacuum to be used as a toy.
Pay close attention when the vacuum is used by or near children.
4. Use only as described in this manual. Use only the manufacturer’s
recommended attachments.
5. Do not use with a damaged cord or plug.
If the vacuum is not working as it should, has been dropped,
damaged, left outdoors, or dropped into water, bring it to a service
center.
6. Do not pull or carry the vacuum by the cord, use the cord as a
handle, close a door on the cord, or pull the cord around sharp
edges or corners.
Do not run the vacuum over the cord.
Keep the cord away from heated surfaces.
7. Do not unplug by pulling on the cord.
To unplug, grasp the plug, not the cord.
8. Do not handle the plug or vacuum with wet hands.
English - 04
DJ68-00709C (EN)-05.indd 4
2014. 10. 28. �� 11:41
9. Do not put any object into openings or vents.
Do not use with any opening blocked.
Keep free of dust, lint, hair, and anything that may reduce air flow.
10.Keep hair, loose clothing, fingers, and all parts of your body away
from openings and moving parts.
11.Turn off all controls before unplugging.
12.Use extra care when cleaning on stairs.
13.Do not use to pick up flammable or combustible liquids, such as
gasoline, or use in areas where they may be present.
14.Do not pick up anything that is burning or smoking, such as
cigarettes, matches, or hot ashes.
15.Do not use without the dirt cup and/or filters in place.
16.Do not use the vacuum cleaner in an enclosed space filled with
vapors given off by oil base paint, paint thinner, some moth
proofing substances, flammable dust, or other explosive or toxic
materials.
17.Store your vacuum cleaner indoors, in a cool and dry area.
18.Use only on dry, indoor surfaces.
19.Do not modify the polarized plug to fit a non-polarized outlet or
extension cord.
20.Do not touch the brush drum when it is rotating.
21.Keep suction away from your face when using nozzles and pipe.
22.Do not pull the power cord around sharp corners and do not allow
it to become trapped.
23.This appliance can be used by children aged from 8 years and
above and persons with reduced physical, sensory or mental
capabilities or lack of experience and knowledge if they have been
given supervision or instruction concerning use of the appliance in
a safe way and understand the hazards involved.
Children shall not play with the appliance.
Cleaning and user maintenance shall not be made by children
without supervision.
24.Children should be supervised to ensure that they do not play with
the vacuum.
25.You must remove the plug from the socket-outlet before cleaning
or performing maintenence on the vacuum.
English - 05
DJ68-00709C (EN)-05.indd 5
2014. 10. 28. �� 11:41
26.If the power cord is damaged, it must be replaced by the
manufacturer or its service agent or a similarly qualified person.
27.Hold plug when rewinding onto cord reel.
Do not allow plug to whip when rewinding.
28.Do not pick up hard or sharp objects such as glass, nails, screws,
coins, etc.
29.Always turn off the vacuum before connecting or disconnecting
the handy vacuum cleaner.
30.Don’t touch the exhaust vent when the exhaust temperature is
hot.
English - 06
DJ68-00709C (EN)-05.indd 6
2014. 10. 28. �� 11:41
Your vacuum cleaner
PRODUCT VIEW
Handle
Dust Bin Release
Button
Carrying Handle
(Dust Bin Handle)
Dust Bin (Handy)
Handy Release
Button
Brush bar
On/Off
Button
Upper Cord
Hanger
01 Your vacuum cleaner
Power On/Off
Button
Pipe
Dust Bin
Lower Cord
Hanger
Brush bar
CAUTION
WARNING
Do not plug in your vacuum cleaner until you are familiar with all instructions and
operating procedures.
Plastic film can be dangerous.
To avoid the danger of suffocation, keep the film away from babies and children.
English - 07
DJ68-00709C (EN)-05.indd 7
2014. 10. 28. �� 11:41
CARTON CONTENTS
( 1 )
( 4 )
( 2 )
( 5 )
( 5 )
( 3 )
( 6 )
( 6 )
• Empty carton. Find the parts shown above before disposing of packing materials.
1. Vacuum cleaner body
2. Handy Vacuum cleaner
3. Pipe
4. 2 In 1 Accessory
5. Eco Hard Floor(Optional depending on the model)
6. Pipe (Connector for Eco Hard Floor) (Optional depending on the model)
7. Accessory Kit (Optional depending on the model)
8. Users Manual
English - 08
DJ68-00709C (EN)-05.indd 8
2014. 10. 28. �� 11:41
Before using the vacuum cleaner
ASSEMBLE THE HANDY VACUUM, PIPE, AND 2 IN 1 ACCESSORY
• Connect the Handy Vacuum cleaner and
pipe.
• Connect the 2 In 1 Accessory and the
pipe.
02 Before using the vacuum cleaner
Click
Click
Click
• When inserting the handle (the handy vacuum cleaner) into the top of vacuum body, put
in the hole of the lower cord hanger after pull back the dusting brush.
English - 09
DJ68-00709C (EN)-05.indd 9
2014. 10. 28. �� 11:41
• Wind the cord around the cord hangers
and secure with clip.
USING THE ACCESSORIES
• Crevice tool
• Dusting Brush
English - 10
DJ68-00709C (EN)-05.indd 10
2014. 10. 28. �� 11:41
Operating cleaner
STOWING THE POWER CORD
03 Operating cleaner
CAUTION
When removing the plug from an electrical outlet, grasp the plug,
not the cord.
English - 11
DJ68-00709C (EN)-05.indd 11
2014. 10. 28. �� 11:41
OPERATING THE ON / OFF SWITCH
Handy vacuum cleaner mode
1
2
3
OR
• Push the release button, and then separate the handy vacuum cleaner from the body.
• Push the power On/Off switch.
"Eco Hard Floor" brush and Pipe(Connector for Eco Hard Floor) should be connected to
the tip of Pipe, not the end of handle.
Upright mode
1
2
• Place a foot on the brush, and then tilt the handle back gently to release the lock.
• Push the power On/Off switch.
English - 12
DJ68-00709C (EN)-05.indd 12
2014. 10. 28. �� 11:41
OPERATING THE BRUSH BAR ON / OFF SWITCH
1
2
3
03 Operating cleaner
• Push the power On/Off switch, and then push the brush bar On/Off switch.
• The Brush Switch should be in the "On" position for normal carpet cleaning.
• Turn the Brush Switch "Off" for bare floor cleaning or other delicate surfaces.
When the vacuum is in the upright position, the brush bar does not work.
CAUTION
RESETTING THE OVERLOAD PROTECTOR
• The overload protector shuts off the
brush motor if the brush bar becomes
obstructed.
To reset the overload protector, use a pen
tip to press the reset switch.
English - 13
DJ68-00709C (EN)-05.indd 13
2014. 10. 28. �� 11:41
USING THE VACUUM'S HANDLE (THE DUST BIN HANDLE)
CAUTION
When you carry the vacuum cleaner by the handle, do not push the dust bin release
button.
USING THE ACCESSORY KIT (OPTIONAL)
Funiture tool
Window tool
English - 14
DJ68-00709C (EN)-05.indd 14
2014. 10. 28. �� 11:41
Multiple Angle Stair Tool
03 Operating cleaner
• Cleaning a narrow corner.
• Cleaning a carpet and stairs.
• Adjust the multiple angle tool manually.
You can rotate the entire tool 90 degrees and change the angle of both wings.
English - 15
DJ68-00709C (EN)-05.indd 15
2014. 10. 28. �� 11:41
Pet Tool
• Rake the hair.
• Seperate the cover from the pet tool, and then throw the hair away.
• Re-attach the cover.
English - 16
DJ68-00709C (EN)-05.indd 16
2014. 10. 28. �� 11:41
Maintenance
EMPTYING THE DUST BIN
• To empty the dust bin, hold the dust bin
over a garbage can, and then push the
button near the bottom of the bin.
Alternately, for asthma or allergy sufferers:
• To empty the dust bin, place the bottom
of the bin into a plastic bag as shown.
Holding the bag firmly, push the button
near the bottom of the bin.
• With the bin still in the plastic bag, close
the bottom of the bin.
Remove the bin from the plastic bag, seal
the bag, and then drop it in the trash can.
1
04Maintenance
• Empty the dust bin when dust reaches the
'MAX' mark.
• Take the dust bin out by pushing the
button on the handle.
2
3
4
English - 17
DJ68-00709C (EN)-05.indd 17
2014. 10. 28. �� 11:41
CLEANING THE GRILLE
• Push the button.
Separate the dust bin from the vacuum's
body.
1
• Clean the grille with the dusting brush to
remove lint.
2
• To re-attach the dust bin to the vacuum's
body, follow steps 3 and 4.
3
4
English - 18
DJ68-00709C (EN)-05.indd 18
2014. 10. 28. �� 11:41
CLEANING THE PREMOTOR FILTER
• Pull the dust bin cover to open.
1
2
• Shake the filter to remove dust, and then
wash the filter.
3
• Leave the filter in the shade until
completely dry.
4
04Maintenance
• Remove the filter from the dust bin.
English - 19
DJ68-00709C (EN)-05.indd 19
2014. 10. 28. �� 11:41
• Put the filter into the dust bin.
5
Check the filter regularly and wash every 1~2 months.
Make sure the filter is completely dry before putting it back into the vacuum cleaner.
Allow it to dry for 12 hours.
Do not use a wet filter
Replace the dust filter if it becomes damaged or deformed.
The dust bin cover will not close if the filter is not installed correctly.
English - 20
DJ68-00709C (EN)-05.indd 20
2014. 10. 28. �� 11:41
CLEANING THE FILTER
• Take the dust bin out by pushing button on
the handle.
• Separate the filter from the vacuum's
body.
• Shake the filter to remove dust.
04Maintenance
• Remove the filter cover.
1
2
3
4
Clean the filter when suction is noticeably and continuously reduced or the vacuum
cleaner overheats abnormally.
Note: Filters are not washable.
Replace the filter if cleaning does not resolve the problem.
English - 21
DJ68-00709C (EN)-05.indd 21
2014. 10. 28. �� 11:41
• Re-insert the filter into the vacuum's body.
• Re-assemble the filter and filter cover.
5
6
Click
• Re-attach the dust bin to the vacuum.
7
The dust bin will not re-attach to the vacuum if the filter cover is not installed
correctly.
English - 22
DJ68-00709C (EN)-05.indd 22
2014. 10. 28. �� 11:41
CHECKING THE BRUSH
1
• Carefully cut off any hair or string caught in
the brush.
2
04Maintenance
• Turn off and unplug the vacuum.
Lie the vacuum down so its bottom is
accessible as shown.
Before inspecting the brush bar, turn off the brush bar and unplug the vacuum.
CAUTION
English - 23
DJ68-00709C (EN)-05.indd 23
2014. 10. 28. �� 11:41
CHECKING FOR CLOGS
• Place a foot on the brush, and then tilt the
handle back gently to release the lock.
1
• Push the release button on the brush
housing, and then pull the hose out.
2
• Check for clogs in the opening of the
brush housing and in the hose.
3
• When done, re-attach the hose to the
brush housing.
4
Click
Before checking for clogs, turn off the brush bar and unplug the vacuum.
CAUTION
English - 24
DJ68-00709C (EN)-05.indd 24
2014. 10. 28. �� 11:41
EMPTYING THE DUST BIN OF THE HANDY VACUUM CLEANER
• Separate the dust bin from the vacuum's
body.
• Empty the dust bin.
• Re-assemble the filter and grille.
2
04Maintenance
• Remove the filter and grille.
1
3
4
English - 25
DJ68-00709C (EN)-05.indd 25
2014. 10. 28. �� 11:41
• Re-attach the dust bin to the vacuum
body. (Align the open lock symbol on the
dust bin with the arrow on the body, and
then turn the bin counterclockwise so that
the closed lock symbol aligns with the
arrow.)
5
CLEANING THE FILTER OF THE HANDY VACUUM CLEANER
• Separate the dust bin from the vacuum's
body, and then remove the filter.
1
• Shake the filter to remove dust, and then
wash the filter.
2
• Leave the filter in the shade until
completely dry.
3
English - 26
DJ68-00709C (EN)-05.indd 26
2014. 10. 28. �� 11:41
• Re-assemble the dust bin.
4
04Maintenance
• Re-attach the dust bin to the vacuum
body.
(Align the open lock symbol on the dust
bin with the arrow on the body, and then
turn the bin counterclockwise so that the
closed lock symbol aligns with the arrow.)
5
Make sure the filter is completely dry before putting it back into the vacuum cleaner.
Allow it to dry for 12 hours.
Do not use a wet filter.
Replace the dust filter if it becomes damaged or deformed.
Do not operate the vacuum cleaner without the filter in place.
English - 27
DJ68-00709C (EN)-05.indd 27
2014. 10. 28. �� 11:41
Troubleshooting
Check this list of possible problems and solutions before bringing your vacuum to a service
center.
PROBLEM
SOLUTION
Cleaner won’t run.
• Check the electrical plug. Make sure it is fully plugged in.
• Press the Power on/off button.
• Reset the overload protector.
Suction Motor does
not start.
Thermal protector
activated.
• Allow the vacuum to cool.
Brush Motor does not
start.
Cleaner won’t pick up
or low suction.
Dust escaping from
cleaner.
Cleaner tools won’t
pick-up.
(Handy vacuum
cleaner)
• Check the power ON/OFF button and the brush ON/OFF
button.
• Cut hair or string off the brush.
• Reset the overload protector.
• Empty the dust bin.
• Clean the filter and confirm that the filter assembly is positioned
properly.
• Check the hose connection or flow path.
• Empty the dust bin.
• Clean the pre-motor filters.
• Clean or replace the exhaust filter.
• Confirm that the filter assembly is positioned properly.
• Check inlets, pipe, and dust bin for obstructions.
Remove obstruction.
• Empty the dust bin.
• Remove and clean the filters.
• Confirm that the dust bin is locked properly.
This Vacuum cleaner is approved the following.
EMC Directive : 2004/108/EEC
Low Voltage Directive : 2006/95/EC
English - 28
DJ68-00709C (EN)-05.indd 28
2014. 10. 28. �� 11:41
Product fiche
[English]
According to Commission Regulation (EU) No 665/2013 and No 666/2013
A Supplier
B Model
C
D
E
F
G
H
I
Energy Efficiency
Class
Annual Energy
Consumption (kWh/
yr)
Carpet Cleaning
Performance Class
Hardfloor Cleaning
Performance Class
Dust Re-Emission
Class
Sound Power Level
(dBA)
Rated Input Power
(W)
J Type
Samsung Electronics., Co. Ltd
SU10F70SA SU10F70SB SU10F70SD SU10F70SQ SU10F70SR
B
B
B
A
A
34
34
34
27
27
D
D
D
C
C
F
F
F
A
A
A
A
A
A
A
87
87
87
87
87
800
800
800
800
800
General purpose vacuum cleaner
1) Indicative annual energy consumption (kWh per year), based on 50 cleaning tasks.
Actual annual energy consumption will depend on how the appliance is used.
2) Measurements for power consumption and performance are based on methods in
EN 60312 - 1 and EN 60704.
DJ68-00709C (EN)-05.indd 29
2014. 10. 28. �� 11:41
Memo
DJ68-00709C (EN)-05.indd 30
2014. 10. 28. �� 11:41
Memo
DJ68-00709C (EN)-05.indd 31
2014. 10. 28. �� 11:41
If you have any questions or comments relating to Samsung products, please contact the
SAMSUNG customer care center.
COUNTRY
CUSTOMER CARE CENTER
WEB SITE
U.K
0330 SAMSUNG (7267864)
www.samsung.com
SOUTH AFRICA
0860 7267864 (SAMSUNG)
www.samsung.com
DJ68-00709C-05
DJ68-00709C (EN)-05.indd 32
2014. 10. 28. �� 11:41