Transcript
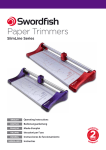
Please read the following instructions
before operating your sharpener.
l To be used under adult supervision only.
Model
Product Code
Replacement
Blade Code
Compatible Pencil
Size(s)
Curve
40103
40807
8-12mm
1 Place the sharpener on
a flat surface, securing
it in place with the desk
clamp if necessary.
Curve Manual
Pencil Sharpener
Operating
Instructions
DESKTOP
4 +6
2 Holding the
handle still, turn
the pencil point
options knob
to adjust the
sharpness.
2
3 Pull the front plate out until it locks into position.
5
4 Push the lever down and insert the pencil.
5 Turn the handle clockwise to sharpen the pencil.
The auto-stop feature will stop sharpening the pencil
when it has reached the selected sharpness.
+
3
8
7
6 Push the lever down and remove the pencil.
7 Turn the handle clockwise to retract the front plate.
Cleaning
8
l Use a small brush (e.g. paintbrush or toothbrush) to clean the cutting
blade. Never use metal objects as this may damage the cutting blade.
Empty the shavings tray if necessary by sliding it out
from the main sharpener unit.
Replacement Blades
As with all sharpeners, frequent use will eventually blunt the
sharpener blade. For replacement blades, please contact your
supplier quoting product code 40807.
For blade replacement instructions, go to
www.snopakebrands.com.
Regular cleaning will ensure that your sharpener operates efficiently.
l The shavings tray can be removed and cleaned with water only.
Never clean the main sharpener unit with water or use solvents such
as alcohol or thinner.
Coloured Pencils
l Sharpening coloured pencils causes wax to build up on the
sharpener blade.
l We recommend alternating between coloured and graphite pencils
as graphite will help to clean the blade.
l If excessive build up occurs then clean the blade as per the
instructions above.
For troubleshooting and product support, please visit www.snopakebrands.com