1
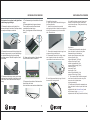
说明书递交文档
设 计
刘克亮
DESIGN
2011.8.2
校 对
CO.BY
标准化
STANDARD
业务
seller
批 准
AUTHORIZE
毛娅男
图纸名称 PART NAME
图号/物料编码 PART NO.
50200101B816
I N D E S I T 237型号说明书
马凯
曹筱峰
材料 MATERIAL
图样标记 版本号 重量(g)
REL
REV.NO. WEIGHT
比例
scale
2
1:1
于清
封面120g、内文80g双胶纸
美的冰箱事业部
共 页
TOTAL SHEETS
第 页
NO. OF SHEETS
MIDEA REFRIGERATION DIVISION
技术要求
1. 尺寸:16K
2. 印刷颜色:彩色
3. 样板需送设计部门封样
4.
标记
变更内容
MARKER
修改日期
签名
①
封底地址更改
②
第5、6、16版面内容多处更改,厂家以新图纸印刷 2012.12.12 庄金龙
③
④
⑤
2012.11.21 庄金龙
DAA 55 NF UK.1
DAA 55 NF K UK
REFRIGERATOR-FREEZER
Plug replacement(UK&lreland only)
Should you need to replace the plug,the
wires in the power cable are colour in the
following way:
Blue - Neutral ’N’
Brown - Live ‘L’
Green&Yellow - Earth ‘E’
As the colours of the wires in the power cable
may not correspond with the coloured
markings identifying the terminals in your
plug,and proceed as follows:
The green&yellow wire must be connected to
the terminal in the plug that is marked with
the letter E or by the earth symbol.
The blue wire must be connected to the
terminal that is marked with the letter N.
The brown wire must be connected to the
terminal that is marked with the letter L.
If power supply cord is damaged,it must
replaced by the manufacturer or its service
agent or a similar qualified person in order to
avoid a hazard.
3
REFRIGERATOR-FREEZER
UNPACKING YOUR REFRIGERATORFREEZER
WARNING: Use two or more people to move
refrigerator-freezer.Failure to do so can result
in back or other injury.
Remove tape and any labels from your
refrigerator-freezer before using(except the
rating label).
To remove any remaining tape or glue, rub the
area briskly with your thumb.
Tape or glue residue can also be easily
removed by rubbing a small amount of liquid
dish soap over the adhesive with your fingers.
Wipe with warm water and dry.
Do not use sharp instruments, rubbing alcohol,
flammable fluids, or abrasive cleaners to
remove tape or glue. These products can
damage the surface of your refrigeratorfreezer.
When moving the refrigerator-freezer, do not
tilt the refrigerator-freezer beyond 45°from
upright position
CLEANING BEFORE USE:
After you remove all of the packaging
materials, (especially the foam between
outside condenser and cabinet should be
removed)clean the inside of your refrigeratorfreezer before using it.
the hinge side to allow for the door to swing
open.
Never install your refrigerator-freezer near
heat source and direct sun shins.
ELECTRICAL REQUIREMENT
WARNING: DO NOT REMOVE GROUND
PRONG.
DO NOT USE AN ADAPTOR.
DO NOT USE EXTENSION CORD.
Failure to follow these instructions can result in
death, fire or electrical shock.
Before you move your refrigerator-freezer into
its final location, it is important to make sure
you have the proper electrical connection.
RECOMMENDED EARTHING METHOD
AC220-240Volt /50Hz ,AC only 10 ampere
fused and properly earthed electrical supply is
required. It is recommended that a separate
circuit serving only this appliance be provided.
Use a receptacle which cannot be turned off
with a switch or pull chain. Do not use an
extension cord.
NOTE: Before performing any type of
installation, disconnect the refrigerator-freezer
from the electrical source. When you are
finished, connect the refrigerator-freezer to the
electrical source and reset the control to the
desired setting.
SPACE REQUIREMENTS
WARNING: Keep flammable materials and
vapors, such as gasoline, away form
refrigerator-freezer.Failure to do so can result
in death, explosion, fine or burns.
To ensure proper ventilation for your
refrigerator-freezer, allow for 200mm space on
each side between walls, 200mm space
between back of your refrigerator-freezer and
the wall, and 300mm space between counter
top and the roof or ceiling.
If you are installing your refrigerator-freezer
next to a fixed wall, leave sufficient space on
LEVELING
If the refrigerator-freezer is not leveled during
installation. The doors may not close or seal
properly, causing cooling, frost, or moisture
problems. It is very important of the
refrigerator-freezer to be level in order to
function properly.
To level your refrigerator-freezer you may
either turn the adjustable foot clockwise to
raise that side to the refrigerator-freezer or turn
counter – clockwise to lower that side.
NOTE: Having someone push against the top
of the refrigerator-freezer, take some weight
off. This makes it easier to adjust the
adjustable foot.
4
REFRIGERATOR-FREEZER
USE OF THE APPLIANCE
To obtain the best possible results form your
refrigerator-freezer, it is important that you
use it properly.
TEMPERATURE CONTROL
The temperature in the refrigerator-freezer is
controlled by the thermostat control knob.
The temperature inside the refrigerator-freezer
automatically adjusts itself according to the
position of the thermostat knob.
1=warmest 6=coldest
We raccomend, however, the medium position.
"OFF" position means stop work.
REPLACING THE LIGHT BULB
To replace the light bulb in the refrigerator
compartment, set the thermostat control knob
on "OFF" and pull out the plug from the electrical
socket.
Access the light bulb by removing the cover.
Replace it with a 10 watt bulb. Be sure to replace
the bulb with one of the same size and shape.
POWER INTERRUPTIONS
If the electricity in your house goes off for a
shorter period, keep both doors closed to
help foods stay cold and frozen.
If the power will be out for a longer period,
remove foods from the freezer and stored it in
a frozen food locker.
Fresh Food Storage
Wrap or store food in the refrigerator in
airtight and moisture – proof material.
This prevents food odor and taste transfer
throughout refrigerator.
·Fruit – wash, let dry and store in
refrigerator in plastic bags or crisper.
·Leafy vegetables- Remove wrapping and
trim or tear off bruised and discolored areas,
wash in cold water and drain. Place in plastic
bag or plastic container and store in crisper.
·Fish –Use fresh fish the same day as
purchased.
·Meat – Store most meat in original
wrapping as long as it is airtight and moisture
– proof.
Re – wrap if necessary.
·Leftovers – Cover leftovers with plastic
wrap or aluminum foil.Plastic containers with
tight lied can also be used.
Frozen Food Storage
When using the refrigerator-freezer for the
first time, set the thermostat control knob on "6"
f or at least two hours before introducing
the food to be stored.
All frozen food products you purchase should
be placed in the freezer compartment as
soon as possible to avoid the frozen food
from defrosting.
Storage recommendation printed on the
packaging of frozen food by the
manufacturers should be always be followed.
5
REFRIGERATOR-FREEZER
Freezing Fresh Food
Ensure that your freezing operations are
carried out under the most hygienic
conditions as freezing alone does not
sterilize the food. It is advisable to freeze the
food by packing it into separate meal portions
and not in bulk form. Never put hot or even
warm foodstuffs into the freezer
compartment. Prior to storing the frozen
food, pack it in plastic bags, aluminum sheets
or freezing containers and place into the
freezer compartment. The maximum quantuty
of food that may be frozen daily is indicated on
the plate containing the technical properties
located on the back of the refrigerator-freezer.
Note: Never put bottled food or drinks in the
freezer compartment.For best performance,
leave enough space in the Freezer
compartment for air to circulate around the
packages.
Maintaining Your Refrigerator-freezer
The refrigerator-freezer should be clean at least
once a month to avoid mould and unpleasant
odours.
During cleaning and maintenance it is necessary
to disconnect the appliance from the electricity
supply.
·Set the thermostat control knob on "OFF"
·Pull the plug out of the socket
·Remove all movable parts from inside,
such as shelves and crisper. Etc . Internal
parts may be soaked in warm water and neutral
soap.
· clean using a soft sponge that has been soaked
in lukewarm water and bicarbonate of soda or
neutral soap. Do not use solvents, abrasive
products, bleach or ammonia.
·Hand wash, rinse and dry all surfaces
thoroughly.
·Do not use cleaning waxes, concentrated
detergents, bleaches or cleaners containing
petroleum on plastics and rubber parts.
·Never use paper towels, window sprays,
scouring cleansers or flammable fluids on
plastic parts as these can scratch or damage
material.
PROLONGED OFF PERIODS
If the refrigerator-freezer is not in use for a
long period of time, proceed as follows:
Disconnect the refrigerator-freezer from the
main supply by removing the plug from the
wall socket.
Clean and dry the inside as instructed under
the heading of cleaning the refrigeratorfreezer.
Leave the door open to prevent any
unpleasant smells from building up while the
refrigerator-freezer is not in use.
6
REFRIGERATOR-FREEZER
Refrigerator-freezer door install guidelines
about swapping left&right
1. Remove the top bar cover fixed by four
screws with caps, then take off two top endcap
coverslips and a top cover buckle
4. The disassembly and installation of bottom
parts
A. Disassemble lower hinge and screws.
Then install them on the other side and
consolidate the lower hinge.
Note:the refrigerator-freezer incline angle
less 45°.
REFRIGERATOR-FREEZER
5. Install the lower door
6.Tighten the screws of the middle hinge on
the reversible side.
7、Install the top door and remove the
existing top door block. Install a new top door
block (not the same one) on the reversible
side. Screw it down.
8、Install the top bar cover and a top cover
buckle. Screw down the four screws and
cover them with caps. Finally insert the top
endcap coverslip
screw cap(four)
screw cap(four)
The screws
fixed the
bottom-hinge
Catch(two)
Catch(two)
2. Remove three screws of the top hinge, take
the door hinge as axis, turn over the top hinge
in clockwise direction, then the top hinge
could be removed. Take off the top door, and
put it aside.
B、Swap over the position of the adjustable
foot to the other side of the cabinet.
7、Reuse the disassembled top hinge, three
screws and hinge shaft sleeve.
A. Disassemble the axis of the hinge, swap
over its position to the other side, then
consolidates the axis and screws it down
Screw(three)
3. Remove middle hinge, screws, screw caps
and plastic inserting nails. Install them on the
other side. Take off the lower door and put it
away.
B. Install the assembled top hinge. Screw it
down and fix it on target side
C. Swap over the position of the lower door
block to the other side,
And install the screws and consolidate them.
7
Attachment:
1. Components that could be transferred
from one side to the other directly after
disassembling are listed below:
top door top endcap coverslip (2pcs)
top cover buckle (1pc)
hinge shaft sleeve (1 or 2pcs)
screws of top hinge (3 pcs)
middle hinge assembly (1 pc)
screws of middle hinge (2 pcs)
insert nail (2 pcs)
screw cap (2 pcs)
door stopper (1 pc)
bottom hinge assembly (1 pc)
screws of lower hinge (3pcs)
2. The component that could be swapped
over from one side to the other only after
reconstruction is listed below:
top hinge assembly
3. Components that could be swapped over
from one side to the other in pairs are listed
below:
adjustable foot with internal thread (used
with the lower hinge)
adjustable foot with bolt (fixed at the bottom)
8
REFRIGERATOR-FREEZER
4. Components that could not be reused
temporarily are listed below:
left block on top door
right block on top door
·Ensure the Appliance is unplugged and
empty。
·Adjust the two leveling feet to their highest
position。
·We recommend you have someone to assist
you。
NOTE:
To take the door off it is necessary to tilt the
Appliance backward。
You should rest the Appliance on something
solid e.g.a chair just below the top panel。
Do not lay the Appliance completely flat as this
may damage the coolant system。
TROUBLE SHOOTING
In case of malfunction, you can solve many
common problems easily.
Your refrigerator-freezer will not
operate…Check if
-- The power supply cord is unplugged.
The doors will not close completely…Check if
-- The drawers are out of position.
-- The gaskets are dirty.
-- The refrigerator-freezer is not level.
The refrigerator-freezer is noisy when
running…Check if
-Check the refrigerator-freezer is level
and it is not in contact with another appliance
or kitchen furniture.
The refrigerator-freezer does not cool
sufficiently…Check if
-If the door has been opened too often,
or it has been left open for a while it will take
time for the refrigerator-freezer to reach its
set temperature.
-Check the airflow the rear of the
refrigerator-freezer has not been reduced
due to insufficient clearance.
The following characteristics should not be
looked upon as a problem.
-A gentle tricking sound caused by
coolant flowing the pipe.
Compressor operating at high temperature.
REQUESTING ASSISTANCE OR SERVICE
If the problem is not due to one of the items
listed in Troubleshooting, Contact the dealer
or authorized Service Company.
9
REFRIGERATOR-FREEZER
WARNNING
RECOMMENDATIONS:
1) WARNING – Keep ventilation openings, in
the appliance enclosure or in the built-in
structure, clear of obstruction.
2) WARNING – Do not damage the
refrigerant circuit.
3) WARNING – Do not use mechanical
devices or other means to accelerate the
defrosting process, other than those
recommended by the manufacturer
3.1) WARNING – Do not use electrical
appliances inside the food storage
compartments of the appliance, unless they
are of the type recommended by the
manufacturer
3.2) Do not store explosive substances such
as aerosol cans with a flammable propellant
in this appliance
4) The appliance has to be unplugged after
use and before carrying out user
maintenance on the appliance.
5) This appliance is not intended for use by
persons (including children) with reduced
physical, sensory or mental capabilities, or
lack of experience and knowledge, unless
they have been given supervision or
instruction concerning use of the appliance
by a person responsible for their safety.
6) Children should be supervised to ensure
that they do not play with the appliance.
7) If the supply cord is damaged, it must be
replaced by the manufacturer, its service
agent or similarly qualified persons in order
to avoid a hazard.
Correct Disposal of this product:
This marking indicates that this product
should not be disposed with other household
wastes throughout the EU. To prevent
possible harm to the environment or human
health from uncontrolled waste disposal,
recycle it responsibly to promote the
sustainable reuse of material resources. To
return your used device, please use the
return and collection systems or contact the
retailer where the product was purchased.
They can take this product for environmental
safe recycling.
10
DAA 55 NF UK.1
00842620000