1
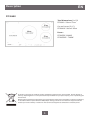
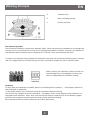
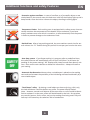
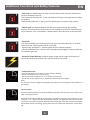
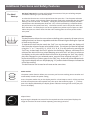
Induction Hob DTi1049 Dear Customer, Thank you for buying a DE DIETRICH hob. Our research teams have designed a new generation of kitchen appliances. As a result of our unique expertise, we have produced a range of goods whose quality, design and technical advance are unsurpassed. You will find that the clean lines and modern look of your De Dietrich hob blends in perfectly with your kitchen décor. It is easy to use and performs to a high standard. De Dietrich also makes a range of products that will enhance your kitchen such as hobs, extractor hoods, built-in dishwashers and refrigerators. There are models to complement your new De Dietrich hob. Of course, we make every effort to ensure that our products meet all your requirements, and our Customer Service department is at your disposal, to answer all your questions and to listen to all your suggestions (see back cover of manual). De Dietrich is certain that by setting new standards of excellence by which comparisons can be made, customers will find that De Dietrich appliances offer a better and more exciting way of living. DE DIETRICH. www.dedietrich.co.uk We are constantly improving our products; for this reason we reserve the right to make all modifications to their technical, functional or aesthetic characteristics, originating from technical developments. This appliance is not intended for use by persons (including children) with reduced physical sensory or mental capabilities, or lack of experience and knowledge, unless they have been given supervision or instruction concerning use by a person responsible for their safety. Children should be supervised to ensure that they do not play with the appliance WARNING This product is not for use in the USA. Before installing and using this appliance please read the installation guide section of this booklet fully. This guide will help you to quickly familiarise you with all the features of the appliance. Contents 1/ Description of your appliance 2/ Overview / working principle 3/ Quick start guide 4/ Product / Safety features explained 7/ Cleaning and maintaining your appliance 8/ Installation guide 11/ Help Guide EN Description EN DTi1049X Total dimensions (L x l)X DTi1049 : 93cm x 51cm Cutout Recess (L’ x l’) DTI1049X : 90cm X 49cm Power : DTI1053X :9200W DTI1053XE : 7200W As shown in this logo, the materials used to package this appliance are not recyclable. Please dispose of them by depositing them in municipal containers provided for this purpose and play a role in protecting the environment. Recycling of the appliances organised by your manufacturer will thus be undertaken in optimum conditions, in accordance with European directive 2002/96/CE relating to electrical and electronic equipment waste. Contact your local authority or retailer for how to have used appliances collected or collection points. 1 Working Principle EN A Induction coils B Glass insulating hob top C Ferrous pan base The induction principle The principle of induction is based on a magnetic effect. When you place your cookware on a cooking zone and you turn it on, the electronic circuits in your cooking hob produce “induced” currents in the bottom of the cookware which instantly raise its temperature. This heat is then transmitted to the food. In order for an induction hob to operate the cookware must have a ferrous base (containing Iron). A simple rule is if a magnet sticks to the base of your pan then it should be suitable for use on induction hobs. When you buy your cookware, make sure that one of these logos are on the package; it assures you that it is compatible with induction cooking. Cookware To verify that your cookware is suitable, place it on a heating area on power 4. - If the display remains on, your cookware is compatible. - If the display flashes, your cookware cannot be used with induction cooking. You can also use a magnet to test the cookware. If a magnet “sticks” to the bottom of the cookware, it is compatible with induction. Glass, terra cotta, aluminium without a special finish on the bottom, copper and some non-magnetic stainless steels do not work with induction cooking. We recommend that you select cookware with a thick, flat bottom. 2 Quick Start Guide EN Controls A Front Continuum Zone H Boil Function B Rear Continuum Zone I Power Tracker C Entire Continuum Zone J Pre-set Power Levels D Power settings display K Boost Function E Timer Settings Display L Timer + and - controls F Power + and - Controls M Elapsed Time Function G On / Off Controls for Zones N Control Lock Function Quick Start Guide Prior to using you appliance you need to ensure the appliance has been installed in accordance with the installation instructions within this guide. Particular attention should be paid to the ventilation requirements as this could affect the performance of the appliance as well as the long term reliability. Operation Care should be taken to ensure that the pan / pans being used cover a minimum of 80% of the cooking zone. Place the pan on the zone you wish to use and select the zone on the control panel using the selector controls “F” or, if the entire zone is required “C”. Select either a pre-set power level “H” or use the “+” or “-” controls to determine the desired power level. If you wish to control more than one pan these should be selected in turn, noting the controls apply the power settings to the last zone selected. This is shown by an indicator light adjacent to the zone selector “F”. Noise You may notice a clicking noise when either using multiple zones or a single zone on low power settings (below level 7). This is normal and should not be considered a fault; it is the electronics of the appliance regulating the power delivery to the zones. You may notice a corresponding reduction of the bubbles in the base of the pans on the hob, again this is normal. Power sharing The machine is manufactured with shared electronics controlling the cooking zones. The power delivered by the independent electronics is split between the two zones. If “boost” is selected on one zone the power is reduced on the other to ensure the maximum connected load is not breached. This is not a fault with the appliance. You may wish to select “Boost” on the Continuum setting, it is worth noting that you may notice a clicking and alternating bubble pattern in the base of the cookware, this is normal. Suitable cookware If the display on the appliance flashes when set, this is an indication that either there is no pan on the zone or, an unsuitable pan is being used. Please refer to the pan guide in the description section of this guide for further details. 3 Additional functions and safety Features EN Protection against overflows. In case of overflow, or of a metallic object or wet cloth placed on the control areas, the hob turns itself off, the displays light up and a beep sounds. Clean the hob or remove the object, then begin cooking again. Temperature limiter. Each cooking zone is equipped with a safety sensor that constantly monitors the temperature of the bottom of the cookware. If you leave empty cookware on a zone which is turned on, it will automatically limit the power in order to prevent damage to the cookware or hob. Residual heat. After a long cooking period, the zone used can remain hot for several minutes. An ‘’H’’ flashes during this period. Do not put your hand on the zone. Auto-Stop system. If you forget cooking is in progress, after a predefined time, this safety function will automatically turn off your hob (from 1 to 10 hours depending on the power setting). “AS” displays and a beep sounds after about 2 minutes. Press on the main selector to delete this information. A beep will confirm your setting. Automatic Pan Detection: detects when a suitable pan is placed on the cooking zone and so eliminates the possibility of the hob being activated accidentally by a non-suitable object. “Small Items” safety. By placing a small object on the area (a ring, a fork, etc), the hob will detect it and not deliver any power. The power display flashes. Note: However, several small objects at the same time on a zone could be identified as cookware. In that case, power will be delivered by the hob. Do not place any utensils (spoons, forks, covers, etc) on the cooking zone being used. They will heat up in the same way as cookware: Risk of combustion. 4 Additional Functions and Safety Features EN Child Lock: for added peace of mind, the child lock can be manually activated to prevent accidental start-up. To activate the lock pres the “I” key and hold until a beep is sounded and an indicator appears. To de-activate hold the “I” key until the indicator goes out and a beep sounds. Control Lock: can be activated to lock the control panel during the cooking process. This will lock the controls set on the cooking zones but will allow the stop key to function. This is activated in / deactivated in the same way as the child lock. Clean lock This function allows you to temporarily lock your hob while cleaning. To activate Clean lock your cooking hob must be turned off. - Briefly press touchpad “I”. A beep sounds and an indicator appears. - After a predefined time, the lock will automatically disengage. A beep sounds and the indicator goes out. Electronic Power Monitor: prevents power surge and de-surge in the event of electrical interference without loss of performance to the hob. •Independent timer. This function allows you to time an event, without cooking. - Select a cooking zone you are not using. - Set the time with touchpad “G”. A “t” flashes in the display. - At the end of your adjustment “t” becomes fixed and the count begins. Note: You can stop a count in progress by keeping your finger on the touchpad of the selection on the display. Timer Function Each zone of the appliance can be controlled by using the timer function to turn off the zone after a set period of time. Select the zone required and adjust the power as required. press the timer controls “G” and using the “+” or “-”keys select the cooking time required. The appliance will now count down the time and turn off as required. When the time remaining is less than 1 minute the display will indicate seconds remaining. At the end of the time a beep will indicate the end of cooking. 5 Additional Functions and Safety Features Pre Heat / Heat up EN Pre-heat / Heat upThis Function will preheat the contents of the pan to boiling temperature before reducing to your selected power. To select the function turn on the required zone then press the “-“on the power selection keys, “HU” is shown on the display, Select the power level to be maintained after the initial heat up ( this must be level 7 or above ). During the pre-heat phase the display will alternate between the selected power level and “HU”, once the preheating is complete the display will revert to the power level only. This feature can be used in conjunction with the timer functions. For example you can set the appliance to preheat a pan of pasta to a boil reduce the pan to a simmer then time the entire cooking phase to ensure perfect results every time. Boil Function The boil function allows the user to heat to boiling point a quantity of water prior to adding food such as Pasta or vegetables and then maintaining the boiling for a period of time set by the user. To operate the boil function touch the “boil” icon on the touch pad, the display will then show the volume of water to be boiled in litres. The volume can then be adjusted using the “+” or “-” keys (0.5l, 1l, 1.5l,2l, 2.5l, 3l, 4l, 5l or 6l) confirm by pressing the “boil” key. A short beep and “boiL” appears on the display. When a consistent boil is achieved the hob will emit a pulsed beeping noise and “boil” will then scroll across the display, at this point add the food and confirm by pressing the “boil” key, the display then changes to a pre-selected power, press the time required using the “+” “-” keys and confirm by a further press on the “boil” key. At the end of the selected cooking time the display will turn off (displaying “H”) and the hob will beep to indicate the end of the cooking. The boil function can be used on all zones at the same time. Power tracker The power tracker function allows you to move a pan from one cooking zone to another and automatically transfer the power setting. Press the power tracker key on the display, wait for a short beep to sound. Lift the pan from the hob and replace onto the required zone, then press the tracker key again. “[ ]” will appear in the display followed by the display power indication moving to the correct pan position on the display. Elapsed Time By pressing the elapsed time control for the required zone the control panel displays the length of time that the zone has been operating since being turned on. 6 Cleaning and Maintaining your Appliance EN Preserve your appliance The vitroceramic glass surface is highly resistant, but not unbreakable. Here are some recommendations for increasing its lifetime: - Avoid banging or clattering the cookware. - Avoid putting heating covers on the hob. A suction effect may damage the vitroceramic surface. - Do not use cookware with bottoms that are rough or dented. - Do not use your cooking hob as a work surface. - Never use aluminium foil or paper or aluminium scrubber to clean it. The aluminium melts and damages the top. - Never use a steam cleaner to clean your hob. - Never directly reheat a tin can. It will have a risk of exploding. For the safety of your kitchen, do not place cleaning items or inflammable objects or cleaning products in the kitchen furniture underneath your cooking hob. TYPES OF STAINS/SPOTS Light accumulation of baked-on stains/dirt. Sugar spills, melted plastics. Rings and hard water residue. Shiny metal Aesthetic damage to the hob top which does not entail a lack of function, are not covered by our guarantee for example chips and scratches. Full terms of the guarantee are available at www.dedietrich.co.uk. Maintaining your appliance Type of stain / spots Use What to do Light Cleaning sponges Thoroughly moisten the zone to be cleaned with hot water, then wipe off. Accumulation of baked- Cleaning sponges on stains/ dirt Scraper for glass Sugar spills, melted plastics etc Thoroughly moisten the zone to be cleaned with hot water. Use a scraper for glass to remove the large bits, follow with rough side of a disinfectant sponge then wipe off. Ring marks and rard water residue White vinegar Apply warm white vinegar to the stain, let stand, then wipe with a soft cloth Shiny metal colourings Weekly maintenence Special vitro-creamhob cleaner product with conditioner. Apply a cleaning agent for vitro-ceramic glass(preferably containing silicon for protection)to the surface as per product instructions 7 Installation Guide EN Installation Your appliance should be positioned so that the mains switch is accessible. The distance between the edge of your appliance and the side and rear walls (or partitions) must be at least four centimetres (area A). Your appliance can be easily integrated above a cabinet, an oven or a build-in household appliance. Simply verify that the air intakes and outlets are free of obstruction, poor ventilation can affect both the performance of your appliance and reduce its lifespan. Stick the foam gasket to the bottom of your appliance. This will allow you to achieve an airtight seal with the worktop. Attach the clips to the hob if supplied. Cut-out Information. Please ensure the correct cut out size for your appliance. Details of the cut out sizes are shown on page 4. L’ being the width (left to right) l’ the depth of the cut out (front to back) Installing above a cupboard When installing above a cupboard please ensure a gap for ventilation is provided to the rear of the cupboard. You should also ensure that the ventilation slots in the front of the appliance are not blocked / obscured in any way. It may be necessary to cut the work-surface or cupboard carcass to ensure adequate air flow. Installing above a drawer When installing your appliance above a drawer or shallow cupboard, it may be necessary to remove the carcass support rail from the housing in order to ensure a 4mm air gap is maintained. 8 Installation Guide EN Installing above an oven When installing your appliance above an oven, it may be necessary to remove the carcass support rail from the housing in order to ensure a 4mm air gap is maintained. Most modern ovens including all De Dietrich models will not require any further insulation between the oven and hob. It is not recommended to use the Pyro-clean function of an oven while using the hob. Use of sealants The appliance should be fixed to the work-surface using the roll of foam seal provided. Any appliance sealed to the work-surface using silicone sealant or similar may result in damage to both the appliance and work-surface should it need to be removed. The use of sealants may result in the appliance being unserviceable and as such may be excluded from warranty repairs. 9 Installation Guide EN Electrical connection Hook-up of 220-240V ~32 amp Hook-up of 220-240V ~16 amp •Hook-up of 2x230V 2L+2N ~ - 16A •Hook-up of 400V 2N ~ - 16A •Hook-up of 400V 3~ - 16A 10 Help Guide EN Problems on installation Posssible Causes What should you do? A special code / display ap Working normally pears across the ccontrol panel Nothing this code will turn off after 30 seconds or if the zone is turned on Your installation blows a fuse Incorrect electrical connection / trip Only 1 side of the appliance works Incorrect electrical connection Check electrical supply connection The hob produces an odour during the first cooking ses sions Nothing. The smell will disapear with use. New appliance Check electrical supply connection Problems after switching on You observe that Possible causes What should you do? The hob does not operate and The machine is not switched Check electrical supply, mains there are no indicator lights on or correctly connected to switches / circuit breaker / on the display. the power supply. fuses The hob is not working and an The appliance has detected a Call the after sales service “F” code is displayed (Excep fault department tion of “F7” shown on next section) The hob does not function and displays the lock symbol The hob is locked 11 Please refer to child lock fea ture. Help Guide EN Problems while in use You observe that. Possible causes What should you do The hob has stopped working The hob has detected an and “” is displayed also an aud overflow or object covering able beep is heard the controls. Ensure the controls are clean and dry and remove any ob jects that cover them A series of small dashes appears The electronic circuits have across the display or “F7” over heated Check the ventillation for the appliance is in line with this guide. Use correct pan size for zone enssuring it is compatable with induction (ferrous) After turning on a zone the dis play continues to flash The cookware used is either too small for the zone or is unsuitable for induction cooking. The pans make a noise during This is normal for some types Nothing. There is no risk to cooking and the hob produces a of cookware. This is caused either the hob or cookware clicking noise by the transfer of power from the hob to the cookware The fans continue to run at the The fan is cooling the elec Nothing end of cooking tronics and will cut out auto matically The hob cuts out during cooking The electronics have detected a power surge, they have cut out in order to protect the electronics. Switch off the power supply to the appliance and switch back on, resetting the elec tronics. If this does not reset the appliance call After Sales Service Reduction in power while using The boost function will “bor “Boost” / full power on an adja row” power from its adjacent cent zone (front to back) zone (front to back) while using boost. Nothing. This is normal for induction. it is designed to allow the greatest flexability of power output. 12