1
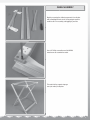
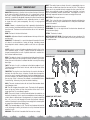
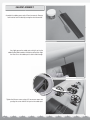
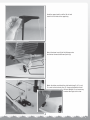
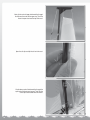
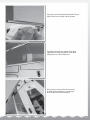
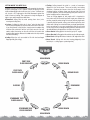
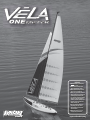
WARNING:
™
➧ NEVER attempt to swim after a
stalled R/C boat!.
➧ Never operate your R/C boat
while standing in the water.
➧ Never operate your R/C boat in
the presence of swimmers.
➧ Always use a Personal Flotation
Device (PFD) when boarding and
operating your retrieval craft,
i.e. Jon boat or duck boat. NOTE:
Because of the sharp running
hardware included with this R/C
boat, we do not recommend a
rubber blow up raft.
➧ R/C boat running hardware is
very sharp. Be very careful
when working on and around
the metal parts.
➧ AquaCraft products are to be
used by ages 14 and over.
aquacraftmodels.com
INTRODUCTION & DESCRIPTION CHANGES
WARRANTY SERVICE
Thank you for purchasing the AquaCraft™ Vela! We want the time you
spend with your new R/C boat to be fun and successful so please
fully read the manual. If for any reason you think this R/C model
is not for you, return it to your local hobby dealer immediately.
Your hobby dealer cannot accept returns on any model after final
assembly or after your boat has been operated.
AquaCraft will warrant your Vela for 90 days after the purchase
from defects in materials or workmanship of original manufacture.
AquaCraft, at their option, will repair or replace at no charge, the
incorrectly made part. This warranty does not cover damage caused
by crash, abuse, misuse, alteration or accident. To return your boat
for service you will need to provide proof of purchase, i.e., your
store receipt or product invoice.
All pictures, descriptions, and specifications found in this instruction
manual are subject to change without notice. AquaCraft maintains
no responsibility for inadvertent errors in this manual.
FEATURES & SPECIFICATIONS
BOAT FEATURES:
Prepainted lightweight fiberglass hull
Pre-assembled preprinted sails
Water-resistant radio hatch
Modern, 1-meter design
Tactic™ TTX242 2.4G two-stick surface radio system
Tactic TSX382 sail winch servo (installed)
Tactic TSX rudder servo (installed)
Prefinished wood boat cradle
Quick and easy final assembly
BOAT SPECIFICATIONS:
Boat Specifications:
Hull Length: 40" [1016mm]
Beam: 6.5" [165mm]
Overall Height: 79" [2006mm]
Weight: 6lbs [2720g]
IN NO EVENT SHALL THE PURCHASER BE ENTITLED TO ANY
INCIDENTAL, SPECIAL, INDIRECT OR CONSEQUENTIAL DAMAGES,
WHETHER RESULTING FROM THE USE, MISUSE OR INABILITY TO
USE THE PRODUCT OR FROM DEFECTS IN THE PRODUCT.
This warranty gives you specific legal rights and you may also
have other rights, which vary from state to state. Outside USA and
Canada, contact local importer for warranty information.
Hobby Services
3002 N. Apollo Drive, Suite 1
Champaign, Illinois 61822
Attn: Service Department
Phone: (217) 398-0007 9:00 am - 5:00 pm Central Time M-F
E-mail: [email protected]
SAFETY PRECAUTIONS
➧ Never, ever, attempt to swim after a stalled R/C boat. DO NOT
get in the water for any reason to retrieve your boat. Your Vela
has flotation added to the interior of the hull and will not sink.
To aid you in retrieving a stalled R/C boat you can use a fishing
real with a tennis ball tied to the end of the line. Or better yet get
yourself a small jon boat so you can row out and pick up your boat.
Remember to use a PFD any time you enter your retrieval craft.
➧ AquaCraft products are to be used by ages 14 and over.
ITEMS REQUIRED
➧ Eight “AA” batteries
➧#2 Phillips® screwdriver
➧ 2.5mm hex wrench
➧ Grease (Grimracer cable grease, AQUB9500)
2
➧ The speed and mass of this boat can inflict property damage and
severe personal injury if a collision occurs. Never run this boat
in the presence of swimmers or where the possibility of collision
with people or property exists.
➧ This boat is controlled by radio signals, which are susceptible to
possible interference from electrical noise.
➧ If your Vela should happen to loose signal, wind and water currents
will slowly carry it to shore. The bad news is that the boat could be
carried to the opposite shore. When surveying areas to run your
model, keep variables in mind such as wind direction, size of the
lake, etc. It is not advisable to run R/C boats on any free-flowing
bodies of water such as creeks or rivers.
CRADLE ASSEMBLY
Begin by removing the sailboat components from the box
and assembling the boat stand. You’re going to need the
cradle to aid in the assembly and rigging of your Vela.
Use a #2 Phillips screwdriver and the M4X16
wood screws to assemble the cradle.
Take note that the support straps go
over (not under) the top bars.
3
SAILBOAT TERMINOLOGY
BACKSTAY: A backstay is the line that runs from the top of the mast
to the stern of the boat. Like other stays, it is a strong wire, rod, or
line that is used to prevent the mast from being blown over. The
backstay is specifically designed to prevent the mast from blowing
forward. Backstays sometimes have adjustable tension in order
to shape the mast (and consequently the sail) in varying wind
conditions.
MAST: The vertical spars on boats. A mast is supported by stays so
that it does not blow over from the force of the sails. The purpose
of the mast is to provide the basic support for the system of sails.
Masts were originally made of wood, then aluminum, and now
they are sometimes made of carbon fiber. The weight of a mast is
extremely important because it cancels out weight in the keel.
MASTHEAD: The top of the mast.
PORT: This is the left side of the boat when aboard and facing the
front (bow). An easy way to remember this is that port and left both
contain four letters.
BOOM: A boom is a horizontal spar that is generally attached to the
mast at one end, and attached to the aft corner of a sail (the clew) at
the other end. The boom is used to hold the sail out in a horizontal
direction.
RUDDER: Blade that turns the boat
BOW: The bow is the front of the boat.
STERN: The back of a boat.
BOWSIES: Adjustment blocks located between the tops of the sails
and the mast.
WEATHER AND LEE HELM: If the boat tends to turn windward, it’s
called weather helm. If the boat tends to turn away from the wind,
it’s called lee helm.
BOWSPRIT: The bowsprit is a spar that extends forward of the hull
of a boat. It can be used for a variety of things, including a more
forward point to attach a forestay and/or a sail such as a spinnaker
or jib.
STARBOARD: This is the right side of the boat when aboard and
facing the front (bow).
CLEAT: A cleat is a piece of hardware designed to hold a line. In the
most traditional sense, a cleat is a piece of metal or wood that is
shaped somewhat like an anvil. A special cleat knot is used to tie a
line to these traditional cleats.
DECK: The deck of a boat is the horizontal outside surface that one
walks upon. When you are outside on a boat, the deck is your floor.
When you are in the cabin of a sailboat the deck is usually the ceiling
above you.
TYING BASIC KNOTS
BOWLINE KNOT:
FOOT: The foot of a sail is a reference to the bottom edge of a sail.
The forward corner of the foot is the tack, and the aft corner of the
foot is the clew.
FORESTAY: The stay that runs from the top of a mast to the bow of
the boat. As with other stays, a forestay is made from strong wire,
rod, or line, and is used to prevent the mast from being blown over.
On some sailboats, the forestay attaches to the mast slightly below
the very top. If this is the case, the sailboat is considered to have a
"fractional rig". A forestay may also be called a headstay.
FIGURE 8 KNOT:
HULL: The main structural outer skin of a boat. Most modern boats
have fiberglass hulls.
JIB: The sail that goes forward of a mast. The leech of a jib generally
does not go any further aft than the position of the mast. If it is
larger than that, it is considered a genoa.
KEEL: The part of a boat's hull that extends below the waterline, on
the boat’s centerline, that is used to counterbalance the tendency of
wind to blow a sailboat over. A keel generally is shaped something
like a fin, so as to cut through the water and prevent sideways
motion of the boat. It also will always have weight at its lowest point
to prevent the sailboat from tipping over.
LUFF: The forward edge of a sail. The luff runs between the head of
a sail (at the top of a mast), to the tack of a sail (at the lower forward
corner of a sail).
MAINSAIL: The sail that is located aft of the mast on a sloop.
4
SQUARE (OR "REEF") KNOT:
BACKSTAY
MAST
MAINSAIL
JIB
BOOM
DECK
STERN
BOW
RUDDER
HULL
KEEL
5
SAILBOAT ASSEMBLY
Assemble the rudder, grease and a 2.5mm hex wrench. Remove
both hatches from the deck by turning the winch drums 90°.
Very lightly grease the rudder post and slip it up into the
rudder stuffing tube located on the bottom of the boat. Align
the tiller arm so the rudder post is able to slide through.
Tighten the tiller arm screw using a 2.5 hex wrench. Make sure
you align the screw with the flat spot on the rudder post.
6
Remove the brass thumb nut from the keel post.
Slip the keel into the hole in the bottom of the hull.
Using the brass thumb nut, tighten the keel in place.
PERFORMANCE TIP:
If you are looking for the ultimate in performance and
don’t foresee the need to remove the keel, you can epoxy
the keel into the bottom of the boat as you assemble it.
You can then very carefully fill and sand the area the keel
around the attachment point to keep drag to a minimum.
The same fill-and-sand procedure can be done where
the counterweight and keel attach as well as around the
screw bosses that hold the counterweight together.
7
Unroll the sails on your work table. The larger sail is
the mainsail and the smaller one is the jib.
Lay out the mast on your work table. You will notice
there are two sections of mast (upper and lower),
along with pre-attached and labeled lines.
Slip the mast joiner into the lower mast. If you feel you have no
need to break down the mast, you can epoxy the halves together;
just remember you are not going to be able to take it back apart.
Place the lower mast into the mast pocket on the top deck
of the hull. You might want to lean the mast against a wall
or have somebody help you stabilize it as you work.
8
Undo the upper hook line of the jib sail and
hook it to front hole of the upper stay.
Attach the lower hook (A) of the jib boom onto
the furthest forward attachment point (A).
Match the letters and attach the side load strings B, C, D, and
E, as well as the backstay line (F). Snug up the blocks to hold
the mast upright. It’s not necessary
to make them tight at this time.
9
Next, slip the mainsail upper attachment line through
the hole near the center of the upper stay. Tie off the
line on the open cleat near the top of the mast.
Open the sail clips and clip the sail on to the mast.
Slip the lower mainsail attachment line through the
open hole of the boom mast mount. Tie off the line
on the open cleat located above the mount.
10
Slip the rear sail line through the back hole of the boom
and tie off the line on the open cleat of the boom.
The longer of the winch lines attaches to the jib by
slipping the line through the guide on the jib boom
and tying off on the forward open cleat.
Attach the last of the winch lines to the mainsail
by sliding the line through the mast and tying it
off on the open cleat on the main boom.
11
SETUP
OPERATION AND TUNING TIPS
1. Install the batteries into both the transmitter and receiver battery
holder.
Make sure your mast does not lean to the left or to the right. Adjust
the line blocks to adjust this.
2. Place the left transmitter stick in the center position. Turn on the
transmitter and then the receiver.
For your first runs, make sure the main mast is straight front to
back. After you have some time on the boat, you can adjust for
weather helm and or lee helm. Adjust (lean) the mast forward to
compensate for weather helm. Adjust (lean) the mast rearward to
compensate for lee helm. Ultimately you want just a small amount
of Weather helm during your run.
3. The large sail servo arm should center as well as the rudder. Move
the left stick to the lowest position for the next step.
4. With the left stick in the lowest position, reposition each sail such
that the sails’ control lines are tight. The mainsail and jib sail should
now be full in and tight.
30°
30°
80°
80°
Adjust the rudder to provide 30° deflection to the right and left. You
can add or remove rudder deflection to your liking, but we have
found 30° to be about best.
80°
SAILING
80°
5. Move the left stick to the full up position. The sails should now
open to 80°. It might be necessary to adjust the full tight position
again as both of these adjustments are dependent on each other.
LAUNCH PROCEDURE
1. Turn “ON” the power to the transmitter and receiver (in that
order). Re-install the hatch covers and turn the winch drums to
secure the covers.
2. Gently place the boat in water that is at least 20" deep and free of
obstacles (weeds, rocks, sticks, ducks, muskrats, etc.). The mast
of the Vela sailboat is NOT A HANDLE. Do not hold the boat by
the mast.
3. When finished running, be sure to turn the power “OFF” to the
receiver and transmitter (in that order).
4. When you are through sailing for the day, remove the keel and
rudder and allow them to dry.
12
Unlike propeller-driven boats that you basically point and accelerate,
sailboats present an interesting challenge. Sailing requires constant
reaction to water movements, wind gusts and direction changes.
These reactions then require adjustment of the rudder and sails in
order to find the best possible course. In some cases, transmitter
adjustments are sufficient. At other times, it will be necessary to
make physically adjust the sails via the rigging lines. There is no
substitute for actual “on-the-water” experience and after your first
couple of outings you may want to re-read this manual to help you
to gain a better understanding of the “art” of sailing. While learning
to sail, it is a good idea to pick up on as much sailing terminology as
possible; this will make it easier to grasp some aspects.
READING THE WIND
When you get to your favorite pond, take a few moments to
observe wind direction, speed, and frequency of gusts and adjust
your sailboat’s rigging as necessary. What follows are guidelines
for tuning your ship’s sails and rigging, but with experience you
will gain the ability to fine-tune your sails and rigging for optimal
performance, regardless of conditions.
➧ For light wind conditions (1-5 mph): Use the adjustment blocks
(bowsies) located between the tops of the sails and the masthead
to tighten the sails so they will respond to the slightest push from
the wind.
➧ For medium wind (6-10 mph): Loosen the sails slightly in order to
find the most efficient combination of sail shape and tension. As a
rough guideline, you will want it somewhere in-between the light
and high wind set-up.
➧ For high wind conditions (11-15 mph): Loosen the jib and
mainsail further. They will be better able to handle the high winds
and your hull will be less likely to lay over on its side.
GETTING WHERE YOU NEED TO GO
Sailboats can easily sail downwind but sailing against the wind can
be quite challenging. In fact, sailboats cannot sail directly into the
wind and attempting to do so will leave you “in irons.” Sailboats can
sail at up to a 45° angle against the wind. Movement against the
wind is known as tacking. Take a moment to study the diagram at
right as you read through these definitions.
➧ Downwind: Sailing with the wind coming from stern (a.k.a.
running and sailing free).
➧ In Irons: A sailboat is said to be “in irons” when the boat stalls
with its bow pointed directly into the wind and no wind in the sails.
If you find yourself in this position, simply move the rudder stick
to either side and hold it until the sails catch some air. You will
need to adjust the tension on the sails with the sail control stick
to get the boat moving. Release the rudder when the ship reaches
the desired heading.
➧ Luffing: When the sails are unable to fill with wind and begin
flapping wildly (like a flag).
➧ Tacking: Sailing towards the wind in a series of maneuvers
diagonal to the wind source. There are basically two tacking
directions. Starboard tack occurs when the wind comes from
starboard and the sail boom hangs over the port side. Port tack
is just the opposite, with the wind coming from port with the sail
boom hanging over the starboard side.
There are varying degrees of tack angle and it is important to
learn when each will be useful and how to get your sailboat into
position, especially when racing. For instance, when trying to reach
a specific position upwind, sailing close-hauled may be the most
direct route. Sailing close-reached allows you to get upwind faster,
but is not as direct. In any case, you basically want the sails to be
full of air and just on the verge of luffing. Here are some terms that
describe different sailing positions in relation to the wind:
➧ Close-Hauled: Sailing against the wind at (up to) 45° angles.
➧ Close-Reached: Sailing against the wind at a much shallower angle.
➧ Beam Reach: Sailing with the boat at about a 90° angle to the wind.
➧ Broad Reach: Sailing with the wind coming diagonally from
behind (a.k.a. sailing large or quartering wind).
BEAM REACH
PORT TACK
CLOSE-REACHED
BROAD REACH
PORT TACK
CLOSE-HAULED
BROAD REACH
DOWNWIND
IN IRONS
BROAD REACH
STARBOARD TACK
CLOSE-HAULED
BROAD REACH
STARBOARD TACK
CLOSE-REACHED
BEAM REACH
13
PLEASE READ BEFORE RUNNING THE VELA SAILBOAT:
➧ NEVER attempt to swim after a stalled or stuck boat! Wait patiently
for the wind currents to return the boat to shore or use a tennis
ball attached to the end of a fishing line to retrieve it.
➧ Sailing the Vela in winds over 15 mph is not advised.
➧ It is dangerous to operate any R/C vehicle when there is insufficient
light.
➧ CAUTION: Windy conditions cause rough water that will affect the
performance of your sailboat and increase the chances of taking
on water.
➧ Your Vela sailboat may occasionally take on small amounts of
water, especially when running in high winds or rough water, or
making tight turns. Keep a roll of paper towels handy and dry
out the hull interior after every run. Check for leaks if you notice
excessive amounts of water in the hull.
➧ IMPORTANT: If, for whatever reason, your boat takes on a large
amount of water causing the electronics to get wet, you must do
the following immediately: Remove the radio equipment from
the boat. Allow the components to air dry completely before
reassembling. Reinstall the components and check for proper
operation before running the boat in water.
➧ Total run time of the Vela sailboat is approximately 45-60 minutes
(assuming you begin with new batteries in the receiver box).
When you notice a decrease in power or sluggish response, it
means the batteries are nearly drained and it’s time to head for
shore. As soon as the boat reaches shore, turn off the power to
the receiver and transmitter (in that order).
MAINTENANCE
Make sure you replace low batteries. Leave the hatch covers off
overnight to allow any water to evaporate from the inside of the hull.
Clean the exterior of the hull with standard household cleaners and
check for any loose knots or screws.
NATIONAL ORGANIZATION
The American Model Yachting Association is a not-for-profit
organization dedicated to promoting the designing, building, racing,
and preservation of all model sailing yachts, and membership is
open to all who are interested in these activities.
theamya.org
14
REPLACEMENT PARTS
To order replacement parts for the AquaCraft Vela use the stock
numbers in the list below. Replacement parts may be purchased
from your local hobby shop or by mail order. If you need help
locating a dealer, visit aquacraftmodels.com and click on “Where to
Buy”. If you are missing parts, contact AquaCraft Product Support
at:
Phone: 217.398.8970
Fax: 217.398.7721
E-mail: [email protected]
AQUB6403
AQUB6465
AQUB6490
AQUB7110
AQUB7500
AQUB7501
AQUB7502
AQUB7825
AQUB7826
AQUB7827
AQUB7828
AQUB8660
AQUB8661
AQUB8662
AQUB8750
AQUB8751
AQUB8802
AQUB8820
Deck Guides and Rigging Cleats
Hatch with Latches
Jib Support with Tie Rod
Sailboat Stand
Keel
Keel and Bulb Thumb Nuts
Keel Bulb with Weight
Main Mast with Blocks
Main and Jib Sail
Mast Head
Main and Jib Boom with Blocks
Rigging Line 12-Meters
Rigging Line Adjuster Blocks
Rigging Line Clips
Rudder
Rudder Control Arm
Spreaders
Sail Clips
15
© 2010 Hobbico® Inc. ➧ AQUB0200 Mnl