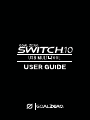
1
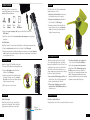
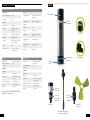
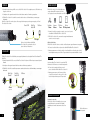
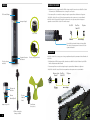
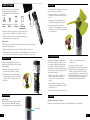
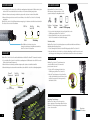
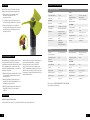
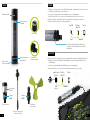
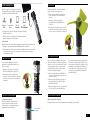
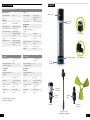
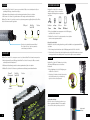
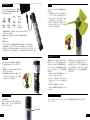
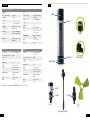
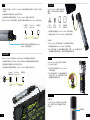
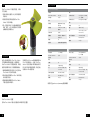
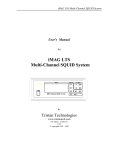
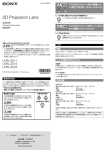
1
Table of Contents
Get To Know Your Gear
2
Charge It
3
Solar Ready™
3
Charge Your Gear
4
Flashlight Tool
4
Flashlight
4
Fan Tool
5
Replaceable Battery
5
Troubleshooting
5
Technical Specifications
6
Español
7-11
Français
12-16
Deutsch
17-21
Italiano
22-26
Nederlands
27-31
日本語
32-36
中文
37-41
1
CHARGE IT
GET TO KNOW YOUR GEAR
1. Using the flip-out charging USB tip, plug Goal Zero Switch 10 into any live USB port and
charge up in 4 hours.
2. Know it’s charging when the blue indicator lights illuminate and flash.
Metal Collar
3. Goal Zero Switch 10 is ready to go when all lights are illuminated and holding steady.
Goal Zero Switch 10 allows for pass-through power so you can charge your gear and
Goal Zero Switch 10 at the same time.
Built-In
Flashlight
USB Port
Goal Zero
Switch 10
Smartphone
USB Output
4 Hrs
1 Recharge
Check the battery level of Goal Zero Switch
10 by pressing the button next to the
indicator lights.
SOLAR READY™
Battery
Indicator Light
Flip-out
Charging Tip
Flip-out Charging Tip
Goal Zero Switch 10 is engineered to charge quickly from Goal Zero’s Nomad ® Solar Panels.
1. Using the flip-out charging USB tip, plug Goal Zero Switch 10 into the USB port on the back
of the Nomad panel.
2. Know it’s charging when the blue lights illuminate and flash.
3. Goal Zero Switch 10 is ready to go when all lights are illuminated and holding steady.
Nomad 7
Solar Panel
4 Hrs
Beam
Adjustment
On/Off
Button
Full Sun
Goal Zero
Switch 10
Smartphone
1 Recharge
On/Off
Button
Fan Tool
Flashlight Tool
(Two Pieces)
Micro-USB Charging Cable
2
3
CHARGE YOUR GEAR
FAN TOOL
Goal Zero Switch 10 Fan is a lightweight
and quiet way to cool off.
Goal Zero Switch 10 is designed to
charge POV cameras, phones, and other
handheld USB-powered gear.
1. Attach the soft fan blades to the motor
by sliding the two pieces together.
7”
Fan
5x
Flashlight
4 Hours
Phone
1x
2. Plug the assembled fan tool into Goal
Zero Switch 10’s USB output.
3. Keeping one hand on the fan slide the
metal collar up one click, and twist the
collar in the direction indicated by the
“tighten” arrow until snug.
Tablet
25% Boost
1. Using your gear’s charging cable, plug into Goal Zero Switch 10’s USB output.
2. Goal Zero Switch 10 will automatically begin charging when you plug in
your gear.
Certified Cables
Goal Zero Switch 10 comes with certified cables to efficiently charge your gear.
1. Plug the included cable into Goal Zero Switch 10’s USB output.
2. Keeping one hand on the cable slide the metal collar up one click, and twist the
collar in the direction indicated by the “tighten” arrow until snug. Be careful not
to over tighten the collar.
FLASHLIGHT TOOL
REPLACEABLE BATTERY
The battery inside the Goal Zero Switch
10 is replaceable. Over time, the lithium
battery inside Goal Zero Switch 10 will lose
its efficiency. If you notice your Goal Zero
Switch 10 isn’t holding a charge, or is no
longer charging your gear as much, it might
be time to replace the battery.
Goal Zero Switch 10 Flashlight is a bright,
110 lumen LED light with an adjustable beam.
1. Plug the flashlight tool into Goal Zero
Switch 10’s USB output.
2. Keeping one hand on the flashlight slide
the metal collar up one click, and twist
the collar in the direction indicated by the
“tighten” arrow until snug.
1. Unscrew the USB charging end (Bottom)
of Goal Zero Switch 10 by grasping the
black cap and twisting to the left.
3. Reattach the black cap and plug Goal
Zero Switch 10 into a live USB port.
You’ll need to purchase the replacement
a Goal Zero 18650 lithium battery from
GoalZero.com – please note, Goal Zero
Switch 10 is not compatible with any other
18650 lithium battery. Our batteries are
engineered with built-in protections and are
optimized to power Goal Zero gear.
2. Remove the old battery and insert the
new Goal Zero 18650 lithium battery in
either direction.
3.Twist the silver collar to focus.
FLASHLIGHT
TROUBLESHOOTING
Built-In Flashlight
Goal Zero Switch 10 Reset:
Goal Zero Switch 10 also comes with a
small, built-in flashlight. Turn it on/off by
lightly pressing the button on the light.
Plug Goal Zero Switch 10 into any live USB port to reset it.
4
Built-In Flashlight Button
5
TECHNICAL SPECIFICATIONS
ESPAÑOL
Goal Zero Switch 10 Recharger
Charge times:
GOAL ZERO Nomad 7
USB Source
Ports:
4-6 hrs
USB port (output)
USB port (input)
Cell chemistry
Li-ion NMC
Cell type
18650 by LG chem/
Chainable
No
Weight
4 oz (113g)
Cell capacity
11Wh (3.7V, 3000mAh)
Dimensions
4.5 x 1 x 1 in (11.4 x 2.5
Lifecycles
hundreds of cycles
Shelf-life
Keep plugged in, or charge
Fuses
none
Management system
Charging and low-battery
protection built-in
Fan Tool
Linterna
Incorporada
5V, up to 1A (5W max)
General:
Samsung
every 3-6 months
Cuello Metálico
regulated
4 hrs
Battery:
5V, up to 1.5A (7.5W max),
Salida USB
x 2.5 cm)
Operating usage
32-104 F (0-40 C)
temp.
Certs: (display as
CE, FCC, ROHS
icons)
Warranty
12 months
Luz Indicadora
de Batería
Flashlight Tool
Fan (output)
5V, 0.35A (1.7W max)
Runtime on Goal Zero
5 hrs
Switch 10
LED (output)
3W, white CREE LED,
110 Lumens
Runtime on Goal Zero
Punta de
Carga
4 hrs
Switch 10
GENERAL:
Chainable
no
Weight
1.3 oz (36 g)
Dimensions
2.4 x 3.5 x 3.5 in (6.2 x
9 x 9 cm)
Operating usage temp.
32-104F (0-40C)
Certs
CE, FCC, ROHS
Warranty
12 months
GENERAL:
Chainable
no
Weight
2 oz (56 g)
Dimensions
2.6 x 1.3 x 1.3 in (6.6 x
3.2 x 3.2 cm)
Operating usage temp.
32-104F (0-40C)
Certs
CE, FCC, ROHS
Warranty
12 months
Ajuste del
haz de luz
Be sure to ACTIVATE YOUR WARRANTY
at goalzero.com/warranty
Botón de
Encendido/
Apagado
Botón de
Encendido/
Apagado
Ventilador
Linterna
6
Punta de carga
(Dos piezas)
Cable de Carga/Punta
de carga certificados
7
CÁRGUELO
CARGUE SU EQUIPO
1.Usando la punta de carga USB conecte el Goal Zero Switch 10 a cualquier puerto USB en directo y
cárguelo en 4 horas.
2.Sabrá que está cargando cuando las luces indicadoras azules se iluminen y parpadeen.
El Goal Zero Switch 10 está diseñado para
cargar cámaras POV cameras, teléfonos,
otros equipos de mano alimentados con USB.
3.El Goal Zero Switch 10 estará listo cuando todas las luces estén iluminadas y se mantengan
iluminadas.
Goal Zero Switch 10 permite el paso de la energía de forma que pueda cargar su equipo y el Goal
Zero Switch 10 a la vez.
Puerto USB
Goal Zero
Switch 10
Teléfonos
7”
Ventilador
5 horas
Linterna
4 horas
Tableta
Teléfonos
1 vez 25% de potencia
1.Usando el cable de carga de su equipo, conecte en el puerto
de salida del USB del Goal Zero Switch 10.
4 Horas
1 Recarga
Revise el nivel de la batería del Goal
Zero Switch 10 presionando el botón
junto a las luces indicadoras.
El Goal Zero Switch 10 está diseñado para cargar rápidamente desde cualquier Panel Solar Nomad ® de
Goal Zero.
1.Usando la punta del USB, conecte el Goal Zero Switch 10 al puerto USB en la parte trasera del panel
Nomad.
2.Sabrá que está cargando cuando las luces azules se iluminen y parpadeen.
3.El Goal Zero Switch 10 estará listo para usarse cuando todas las luces estén iluminadas y se mantengan
iluminadas.
4 Horas
a pleno sol
Cables Certificados
El Goal Zero Switch 10 viene con cables certificados para cargar eficazmente su equipo.
1.Conecte el cable incluido en el puerto de salida USB del Goal Zero Switch 10.
2.Mantenga una mano en el cable y deslice el cuello metálico un clic más, y gire el cuello
hacia izquierda hasta que esté firme. Tenga cuidado de no apretar demasiado el cuello.
SOLAR READY™
Panel Solar
Nomad 7
2.El Goal Zero Switch 10 comenzará a cargar inmediatamente
cuando conecte su equipo.
Goal Zero
Switch 10
Teléfonos
LINTERNA
La Linterna Goal Zero Switch 10 es una luz LED
brillante de 110 lúmenes con haz de luz ajustable.
1.Conecte la herramienta de linterna en el
puerto de salida USB del Goal Zero Switch 10.
2.Mantenga una mano en la linterna y deslice
el cuello de metal un clic más, y gire el cuello
hacia la izquierda hasta que esté apretado.
1 Recarga
LINTERNA INCORPORADA
Linterna incorporada
El Goal Zero Switch 10 también viene con una
pequeña linterna incorporada. Enciéndala/
apáguela presionando suavemente el botón en
la luz.
8
Botón de Linterna
incorporada
9
ESPECIFICACIONES TÉCNICAS
VENTILADOR
El ventilador Goal Zero Switch 10 es una forma
liviana y silenciosa de refrescarse.
Cargador Goal Zero Switch 10
1.Fije las hojas blandas del ventilador al motor
juntando las dos piezas.
GOAL ZERO Nomad 7
4-6 horas
Fuente USB
4 horas
TIEMPO DE CARGA:
2.Conecte la herramienta de ventilador armada
en el puerto de salida USB del Goal Zero
Switch 10.
PUERTOS:
Tipo de célula
Li-ion NMC
Capacidad de célula
11Wh (3.7V, 3000mAh)
Ciclos de vida
Cientos de ciclos
Vida útil
Manténgalo conectado,
Fusibles
Ninguno
Sistema de manejo
Carga y protección
incorporada de batería
5V, hasta 1A (5W máx)
GENERAL:
Conexión en serie
No
Peso
4 oz (113g)
Dimensiones
4.5 x 1 x 1 in (11.4 x 2.5
x 2.5 cm)
o cargue cada 3-6
meses
5V, hasta 1.5A (7.5W
máx), regulado
Puerto USB (entrada)
BATERÍA:
3.Mantenga una mano en el abanico y deslice
el cuello metálico un clic más, y gire el cuello
hacia la izquierda hasta que esté apretado.
Puerto USB (salida)
Temperatura de uso
32-104 F (0-40 C)
operativo
Certificaciones
CE, FCC, ROHS
Garantías
12 meses
baja
PUNTA DE VENTILADOR
BATERÍA REMPLAZABLE
Con el tiempo, la batería de litio en el Goal Zero
Switch 10 perderá su eficacia. Si advierte que
su Goal Zero Switch 10 no retiene una carga o
no está cargando mucho su equipo, puede que
sea tiempo de remplazar la batería.
1.Desenrosque el extremo de carga USB del
Goal Zero Switch 10 sosteniendo la tapa
negra y girándola hacia la izquierda.
PUNTA ATORNILLABLE
Ventilador (salida)
5V, 0.35A (1.7W máx)
Tiempo de ejecución en el
5 horas
Goal Zero Switch 10
Deberá adquirir el remplazo de la batería de litio
Goal Zero 18650 de GoalZero.com – Advierta
que el Goal Zero Switch 10 no es compatible
con ninguna otra batería 18650. Nuestras
baterías están fabricadas con protecciones
incorporadas y están optimizadas para
alimentar equipos Goal Zero.
2.Saque la batería vieja e inserte la nueva
batería de litio Goal Zero 18650 en cualquier
dirección.
3.Vuelva a colocar la tapa negra y conecte el
Goal Zero Switch 10 a un puerto USB en
directo.
LED (salida)
3W, blanca CREE LED,
Tiempo de ejecución en el
4 horas
110 Lúmenes
Goal Zero Switch 10
GENERAL:
Conexión en serie
no
Peso
1.3 oz (36 g)
Dimensiones
2.4 x 3.5 x 3.5 in (6.2 x
Temperatura de uso
32-104F (0-40C)
9 x 9 cm)
GENERAL:
Conexión en
Peso
2 oz (56 g)
Dimensiones
2.6 x 1.3 x 1.3 in (6.6 x
Temperatura de uso
32-104F (0-40C)
3.2 x 3.2 cm)
operativo
Certificados
CE, FCC, ROHS
Garantías
12 meses
no
serie
operativo
Certificaciones
CE, FCC, ROHS
Garantías
12 meses
Asegúrese de ACTIVAR SU GARANTÍA en
goalzero.com/warranty
RESOLUCIÓN DE PROBLEMAS
Reiniciar el Goal Zero Switch 10:
Conecte el Goal Zero Switch 10 a cualquier puerto USB en directo para reiniciarlo.
10
11
CHARGER ET RECHARGER
FRANÇAIS
1.Utilisant la prise de charge articulée USB de charge articulée, branchez votre Goal Zero Switch
10 dans un port USB d’alimentation et rechargez-le en 4 heures.
2.Vous savez qu’il est en mode de recharge lorsque les voyants bleus s’allument et clignotent.
Collier métallique
3.Goal Zero Switch 10 est prêt à fonctionner quand tous les voyants sont et restent allumés.
Goal Zero Switch 10 permet à l’énergie de le traverser, de sorte que vous puissiez charger vos
appareils et votre Goal Zero Switch 10 en même temps.
Lampe intégrée
Port USB
Goal Zero
Switch 10
Téléphone
Sortie USB
4 Heures
une recharge
Pour vérifier le niveau de la batterie de votre Goal
Zero Switch 10, appuyez sur le bouton à côté des
voyants indicateurs.
SOLAR READY™
Voyant indicateur
de batterie
Prise de charge
articulée
Prise de charge articulée
Goal Zero Switch 10 est conçu pour se charger rapidement depuis les panneaux solaires Nomad ® de
Goal Zero.
1.Utilisant la prise USB de charge articulée, branchez votre Goal Zero Switch 10 dans le port USB à
l’arrière d’un panneau solaire Nomad.
2.Vous savez qu’il est en mode de recharge lorsque les voyants bleus s’allument et clignotent.
3.Goal Zero Switch 10 est prêt à fonctionner quand tous les voyants sont et restent allumés.
Panneau solaire
Nomad 7
4 Heures
Réglage du
faisceau
Bouton
Marche/Arrêt
Plein soleil
Téléphone
une recharge
Bouton
Marche/
Arrêt
Ventilateur
Lampe de poche
12
Goal Zero
Switch 10
(Deux pièces)
Câbles et prise de
charge certifiés
13
CHARGEZ VOS APPAREILS
VENTILATEUR
Le Ventilateur Goal Zero Switch 10 est un moyen
léger et silencieux pour se rafraîchir.
Goal Zero Switch 10 est conçu pour charger
appareils photo, téléphones portables et
tout autre appareil de poche alimenté via une
prise USB.
1.Attachez les pales souples au moteur du
ventilateur en glissant et emboitant les deux
pièces.
7”
Ventilateur Lampe de poche
5 Heures
4 Heures
Téléphone
1 recharge
2.Branchez alors l’outil ventilateur dans la
sortie USB de votre Goal Zero Switch 10.
Tablette
25% d’énergie
supplémentaire
3.En gardant un main sur le ventilateur,
déplacez le collier métallique d’un clic vers le
haut, puis serrez le collier en le tournant dans
le sens antihoraire.
1.Utilisant le câble de recharge de votre appareil, branchez-le
dans la prise de sortie USB de votre Goal Zero Switch 10.
2.Goal Zero Switch 10 lancera la recharge automatiquement
lorsque vous brancherez votre appareil.
Câbles certifiés
Goal Zero Switch 10 est livré avec des câbles certifiés afin de charger et recharger
efficacement votre équipement.
1.Branchez le câble fourni dans la sortie USB de votre Goal Zero Switch 10.
2.En gardant une main sur le câble, déplacez le collier métallique d’un clic vers le haut, puis
serrez le collier en le tournant dans le sens antihoraire. Veillez à ne pas trop le serrer.
LAMPE DE POCHE
BATTERIE REMPLAÇABLE
1.Branchez l’outil Lampe de poche dans la
sortie USB de votre Goal Zero Switch 10.
Au fil du temps, la batterie au lithium située à
l’intérieur de votre Goal Zero Switch 10 perdra
de son efficacité. Quand vous remarquez que
votre Goal Zero Switch 10 ne tient plus une
charge efficace, ou n’est plus capable de charger
ou recharger efficacement vos appareils, il faut
alors remplacer la batterie.
2.En gardant une main sur la lampe, déplacez
le collier métallique d’un clic vers le haut, puis
serrez le collier en le tournant dans le sens
antihoraire.
1.Dévissez le bout de la prise USB de votre
Goal Zero Switch 10 en saisissant le
capuchon noir et en le tournant vers la
gauche.
La lampe de poche du Goal Zero Switch 10 est
une puissante DEL de 110 lumens avec faisceau
lumineux réglable.
Goal Zero Switch 10 dans un port USB
d’alimentation.
Vous aurez besoin d’acheter, comme
remplacement, une nouvelle batterie au lithium
Goal Zero 18650 depuis le site GoalZero.com
- Veuillez noter que votre Goal Zero Switch 10
n’est pas compatible avec toute autre batterie au
lithium 18650. Nos batteries sont conçues avec
des protections intégrées et sont optimisées
pour l’alimentation des appareils Goal Zero.
2.Retirez la batterie usagée et insérez une
nouvelle batterie au lithium Goal Zero 18650
peu importe le sens.
3.Rattachez le bouchon noir et branchez votre
LAMPE INTÉGRÉE
DÉPANNAGE
Lampe intégrée
Réinitialiser votre Goal Zero Switch 10
Goal Zero Switch 10 est également équipé d’une
petite lampe intégrée. Allumez/Éteignez-la en
pressant légèrement sur son bouton Marche/Arrêt.
Branchez votre Goal Zero Switch 10 dans un port USB d’alimentation pour le réinitialiser.
Lampe intégrée
14
15
DEUTSCH
SPÉCIFICATIONS TECHNIQUES
Recharger votre Goal Zero Switch 10
TEMPS DE CHARGE :
PORTS :
GOAL ZERO Nomad 7
de 4 à 6 heures
Source USB
4 heures
Li-ion NMC
Capacité de batterie
11Wh (3.7V, 3000mAh)
Durée de vie
Plusieurs centaines de
Entretien de la batterie
5V, jusqu’à 1,5A (7.5W
max), régulé
Prise USB (entrée)
BATTERIE :
Type de batterie
Prise USB (sortie)
5V, jusqu'à 1A (5W max)
Chaînable
Non
Poids
113g
Dimensions
11,4 x 2,5 x 2,5 cm
Laissez-la branchée, ou
Températures d’utilisation
de 0C° à 40C°
Certifications
CE, FCC, ROHS
Garantie
12 mois
3-6 mois
Fusibles
Aucun
Système de gestion
Protections intégrées
Eingebaute
Taschenlampe
GÉNÉRAL :
cycles
rechargez-la tous les
Metallbefestigungsring
USB-Ausgang
de charge et de batterie
faible
Ventilateur
Lampe de poche
Ventilateur (sortie)
5V, 0.35A (1.7W max)
Autonomie sur Goal Zero
5 heures
Switch 10
3W, DEL blanche CREE,
Autonomie sur Goal Zero
4 heures
110 Lumens
Switch 10
GÉNÉRAL :
Chaînable
Non
Poids
36g
Dimensions
6,2 x 9 x 9 cm
Températures d’utilisation
de 0C° à 40C°
Certifications
CE, FCC, ROHS
Garantie
DEL (sortie)
12 mois
N’oubliez pas d’activer votre garantie sur
goalzero.com/warranty
GÉNÉRAL :
Chaînable
Non
Poids
56g
Dimensions
6,6 x 3,2 x 3,2 cm
Températures d’utilisation
de 0C° à 40C°
Certifications
CE, FCC, ROHS
Garantie
12 mois
Batteriestandsanzeige
Ausklappbarer
Ladekontakt
Ausklappbarer
Ladekontakt
Lichtstrahlanpassung
An/AusKnopf
An/AusKnopf
Ventilator
Taschenlampe
16
(zweiteilig)
Zertifiziertes
Ladekabel/Ladekontakt
17
DEINE GERÄTE AUFLADEN
DAS GERÄT AUFLADEN
1.Stecke den Goal Zero Switch 10 mit Hilfe des ausklappbarer ladekontakt USB-Kontakts in jeden
aktiven USB-Port und das Gerät ist innerhalb von 4 Stunden vollständig auf geladen.
2.Wenn die blaue Leuchtanzeige zu blinken beginnt, weißt du, dass sich das Gerät auflädt.
Mit dem Goal Zero Switch 10 können
POV-Kameras, Handys und andere, USBgespeiste Handgeräte aufgeladen werden.
3.Wenn alle Anzeigen leuchten und nicht mehr blinken, ist der Goal Zero Switch 10 vollständig
aufgeladen.
Der Goal Zero Switch 10 ist für Durchlaufstrom ausgelegt, d.h. du kannst deine Geräte und den Goal
Zero Switch 10 zur selben Zeit aufladen.
USB-Port
Goal Zero
Switch 10
Handy
7”
Ventilator
5 Std.
Taschenlampe
4 Std.
Tablet-PC
Handy
einmal 25%Steigerung
1.Stecke einfach das Ladekabel des jeweiligen Geräts in den
USB-Ausgang des Goal Zero Switch 10.
4 Std.
1 Aufladung
Durch Drücken des Knopfs neben den
Anzeigeleuchten kannst du den Batteriestand des
Goal Zero Switch 10 überprüfen.
2.Sobald du das Gerät einsteckst, beginnt der Goal Zero
Switch 10 automatisch mit dem Ladevorgang.
Zertifizierte Kabel
Der Goal Zero Switch 10 wird mit zugelassenen, zertifizierten Kabeln zur effizienten
Aufladung deiner Geräte geliefert.
1.Stecke das mitgelieferte Kabel in den USB-Ausgang des Goal Zero Switch 10.
2.Halte das Kabel mit einer Hand fest, schiebe den Metallring einen Klick nach oben und
dreh ihn gegen den Uhrzeigersinn, bis das Kabel festsitzt. Bitte nicht zu fest anziehen.
SOLAR READY™
Der Goal Zero Switch 10 ist für schnelles Aufladen durch die Goal Zero Nomad ® Solarpaneele konzipiert.
1.Stecke den Goal Zero Switch 10 mit Hilfe des ausklappbaren USB-Kontakts in den USB-Port an der
Rückseite der Nomad Solarpaneele.
2.Wenn die blaue Leuchtanzeige zu blinken beginnt, weißt du, dass sich das Gerät auflädt.
3.Wenn alle Anzeigen leuchten und nicht mehr blinken, ist der Goal Zero Switch 10 vollständig aufgeladen.
Nomad 7
Solarpaneele
4 Std.
volle Sonneneinstrahlung
Goal Zero
Switch 10
Handy
TASCHENLAMPE
Die Goal Zero Switch 10 Taschenlampe hat
ein helles LED-Licht mit 110 Lumen und
justierbarem Lichtstrahl.
1.Stecke die Taschenlampe einfach in den
USB-Ausgang des Goal Zero Switch 10.
2.Halte die Taschenlampe mit einer Hand fest,
schiebe den Metallring einen Klick nach oben
und dreh ihn gegen den Uhrzeigersinn, bis
das Kabel festsitzt.
1 Aufladung
EINGEBAUTE TASCHENLAMPE
Eingebaute Taschenlampe
Der Goal Zero Switch 10 besitzt auch eine
kleine, eingebaute Taschenlampe. Durch leichtes
Drücken des Taschenlampen-Knopfes kannst du
sie an- oder ausstellen.
18
Eingebaute
Taschenlampe
19
TECHNISCHE SPEZIFIKATIONEN
VENTILATOR
Der Goal Zero Switch 10 Ventilator hat kaum
Gewicht und arbeitet annähernd geräuschlos.
Goal Zero Switch 10 Ladegerät
1.Befestige die weichen Ventilatorflügel
am Motor, indem du beide Teile
ineinanderschiebst.
GOAL ZERO Nomad 7
4-6 Std.
USB-Quelle
4 Std.
LADEZEITEN:
2.Stecke den fertig montierten Ventilator in
den USB-Ausgang des Goal Zero Switch 10.
PORTS:
BATTERIE:
3.Halte den Ventilator mit einer Hand fest,
schiebe den Metallring einen Klick nach oben
und dreh ihn gegen den Uhrzeigersinn, bis
das Kabel festsitzt.
Batterieart
Li-ion NMC
Batteriekapazität
11Wh (3.7V, 3000mAh)
Lebensdauer
mehrere Hundert Zyklen
Haltbarkeit
Eingesteckt lassen,
USB-Port
5V, bis zu 1,5A (7,5W
(Ausgangsleistung)
max.), geregelt
USB Port
5V, bis zu 1A (5W max.)
(Eingangsleistung)
ALLGEMEIN:
Verkettungsfähig
Nein
Gewicht
113 g
Abmessungen
11,4 x 2,5 x 2,5 cm
aufladen
Betriebstemperatur
0° – 40°C
Sicherungen
keine
Zertifiziert nach
CE, FCC, ROHS
Energiesystem
Eingebaute
Garantie
12 Monate
oder alle 3 – 6 Monate
Aufladung und
Ladezustandsanzeige
Ventilator
Ventilator
1. Öffne das USB-Ladeende des Goal Zero Switch
10, indem du die schwarze Kappe fasst und
nach links drehst.
LED (Ausgangsleitung)
3W, weißes CREE-LED,
5 Std.
Laufzeit mit Goal Zero
4 Std.
(Ausgangsleistung)
AUSTAUSCHBARE BATTERIE
Die Lithium-Batterie in deinem Goal Zero Switch
10 verliert natürlich mit der Zeit an Leistung.
Sobald du also merkst, dass dein Goal Zero Switch
10 an Ladekraft verliert, oder du deine Geräte
nicht mehr optimal laden kannst, ist es an der Zeit
die Batterie zu wechseln.
Taschenlampe
5V, 0.35A (1.7W max)
Laufzeit mit Goal Zero
Die Ersatz-Goal Zero 18650 Lithium-Batterien
musst du über www.GoalZero.com kaufen.
Beachte hierbei bitte, dass der Goal Zero
Switch 10 nur mit den von uns angebotenen
18650 Lithium-Batterien funktioniert. Unsere
Batterien sind so entwickelt, dass sie über einen
eingebauten Schutz verfügen und alle Goal Zero
Geräte aufladen können.
2. Nimm die alte Batterie heraus und lege eine
neue Goal Zero 18650 Lithium-Batterie ein –
die Richtung spielt keine Rolle.
3. Dreh die schwarze Kappe wieder auf und steck
den Goal Zero Switch 10 in einen aktiven
USB-Port.
110 Lumen
Switch 10
Switch 10
ALLGEMEIN:
ALLGEMEIN:
Verkettungsfähig
Nein
Verkettungsfähig
Gewicht
36 g
Gewicht
Nein
56 g
Abmessungen
6,2 x 9 x 9 cm
Abmessungen
6,6 x 3,2x 3,2 cm
Betriebstemperatur
0° – 40°C
Betriebstemperatur
0° – 40°C
Zertifiziert nach:
CE, FCC, ROHS
Zertifiziert nach
CE, FCC, ROHS
Garantie
12 Monate
Garantie
12 Monate
Bitte vergiss nicht DEINE GARANTIE ZU AKTIVIEREN
unter goalzero.com/warranty
FEHLERSUCHE
Goal Zero Switch 10 Zurücksetzen
Steck den Goal Zero Switch 10 in jeden aktiven USB-Port, um ihn zurückzusetzen.
20
21
ITALIANO
RICARICA
1. Mediante il connettore di ricarica estraibile USB estraibile, collegare Goal Zero Switch 10 in una
qualsiasi porta USB attiva per ricaricarlo in 4 ore.
2. La ricarica è confermata dalle luci blu dell’indicatore accese e lampeggianti.
Collare in metallo
3. Goal Zero Switch 10 è carico e pronto per l’uso quando tutte le luci sono accese e fisse.
Goal Zero Switch 10 consente l’alimentazione contemporanea in modo da poter caricare un
dispositivo e Goal Zero Switch 10 contemporaneamente..
Torcia elettrica
integrata
Porta USB
Goal Zero
Switch 10
Telefoni
Uscita USB
4 ore
1 ricarica
Controllare il livello della batteria di Goal Zero
Switch 10 premendo il pulsante accanto alle luci
dell’indicatore.
SOLAR READY™
Indicatore luminoso
della batteria
Connettore di
ricarica estraibile
Connettore di
ricarica estraibile
Goal Zero Switch 10 è progettato per la ricarica rapida tramite i pannelli solari Nomad ® di Goal Zero.
1. Mediante il connettore USB estraibile, collegare Goal Zero Switch 10 alla porta USB sul retro del
pannello Nomad.
2. La ricarica è confermata dalle luci blu dell’indicatore accese e lampeggianti.
3. Goal Zero Switch 10 è carico e pronto per l’uso quando tutte le luci sono accese e fisse.
pannello solare
Nomad 7
4 ore
Regolazione
del fascio
Pulsante
On/Off
in pieno sole
Telefoni
1 ricarica
Pulsante
On/Off
Ventilatore
Torcia elettrica
22
Goal Zero
Switch 10
(Due elementi)t
Cavo e connettore di
ricarica certificati
23
RICARICA DEI DISPOSITIVI
VENTILATORE
Il ventilatore Goal Zero Switch 10 è un modo
leggero e silenzioso per rinfrescarsi.
Goal Zero Switch 10 è progettato per ricaricare
telecamere POV, telefoni cellulari e altri dispositivi
portatili provvisti di alimentazione USB.
1. Fissare le pale morbide del ventilatore al
motore facendo scorrere i due elementi
insieme.
7”
Ventilatore
5 ore
Torcia elettrica
4 ore
Telefoni
1 ricarica
2. Collegare lo strumento ventilatore
assemblato all’uscita USB di Goal Zero
Switch 10.
Tablet
25% di ricarica
3. Con una mano sul ventilatore far scorrere il
collare in metallo di una posizione verso l’alto
e ruotare in senso antiorario fino a stringerlo.
1. Collegare il cavo di ricarica del dispositivo all’uscita USB di
Goal Zero Switch 10.
2. Goal Zero Switch 10 avvierà la ricarica automaticamente
quando il dispositivo viene collegato.
Cavi certificati
Goal Zero Switch 10 è dotato di cavi certificati per la ricarica efficiente dei dispositivi.
1. Collegare il cavo in dotazione all’uscita USB di Goal Zero Switch 10.
2. Con una mano sul cavo far scorrere il collare in metallo di una posizione verso l’alto
e ruotare in senso antiorario fino a stringerlo. Fare attenzione a non stringere
eccessivamente il collare.
BATTERIA SOSTITUIBILE
TORCIA ELETTRICA
Nel corso del tempo, la batteria al litio interna
del caricatore Goal Zero Switch 10 perde la sua
efficacia. Se ci si accorge che Goal Zero Switch
10 non mantiene la carica o che non ricarica
a sufficienza i dispositivi, potrebbe essere il
momento di sostituire la batteria.
La torcia elettrica Goal Zero Switch 10 è
un’intensa luce a LED di 110 lumen con un
fascio orientabile.
1. Collegare lo strumento torcia elettrica
all’uscita USB di Goal Zero Switch 10.
1. Svitare l’estremità di ricarica USB di Goal
Zero Switch 10 afferrando il cappuccio nero
e girando a sinistra.
2. Con una mano sulla torcia elettrica far
scorrere il collare in metallo di una posizione
verso l’alto e ruotare in senso antiorario fino
a stringerlo.
È necessario acquistare la batteria al litio Goal
Zero 18650 sostitutiva sul sito GoalZero.com.
Si prega di notare che Goal Zero Switch 10 non è
compatibile con altre batterie al litio 18650. Le
nostre batterie sono progettate con protezioni
incorporate e sono ottimizzate per alimentare
dispositivi Goal Zero.
2. Rimuovere la vecchia batteria e inserire la
nuova batteria Goal Zero 18650 al litio in
una delle due direzioni.
3. Rimontare il cappuccio nero e collegare Goal
Zero Switch 10 in una porta USB attiva.
TORCIA ELETTRICA INTEGRATA
RISOLUZIONE DEI PROBLEMI
Torcia elettrica integrata
Ripristino di Goal Zero Switch 10
Goal Zero Switch 10 è inoltre dotato di
una piccola torcia elettrica incorporata.
Per l’accensione e lo spegnimento premere
leggermente il pulsante sulla luce.
Collegare Goal Zero Switch 10 a una qualsiasi porta USB attiva per ripristinarlo.
24
Torcia elettrica
integrata
25
SPECIFICHE TECNICHE
NEDERLANDS
Caricabatterie Goal Zero Switch 10
TEMPI DI RICARICA:
PORTE:
GOAL ZERO Nomad 7
4-6 ore
Porta USB
4 ore
BATTERIA:
Porta USB (uscita)
5 V, fino a 1,5 A
regolata
Porta USB (ingresso)
Ioni di litio NMC
Capacità della cella
11Wh (3.7V, 3000mAh)
Numero di cicli di ricarica
Centinaia di cicli
Possibilità di collegare più
Durata di conservazione
Tenere la batteria
caricatori
collegata o caricarla ogni
Peso
113 g (4 oz)
Dimensioni
11,4 x 2,5 x 2,5 cm (4,5
Temperatura ottimale di
0 °C - 40 °C (32 F -
Fusibili
Nessuno
Management system
Protezione integrata di
ricarica e di basso livello
di carica
Ventilatore
Ventilatore (uscita)
INFORMAZIONI
GENERALI:
utilizzo
104 F)
Certificazioni
CE, FCC, ROHS
Garanzia
12 mesi
LED (uscita)
5 ore
Durata di funzionamento
INFORMAZIONI
INFORMAZIONI
GENERALI:
Batterijstatuslampje
3 W, LED CREE bianco,
110 lumen
con Goal Zero Switch 10
4 ore
Possibilità di collegare più
Flip-out
oplaadplug
no
dispositivi
Peso
36 g (1,3 oz)
Peso
56 g (2 oz)
Dimensioni
6,2 x 9 x 9 cm (2,4 x 3,5
Dimensioni
6,6 x 3,2 x 3,2 cm (2,6 x
Temperatura ottimale di
0 °C - 40 °C (32 F -
x 3,5 in)
0 °C - 40 °C (32 F -
1,3 x 1,3 in)
utilizzo
104 F)
utilizzo
104 F)
Certificazioni
CE, FCC, ROHS
Certificazioni
CE, FCC, ROHS
Garanzia
12 mesi
Garanzia
12 mesi
Lichtstraal
verstelbaar
Aan/Uit
toets
Assicurarsi di attivare la garanzia
su goalzero.com/warranty
Aan/Uit
knop
Ventilator
Zaklamp
26
Flip-out oplaadlug
GENERALI:
no
dispositivi
Temperatura ottimale di
USB-uitgang
Torcia elettrica
5 V, 0,35 A (massimo
con Goal Zero Switch 10
Possibilità di collegare più
No
x 1 x 1 in)
1,7 W)
Durata del funzionamento
Ingebouwde
zaklamp
5 V, fino a 1 A (massimo 5 W)
Tipo di cella
3 - 6 mesi
Metalen ring
(massimo 7,5 W),
(Twee stuks)
Gecertificeerde
oplaadkabel / oplaadplug
27
OPLADEN
UW APPARATEN OPLADEN
1.Sluit de Goal Zero Switch 10 aan op een werkende USB-poort met behulp van de flip-out
oplaadlug USB plug, en laad in 4 uur tijd op.
2.De blauwe indicatielampjes aan de bovenkant gaan branden tijdens het opladen.
3.De Venture 30 is klaar voor gebruik wanneer alle lampjes aanhoudend branden.
De Goal Zero Switch 10 is ontworpen
om POV camera’s, telefoons en andere
draagbare USB-aangedreven apparaten
op te laden.
7”
De Goal Zero Switch 10 geeft de stroom door, zodat uw apparaten tegelijkertijd met de Goal Zero
Switch 10 kunnen worden opgeladen.
USB-poort
Goal Zero
Switch 10
Telefoon
Ventilator
5 uur
zaklamp
4 uur
Telefoon
1 keer
Tablet
25% boost
1.Plug de oplaadkabel van uw apparaat in de USB-uitgang
van de Goal Zero Switch 10.
4 Uur
1 Recharge
2.De Goal Zero Switch 10 begint automatisch met opladen
wanneer u uw apparaat aansluit.
Gecertificeerde kabels
Controleer het batterijniveau van de Goal
Zero Switch 10 door op de knop naast de
controlelampjes te drukken.
De Goal Zero Switch 10 wordt geleverd met gecertificeerde kabels om je apparatuur efficiënt
op te laden.
1.Sluit de meegeleverde kabel aan op de USB-uitgang van de Goal Zero Switch 10.
2.Schuif terwijl u één hand op de kabel houdt de metalen ring één klik naar boven, en draai
de ring tegen de klok in totdat hij vastzit. Pas op dat u de ring niet te vast aandraait.
SOLAR READY™
De Goal Zero Switch 10 is ontworpen om snel op te laden via Goal Zero Nomad ® zonnepanelen.
1.Met behulp van de flip-out USB plug, sluit de Goal Zero Switch 10 aan op de USB-poort aan de
achterzijde van het Nomad paneel.
2.De blauwe indicatielampjes aan de bovenkant gaan branden tijdens het opladen.
3.De Goal Zero Switch 10 is klaar voor gebruik wanneer alle lampjes aanhoudend branden.
Nomad 7
Zonnepaneel
4 Uur
uur volle zon
Goal Zero
Switch 10
Telefoon
ZAKLAMP
De Goal Zero Switch 10 Zaklamp is een heldere,
110 lumen LED-lamp met een verstelbare
lichtbundel.
1.Plug de zaklamp tool in de USB-uitgang van
de Goal Zero Switch 10.
2.Schuif met één hand op de kabel de metalen
ring één klik naar boven, en draai de ring
tegen de klok in totdat hij vastzit.
1 Recharge
INGEBOUWDE ZAKLAMP
Ingebouwde zaklamp
Goal Zero Switch 10 wordt geleverd met een
kleine, ingebouwde zaklamp. Zet hem aan/uit
door een lichte druk op de knop op het licht.
Ingebouwde
zaklamp
28
29
TECHNISCHE SPECIFICATIES
VENTILATOR
De Goal Zero Switch 10 Ventilator is licht van
gewicht en een rustige manier om af te koelen.
Goal Zero Switch 10 Oplader
LAADTIJDEN:
1.Bevestig de zachte ventilatorbladen aan
de motor door de twee stukken in elkaar te
schuiven.
2.Steek de gemonteerde ventilator in de USBuitgang van de Goal Zero Switch 10.
POORTEN:
GOAL ZERO Nomad 7
4-6 uur
USB Bron
4 uur
BATTERIJ:
3.Schuif met één hand op de kabel de metalen
ring één klik naar boven, en draai de ring
tegen de klok in totdat hij vastzit.
Celtype
Li-ion NMC
Celcapaciteit
11Wh (3.7V, 3000mAh)
Levenscycli
honderden cycli
Houdbaarheid
Houd aangesloten, of laad
USB-poort (uitgang)
5V, tot 1.5A (7,5 W max),
USB-poort (ingang)
5V, tot 1A (5W max)
gereguleerd
ALGEMEEN:
Aaneenschakelbaar
Nee
Gewicht
4 oz (113g)
Afmetingen
4.5 x1 x 1 inch (11,4 x
Operationele
32-104 F (0-40 C)
2,5 x 2,5 cm)
elke 3-6 maanden op
Zekeringen
geen
Management systeem
Oplading- en lege batterij
beschreming ingebouwd
Ventilator
Ventilator (output)
1.Schroef het USB oplaad-einde van Goal Zero
Switch 10 los door de zwarte dop vast te
grijpen en naar links te draaien.
CE, FCC, ROHS
Garantie
12 maanden
Zaklamp
3W, white CREE LED,
LED (output)
3W, wit CREE LED, 110
Looptijd op de Goal Zero
4 uur
110 Lumens
VERVANGBARE BATTERIJ
Na verloop van tijd zal de lithium batterij in
Goal Zero Switch 10 zijn efficiëntie verliezen.
Als u merkt dat uw Goal Zero Switch 10 geen
stroom meer vasthoudt, of uw apparaten niet
meer zoveel oplaadt, is het misschien tijd om de
batterij te vervangen.
gebruikstemperatuur
Certificaten
Looptijd op de Goal Zero
U kunt de vervangende Goal Zero 18.650
lithium batterij kopen bij GoalZero.com - let
wel, de Goal Zero Switch 10 is niet compatibel
met andere 18.650 lithium batterijen. Onze
batterijen zijn ontworpen met ingebouwde
beveiligingen en zijn geoptimaliseerd voor het
aandrijven van Goal Zero apparaten.
2.Verwijder de oude batterij en plaats de
nieuwe Goal Zero 18.650 lithium batterij in
één van beide richtingen.
3.Bevestig de zwarte dop en sluit de Goal Zero
Switch 10 op een werkende USB-poort aan.
5 uur
Lumens
Switch 10
Switch 10
ALGEMEEN:
ALGEMEEN:
Aaneenschakelbaar
Nee
Aaneenschakelbaar
Nee
Gewicht
1.3 oz (36 g)
Gewicht
2 oz (56 g)
Afmeting
2.4 x 3.5 x 3.5 inch (6.2
Afmeting
2.6 x 1.3 x 1.3 inch (6.6
32-104F (0-40C)
Operationele
32-104F (0-40C)
Certificaten
CE, FCC, ROHS
Certificaten
CE, FCC, ROHS
Garantie
12 maanden
Garantie
12 maanden
x 9 x 9 cm)
Operationele
gebruikstemperatuur
x 3.2 x 3.2 cm)
gebruikstemperatuur
Zorg dat u uw GARANTIE ACTIVEERT via
goalzero.com/warranty
PROBLEEMOPLOSSING
Resetten van de Goal Zero Switch 10
Plug de Goal Zero Switch 10 in een werkende USB-poort om het te resetten.
30
31
日本語
充電する
1.フリップアウトUSBチップを使ってGoal Zero Switch 10を電気供給可能なUSBポートにつなぎ、4
時間で充電します。
2.インジケータの青色ライトが点滅して充電中であることをお知らせします。
3.すべてのライトが点灯すれば、Goal Zero Switch 10は使える状態になっています。
金属カラー
Goal Zero Switch 10はパススルー電力が使えるので、機器とGoal Zero Switch 10を同時に充電で
きます。
内蔵の懐中
電灯
USB Port
Goal Zero
Switch 10
携帯電話
USB出力
4 時間
1回充電
インジケータライトの隣にあるボタンを押して
Goal Zero Switch 10のバッテリーレベルを確認
して下さい。
SOLAR READY™
バッテリーインジ
ケータ・ライト
フリップアウ
ト充電チップ
フリップアウト充電チップ
Goal Zero Switch 10はGoal ZeroのNomad ® ソーラーパネルから急速に充電ができるように設計さ
れています。
1.フリップアウトUSBチップを使ってGoal Zero Switch 10をNomadソーラーパネルの背面にある
USBポートにつなぎます。
2.青色ライトが点滅して充電中であることをお知らせします。
3.すべてのライトが点灯すれば、Goal Zero Switch 10は使える状態になっています。
Nomad 7
ソーラーパネル
4 時間
ビーム調整
オン/オフ ボタン
Goal Zero
Switch 10
携帯電話
1回充電
オン/オフ ボタン
ファン
(2個の部品)
懐中電灯
認定充電ケーブル/充電チップ
32
33
機器を充電する
ファン
Goal Zero Switch 10ファンは軽量で静かな冷
却方法です。
1.2個の部品をいっしょにすべらせて柔らかいフ
ァンブレードをモーターに取り付けて下さい。
2.つながったファンツールをGoal Zero Switch
10のUSB出力ポートに差し込みます。
3.片手をファンに置いたまま、金属カラーをすべ
らせカチッと止めてください。カラーを左回り
にひねりしっかりと締めます。
Goal Zero Switch 10はPOVカメラ、携帯電
話、その他のUSB駆動の携帯機器を充電する
ように設計されています。
7”
扇風機
5 時間
懐中電灯
4 時間
携帯電話
1回
タブレット
25%増強
1.機器付属の充電ケーブルを使い、Goal Zero Switch 10のUSB
出力ポートにつなぎます。
2.機器がつながれた時 Goal Zero Switch 10は自動的に充電を
開始します。
認定充電ケーブル
Goal Zero Switch 10には機器を効率的に充電する認定ケーブルが付属します。
1.付属の充電ケーブルを Goal Zero Switch 10のUSB出力ポートにつなぎます。
2.片手をケーブルに置いたまま、金属カラーをすべらせカチッと止めてください。カラー
を左回りにひねりしっかりと締めます。カラーを締めすぎないように注意して下さい。
交換可能なバッテリー
懐中電灯
時間が経つにつれ、Goal Zero Switch 10の内
蔵リチウムバッテリーはその効率が失われます。
もしGoal Zero Switch 10が充電状態を保持し
ないようであれば、あるいは機器を充分に充電
しなくなったとすれば、バッテリーの交換時期と
思われます。
1.Goal Zero Switch 10のUSB側の黒いキャップ
をつかみ、左にねじって外します。
2.古いバッテリーを取り外し、新しいGoal Zero
18650リチウムバッテリーを一方方向に挿入し
て下さい。
3.黒いキャップを再装着して、Goal Zero
Switch 10を電気供給が可能なUSBポートにつ
なぎます。
Goal Zero Switch 10 懐中電灯は、調整可能な
ビームを備えた明るい110ルーメンのLEDライ
トです。
1.懐中電灯ツールをGoal Zero Switch 10のUSB
出力ポートにつなぎます。
2.片手を懐中電灯に置いたまま、金属カラーをす
べらせカチッと止めてください。カラーを左回
りにひねりしっかりと締めます。
交換用にはGoal Zeroの18650リチウムバッテリ
ーを GoalZero.comにてお買い求め下さい。 –
他の18650リチウムバッテリーは互換性がありま
せんのでご注意下さい。当社のバッテリーは内蔵
保護の設計がなされ、Goal Zero機器用に最適化
されています。
トラブルシューティング
内蔵の懐中電灯
内蔵の懐中電灯
Goal Zero Switch 10には更に小さな内蔵ライト
が備わっています。ライトの上にあるボタンを軽
く押してオン/オフします。
Goal Zero Switch 10 リセット Goal Zero Switch 10を電気供給が可能なUSBポートに差し込ん
でリセットします。
内蔵の懐中電灯
34
35
中文
技術仕様
Goal Zero Switch 10 充電器
充電時間:
ポート:
GOAL ZERO Nomad 7
4-6 時間
USB電源
4 時間
リチウムイオン NMC
セル容量
11Wh (3.7V, 3000mAh)
ライフサイクル
数百サイクル
保存期間
差し込んだまま維持、ま
なし
管理システム
充電および低バッテリ保
護を内蔵
ファン
5V, 1A (最大5W)まで
連鎖の可不可
不可
内置闪光灯
重量
4オンス (113g)
寸法
4.5 x 1 x 1 インチ (11.4
x 2.5 x 2.5 cm)
操作使用の温度
USB输出
華氏32-104 F (摂氏
0-40 C)
認証
CE, FCC, ROHS
保証
12ヶ月
懐中電灯
ファン (出力)
5V, 0.35A (最大1.7W)
Goal Zero Switch 10のラ
5時間
LED (出力)
3W, 白色 CREE LED,
110ルーメン
Goal Zero Switch 10のラ
ンタイム
4時間
电池电量指示灯
ンタイム
一般:
連鎖の可不可
不可
重量
1.3オンス (36 g)
寸法
2.4 x 3.5 x 3.5 インチ
(6.2 x 9 x 9 cm)
操作使用の温度
金属套环
一般:
たは3-6ヶ月ごとに充電
ヒューズ
5V, 1.5A (最大7.5W)ま
で。安定化
USBポート (入力)
バッテリー:
セル型
USBポート (出力)
認証
CE, FCC, ROHS
保証
12ヶ月
旋转式充电端头
一般:
連鎖の可不可
不可
重量
2 オンス (56 g
寸法
2.6 x 1.3 x 1.3 インチ
(6.6 x 3.2 x 3.2 cm)
華氏32-104F (摂氏
0-40C)
旋转式充电端头
操作使用の温度
華氏32-104F (摂氏
0-40C)
認証
CE, FCC, ROHS
保証
12ヶ月
goalzero.com/warrantyにて必ず保証をアクティブにして下さい。
光束调节
开/关按钮
开/关按钮
风扇
闪光灯
(2只)
认证充电电缆/充电端头
36
37
充电
对设备充电
1.用旋转式USB端头,将 Goal Zero Switch 10插入任何通电的USB端口,可以在4个小时以内
充满电。
2.当蓝色指示灯亮起并闪烁时,表示其正在充电。
Goal Zero Switch 10被设计用来对POV
摄像机、手机及其他手持式USB供电设
备充电。
3.当所有指示灯亮起并保持稳定时,Goal Zero Switch 10随时可以进行充电
7”
Goal Zero Switch 10允许电流通过,因此您可以同时对设备和Goal Zero Switch 10进行充电。
USB端口
4个小时
Goal Zero
Switch 10
智能手机
风扇
5-10小时
闪光灯
6小时
手机
1次
平板电脑
(升压25%)
1.将设备的充电电缆插入 Goal Zero Switch 10的USB输出。
2.当您插入设备后,Goal Zero Switch 10会自动开始充电。
4 小时
1二次充电
通过按下指示灯旁边的按钮来检查 Goal Zero
Switch 10电池电量的大小。
认证电缆
Goal Zero Switch 10配有认证电缆,可以对设备进行快速充电。
1.将配套的电缆插入Goal Zero Switch 10的USB输出。
2.用一只手按住电缆,向上推动金属套环直至听到“咔嗒”一声,然后按逆时针方向
旋转金属套环直至其紧固为止。注意不要将金属套环拧得过紧。
SOLAR READY™
Goal Zero Switch 10可以用Goal Zero的Nomad ® 太阳能充电板进行快速充电。
1.用旋转式USB端头,将Goal Zero Switch 10插入Nomad太阳能充电板背面的USB端口。
2.当蓝色指示灯亮起并闪烁时,表示其正在充电。
3.当所有指示灯亮起并保持稳定时,Goal Zero Switch 10随时可以进行充电。
Nomad7
太阳能充电板
4 小时
Goal Zero
Switch 10
智能手机
闪光灯
Goal Zero Switch 10闪光灯是110流明LED
灯,光束大小可以调节。
1.将闪光灯充电电缆插入Goal Zero Switch
10的USB输出。
2.用一只手按住闪光灯,向上推动金属套环直
至听到“咔嗒”一声,然后按逆时针方向旋
转金属套环直至其紧固为止。
1二次充电
内置闪光灯
内置闪光灯
Goal Zero Switch 10还配有一只小的内置闪
光灯。轻轻按下闪光灯上的按钮即可开启/关
闭闪光灯。
内置闪光灯
38
39
风扇
主要技术参数
Goal Zero Switch 10风扇材质较轻,冷却时
不产生噪音。
Goal Zero Switch 10充电器
充电时间:
端口:
1.将两片风扇叶片推紧在一起,即可安装软的
风扇叶片。
GOAL ZERO Nomad 7
4-6 小时
2.将装好的风扇的充电电缆插入Goal Zero
Switch 10的USB端出。
USB电源
4 小时
电池:
电池类型
3.用一只手按住风扇,向上推动金属套环直至
听到“咔嗒”一声,然后按逆时针方向旋转
金属套环直至其紧固为止。
电池容量
锂离子NMC(镍、猛、
可链接
否
11Wh(3.7V,3000
重量
4盎司(113g)
尺寸
4.5 x1 x 1英寸(11.4 x
可充电次数
几百次
闲置期间
持续充电,或每隔3-6个
保险丝
无
保护系统
内置充电和低电量保护系统
风扇
1.握紧黑色螺帽并向左边旋转,可以拧开Goal
Zero Switch 10的USB充电端。
(1.7W 最大)
Goal Zero Switch 10
5小时
2.拔出旧电池并将新的Goal Zero 18650锂电
池以任意方向插入。
3.重新安装黑色螺帽并将Goal Zero Switch
10插入通电的USB端口。
CE, FCC, ROHS
保修期
12个月
LED灯(输出)
3w,白色CREE LED
灯,110流明
4小时
运行时间
可链接
否
重量
1.3盎司(36g)
2.4 x 3.5 x 3.5英寸(6.2
x 9 x 9cm)
正常工作温度范围
32-104F(0-40C)
认证
CE, FCC, ROHS
保修期
32-104F(0-40C)
认证
Goal Zero Switch 10
综述:
尺寸
2.5 x 2.5 cm)
正常工作温度范围
闪光灯
风扇(输出)
运行时间
您必需在Goal Zero.com购买替换用的Goal
Zero 18650锂电池——注意,Goal Zero
Switch 10与任何其他18650锂电池均不匹
配。我们的电池内置保护装置,并经过优化,
以便为Goal Zero装置充电。
5V,高达1A(5W 最大)
综述:
钴)电池
月充电1次
经过一段时间的使用后,Goal Zero Switch
10内部锂电池的性能会消失。如果您发现
Goal Zero Switch 10不能持续充电,或对设
备的充电效果不如以前,可能需要更换电池。
5V,高达1.5A(7.5w最
大)(经调节)
USB端口(输入)
毫安时)
可替换电池
USB端口(输出)
12个月
综述:
可链接
否
重量
2盎司(56g)
尺寸
2.6 x 1.3 x 1.3英寸 (6.6
x 3.2 x 3.2 cm)
正常工作温度范围
32-104F(0-40C)
认证
CE, FCC, ROHS
保修期
12个月
请勿忘记在goalzero.com/warranty激活保修期
故障排除
Goal Zero Switch 10重置
将Goal Zero Switch 10插入任何通电的USB端口并进行重置。
40
41
GOAL ZERO HEADQUARTERS
675 West 14600 South
Bluffdale, UT 84065
Designed in the U.S.A.
Made in China
1-888-794-6250
For translation in Italiano, 日本語,中文, and
Nederlands go to goalzero.com/userguide
Goal Zero Switch and Nomad are
trademarks of Goal Zero LLC.
Apple, Android, and Windows are
trademarks of Apple Inc., Google Inc., and
Microsoft Corp.
42
We make the powerless, powerful.
goalzero.com/sharethesun