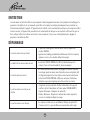
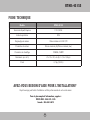
1
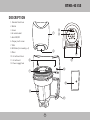
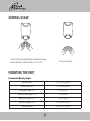
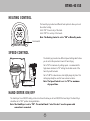
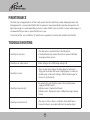
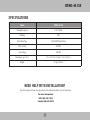
Owner's Manual RTHD-431SS TOUCHLESS AUTOMATIC HAND DRYER Page en Français 13 Please read and retain these instructions. USA: www.royalsovereign.com Canada: www.royalsovereign.ca Royal Sovereign International, Inc. TOUCHLESS AUTOMATIC HAND DRYER Model RTHD-431SS INTRODUCTION Thank you for choosing Royal Sovereign Touchless Automatic Hand Dryer. Please read and retain these instructions. This manual will provide you with valuable information necessary for the proper instructions, care and maintenance of your hand dryer. Installation should be done by a qualified electrican. Improper installation, alteration, service and use of this hand dryer can result in serious personal injury or damage to the unit. If you have questions regarding the installation, use or operation of the hand dryer, please call Royal Sovereign customer service. Because our products are subject to continuous improvement, Royal Sovereign reserves the right to modify product design and specifications without notice and without incurring any obligation. E&OE CONTENTS IMPORTANT SAFETY INFORMATION∙∙∙∙∙∙∙∙∙∙∙∙∙∙∙∙∙∙∙∙∙∙∙∙ 4 DESCRIPTION∙∙∙∙∙∙∙∙∙∙∙∙∙∙∙∙∙∙∙∙∙∙∙∙∙∙∙∙∙∙∙∙∙∙∙∙∙∙∙∙∙∙∙∙∙ 5 GENERAL USAGE∙∙∙∙∙∙∙∙∙∙∙∙∙∙∙∙∙∙∙∙∙∙∙∙∙∙∙∙∙∙∙∙∙∙∙∙∙∙∙∙∙∙ 6 MOUNTING THE UNIT∙∙∙∙∙∙∙∙∙∙∙∙∙∙∙∙∙∙∙∙∙∙∙∙∙∙∙∙∙∙∙∙∙∙∙∙∙∙ 6 HEATING CONTROL∙∙∙∙∙∙∙∙∙∙∙∙∙∙∙∙∙∙∙∙∙∙∙∙∙∙∙∙∙∙∙∙∙∙∙∙∙∙∙∙ 7 SPEED CONTROL∙∙∙∙∙∙∙∙∙∙∙∙∙∙∙∙∙∙∙∙∙∙∙∙∙∙∙∙∙∙∙∙∙∙∙∙∙∙∙∙∙∙ 7 PLUG-IN-READY OPERATION∙∙∙∙∙∙∙∙∙∙∙∙∙∙∙∙∙∙∙∙∙∙∙∙∙∙∙∙∙∙ 8 INSTALLATION INSTRUCTION - STEP 1∙∙∙∙∙∙∙∙∙∙∙∙∙∙∙∙∙∙∙∙∙ 8 INSTALLATION INSTRUCTION - STEP 2∙∙∙∙∙∙∙∙∙∙∙∙∙∙∙∙∙∙∙∙∙ 9 MAINTENANCE∙∙∙∙∙∙∙∙∙∙∙∙∙∙∙∙∙∙∙∙∙∙∙∙∙∙∙∙∙∙∙∙∙∙∙∙∙∙∙∙∙∙ 10 TROUBLESHOOTING∙∙∙∙∙∙∙∙∙∙∙∙∙∙∙∙∙∙∙∙∙∙∙∙∙∙∙∙∙∙∙∙∙∙∙∙∙ 10 SPECIFICATIONS∙∙∙∙∙∙∙∙∙∙∙∙∙∙∙∙∙∙∙∙∙∙∙∙∙∙∙∙∙∙∙∙∙∙∙∙∙∙∙∙∙ 11 LIMITED THREE YEAR WARRANTY∙∙∙∙∙∙∙∙∙∙∙∙∙∙∙∙∙∙∙∙∙∙∙ 12 PAGE EN FRANÇAIS∙∙∙∙∙∙∙∙∙∙∙∙∙∙∙∙∙∙∙∙∙∙∙∙∙∙∙∙∙∙∙∙∙∙∙∙∙∙ 13 IMPORTANT SAFETY INFORMATION Please read this manual thoroughly prior to installation to reduce the risk of fire, electric shock, or personal injury. PLEASE NOTE THE FOLLOWING PRECAUTIONS: 1. Do not allow the hand dryer to be used for any purpose other than drying hands. Use this unit only in the manner intended. 2. If service is required, turn the power OFF. 3. Any metallic items in contact with the hand dryer must be grounded. 4. The hand dryer is designed for indoor use only. 5. If the electrical outlet you intend to use is not adequately grounded, you should have a qualified electrician install the proper outlet. 6. Do not use this unit with any extension cords or adapter plugs. 7. If the cord or plug is damaged in any way, please call the Royal Sovereign Service Department. 8. Do not plug this cord into a loose electrical outlet. 9. Do not block air outlets or intake with obstacles. 10. Do not insert any objects into the hand dryer. 11. To clean the housing, use a soft cloth. Do not use any abrasive cleaning material as it may scratch the unit. Do not spray any cleaning liquids or water in the direction of the hand dryer. 4 RTHD-431SS DESCRIPTION 1. Stainless Steel Cover 2. Nozzel 3. Sensor ① 4. Air nozzel outlet ③ ④ 5. Heat ON/OFF 6. Tamper proof screws 7. Filter 8. Drill Holes (for mounting x 4) ② 9. Motor 10. Circuit board Cover 11. Circuit board ⑤ ⑧ ⑥ 12. Power suppyly hole ⑫ ⑦ ⑩ ⑨ ⑪ 5 GENERAL USAGE The hand dryer will automatically be activated when placing hands underneath - maximum distance 12 cm (4.7 in.) To stop, remove hands MOUNTING THE UNIT Recommended Mounting Heights Men's Restroom 122-127 cm (48-50 in.) Women's Restroom 117-122cm (46-48 in.) Kindergarten (Ages 3-6) 81cm (32 in.) Elementary School (Ages 7-10) 91cm (36 in.) Middle School (Ages 10-13) 102 cm (40 in.) High School (Ages 14-18) 114-120cm (45-47 in.) Handicap Mounting 91.5-96.5cm (36-38 in.) 6 RTHD-431SS HEATING CONTROL The hand dryer provides two different heat options to allow you to set the comfort setting. Set to "ON" for warm dry of the hand. Set to "OFF" for cool dry of the hands. Note: The Heating Control is set to "ON" or Warm Dry mode. Heat switch SPEED CONTROL The hand dryer provides two different speed settings which allow you to control the speed and sound of hand drying. Set to "HI" for maximum dry setting speed - recommended for high volume locations. In "HI" setting, the decibel sound of the hand dryer will be louder. Set to "LOW" for reduced noise, but slightly longer dry time. This setting may ideally be used for lower volume locations. High/Low Seting ON/OFF Seting Note: The Speed Control is set to "HI" for maximum dry speed time. HAND DRYER ON/OFF The hand dryer has a ON/OFF setting on the circuit board to allow you to turn ON/OFF the hand dryer. The Hand Dryer should be set to "OFF" position during installation. Note: The Hand Dryer is set to "ON". The unit will work "out of the box" once the power cable connection is connected. 7 L Motor M Heating wire PLUG-IN-READY OPERATION 120V~ Inductive head socket N The Royal Sovereign hand dryer provides maximum flexibility when installing the hand dryer. The hand dryer is plug and play ready. Simply connect 3 wires to the terminal slots - Positive (L), Negative (N), and Ground (T). A hard-wire option is also available, for those who do not want to use the supplied power supply. Simply use your own power cable (14 AWG or better) INSTALLATION INSTRUCTION - STEP 1 Plug-and-play Ready Operation To prepare the hand dryer for "plug and play" ready operation, proceed as follows: 1. Use the supplied Allen key and remove the stainless steel hand dryer cover. 2.Remove the circuit board cover of the circuit board. Run the supplied power cable though the back power supply hole. 3. Attach the negative cable to the negative terminal (labeled N). 4. Attach the ground cable to the ground terminal (labeled T). 5. Attach the positive cable to the positive ground terminal (labeled L). 6. Proceed to the second step of installation. Hard Wire Operation You have the option of utilizing the supplied power cord, or utilizing you own wires. To utilize the supplied power cord, proceed as per the instructions "Plug and Play Ready Operation" to utilize your own wires. 1. Install 1/2" electrical connector in the pack part of the housing in the hole located above the circuit board. 2. Feed wires though the power supply hole (14 AWG or better); tighten clamp down on wire. 3. Connect the wires to the slots on the terminal marked NLT. 8 RTHD-431SS INSTALLATION INSTRUCTION - STEP 2 1. Select the ideal mounting location for the hand dryer. Refer to Mounting the Unit for ideal height placement. 2. Use the supplied drill hole template sheet and proceed to mark and drill the holes as indicated. 3. If not done already, use the supplied Allen key and remove the hand dryer cover from the base. 4. During installation, ensure the Power button is turned "OFF" - ON/OFF button is located on the circuit board - refer to Page 7 - HAND DRYER ON/OFF. 5. For plug-and-play operation, plug into the electrical outlet, ensuring the power supply cable is not exposed. For hardwired installation, ensure that the unit has the required power and is connected properly. 6. Select the Motor Setting (HI/LOW) to be utilized and ensure the POWER selector switch is turn "ON". Select Heat ON/ Heat OFF option (Preset to Heat On - Refer to Page 7 of Manual "Heating Control"). Test the setting selected by placing your hand underneath the hand dryer. 7. Place the stainless steel cover back on the hand dryer unit and tighten the screws. 145mm 190mm 190mm 200mm 145mm Fig1 Fig2 Fig4 Fig3 Fig5 9 MAINTENANCE This hand dryer is equipped with an air filter to help prevent dust and debris from possibly damaging the motor and heating element. It is recommended that the filter be replaced or cleaned periodically to maintain ideal operation. For high volume usage it is recommended that you clean or replace the filter every six months. For lower volume usage, it is recommended that you clean or replace the filter once a year. To clean the air filter, use a soft bristle 1/2" paint brush or equivalent to clean the dust and debris from the filter. TROUBLESHOOTING Hand Dryer is not warm ∙The Heat option is turned OFF. Set to the ON position. ∙Possible defective heat element. Needs to be replaced. Call Royal Sovereign customer service. Hand Dryer air output is slow ∙M otor setting is set to LOW. Change setting to HI. Hand Dryer is loud ∙There are two motor settings. HI setting allows for faster hand drying, but the decibel (dB) sound is slightly higher. To reduce the decibel sound, set the motor setting to LOW (it will take longer for the user to dry the hands). Hand Dryer does not start ∙No power to the unit. Check the power to the unit (both power supply and ON/OFF switch). ∙Defective sensor - Replace the IR sensor . ∙Defective motor - Replace the motor. Call Royal Sovereign customer service. Hand Dryer will not shut off ∙The sensor is dirty or there is a reflection. Clean the IR Sensor. Ensure that there is no possible reflection from another object. 10 RTHD-431SS SPECIFICATIONS Model RTHD-431SS Voltage/Frequency 110 V, 60 Hz IP Rating IP24 Motor Rate/Type 25,000 RPM Brush Motor Motor Setting HI/LOW Heat Setting ON/OFF Dimensions (w x d x h) 21 x 19 x 32.5 cm (8.2 x 7.4 x 12.8 in.) Weight 4.7 kg (10.5 lb.) NEED HELP WITH INSTALLATION? Royal Sovereign can help arrange professional certified installation of your hand dryer. For more information: USA: 800-397-1025 Canada: 866-961-6673 11 LIMITED FIVE YEAR WARRANTY This warranty applies to repair or replacement of product found to be defective in material or workmanship for five years from the date of the original purchase (3 Year Motor). This warranty is extended only to the original purchaser. This warranty does not apply to damage resulting from abuse, misuse, or improper maintenance of damage that is attributable to acts of nature. Royal Sovereign International, Inc. (and its affiliated companies) is not liable for incidental or consequential damages of any nature. This limitation would not apply if you live in those areas that do not permit the exclusion or limitation of incidental or consequential damages. Defective products for warranty repair or replacement cannot be returned without a Return Authorization number. Please go to www.royalsovereign.com USA-Customer Support Tab to make a request for an Office Product Return Authorization. Defective products must be returned to Royal Sovereign International Consumer Return Department, freight prepaid, with proof of purchase and Return Shipping and Handling payment (check or money order). Upon repair or replacement the product will be returned to the customer. ROYAL SOVEREIGN INTERNATIONAL, INC. 2 Volvo Drive Rockleigh, NJ 07647 USA TEL : +1) 800-397-1025 FAX : +1) 201-750-1022 RS CANADA INC. 5610 Timberlea Blvd, Mississauga Ontario L4W 4M6 CANADA TEL : +1) 905-461-1095 TF # : +1) 866-961-6673 FAX : +1) 905-461-1096 www.royalsovereign.com www.royalsovereign.ca 12 Manuel de l'utilisateur RTHD-431SS SÈCHE-MAINS AUTOMATIQUE SANS CONTACT Veuillez lire et retenir ces instructions. É.-U. : www.royalsovereign.com Canada : www.royalsovereign.ca Royal Sovereign International, Inc. SÈCHE-MAINS AUTOMATIQUE SANS CONTACT Modèle RTHD-431SS INTRODUCTION Merci d'avoir choisi le Sèche-mains automatique sans contact de Royal Sovereign. Veuillez lire et retenir ces instructions. Le présent manuel fournit de précieux renseignements nécessaires à l'entretien approprié de votre sèche-mains. L'installation doit être effectuée par un électricien qualifié. L'installation, la modification, l'entretien et l'utilisation inappropriés de ce sèche-mains peuvent provoquer des lésions corporelles graves ou endommager l'appareil. Si vous avez des questions relatives à l'installation, l'utilisation ou l'exploitation du sèche-mains, veuillez appeler le service à la clientèle de Royal Sovereign. Parce que nos produits font constamment l'objet d'améliorations, Royal Sovereign se réserve le droit de modifier le modèle et la fiche technique sans avis ni obligation de la part du fabricant. SEO TABLE DES MATIÈRES CONSIGNES DE SÉCURITÉ IMPORTANTES∙∙∙∙∙∙∙∙∙∙∙∙∙∙∙∙∙ 16 DESCRIPTION∙∙∙∙∙∙∙∙∙∙∙∙∙∙∙∙∙∙∙∙∙∙∙∙∙∙∙∙∙∙∙∙∙∙∙∙∙∙∙∙∙∙∙ 17 UTILISATION GÉNÉRALE∙∙∙∙∙∙∙∙∙∙∙∙∙∙∙∙∙∙∙∙∙∙∙∙∙∙∙∙∙∙∙∙∙ 18 INSTALLATION DE L'APPAREIL∙∙∙∙∙∙∙∙∙∙∙∙∙∙∙∙∙∙∙∙∙∙∙∙∙∙∙ 18 RÉGULATION DU SYSTÈME DE CHAUFFAGE∙∙∙∙∙∙∙∙∙∙∙∙∙∙∙ 19 COMMANDE DE VITESSE∙∙∙∙∙∙∙∙∙∙∙∙∙∙∙∙∙∙∙∙∙∙∙∙∙∙∙∙∙∙∙∙∙ 19 MISE EN MARCHE DÈS LE BRANCHEMENT∙∙∙∙∙∙∙∙∙∙∙∙∙∙∙∙ 20 INSTRUCTIONS D'INSTALLATION - ÉTAPE 1∙∙∙∙∙∙∙∙∙∙∙∙∙∙ 20 INSTRUCTIONS D'INSTALLATION - ÉTAPE 2∙∙∙∙∙∙∙∙∙∙∙∙∙∙ 21 ENTRETIEN∙∙∙∙∙∙∙∙∙∙∙∙∙∙∙∙∙∙∙∙∙∙∙∙∙∙∙∙∙∙∙∙∙∙∙∙∙∙∙∙∙∙∙∙∙ 22 DÉPANNAGE∙∙∙∙∙∙∙∙∙∙∙∙∙∙∙∙∙∙∙∙∙∙∙∙∙∙∙∙∙∙∙∙∙∙∙∙∙∙∙∙∙∙∙∙∙ 22 FICHE TECHNIQUE∙∙∙∙∙∙∙∙∙∙∙∙∙∙∙∙∙∙∙∙∙∙∙∙∙∙∙∙∙∙∙∙∙∙∙∙∙∙∙ 23 GARANTIE LIMITÉE DE TROIS ANS∙∙∙∙∙∙∙∙∙∙∙∙∙∙∙∙∙∙∙∙∙∙∙ 24 CONSIGNES DE SÉCURITÉ IMPORTANTES Lire ce manuel entièrement avant de procéder à l'installation de l'appareil. Pour réduire les risques d'incendie, de choc électrique ou de lésions corporelles. VEUILLEZ TENIR COMPTE DES CONSIGNES SUIVANTES : 1. Ne pas permettre que le sèche-mains soit utilisé à des fins autres que le séchage des mains. Utiliser cet appareil conformément à la méthode d'utilisation prévue. 2. Si l'entretien est nécessaire, COUPER l'alimentation au préalable. 3. Tout élément métallique en contact avec le sèche-mains doit être mis à la terre. 4. Le sèche-mains ne doit s'utiliser qu'à l'intérieur. 5. Si la prise électrique que devant être utilisée n'est pas reliée à la terre convenablement, faire installer une prise appropriée par un électricien qualifié. 6. Ne pas utiliser cet appareil avec un cordon prolongateur ou un adaptateur de fiche. 7. Si le cordon d'alimentation ou la prise électrique est endommagé d'une quelconque manière, appeler le Service technique de Royal Sovereign. 8. Ne pas brancher le cordon d'alimentation de cet appareil sur une prise électrique qui ne serait pas assez serrée. 9. Ne pas obstruer les prises d'air de l'appareil avec quelque objet que ce soit. 10. N'introduire aucun objet dans le sèche-mains. 11. Utiliser un chiffon doux pour nettoyer l'enveloppe de l'appareil. Ne pas utiliser un agent de nettoyage abrasif, car il peut rayer l'appareil. Éviter de vaporiser des liquides de nettoyage ou de l'eau directement sur le sèche-mains. 16 RTHD-431SS DESCRIPTION 1. Couvercle en acier inoxydable 2. Buse 3. Capteur ① 4. Bouche individuelle d'aération ③ ④ 5. Chauffage EN MARCHE/ARRÊT 6. Vis inviolables 7. Filtre ② 8. Trous de fixation (pour le montage x 4) 9. Moteur ⑤ 10. Couvercle de circuits imprimés ⑥ 11. Carte de circuits imprimés ⑧ 12. Trou d'alimentation ⑫ ⑦ ⑩ ⑨ ⑪ 17 UTILISATION GÉNÉRALE Le sèche-mains s'active automatiquement lorsque vous placez les mains en dessous - distance maximale 12 cm (4,7 po) Dès que vous retirez vos mains, il cesse de fonctionner INSTALLATION DE L'APPAREIL Hauteurs de fixation recommandées Toilettes pour hommes 122-127 cm (48-50 po) Toilettes pour femmes 117-122cm (46-48 po) École maternelle (3 - 6 ans) 81cm (32 po) École élémentaire (7 - 10 ans) 91cm (36 po) École intermédiaire (10 - 13 ans) 102 cm (40 po) École secondaire (14 - 18 ans) 114-120cm (45-47 po) Hauteur d'installation pour handicapés 91,5 - 96,5 cm (36-38 po) 18 RTHD-431SS RÉGULATION DU SYSTÈME DE CHAUFFAGE Commutateur de chaleur Le sèche-mains offre deux options de chauffage différentes qui vous permettent de régler les paramètres de confort. Régler l'appareil à « ON » (marche) pour sécher les mains à chaud. Régler l'appareil à « OFF » (arrêt) pour sécher les mains à froid. Remarque : la régulation du système de chauffage se règle à « MARCHE » ou au mode Séchage à chaud. COMMANDE DE VITESSE Fonction Vitesse maximale/ Vitesse minimale Fonction MARCHE/ARRÊT Le sèche-mains offre deux modes de réglage différents de la vitesse qui vous permettent de contrôler la vitesse et la sonorité du séchage des mains. Régler l'appareil à « HI » pour obtenir la vitesse de séchage maximale - recommandée pour les emplacements où l'appareil est très utilisé. Pour ce qui est de la fonctionnalité « HI », l'intensité sonore en décibel du sèche-mains sera plus forte. Régler l'appareil à « VITESSE MINIMALE » pour réduire la sonorité produite, mais la durée de séchage est légèrement plus longue. Cette fonction serait idéale pour les emplacements où l'appareil est faiblement utilisé. Remarque : la commande de vitesse se règle à « HI »pour obtenir la vitesse de séchage maximale. SÈCHE-MAINS EN MARCHE (ON)/ARRÊT (OFF) Le sèche-mains possède une fonction Marche (ON)/Arrêt (OFF) sur la carte de circuit imprimés qui vous permet de METTRE le sèche-mains en MARCHE ou de l'ARRÊTER. Le Sèche-mains devrait être en position « ARRÊT » durant l'installation. Remarque : la fonction « MARCHE » est sélectionnée pour le sèche-mains, l'appareil fonctionne 'dès son installation' une fois que le cordon d'alimentation est branché. 19 L Moteur M Fil chauffant FONCTIONNEMENT DÈS LE BRANCHEMENT 120V~ Prise à tête inductive N Le sèche-mains Royal Sovereign offre une flexibilité maximale lors de son installation. Dès qu'il est branché, il se met en marche immédiatement. Brancher simplement 3 fils sur les points de raccordement du terminal - Positif (L), Négatif (N), et terre (T). Une option de connexion par fil est disponible, pour ceux qui n'aimeraient pas utiliser le cordon d'alimentation fourni. Utiliser simplement son propre cordon d'alimentation (14 AWG ou un modèle supérieur) INSTRUCTIONS D'INSTALLATION - ÉTAPE 1 Brancher et mettre l'appareil en marche Pour préparer le sèche-mains en vue de son 'fonctionnement dès le branchement', procéder comme suit : 1. Utiliser la clef Allen fournie et retirer le couvercle en acier inoxydable du sèche-mains. 2. Retirer le couvercle de la carte de circuits imprimés. Passer le cordon d'alimentation fourni à travers le trou d'alimentation. 3. Brancher le câble négatif sur le point de raccordement du terminal négatif (portant la marque N). 4. Brancher le conducteur de terre sur la mise à la masse (portant la marque T). 5. Brancher le câble positif sur la borne positive à la masse (portant la marque L). 6. Passer à la deuxième phase de l'installation. Utilisation du câble Vous pouvez utiliser le cordon d'alimentation fourni ou vos propres câbles. Pour utiliser le cordon d'alimentation fourni, suivre les instructions données dans la section 'Fonctionnement dès le branchement'. Pour utiliser vos propres câbles. 1. Installer le connecteur électrique de 1/2 po dans la partie de l'enveloppe réservée à cet effet dans le trou situé au-dessus de la carte de circuits imprimés. 2. Alimenter les fils à l'aide du trou d'alimentation (14 AWG ou une version supérieure); serrer les brides sur le câble vers le bas. 3. Brancher les fils sur les points de raccordement du terminal marqués NLT. 20 RTHD-431SS INSTRUCTIONS D'INSTALLATION - ÉTAPE 2 1. Sélectionner l'emplacement d'installation idéal du sèche-mains. Voir les instructions d'installation de l'appareil relatives à la hauteur d'installation idéale. 2. Utiliser la feuille modèle des trous de fixation fournie et procéder au marquage et à la création de trous comme indiqué. 3. Si cela n'a pas encore été fait, utiliser la clef Allen pour retirer le couvercle du sèche-mains de la base. 4. Durant l'installation, s'assurer que la touche de MISE EN MARCHE est en 'ARRÊT' - La touche MARCHE/ARRÊT est située sur la carte de circuits imprimés - voir la page 19 - MISE EN MARCHE/ARRÊT DU Sèche-MAINS. 5. Concernant le Fonctionnement dès le branchement, brancher l'appareil sur la prise électrique, en s'assurant que le cordon d'alimentation n'est pas exposé. Pour ce qui est de l'installation câblée, s'assurer que l'appareil est alimenté et branché convenablement. 6. Sélectionner la Fonction (HI/LOW) du moteur à utiliser et s'assurer que le commutateur d'ALIMENTATION est en position 'MARCHE'. Sélectionner l'option Chauffage EN MARCHE/Chauffage EN ARRÊT - (L'appareil est réglé d'avance à la position Chauffage EN MARCHE - Voir la page 19 du Manuel portant sur la 'Régulation du système de chauffage'). Tester les fonctions sélectionnées en plaçant la main sous le sèche-mains. 7. Replacer le couvercle an acier inoxydable sur le Sèche-mains et serrer les vis. 145mm 190mm 190mm 200mm 145mm Fig1 Fig2 Fig4 Fig3 Fig5 21 ENTRETIEN Ce sèche-mains est doté d'un filtre à air qui empêche l'endommagement du moteur et du système de chauffage par la poussière et les débris. Il est recommandé que le filtre soit remplacé ou nettoyé périodiquement pour maintenir un fonctionnement idéal de l'appareil. Si l'appareil est très sollicité, il est recommandé de nettoyer ou de remplacer le filtre tous les six mois. Si l'appareil très peu utilisé, il est recommandé de nettoyer ou de remplacer le filtre une fois par an. Pour nettoyer le filtre à air, utiliser une brosse à soies souples de 1/2 po ou un outil équivalent pour dégager la poussière et les débris du filtre. DÉPANNAGE Le sèche-mains n'est pas chaud ∙L'option de chauffage est MISE EN ARRÊT. Mettre l'appareil en position MARCHE. ∙Système de chauffage probablement défectueux. Doit être remplacé. Appeler le service à la clientèle de Royal Sovereign. Le débit d'air du sèche-mains est lent ∙L a fonction VITESSE MINIMALE (LOW) est sélectionnée pour le moteur. Passer à la fonctionnalité HI (vitesse maximale). Le sèche-mains est sonore ∙Le moteur possède deux options de réglage. La fonction HI permet le séchage rapide des mains, mais l'intensité sonore en décibels (dB) est légèrement plus forte. Pour réduire cette intensité, sélectionner la fonction VITESSE MINIMALE (LOW) pour le moteur (l'utilisateur attendra un peu plus longtemps pour faire sécher ses mains). Le sèche-mains ne se met pas en marche ∙L'appareil n'est pas alimenté. Vérifier l'alimentation de l'appareil (vérifier à la fois l'alimentation et l'interrupteur MARCHE/ARRÊT). ∙Capteur défectueux - Remplacer le capteur IR. ∙Moteur défectueux - Remplacer le moteur. Bien vouloir appeler le service à la clientèle de Royal Sovereign. Le sèche-mains ne s'arrête pas ∙Le capteur est sale ou il y a une réflexion. Nettoyer le capteur IR. S'assurer qu'il n'y a pas de réflexion provenant d'un autre objet. 22 RTHD-431SS FICHE TECHNIQUE Modèle RTHD-431SS Tension électrique/fréquence 110 V, 60 Hz Indice de protection IP24 Régime/type de moteur Moteur à balais à 25 000 T/M Paramètres du moteur Vitesse maximale (Hi)/Vitesse minimale (Low) Paramètres de chauffage MARCHE / ARRÊT Dimensions (w x d x h) 21 x 19 x 32,5 cm (8,2 x 7,4 x 12,8 po) Poids 4,7 kg (10,5 lb.) AVEZ-VOUS BESOIN D'AIDE POUR L'INSTALLATION? Royal Sovereign peut faciliter l'installation certifiée professionnelle de votre sèche-mains. Pour de plus amples d'informations, appeler : ÉTATS-UNIS : 800-397-1025 Canada : 866-961-6673 23 GARANTIE LIMITÉE DE 5 ANS Cette garantie prévoit la réparation ou le remplacement d'un produit comportant un vice de matériau ou de fabrication pendant cinq ans à partir de la date de l'achat initial (assurance moteur de 3 ans). La garantie n'est offerte qu'à l'acheteur d'origine. Cette garantie ne couvre pas les dommages causés par l'abus, le mésusage, l'entretien inapproprié ou les dommages attribuables aux calamités naturelles. Royal Sovereign International, Inc. (et ses filiales) n'accepte aucune responsabilité pour les dommages consécutifs ou indirects, quelle que soit leur nature. Cette restriction ne s'applique pas si vous résidez dans une région qui ne permet pas l'exclusion ou la restriction des dommages consécutifs ou indirects. Les produits défectueux couverts par la garantie en vue de la réparation ou du remplacement ne peuvent pas être retournés sans un numéro d'autorisation de retour. Bien vouloir accéder à www.royalsovereign.com, USA, onglet Soutien à la clientèle, pour présenter une demande d'autorisation de retour d'article de bureau (Office Product Return Authorization). Les produits défectueux doivent être expédiés au service à la clientèle de Royal Sovereign International, port payé, et accompagnés d'une preuve d'achat et du paiement des frais de port et de manutention pour le retour (chèque ou mandat postal). Suivant la réparation ou le remplacement, le produit sera retourné au client. ROYAL SOVEREIGN INTERNATIONAL, INC. RS CANADA INC. 5610 Timberlea Blvd, Mississauga Ontario L4W 4M6 CANADA TÉL. : 1 905 461-1095 Numéro SF : 1 866 961-6673 TÉLÉC. : 1 905 461-1096 2 Volvo Drive Rockleigh, NJ 07647 ÉTATS-UNIS TÉL. : 1 800 397-1025 TÉLÉC. : 1 201 750-1022 www.royalsovereign.com www.royalsovereign.ca 24