1
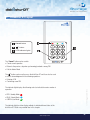
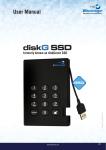
User Manual
iStorage diskAshur DT ® Manual – v 3.2
Remember to save your PIN in a safe place.
If lost or forgotten, there is no way to access the drive.
If you are having difficulty using your diskAshur DT® drive please contact our technical department at
email address - [email protected] or by phone on +44 (0) 20 8991 6260.
www.istorage-uk.com
#1
Copyright © iStorage, Inc 2011. All rights reserved.
Windows is a registered trademark of Microsoft Corporation.
All other trademarks and copyrights referred to are the property of their respective owners.
Distribution of modified versions of this document is prohibited without the explicit permission of the copyright holder.
iStorage diskAshur DT® Manual – v 3.2
Distribution of the work or derivative work in any standard (paper) book form for commercial purposes is prohibited unless prior permission is
obtained from the copyright holder.
DOCUMENTATION IS PROVIDED AS IS AND ALL EXPRESS OR IMPLIED CONDITIONS, REPRESENTATIONS AND WARRANTIES, INCLUDING ANY
IMPLIED WARRANTY OF MERCHANTABILITY, FITNESS FOR A PARTICULAR PURPOSE OR NON-INFRINGEMENT, ARE DISCLAIMED, EXCEPT TO
THE EXTENT THAT SUCH DISCLAIMERS ARE HELD TO BE LEGALLY INVALID
All trademarks and brand names are the
property of their respective owners.
#2
www.istorage-uk.com
Table of Contents
Introduction.....................................................................................................................................4
Box contents....................................................................................................................................4
1. diskAshur DT Layout.................................................................................................................5
2. Connecting the diskAshur DT...................................................................................................6
3. How do I use the diskAshur DT the first time?...........................................................................7
4. What if I forget the User PIN?....................................................................................................7
5. Entering the Standby Mode.......................................................................................................8
6. Entering the User Mode............................................................................................................8
7. Exiting the User Mode...............................................................................................................8
8. Entering the Admin Mode.........................................................................................................9
9. Exiting the Admin Mode............................................................................................................9
10. Changing the Admin PIN........................................................................................................10
11. Adding a new User PIN...........................................................................................................11
12. Deleting the User PINs............................................................................................................11
13. Changing the User PIN...........................................................................................................11
14. Setting the Unattended Auto Lock Feature...............................................................................12
15. Brute Force Protection............................................................................................................13
16. Setting a Self Destruct PIN......................................................................................................14
17. Completely resetting the diskAshur DT...................................................................................15
iStorage diskAshur DT ® Manual – v 3.2
18. Initializing and formatting the diskAshur DT after a complete reset.........................................15
19. Hibernating, Suspending, or Logging off ...............................................................................17
20. Troubleshooting .....................................................................................................................18
21. Technical Support ..................................................................................................................22
22. Warranty and RMA information...............................................................................................22
www.istorage-uk.com
#3
Introduction
Looking for an effortless way to secure your data? Look no further than the diskAshur DT.
With an easy-to-use keypad design and software free setup, the diskAshur DT enables you to access the drive
with your own unique PIN. Featuring 256 bit hardware encryption and a super-fast USB 3.0 connection, the diskAshur DT
provides seamless real-time hardware encryption, keeping your data safe 24/7.
iStorage diskAshur DT® Manual – v 3.2
Box contents
•diskAshur DT® Drive
•Universal Mains Adapter
•USB Cable
•Quick Start Guide
#4
www.istorage-uk.com
1. diskAshur DT Layout
1
2
3
Cancel button
button
LED Indicator lights
The “Cancel” button can be used to:
• Cancel current operation
• Return to the previous step when you knowingly entered a wrong PIN
• Exit the Admin Mode
The
button can be used to access the diskAshur DT and it can also be used
as an OK acknowledgement in the following operations:
• Entering a PIN
• Confirming a new PIN
iStorage diskAshur DT ® Manual – v 3.2
The indicator light displays the following colors to indicate the various modes of
operation:
• RED: Standby Mode
• BLUE: Admin Mode
• GREEN: User Mode
The indicator light has other display methods to indicate different status of the
diskAshur DT. Details are provided later in this chapter.
www.istorage-uk.com
#5
2. Connecting the diskAshur DT
Be sure to review the following information before you begin to use the diskAshur DT.
Attention: Use only the included cables with your diskAshur DT.
You might damage the drive if you use a cable not included with the diskAshur DT.
1. Ensure that the power switch on the back of the diskAshur DT is in the OFF position.
2. Connect the diskAshur DT to a power outlet using the included AC Adapter.
3. Attach the USB cable to the diskAshur DT drive and to an available USB port on your computer.
4. Turn the power switch on the back of the diskAshur DT to the ON position.
Off
O
iStorage diskAshur DT® Manual – v 3.2
On
|
5. The LED indicator light should turn RED, indicating that the drive is now ready to use.
#6
www.istorage-uk.com
3. How do I use the diskAshur DT the first time?
You can use it in one of the following ways:
• Enter the Admin Mode with 123456 (default administrator PIN),
and then you are able to change the Admin PIN or create a User PIN.
• Directly enter the Secure User Mode with 123456 (default Admin PIN)
to use the diskAshur DT.
4. What if I forget the User PIN?
Use your Admin PIN to enter Admin Mode, and then create another User PIN in Admin Mode.
NOTE: If you forget or lose your ADMIN PIN there is no way to access the drive. Even an IStorage
employee will be unable to help you access your data. In the event that this happens, the only way to use
the drive is to do a complete reset, which will reset the encryption key making all data on the drive
unrecoverable and restore the to the default Admin PIN 123456.
See the Chapter “Completely Resetting the diskAshur DT” for instructions.
iStorage diskAshur DT ® Manual – v 3.2
www.istorage-uk.com
#7
5. Entering the Standby Mode
The Standby Mode is the default mode of the diskAshur DT and is the gateway to other operations.
To enter the Standby Mode, attach the diskAshur DT to your computer. The drive automatically goes into Standby Mode and
the LED indicator light turns RED. In this mode, the diskAshur DT is locked. It cannot be recognized by My Computer and it
does not provide either the regular functions or the encryption function. However, it enables you to enter and switch between
the Admin Mode and the User Mode.
Attention: To switch between the Admin Mode and the User Mode, you are required to switch to the
Standby Mode first, and then you can enter the mode of your choice.
6. Entering the User Mode
To enter the User Mode, do the following:
1. Attach the drive to your computer and to a power outlet using the AC Adapter.
Turn the power switch to the ON position. The drive will be in Standby Mode.
2. Enter the User PIN or the Admin PIN (the default Admin PIN is 123456) and
press
. The LED indicator light turns GREEN indicating that the drive is in
the User Mode. If the LED indicator light flashes RED, you need to re-enter the
correct PIN.
7. Exiting the User Mode
iStorage diskAshur DT® Manual – v 3.2
To exit the User Mode, press the “Cancel” button on the diskAshur DT keypad. If there is no activity for 5 seconds the drive
will lock and go into Standby mode.
Alternately, you can turn your diskAshur DT OFF at the power switch on the back of the unit. Once you turn the diskAshur DT
ON again, the LED indicator light will be RED, indicating that you are in the Standby Mode.
#8
www.istorage-uk.com
8. Entering the Admin Mode
The diskAshur DT cannot be recognized by the operating system in the Admin Mode.
To enter the Admin Mode, do the following:
1. Attach the USB cable to an available USB port on your computer and turn the
diskAshur DT ON. The diskAshur DT goes into the Standby Mode, and the LED
indicator light turns RED.
2. Press and hold
+ 0 for five seconds until the LED indicator light flashes
RED. This indicates that you can enter the Admin PIN.
3. Enter the Admin PIN and press
. The default Admin PIN is
123456. The drive is in Admin Mode when the LED indicator light has
changed to BLUE.
Note: If the LED indicator light flashes RED for a few seconds, indicating the diskAshur DT has returned to
the Standby Mode, go back to Step 2.
This is due to one of the following conditions:
• You entered an incorrect Admin PIN in Step 3.
• No activity was detected within 10 seconds in the Admin Mode.
9. Exiting the Admin Mode
To exit the User Mode, press the “Cancel” button on the diskAshur DT keypad. If there is no activity for 5 seconds the drive
will lock and go into Standby mode.
www.istorage-uk.com
#9
iStorage diskAshur DT ® Manual – v 3.2
Alternately, you can turn your diskAshur DT OFF at the power switch on the back of the unit. Once you turn the diskAshur DT
ON again, the LED indicator light will be RED, indicating that you are in the Standby Mode.
10. Changing the Admin PIN
You can change the Admin PIN by doing the following:
1. Enter Admin Mode (refer to page 9 for details).
2. Press and hold
+ 9 until the LED indicator light flashes BLUE.
3. Enter the new PIN and press
(The PIN must be a minimum
of 6 digits and a maximum of 16 digits). The LED indicator light flashes
GREEN three times. See note below.
4. Re-enter the new Admin PIN and press
. The LED indicator light
will be solid GREEN for two seconds and then the LED indicator light
will become solid BLUE indicating that the Admin PIN has been changed
successfully.
Note: If the LED indicator light flashes RED three times, this indicates that the PIN is less than 6 digits
or more than 16 digits. Enter a PIN that contains 6 – 16 digits after the LED indicator light flashes
BLUE intermittently.
1. If the LED indicator light flashes RED intermittently and then BLUE intermittently, go back
to step 3. This is due to one of the following conditions:
• You waited longer than 10 seconds before entering a PIN.
• The new PIN was entered incorrectly.
iStorage diskAshur DT® Manual – v 3.2
2. If no activity is detected within two minutes in the Admin Mode, the
diskAshur DT will return to the Standby Mode.
#10
www.istorage-uk.com
11. Adding a new User PIN
You can add a new User PIN by doing the following:
1. Enter the Admin Mode (refer to page 9 for details).
2. Press and hold
+ 1 until the LED indicator light flashes BLUE intermittently.
3. Enter a User PIN and press
(a minimum of 6 digits and a maximum
of 16 digits). The LED indicator light will flash GREEN three times.
4. Immediately re-enter the new User PIN and press
. If the LED
indicator light goes GREEN for two seconds and then the LED indicator
light goes to solid BLUE, the User PIN was added successfully.
12. Deleting the User PINs
You can delete all User PINs by doing the following:
1. Enter the Admin Mode (refer to page 9 for details).
2. Press and hold 7 + 8 +
for five seconds until the LED indicator light
flashes BLUE intermittently. After the LED indicator light will flash GREEN
three times and then the LED indicator light will flash BLUE intermittently.
3. Press and hold 7 + 8 +
a second time for five seconds until the LED
indicator light goes solid GREEN for two seconds. Then the LED
indicator light will go back to solid BLUE. This indicates that the User
PINs were deleted successfully.
13. Changing the User PIN
You can change the User PIN by doing the following:
www.istorage-uk.com
iStorage diskAshur DT ® Manual – v 3.2
1. Enter User Mode (refer to page 8 for details).
2. Press and hold
+ 1 until the LED indicator light flashes RED.
3. Enter your old PIN and press
. The LED indicator light will turn
GREEN, then the LED indicator light will change to flashing BLUE.
4. Enter the new PIN and press
(The PIN must be a minimum
of 6 digits and a maximum of 16 digits). The LED indicator light will flash
GREEN three times.
5. Immediately re-enter the new User PIN and press
. The LED
indicator light will stay solid GREEN indicating that the User PIN has
been changed successfully.
#11
14. Setting the Unattended Auto Lock Feature
To protect against unauthorized access if the drive is unlocked and unattended, the diskAshur DT can be set to automatically
lock after a pre-set amount of time.
In its default state, the diskAshur DT Unattended Auto Lock feature is turned off. The Unattended Auto Lock can be set to
activate after 5, 10 or 20 minutes.
To set the Unattended Auto Lock please use the following steps:
1. Enter the Admin mode by pressing and holding
+ 0 for five seconds until
the LED indicator light flashes RED. This indicates that you can enter the
Admin PIN.
2. Enter the Admin PIN and press
. The drive is in Admin Mode when the
LED indicator light has changed to BLUE.
3. Once in Admin mode, press
+ 6. The LED indicator lights
should start flashing RED and BLUE intermittently.
4. Press one of the numbers below that corresponds to amount of time you would
like the drive to lock after no activity:
Auto Lock Timeout Table:
1 = 5 min
2 = 10 min
3 = 20 min
0 = OFF
iStorage diskAshur DT® Manual – v 3.2
The default is 0 (OFF)
5. After you have input the number, the LED indicator light should flash
GREEN 3 times to indicate that you have successfully set the Unattended Auto
Lock feature.
#12
www.istorage-uk.com
15. Brute Force Protection
What is Brute Force Attack?
A brute force attack is a method of defeating a cryptographic scheme by systematically trying a large number of possibilities;
for example, a large number of the possible keys in a key space in order to decrypt a message.
In most schemes, the theoretical possibility of a brute force attack is recognized, but it is set up in such a way that it would be
computationally infeasible to carry out. Accordingly, one definition of “breaking” a cryptographic scheme is to find a method
faster than a brute force attack.
How does the diskAshur DT protect against brute force attack?
1. With the drive locked and in the standby state the LED indicator light will be
solid RED.
2. After six tries to enter the correct user or Admin PIN the keypad will
not respond and LED indicator light will turn off. The drive will need to be
unplugged from the USB port and replugged. This will be repeated for each six
unsuccessful attempts.
3. If the user unsuccessfully tries to unlock the drive on his 10th try the keypad
will lock and the LED indicator light will begin blinking quickly. Even after
unplugging and replugging in the unit, the drive will remain locked and the
LED indicator light will continue to blink rapidly.
4. Here are the steps to allow the user to unlock the keypad for 10 more attempts
to unlock his drive.
a. Unplug the device from the computer
b. Push and hold the number 5 (five) key and plug-in the drive
iStorage diskAshur DT ® Manual – v 3.2
c. The LED indicator lights will flash rapidly between RED and GREEN.
d. Enter the code 5278879
e. The keypad will unlock. The LED indicator light will be solid RED indicating
that the drive is in the standby state. This will allow only 10 more attempts
f. After a total of 20 attempts the drive will lock. The LED indicator light will flash
RED quickly. You must now go through the reset process and reformat the drive to
be able to use the drive again. (see page 15)
www.istorage-uk.com
#13
16. Setting a Self Destruct PIN
The diskAshur DT has the ability to set a PIN that will reset the encryption key if needed. By resetting the encryption
key all data on the drive will be lost and cannot be recovered.
Note: After initiating the Self Destruct sequence, the PIN used to initiate the self destruct sequence will
become the default Admin PIN. The drive will need to be initialized and reformatted. For directions
see page 15.
To set a Self Destruct PIN please use the following steps:
1. Enter the Admin mode by pressing and holding
+ 0 for five seconds until
the LED indicator light flashes RED. This indicates that you can enter the
Admin PIN.
2. Enter the Admin PIN and press
. The drive is in Admin Mode when the
LED indicator light has changed to BLUE.
3. Once in Admin mode, press
+ 3. The LED indicator lights should start flashing
RED and BLUE intermittently.
4. Input in the PIN that you would like to use as the Self Destruct PIN and
press
.
Note: The PIN must be a minimum of 6 and a maximium of 16 digits and cannot match any
Admin or User PINs already used by the drive. In the future, a User or Admin PIN can not
be set to the same number as used by the Self Destruct PIN.
5. The diskAshur DT will then check against known PINs to make sure that it is
not already in use. If in use the LED indicator light will flash RED 3 times and
the drive will go into Standby mode. If this happens please re-enter the Admin
mode (step 1) and repeat the process with a new PIN.
iStorage diskAshur DT® Manual – v 3.2
6. If the Self Destruct PIN is accepted the LED indicator light flashes
GREEN three times.
7. Immediately re-enter the new PIN and press
. If the LED indicator
light stays solid GREEN for two seconds and then the LED indicator
light goes to solid BLUE, the Self Destruct PIN was added successfully.
8. To delete the Self Destruct PIN, you will need to delete all of the User
PINs. Please refer to the instructions on page 11 - Deleting User PINs.
#14
www.istorage-uk.com
17. Completely resetting the diskAshur DT
If you forget all the User PINs or Admin PIN, you can perform a complete reset to remove all the User
PIN, and restore the Admin PIN to the default 123456.
Attention: Completely resetting the diskAshur DT will reset the encryption key, in effect making all
the data on the drive unrecoverable. You will need to partition and format the diskAshur DT with disk
management applications.
To perform a complete reset of the drive, do the following:
1. Connect the diskAshur DT to an available USB port. Turn on the power
switch on the back of the drive while holding the “Cancel” button.
The LED indicator lights will flash BLUE and RED alternately
Note: If no activity is detected for 30 seconds in this step, the diskAshur DT
will go into the Standby Mode.
2. Press and hold “Cancel” +
+ 2 for 10 seconds until the LED indicator
lights flash RED and BLUE intermittently, and then stop on a solid color. The
LED indicator light will then turn solid GREEN for two seconds, followed by the
LED indicator light turning solid RED. You have successfully reset the
diskAshur DT.
18. Initializing and formatting the diskAshur DT after a complete reset
A complete reset of the diskAshur DT will erase all information and partition settings. You will need to initialize and format
the diskAshur DT.
To initialize your diskAshur DT, do the following:
iStorage diskAshur DT ® Manual – v 3.2
1. After a complete reset, attach the diskAshur DT to the computer.
2. Wait 5 seconds for the computer to recognize the device.
3. Enter the default User PIN 123456 and press
to enter the User Mode.
4. Right-click My Computer, and then click Manage from the Windows desktop.
www.istorage-uk.com
#15
5.
In the Computer Manage window, click Disk Management. In the Disk Management window, the diskAshur DT is
recognized as an unknown device that is uninitialized and unallocated.
iStorage diskAshur DT® Manual – v 3.2
Note: If the Initialize Disk Wizard window opens, click Cancel.
6.
Right-click Unknown Disk, and then select Initialize Disk.
7.
In the Initialize Disk window, click OK.
8.
Right-click in the blank area under the Unallocated section, and then select New Simple Volume. The Welcome to
the New Simple Volume Wizard window opens.
#16
www.istorage-uk.com
9.
Click Next.
10. If you need only one partition, accept the default partition size and click Next.
11. Assign a drive letter or path and click Next.
12. Create a volume label, select Perform a quick format, and then click Next.
13. Click Finish.
14. Wait until the format process is complete. The diskAshur DT will be recognized and it is available for use.
19. Hibernating, Suspending, or Logging off from the Operating System
Be sure to save and close all the files on your diskAshur DT before hibernating, suspending, or logging off from the
Windows operating system.
It is recommended that you log off the diskAshur DT manually before hibernating, suspending, or logging off from your
system.
iStorage diskAshur DT ® Manual – v 3.2
To log off the diskAshur DT, double-click Safely Remove Hardware on the Windows desktop and remove the diskAshur DT
from your computer.
Attention: To ensure the data integrity of your diskAshur DT, be sure to lock or log off your
diskAshur DT if you are:
• away from your computer
• using the switching user function by sharing a computer with others
www.istorage-uk.com
#17
20. Troubleshooting
This section contains troubleshooting information for the diskAshur DT. If you encounter any of the following problems when
using the diskAshur DT, refer to the corresponding answers.
Q: How do I use the diskAshur DT the first time?
A: You can use it in one of the following ways:
• Enter the Admin Mode with 123456 (default administrator PIN),
and then you are able to change the Admin PIN or create a User PIN.
• Directly enter the Secure User Mode with 123456 (default Admin PIN) to use the diskAshur DT.
Q: I enter the drive with the default PIN but am not able to change the code. Why?
A: You are entering the drive using the Admin PIN. This code can only be changed from the Admin mode.
Q: What can I do if I forget the User PIN?
A: Use your Admin PIN to enter Admin Mode, and then create another User PIN in Admin Mode.
Q: What can I do if I forget the Admin PIN?
A: There is no other way to retrieve the Admin PIN except a complete reset of the diskAshur DT. After a complete reset,
all data will be lost and you will need to initialize, allocate and format the diskAshur DT manually. Then you will be able
to use the default Admin PIN 123456.
Q: Why did the operating system not recognize the diskAshur DT after I completely reset the computer and
after I enter the User Mode?
A: You need to initialize, allocate and format the diskAshur DT manually. For more information, refer to Initializing and
formatting the Hard Drive after a complete reset in this manual.
iStorage diskAshur DT® Manual – v 3.2
Q: How do I use the diskAshur DT without a PIN?
A: As a full disk encryption product, the diskAshur DT can never be used without a PIN.
Q: What encryption algorithm is used in this product?
A: The diskAshur DT uses AES 256-bit algorithm.
Q: Why could I not initialize, partition or format the diskAshur DT?
A: Ensure that you have administrator privileges. You can use only the administrator account to initialize, partition or
format the diskAshur DT in the Admin Mode.
#18
www.istorage-uk.com
Q: Do I require “Admin Rights” for the diskAshur DT to work?
A: No, since the diskAshur DT does not require any software to be installed and the encryption/decryption is performed in
Hardware on the drive itself, “Admin Rights” are not required.
Q: I’m getting a continuously flashing red light what is wrong?
A: You have entered an incorrect PIN too many times and have triggered the brute force attack protection; you can reset this
counter by referring to the `Brute Force Protection` section of this manual. When trying again ensure you are using the
correct PIN as too many lockouts are irreversible.
Q: My diskAshur DT locks for no reason when connected to my computer whilst I’m using it, what is
causing this?
A: The issue you are having is being caused by power saving settings on your PC or Laptop so please see below and make
the appropriate changes to your computer and this will stop the diskAshur DT from locking as when your computer is power
saving it switches off data to the USB ports and our products see that as `Disconnect` and are designed to lock when this is
detected.
Microsoft Windows
Doing the following will prevent Windows from switching off the diskAshur DT, go to ‘Control Panel’ & ‘Power Options’,
the easier option is to disable power saving which means stopping the computer from `Sleeping` see below;
iStorage diskAshur DT ® Manual – v 3.2
In addition go into `Advanced Settings` in `Power Option` to disable the following:
• Ensure the computer is set to sleep: Never (as above)
• Turn off hard disk after: 999999 Minutes
• USB selective suspend setting: Disabled
This will keep the diskAshur DT connected to the computer continuously on.
www.istorage-uk.com
#19
Apple Mac
The diskAshur DT keeps locking after 5-10 minutes on the Macs – This will be due the Mac’s power saving as there is a
setting to switch off hard drives that are idle after a fix period of time see below;
iStorage diskAshur DT® Manual – v 3.2
The settings in Energy Saver preferences affect what happens when your Mac is left unattended for a period of time that you
specify. Disable `Put the hard disk(s) to sleep when possible` to prevent the diskAshur DT going to sleep and so not locking.
You will also need to stop the computer from sleeping to prevent the diskAshur DT from locking.
#20
www.istorage-uk.com
Note For Windows 8.1 users; You will need to install a Windows update (KB2919355 ) as well as follow the steps on
pages 18 &19. Please go to this link and choose Method 2; http://support.microsoft.com/kb/2919355. Once the download
option appears select KB2919355 and then download and install.
Q: My diskAshur DT locks when my computer sleeps/hibernates how can I stop this?
A: The only way to prevent this is by changing the power settings (Windows computers) of the computer so that it only
switches of the monitor on hibernation/sleep and keeps power to hard drives and USB. On Apple MAC computers going to
the power settings in `System Preferences` and clicking the do not suspend USB will keep the drive alive even if the MAC
goes into full hibernation.
Q: The diskAshur DT will not power on when connected to my computer?
A: This only happens when the computer the diskAshur DT is connected to cannot provide enough power from the USB port
to power the drive. This issue only appears on much older computers and/or imbedded systems like USB enabled medical
equipment. It can be resolved by either trying all the USB ports on the computer or system as some ports can have less power
than others or failing that use the USB Y-Power cable supplied with the diskAshur DT to ensure the correct power.
Q: I want to use my diskAshur DT with different Operating Systems how can that be done?
A: To make the diskAshur DT universally compatible with all the most common Operating Systems and embedded systems
like USB enabled medical equipment, requires the drive to be formatted using the FAT file system. This is done by using
`Disk Management` in Windows, `Disk Utility` on MAC OS/x or MKFS in Linux.
Q: How many unique User ID’s can I create?
A: The Administrator feature allows enrollment of up to five (5) unique User ID’s and one (1) Administrator. If a user forgets
their PIN, the diskAshur DT can be unlocked using the Admin PIN.
iStorage diskAshur DT ® Manual – v 3.2
www.istorage-uk.com
#21
21. Technical Support
iStorage provides the following helpful resources for you:
iStorage’s Website
http://www.istorage-uk.com
E-mail correspondence
[email protected]
Telephone support with our Technical Support Department on +44 (0) 20 8991-6260.
iStorage’s Technical Support Specialists are available from 9:00 a.m. to 5:30 p.m.
GMT - Monday through Friday.
22. Warranty and RMA information
Two Year Warranty:
iStorage offers a 2-year warranty on the iStorage diskAshur DT against defects in materials and workmanship under normal
use. The warranty period is effective from the date of purchase either directly from iStorage or an authorised reseller.
iStorage diskAshur DT® Manual – v 3.2
Disclaimer and terms of warranty:
THE WARRANTY BECOMES EFFECTIVE ON THE DATE OF PURCHASE AND MUST BE VERIFIED WITH YOUR SALES RECEIPT OR INVOICE DISPLAYING THE DATE OF PRODUCT
PURCHASE.
ISTORAGE WILL, AT NO ADDITIONAL CHARGE, REPAIR OR REPLACE DEFECTIVE PARTS WITH NEW PARTS OR SERVICEABLE USED PARTS THAT ARE EQUIVALENT TO NEW IN
PERFORMANCE. ALL EXCHANGED PARTS AND PRODUCTS REPLACED UNDER THIS WARRANTY WILL BECOME THE PROPERTY OF ISTORAGE.
THIS WARRANTY DOES NOT EXTEND TO ANY PRODUCT NOT PURCHASED DIRECTLY FROM ISTORAGE OR AN AUTHORIzED RESELLER OR TO ANY PRODUCT THAT HAS BEEN
DAMAGED OR RENDERED DEFECTIVE: 1. AS A RESULT OF ACCIDENT, MISUSE, NEGLECT, ABUSE OR FAILURE AND/OR INABILITY TO FOLLOW THE WRITTEN INSTRUCTIONS
PROVIDED IN THIS INSTRUCTION GUIDE: 2. BY THE USE OF PARTS NOT MANUFACTURED OR SOLD BY ISTORAGE; 3. BY MODIFICATION OF THE PRODUCT; OR 4. AS A RESULT
OF SERVICE, ALTERNATION OR REPAIR BY ANYONE OTHER THAN ISTORAGE AND SHALL BE VOID. THIS WARRANTY DOES NOT COVER NORMAL WEAR AND TEAR.
NO OTHER WARRANTY, EITHER EXPRESS OR IMPLIED, INCLUDING ANY WARRANTY OR MERCHANTABILITY AND FITNESS FOR A PARTICULAR PURPOSE, HAS BEEN OR WILL BE
MADE BY OR ON BEHALF OF ISTORAGE OR BY OPERATION OF LAW WITH RESPECT TO THE PRODUCT OR ITS INSTALLATION, USE, OPERATION, REPLACEMENT OR REPAIR.
ISTORAGE SHALL NOT BE LIABLE BY VIRTUE OF THIS WARRANTY, OR OTHERWISE, FOR ANY INCIDENTAL, SPECIAL OR CONSEQUENTIAL DAMAGE INCLUDING ANY LOSS OF
DATA RESULTING FROM THE USE OR OPERATION OF THE PRODUCT, WHETHER OR NOT ISTORAGE WAS APPRISED OF THE POSSIBILITY OF SUCH DAMAGES.
#22
www.istorage-uk.com
iStorage diskAshur DT ® Manual – v 3.2
© iStorage, 2011, 2012. All rights reserved.
iStorage Limited, iStorage House, 13 Alperton Lane
Perivale, Middlesex. UB6 8DH, England
Tel: +44 (0) 20 8991 6260 | Fax: +44 (0) 20 8991 6277
e-mail: [email protected] | web: www.istorage-uk.com
www.istorage-uk.com
#23