1
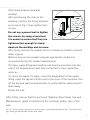
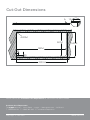
kvf21 & kvf22
Stainless Steel
Flush
Mount
Sinks
Installation
Customer Care Department • The
Group Ltd. • Harby Road • Langar • Nottinghamshire • NG13 9HY
T : 01949 862 012 F : 01949 862 003 E : [email protected] W : www.cda.eu
www.cda.eu
Installation
Before Installation
Thoroughly check the sink and any fittings for signs of transport (or
other) damage. Please note: After fitting, sinks cannot be returned for
credit or replacement.
Offer up the sink to the worktop and/or the cabinets to confirm that
the external dimensions of the bowls are compatible with the cabinets
themselves.
Confirm that with the sink in position:
•
There is adequate space to install any taps or other required
accessories.
•
There is adequate space to install the waste pipework and that any
necessary modification to internal shelves to accommodate the waste
(and trap) is acceptable.
•
Access to any water stop-cock or other services will still be adequate
after the installation.
Installation
•
Refer to the cut-out sizes on the back of this manual and use them
to mark out where the worktop needs to be cut. Double-check the
dimensions before cutting the worktop aperture.
•
After cutting out the worktop aperture, we recommend you seal the
cut edges with silicone (or similar) sealant to help prevent ingress of
water.
•
It is often easier to mount the taps, waste-fitting and overflow onto the
sink prior to fitting the sink to the worktop.
•
The edges of the sink should be bedded onto a bead of silicone
(or similar) sealant, to create a barrier to the ingress of water and
2
other items between sink and
worktop.
•
After positioning the sink on the
worktop, position the fixing brackets
as shown in Fig. 1, then tighten their
screws.
•
Do not use a power tool to tighten
the screws; by using a hand tool
Fig. 1
it is easier to ensure that they are
tightened just enough to clamp
down on the worktop and no more.
•
After fixing, ensure the sealant forms a continuous bead to prevent
water ingress.
•
Remove any excess sealant using an appropriate method as
recommended by the sealant manufacturer.
•
The taps, waste-fitting and overflow can now be mounted onto the
sink (if not already done) and fully connected to their respective
services.
•
To check the waste for leaks, close the plug/basket of the waste
fitting, open the tap and fill the sink to the level of the overflow; turn
off the tap and wait several minutes to verify that the water doesn’t
drain away.
•
Empty the sink.
After fitting, ensure that the enclosed “Stainless Steel Sinks Use and
Maintenance” guide is retained for the customer and/or user of the
sink.
E & O E. All instructions, dimensions and illustrations are provided for guidance only. CDA reserve the
right to change specifications without prior notice.
3
Cut-Out Dimensions
A
1.5
4-R10±1
507±1
520±1
987±1
30
30
1000±1
Please contact our Customer Care Department for Service on the details below
Customer Care Department
The
Group Ltd. • Harby Road • Langar • Nottinghamshire • NG13 9HY
T : 01949 862 012 F : 01949 862 003 E : [email protected]
Customer Care Department • The
Group Ltd. • Harby Road • Langar • Nottinghamshire • NG13 9HY
T : 01949 862 012 F : 01949 862 003 E : [email protected] W : www.cda.eu
Copyright © CDA 2015
www.cda.eu