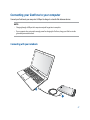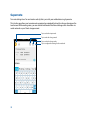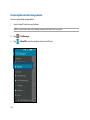
1
ZenFone 4
e-manual
E8838
April 2014
First Edition
2
Contents
Conventions used .........................................................................................................................9
Care and safety........................................................................................................................... 10
Guidelines..............................................................................................................................................................10
Proper disposal....................................................................................................................................................11
Get your Zen ready!
Parts and features...............................................................................................................................................14
Installing a micro-SIM card..............................................................................................................................15
Installing a memory card.................................................................................................................................20
Charging your ZenFone....................................................................................................................................25
Turning your ZenFone on or off.....................................................................................................................28
There’s no place like Home
Zen Home features..................................................................................................................... 32
Home screen........................................................................................................................ 32
Managing your home........................................................................................................................................34
Quick settings.......................................................................................................................................................38
ASUS keyboard settings...................................................................................................................................42
Voice Search..........................................................................................................................................................43
Lock Screen...........................................................................................................................................................46
Connecting your ZenFone to your computer........................................................................... 47
Connecting with your notebook....................................................................................... 47
Connecting with your desktop PC..................................................................................... 48
Call in style
Managing contacts..................................................................................................................... 50
Adding contacts..................................................................................................................................................50
Importing contacts............................................................................................................. 51
Exporting contacts............................................................................................................. 52
3
Making and receiving calls........................................................................................................ 53
Make a call........................................................................................................................... 53
Receive a call....................................................................................................................... 55
Dual SIM feature......................................................................................................................... 56
Renaming your micro SIM cards....................................................................................................................56
Assigning a default micro SIM card..............................................................................................................57
Backup/restore call logs............................................................................................................. 58
Creating a call log backup...............................................................................................................................58
Restoring call log backups...............................................................................................................................58
Send messages and more
Messaging................................................................................................................................... 60
Sending or replying to messages..................................................................................................................60
Setting up your messaging options.............................................................................................................61
Omlet Chat.................................................................................................................................. 62
Registering to Omlet Chat...............................................................................................................................62
Access your emails
Email............................................................................................................................................ 68
Setting up an email account...........................................................................................................................68
Adding email accounts.....................................................................................................................................69
Gmail........................................................................................................................................... 70
Setting up a Gmail account.............................................................................................................................70
Capture moments
Launching the Camera app........................................................................................................ 74
From the lock screen..........................................................................................................................................74
From the home screen......................................................................................................................................74
Using the volume key........................................................................................................................................74
4
Using Camera for the first time................................................................................................. 75
Tutorial....................................................................................................................................................................75
Image Locations..................................................................................................................................................76
Camera home screen.................................................................................................................. 77
Image settings.....................................................................................................................................................78
Video settings.......................................................................................................................................................80
Advanced camera features........................................................................................................ 81
Self timer................................................................................................................................................................81
Gallery
Using the Gallery........................................................................................................................ 84
Main screen...........................................................................................................................................................84
Viewing files from other source locations..................................................................................................85
Sharing files from the gallery..........................................................................................................................86
Deleting files from the gallery........................................................................................................................86
Editing an image.................................................................................................................................................87
Work hard, play harder
Supernote................................................................................................................................... 90
Creating a notebook..........................................................................................................................................92
Sharing a notebook on the Cloud.................................................................................................................92
Sharing a note the Cloud.................................................................................................................................92
Calendar...................................................................................................................................... 93
Creating an event from your ZenFone........................................................................................................93
Adding an account to Calendar.....................................................................................................................94
Creating an event from your account..........................................................................................................94
What’s Next................................................................................................................................. 95
Do It Later.................................................................................................................................... 96
Accessing or creating to-do tasks.................................................................................................................96
Weather....................................................................................................................................... 97
5
Weather home screen.......................................................................................................................................98
Clock............................................................................................................................................ 99
Launching Clock..................................................................................................................................................99
World Clock........................................................................................................................................................ 100
Alarm clock......................................................................................................................................................... 101
Stopwatch........................................................................................................................................................... 102
Timer..................................................................................................................................................................... 103
File Manager............................................................................................................................. 105
Accessing the internal storage.................................................................................................................... 105
Accessing the external storage device..................................................................................................... 106
Accessing Cloud Storage............................................................................................................................... 107
The Internet
Browser...................................................................................................................................... 110
Fun and entertainment
Using headset........................................................................................................................... 112
Connecting audio jack................................................................................................................................... 112
Audio Wizard............................................................................................................................. 113
Using Audio Wizard......................................................................................................................................... 113
Play Games................................................................................................................................ 114
Using Play Games............................................................................................................................................ 114
Music.......................................................................................................................................... 115
Launching Music.............................................................................................................................................. 115
Playing songs..................................................................................................................................................... 115
Playing songs from your SD card............................................................................................................... 115
Playing Cloud music....................................................................................................................................... 116
FM Radio.................................................................................................................................... 117
FM Radio home screen..................................................................................................... 117
Sound recorder......................................................................................................................... 118
6
Launching Sound Recorder.......................................................................................................................... 118
Sound Recorder home screen.......................................................................................... 118
Maintain your Zen
Keeping your device up-to-date............................................................................................. 120
Updating your system.................................................................................................................................... 120
Storage...................................................................................................................................... 120
Backup and reset...................................................................................................................... 121
Securing your ZenFone............................................................................................................ 122
Unlocking your screen................................................................................................................................... 122
Setting your ZenFone identity......................................................................................... 127
Connect your Zen
Wi-Fi........................................................................................................................................... 130
Enabling Wi-Fi................................................................................................................... 130
Connecting to a Wi-Fi network........................................................................................ 130
Disabling Wi-Fi.................................................................................................................. 131
Bluetooth®................................................................................................................................. 131
Enabling Bluetooth®......................................................................................................... 131
Pairing your ZenFone to a Bluetooth® device....................................................................................... 132
Unpairing your ZenFone from the Bluetooth® device........................................................................ 132
Miracast™.................................................................................................................................. 133
Share Link.................................................................................................................................. 134
The Cloud.................................................................................................................................. 136
ASUS WebStorage............................................................................................................. 136
App essentials
Switching apps......................................................................................................................... 138
Locking apps............................................................................................................................. 138
Downloading apps................................................................................................................... 139
7
There’s more to your Zen
Power Saver.............................................................................................................................. 142
Setting up Power Saver.................................................................................................................................. 142
Customizing Power Saver............................................................................................................................. 143
Splendid.................................................................................................................................... 144
Appendix
Notices....................................................................................................................................... 146
8
Conventions used
To highlight key information in this manual, some text are presented as follows:
IMPORTANT! This message contains vital information that must be followed to complete a task.
NOTE: This message contains additional information and tips that can help complete tasks.
CAUTION! This message contains important information that must be followed to keep you safe while performing
tasks and prevent damage to your ZenFone data and components.
9
Care and safety
Guidelines
Road safety comes first. We strongly recommend not to use your device when driving or operating any
type of vehicle.
This device should only be used in environments with ambient temperatures between 5°C (41°F) and
35°C (95°F).
Turn off your device in restricted areas where the use of mobile devices is prohibited. Always obey rules
and regulations when in restricted areas, such as, in aircraft, movie theater, in hospitals or near medical
equipment, near gas or fuel, construction sites, blasting sites and other areas.
Use only AC adapters and cables approved by ASUS for use with this device. Refer to the rating label on
the bottom of your device and ensure that your power adapter complies with this rating.
Do not use damaged power cables, accessories, and other peripherals with your device.
Keep your device dry. Do not use or expose your device near liquids, rain, or moisture.
You can put your device through x-ray machines (such as those used in conveyor belts for airport
security), but do not expose the device to magnetic detectors and wands.
The device screen is made of glass. If the glass gets broken, stop using the device and do not touch the
broken glass parts. Immediately send device for repair to ASUS-qualified service personnel.
Do not listen at high volume levels for long periods to prevent possible hearing damage.
Disconnect the AC power before cleaning your device. Use only a clean cellulose sponge or chamois
cloth when cleaning your device screen.
Send device for repair to ASUS-qualified service personnel only.
10
Proper disposal
Do not throw your device in municipal waste. This product has been designed to enable proper reuse
of parts and recycling. The symbol of the crossed out wheeled bin indicates that the product (electrical,
electronic equipment and mercury-containing button cell battery) should not be placed in municipal
waste. Check local regulations for disposal of electronic products.
Do not throw the battery in municipal waste. The symbol of the crossed out wheeled bin indicates that
the battery should not be placed in municipal waste.
11
12
1
Get your Zen ready!
Parts and features
Take a hold of your device and have it up and running in a jiffy.
Audio jack
Rear camera
Earpiece receiver
Front camera
Speaker
Micro-USB port
Touchscreen
display
Power key
Volume key
Groove
Microphone
14
IMPORTANT:
• We do not recommend using a screen protector as it can interfere with the proximity sensor. If you want to use
a screen protector, ensure that it does not block the proximity sensor.
• Keep the device, particularly the touch screen, dry all the time. Water or other liquids can cause the touch
screen to malfunction.
• Ensure that the Micro-SIM/memory card compartment cover is always closed when operating or carrying the
device.
Installing a micro-SIM card
A micro-subscriber identity module (micro-SIM) card stores information, such as your mobile phone number,
contacts, messages and other data that gives you access to a mobile network.
Your ZenFone comes with two micro-SIM card slots that allows you to setup and use two mobile network
services without having to carry two mobile devices at the same time.
CAUTION:
• This device is designed for use with a mobile carrier-approved micro-SIM card only.
• We do not recommend the use of trimmed SIM cards in the micro-SIM card slot.
• Turn off your device before inserting a micro-SIM card.
• Be extra careful when handling a micro-SIM card. ASUS is not responsible for any loss or damage incurred to
your micro-SIM card.
• Do not insert a memory card into the micro-SIM card slot! If a memory card happens to be inserted into the micro-SIM slot, send your device to an ASUS-qualified service personnel.
15
To install a micro-SIM card:
1. Turn off your device.
2. Pry the cover loose from the groove on the bottom-left corner, then pull the rear cover off.
CAUTION! Be careful when you pry open the cover.
3. Orient the micro-SIM card with its gold-plated contacts facing downward then insert it into the Micro-SIM
card 1 slot.
4. Push the micro-SIM card all the way into the slot until it is seated firmly in place.
Micro-SIM card 1 slot
16
5. If you wish to install another micro-SIM card, orient the micro-SIM card with its gold-plated contacts
facing downward then insert it into the Micro-SIM card 2 slot.
Micro-SIM card 2 slot
6. Put the rear cover back in place. Press down the rear cover on all sides to secure in place.
NOTE: If you installed two micro-SIM cards, go to Settings > Dual SIM card settings for information and
configuration of your SIM cards.
17
Removing a Micro-SIM card
CAUTION: Be extra careful when handling a micro-SIM card. ASUS is not responsible for any loss or damage
incurred to your micro-SIM card.
To remove a micro-SIM card:
1. Turn off your device.
2. Pry the cover loose from the groove on the bottom-left corner, then pull the rear cover off.
CAUTION! Be careful when you pry open the cover.
18
3. Press the micro-SIM card that you want to remove, then pull it out.
Repeat the same step, if you wish to remove the other micro-SIM card.
4. Put the rear cover back in place. Press down the rear cover on all sides to secure in place.
19
Installing a memory card
Your ZenFone supports a microSD™, microSDHC™, and microSDXC™ memory card with up to 64 GB capacity.
NOTE: Some memory cards may not be compatible with your ZenFone. Ensure that you use only compatible
memory cards to prevent loss of data, damage to your device or memory card, or both.
CAUTION!
• Be extra careful when handling a memory card. ASUS is not responsible for any data loss or damage incurred to
your memory card.
• Do not insert a micro-SIM card into the memory card slot! If a micro-SIM card happens to be inserted into the memory card slot, bring your device to an ASUS-qualified service personnel.
To install a memory card:
1. Turn off your device.
2. Pry the cover loose from the groove on the bottom-left corner, then pull the rear cover off.
CAUTION! Be careful when you pry open the cover.
20
2. Align and insert a memory card into the memory card slot.
3. Push the memory card all the way into the slot until it is seated firmly in place.
Memory card slot
4. Put the rear cover back in place. Press down the rear cover on all sides to secure in place.
NOTE: After installing a formatted memory card, you can access its contents from File Manager > sdcard.
21
Formatting memory card
If you installed a new memory card or a memory card that was formatted using a computer, you may need to
format your memory card on the device to ensure compatibility with your device.
CAUTION: If your memory card contains data, ensure to create a backup of all important data stored in the
memory card before formatting it.
To format your memory card:
1. From the Home screen, go to All Apps > Settings > Storage > Format SD card.
2. Select Erase Everything.
3. You can preview the contents of your memory card from All Apps > File Manager.
22
Removing memory card
CAUTION!
• Be extra careful when handling a memory card. ASUS is not responsible for any data loss or damage incurred to
your memory card.
• Eject the memory card properly to safely remove it from device. To eject the memory card, go to Home > All
Apps > Settings > Storage > Remove
To remove a memory card:
1. Turn off your device.
2. Pry the cover loose from the groove on the bottom-left corner, then pull the rear cover off.
CAUTION! Be careful when you pry open the cover.
23
2. Press the memory card to eject, then pull it out.
3. Put the rear cover back in place. Press down the rear cover on all sides to secure in place.
24
Charging your ZenFone
Your ZenFone comes partially charged but you must charge it fully before using it for the first time. Read the
following important notices and cautions before charging your device.
IMPORTANT:
• Use only the bundled AC power adapter and micro-USB cable to charge your ZenFone. Using a different AC
power adapter and cable may damage your device.
• Peel off the protective film on the AC power adapter and micro-USB cable before using it with your device.
• Ensure to plug the AC power adapter to a compatible power outlet. You can plug the AC power adapter to any
compatible 100~240 V outlet.
• The output voltage of the AC power adapter for this device is DC 5.2V, 1.35A.
• When using your ZenFone while plugged-in to a power outlet, the power outlet must be near your device and
easily accessible.
• To conserve electricity, unplug the AC power adapter from the power outlet when not in use.
• Do not place heavy objects on top of your ZenFone.
CAUTION!
• While charging, your ZenFone can become warm. This is normal, however, if your device becomes unusually
hot, disconnect the micro-USB cable from your device and send the device, including the AC power adapter
and cable to an ASUS-qualified service personnel.
• To prevent any damage to your ZenFone, AC adapter, or micro-USB cable. Ensure that the micro-USB cable, AC
adapter, and your device are connected properly before charging.
25
To charge your ZenFone:
1. Connect the micro USB cable to the AC power adapter.
2. Plug the AC power adapter to a grounded power outlet.
3. Connect the micro USB cable to your ZenFone.
3
2
1
IMPORTANT:
• Charge your ZenFone for eight (8) hours before using it in battery mode for the first time.
• The status of battery charge is indicated by the following icons:
26
Low Not Charging
Charging Full
4. When fully-charged, disconnect the USB cable from your ZenFone first before unplugging the AC power
adapter from the power outlet.
NOTES:
• You can use your device while charging but it may take longer to fully charge the device.
• Charging your device via USB port of a computer may take longer to fully charge the device.
• If your computer does not provide enough power for charging via USB port, charge your ZenFone using the AC
power adapter plugged to a power outlet instead.
27
Turning your ZenFone on or off
Turning your device on
To turn your device on, press and hold the power button until your device vibrates and starts up.
Turning your device off
To turn your device off:
1. If your screen is turned off, press the power button to turn it on. If your screen is locked, unlock the device
screen.
2. Press and hold the power button, then when prompted, tap Power off then tap OK.
Sleep mode
To put your device in sleep mode, press the power button once until the screen turns off.
28
First time use
When you turn your Zen device on for the first time, Setup Wizard will guide you through the setup process.
Follow the on-screen instructions to select your language, select input methods, setup your mobile network
and Wi-Fi, sync accounts, and configure your location services.
Use your Google or ASUS account to setup your device, if you do not have a Google or ASUS account yet, go
ahead and create one.
Google Account
Using a Google Account allows you to fully utilize the Android OS features, including:
• Organize and see all your information from anywhere.
• Automatically backup all your data.
• Leverage Google services conveniently from anywhere.
ASUS Account
Having an ASUS Account gets you to enjoy the following perks:
• Personalized ASUS support service and warranty extension for registered products.
• Free 5 GB of Cloud storage space.
• Receive the latest device and firmware updates.
NOTE: You can also use the Setup Wizard to reconfigure your device, any time at your convenience. From the
Home Screen go to All Apps > Setup Wizard.
29
Battery power conservation tips
The battery charge is the lifeline of your Zen device. Here are some battery power conservation tips that helps
preserve the power of your Zen device battery.
– When not in use, press the power button to put the device in sleep mode.
– Activate Smart Saving in Power Saver app.
– Set audio to Power Saving mode.
– Decrease brightness of display.
– Keep the speaker volume to a low level.
– Disable Wi-Fi feature.
– Disable Bluetooth feature.
– Disable Miracast feature.
– Disable GPS.
– Disable the screen auto-rotate feature.
– Disable all auto-sync features in your device.
30
2
There’s no place like Home
Zen Home features
Home screen
Get reminders of important events, app and system updates, weather forecasts, and text messages from
people who really matter to you, right from your Home screen.
Swipe down this area to display System notifications
Swipe down this area to display Quick settings
Tap to update Weather settings
Tap to display Time settings
Tap to open Google Search page
Tap to open Voice Search
Tap to open All Apps screen
Tap to open an app
Swipe the Home screen to the left or right to display the extended Home screen
32
Understanding icons
These icons are shown on the status bar and will guide you of the current status of your ZenFone.
This icon shows the signal strength of your mobile network.
1
This icon shows that a micro SIM card is inserted in micro SIM card slot 1.
This icon shows that a micro SIM card is inserted in micro SIM card slot 2.
2
NOTE: If the SIM card icon is displayed in green, it indicates that it is set as the default network.
This icon shows that you have an unread message.
This icon shows the signal strength of your Wi-Fi connection.
This icon shows the battery status of your ZenFone.
This icon shows that a microSD card is inserted in your ZenFone.
This icon shows that you took screenshots of your ZenFone.
This icon shows that your ZenFone is on Airplane mode.
This icon shows that Wi-Fi hotspot of your ZenFone is enabled.
This icon shows that Smart Saving mode is enabled.
This icon shows that Mute mode is enabled.
This icon shows that Vibrate mode is enabled.
This icon shows downloading of an app or file.
33
Managing your home
Stamp your own personality to your Home screen. Select an attractive design as your wallpaper, add shortcuts
for quick access to your fave apps, and add widgets for a quick review of important info. You can also add
more pages so you can add and quickly access or review more apps or widgets on your Home screen.
• To add items to home, tap and hold an empty area on your Home screen and select any of these
categories: Apps, Widgets, Wallpaper, and Add new pages.
• To go through the pages of your Home screen, swipe left or right.
34
App shortcuts
Add shortcuts to quickly access your often-used apps right from your Home screen.
To add an app shortcut:
1. Tap and hold an empty area on your Home screen and select Apps.
2.From All Apps, tap and hold an app, then drag it to an empty area on your Home screen.
To remove an app shortcut:
From your Home screen, tap and hold an app, then drag it to X Remove on the top of your screen.
Widgets
Add widgets for a quick review of your calendar, maps, battery status, and more.
To add a widget:
1. Tap and hold an empty area on your Home screen and select Widgets.
2.From Widgets, tap and hold a widget, then drag it to an empty area on your Home screen.
To remove an app shortcut:
From your Home screen, tap and hold a widget, then drag it to X Remove on the top of your screen.
NOTE: You can also tap
on your Home screen to view All Apps and Widgets.
35
Wallpapers
Let your apps, icons, and other Zen elements sit on an attractively designed wallpaper. You may add a
translucent background tint to your wallpaper for readability and clarity. You can also select an animated
wallpaper to make your screen come alive.
Tap to apply a background tint
Tap to select the background tint
Move the slider to adjust the transparency of the wallpaper
Tap to wallpaper
36
Applying wallpaper and background tint
To apply wallpaper and background tint:
1. Tap and hold an empty area on your Home screen and select Wallpapers.
2. Select where you want your wallpaper: on your Home screen, Lock screen, or Home screen and Lock
screen. If you do not want to add a background tint to your wallpaper, skip to step 5.
3.Tick Background tint, then adjust the transparency level.
4.Tap
then select a color.
5. Select a wallpaper, then tap Apply.
NOTES:
• A background tint can be applied to your Home screen, or Home screen and Lock screen.
• You can also set up your wallpaper settings from > Settings > Display.
Applying an animated wallpaper
To apply an animated wallpaper:
1. Tap and hold an empty area on your Home screen and select Wallpapers.
2. Select where you want your wallpaper: on your Home screen, or Home Screen and Lock screen.
3. Select an animated wallpaper, then tap Apply.
NOTE: You can also set up your wallpaper settings from
> Settings > Display.
37
Quick settings
Enable functions with just one tap and personalize your ZenFone using Quick settings. This unique Zen
feature also shows system notifications that help you track recent updates and changes on your ZenFone.
You can launch Quick settings anytime you need it, even if you are currently using an app on your ZenFone.
Launching Quick settings
Swipe down from the upper right corner of your ZenFone’s screen.
Tap to open Settings
Tap to enable/disable features in Quick
settings
Tap to view current System notifications
Slide left or right to adjust the screen’s
brightness.
Tap these buttons to enable or disable
their functions.
38
Inside Quick settings
Use Quick settings as a one-tap access for some of the features and programs of your ZenFone.
Access settings
Tap
View ASUS Quick
settings list
Tap
to view the current list of features that you can enable or disable from the Quick
settings notification panel.
View system
notifications
Tap
to launch your ZenFone’s Settings app.
to view the current updates and changes made on your ZenFone.
Go back to the Quick
settings home screen
From the System notifications screen, tap
Access Display settings
Tap
to go back to the home screen.
to launch the Display app.
39
Using the Quick settings Notification Panel
The Quick settings Notification Panel provides a one-tap access to some of the wireless features and settings
of your ZenFone. Each of these features are represented by a button.
NOTE: A blue button indicates that the feature is currently enabled while a gray button indicates a disabled
feature.
Adding or removing buttons
To add or remove existing buttons from the ASUS Quick Settings notification panel:
1. Launch Quick settings then tap
.
2. Tap the box beside the feature to add or remove it from the ASUS Quick Setting Notification Panel.
NOTE: A checked box indicates that the feature's button is accessible via the ASUS Quick Settings Notification
Panel while an unchecked box means the opposite.
3. Tap
40
to go back and view the current ASUS Quick Settings notification panel
Using System notifications
Inside System notifications, you can see the latest updates done and system changes made on your ZenFone.
Most of these changes are data and system-related. The System notifications screen is intuitive and can be
navigated through the following ways:
Tap this to delete all of the listed notifications.
Swipe the notification to the left or
right to remove it from the list.
Tap on the notification to view its
details.
41
ASUS keyboard settings
Create SMS messages, emails, and log-in passwords using your ZenFone’s touch keyboard.
To access the ASUS keyboard settings:
1. Launch Quick settings then tap
.
2. Scroll down the Settings screen and select Language & input.
3. Tap
beside ASUS keyboard.
4. Configure the settings according to your personal preferences.
42
Voice Search
Make voice commands to your ZenFone then watch it listen and take action using the Voice Search app. Using
Voice Search, you can make voice commands to accomplish the following:
•
Search for data and information online or on your ZenFone
•
Launch apps inside your ZenFone
•
Get directions going to a location
IMPORTANT! Your ZenFone must be connected to the Internet to be able to use this feature.
Launching Voice Search
1. Tap
> Voice Search.
2. Once the mic icon turns red, start saying your voice command.
NOTE: Speak clearly and use concise phrases when talking to your ZenFone. It also helps to start your commands
with a verb related to the ZenFone feature you want to use.
43
Customizing voice search results from the Phone search group
If you want to set parameters for the voice search results gathered from your Google account and your
ZenFone’s data, you may do so using the following steps:
1. On your ZenFone’s home screen, tap
2. Tap
44
> Settings.
> Voice Search.
3. Tap Phone search
4. Tick the box of the search groups you would like to include as source when using Voice Search.
45
Lock Screen
By default, the lock screen appears after turning on your device and while waking it up from sleep mode. From
the lock screen, you can proceed to your device’s Android® system by swiping on your touch screen panel.
Your device’s lock screen can also be customized to regulate access to your mobile data and apps.
Customizing your lock screen
If you want to change your lock screen settings from the default Swipe option, refer to the following steps:
1. Launch Quick settings then tap
.
2. Scroll down the Settings screen and select Lock screen.
3. In the next screen, tap Screen lock.
4. Tap the screen lock option you would like to use.
46
Connecting your ZenFone to your computer
Connect your ZenFone to your computer’s USB port to charge it or transfer files between devices.
NOTES:
• Charging through a USB port of a computer may take longer time to complete.
• If your computer does not provide enough power for charging the ZenFone, charge your ZenFone via the
grounded power outlet instead.
Connecting with your notebook
47
Connecting with your desktop PC
To connect your ZenFone to your computer:
1. Plug the micro USB connector into your ZenFone.
2. Plug the USB connector to the USB port of your computer.
48
3
Call in style
Managing contacts
Add, import, or export your contacts from your SIM or email accounts to your ZenFone and vice-versa.
Adding contacts
To add contacts:
1.Tap Contacts app then tap Create a new contact from the
tab.
2. On the Contacts screen, select the account that you want to save your contact:
a.Device
b. SIM card storage (SIM1 or SIM2)
c. E-mail account
NOTE: If you don't have an e-mail account, tap Add account then create one.
3. Follow the succeeding onscreen instructions to add and save the new contact.
50
Importing contacts
Import your contacts and their respective data from one contact source to your ZenFone, e-mail account, or a
micro SIM card.
To import contacts:
1.Tap Contacts app then tap the
tab.
2.Tap Import/export contacts then select from the following importing options:
a. Import from SIM 1 card/Import from SIM 2 card
b. Import from storage
3.
Select from the following accounts to save the contact:
a. Email account/s
b.Device
c. SIM1/SIM2
4. Tick to select the contacts that you wish to import and when done, tap Import.
51
Exporting contacts
Export your contacts to any of the storage accounts in your ZenFone.
1.Tap Contacts app then tap the
tab.
2.Tap Import/export contacts then select from the following exporting options:
a. Export to SIM 1 card/Export to SIM 2 card
b. Export to storage
3.
Tap to select the contacts from the following accounts:
a. All contacts
b. E-mail account/s
c.Device
d. SIM1/SIM2
4. Tick the contacts that you want to export.
5. When done, tap Export.
52
Making and receiving calls
Make a call
Your ZenFone offers you many ways to make a call. Call your friends from saved contacts list, dial a phone
number directly, or even dial a number without keying in a passcode on the lock screen.
Calling from Contacts app
Use the Contacts app to make a call from your contacts list.
To call via the Contacts app:
1. From your Home screen, tap Contacts app then look for the contact name that you wish to call.
NOTE: To view all contacts from all contact accounts, tap Contacts to display dropdown list then tick all accounts.
2. Tap the contact name then tap the number.
3. If there are two SIM cards installed, tap the SIM card that you want to make the call.
53
Dialing a phone number
Use the Phone app to directly dial a phone number.
To call via the Phone app:
1. From your Home screen, tap Phone app then tap the number keys.
2. Select from call buttons SIM1 or SIM2 to dial the number.
Call buttons
NOTE: The labels of the call buttons may vary depending on the setting that you made to your micro SIM cards.
Refer to section Dual SIM feature of this user manual for more information.
54
Receive a call
The touch screen of your ZenFone lights up when there is an incoming call. The display of the incoming call
also varies, depending on the status of your ZenFone.
Answering a call
There are two ways to answer a call depending on the status of your ZenFone:
•
If your device is active, tap Answer. To reject a call, tap Decline.
•
If your device is locked, drag to
to answer or to
to reject the call.
NOTE: You can also send a message to reject the call. Swipe up Reject with message then select from the
displayed options to send the message.
55
Dual SIM feature
The dual SIM feature of your ZenFone lets you manage the settings of the installed micro SIM cards. With this
feature, you can enable/disable the micro SIM cards, assign SIM names, or set one as a preferred network.
Renaming your micro SIM cards
Change the names of your micro SIM cards on your ZenFone so that you can identify them easily.
To change the names of your micro SIM cards, tap SIM1 name: SIM1 or SIM2 name: SIM2 then key in the
names for your micro SIM cards.
NOTE: If your SIMs have different mobile service providers, we recommend you to use the names of these
providers for your SIM names. If both SIMs have the same mobile service provider, we recommend you to use the
mobile numbers for your SIM names.
56
Assigning a default micro SIM card
Assign a micro SIM card as your default SIM for voice calls and data services.
SIM card for voice calls
When you make a call, your ZenFone automatically uses the default micro SIM card to connect the call.
To assign a micro SIM card for voice calls, tap Voice call then tap the SIM that you want to use.
IMPORTANT! You can only use this feature if you make a call from your contacts list.
SIM card for data service
To assign a micro SIM card for data service, tap Data service network then select from SIM1 or SIM2.
57
Backup/restore call logs
Have your call logs stored in your ZenFone to track the calls that you’ve received, made, or missed. You can
also send the saved call logs to your online storage account or e-mail it via the installed e-mail apps in your
ZenFone.
Creating a call log backup
To back up call logs:
1. From the Home screen, tap
then tap
to hide the keypad.
2.Tap then tap Backup call log.
3.Tap Backup call log to device to save the call log backup in your ZenFone. To email the call log backup,
tap Backup call log to device and send out.
4. Key in a backup file name then tap OK. After the backup is successful, tap OK.
Restoring call log backups
To restore call log backups:
1. From the Home screen, tap
2. Tap
then tap
to hide the keypad.
then tap Restore call log.
3. Select a call log backup that you want to restore, then tap OK.
4. After restoring call log is successful, tap OK.
5. Tap
58
to view the restored call logs.
4
Send messages and more
Messaging
Messaging lets you send, promptly reply, or reply at a later time to important messages from your contacts in
any of your SIM cards installed on your device. You can also email your message threads or conversations to
others to keep them in the loop.
Sending or replying to messages
To start a message thread:
1. From the Home screen, tap
, then tap
2. In the To field, enter the number or tap
.
to select a contact from your list.
3. Start composing your message in the Type message field.
4. When you’re done, select the SIM account where you’re going to send your message from.
60
Setting up your messaging options
You can forward a message thread or conversation to others, and set an alert so you can reply to an important
message at a convenient time.
To forward an SMS conversation:
1. From the Home screen, tap
.
2. Tap to select a sender image, then tap
> Forward SMS conversation.
3.Tap Select All or any of the messages from the thread, then tap Forward.
4. In the To field, tap
to select a contact’s email address or mobile number.
5. When you’re done, select the SIM account where you’re going to send your message from. The
conversation will be forwarded as an MMS (Multimedia Messaging Service) message.
NOTES:
• Ensure that you have MMS subscription with your mobile service provider.
• Ensure that data access is enabled on your device. From your Home screen, tap Mobile networks, then tick Data enabled.
> Settings > More... >
• Mobile data and messaging rates apply when forwarding conversations to others.
To set a message as a reply-later task:
When you receive an important message at an untimely time, you can add it to your to-do list so you can reply
to it at a later time.
1. In the message screen, tap
.
2.Tap Reply later. The message is added to your Do It Later tasks.
3. When you’re ready to reply to the message, go to the Do It Later app from All Apps.
61
Omlet Chat
Omlet Chat is an online messaging app that lets you chat with your friends on the spot, send multimedia
messages, and store your data on any of your Cloud accounts securely and privately.
NOTE: Omlet Chat app may only be available in some countries.
Registering to Omlet Chat
There are two ways to register to Omlet Chat, via mobile phone number and e-mail account or Facebook
account.
Registering your mobile phone number
Use your mobile phone number to sign in to Omlet Chat.
To register your mobile phone number:
1. Tap
then tap Omlet Chat app.
2. On the Sign in page, select your country and key in your mobile phone number then tap Next. Omlet
Chat app sends a text message containing the PIN to proceed with the registration.
3. Key in the PIN then tap Next.
4. Key in your name then tap Get Started.
5. If you want Omlet Chat to automatically update your friends from your contacts list, tap Okay! Let’s do it!
If you want to add your friends manually, tap No thanks.
NOTES:
• A series of screens appear for the app's introduction. Follow the onscreen instructions until Omlet Chat main
screen appears.
• Omlet Chat app can only add contacts with Omlet chat installed to their devices.
6. On the Omlet Chat main screen, tap START CHAT then select a contact that you want to chat.
62
Registering your e-mail or Facebook account
Use your e-mail or Facebook account to sign in to Omlet Chat.
To register your e-mail or Facebook account:
then tap Omlet Chat app.
1. Tap
2. On the Sign in page, tap Connect a different account here to select an account from Email or
Facebook, then follow the succeeding onscreen instructions.
•
If you select Email, key in your e-mail account then tap Next. Omlet Chat app will send a confirmation
message to your e-mail account.
•
If you select Facebook, Omlet Chat app will take you to Facebook to log in to your Facebook account.
3. Key in your name then tap Get Started.
4. If you want Omlet Chat to automatically update your friends from your contacts list, tap Okay! Let’s do it!
If you want to add your friends manually, tap No thanks.
NOTES:
• A series of screens appear for the app's introduction. Follow the onscreen instructions until Omlet Chat main
screen appears.
• Omlet Chat app can only add contacts with Omlet chat installed to their devices.
5. On the Omlet Chat main screen, tap START CHAT then select a contact that you want to chat.
63
Sending Omlet invites
To add contacts to Omlet Chat, you need to send an invite to your friends to download and use Omlet Chat.
To send Omlet invitation:
1.Tap Contacts on the Omlet Chat menu.
2. From the Add contacts screen, tap Invite a friend then select from following options:
•
Invite an Email or Phone number. Key in the mobile phone number or e-mail of your friend then tap
Go.
•
Invite Facebook friends. Tap to log in to your Facebook account.
•
Invite address book friends. Tap to invite friends from the contacts list of your e-mail.
3. Omlet Chat app gathers the contacts of your account. After selecting the contacts, follow the onscreen
instructions to complete the operation.
64
•
For Facebook app, tick to select the contacts, then tap Send.
•
For address book, tick to select the contacts, then tap SEND INVITES.
Using Omlet chat
Send text and multimedia messages for a fun, creative, and interactive conversation.
To start conversation, tap Contacts from the Omlet Chat menu then tap the contact name.
Sending a chat message
To send a chat message, key in your message in What’s up field then tap
.
Sending a voice message
To send a voice message, tap and hold
while saying your message then release
to send.
65
Sending a virtual sticker
To send a virtual sticker, tap
then select from the available virtual stickers.
NOTE: You can download more virtual stickers from Sticker Store. To download the virtual stickers, tap
then tap
.
>
Sending multimedia messages
From the chat thread, tap
then select from these icons to send a specific mutlimedia message.
Tap to launch Camera app and
send the captured picture
Tap to send a picture from
your ZenFone.
Tap and hold an app
then tap Pin it! to add
to the list of apps in
Omlet Chat
Tap to send your current
address with a map snippet
Tap to create a sticker
from a saved picture.
Tap to edit and send a
photo.
Tap to create and send
drawings or doodles.
Tap to search GIP files
in the Internet and
send the GIF file to you
message thread
Swipe up the screen shown above to view these icons:
Tap to send polls/
surveys
Tap to share a picture for a
limited time.
Tap to search and send video clips from YouTube™.
66
5
Access your emails
Email
Add Exchange, Gmail, Yahoo! Mail, Outlook.com, POP3/IMAP accounts so you can receive, create, and browse
emails right from your device. You can also sync your email contacts from these accounts to your ZenFone.
IMPORTANT! You must be connected to the Internet so you can add an email account or send and receive emails
from added accounts.
Setting up an email account
To set up an email account:
1. From the Home screen, tap Email to launch the Email app.
2. Tap the mail provider you want to setup.
3. Key in your email address and password and tap Next.
NOTE: Wait while your device automatically checks your incoming and outgoing mail server settings.
4. Configure the Account settings such as inbox checking frequency, sync days, or notification for incoming
emails. When done, tap Next.
5. Key in an account name that you want to be displayed in the outgoing messages, then tap Next to log
into your inbox.
68
Adding email accounts
To add other email accounts:
1. From the Home screen, tap Email to launch the Email app.
2. Tap
> Settings, then add an email account.
3. Tap the mail provider you want to setup.
4. Follow the succeeding instructions to complete setting up your new email account.
NOTE: You may also refer to steps 3 to 5 in the Setting up an email account section of this manual to complete
this setup process.
69
Gmail
Using the Gmail app, you can create a new Gmail account or synchronize your existing Gmail account so you
can send, receive, and browse emails right from your device.
Setting up a Gmail account
1. Tap Google then tap Gmail.
2.Tap Existing and key in your existing Gmail account and password, then tap
.
NOTES:
•
Tap New if you do not own a Google account.
• When signing in, you have to wait while your device communicates with Google servers to setup your account.
70
3. Use your Google account to backup and restore your settings and data. Tap [right arrow icon] to sign in to
your Gmail account.
IMPORTANT! If you have several email accounts aside from Gmail, use Email app to set up and access all your
email accounts.
71
72
6
Capture moments
Launching the Camera app
Capture images and record videos using your ZenFone’s Camera app. Refer to any of the steps below to open
the Camera app.
From the lock screen
Drag down
until the camera app is launched.
From the home screen
Tap Camera.
Using the volume key
While your ZenFone is on sleep mode, double-click the volume key to wake it up and immediately launch the
Camera app.
NOTE: Before using the volume key to launch the Camera app, enable this function from Settings > Lock screen,
then slide Instant camera to ON.
74
Using Camera for the first time
After launching the Camera for the first time, two consecutive features appear to help you get started: Tutorial
and Image locations.
Tutorial
If it is your first time to use your ZenFone’s camera, you will encounter the following tutorial screen after
launching the Camera app. Refer to the following steps to proceed from this screen.
1. On the Tutorial screen, tap Skip if you want to skip viewing or Start to view the basic tutorial about using
Camera.
2. After tapping either of these options, you will then proceed to the Image Locations screen.
75
Image Locations
After going through the Tutorial screen, the Image Locations screen appears to help you create automatic
location tags for your images and videos. Refer to the following steps to proceed from this screen:
1. On the Image Locations screen, tap No thanks to proceed to the camera screen or Yes to set up location
tagging for your captured images and videos.
2.Slide Location Access to ON to enable the location tagging feature.
3.Tap Agree on the next screen to fully enable the feature and proceed to the Camera screen.
76
Camera home screen
Tap the icons to start using your camera and explore the image and video features of your ZenFone.
Switch between the
front and rear cameras
Use advanced camera settings
Zoom in or zoom out
Record videos
Take photos
See the gallery
77
Image settings
Adjust the appearance of your captured images by configuring your camera’s settings using the steps below.
IMPORTANT! Apply the settings first before taking images.
1. On the camera’s home screen, tap
>
2. Scroll down and configure the available options.
Image
Configure the image quality using these options.
78
.
Shoot mode
Set your shutter speed to Timer mode or change the Burst speed under this option.
Focus & exposure
Enable Touch auto-exposure or Face detection under this option.
79
Video settings
Adjust the appearance of your recorded videos by configuring your camera’s settings using the steps below.
IMPORTANT! Apply the settings first before taking images.
1. On the camera’s home screen, tap
>
.
2. Scroll down and configure the available options.
Image
Configure the video quality using these options.
Focus & exposure
Enable Touch auto-exposure under this option.
80
Advanced camera features
Explore new ways of capturing images or videos and make captured extra special moments using the
advanced camera features of your ZenFone.
IMPORTANT! Apply the settings first before taking images. Available features may vary per model.
Self timer
After selecting Self timer and then the time , your shutter starts taking burst shots two (or five / ten) seconds
after you actually press the shutter button.
Taking photos
1. From the Camera app’s home screen, tap
2. Tap
.
> Self timer.
3. Select the timer.
81
82
7
Gallery
Using the Gallery
View images and play videos on your ZenFone using the Gallery app.
This app also allows you to edit, share, or delete image and video files stored in your ZenFone. From Gallery,
you can display images in a slideshow or tap to view the selected image or video file.
To launch Gallery, tap
Main screen
84
> Gallery.
Viewing files from other source locations
By default, your Gallery displays all the files on your ZenFone according to their album folders.
To view files from other locations accessible via your ZenFone:
1. From the main screen, tap
.
2. Tap any of the following source locations to view their respective files.
IMPORTANT! Internet connection is required for viewing photos and videos under People.
85
Sharing files from the gallery
To share files from the gallery:
1. From Gallery screen, tap the folder where the files you want to share are located.
2. After opening the folder, tap
to activate file selection.
3. Tap the files you want to share. A check mark appears on top of the image you select.
4. Tap
then select from the list where you want to share the image/s.
Deleting files from the gallery
To delete files from the gallery:
1. From Gallery screen, tap the folder where the files you want to delete are located.
2. After opening the folder, tap
to activate file selection.
3. Tap the files you want to delete. A check mark appears on top of the image you select.
(when the Zenfone is in landscape view) or tap
4.Tap
(when the Zonfone is in portrait view).
86
then tap Delete from the pop-up window
Editing an image
The Gallery also features its own image editing tools that you can use to enhance images saved on your
ZenFone.
To edit an image:
1. From Gallery screen, tap the folder where the files are located.
2. After opening the folder, tap the image you want to edit.
3. Once the image is opened, tap it again to show its functions.
4. Tap
to open the image editing toolbar.
5. Tap any of the icons on the editing toolbar to apply changes to the image.
87
88
8
Work hard, play harder
Supernote
Turn note-taking into a fun and creative activity that syncs with your mobile data using Supernote.
This intuitive app allows you to create notes organized per notebook by directly writing or drawing on the
touchscreen. While creating notes, you can also add multimedia files from other apps and share them via
social networks or your Cloud storage account.
Tap to select the input mode
Tap to undo the change made
Tap to redo the change made
Tap to configure the settings for the notebook
90
Understanding icons
Depending on your selected input mode, these icons appear as you take down your notes on SuperNote.
Select this type mode when you want to use the onscreen keyboard to enter your notes.
Select this write mode when you want to scribble or write your notes.
Select this draw mode when you want to create drawings or doodles.
When in draw mode, tap this icon to select the drawing tool to use, and the stroke color or size.
When in draw mode, tap this icon to erase some contents in your notes.
Tap this icon to take a photo or video, record audio, add timestamp and more to your notes.
Tap this icon to add a new page to your notebook.
91
Creating a notebook
To create new files using Supernote, refer to the following steps:
1. Tap
> Supernote.
2.Tap Add a new notebook.
3. Name the file and select Pad or Phone as the page size.
4. Select a template and start writing your notes.
Sharing a notebook on the Cloud
You may share your notebook on the Cloud using the following steps:
1. On the Supernote home screen, tap-and-hold the notebook you would like to share.
2. In the pop-up screen, tap Enable cloud sync.
3. Input your ASUS WebStorage account’s User name and Password details to proceed with syncing your
notebook to the Cloud.
4. Once the notebook has been successfully synced to the Cloud, the Cloud icon appears on top of the
shared notebook.
Sharing a note the Cloud
Aside from your notebook, you may also share individual notes from your Supernote to your Cloud storage
account. To do this:
1. Launch the notebook that contains the note you want to share.
2. Tap-and-hold the note you want to share.
92
3. In the pop-up screen, tap Share then select the type of file format you want to share it as.
4. In the next screen, select the Cloud storage account where you would like to share your note.
5. Follow the succeeding instructions to complete sharing your selected note.
Calendar
The Calendar app enables you to keep track of important events using your ZenFone. Along with creating
events you may also add notes, set reminders, or create a countdown notice to ensure you don’t forget these
important occasions.
Creating an event from your ZenFone
1. Tap
> Calendar.
2.Tap New Event to start creating a new event.
3. In the New event screen, input all the necessary details of your event.
4. Once finished, tap
to save and exit.
93
Adding an account to Calendar
Aside from creating an event logged on your ZenFone, you can also use Calendar to create events that get
automatically synced with your online accounts. But first, these accounts must be added to Calendar using the
following steps:
1.Launch Calendar.
2. Tap
> Accounts.
3. Tap the account you want to add.
4. Follow the succeeding onscreen instructions to complete adding the new account to Calendar.
Creating an event from your account
After adding online accounts that you would like to sync with Calendar, you may now use your ZenFone to
create notifications for those online accounts by following these steps:
NOTE: Your online account must already be added to Calendar before you can proceed with the following steps.
You may refer to the Adding an account to Calendar section in this e-manual for more details.
1. Tap
> Calendar.
2.Tap New Event to start creating a new event.
3. In the New event screen, tap My Calendar to view all the accounts currently synced with the Calendar.
4. Tap the account where you would like to create a new event.
5. In the New event screen, input all the necessary details of your event.
94
What’s Next
Do not miss out on important events, having fun out in the sun, or getting messages/emails/calls from your
favorite people. Set up your calendar of events, Favorites and VIP groups, or weather update settings to get
alerts and reminders of what’s next. View your What’s Next alerts from the Lock screen, Systems Notification
panel, and What’s Next widget or app.
If you’re using What’s Next for the first time, you would have to set up your calendar account or use the
Calendar app in your ZenFone.
NOTES:
• Set up your favorite contacts and VIP groups to receive alerts for missed calls and unread messages or emails
from people who matter to you.
• Get details on creating your calendar of events from the Calendar section.
• Learn how to get weather updates from the Weather section.
95
Do It Later
Get hold of even the most trivial things in your busy life. Even when you’re too busy, reply to your emails, SMS
messages, calls, or read news online at your convenience.
Mark your unread messages or emails, interesting web pages, and missed calls as Reply Later, Read Later, or
Call Later items. These marked items will be added to your Do It Later tasks, and you can act on these tasks at
a convenient time.
NOTE:
• Popular third-party apps that support Do It Later include Google Maps, Google Chrome, Google Play,
YouTube, and iMDb.
• Not all apps can share and add tasks to Do It Later.
Accessing or creating to-do tasks
When you’ve previously set a message or email as Reply Later, or a call as Call Later, or a web page as Read
Later, you can go back to these important message/email/call/web page on the Do It Later app.
To access your to-do tasks:
1. From the home screen, tap
, then tap Do It Later from All Apps.
2. Select the task that you want to act on.
To create a new to-task:
From the Do It Later screen, tap
96
, then proceed to create your to-do task.
Weather
Get real-time weather updates straight from your ZenFone using the weather app. Using Weather, you can also
check other weather details from around the world.
Weather app launcher
97
Weather home screen
Tap this to configure the
Weather settings.
Tap this to search for weather
information from other cities.
Swipe down to see other
weather information.
98
Clock
Customize the time zone settings of your ZenFone, set alarms, and use your ZenFone as a stop watch using
the Clock app.
Launching Clock
Launch the Clock app using either of the following options:
•
From your ZenFone’s home screen, tap the digital clock display.
•
Tap > Clock.
99
World Clock
Tap
to access the world clock settings of your ZenFone.
Tap this to access the settings of the
world clock feature.
Tap this to set your clock on night
mode.
Tap this to view the list of cities
marked on your world clock.
Tap this to add a new city to mark on
your world clock’s map.
100
Alarm clock
Tap
to access the world clock settings of your ZenFone.
Tap this to access the settings of the
alarm clock feature.
Tap this to delete any of the
previously set alarms.
Tap this to set a new alarm time.
101
Stopwatch
Tap
to use your ZenFone as a stopwatch.
Tap this button to start running the
stopwatch feature.
102
Timer
You may set multiple timer options for your ZenFone. To do this, follow the steps below:
Setting the timer
1. Tap
to access the timer feature of your ZenFone.
numeric keypad
2. Use the numeric keypad to input your target time then tap start to start the timer.
103
Adding or deleting timer settings
You may also add new timer settings or delete existing ones that you no longer need. To do any of these
options, refer to the following steps:
1. Tap
to access the timer feature of your ZenFone.
2. If you previously created a timer setting, these would appear on your Timer home screen. You may delete
or add new timer settings using the icons on your Timer home screen.
Tap this to create a new timer setting.
Tap this to delete the previously set
timer.
104
File Manager
Using File Manager allows you to easily locate and manage your data on the internal storage of your ZenFone
and its connected external storage devices.
Accessing the internal storage
To access the internal storage:
1.Tap
> File Manager.
2. Tap
> Internal storage to view the contents of your ZenFone then tap an item to select.
105
Accessing the external storage device
To access the external storage device:
1. Insert a microSD card into your ZenFone.
NOTE: For more details, refer to the Installing a memory card section in this user guide.
2.Tap
> File Manager.
3.Tap
> MicroSD to view the contents of your microSD card.
106
Accessing Cloud Storage
IMPORTANT! Enable Wi-Fi on your ZenFone to view files from Cloud Storage.
To access files saved on your cloud storage accounts:
1.Tap
> File Manager.
2. Tap
then tap a cloud storage location under Cloud Storage.
107
108
9
The Internet
Browser
Your browser’s clean and intuitive Zen interface makes it easier to surf web contents at a fast page loading
speed via its Chrome-based browser engine. It also lets you share or email web contents, as well as send it as a
read later task.
Go to page that you want to share, then tap .
• Tap share a page, tap Share page, then select the account or app where you want to share the page to.
• To send a page for later reading, tap Read later. The page is added a to-do task in your Do It Later app.
NOTES:
• Ensure that your ZenFone is connected to a Wi-Fi or mobile network.
• If you connect to a mobile network, charges may apply based on your network plan.
• Refer to section Connecting to a Wi-Fi network for details.
• Access your to-do tasks from the Do It Later app on All Apps.
110
10
Fun and entertainment
Using headset
Have the freedom to do other things while you’re in a call or enjoy listening to your favorite music, using a
headset.
Connecting audio jack
Insert the 3.5mm headset jack into the audio port of your device.
WARNING!
• Do not insert other objects into the audio jack port.
• Do not insert a cable with electric power output into the audio jack port.
• Listening at a high volume for long periods can damage your hearing.
NOTES:
• We highly recommend to use only compatible headsets or the bundled headset with this device.
• Unplugging the audio jack while listening to music, automatically pauses the music played.
• Unplugging the audio jack while watching a video, automatically pauses the video playback.
112
Audio Wizard
AudioWizard allows you to customize the sound modes of your Notebook PC for a clearer audio output that
fits actual usage scenarios.
Using Audio Wizard
To use AudioWizard:
1.Tap ASUS > Audio Wizard.
2. In the AudioWizard window, tap the sound mode you want to activate then tap Done to save and exit.
113
Play Games
Get the latest games online and share them in your social media accounts using the Play Games app. You can
also join multiplayer games and check out leaderboards for some competitive gaming fun.
IMPORTANT! Log in to your Google account to maximize the features of Play Games.
Using Play Games
To use Play Games:
1.Tap
> Play Games.
2. Tap the option you would like to use.
Tap this to see an overview of your gaming activity. It also shows
the gaming activity of your Google+ contacts.
Tap this to show your gaming activities under the following
options: ALL MY GAMES, MOST RECENTLY PLAYED, INSTALLED
Tap this to see all the games you played using your Google+
account.
Tap this to view all your fellow contacts in Google who are also
playing games via Play Store. You may view them under these
options: ALL, MOST RECENT, YOU MAY KNOW
Tap this to browse through games under the following categories:
FEATURED, POPULAR, POPULAR MULTIPLAYER.
Tap this to launch Play Store’s Games category.
114
Music
Access your music collection right on your ZenFone using the Music app. Music allows you to play music files
stored internally or from an external storage device.
Launching Music
To launch Music, tap
> Music.
Playing songs
By default, Music plays all the songs saved in your ZenFone’s internal storage system. Start playing songs by
tapping on them.
Playing songs from your SD card
To play songs saved from your SD card:
1. Ensure that your SD card is already inserted in your ZenFone.
NOTE: For details on how to install the SD card, refer to the Insert micro SD card section in this e-Manual.
2. From the Music home screen, tap
.
3. Under My Device, tap Music to browse through the music files saved in your SD card.
115
Playing Cloud music
IMPORTANT! Enable Wi-Fi on your ZenFone to view files from Cloud music.
Your ZenFone currently supports music files saved in the following cloud storage accounts:
•
ASUS Webstorage
•
Dropbox
•
OneDrive
•
Drive
Adding a cloud storage account
To play songs saved from any of these cloud storage accounts:
.
1. From the Music home screen, tap
2. Under Cloud Music, select Add cloud service.
3. Select the cloud storage service where you want to play music files from.
4. Follow the succeeding instructions to complete signing in to your cloud storage account.
Playing songs from a cloud storage account
1. Launch the Music app then tap
.
2. Under Cloud Music, select the cloud storage service you want to play songs from.
116
FM Radio
Listen to your favorite local radio stations using your ZenFone.
To use this feature:
1. Connect the bundled headset with your ZenFone.
2. Tap
> FM Radio.
FM Radio home screen
Tap this to turn off the
FM Radio.
Tap this to switch
between headset or
loudspeaker mode.
Tap any of these buttons
to set the current
frequency as a radio
preset.
Tap this to change the
band frequency of your
FM radio.
Tap these buttons to
search for radio stations.
117
Sound recorder
Record audio files using your ZenFone by enabling the Sound Recorder app.
Launching Sound Recorder
To launch Sound Record, tap
> Sound Recorder.
Sound Recorder home screen
Tap this to customize the
Sound Recorder settings.
Tap this to start audio
recording.
Tap this to view the list of
saved audio recording files.
118
11
Maintain your Zen
Keeping your device up-to-date
Keep your ZenFone in the loop of Android system updates and upgraded apps and features.
Updating your system
To update your ZenFone:
1. Tap
then tap Settings.
2. On the Settings screen, slide down to display other items then tap About.
3.Tap System update then tap Check Update.
NOTE: You can preview the last time your ZenFone’s system was updated at the Last update check: of the System
update window.
Storage
You can store data, apps, or files on your ZenFone (internal storage), on an external storage, or on an online
storage. You need an internet connection to transfer or download your files on an online storage. Use the
bundled USB cable to copy files to or from the computer to your ZenFone.
120
Backup and reset
Back up data, Wi-Fi passwords, and other settings to Google servers using your ZenFone.
To do this:
1. Tap
then tap Settings > Backup and reset.
2. From the Backup & reset window, you can:
•
Backup my data: This feature backs up your data, Wif-Fi passwords, and other settings to Google
servers when enabled.
•
Backup account: Allows you to specify the acount you to be associated when you save your backup.
•
Automatic Restore: This features facilitates restoration of backed up settings and data when you
renintall an app.
•
Factory data reset: Erases all data on phone.
121
Securing your ZenFone
Use the security features of your ZenFone to prevent unauthorized calls or access of information.
Unlocking your screen
When the screen is locked, you can open it with the security unlocking options that the ZenFone offers you.
To select the screen unlock of your ZenFone:
1. Tap
then tap Settings > Lock Screen.
2.Tap Screen lock then select an option to unlock your ZenFone.
NOTES:
• Refer to section Unlock screen options for more information.
• To deactivate the unlock screen option that you set, tap None on Choose screen lock screen.
Unlock screen options
Choose from these options to lock your ZenFone.
•
122
Slide: Slide your finger to any direction to unlock your ZenFone.
•
Pattern: Slide your finger on the dots and create a pattern.
IMPORTANT! You can create a pattern with a minimum of four dots. Ensure to remember the pattern that you
created to unlock your device.
123
•
PIN: Key in at least four numbers to set a PIN.
IMPORTANT! Ensure to remember the PIN that you created to unlock your device.
124
•
Password: Key in at least four characters to create a password.
IMPORTANT! Ensure to remember the password that you created to unlock your device.
125
Configuring the other screen security features
Aside from the mode of screen lock, you can also do the following on the Screen security window:
•
Quick Access: Slide the Quick Access switch to ON to launch apps on the lock screen.
•
What’s Next widget: Slide the What’s Next Widget switch to ON to show the said widget on the lock
screen.
•
Instant camera: Slide the Instant camera switch to ON to launch the Camera app even if your ZenFone is
in idle mode by pressing the volume button twice.
•
Owner info: Tap this to edit and key in the information that you want to appear even when your screen
is locked.
126
Setting your ZenFone identity
Know your ZenFone’s identity such as serial number, IMEI (International Mobile Equipment Identity) number,
or model number.
This is important, as when you may lose your ZenFone, you can contact your mobile carrier and provide the
information to blacklist the unauthorized use of your ZenFone.
To display your ZenFone’s identity:
1.Tap All Apps then tap Settings.
2. On the Settings screen, slide down to display other items then tap About. The About screen displays the
status, legal information, model number, operating system version, hardware, and software information
of your ZenFone.
3. To see the serial number, SIM contact number, and IMEI of your ZenFone, tap Status.
127
128
12
Connect your Zen
Wi-Fi
The Wi-Fi technology of your ZenFone gets you connected to the wireless world. Update your social media
accounts, browse the Internet, or exchange data and messages wirelessly with your ZenFone.
Enabling Wi-Fi
To enable Wi-Fi:
1. Tap
on the Home screen then tap Settings app.
2. Slide the Wi-Fi switch to the right to turn on the Wi-Fi.
NOTE: You can also enable the Wi-Fi from Quick Settings screen. Refer to section Quick Settings on how to
launch Quick Settings screen.
Connecting to a Wi-Fi network
To connect to a Wi-Fi network:
1. On the Settings screen, tap Wi-Fi to display all detected Wi-Fi networks.
2. Tap a network name to connect to it. For a secured network, you may be prompted to key in a password
or other security credentials.
NOTES:
• Your ZenFone automatically reconnects to the network that you connected with previously.
• Turn off Wi-Fi feature to help save battery power.
130
Disabling Wi-Fi
To disable Wi-Fi:
1. Tap
on the Home screen then tap Settings app.
2. Slide the Wi-Fi switch to the left to turn off the Wi-Fi.
NOTE: You can also disable the Wi-Fi from Quick Settings screen. Refer to section Quick Settings on how to
launch Quick Settings screen.
Bluetooth®
Use the Bluetooth feature of your ZenFone to send or receive files and stream multimedia files with other
smart devices over short distances. With Bluetooth, you can share your media files with your friends’ smart
devices, send data for print with a Bluetooh printer, or play music files with a Bluetooth speaker.
Enabling Bluetooth®
To enable Bluetooth:
1. Tap
on the Home screen then tap Settings app.
2. Slide the Bluetooth switch to the right to turn on the Bluetooth.
NOTE: You can also enable the Bluetooth from Quick Settings screen. Refer to section Quick Settings on how to
launch Quick Settings screen.
131
Pairing your ZenFone to a Bluetooth® device
Before using the Bluetooth feature of your ZenFone in full scale, you have to pair it first with the Bluetooth
device. The ZenFone automatically stores the pairing connection of the Bluetooth device.
To pair your ZenFone to a Bluetooth device:
1. On the Settings screen, tap Bluetooth to display all available devices.
IMPORTANT!
• If the device that you want to pair is not in the list, ensure to enable its Bluetooth feature and is discoverable.
• See the user guide that came with your device to learn how to enable its Bluetooth and and set it to
discoverable.
2.Tap SEARCH FOR DEVICES to scan for more Bluetooth devices.
3. In the list of available devices, tap the Bluetooth device that you want to pair with. Follow the succeeding
instructions to complete the pairing.
NOTE: Turn off Bluetooth feature to help save battery power.
Unpairing your ZenFone from the Bluetooth® device
To unpair your ZenFone to a Bluetooth device:
1. On the Settings screen, tap Bluetooth to display all available and paired devices.
2. In the list of paired devices, tap
132
of Bluetooth device that you want to unpair, then tap Unpair.
Miracast™
Using Miracast technology, you can screencast your ZenFone screen to a Miracast-supported display. Doing
this allows an external display to become a dual monitor or second screen to your ZenFone.
Launching Miracast
There are two ways you can use to start using Miracast from your ZenFone:
From Quick settings
1. Setup the Miracast-supported display you want to use with your ZenFone.
2. Launch Quick settings on your ZenFone.
3. On the notification panel, tap Miracast.
4. Slide the Wireless display (Miracast) option to ON.
5. Refer to the SSID shown on your Miracast-supported display and select the same SSID on your ZenFone
to start pairing.
6. Once the connection is made, your Miracast-supported display shows the same content currently shown
on your ZenFone.
From Settings
1. Tap
> Settings.
2. Under Device, select Wireless display (Miracast).
3. Set the Wireless display (Miracast) option to ON.
4. Refer to the SSID shown on your Miracast-supported display and select the same SSID on your ZenFone
to start pairing.
5. Once the connection is made, your Miracast-supported display shows the same content currently shown
on your ZenFone.
133
Share Link
Share and receive files, apps, or media contents with other smart devices using Share Link app via a Wi-Fi
connection. With this app, you can send or receive files that are larger than 100 MB and lets you share or
receive multiple files at the same time. Share Link app sends and receives files faster than using Bluetooth.
NOTE: When sharing files using Share Link, your ZenFone automatically connects to the available Wi-Fi network in
your area.
IMPORTANT! You must enable the Wi-Fi Hotspot of your ZenFone to receive files. Refer to section Using the
Quick settings Notification Panel for more information.
Sharing files
To share files:
1. From your Home screen, tap
then tap Share Link.
2.Tap Send file then select from the options that appear on your screen.
134
3. Tap the files that you want to send then tap Done.
4. After your ZenFone detects the other devices, tap the device that you want to share your files with.
Receiving files
To receive files:
1. From your Home screen, tap
then tap Share Link.
2.Tap Receive file to receive the files from the sender.
135
The Cloud
Back up your data, sync files among different devices, and share files securely and privately via a Cloud
account such as ASUS WebStorage, Drive, OneDrive, and Dropbox.
ASUS WebStorage
Register for or sign in to ASUS WebStorage and get up to 5GB of free cloud storage account. Automatically
upload newly captured photos for instant sharing, sync files among different devices, or share files via your
ASUS WebStorage account.
NOTE: To the enjoy auto-upload function, enable Instant Upload from Settings > Instant Upload in your ASUS
WebStorage.
136
13
App essentials
Switching apps
When you’ve launched several apps on your Zen, you can easily switch between your recently-launched apps.
Tap
to view your recently-launched apps.
• Tap an app to view it.
• To remove an app, simply swipe it to the left or right.
Locking apps
Secure your apps from unauthorized use with a 4-12 digit password.
To lock your apps:
1.
From All Apps, tap
> Lock.
3. Enter a password containing 4-12 digits, then tap OK.
To change the password of your locked apps:
1.
From All Apps, tap
> Lock app settings. Enter your password when prompted.
2.Tap Change password, and enter your old and new password.
138
Downloading apps
Download tons of apps and games from Play Store directly to your ZenFone. Some of the apps and games are
free, others you may need to purchase using a credit card or other payment form.
To download apps:
1.Tap Play Store from your Home screen.
2. Follow the onscreen instructions to sign in to your existing Gmail account. If you don’t have a Gmail
account, please create one.
3. After successfully signing in, you can start downloading an app from Play Store.
139
140
14
There’s more to your Zen
Power Saver
Fully maximize or extend the power of your ZenFone even when it is idle or while it stays connected to your
network. Smartly customize the power settings for your frequent activities such as reading emails or watching
videos.
Setting up Power Saver
Maximize, optimize, or customize the power of your ZenFone with some smart power saving options.
To set up Power Saver:
1.From All Apps, tap Power Saver.
2. Slide Smart saving to ON.
142
3. Select any of these modes:
•• Ultra-saving mode: Disconnects the network connection when your ZenFone is idle to fully
maximize its battery life.
•• Optimized mode: Extends the battery life while your ZenFone stays connected to your network.
•• Customized mode: Allows you to set up the power settings for your frequent activities, and
Customizing Power Saver
Set the brightness level for your frequent activities such as reading emails or books, watching videos, browsing
websites, and listening to music. You can also enable the power saving function for some apps or enable the
auto-disconnection of your network when your ZenFone is asleep.
To customize Power Saver:
1.From Power Saver, tick Customized mode, then tap
.
2. Tick an activity, then set the brightness level in percentage.
3. If you want to enable the auto-disconnection of your network, tick IM and other apps using push
notification. Your ZenFone will automatically disconnect from your network when it is idle, and will
resume the network connection when you wake up your ZenFone.
143
Splendid
ASUS Splendid allows you to easily adjust the display settings.
Tap to switch between tabs
Move to turn on/ off the
Vivid Mode
Move to adjust the color
temperature
Tap to reset to the last
changes you made
Tap to set to factory
defaults
To use ASUS Splendid:
1. Tap
> ASUS Splendid.
2. Adjust the screen color temperature and contrast through the Temperature and Enhancement tabs.
3.Tap Done to apply the changes.
144
Appendix
Notices
Federal Communications Commission Statement
This device complies with FCC Rules Part 15. Operation is subject to the following two conditions:
•
This device may not cause harmful interference.
•
This device must accept any interference received, including interference that may cause undesired
operation.
This equipment has been tested and found to comply with the limits for a class B digital device, pursuant
to Part 15 of the Federal Communications Commission (FCC) rules. These limits are designed to provide
reasonable protection against harmful interference in a residential installation. This equipment generates,
uses, and can radiate radio frequency energy and, if not installed and used in accordance with the instructions,
may cause harmful interference to radio communications. However, there is no guarantee that interference
will not occur in a particular installation. If this equipment causes harmful interference to radio or television
reception, which can be determined by turning the equipment off and on, the user is encouraged to try to
correct the interference by doing one or more of the following measures:
•
Reorient or relocate the receiving antenna.
•
Increase the separation between the equipment and receiver.
•
Connect the equipment into an outlet on a circuit different from that to which the receiver is connected.
•
Consult the dealer or an experienced radio/TV technician for help.
Changes or modifications not expressly approved by the party responsible for compliance could void the
user‘s authority to operate the equipment.
The antenna(s) used for this transmitter must not be co-located or operating in conjunction with any other
antenna or transmitter.
Operation on the 5.15-5.25 GHz frequency band is restricted for indoor use only. The FCC requires indoor use
for the 5.15-5.25 GHz band to reduce the potential for harmful interference to co-channel Mobile Satellite
Systems. It will only transmit on 5.25-5.35 GHz, 5.47-5.725 GHz and 5.725-5.850 GHz bands when associated
with an access point (AP).
146
RF Exposure Information (SAR)
This device meets the government’s requirements for exposure to radio waves. This device is designed and
manufactured not to exceed the emission limits for exposure to radio frequency (RF) energy set by the Federal
Communications Commission of the U.S. Government.
The exposure standard employs a unit of measurement known as the Specific Absorption Rate, or SAR. The
SAR limit set by the FCC is 1.6 W/kg. Tests for SAR are conducted using standard operating positions accepted
by the FCC with the EUT transmitting at the specified power level in different channels.
The highest SAR value for the device as reported to the FCC is 1.18 W/kg when placed next to the body.
The FCC has granted an Equipment Authorization for this device with all reported SAR levels evaluated as
in compliance with the FCC RF exposure guidelines. SAR information on this device is on file with the FCC
and can be found under the Display Grant section of www.fcc.gov/oet/ea/fccid after searching on FCC ID:
xxxxxxxxx.
Canada, Industry Canada (IC) Notices
This Class B digital apparatus complies with Canadian ICES-003, RSS-210, and CAN ICES-3(B)/NMB-3(B).
Operation is subject to the following two conditions: (1) this device may not cause interference, and (2) this
device must accept any interference, including interference that may cause undesired operation of the device.
The IC ID for this device is 3568A-K00C.
Radio Frequency (RF) Exposure Information
The radiated output power of the Wireless Device is below the Industry Canada (IC) radio frequency exposure
limits. The Wireless Device should be used in such a manner such that the potential for human contact during
normal operation is minimized.
This device has been evaluated for and shown compliant with the IC Specific Absorption Rate (“SAR”) limits
when installed in specific host products operated in portable exposure conditions.
Canada’s REL (Radio Equipment List) can be found at the following web address: http://www.ic.gc.ca/app/sitt/
reltel/srch/nwRdSrch.do?lang=eng
Additional Canadian information on RF exposure also can be found at the following web address: http://www.
ic.gc.ca/eic/site/smt-gst.nsf/eng/sf08792.html
147
Canada, avis d’Industrie Canada (IC)
Cet appareil numérique de classe B est conforme aux normes canadiennes ICES-003, RSS-210 et CAN ICES3(B)/NMB-3(B).
Son fonctionnement est soumis aux deux conditions suivantes: (1) cet appareil ne doit pas causer
d’interférence et (2) cet appareil doit accepter toute interférence, notamment les interférences qui peuvent
affecter son fonctionnement. L’identifiant IC de cet appareil est 3568A-K00C.
Informations concernant l’exposition aux fréquences radio (RF)
La puissance de sortie émise par cet appareil sans fil est inférieure à la limite d’exposition aux fréquences
radio d’Industrie Canada (IC). Utilisez l’appareil sans fil de façon à minimiser les contacts humains lors du
fonctionnement normal.
Ce périphérique a été évalué et démontré conforme aux limites SAR (Specific Absorption Rate – Taux
d’absorption spécifique) d’IC lorsqu’il est installé dans des produits hôtes particuliers qui fonctionnent dans
des conditions d’exposition à des appareils portables.
Ce périphérique est homologué pour l’utilisation au Canada. Pour consulter l’entrée correspondant à l’appareil
dans la liste d’équipement radio (REL - Radio Equipment List) d’Industrie Canada rendez-vous sur: http://www.
ic.gc.ca/app/sitt/reltel/srch/nwRdSrch.do?lang=eng
Pour des informations supplémentaires concernant l’exposition aux RF au Canada rendez-vous sur: http://
www.ic.gc.ca/eic/site/smt-gst.nsf/eng/sf08792.html
148
IC Warning Statement
The device could automatically discontinue transmission in case of absence of information to transmit, or
operational failure. Note that this is not intended to prohibit transmission of control or signaling information
or the use of repetitive codes where required by the technology.
The device for the band 5150-5250 MHz is only for indoor usage to reduce potential for harmful interference
to co-channel mobile satellite systems; the maximum antenna gain permitted (for device in the bands 52505350 MHz and 5470-5725 MHz) to comply with the EIRP limit; and the maximum antenna gain permitted (for
devices in the band 5275-5850 MHz) to comply with the EIRP limits specified for point-to-point and non pointto-point operation as appropriate, as stated in section A9.2(3). In addition, high-power radars are allocated as
primary users (meaning they have priority) of the band 5250-5350 MHz and this radar could cause interference
and/or damage to LE-LAN devices.
149
The Country Code Selection feature is disabled for products marketed in the US/Canada. For product available
in the USA/Canada markets, only channel 1-11 can be operated. Selection of other channels is not possible.
EC Declaration of Conformity
This product is compliant with the regulations of the R&TTE Directive 1999/5/EC. The Declaration of
Conformity can be downloaded from http://support.asus.com.
Prevention of Hearing Loss
To prevent possible hearing damage, do not listen at high volume levels for long periods.
À pleine puissance, l’écoute prolongée du baladeur
peut endommager l’oreille de l’utilisateur.
For France, headphones/earphones for this device are compliant with the sound pressure level requirement
laid down in the applicable EN50332-1:2000 and/or EN50332-2:2003 standard required by French Article
L.5232-1.
150
CE Mark Warning
CE marking for devices with wireless LAN/ Bluetooth
This equipment complies with the requirements of Directive 1999/5/EC of the European Parliament
and Commission from 9 March, 1999 governing Radio and Telecommunications Equipment and mutual
recognition of conformity.
The highest CE SAR value for the device is 0.530 W/Kg.
This equipment may be operated in:
AT
BE
BG
CH
CY
CZ
DE
DK
EE
ES
FI
FR
GB
GR
HU
IE
IT
IS
LI
LT
LU
LV
MT
NL
NO
PL
PT
RO
SE
SI
SK
TR
DFS controls related to radar detection shall not be accessible to the user.
151
RF Exposure information (SAR) - CE
This device meets the EU requirements (1999/519/EC) on the limitation of exposure of the general public to
electromagnetic fields by way of health protection.
The limits are part of extensive recommendations for the protection of the general public. These
recommendations have been developed and checked by independent scientific organizations through
regular and thorough evaluations of scientific studies. The unit of measurement for the European Council’s
recommended limit for mobile devices is the “Specific Absorption Rate” (SAR), and the SAR limit is 2.0 W/Kg
averaged over 10 gram of body tissue. It meets the requirements of the International Commission on NonIonizing Radiation Protection (ICNIRP).
For next-to-body operation, this device has been tested and meets the ICNRP exposure guidelines and the
European Standard EN 62311 and EN 62209-2. SAR is measured with the device directly contacted to the body
while transmitting at the highest certified output power level in all frequency bands of the mobile device.
Power Safety Requirement
Products with electrical current ratings up to 6A and weighing more than 3Kg must use approved power cords
greater than or equal to: H05VV-F, 3G, 0.75mm2 or H05VV-F, 2G, 0.75mm2.
ASUS Recycling/Takeback Services
ASUS recycling and takeback programs come from our commitment to the highest standards for protecting
our environment. We believe in providing solutions for you to be able to responsibly recycle our products,
batteries, other components as well as the packaging materials. Please go to http://csr.asus.com/english/
Takeback.htm for detailed recycling information in different regions.
Coating notice
IMPORTANT! To provide electrical insulation and maintain electrical safety, a coating is applied to insulate the
device except on the areas where the I/O ports are located.
152
Green ASUS notice
ASUS is devoted to creating environment-friendly products and packaging to safeguard consumers’ health
while minimizing the impact on the environment. The reduction of the number of the manual pages complies
with the reduction of carbon emission.
For the detailed user manual and related information, refer to the user manual included in the ASUS Tablet or
visit the ASUS Support Site at http://support.asus.com/.
Regional notice for Singapore
This ASUS product complies with IDA Standards.
153
Model name: ASUS_T00I
Manufacturer:
ASUSTeK Computer Inc.
Address:
4F, No.150, LI-TE RD., PEITOU, TAIPEI 112, TAIWAN
Authorised represe
ntative in Europe:
ASUS Computer GmbH
Address:
HARKORT STR. 21-23, 40880 RATINGEN, GERMANY
154
COPYRIGHT INFORMATION
No part of this manual, including the products and software described in it, may be reproduced, transmitted, transcribed, stored in a
retrieval system, or translated into any language in any form or by any means, except documentation kept by the purchaser for backup
purposes, without the express written permission of ASUSTeK COMPUTER INC. (“ASUS”).
ASUS PROVIDES THIS MANUAL “AS IS” WITHOUT WARRANTY OF ANY KIND, EITHER EXPRESS OR IMPLIED, INCLUDING BUT NOT LIMITED
TO THE IMPLIED WARRANTIES OR CONDITIONS OF MERCHANTABILITY OR FITNESS FOR A PARTICULAR PURPOSE. IN NO EVENT SHALL
ASUS, ITS DIRECTORS, OFFICERS, EMPLOYEES OR AGENTS BE LIABLE FOR ANY INDIRECT, SPECIAL, INCIDENTAL, OR CONSEQUENTIAL
DAMAGES (INCLUDING DAMAGES FOR LOSS OF PROFITS, LOSS OF BUSINESS, LOSS OF USE OR DATA, INTERRUPTION OF BUSINESS AND
THE LIKE), EVEN IF ASUS HAS BEEN ADVISED OF THE POSSIBILITY OF SUCH DAMAGES ARISING FROM ANY DEFECT OR ERROR IN THIS
MANUAL OR PRODUCT.
Products and corporate names appearing in this manual may or may not be registered trademarks or copyrights of their respective
companies, and are used only for identification or explanation and to the owners’ benefit, without intent to infringe.
SPECIFICATIONS AND INFORMATION CONTAINED IN THIS MANUAL ARE FURNISHED FOR INFORMATIONAL USE ONLY, AND ARE SUBJECT
TO CHANGE AT ANY TIME WITHOUT NOTICE, AND SHOULD NOT BE CONSTRUED AS A COMMITMENT BY ASUS. ASUS ASSUMES NO
RESPONSIBILITY OR LIABILITY FOR ANY ERRORS OR INACCURACIES THAT MAY APPEAR IN THIS MANUAL, INCLUDING THE PRODUCTS
AND SOFTWARE DESCRIBED IN IT.
Copyright © 2014 ASUSTeK COMPUTER INC. All Rights Reserved.
LIMITATION OF LIABILITY
Circumstances may arise where because of a default on ASUS’ part or other liability, you are entitled to recover damages from ASUS.
In each such instance, regardless of the basis on which you are entitled to claim damages from ASUS, ASUS is liable for no more than
damages for bodily injury (including death) and damage to real property and tangible personal property; or any other actual and
direct damages resulted from omission or failure of performing legal duties under this Warranty Statement, up to the listed contract
price of each product.
ASUS will only be responsible for or indemnify you for loss, damages or claims based in contract, tort or infringement under this
Warranty Statement.
This limit also applies to ASUS’ suppliers and its reseller. It is the maximum for which ASUS, its suppliers, and your reseller are
collectively responsible.
UNDER NO CIRCUMSTANCES IS ASUS LIABLE FOR ANY OF THE FOLLOWING: (1) THIRD-PARTY CLAIMS AGAINST YOU FOR DAMAGES;
(2) LOSS OF, OR DAMAGE TO, YOUR RECORDS OR DATA; OR (3) SPECIAL, INCIDENTAL, OR INDIRECT DAMAGES OR FOR ANY ECONOMIC
CONSEQUENTIAL DAMAGES (INCLUDING LOST PROFITS OR SAVINGS), EVEN IF ASUS, ITS SUPPLIERS OR YOUR RESELLER IS INFORMED
OF THEIR POSSIBILITY.
SERVICE AND SUPPORT
Visit our multi-language web site at: http://support.asus.com
155
156