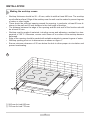
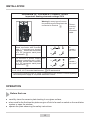
1
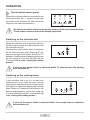
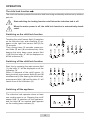
PB*4VQ247CF OPERATING MANUAL IOAA-646 (10.2014/1) DEAR USER, The plate is exceptionally easy to use and extremely efficient. After reading the instruction manual, operating the cooker will be easy. Before being packaged and leaving the manufacturer, the plate was thoroughly checked with regard to safety and functionality. Before using the appliance, please read the instruction manual carefully. By following these instructions carefully you will be able to avoid any problems in using the appliance. It is important to keep the instruction manual and store it in a safe place so that it can be consulted at any time. It is necessary to follow the instructions in the manual carefully in order to avoid possible accidents. Caution! Operate the appliance only after reading / understanding this Manual. The appliance has been designed only for cooking. Any other use (for example for heating) does not comply with its operating profile and may cause danger. The producer reserves a right to implement changes having no impact on the operation of the appliance. Certificate of compliance CE The Manufacturer hereby declares that this product complies with the general requirements pursuant to the following European Directives: l The Low Voltage Directive 2006/95/EC, l Electromagnetic Compatibility Directive 2004/108/EC, ErP Directive 2009/125/EC, and therefore the product has been marked with the symbol and the Declaration of Conformity has been issued to the manufacturer and is available to the competent authorities regulating the market. 2 TABLE OF CONTENTS Basic information.................................................................................................2 Safety instructions................................................................................................4 Description of the appliance...............................................................................8 Installation ...........................................................................................................9 Operation ..........................................................................................................12 Cleaning and maintenance ...............................................................................20 Emergency procedures......................................................................................22 Technical data ....................................................................................................24 Warranty ...................................................................................................................24 3 SAFETY INSTRUCTIONS Warning: The appliance and its accessible parts become hot during use. Care should be taken to avoid touching heating elements. Children less than 8 years of age shall be kept away unless continuously supervised. This appliance can be used by children aged from 8 years and above and persons with reduced physical, sensory or mental capabilities or lack of experience and knowledge if they have been given supervision or instruction concerning use of the appliance in a safe way and understand the hazards involved. Children shall not play with the appliance. Cleaning and user maintenance shall not be made by children without supervision. Warning: Unattended cooking on a hob with fat or oil can be dangerous and may result in fire. NEVER try to extinguish a fire with water, but switch off the appliance and then cover flame e.g. with a lid or a fire blanket. Warning: Danger of fire: do not store items on the cooking surfaces. 4 SAFETY INSTRUCTIONS Warning: If the surface is cracked, switch off the appliance to avoid the possibillity of electric shock. The appliance is not intended to be operated by means of an external timer or separate remote-control system. You should not use steam cleaning devices to clean the appliance. ● Before using the ceramic plate for the first time read the Operating Manual carefully as thus you can ensure safe operation and avoid damage to the plate. ● If the ceramic plate is operated near a radio, TV set or other emitting device, please check whether the touch panel works correctly. ● The ceramic plate should be installed by a qualified electrician. ● Do not install the plate near refrigerating devices. ● The furniture the plate is fitted in should be resistant to temperatures up to 100ºC. The requirement applies to the veneers, edges, plastic surfaces, glues and varnishes. ● The plate can be used only after it has been fitted into furniture, as only thus you will be protected from accidental contact with live components. ● Electric appliances can be repaired only by qualified specialists. Unprofessional repairs may compromise the safety of the appliance. ● The appliance is disconnected from the mains only when the mains plug is pulled out from the socket or when the fuse has been switched off. ● Never allow children to remain unattended near the cooktop nor to play with the control panel. ● When switched on the hotplates quickly become hot. To avoid unnecessary power consumption, switch them on only after putting a cooking pot. ● Residual temperature indicator built-in into the electronic system tells you whether the hotplate is still switched on and whether it is still hot. ● Should there be a power failure, all the settings and indications will be cancelled. Please ● ● be careful when the power supply is restored as hotplates which have been hot before power failure will no longer be controlled by the indicator. If there is a mains socket located near the hotplate, please make sure that the supply cord does not touch the hot places. Do not leave the plate unattended when cooking on fats and oils as they create fire hazard. 5 SAFETY INSTRUCTIONS ● Do not use plastic pots or containers made from aluminium foil as they melt in high temperatures and may damage the ceramic plate. ● Sugar, citric acid, salt etc., both in liquid and solid state, as well as plastic should not get into contact with a hot hotplate. ● If through carelessness, sugar or plastic gets on a hot hotplate, you may not switch off ● ● ● ● ● ● the plate but scrape away sugar or plastic using a sharp scrapper. Protect hands from burns. Use only flat-bottom pots and saucepans on your ceramic plate, without sharp edges or burrs as otherwise the plate may get permanently damaged. The heating surface of the ceramic plate is resistant to thermal shock. It is neither hot nor cold-sensitive. Avoid dropping objects on the plate. A point hit, for example a falling bottle with spices, may in unfavourable circumstances lead to cracks and splits appearing on your ceramic plate. Boiled over residuals of food may penetrate damaged places and get to the live components of the ceramic plate Should cracks or splits appear on the surface of your ceramic plate immediately disconnect it from the mains. In order to do so, switch off the fuse or pull out the mains plug from the socket. Call the Customer Service Please observe the maintenance and cleaning guidelines. Should you fail to proceed in compliance with the provided guidelines, you will lose your warranty rights 6 SAVING ENERGY UNPACKING The appliance is protected from damage during transportation by its packaging. After unpacking please dispose of the packing materials in a manner creating no risk to the Everybody who properly uses energy not only saves money but also consciously acts in aid of the natural environment. So let’s save electric energy by: environment. All materials used for packing are harmless to the natural environment, can be recycled in 100% and have been identified with appropriate symbol. ● Using proper cookware Pots and pans with flat and thick bottom help to save up to one-third of electric energy. Remember about the lid as otherwise the consumption of energy quadruples! Caution! Packing materials (polyethylene bags, pieces of polystyrene etc.) should be kept away from children during unpacking. ● Matching cookware to the size of the hotplate A cooking pot should neither be smaller nor bigger than the used hotplate. ● Maintaining hotplates and pot bottoms clean Dirt obstructs the transfer of heat – heavily burnt food residuals often can be cleaned only with chemicals harmful to the environment. ● Avoiding necessary “peeping into pots”. Disposing of the device ● Not using the plate near refrigerators / freezers As the consumption of energy unnecessary rises. When disposing of the device, do not bring it to regular munici pal waste containers. Instead, bring it to electrical and elec tronic waste recycling and reuse center. A relevant label has been put on the device, its instructions manual, or on the package. The device has been manufactured of recy clable materials. By bringing old device to recycling collection center, you show that you care about nature. Ask your local environmental care authority for information on location of such facilities. 7 DESCRIPTION OF THE APPLIANCE Description of PB*4VQ247CF induction hob Back left cooking zone Ø 145 Back right cooking zone Ø 180 Front left cooking zone Ø 210 Front right cooking zone Ø 145 Touch control sensor panel 3 2 1. 2. 3. 4. 5. 5 4 On/off sensor Cooking zone selector sensor, Cooking zone indicators Lower heat setting selector, Higher heat setting selector, 8 1 INSTALLATION Making the worktop recess • Worktop thickness should be 28 - 40 mm, while its width at least 600 mm. The worktop must be flat and level. Edge of the worktop near the wall must be sealed to prevent ingress of water or other liquids. • There should be sufficient spacing around the opening, in particular, at least 50 mm distance to the wall and 60 mm distance to the front edge of worktop. • The distance between the edge of the opening and the side wall of the furniture should be at least 55 mm. • Worktop must be made of materials, including veneer and adhesives, resistant to a temperature of 100°C. Otherwise, veneer could come off or surface of the worktop become deformed. • Edge of the opening should be sealed with suitable materials to prevent ingress of water. • Worktop opening must cut to dimensions as shown on figure 1. • Ensure minimum clearance of 25 mm below the hob to allow proper air circulation and prevent overheating. 1 (*) 560 mm for hob 600 mm (*) 750 mm for hob 770 mm 9 INSTALLATION Note. When installing the hob in the kitchen worktop, install a partition panel, as shown on the picture. If the hob is to be installed above a built-in oven, installation of the partition panel is not required. Installing hob in kitchen cabinet worktop. If the hob was installed in the kitchen worktop above the drawer, the bottom cover of the hob must be covered with a wooden panel or protective board for ceramic hobs. Installing hob in kitchen cabinet worktop above oven. Do not install the hob above the oven without ventilation. Route electrical lead so that it does not touch the lower guard. 10 INSTALLATION Installation of PB*4VQ247CF plate • Use four “A” brackets for 38 mm thick worktops. Fit the hob into worktop opening as shown on figure 2 and 3. To properly secure hob in 28 mm thick worktop, use four 15x15x50 mm wooden blocks in addition to “A” brackets. Fit the hob into worktop opening as shown on figure 4 and 5. • Check if adhesive seal is properly applied to the hob‘s flange. • Loosely attach fixing brackets to the bottom of the hob • Remove dust from the worktop, insert hob into the opening and press in firmly, • Position fixing brackets perpendicularly to the hob‘s edge and tighten firmly. 2 4 4 5 4 15 5 1 1. 2. 3. 4. 5. 2 1 3 worktop screw fixing bracket hob seal 3 1. 2. 3. 4. 5. 6. 5 560 15 6 2 3 worktop screw fixing bracket hob seal wooden block min 50 min 50 560 270 50 490 490 320 416 min 60 min 60 466 11 50 INSTALLATION Connecting the plate to the electrical system Note! The plate can be connected to the mains only by a qualified certified installer. Wilful adaptations or modifications to the electric system are prohibited. Guidelines for the installer The plate is factory-set for three-phase alternating current power supply (400 V 2N~50 Hz). It may be adapted for one-phase current power supply (230 V) by adequate bridging on the connection strip, in accordance with the attached wiring diagram. The wiring diagram is also provided in the bottom part of the lower cover. The connection strip can be accessed once the lid on the bottom cover is removed. Please remember to match the mains connection cable to the type of connection and the rated power of the plate. Fix the mains connection cable in a stay wire Note! Do not forget to connect the protective circuit to a clamp of the connection strip marked with sign. The plate power supply system should be protected by appropriately selected safety device or after the power supply protection, by appropriate safety switch cutting off the power in case of emergency. Before connecting the plate to the electric system read information provided on the rating plate and wiring diagram. Note! The installer is obliged to complete and leave with the user a “certificate of connecting the plate to the mains” (attached to the warranty card). Methods of connection other than those indicated on the diagram can damage the plate. 12 INSTALLATION DIAGRAM OF POSSIBLE CONNECTIONS Important! Heating elements voltage 230V Warning! In every type of connection protective grounding has to be connected to terminal 1 2* For 230 V power supply single 1N~ phase connection with a neutral lead, 1-2 terminals are shorted together , neutral lead connected to 4, PE (protective earth) lead connected to For 400/230 V power supply 2N~ 2-phase connection with a neutral lead, neutral lead connected to 4, PE (protective earth) lead connected to L1=R, L2=S, L3=T, N=neutral lead terminal , 1 3 2 L1 4 PE 2 3 L2 4 PE H05VV-F or H05RR-F 3X 4 mm2 N 1 L1 Recommended type of connector cable H05VV-F or H05RR-F 4X 2,5 mm2 N =PE lead terminal *Connect the remaining wire to clamp 3 (connected to the cooker’s internal system) if the mains power supply is a 3-phase 400/230V current. OPERATION Before first use ● carefully clean the ceramic plate treating it as a glass surface, ● when used for the first time the plate can give off a bit of a smell so switch on the ventilation system or open the window, ● operate the plate observing the safety instructions. 13 OPERATION The ceramic plate is equipped with sensors operated by touching the marked areas with a finger. Every touch of a sensor is confirmed with a sound. When switching the plate on and off and setting the heating power always touch only one sensor. If you touch several sensors at the same time (with the exception of switching off the hotplate or the clock), the system will ignore the entered settings and, should you keep touching the sensors for a long time, will emit a fault signal. Proper cookware There is specially made and tested cookware for cooking on ceramic plates availabl on the market. Observe instructions provided by the cookware manufacturers. Cookware with aluminium or copper bottoms can leave metallic discoloration, very difficult to remove. Be particularly careful when using enamelware, as it may irreparably damage your plate when left on a hotplate with the content boiled down. To achieve optimal power consumption, optimal cooking times and to avoid burning of food boiled over on the plate, observe the following recommendations. Bottoms: The cookware should have a stable, flat bottom, as sharp-edged bottoms or bottoms with burrs and charred food residuals can scratch your ceramic plate and have abrasive impact on it! Sizes: The diameter of the bottom surface of the pot should match the diameter of the used heating element. Lids: Lids prevent heat from escaping from the pot and thus shorten the cooking time and reduce the consumption of power. 14 OPERATION Touch control sensor panel When the cooking surface is connected to the electricity mains, the „-” symbol should light up briefly on the indicator (3), after which the induction hob can be switched on. 3 No objects should be placed on the sensor surfaces (this could cause an error). Touch sensor surfaces should be always kept clean. Switching on the induction hob When the induction hob is switched off then all the cooking zones are disconnected and the indicators are off. Touching the on/off sensor field (1) switches on the induction hob, and a flashing „0” appears on the right front sensor field (3) for 10 seconds. Now the desired heating power can be set using the (+) sensor field (5) and the (-) sensor field (4) (see „setting the heating power”). 3 5 4 1 If none of the sensor fields is switched within 10 seconds then the heating zone switches off. Switching on the cooking zones If the induction hob is on (i.e. at least one cooking zone is on), then the next cooking zone can be switched on by touching sensor field (2) first to chose the appropriate cooking zone. When a „0” flashes on the indicator, the desired heating power can be set using the (+) sensor field (5) and the (-) sensor field (4) (see „setting the heating power”) 2 4 5 If none of the sensor fields is touched within 10 seconds then the induction hob switches off. 15 OPERATION Selecting a cooking zone Touching the cooking zone selection sensor field (2) activates the individual cooking zones. A cooking zone is active when a number is flashing on indicator (3). We can then change the power level settings for a chosen cooking zone using the (+) sensor field (5) or the (-)(4) or switch off the cooking zone by touching simultaneously (+)(5) and (-)(4). 3 After 10 seconds the cooking zone becomes inactive, and to make further changes the cooking zone should be reactivated using the sensor field (2). 2 5 4 Activation of the cooking zones always begins from the front right cooking zone and is changed clockwise by touching sensor field (2). Setting the heating power In order to set the heating power, first select the desired cooking zone using the cooking zone selector sensor (2). Then, when the cooking zone indicator (3) shows “0” and a digit is flashing, start setting the required heating power using the (+) sensor (5) or the (-) sensor (4). 4 If you do not wish the automatic warm-up function to operate, start the heating power selection by touching the (-) sensor (4) first. You can then gradually increase the heating power by operating the (+) sensor field (5), or lower the heating power setting by operating the (-) sensor (4). 5 4 If, however, you do wish to cook using the automatic warm-up function, start heating power selection by touching the (+) sensor (5) first. (see „automatic warmup function”) 5 16 OPERATION Automatic warm-up function Each cooking zone is equipped with an automatic warm-up function. When this is activated, then the given cooking zone is switched on at full power for a time dpending on the heat setting selected, and is then switched back to the heat setting set. 3 5 Activate the automatic warm-up function by setting the required heating power by touching the (+) sensor (5) first. Then the heating level „9” is displayed intermittently on the cooking zone indicator (3) with the letter “A” for around 10 seconds. 3 5 If you start to set the heating power level within 10 seconds by touching the (-) sensor field (4), then the automatic warm-up function is activated and the letter „A” remains lit for as long as it stays activated. Cooking heating power setting Fast cooking time (min) 1 1 The cooking heating power level can be now changed at any moment using the method described above in the „setting the heating power” section. 2 3 3 4,8 4 6,5 5 8,5 6 2,5 7 3,5 8 4,5 9 - If you do not start to set the heating power setting within 10 seconds, then the letter „A” vanishes and the automatic warm-up function is inactive. If you do not wish the automatic warm-up function to operate, start selecting the heating power by touching the „-” sensor (4) (the letter „A” is not lit). Switching off selected cooking zone Selected cooking zone may be switched off in the following way: 1.Select the required cooking zone using the cooking zone selection sensor field (2). 2.Then simultaneously press the (+) sensor (5) and the (-) sensor (4), or use the (-) sensor (4) to lower the setting to „0”. 3 2 The letter „H” appears on the indicator symbolising residual heat. 17 4 5 OPERATION Residual temperature indicator When a hot plate has been switched off, letter “H” is displayed indicating that the hotplate is still hot. Do not touch the hotplate and do not put heat-sensitive objects on it when the “H” letter is displayed as you can burn yourself or melt the object! When the indication goes out you can touch the hotplate, bearing in mind that it still does not have ambient temperature. During the supply voltage drop the „H“ is no more shown. In spite of this the hot fields can be still hot! Important! If the cooking plate is started again after the renewed switching on or after the supply voltage drop, a short „self-test” will be performed. The „H” will be displayed on the residual heat indicator during about 45 to 60 minutes. The indication of residual heat is not based on the measurement of a value, but on the calculation depending on the operating time of hot fields. After the pause caused by the supply voltage drop the highest possible temperature and the longest cooling time are taken into account and therefore the indication time is so long lasting. This is of no importance for the further operation of the cooking plate. Limited time of operation To increase reliability of the plate each hotplate is provided with operation time limiter. The maximal time of operation depends on the last selected heating power level. If the heating power is not changed during the specified time (see the Table), the hotplate will be switched off automatically and the residual temperature indicator will be lighted. If you want to continue cooking, switch on the hotplate again at the required level of heating power. 18 Heating power level Maximal time of operation in hours 1 10 2 5 3 5 4 4 5 3 6 2 7 2 8 2 9 1 OPERATION The child lock function The child lock function protects the induction hob from being accidentally switched on by children, pets, etc. Start switching the locking function on/off when the induction hob is off. When the mains power is off, the child lock function is automatically deactivated. Switching on the child lock function Touching the on/off sensor field (1) switches on the induction hob, and a flashing „0” appears on the right front sensor field (3) for 10 seconds. Then, during these 10 seconds, press sensor fields (2) and (4) simultaneously. After hearing the short beep, press sensor field (+)(5) and the letter „L” will be displayed on all the indicators (3). 3 1 3 5 2 4 Switching off the child lock function Start this by pressing the main sensor field (1), the letter „L” will be displayed on all the indicators (3). Within 10 seconds of the on/off sensor (1) being touched, press sensor fields (2) and (4) simultaneously. After hearing the short beep, press sensor field (-)(4) and the letter „L” will vanish from all the indicators (3). 3 3 1 4 2 4 Switching off the appliance The induction hob operates when at least one cooking zone is on. Pressing the on/off sensor field (1) switches off the appliance, and the letter „H” for residual heat appears on the cooking zone indicator (3). 3 1 19 CLEANING AND ROUTINE MAINTENANCE Daily cleaning and proper maintenance have crucial impact on the durability of your ceramic plate. Clean the ceramic plate observing the same rules as for glass. Never use abrasive or aggressive cleaning agents, scrubbing powders or scratching sponges. Cleaning the plate after every use Removal of stains ● Light pearly stains (aluminium residu es) can be removed from cooled plate using special cleaning agents. Calca reous residues (i.e. boiled over water) can be removed with vinegar or special cleaning agents ● Wipe off slight, not-burnt patches of dirt using damp cloth without cleaning agent. Washing liquid can cause blue discolora tion to appear on the plate. The stubborn stains often cannot be removed after first cleaning, even if special cleaning agents are used. ● Do not switch off the hotplate when remo ving sugar, sugar-containing food, plastic or aluminium foil! Immediately scrape off the residuals (when still hot) from the hotplate using a sharp scrapper. When the dirt is removed you can switch off the plate and clean it again after cooling down using special cleaning agents ● Remove larger patches of dirt, stron gly sticking to the plate using sharp scrapper and wipe off the surface with a damp cloth. Special cleaning agents can be bought in supermarkets, special electromechanical shops, drugstores and shops with kitchen appliances. Sharp scrappers can be bought in DIY shops, shops with building tools and painting accessories. Cleaning scrapper 20 CLEANING AND ROUTINE MAINTENANCE Caution! If from any reason you are not able to control the switched on plate, switch off the main switch or screw out the fuse and call the Customer Service. Never apply cleaning agent on a hot hotplate. Leave the cleaning agent to dry and then wipe it off with a wet cloth. Any residuals of cleaning agents should be wiped off with a damp cloth before heating the plate for the next time, as otherwise they can have caustic effect. Caution! Should cracks or splits appear on the surface of your ceramic plate, immediately disconnect the plate from the mains (by switching off the fuse or unplugging the plug) and call the Customer Service. Failure to observe the ceramic plate maintenance instructions can result in losing your warranty rights! 21 EMERGENCY PROCEDURES Every time when emergency situation occurs you should: • switch off the working assemblies of the plate • disconnect power supply • call in the service • as some minor faults can be removed by the user in accordance with the below specified instructions, before calling the Customer Service please go through the Table checking every point. PROBLEM CAUSE 1.The appliance is not wor - power supply failure king ACTION -check the in-house electric system fuse, replace if ne cessary 2. The appliance does not -control panel has not been - switch it on respond to the entered set- switched on tings - sensors have been touched - touch the sensors for a bit for less than one second longer - several sensors have been - always touch only one sen touched at the same time sor (except when switching off a hotplate) 3.The appliance does not - children lock has been respond and emits a short activated signal - switch off the children lock 4.The appliance does not -improper operation (improper - again activate the plate res pond and emits a long sensors have been touched signal or proper sensors have been touched for too short time - covered or dirty sensor - uncover or clean the sen (sensors) sors 5.The whole appliance swit - no settings have been en - again switch on the control ches off tered within 10 seconds from panel and immediately enter switching the plate on the settings - covered or dirty sensor - uncover or clean the sen (sensors) sors 6. One heating zone switches off, and ”H” is on the display. - limited time of operation - again switch on the hot plate - covered or dirty sensor - uncover or clean the sen (sensors) sors 22 EMERGENCY PROCEDURES PROBLEM CAUSE ACTION 7.Residual temperature indi - power supply failure, the -the residual temperature in cator is not lighted although appliance has been discon dicator will work again after the hotplates are still hot nected from the mains switching the control panel on and off. 8. Crack in the ceramic plate 9. If the fault still remains Danger! Immediately disconnect the ceramic plate from the mains (fuse) and call the nearest Customer Service Centre. Disconnect the ceramic plate from the mains (fuse) and call the nearest Customer Service Centre. Important! You are the person responsible for proper condition and operation of the appliance in your household. If you call the Service for a fault which resulted from improper operation, you will be charged with the costs of the visit even during the period of warranty. We shall not be held liable for damages caused by a failure to observe this Manual. 23 TECHNICAL DATA Rated voltage: 400V 2N~50 Hz Rated power: PB*4VQ247CF - hotplate: 2 x Ø 145 mm 1200 W - hotplate: 1 x Ø 180 mm 1800 W - hotplate: 1 x Ø 210 mm 2300 W Dimensions: 576 x 518 x 50; Weight: ca. 7,8 kg; WARRANTY Warranty Warranty services according to the warranty card. The producer shall not be held liable for any damages caused by improper operation of the product. Please enter the type and factory number of the plate from the rating plate Type.................................................... Factory number......................................... 24 25 26 27