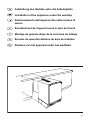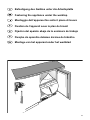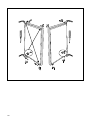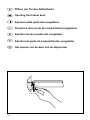
1
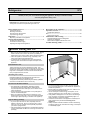
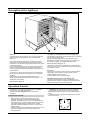
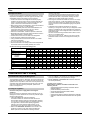
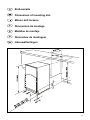
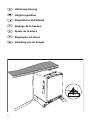
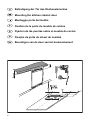
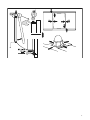
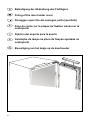
Refrigerator
EN
Thank you for your trust and for buying this appliance. We hope it will successfully
serve the purpose for many years.
Refrigerator is for domestic use only and is intended for
storing fresh foods at the temperature higher than 0°C.
Before Putting Into Use.................................................. 2
Instructions for Use
Mounting Instructions
We Care for the Environment
Tips for Energy Savings
Description of the Appliance ..........................................4
Operation Control...........................................................4
Temperature Selection
Use ....................................................................................5
Important ........................................................................ 3
Disposing of the Worn Out Appliance
Placing and Installation ................................................. 3
Choosing the Right Place
Connection to Power Supply
Adjusting the height of the appliance
Storing Fresh Foods
Maintenance and Cleaning.............................................5
Automatic Defrosting of the Refrigerator
Cleaning the Appliance
Switch Off the Appliance When Not In Use
Trouble-Shooting Guide .................................................6
Before Putting Into Use
• Before connecting the appliance to the mains supply, leave it
stand for about 2 hours, which will reduce a possibility of
malfunctions in the cooling system due to transport handling.
• Clean the appliance, and be thorough, especially in the
interior (See Cleaning and Maintenance).
• In case the interior accessories are not correctly placed,
rearrange them as described in chapter Description of the
Appliance.
Instructions for Use
These instructions for use are intended for the user. They
describe the appliance and its correct and safe use. They were
prepared for various types/models of refrigerators therefore you
might find in it description of some functions and accesories
that your appliance does not have.
Mounting Instructions
Integrated appliances are equipped with instructions for
mounting the appliance into the kitchen unit.
The appliance should be professionally mounted by qualified
technician and instructions are for his use only.
We Care for the Environment
• Our appliances are distributed in packaging made of
environmental friendly material which could safely be
recycled, disposed off or destroyed, with no effects on the
nature whatsoever.
• These instructions are printed either on recycled paper or
chlorine free bleached paper.
• When your appliance finally wears out, please try not to
burden the environment with it; call your nearest authorised
service agent. (See Disposing of the Worn Out Appliance)
Tips for Energy Savings
• Try not to open the door too often, especially when the
weather is wet and hot. Once you open the door, mind to
close it as soon as possible. This is especially important if
you have an upright model.
• Check periodically if the appliance is provided with sufficient
cooling (undisturbed circulation of air through the bottom rail
openings).
2
• Turn the thermostat knob from higher to lower setting as
soon as possible (depends on how loaded the appliance is,
ambient temperature...).
• Before loading the appliance with fresh food, make sure it
was cooled to ambient temperature.
• Ice and frost layer increase energy consumption, so do
clean the appliance as soon as the layer is 3-5 mm thick.
• If the gasket is damaged or if it turns out that the sealing is
poor, the energy consumption is substantially higher. To
restore efficiency, replace the gasket.
• Condenser at the bottom of the appliance must always be
clean and dust free (see Section Cleaning of the
Appliance).
• Always consider instructions stated in sections Positioning
and Energy Saving Tips, otherwise the energy consumption
is substantially higher.
Instructions for Use
Important
• The appliance is manufactured in compliance with all
relevant safety standards; however, it is recommended that
persons with impaired physical, motional, or mental abilities,
or persons with inadequate experience and knowledge, do
not use the appliance without due supervision. The same
recommendation applies to minors using the appliance.
• If you have bought this appliance to replace an old one
equipped with a lock that cannot be opened from inside
(lock, bolt), make sure that the lock is broken. This will make
it impossible for children to lock themselves inside
the appliance and suffocate.
• The appliance must be correctly connected to the mains
supply. (see: Connecting to the Mains Supply).
• If the food has strange smell or color, throw it away, because
it is very likely that it is spoiled and therefore dangerous to
eat.
• Disconnect the appliance from the power supply before
repairing it (only a qualified technician should repair it),
before cleaning and before replacing the light bulb.
• Do not defrost the appliance with other electric appliances
(as for example with hair dryer) and never scrape the frost
layer with sharp objects. Use only enclosed tools or tools
recommended by the manufacturer.
• For the sake of environment protection - be careful not to
damage the rear wall of the appliance (the condenser unit or
the tubes - for example when moving the appliance) or any
part of the refrigerating system inside the appliance.
• The refrigerating system of the appliance is filled with
refrigerant and oil, so when the appliance is damaged,
handle it with care and dispose it of in compliance with
environmental protecting precautions. (See We Care for the
Environment).
• If the supply cord is damaged, it must be replaced by the
manufacturer or his service agent or a qualified person in
order to avoid hazard.
• The rating plate is inside the appliance or outside on the rear
wall.
• Warning: Ventilation slots on the appliance or built-in
element should always be kept clean and unobstructed.
• Warning: Do not use any mechanical accessories when
thawing the refrigerator, except for those explicitly
recommended by the manufacturer.
• Warning: To prevent any pollution be careful not to damage
the insulation or refrigeration tubes at the rear wall during the
installation, cleaning and disposal of the appliance.
• Warning: Do not use any electrical devices inside the
appliance, except for those explicitly recommended by the
manufacturer.
The symbol on the product or on its packaging
indicates that this product may not be treated as
household waste. Instead it shall be handed over
to the applicable collection point for the recycling
of electrical and electronic equipment. By ensuring this
product is disposed of correctly, you will help prevent
potential negative consequences for the environment and
human health, which could otherwise be caused by
inappropriate waste handling of thisproduct. For more
detailed information about recycling of this product,
please contact your local city office, your household waste
disposal service or the shop where you purchased the
product.
Disposing of the Worn Out Appliance
• When your appliance finally wears out, dispose it of. If the
appliance has a lock, break it, in order to prevent eventual
accidents (danger of children get locked inside the
appliance).
• The refrigerating system of the appliance is filled with
refrigerant and insulating substances which should be
separately treated and processed. Call your nearest
authorised service agent or specialised servicing centre. If
you don't find one, contact your local authorities or your
distributor. Be careful not to damage the tubes on the rear
wall of the appliance (danger of pollution).
• To avoid pollution of the environment make sure not to
damage the hose at the bottom of the appliance.
Placing and Installation
Choosing the Right Place
Connection to Power Supply
Place the appliance in a dry and regularly ventilated room.
Allowed ambient temperature depends on the model (class) of
the appliance and is stated on the rating plate of the appliance.
Never place the appliance near heat emitting devices (e.g.
cooker, radiator, water heater or similar devices) and do not
expose it to direct sunlight.
The appliance should be positioned at least 3 cm away from
the electric or gas cooker and at least 30 cm away from the oil
or coal stove. If this is not possible, use an appropriate
insulation.
Class
SN (subnormal)
N (normal)
Ambient temparature
from + 10°C to + 32°C
from + 16°C to + 32°C
Connect the appliance with the cable and plug to the power
supply socket outlet with a ground terminal (safety socket).
Required nominal voltage and frequency are indicated on the
rating plate.
The connection to the mains supply and earthing have to be
made according to current standards and regulations. The
appliance resists temporary voltage tolerance up to
-6 to +6 %.
Adjusting the height of the appliance
The appliance is equipped with four adjustable legs, so that the
height may be adjusted from 82 to 90 cm. The height must be
adjusted prior building the appliance into the opening slot, and
it should be set at such height that the top panel of the
appliance fits exactly below the kitchen worktop (see Mounting
Instructions).
Instructions for Use
3
Description of the Appliance
Shelf (1)
The shelf may be placed randomly upon any of the guide slots
within the interior of the appliance. It is protected against
sliding out.
The shelf is placed upon the top four guides by lowering the
front section of the shelf downwards, the rear of the shelf is
placed upon the guide slot and the shelf is inserted in the guide
in the inclined position.
The shelf is placed upon the top four guides by lifting the front
section of the shelf upwards, the rear of the shelf is placed
upon the guide slot and the shelf is inserted in the guide in the
inclined position.
In case you may wish to remove the shelf from the appliance
lift the shelf by hand at the rear and pull it out in the opposite
procedure.
Glass shelves are protected with plastic edge frames.
Quickly perishable food should be stored on the back i.e. the
coldest part of the shelves.
Defrost Water Outlet (2)
The interior of the refrigerator is cooled with cooling plate
incorporated in the rear wall. Under the plate there is a channel
and an outlet for defrost water.
Regularly check the defrost water outlet and the channel,
because they should never be clogged (as for example with
food rests). If clogged, use a plastic straw and clean it.
Crisp tray and serving tray (3)
The tray at the bottom of the refrigerator is covered with the
serving tray. This cover protects the stored fruit and vegetables
from excessive drying.
Door Liner
The door liner consists of various shelves or holders used for
storing eggs, cheese, butter and yogurt as well as other
smaller packages, tubes, cans etc.
The lower shelf is used for storing bottles.
Illumination in the Interior of the Refrigerator
The light for illuminating the interior of the appliance is on,
when the door is opened. The operation of the light does not
depend on the position of the thermostat knob.
Operation Control
The appliance is controlled with thermostat knob, situated in
the right upper part inside the appliance.
Turn the knob from STOP (0) position towards 7 and
backwards.
Temperature Selection
• In STOP (0) position the appliance does not operate (the
cooling system is switched off), yet power supply is not
interrupted (the light is on, when you open the refrigerator
door).
• Temperature in the refrigerator also depends on how often
the door is opened.
• Higher settings on the knob (towards 7) mean lower
temperatures (colder) in all three compartments of the
appliance. Temperature in the interior of the appliance may
even drop below 0°C. Higher settings should be used only in
case higher temperature is recommended or required.
When the ambient temperature is normal, we recommend
medium setting.
• Changes of the ambient temprature affect temperature in the
interior of the appliance (choose correct setting of the
thermostat knob).
4
Instructions for Use
Use
freezing of the foods.
Use a thermometer and measure the temperature in the
individual compartments. Place the thermostat in a glass
vessel filled with water. Temperature readings are most
reliable few hour after steady state is reached.
• Some organic solutions like volatile oils in lemon or orange
peel, acid in butter etc. could cause damage and when in
contact with plastic surfaces or gaskets for longer period of
time they can even cause accelerated ageing of the plastic
material.
• Unpleasant odor inside the refrigerator is a sign that
something is wrong with foods or that your refrigerator needs
cleaning. Unpleasant odor can be eliminated or reduced by
washing the interior of the refrigerator with a mild solution of
water and vinegar.
We also recommend using activated carbon filters to clean
the air or to neutralize odors.
• If you plan a longer journey, make sure to remove quickly
perishable articles of food out of the appliance before you
leave.
Storing Fresh Foods
Proper use of the appliance, adequately packed food, correct
temperature and taking into account hygienic precautions will
substantially influence the quality of the food stored.
• Foods to be stored in the refrigerator should be properly
packed as to prevent mixing various moisture degrees and
odors (in polyethylene bags or sheet, aluminium foil, wax
paper, or stored in covered containers or bottles).
• Before storing food in the refrigerator, remove the excessive
packaging (like yoghurt in multi-package).
• Pack systematically and make sure that foodstuffs do not
touch each other (various odours may mix). Assure
adequate air circulation around packages.
• Never store inflammable, volatile or explosive substances.
• Beverages with high alcohol percentage should be stored in
tightly sealed bottles in vertical position.
• Food should not touch the rear wall of the refrigerator!
• Foods should be cooled down before storing.
• Crispy and delicate foods should be stored in the coldest
parts of the refrigerator.
• Try not to open the door too often.
• Set the thermostat to the setting where lowest temperatures
are reached. Set the thermostat gradually as to avoid
Fresh Food Storage Time in the Refrigerator
Article of food
Butter
Eggs
Meat: fresh uncut
chopped
smoked
Fish
Marinade
Root
Cheese
Sweets
Fruit
Prepared dishes
Legend:
1
+
+
+
+
+
+
+
+
+
+
+
+
2
+
+
+
=
+
=
+
+
+
+
+
+
3
+
+
=
4
+
+
5
+
+
Storage time (days)
6
7
8
9
+
+
=
=
+
+
+
+
10
=
+
11
=
=
12
=
=
13
14
=
=
+
+
+
+
+
+
+
+
=
=
=
=
+
+
+
=
=
=
+
+
+
=
=
=
+
+
=
=
=
+
+
=
=
=
+
+
=
+
+
=
+
=
=
+
=
=
=
=
=
=
=
=
=
=
=
=
=
=
=
=
=
=
+ reccomended storage time
= possible storage time
Maintenance and Cleaning
Automatic Defrosting of the Refrigerator
The refrigerator requires no defrosting, since the ice at the rear
wall melts automatically. Ice, formed at the rear end during the
operation of the compressor, melts when the compressor is off,
and water drops slide downwards through the hole in the rear
wall o the condenser collecting receptacle, placed at the
bottom of the appliance.
Cleaning the Appliance
Disconnect the power supply before cleaning the
appliance.
Do not use coarse or aggressive cleaning agents as you can
damage the surface. Be careful to remove any cleanser agent
remaining after cleaning.
• Clean the exterior with water and detergent.
Varnished surfaces are cleaned with soft cloth and an
alcohol based cleaning agent (for example glass cleaners).
You may also use alcohol (ethanol or isoprophylic alcohol).
The application of abrasive and specially aggressive
cleaners, such as the stainless steel cleaners, is not
appropriate for the cleaning of plastic and coated parts.
• Remove the detachable accesories in the interior of the
appliance and clean it with water and liquid detergent.
Plastic parts cannot be washed in washing machine.
• Wash the interior of the appliance with lukewarm water, in
which you added one or two spoonfuls of vinegar.
• The air openings in the bottom rail should be cleaned or
vacuumed periodically.
Cleaning of the condenser
Dust from the condenser should be vacuumed in the
following manner:
− push the finger through the opening in the bottom rail and
release the fastener;
− pull the rail towards you and remove it;
− remove the bottom board of the kitchen cabinet;
− pull the condenser dish out;
− use the vacuum cleaner to clean the dust from the condenser;
− replace the condenser dish and the bottom rail in the opposite
order.
Instructions for Use
5
• Unscrew the screws from the condenser bonnet and remove the
bonnet.
• Clean the dust and dirt from the condenser.
After cleaning, connect the appliance to power supply and reload it.
Periodical cleaning of the condenser
In order to optimize the operation of the appliance and save
energy, it is recommended to clean periodically the dust from
the condenser at the back of the appliance.
Disconnect the appliance from the mains prior the
commencement of cleaning!
• Empty the contents of the appliance.
• Remove the supporting panel from the bottom of the kitchen
cabinet.
• Remove the screws fixing the appliance to the kitchen worktop.
• Pull the appliance out and expose the condenser at the back of the
appliance.
After cleaning return the appliance to its place, plug in the
mains power cord and fill with food.
Switch Off the Appliance When Not In Use
If you do not intend to use the appliance for a longer period, set
the thermostat knob to the STOP (0) position, disconnect the
power supply, take out the foods and defrost and clean the
appliance. Leave the door slightly open.
Trouble-Shooting Guide
During the service, you can come across some troubles that in
most cases result from improper handling of the appliance and
can easy be eliminated.
The Appliance Fails to Operate After Connecting to the
Mains Supply
• Check the supply in the outlet socket and make sure the
appliance is switched on (thermostat knob in operating
position).
Sound alarm
The excessive dust upon the condenser is signaled by the
sound alarm, heard at each opening of the appliance door –
until the default is removed.
Check the air circulation through the bottom rail openings and
if necessary clean or vacuum the dust from the condenser.
See Section Cleaning and Maintenance.
Continuous Operation of the Cooling System
• The door was frequently opened or it was left opened for too
long.
• The door is not properly closed (the door may sag, the
gasket may be polluted or damaged).
• Perhaps you have overloaded the appliance with fresh
foods.
• Insufficient cooling of compressor and condenser.
Check the air circulation through the bottom rail openings
and if necessary clean or vacuum the dust from the
condenser. See Section Cleaning and Maintenance.
Ice Formation on the Inner Rear Wall
Until the water is drained through the hole in the rear and into
the receptacle at the bottom of the appliance, normal
automatic defrosting of the appliance is guaranteed.
In case the ice formation on the inner back wall is increased (35 mm), ice should be manually defrosted.
Set the thermostat knob to STOP (0) position and leave the
door open. Never use electric devices for defrosting and do not
scrape the ice or frost layer with sharp objects.
After completed defrosting, turn the knob to desired position
and close the refrigerator door.
The cause of increased ice formation may be one of the
following:
− the door does not seal well (clean the gasket if it is
contaminated, or replace it if it is damaged);
− the door was frequently opened or it was left opened for
too long;
− the food stored in the refrigerator was warm;
− the food or dish is touching the inner back wall.
6
Water drains into the bottom compartment of the
appliance
Water leaks from the refrigerator if the drain hole is clogged, or
if the water drips past the collection gutter.
• Clean the clogged outlet, for example with a plastic straw.
• Manually defrost the increased ice layer. See "Ice Formation
onthe Inner Rear Wall".
Noise
Cooling in refrigerating-freezing appliances is enabled by the
cooling system with compressor, which produces noise. How
noisy the appliance is depends on where it is placed, how it is
used and how old the appliance is.
• During the operation of the compressor the noise of liquid
is heard and when the compressor is not operating, the
refrigerant flow is heard. This is a normal condition and it
has no influence whatsoever on the lifetime of the appliance.
• After starting the appliance, the operation of the
compressor and the refrigerant flow may be louder, which
does not mean that something is wrong with the appliance
and it has no influence on the lifetime of the appliance.
Gradually the noise is reduced.
• Sometimes unusual and stronger noise is heard, which is
rather unusual for the appliance. This noise is often a
consequence of inadequate placing.
Instructions for Use
− The appliance shall be placed and levelled firmly on
solid base.
− It should not touch the wall or kitchen units standing next
to it.
− Check the accesories in the interior of the appliance,
they should be placed correctly in their positions; also
check the bottles, tins and other vessels that might
touch each other and rattle.
Bulb Replacement
Before replacing the light bulb, disconnect the appliance form
the power supply.
Press the cover at the rear side (in the arrow 1 direction) and
remove the plastic cover (in the arrow 2 direction). Replace the
bulb with a new one (E14, max. 15 W).
Don't forget: the old bulb does not belong to organic waste.
Light bulb is consuming good therefore our in-guarantee
service does not relate to it.
WE RESERVE THE RIGHT TO ALTER THE SPECIFICATIONS WITH NO INFLUENCE ON THE
OPERATION OF THE APPLIANCE.
Instructions for Use
7
142099
40
Инструкции за монтаж
Einbaumaße
Dimensions of mounting slot
Misure dell’incasso
Dimensions de montage
Medidas de montaje
Dimensões de montagem
Inbouwafmetingen
3
Höhenregulierung
Height regulation
Regolazione dell’altezza
Réglage de la hauteur
Ajuste de la altura
Regulação em altura
Instelling van de hoogte
4
Aufstellung des Gerätes unter die Arbeitsplatte
Installation of the appliance under the worktop
Posizionamento dell’apparecchio sotto il piano di
lavoro
Encastrement de l'appareil sous le plan de travail
Montaje de aparato abajo de la encimera de trabajo
Encaixe do aparelho debaixo da área de trabalho
Plaatsen van het apparaat onder het werkblad
5
Befestigung der Tür des Küchenelementes
Mounting the kitchen cabinet door
Montaggio porta del mobile
Fixation de la porte du meuble de cuisine
Fijación de las puertas sobre el mueble de cocina
Fixação da porta do móvel de cozinha
Bevestigen van de deur van het keukenelement
6
7
Befestigung der Abdeckung des Türträgers
Fixing of the door holder cover
Fissaggio coperchio del sostegno porta (sportello)
Pose du cache sur la plaque de fixation vissée sur la
contreporte
Fijación del soporte para la puerta
Instalação da tampa na placa de fixação apertada na
contraporta
Bevestiging van het kapje op de deurhouder
8
Befestigung des Gerätes unter die Arbeitsplatte
Fastening the appliance under the worktop
Montaggio dell’apparecchio sotto il piano di lavoro
Fixation de l'appareil sous le plan de travail
Fijación del aparato abajo de la encimera de trabajo
Fixação do aparelho debaixo da área de trabalho
Montage van het apparaat onder het werkblad
9
Sockelblende aufsetzen
Adjusting base
Adeguamento dello zoccolo
Ajuster la plinthe
Fijación sobre el mueble de cocina
Ajustar a base
Sokkel aanpassen
10
Auswechseln der Tür (falls notwendig)
Door exchange (if applicable)
Cambio porta (se necessario)
Réversibilité de la porte (si nécessaire)
Cambio de las puertas (si es necesario)
Reversibilidade da porta (se necessário)
Verandering van de openingsrichting van de deur
(indien nodig)
11
12
Türanschlagwechsel beim Tiefkühlraum (haben nur einige
Modelle)
Changing the Direction of Opening the Door on the
Low Temperature Compartment (in some models only)
Sportello reversibile dello scomparto a bassa
temperatura (solo alcuni modelli)
Changement du sens d'ouverture du portillon du
compartiment basse température (sur certains modèles
seulement)
Cambio del sentido de la apertura de la puerta del
compartimento de baja temperatura (sólo algunos tipos lo
tienen)
Modificação da direcção da abertura da porta do
compartimento de temperaturas baixas (em apenas certos
modelos)
Verandering van de openingsrichting de vriesruimte
(hebben slechts enkele modellen)
13
Öffnen der Tür des Gefrierfachs
Opening the freezer door
Apertura della porta del congelatore
Ouverture de la porte du compartiment surgélateur
Apertura de las puertas del congelador
Abertura da porta do compartimento congelador
Het openen van de deur van de diepvriezer
14
142099
40
Инструкции за монтаж